manuals.online logo
Brands
  1. Home
  2. •
  3. Brands
  4. •
  5. Eterna
  6. •
  7. Heater
  8. •
  9. Eterna OILHT157 User manual

Eterna OILHT157 User manual

Pack contents:
1 x Oil lled heater c/w 13A. fused,
3 pin plug tted
2 x Heater wheel clamping plates
4 x Castor wheels
4 x Dome nuts
2 x U clamping bolts
4 x U clamp securing wing nuts
Model:
OILHT157
1.5kW Oil Filled Heater
These instructions are provided as a guideline to assist you.
PLEASE READ THESE INSTRUCTIONS BEFORE INSTALLATION
AND RETAIN FOR FUTURE REFERENCE
INSTALLATION INSTRUCTIONS
A guide for qualied electricians
CLEANING:
Always remove the plug from the electrical socket
and allow the heater to cool down before cleaning
the heater.
Wipe heater with a soft dry cloth.
Wind the cable around the cable tidy and store the
heater in a clean dry place.
CLEANING WARNING:
Do not immerse the heater in
water.
Do not use any cleaning chemicals
such as detergents and abrasives.
Do not allow the interior to get
wet.
EVENTUALLY, YOU MAY WANT TO
REPLACE THIS PRODUCT:
Regulations require the recycling of Waste from
Electrical and Electronic Equipment (European
“WEEE Directive” eective August 2005—UK
WEEE Regulations eective 2nd January 2007).
Environment Agency Registered Producer: WEE/
GA0248QZ.
WHEN YOUR PRODUCT COMES TO THE END OF
ITS LIFE OR YOU CHOOSE TO REPLACE IT, PLEASE
RECYCLE IT WHERE FACILITIES EXIST  DO NOT
DISPOSE WITH HOUSEHOLD WASTE.
IF YOU EXPERIENCE PROBLEMS:
If you believe your product is defective, please return
it to the place where you bought it. Our Technical
Team will gladly advise on any Eterna Lighting
product, but may not be able to give specic
instructions regarding individual installations.
SOME PARTS OF THIS
PRODUCT CAN BECOME
VERY HOT AND CAUSE
BURNS. PARTICULAR
ATTENTION HAS TO BE
GIVEN WHERE CHILDREN
AND VULNERABLE
PEOPLE ARE PRESENT.
CAUTION!
Children of less than 3 years should be kept away from the
heater unless continuously supervised.
Children aged from 3 years and less than 8 years shall only
switch on/o the appliance provided that it has been placed
or installed in its intended normal operating position and
they have been given supervision or instruction concerning
use of the appliance in a safe way and understand the hazards involved.
Children aged from 3 years and less than 8 years shall not plug in, regulate
and clean the appliance or perform user maintenance.
WARNING!
Email: [email protected]o.uk / technical@eterna-lighting.co.uk
Visit our website: www.eterna-lighting.co.uk Made in ChinaIssue 0121
As with all portable
heating appliances -
this product is only
suitable for well
insulated spaces
or occasional use.
READ THIS FIRST:
Check the pack and make sure you have all of
the parts listed on the front of this booklet. If
not, contact the supplier where you bought this
product.
IMPORTANT SAFEGUARDS:
When using an electrical appliance, basic safety
precautions should always be observed, including
the following:
This appliance is not intended for use by persons
(including children) with reduced physical, sensory
or mental capabilities, or lack of experience
and knowledge, unless they have been given
supervision or instruction concerning use of the
appliance by a person responsible for their safety.
Extreme caution is necessary where children or
persons with reduced physical, sensory or mental
capabilities may come into contact with the heater
when in use.
This heater is hot when in use. To avoid burns and
personal injury, do not let bare skin touch hot
surfaces. Never leave the heater unattended whilst
it is in use.
The product is for household/oce use only.
WARNING -
In order to avoid
overheating when in use, do
not cover the heater or position
where it may come in contact
with ammable materials, such as
curtains, drapes etc. to avoid the
risk of re.
WARNING -
When scrapping the
heater, follow the regulations
concerning the disposal of oil.
This heater is lled with a precise quantity of
special oil. In case of leakage or repair which
requires opening of the oil container this should
only be carried out by the manufacturer or
qualied engineer.
The heater must not be located adjacent to or
against an electrical socket.
Do not run the cord under carpets/rugs.
Arrange the cord away from high trac areas and
where it will not present a trip hazard.
Do not operate the heater with a damaged cord/
plug or if the heater malfunctions.
If the supply cord is damaged, it must be replaced
by qualied engineer.
Avoid the use of an extension cord as this may
overheat and cause a risk of re.
Use the heater in a well ventilated area.
Do not use the heater in any areas where petrol,
paint or other ammable liquids are stored e.g.
garages or workshops.
Do not use this heater in the immediate
surroundings of a bath, shower, swimming pool or
where water is present.
SPECIFICATION:
VOLTAGE: 220-240V~50-60Hz
POWER MAX: 1.5kW
WARNING:
Only operate the heater in an upright position with
the feet attached, any other position could cause
malfunction.
When in use this product contains hot liquid.
Before each use the user must make a physical
inspection to ensure there is no damage to the
metal case of the product.
Do not try to repair the heater yourself, always
consult a suitably qualied engineer.
Never leave the heater unattended when it is in
use.
Do not use the heater in small rooms when they are
occupied by persons who are not capable of leaving
the room on their own, unless constant supervision is
provided.
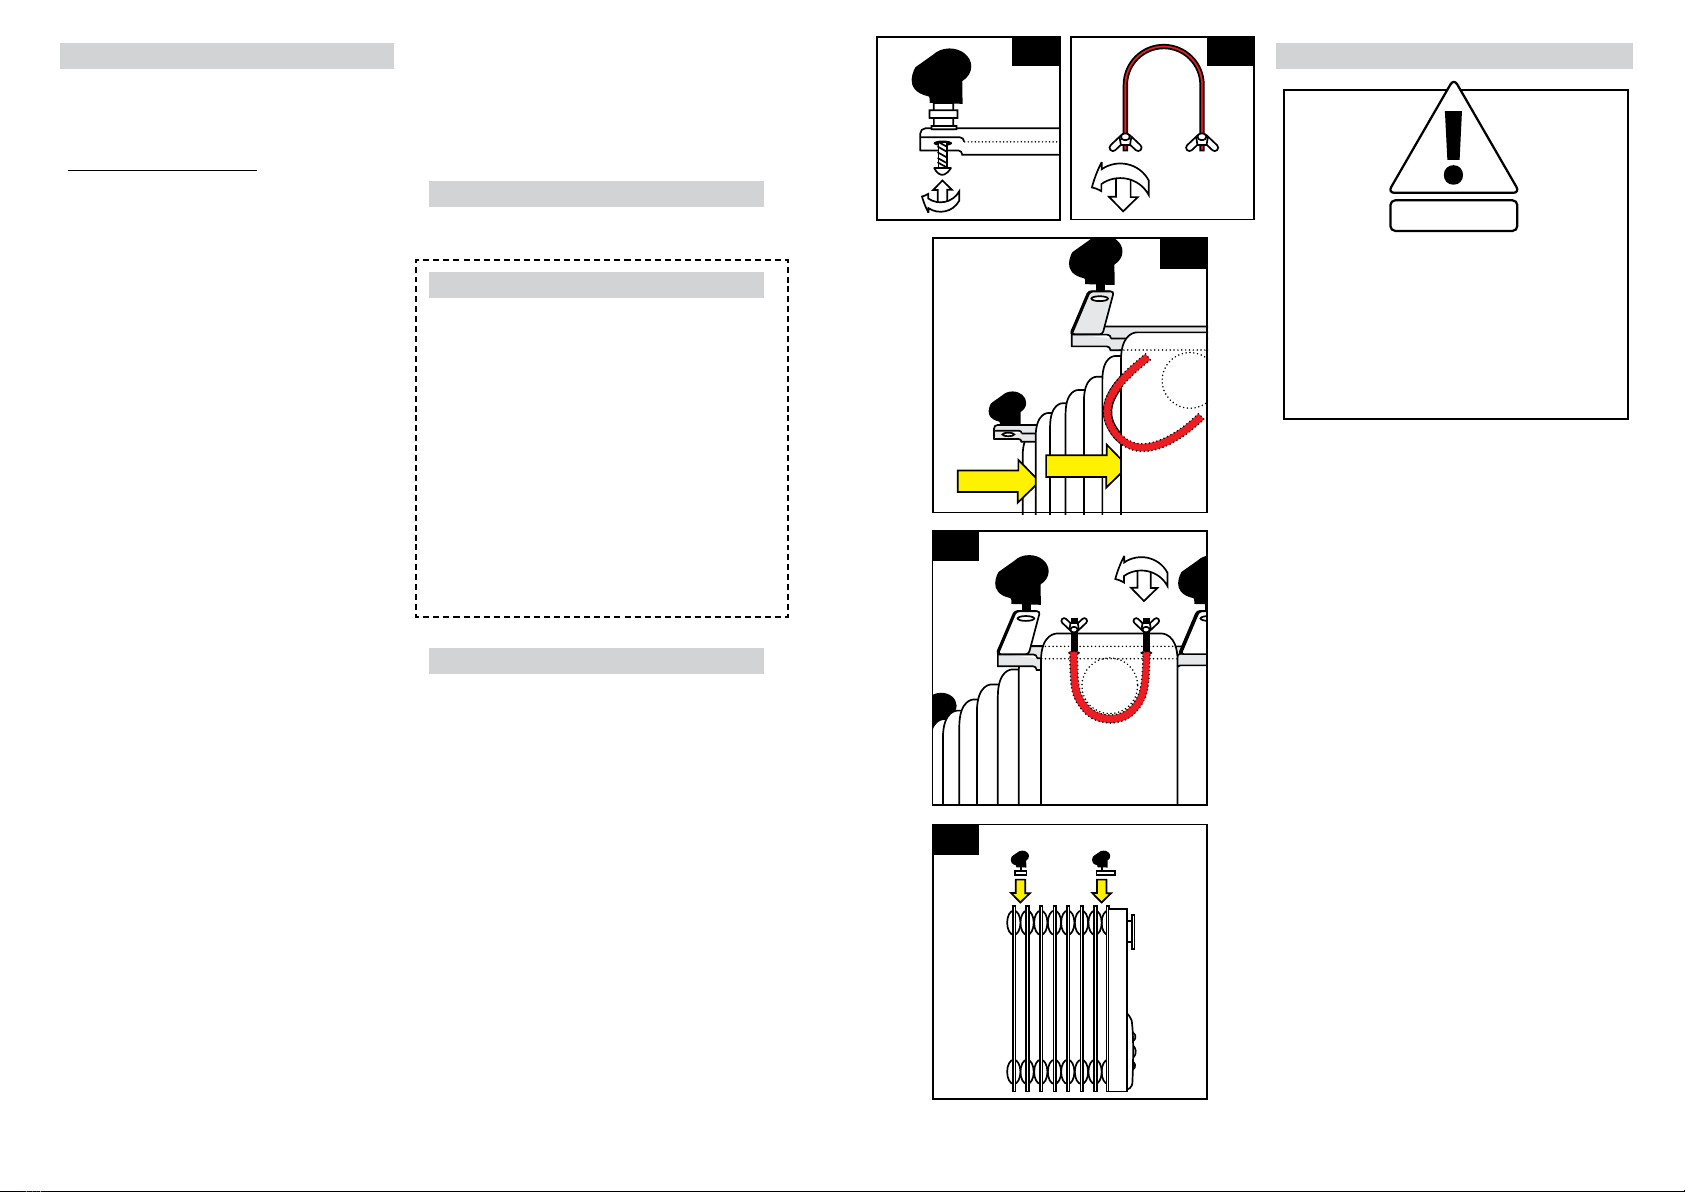
ASSEMBLY INSTRUCTIONS:
YOU MUST ATTACH THE FEET BEFORE
OPERATING THE HEATER.
1. Place the radiator upside-down on a scratch-free
location, making sure it is stable and will not fall.
2. To attach the castors to the mounting plate,
unscrew domed nut and feed through the holes
in each end of the mounting plate. Screw domed
nut back in place (g. 1) ensuring that they are
fully tightened.
3. Unscrew wing nuts from the U-shaped bolt
(g. 2). Hook U-shaped bolt onto the radiator
between the rst two ns (see g. 3).
4. Feed castor mounting plate on to the U-shaped
bolt. (g. 4).
5. Screw wing nuts on to ends of U-shaped bolt
and fasten securely (g. 4). Over tightening may
cause damage to the radiator.
6. Now fasten second castor mounting plate
between last two ns (g. 5) and by repeating
the above steps.
NOTE: When in use ensure full length of cable is
uncoiled from the cable tidy.
INSTRUCTIONS FOR USE:
WHEN IN USE THIS PRODUCT
CONTAINS HOT LIQUID.
BEFORE EACH USE THE USER
MUST MAKE A PHYSICAL
INSPECTION TO ENSURE THERE
IS NO DAMAGE TO THE METAL
CASE OF THE PRODUCT.
NOTE: When the heater is turned on for the rst time
or after having not been used for a long period, it
may smell for a short while.
1. Position the heater on a at and stable surface.
2. Set all controls to OFF and insert the plug into an
electrical socket.
3. Rotate the thermostat knob clockwise to MAX
position and switch the heater on as follows:
I = Low heat (600W)
II = Medium heat (900W)
I + II = High heat (1.5kW)
4. When your room reaches the desired temperature,
slowly rotate the thermostat knob counter
clockwise until the red indicator light goes out.
The thermostat can now be left at this setting. As
soon as the room temperature has dropped below
the set temperature, the unit will switch itself on
automatically until the set temperature has been
reached again. In this way the room temperature
remains constant with the most economical use of
electricity.
5. To change the room temperature setting, rotate
the thermostat knob clockwise to raise the
temperature, or anti-clockwise to lower it.
6. This heater includes an overheat protection
system that shuts o the heater when parts of the
heater get excessively hot.
7. This unit is tted with anti-tip cut-out protection.
Should the unit not be in the correct vertical
position, the heater will shut o.
8. To completely shut the heater o, turn all the
controls to OFF, and remove plug from the
electrical socket.
Fig 1 Fig 2
Fig 3
Fig 4
Fig 5
WARNING!
Model Identier(s): OILHT157 OILHT211 OILHT211T
Heat output
Nominal heat output Pnom 1.5 2.0 2.0 kW
Minimum heat output (indicative) Pmin 0.6 0.8 0.8 kW
Maximum continuous heat output Pmax,c 1.5 2.0 2.0 kW
Auxiliary electricity consumption
At nominal heat output elmax 1.498 1.990 1.990 kW
At minimum heat output elmin 0.599 0.798 0.798 kW
In standby mode elSB N/A N/A 0.00091 kW
Type of heat output/room temperature control
With mechanic thermostat room temperature control Yes
Contact details: Eterna Lighting Ltd, Huxley Close, Wellingborough, Northamptonshire NN8 6AB

This manual suits for next models

2

Other Eterna Heater manuals

Eterna FPH400 Setup guide

Eterna

Eterna FPH400 Setup guide

Eterna CFAN Setup guide

Eterna

Eterna CFAN Setup guide

Eterna TH1FT060 Setup guide

Eterna

Eterna TH1FT060 Setup guide

Eterna OILH211TIM User manual

Eterna

Eterna OILH211TIM User manual

Eterna OH157 User manual

Eterna

Eterna OH157 User manual

Eterna CTIME User manual

Eterna

Eterna CTIME User manual

Eterna TR70W User manual

Eterna

Eterna TR70W User manual

Eterna DFH2KW User manual

Eterna

Eterna DFH2KW User manual

Eterna Q1200 User manual

Eterna

Eterna Q1200 User manual

Eterna PFH2400 User manual

Eterna

Eterna PFH2400 User manual

Eterna CONVHTSTD User manual

Eterna

Eterna CONVHTSTD User manual

Eterna PFH2400 User manual

Eterna

Eterna PFH2400 User manual

Eterna SH3WH Setup guide

Eterna

Eterna SH3WH Setup guide

Eterna DFHT2KW User manual

Eterna

Eterna DFHT2KW User manual

Eterna DFHT2KW User manual

Eterna

Eterna DFHT2KW User manual

Eterna Q1200 Setup guide

Eterna

Eterna Q1200 Setup guide

Eterna OH211 Setup guide

Eterna

Eterna OH211 Setup guide

Eterna OH211T User manual

Eterna

Eterna OH211T User manual

Eterna PAT2000W Setup guide

Eterna

Eterna PAT2000W Setup guide

Eterna FH2 Setup guide

Eterna

Eterna FH2 Setup guide

Eterna SH3WH User manual

Eterna

Eterna SH3WH User manual

Popular Heater manuals by other brands

Jaga GEO 180 Mounting instructions

Jaga

Jaga GEO 180 Mounting instructions

Combustion Research reflect-o-ray eds 3.5 Installation operation & maintenance

Combustion Research

Combustion Research reflect-o-ray eds 3.5 Installation operation & maintenance

emerio FH-110704.1 instruction manual

emerio

emerio FH-110704.1 instruction manual

Klimatronic Air Booster 2000 manual

Klimatronic

Klimatronic Air Booster 2000 manual

Zodiac JXi 200 Installation and operation manual

Zodiac

Zodiac JXi 200 Installation and operation manual

Consort Claudgen QZWP30N Installation, operation and maintenance instructions

Consort Claudgen

Consort Claudgen QZWP30N Installation, operation and maintenance instructions

Master XL 9ER operating manual

Master

Master XL 9ER operating manual

Aqua-Hot 200 Series installation manual

Aqua-Hot

Aqua-Hot 200 Series installation manual

Nevir NVR-9549QS instruction manual

Nevir

Nevir NVR-9549QS instruction manual

Scarlett SC-058 instruction manual

Scarlett

Scarlett SC-058 instruction manual

HEATSTRIP Design THH Series Operation, installation, and maintenance manual

HEATSTRIP

HEATSTRIP Design THH Series Operation, installation, and maintenance manual

Mars Air Systems QP10 Unheated Series manual

Mars Air Systems

Mars Air Systems QP10 Unheated Series manual

KOREX WF269 user manual

KOREX

KOREX WF269 user manual

Empire SR-10TBC-3 Installation instructions and owner's manual

Empire

Empire SR-10TBC-3 Installation instructions and owner's manual

SchwankAir 524EH manual

SchwankAir

SchwankAir 524EH manual

Daewoo electricals HEA1495 quick start guide

Daewoo electricals

Daewoo electricals HEA1495 quick start guide

Rowi HKH 1800/2/1 RETRO Original instruction manual

Rowi

Rowi HKH 1800/2/1 RETRO Original instruction manual

SRP WTH Series Installation, operation and service instructions

SRP

SRP WTH Series Installation, operation and service instructions

manuals.online logo
manuals.online logoBrands
  • About & Mission
  • Contact us
  • Privacy Policy
  • Terms and Conditions

Copyright 2025 Manuals.Online. All Rights Reserved.