ADIR ADIHO201-01 Series User manual

USER GUIDE
Wall Mounted
ADIHO201-01-SERIES
Media Console
Shelving Unit

AdirHome is dedicated to bringing
our customers the best possible selection
of products to improve their homes.
We pride ourselves on creating uniquely exquisite products for your home that you will
enjoy for many years to come. Furnishing your home can be expensive and stressful,
but we’ll help make the process affordable and stress-free. Every product is designed
to the highest standards, and we offer a wide range of aesthetics from rustic to vintage
decor, ensuring to t your style.
Thank you
for your
purchase.

1 Parts and Hardware
3 Assembly Instructions
11 Warranty
12 Disclaimer
Table of Contents
1
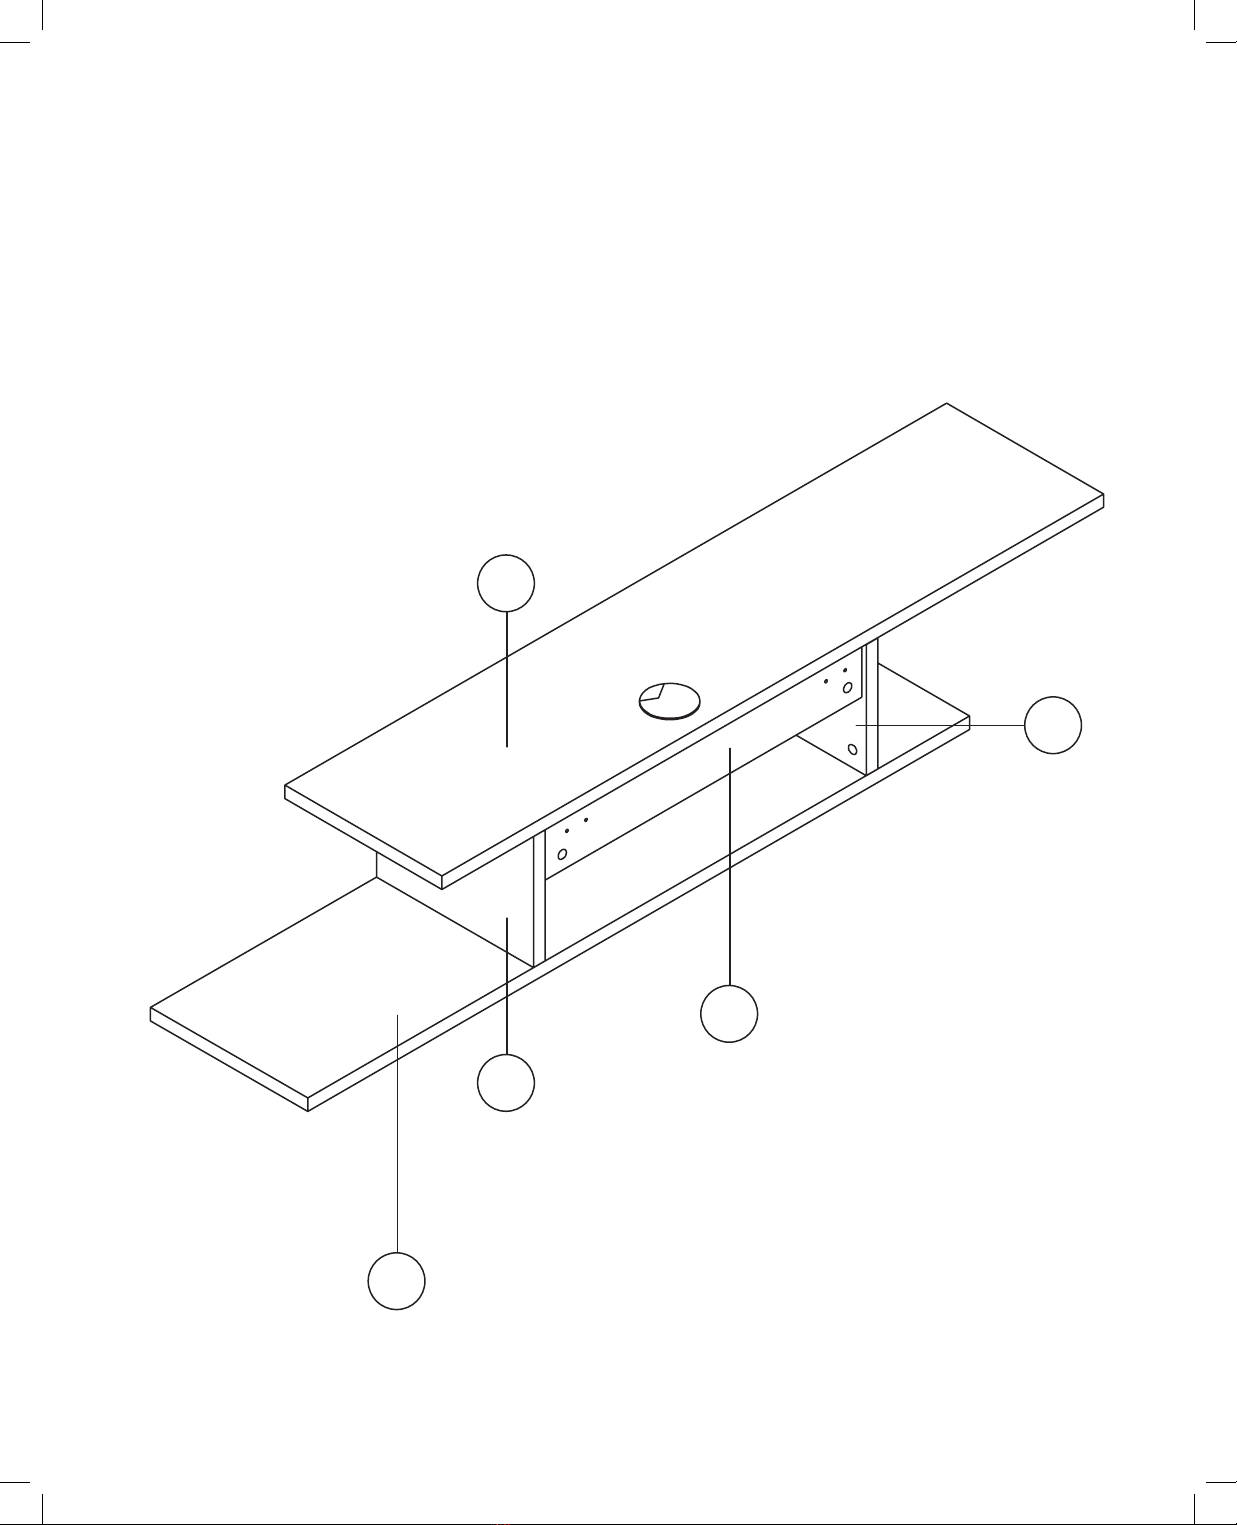
Parts and Hardware
Parts List:
1. Bottom Panel
2. Left Support Panel
3. Right Support Panel
4. Top Panel
5. Cross Panel
1
5
3
2
4
2
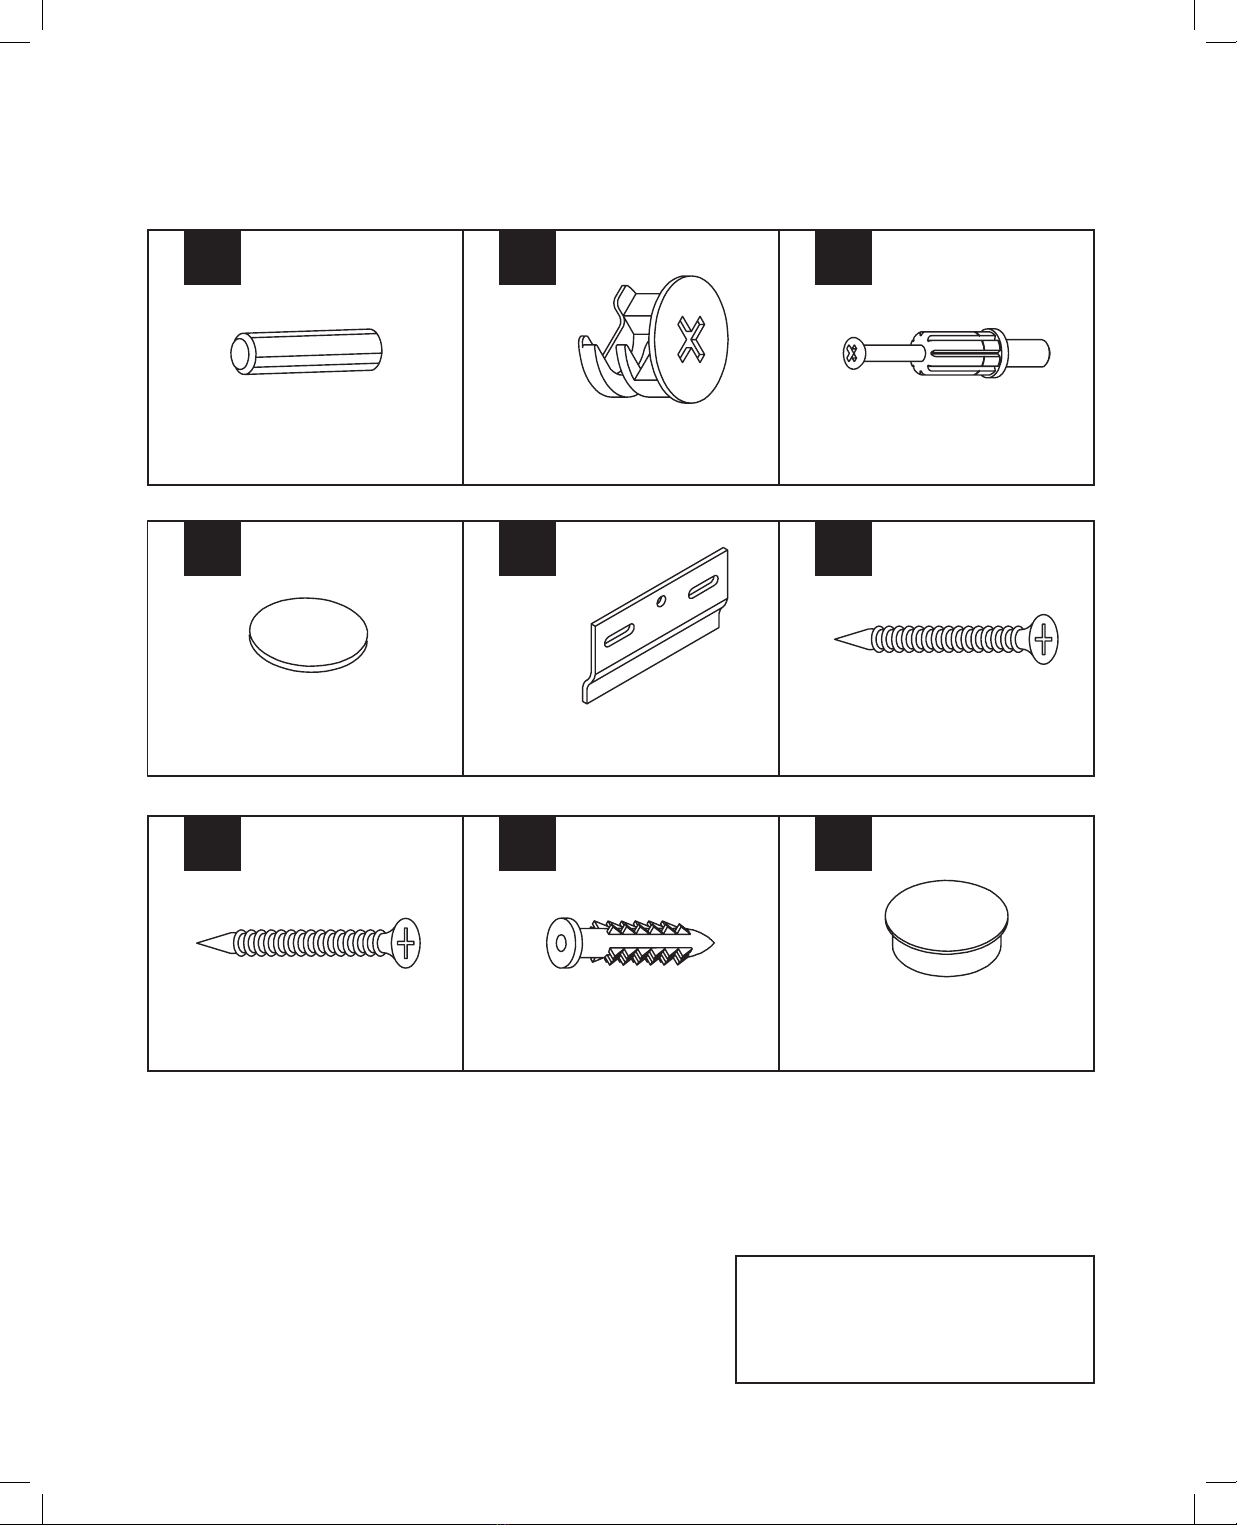
Parts and Hardware
Tools Required (But Not Included)
Wooden Dowel (x11)
Plastic Cover (x11)
M6x50 Screw (x4)
• Screwdriver
• Drill
• Rubber Mallet
NOTE:
• All Cam Lock Bolts need to be screwed in with a screwdriver.
• All Wooden Dowels need to be tapped in with a rubber mallet.
• All Cam Locks need to be tightened with a screwdriver.
WEIGHT CAPACITY:
Mounted Into A Stud: 50-80lbs.
Mounted Into Sheetrock: 30-50 lbs.
Cam Lock (x11)
Mounting Bracket (x4)
Plastic Anchor M6x50 (x4)
Cam Lock Bolt (x11)
M4x15 Screw (x6)
Plastic Grommet
A
D
G
E
H
F
I
B C
3
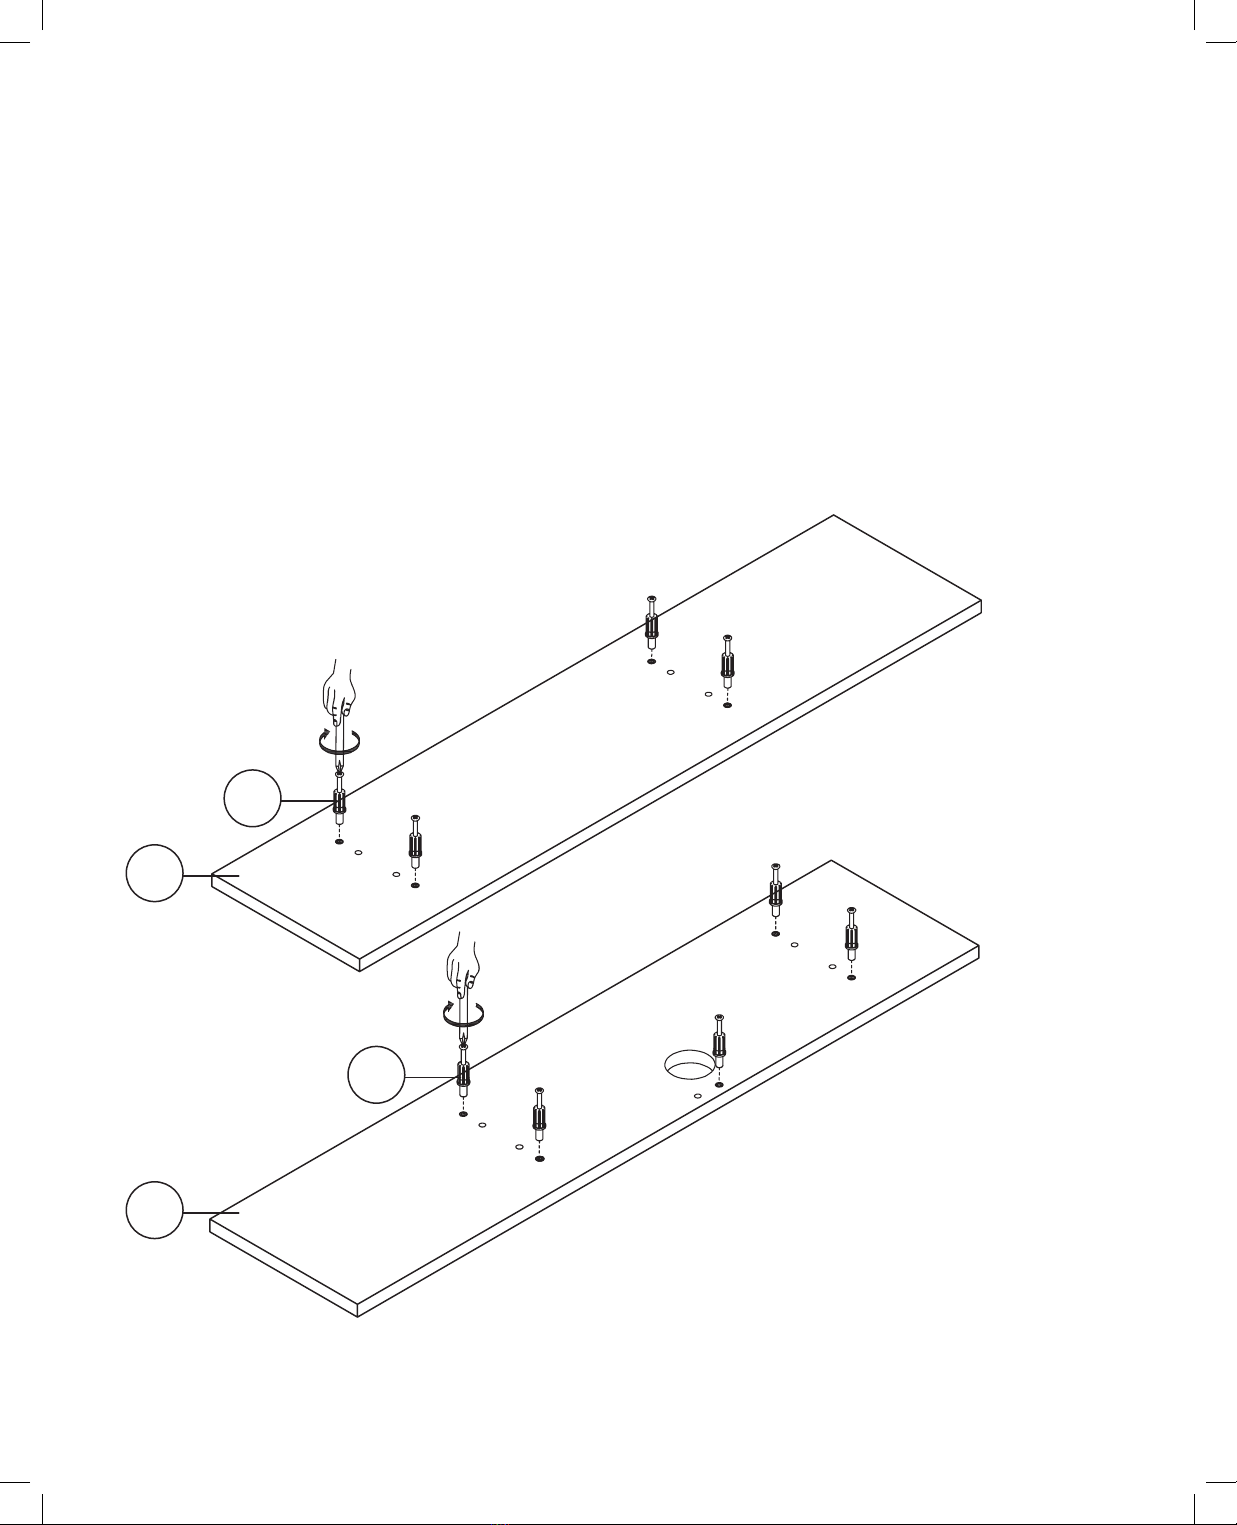
Assembly Instructions
STEP 1
A. Take your Bottom Panel (1) and your Top Panel (4) and insert four Cam Lock Bolt’s (C)
in the Bottom Panel (1) in the outer pre-drilled holes, as pictured.
B. Insert ve Cam Lock Bolt’s (C) in the outer pre-drilled holes and the middle hole, as
pictured. Screw in all nine Cam Lock Bolt’s (C) with a screwdriver.
1
C
C
4

4
STEP 2
A. Locate your Left Panel (2) and Right Panel (3) place them on a at surface with the
pre-drilled holes facing up.
B. Place a Cam Lock (B) and a Cam Lock Bolt (C) in the outer, pre-drilled hole, as pictured.
Tighten the Cam Lock Bolt (3) with a screwdriver.
C. Then, insert four Wooden Dowel’s (A) in each panels’ two inner pre-drilled holes located
on the panel’s edge.
D. Gently tap the Wooden Dowel’s (A) in until they’re secure.
Assembly Instructions
2
3
A
A
C
C
5
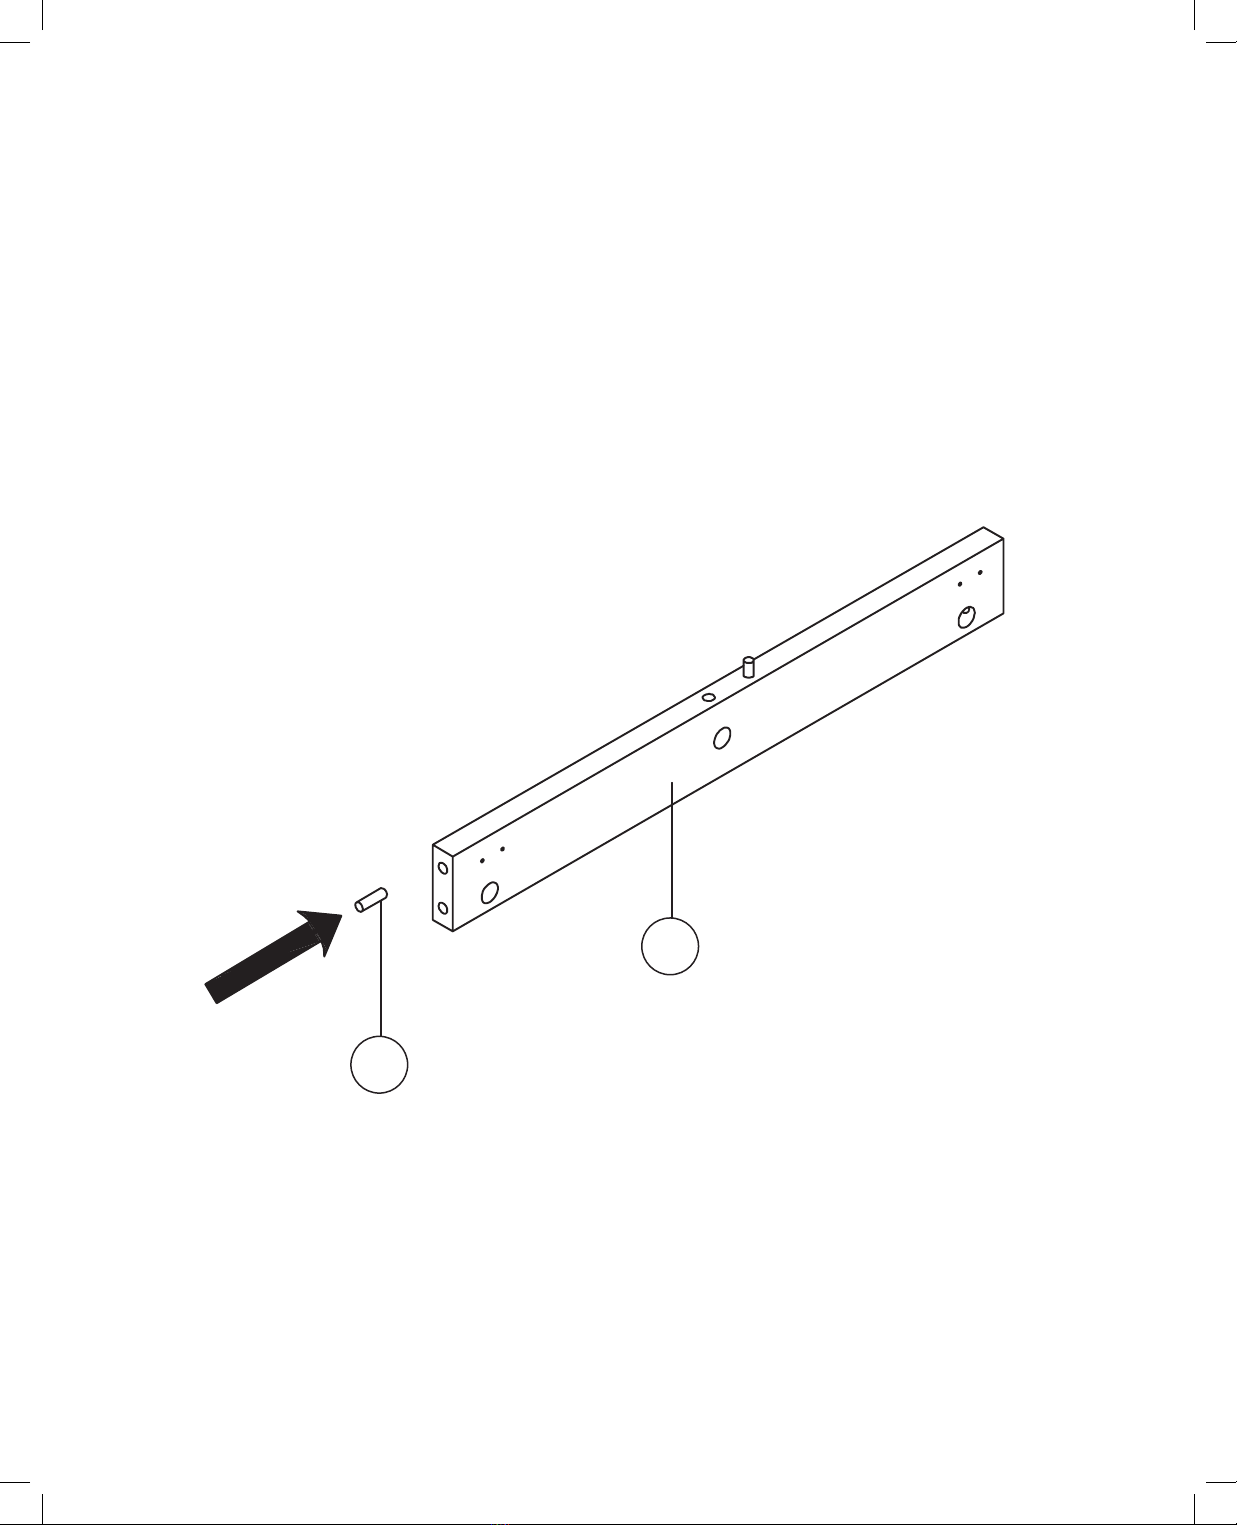
Assembly Instructions
STEP 3
A. Locate your Cross Panel (5), place it on its edge, as pictured. Insert one Wooden
Dowel (A) on each end of the Cross Panel (5) and gently tap them in until they’re
secure.
B. Insert a Cam Lock (B) and a Cam Lock Bolt (C) at the bottom of the Cross Panel (5).
Tighten the Cam Lock Bolt (3) with a screwdriver.
A
5

6
Assembly Instructions
STEP 4
A. Take the Right Support Panel (3) and line it up with the Cam Lock Bolt’s (C) on the right
of the Bottom Panel (1).
B. Gently tap in the Right Support Panel (3) until it is ush with the Bottom Panel (1).
C. Attach the Cross Panel (5) to the inside of the Right Support Panel (3) and gently tap the
Cross Panel (5) until it is ush with the Right Support Panel (3).
D. Take the Left Support Panel (2) and line it up with the Cam Lock Bolts on the Bottom
Panel’s (1) left side.
E. Gently tap in the Left Support Panel (2) until it is ush with the Bottom Panel (1).
F. Line up the Cross Panel (5) with the holes on the Left Support Panel (2), and gently tap
the Left Support Panel (2) until it is ush with the Cross Panel (5).
2
1
5
3
B

7
Assembly Instructions
STEP 5
A. Line up the Top Panel (4) with the Wooden Dowels (A) on the Right Support Panel (3) and
the Left Support Panel (2).
B. Gently tap the Top Panel (4) until it becomes ush with the Right Support Panel (3) and the
Left Support Panel (2).
C. Install and tighten all Cam Lock’s (B) 180 degrees, as pictured, in the Left Support Panel (2),
the Right Support Panel (3), and the Cross Panel (5) until they are all ush with each other.
2
1
5
4
3

8
Assembly Instructions
STEP 6
A. Locate on your wall where you would like to mount your Wall Mounted Media Console.
B. Mark on the wall where you want to drill your holes to secure your Mounting Brackets (E).
C. Drill four holes and place the Plastic Anchors (H) inside of them.
D. Place the Mounting Brackets (E), with the lip-side facing up, over the holes and screw in
with the M6x50 Screws (G).
G
E
H
351mm
40mm 40mm
9
Assembly Instructions
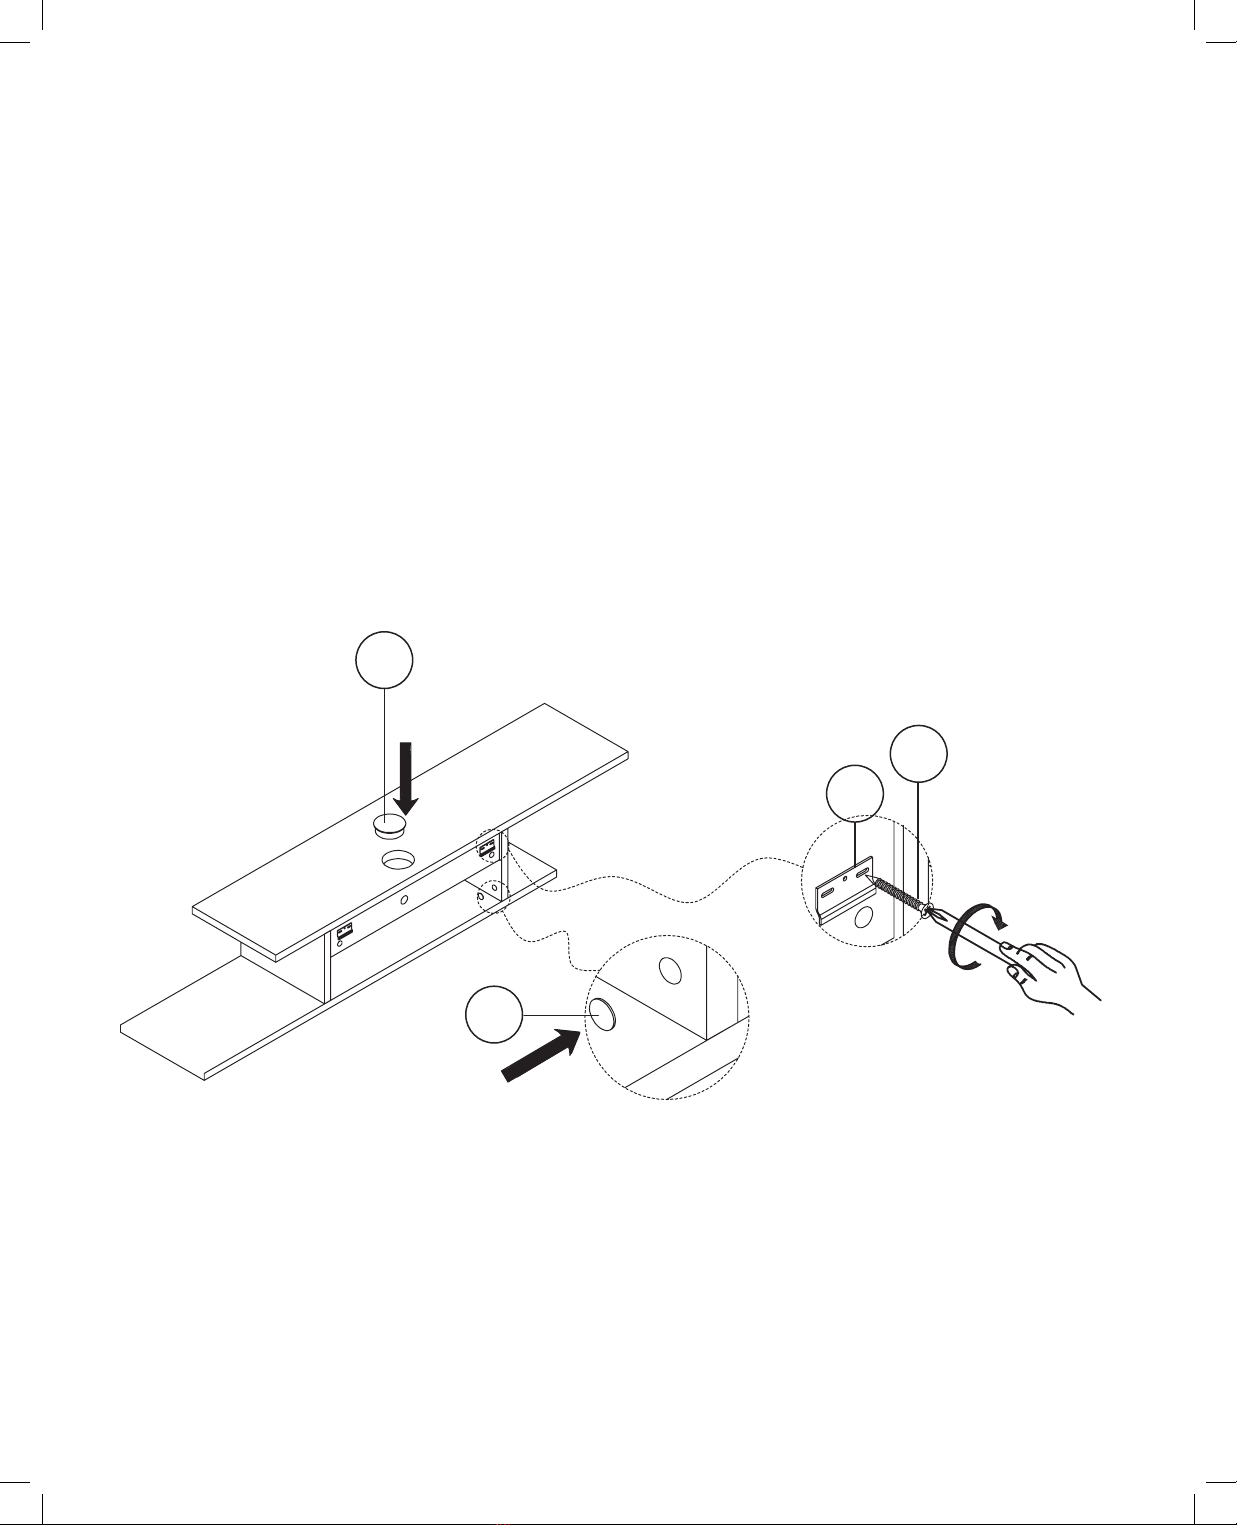
STEP 7
A. On the back of the Cross Panel (5), secure the remaining 2 Mounting Brackets (E) using the
included 4 M4x15 Screw’s (F).
B. Once you have tightened all screws, check that the brackets are facing in the correct
direction, grab your Wall Mounted Media Console, and slide the Mounting Brackets (E)
on the back of the unit, downward onto the wall Mounting Brackets (E).
C. Insert Plastic Cover’s (D) where you installed all Cam Lock’s (B) by applying light pressure.
E
D
I
F

10
Assembly Instructions
STEP 8
Once completed, your Adir Home Wall Mounted Media Console should look like this.

11
Limited Warranty
1. AdirCorp (the company) warrants to the purchaser that the product will be free from
defects in workmanship and materials for a period of three (3) year from the date of
purchase.
2. These warranties are not assignable or transferable to any other person.
3. Any damage to the product as a result of misuse, tampering, abuse, neglect, accident,
improper installation, modification, unauthorized service, destruction, or the alteration of
the serial number or use violates the instructions furnished by the Company will void this
warranty.
4. The sole responsibility of the Company shall be limited to the repair or replacement (in its
sole discretion) of any component of the product which fails to conform to this warranty
at no cost to the purchaser for the period of the warranty.
5. Contact the Company directly to obtain service under this warranty. If it becomes
applicable to send a defective product to the Company, a Return Authorization Number
must first be obtained from the company. To obtain service under this warranty, purchaser
must provide the Company with the following items (a) proof of purchase, (b) police or fire
department report, (c) photographs of damaged sad, and (d) written testimonial.
6. Products shipped without prior Return Authorization and Return Authorization Number may
not be accepted, and the Company will not be responsible for their disposition and/or cost
of return to the owner.
7. The Company will not assume any responsibility for any loss or damage incurred in
shipping. All return authorized products should include a copy of the original invoice in
order that this warranty may be Honored.
8. This warranty is not an insurance policy. The Company is not responsible for any manner
of damage to or theft of the Purchaser’s product or its contents.
9. We recommend that the product being returned is accompanied by the sales receipt with
all relevant information regarding the purchase of the item and is returned to the Company
within ten (10) days of the claim date of purchase to validate this warranty.
10. Any implied warranties that the purchaser may have are limited to the duration of the
warranties described above. There are no further warranties that extend or apply beyond
the face hereof, and the company expressly disclaims and excludes any and all warranties
of merchantability or fitness for a particular purpose. Some states do not allow limitations
on how long an implied warranty lasts, so the above limitation may not apply to you.
11. Repair or replacement shall be the sole remedy for the purchaser under this warranty.
The company shall not be liable for any direct, indirect, incidental or consequential
damages, losses or expense arising from the use or misuse of the product. Some states
do not allow the exclusion or limitations of incidental or consequential damages, so the
limitation may not apply to you.
12. This warranty gives you specific legal rights, and you may also have other rights which
vary from state to state.

12
Disclaimer
By purchasing products from AdirCorp, the user agrees as follows:
TO THE MAXIMUM EXTENT PERMITTED BY LAW, THE PRODUCTS AND INFORMATION ON
THIS SITE IS PROVIDED “AS IS” AND WITH ALL FAULTS AND ALPINE INDUSTRIES. MAKES NO
PROMISES, REPRESENTATIONS, OR WARRANTIES, EITHER EXPRESS, IMPLIED, STATUTORY,
OR OTHERWISE, WITH RESPECT TO THE PRODUCTS AND INFORMATION, INCLUDING
ITS CONDITION, ITS CONFORMITY TO ANY REPRESENTATION OR DESCRIPTION, OR THE
EXISTENCE OF ANY LATENT OR PATENT DEFECTS, AND ALPINE INDUSTRIES. SPECIFICALLY
DISCLAIMS ALL IMPLIED (IF ANY) WARRANTIES OF TITLE, MERCHANTABILITY, NON
INFRINGEMENT, FITNESS FOR A PARTICULAR PURPOSE, ACCURACY OR COMPLETENESS,
QUIET ENJOYMENT, AND QUIET POSSESSION. THE ENTIRE RISK ARISING OUT OF USE OR
PERFORMANCE OF THE PRODUCTS AND INFORMATION LIES WITH USER.
TO THE MAXIMUM EXTENT PERMITTED BY LAW, IN NO EVENT SHALL ALPINE INDUSTRIES
PRODUCTS OR ITS SUPPLIERS BE LIABLE FOR CONSEQUENTIAL, INCIDENTAL, SPECIAL,
INDIRECT, OR EXEMPLARY DAMAGES WHATSOEVER ARISING OUT OF OR IN ANY WAY
RELATING TO THIS AGREEMENT OR USER’S USE OF OR INABILITY TO USE THE PRODUCTS
AND INFORMATION, OR THE PROVISION OR FAILURE TO PROVIDE SUPPORT SERVICES,
INCLUDING, BUT NOT LIMITED TO, LOST PROFITS, LOSS OF CONFIDENTIAL OR OTHER
INFORMATION, BUSINESS INTERRUPTION, PERSONAL INJURY, LOSS OF PRIVACY, FAILURE
TO MEET ANY DUTY (INCLUDING OF GOOD FAITH OR REASONABLE CARE), NEGLIGENCE,
COSTS OF PROCUREMENT OF SUBSTITUTE GOODS OR SERVICES, OR ANY OTHER CLAIM
FOR PECUNIARY OR OTHER LOSS WHATSOEVER, OR FOR ANY CLAIM OR DEMAND AGAINST
USER BY ANY OTHER PARTY, EVEN IF ALPINE INDUSTRIES HAS BEEN ADVISED OF THE
POSSIBILITY OF SUCH DAMAGES. THESE LIMITATIONS SHALL APPLY NOTWITHSTANDING
ANY FAILURE OF ESSENTIAL PURPOSE OF ANY LIMITED REMEDY.
NOTWITHSTANDING ANY DAMAGES USER MAY INCUR FOR ANY REASON WHATSOEVER
(INCLUDING, WITHOUT LIMITATION, ALL DAMAGES REFERENCED ABOVE AND ALL DIRECT
OR GENERAL DAMAGES), THE ENTIRE LIABILITY OF ALPINE INDUSTRIES AND ANY OF ITS
SUPPLIERS UNDER ANY PROVISION OF THIS AGREEMENT AND YOUR EXCLUSIVE REMEDY
FOR ALL OF THE FOREGOING SHALL BE LIMITED TO THE GREATER OF THE AMOUNT
ACTUALLY PAID FOR THE PRODUCTS AND INFORMATION OR U.S. $1. THE FOREGOING
LIMITATIONS, EXCLUSIONS, AND DISCLAIMERS SHALL APPLY TO THE MAXIMUM EXTENT
PERMITTED BY APPLICABLE LAW, EVEN IF ANY REMEDY FAILS ITS ESSENTIAL PURPOSE.
If any provision of this Agreement is declared invalid or unenforceable, the remaining provisions
of this Agreement will remain in effect. AdirCorp has the right to modify these terms and
conditions at any time.

13
ADIHO201-01-BLK
27 Selvage Street • Irvington, NJ • 07111 • © 2021 AdirCorp
adircorp.com
ADIHO201-01-SERIES
27 Selvage Street • Irvington, NJ • 07111 • © 2021 AdirCorp
adircorp.com
Other ADIR Indoor Furnishing manuals


Popular Indoor Furnishing manuals by other brands

Sjobergs
Sjobergs PIBL 701421 Assembly instructions

modway
modway EEI-2326 quick start guide

Delta Children
Delta Children Universal 6 Assembly instructions

DIVERSIFIED WOODCRAFTS
DIVERSIFIED WOODCRAFTS DT-30A Assembly instructions

Germania
Germania Hangevitrine 1502 Assembly instruction

Bassett
Bassett INSPIRED LUCCA BP-LUCWD58 Assembly instructions

Ameriwood HOME
Ameriwood HOME 8613015COM manual

John Lewis
John Lewis CSL 220-JL Assembly manual

Safavieh Furniture
Safavieh Furniture Leonard FOX4213 manual

Article
Article MYSEN Bookcase Assembly instructions

Komfort & Wohnen
Komfort & Wohnen 4301 Assembly instructions

J.Burrows
J.Burrows Typhoon Esport Pro Assembly instructions


