Admiral Lake and Pond JetStream User manual

JetStream Manual
A sincere, “Thank you!” for investing in an Admiral Lake and
Pond product. We very much appreciate the confidence that
you have placed in us by making this purchase.
Practically every User Manual ever written prefaces with, “Please read
through completely before using this product” and then proceeds to
thoroughly insult your intelligence. In contrast, the following is a quick read
that will offer truly useful tips and things you should know. We promise, no
20-page tutorial stating the obvious!
Uses for the JetStream:The JetStream is helpful in accomplishing a
variety of lake and pond-cleaning tasks. It can be used to push muck,
detritus, leaves and other undesirables from your shore bottom. It can be
used to flush out seasonal “floaties'' like duckweed and filamentous algae,
etc. and/or be used to freshen up areas plagued with stinky, stagnant water.
Furthermore, it also functions as an aerator when used near the surface.
This will help to increase oxygen levels, which in turn improves both water
clarity and quality, removes foul odors and mosquitos, and slows algae
growth, among other benefits. In the winter, the JetStream may even be
used as a de-icer to maintain open water in areas where it may be
beneficial. You should be aware that when used as a de-icer, there are
obvious safety concerns and as such, we recommend you do research on
the topic and/or consult with the DNR.
Using the Jet Stream: Every shoreline is different, so the following
suggestions may need modifying per your individual situation and, as with
any piece of equipment, using your JetStream is the best way to master it.
Please read the following tips and instructions below to help you to use the
JetStream most effectively and efficiently.
1
Agitation: Lake/pond muck, sticks, and leaves are often times practically
suctioned to the bottom of the lake or pond. As such, any kind of agitation
to help get debris up off the bottom and into the water column will speed
progress and aid the JetStream’s effectiveness.
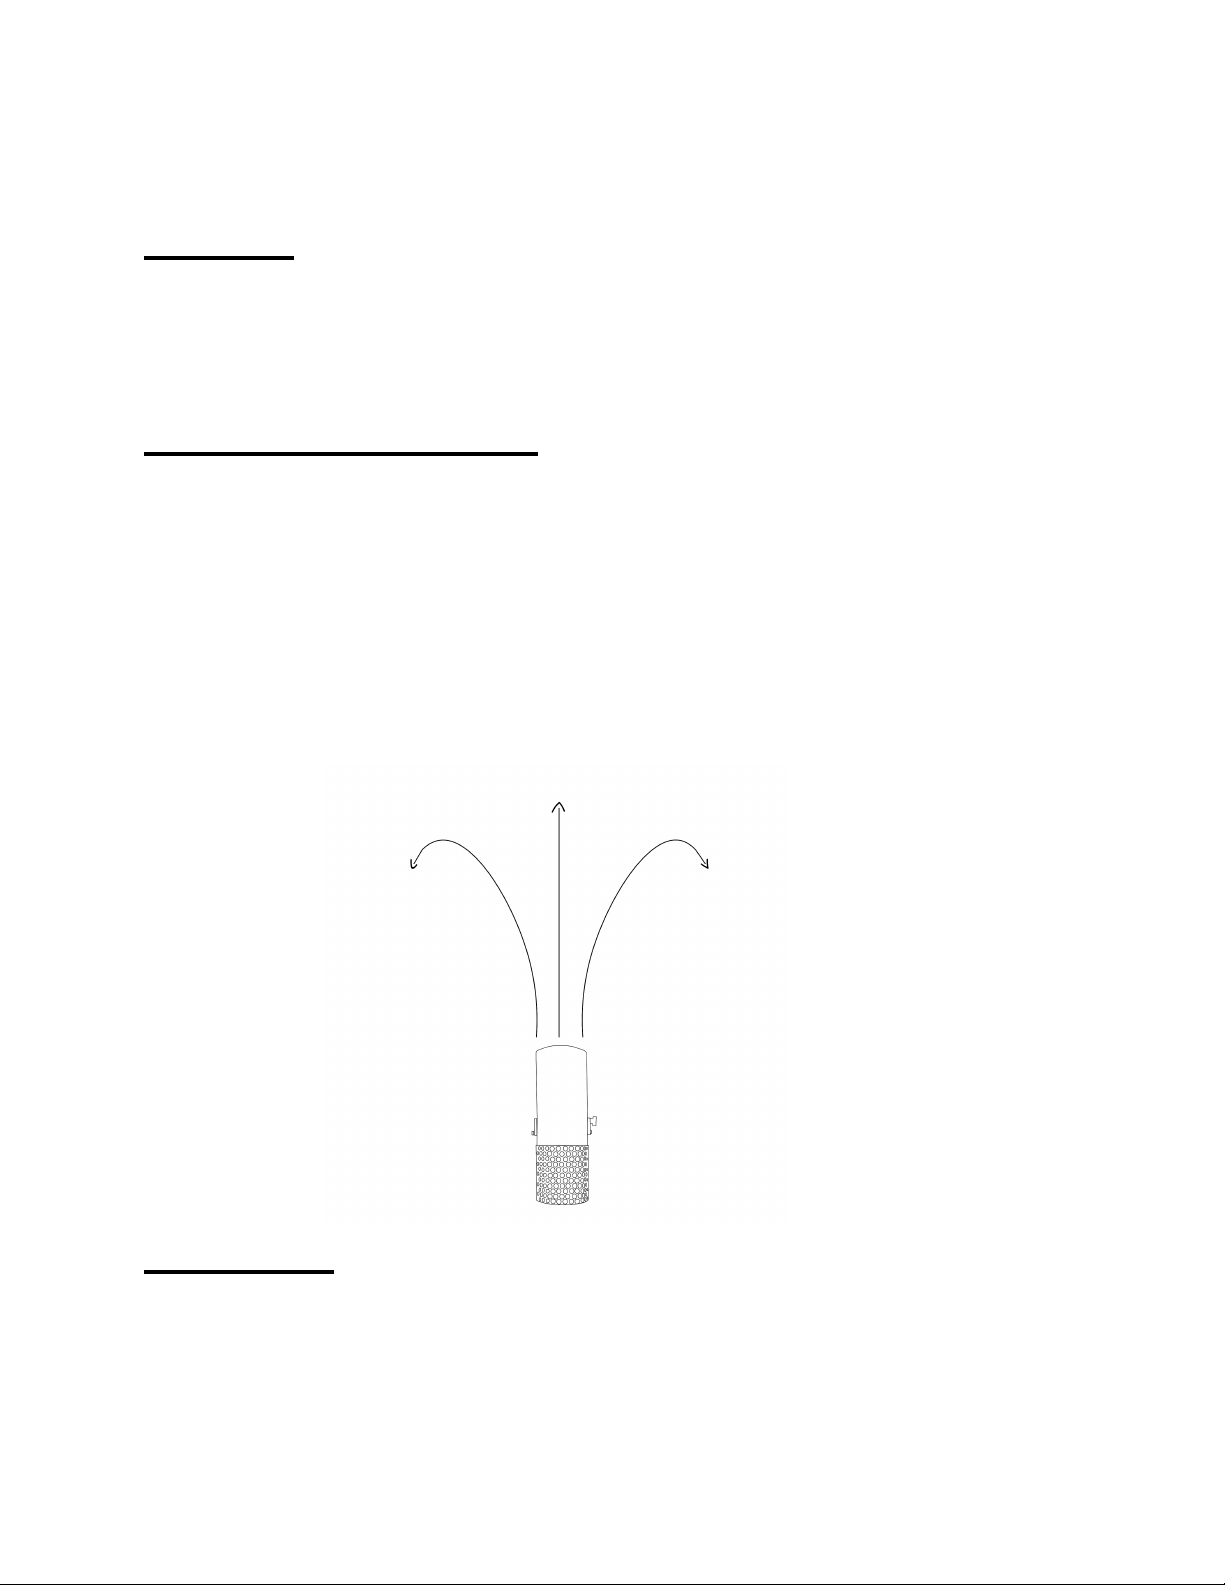
The counter-flow factor: One of the more important nuances to
learn about the JetStream is the inherent counter-flow that it creates. This
is a scientific cause & effect whereby the water on either side of the main
central flow will curl around and run in the opposite direction. The trick to
combating this counterproductive effect is to rotate the JetStream in small
increments (moving along the below-mentioned, “V” shape). Doing so will
ensure that the water flowing backwards from the area you just cleaned will
not bring debris back into that clean area.
Wind helps: Whenever possible, use the JetStream on the upwind side
of the area to be cleaned (with the unit pointed downwind). As always,
working with Mother Nature is more effective than working against her. If
your prevailing winds tend to shift from left to right from one day to the next,
2

you may want to start the cleaning process in the center of your shoreline
and work left or right depending on wind direction. Note that with any
change in wind direction, so too should your JetStream positioning be
adjusted.
Locomotion: “Everybody’s doing a brand new dance now” (just checking
to make sure you're still paying attention). Like a locomotive, the JetStream
can take a while (up to several minutes) to build up momentum to get the
stream established and debris moving. Allowing the stream time to become
established will result in much more effective use.
Cavitation: The JetStream can be used in water as shallow as 18
inches. However, any shallower and you will either blow trenches in the
lake bottom or cause cavitation (an entrance of air into water). This could
occur via small vortices or “tornados” that will form and allow air into the
propulsion system via the intake opening. This drastically reduces
performance. So, make sure that the JetStream is placed deep enough that
cavitation does not occur, which is right around 8 inches. If you have a
beach that is primarily shallow, you may want to consider covering the
JetStream’s intake with a rag or otherwise to reduce this effect. Maintain at
least 4 inches from the bottom to avoid propeller damage.
3
Trenching: Unless you are planning on farming your lake or pond
bottom (which we can't imagine you are), you can avoid making trenches
by doing two things: Not placing the JetStream too close to the bottom
and/or slightly tilting the unit up, away from the bottom.
Starting out: The ease of placing the JetStream & stake into your lake
bottom will depend upon how dense/hard-packed the bottom is as well as
the presence of rocks. Only in the most extreme situations should it be
necessary to first drive in the stake (using a rubber mallet and a block of
4

wood so as not to damage the stake, and then placing the JetStream atop
the stake). Otherwise, you may drive the stake into bottom sediment by
grasping either end of the unit with both hands and then use your weight to
drive the stake in. To help facilitate driving the stake in, a knee can be
placed on the center of the unit and a bit of wiggling will help to drive the
stake in further.
Where to start? It is recommended that you first start the cleaning process
by working out from the cleanest “corner” of your shoreline, and move
progressively towards the problem areas. If there are no clean areas from
which to start, it's best to start the cleaning process from a single point,
preferably up-wind (pointing the JetStream downwind), as working with
Mother Nature is always more productive. Why wouldn’t you start in the
most problematic areas? This would be akin to putting an explosive in the
middle of a garbage heap in an effort to clean it up (not practical!)
Moreover, if your muck is more than a foot deep/thick, you must not
immerse the JetStream in said muck as doing so may ruin the propeller.
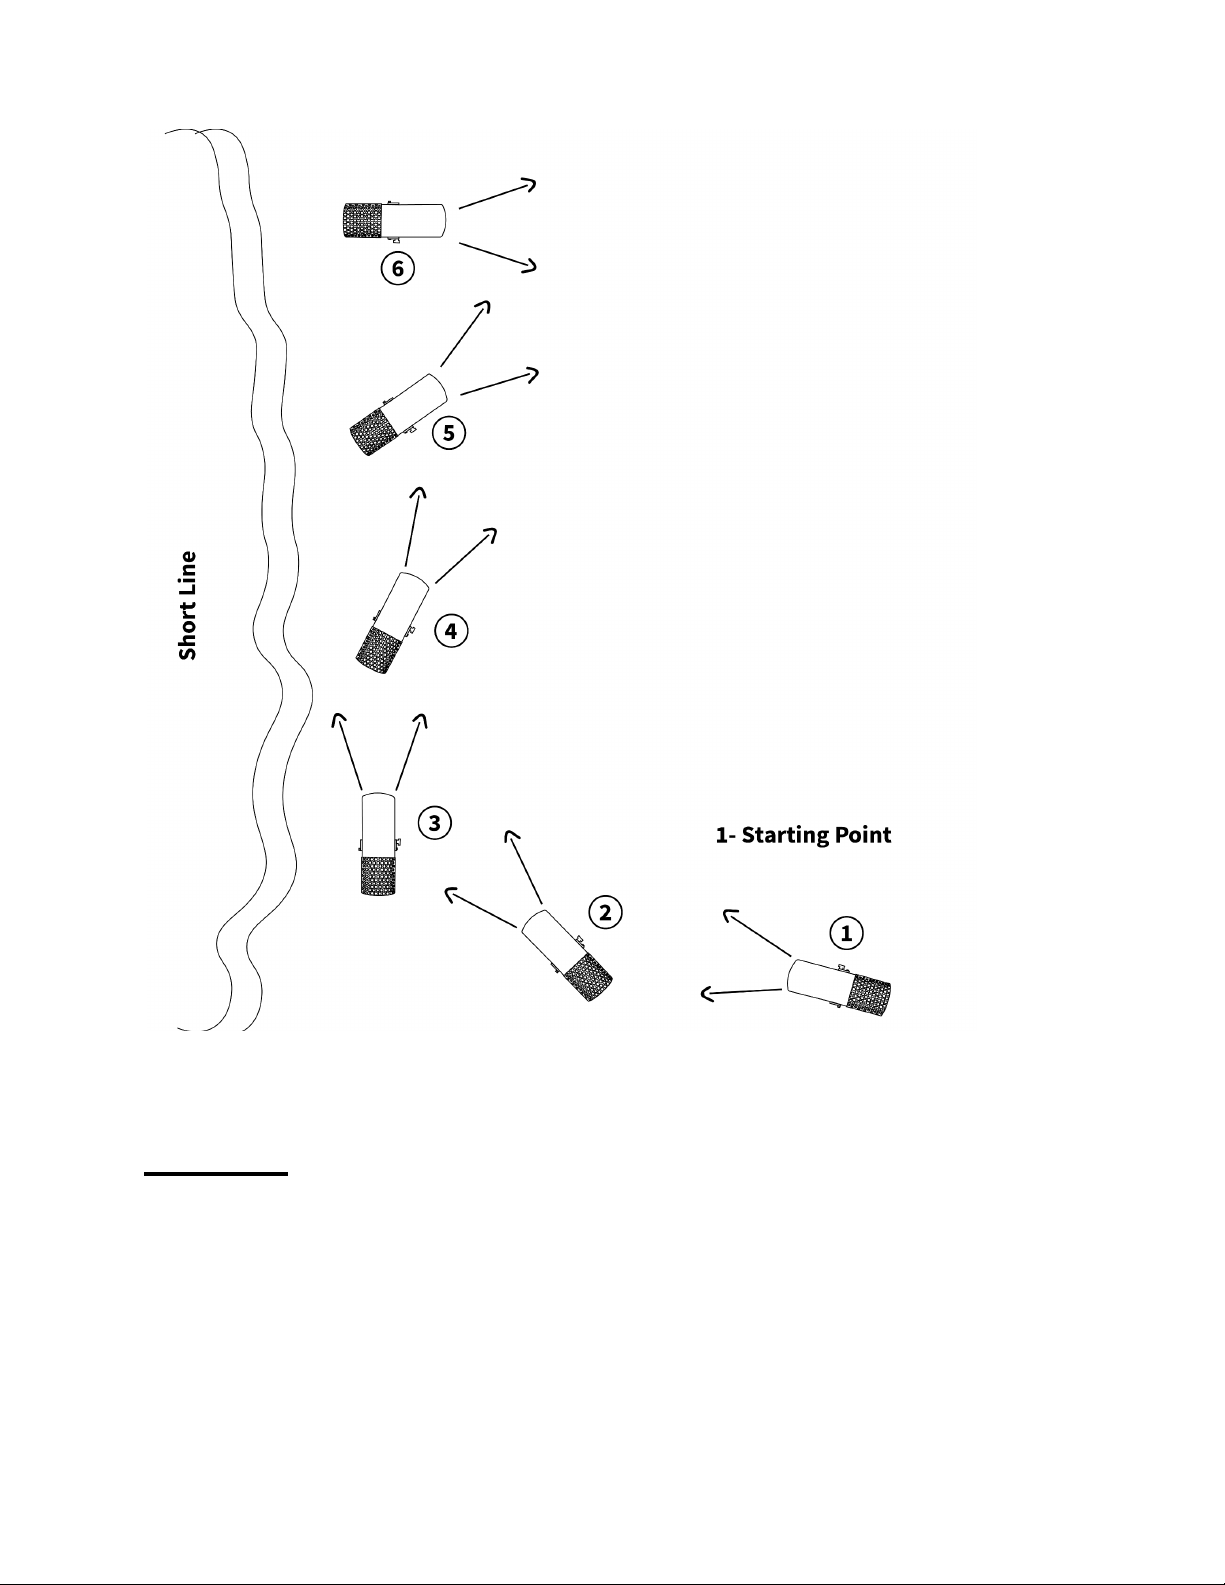
Below we will provide a possible example of JetStream use:
1) Place the JetStream offshore and point it nearly directly at the shoreline.
How far out from the shoreline depends; you want to make sure that the
flow has enough force to reach the shore and clean said area, but without
causing erosion. After the JetStream has cleared a path, it should result in
a clean, “V” shape, spreading out from the unit.
2) Move the JetStream towards the shore, following the downwind leg of
the “V”. This will open the “V” shape until eventually it will resemble an “L”
shape. Continue to place the JetStream further down the opening “line”
until the JetStream is blowing parallel to the shoreline. Using a buffer area
such as the shoreline will help to contain and eventually rid your lakeshore
or pond of unwanted debris.
5
Aeration: One of the JetStream’s best features is that it can be used to
clear debris of all kinds and aerate at the same time. If aeration is your
main goal (or part of your goal), the higher the JetStream is pointed
upwards and the closer to the surface, the better. For maximum aeration,
make sure the JetStream is pointed as far upwards as possible. The closer
the JetStream is to the surface, and the greater the upwards angle, the
more effective it will be. JetStream use near the surface will cause bubbling
6

and substantial agitation at the water’s surface, which will oxygenate and
aid the nearby area greatly, benefitting fish and reducing the presence of
algae. It will also help provide clarity to your water and eliminate foul odors
and other maladies.
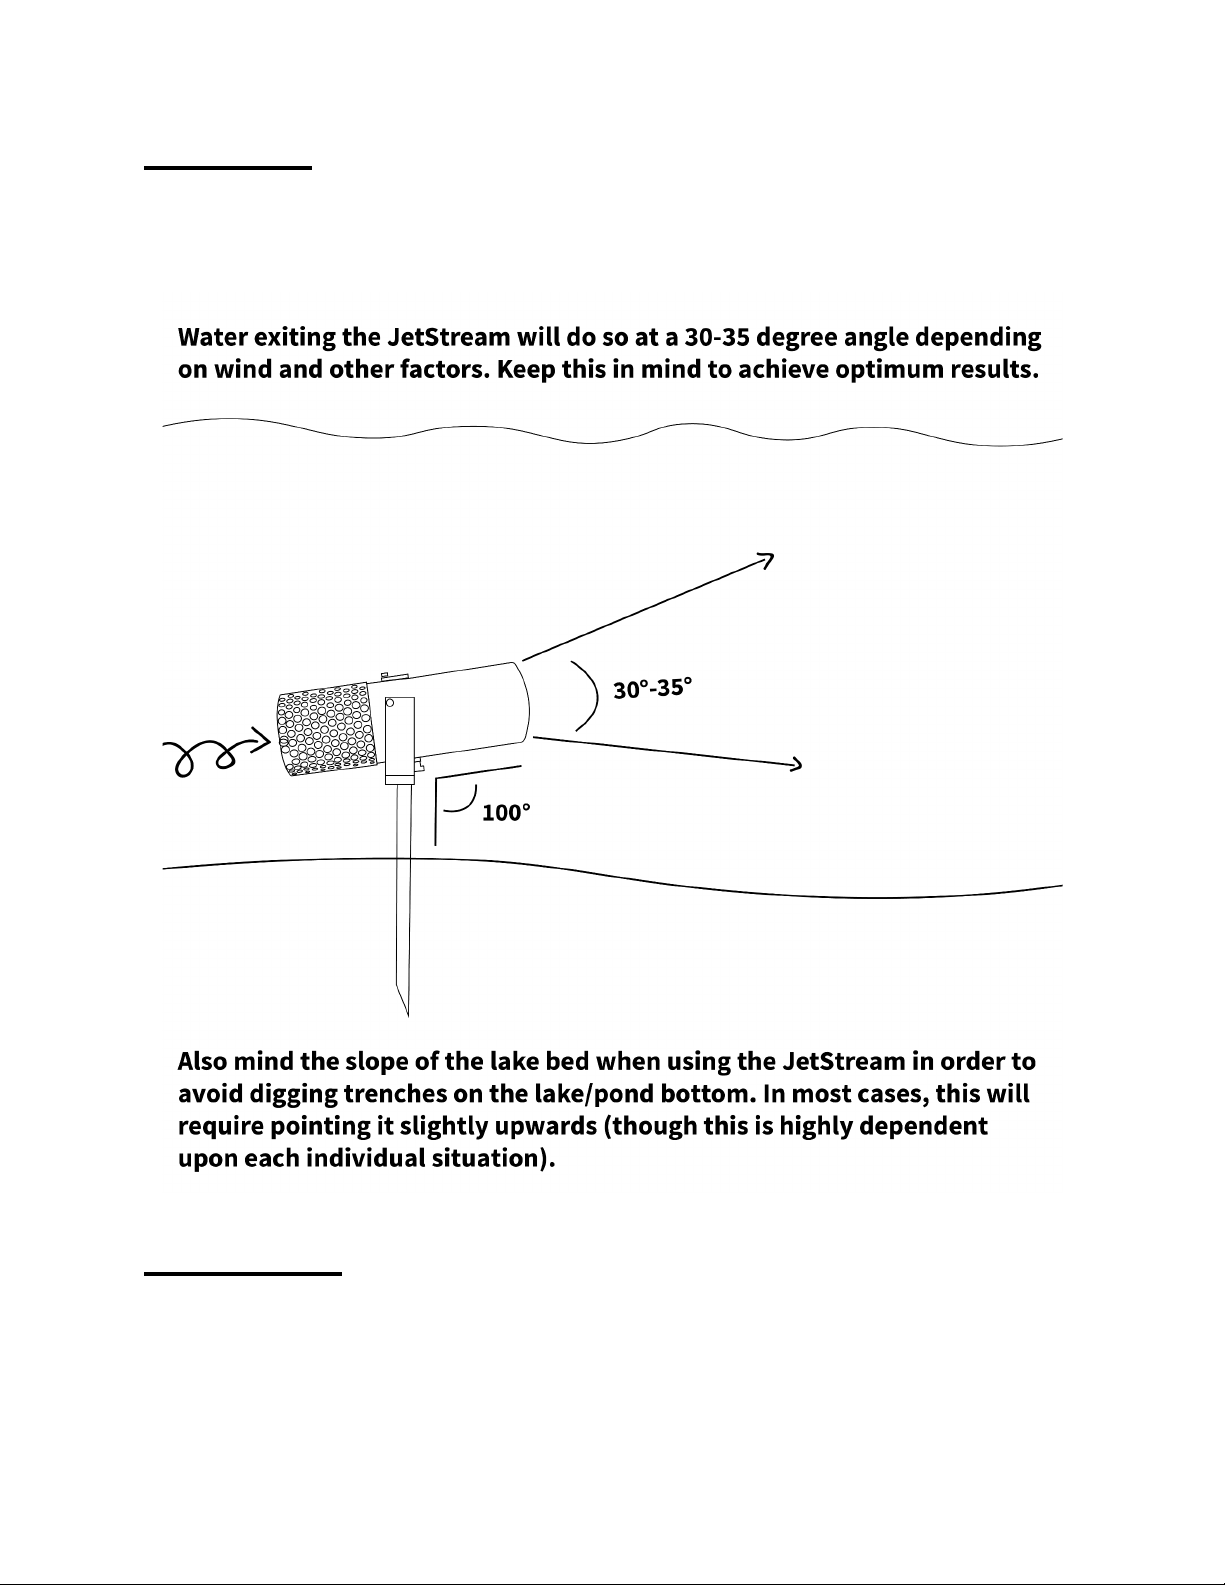
Targeting Surface Debris & Weeds: When encroaching weeds
and debris are the main problem, determine whether they are floating or
submerged, and position the JetStream vertically at the same or lower
height (keeping in mind vertical limits due to cavitation and trenching on the
high and low ends, respectively). In most cases, we recommend you to
angle the JetStream slightly upwards at an angle of up to 110 degrees
towards the problem areas. This will push weeds in the desired direction
and keep them suspended in the water column long enough to move them
far away.
Targeting Bottom Debris & Muck: Referring back to the images
on pages 4 and 5, it is important when targeting bottom-dwelling debris and
muck to maintain a water exit angle that matches the slope of your lake
bed. This will avoid trenching and damage to the unit. It is also important to
remember that the lowest part of the unit (typically the intake) must be at
least 4 inches away from the surface of the debris. In case of substantial
amounts of debris or deep muck, that distance should be increased to 6-12
inches to avoid damage to the propeller, which can be caused by the large
amount of sediment that will be driven into the water column. As a general
rule of thumb, the 4 inch minimum distance should be increased by an inch
to 1.5 inches of distance for every 3 inches of bottom debris/muck present.
If muck or debris are over 18 inches, it is likely that the standard 2-foot
stake mount will not be sufficient. If muck or debris reaches these depths
near shore, we recommend that the Deep Stake or one of the two dock
mounts be used instead. If muck depth is over 18 inches in deep water, but
less than that in shallow areas, you may use the standard stake, but must
start near shore and work your way towards the deeper areas, dispersing
excessive muck and debris as you move outwards.
7

JetStream Mounting Options: The JetStream offers many mounting
options beyond the standard mounting stake to give optimum flexibility of
use. Below we will cover installation instructions and features of each. In
the case of all mounting options, use will depend on the goal, as discussed
in the 3 sections above (aeration, surface, and bottom debris).
Dock Deck Mount: The Dock Deck Mount is a convenient option providing
those with a docks an option to control their JetStream from outside of the
water. It features rotational as well as depth control and is not limited by
water depth. It comes in 3 pieces; the tube, the mounting plate, and the
adjustable collar. The mounting plate must have at least 2 holes going
through it (4 holes is preferable) that will be used to insert bolts that will
then go through the top of your dock’s deck or around dock sections with
bolts on the underside. The 6-foot tube will then be inserted into the
mounting plate, and the collar around the pole, above the mounting plate.
Lastly, the JetStream will be attached to the bottom via a “hanging”
configuration with the JetStream’s mounting bracket facing upwards and
attached via tightening the knob. The mounting collar may be adjusted to
control height and rotation conveniently from your dock.
Dock Leg Mount: The Dock Led Mount is a more simplistic dock mount
option featuring full 360 degree rotation and a bit more mobility than the
Dock Deck Mount in that it may be moved vertically along dock leg
supports as well as from one support to another. It is installed by tightening
the provided U-bolts until they are held firmly around your dock supports.
Vertical adjustments of the mount can be made via loosening and
re-tightening these bolts to move up and down vertically along your dock
leg supports. The same installation process may be used to relocate it to
your other supports (assuming they are the same size/shape) in order to
target any problem areas. The Dock Leg Mount allows the JetStream to
8

rotate a full 360 degrees by simply loosening and tightening the mounting
knob until the desired position is obtained.
Concrete Disk Mount: The Concrete Disk Mount, lovingly referred to as
“The Pancake”, allows for convenient use at the bottom of lakes and ponds.
It is mobile and ideal for shallow water mounting, especially when rocks are
present that impede stake usage. By tying a rope to the eye hook at the
front of the disc, it can be easily dragged from one area to another, and
rotated by pulling the rope from side to side. The low footprint of the
concrete disc mount makes removal of bottom debris very effective. As is
the case with all JetStream mounts, vertical angles may be adjusted via
tightening/loosening the knob on the aluminum bracket.
Deep Stake Mount: The Deep Stake is an excellent deep water option that
combines the mobility of the short stake with all of the advantages of the
Dock Leg Mount. How, you ask? The Deep Stake is simply a longer stake
with a Dock Leg Mount attached to the upper part of the stake. As such,
that upper “arm” of the mount can be attached there and then easily moved
to your dock by swapping the Deep Stake-specific U-bolts for U-bolts that
fit your dock supports. The Deep Stake features full rotation of the
JetStream just like the standard stake, as well as 4.5 feet of vertical
JetStream movement along its upper half via U-bolt adjustment of the
upper arm.
When “planting” the Deep Stake, look for an area with few to no rocks, and
push the tip of the stake as far down as possible into the lakebed, stepping
on the horizontal metal bar 1/3 of the way up the stake while gripping the
handles above. If necessary, a bit of jumping up and down can help get the
job done.
9

Tips for Longevity: Your JetStream will provide years of dependable
service provided that it is properly cared for. To ensure its longevity and
keep it within warranty guidelines requires minimal effort on your part,
however. One of the more important factors to keep in mind is that, though
your unit comes equipped with a thermal shut-down feature, it relies upon
unimpeded water flow - not only to provide the best performance possible -
10

but also to also keep the motor cool. As such, it is very important to make
sure that the unit remains submerged in the water during use, and to a
lesser extent that the perforated intake screen is kept at least somewhat
clear. As long as the intake screen is not covered in debris for a prolonged
time, the unit will be able to work normally and risk to the motor will be
negligible.
It is also imperative that you use a GFCI outlet that supplies the full voltage
that it is ascribed to be supplying. Oftentimes, old cabins and DIY electrical
work done in years past may have worked fine for dock lights, etc. but are
not up to the task of much more than that. If in doubt, use of a voltmeter
can establish that you are, in fact, putting out the ascribed 110 or 220 volts.
If you live in a frigid climate, the JetStream may also serve as a de-icer.
However, it is important that when not in use, your JetStream be stored in
an above-freezing area over the winter and though not imperative, it is a
good idea to spray a few doses of WD-40 or similar spray lubricant into the
pump intake while running the pump for approximately 15 seconds. This
will help to displace water and lubricate the bearings.
Lastly, we recommend that the zinc anode that comes included (on
post-2021 models), be replaced once per season or when the anode turns
a “white” color or has visibly shrunk to 50% of its original size or more
(original size is 2.5 to 3 inches in diameter and ~1 centimeter in length). In
order to do so, simply remove the original screw that held the anode -
located at the end of the aluminum intake - put the new anode on the
screw, and tighten, leaving the anode placed snugly against the outside
end of the intake. If you have purchased a unit made in 2021 or earlier and
would like to order an anode, please contact us.
11

The infamous “What not to do’s”:
Doing the following will make your JetStream unhappy and likely damage it
and/or void the warranty. So.........
1) Don’t use extension cords.
2) Don’t start the unit while laying on its side in the water. Doing so will
suck in bottom debris and almost certainly ruin the propeller.
3) The JetStream should only be used by adults who are familiar with its
operation.
4) The JetStream should not be run when small children are in the vicinity.
5) If you have an external control box, make sure that it is protected from
the outdoor elements.
6) Do not store or leave the JetStream in temperatures below freezing
when not in use. Water in the motor can freeze and void the warranty.
7) Never stick hands, feet or objects into either end of the JetStream.
8) Finally, do not attempt to eat or stick the JetStream in your eye.
If you have any questions, suggestions, or feedback, please don’t hesitate
to give us a call (952-401-3792)! Customer satisfaction is our top priority!
12

13
Other manuals for JetStream
1
Table of contents
Popular Swimming Pool Vacuum manuals by other brands


8 STREME
8 STREME 5220 manual

Astral Pool
Astral Pool S10 installation manual

Aqua Products
Aqua Products Pool Rover T E1595 operating instructions

Aeffe
Aeffe KEELCRAB AQUAPOOL LIGHT-ONE user manual

Paramount Fitness
Paramount Fitness SwingJet installation guide

Steinbach
Steinbach Pool Professional Poolrunner Battery Pro Performance... ORIGINAL OWNER'S MANUAL