Admiral NT17H6 User manual

Admiral
no frost
ENERGY SAVER
CONTROL
REFRIGERATOR FREEZER
CONTROL CONTROL FREEZER DOOR
I DAIRY SHELVES
ICE CUBE TRAYS FREEZER COMPARTMENT
& STORAGE BUCKET SHELF
CANTILEVER REFRIGERATOR
FAST-FREEZE SHELVES
COMPARTMENT CRISPER DOOR SHELVES
CRISPER
CRISPER REMOVABLE
COVER BASE GRILLE
Please read the enclosed instructions to become better acquainted with your new
model. In order to prevent unnecessary service calls, refer to the self-service check list.
If you do need service, be sure to report the model and serial numbers to the service
man. They are found on the serial plate, located at the upper front left corner of the
liner. Here is a convenient place to record these numbers.
MODEL NO. SERIAL NO.

INTRODUCTION If the floor is not leveland it is necessary The No.9 freezer control setting is recom-
to raise the rear of the cabinet, we suggest mended for short term use only.
We welcome you into the Admiral family rolling the rear wheels on to a piece of ply- Your refrigerator may run for several hours
as an owner of a quality Home Appliance. wood or other shim material,when you first start it. This is normal and
This product was designed, engineered, and Be sure that the two front levelers touch shouldn't be cause for alarm.
manufactured to the highest standards of the floor to lock the cabinet in place. Changing either control will have some ef-
quality and performance.Please read these fect on the temperature of the other corn-
instructions carefully to become better ac- ELECTRICAL CONNECTION partment.
quainted with yournew Admiralappliance. AND GROUNDING In a day or two,you may decide that one
This applianceis designed to operate on a or both compartments should be colderor
nominal115 volt,15 amp.,60 cycleline.
INSTALLATION warmer. If so, adjust the control(s)as in-
There should be a separate, grounded cir-structed in the accompanying chart.
cult,serving this appliance only. DO NOT freshfood control on "5."
LOCATION use an extension cord.T....... • See:................ "5."
If you have agreed to install your new re- POWERSUPPLYCOCO_'-ll_
frigeratoryourself, please follow these help- _T. 3-PRONG (_--I) Refrigerator toe WARM." T,_r_ne_.... food controlt .... t
_f_l(.INOI NGPLUG* number.
Turn fresh food control to next
ful suggestions. Refrigerator too COLD: lower number,
Turn freezer control to next
1. Remove base skids and replace front _) FreezertooWARM."higher number.
levelers.,_ (¢1_
Turn freezer control to next
2.Remove all exterior and interior tape FreezertooCOLD: lowernurnoer.
carefully and retain old tape. Make a _or OFF: Setfreshfoodcontrolon off.
small pad of this tape to pick off any re-
maining tape residues.This will elimi- _ USE OF CONTROLS
nate the need touse dangerous solventsf
GROU_INGTYPE IMPORTANT: EXCEPT WHEN START-
of any kind. WALLRECEPTACLEING, DO NOT CHANGE EITHER CON-
PRONGS ON POWERCORD
3. Removeand discard cantilever shelf"mC*_ONOF TROL MORE THAN ONE NUMBER AT
PLUG MAY BEDIFFERENT ON YOUR MOOEL
packing clipslocated just above each TH*NS.OWN"ERE. A TIME. ALLOW 24 HOURS FOR
shelfwhereithooks onto the frame.To This appliance is equipped with a three- TEMPERATURE TO STABILIZE BE-
remove a clip,wigglesideways and pull pronged grounding plug for your protection FORE RESETTING.
straight out. against possible electrical shock hazards. It
must be plugged into a grounding recepta- ENERGY SAVER CONTROL
LJ__ cle.Where a standard twoprong wall recep- During extremely humid weather, moisture
tacle is encountered, it is the personal re- has a tendency to collect on objects that are
sponsibility and obligation of the customer cooler than the surrounding air,just asdroplets
to have it replaced with a properly grounded of water accumulate on aglass containing an
three-prong wall receptacle. DO NOT, under iceddrink during ahot summer day.This refrig-
any circumstances, cut or remove the third erator is built to exacting standards and,there-
(_ground)prong from the power cord. fore, contains condensate driers that are de-
DO NOT use an adapter plug. signed to minimize any collection of moisture
All U.L. listed refrigerators and freezers are on the cabinet external surface during periods
equipped with this type plug.of high humidity.
4.Select a locationforyour newrefrigera- SAFETY REMINDER ENERGYSAVER
torawayfrom any heat sources.Allow a ON OFF
free flow of air through thefront base If you are not going to useyour old refrig-
grille, erator, be sure to REMOVE THE DOORS so
a child won't be accidentally trapped inside U
5. Your model should not be installed and suffocate. This is required by law in If you live in an area of low humidity, or one
where the temperature will go below many communities, in which the humidity is considerablylower dur-
55°F because it will not run frequently ing certain seasons, you can switch the Energy
enough to maintain proper temperature OPERATION SaverConrolto "ON" whichwill disconnectthein the freezer,condensate driers and decreasethe amount of
electricity you use.
6.For ease of installation,you should leave SETTING CONTROLS Inareasof relatively high humidity, the Energy
a space of about one-half inch between
yourrefrigerator and adjacent walls or Your new refrigerator has two controls.Saver Control in the "OFF" position will mini-
cabinets. One for regulating the temperature in the mize any collection of moisture on the outside
fresh food compartment and one for the surface of the cabinet.
LEVELING IS IMPORTANT f,eezer. The fresh food compartmentand the
A refrigerator will not operate properly freezer compartment controlsare located at WARM CABINET SURFACES
unless it is level and rests firmly on all four thetop front of the fresh food compartment. At times, the front surfacesof your refrig-
corners.Your model has four wheels and a Turn both controls to "No.5"to start your erator cabinet maybe warm to thetouch.
levelingscrew beneath each front corner at refrigerator.This isanormal function of your refrigerator.
the base of thecabinet that can beturned in This featureprevents moisturefrom conden-
sing on the outsideof your refrigeratordur-
or out as required.I ing humid weather. This condition may be
iI• 5 = Inoticeable when you first start your refrigera-
I
_L. tor, during hot weather, and excessive or
lengthy door openings.
LII;1111 •I=,_,=] _I l :(e_-_
5-Normal ENERGY SAVER
9-Coldest ON OFF FEATURES
L_2The fresh food compartment is cooled by
a gentle stream of circulating chilled air.
I===Z-ml
ITo maintainthe natural flavor,moisture
I 6 • 5 • 41and nutrition of fresh foods, we recommend
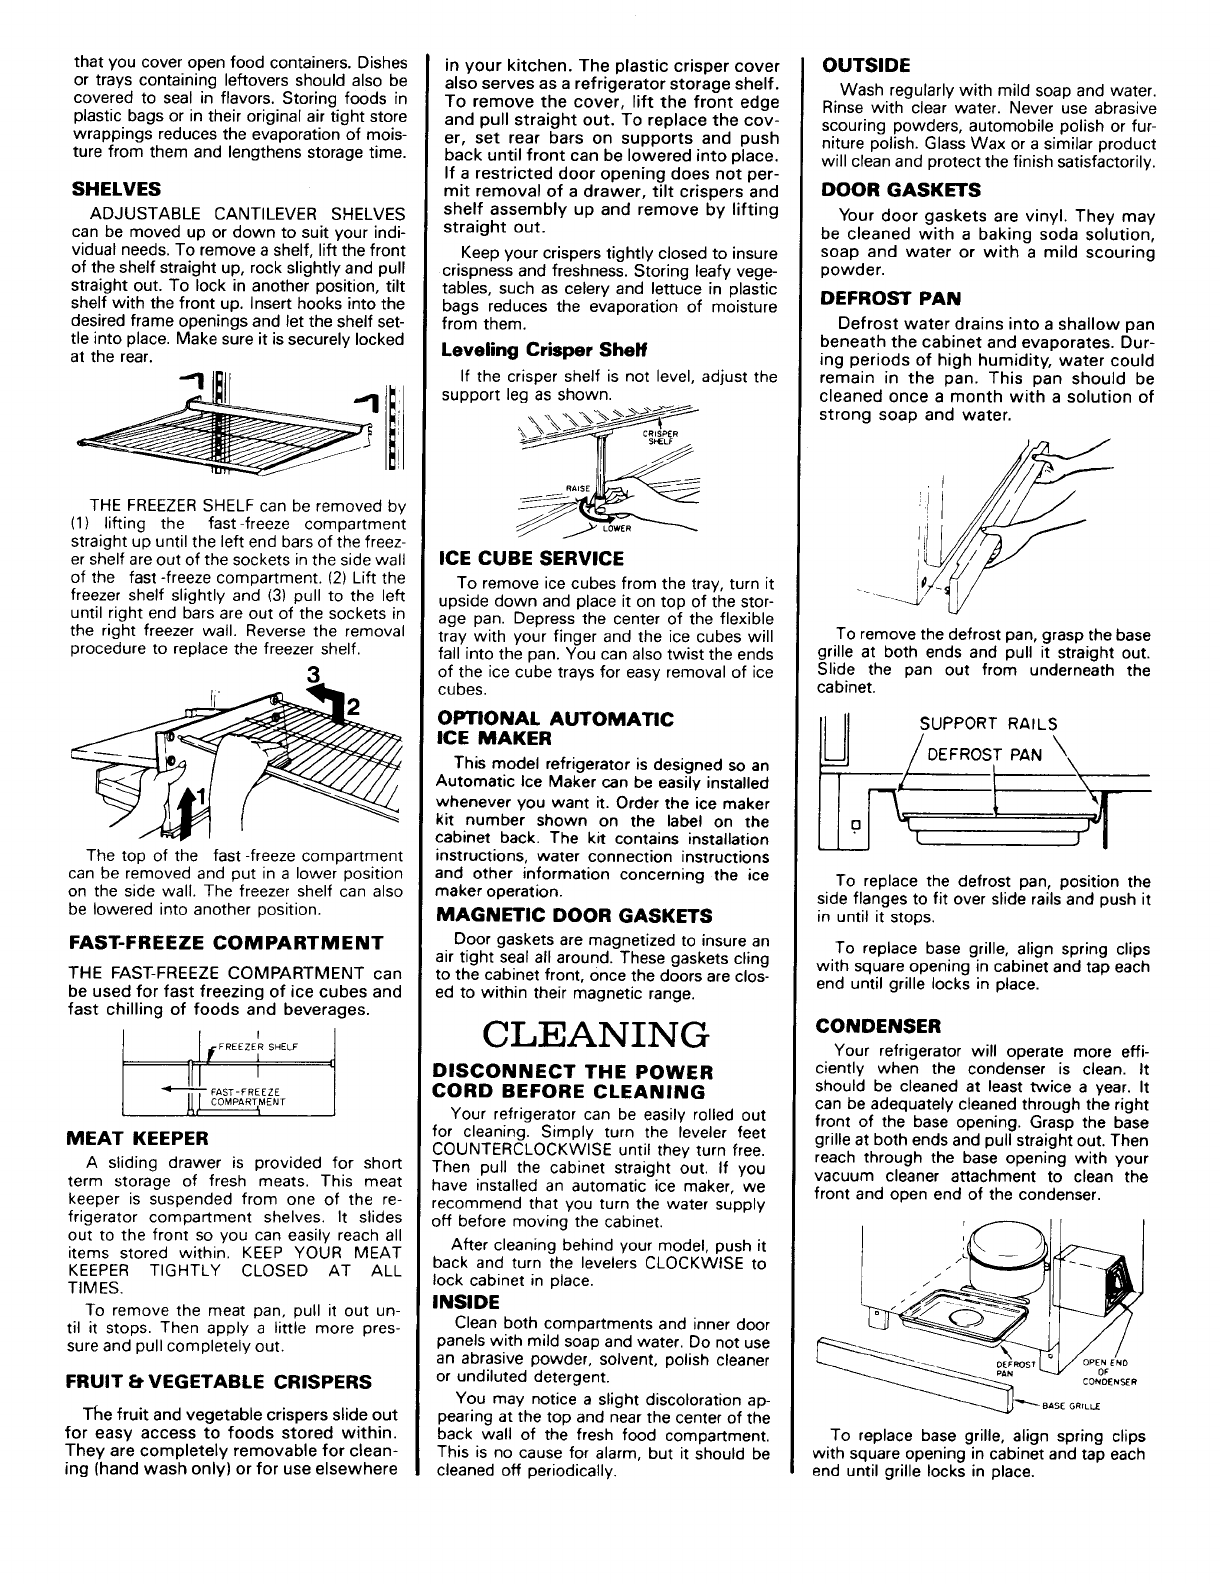
that you cover open food containers.Dishes in your kitchen.The plastic crisper cover OUTSIDE
or trays containing leftovers should also be also serves as a refrigerator storage shelf.Wash regularly with mild soap and water.
covered to seal in flavors.Storing foods in To remove the cover, lift the front edge Rinse with clear water. Never use abrasive
plastic bags or in their original air tight store and pull straight out. To replace the cov- scouring powders, automobile polish or fur-
wrappings reduces the evaporation of tools- er, set rear bars on supports and push niture polish.Glass Wax or a similar product
ture from them and lengthens storage time. back until front can be lowered into place, will clean and protect the finish satisfactorily.
If a restricted door opening does not per-
SHELVES mit removal of a drawer, tilt crispers and DOOR GASKETS
ADJUSTABLE CANTILEVER SHELVES shelf assembly up and remove by lifting Your door gaskets are vinyl.They may
can be moved up or down to suit your indi- straight out. be cleaned with a baking soda solution,
vidual needs. To remove a shelf, lift the front Keep your crispers tightly closed to insure soap and water or with a mild scouring
of the shelf straight up, rock slightly and pull crispness and freshness. Storing leafy vege- powder.
straightout. To lock in another position, tilttables, such as celery and lettuce in plastic
shelf with the frontup.Inserthooks into the bags reduces the evaporation of moisture DEFROST PAN
desired frameopenings and lettheshelf set- from them.Defrost water drains into a shallow pan
tie into place.Make sureit is securelylocked beneath thecabinetand evaporates.Dur-
at the rear. Leveling Crisper Shelfing periods of high humidity,watercould
_ i If the crisper shelf is not level, adjust the remain in the pan. This pan shouldbe
support leg as shown, cleaned once a month with a solution of
\\ _\ %'x_'__ strong soap and water.
,\_,.--_;_ C"!_ER
RAISE _ i
THE FREEZERSHELF can be removed by _,__ !i
(1) lifting the fast-freeze compartment i
straight up until the left end barsof the freez- ! Jl [ //_
er shelf are out of the sockets in the side wall ICE CUBE SERVICE
of the fast-freeze compartment.(2) Lift the To remove ice cubes from the tray, turn it _ _ .,_f7/_.4'_
freezer shelf slightly and (3) pull to the left upside down and place it on top of the stor-
until right end bars are out of the sockets in age pan. Depress the center of the flexible
the right freezer wall. Reverse the removal tray with your finger and the ice cubes will To remove the defrost pan, grasp the base
procedure to replace the freezer shelf, fall into the pan. You can also twist the ends grille at both ends and pull it straight out.
of the ice cube trays for easy removal of ice Slide the pan out from underneath the
li cubes, cabinet.
N i P ORi s
This model refrigerator is designed so an I1 IJ DEFROST PAN _
Automatic Ice Maker can beeasilyinstalled \
whenever you want it. Orderthe ice maker XK-
kit numbershown on thelabel on the g
cabinetback. The kitcontains installation
The top of the fast-freeze compartment instructions, water connection instructions
can be removed and put in a lower position and other information concerning the ice To replace the defrost pan, position the
on the side wall.The freezer shelf can also maker operation, side flanges to fit over slide rails and push it
be lowered into another position.MAGNETIC DOOR GASKETS in until it stops.
FAST-FREEZE COMPARTMENT Door gaskets are magnetized toinsure an To replace basegrille, align spring clips
air tight sealall around. Thesegaskets cling with squareopening in cabinetand tap each
THE FAST-FREEZE COMPARTMENT canto the cabinetfront, once the doorsare clos- end until grille locks in place.
beusedfor fast freezing of ice cubes and ed to within their magnetic range.
fast chilling of foods and beverages.
' CLEANING CO.DENSER
RfFREEZERSHELF ,Your refrigerator willoperate more effi-
. I[I 1 DISCONNECT THEPOWER ciently when the condenser isclean. It
FAST-FREEZE
_,[ COMRA*\,ENr CORD BEFORE CLEANING should be cleaned atleast twicea year. It
can be adequately cleanedthrough the right
Your refrigerator canbeeasilyrolled out front ofthe baseopening.Grasp the base
MEAT KEEPER for cleaning.Simply turnthe leveler feet grilleat both ends and pull straightout. Then
COUNTERCLOCKWISE untiltheyturn free. reach through thebase opening with your
A sliding drawer is provided for short Then pull the cabinet straight out.If you vacuum cleaner attachment to clean the
term storage of fresh meats. This meat have installed an automatic ice maker,we front and open end of the condenser.
keeper is suspended from one of the re- recommend that you turn the water supply
frigerator compartment shelves.It slides off before moving the cabinet, r_ Irr
out to the front so you can easily reach all After cleaning behind your model, push it
items stored within. KEEP YOUR MEAT
KEEPER TIGHTLY CLOSED AT ALL back and turn the levelers CLOCKWISE to _
lock cabinet in place.
TIMES.
To remove the meat pan, pull it out un- INSIDE
til it stops. Then apply a little more pres- Clean both compartments and inner door
sure and pull completely out.panels with mild soap and water. Do not use ___0, EN/'°
an abrasive powder, solvent, polish cleaner
FRUIT _VEGETABLE CRISPERS orundiluted detergent. CL_OE,SERYoumay notice a slightdiscoloration ap- _"_B=SEG,,
The fruit and vegetable crispers slide out pearing at the top and near the center of the
for easy access to foods stored within, back wall of the fresh food compartment. To replace base grille, align spring clips
They are completely removable for clean- This is no cause for alarm, but it should be with square opening in cabinet and tap each
ing (hand wash only) or for use elsewhere cleaned off periodically,end until grille locks in place.
REPLACING CHANGING
LIGHT BULB REVERSIBLE
DISCONNECT THE POWER DOORS
CORD BEFORE REPLACING Thisrefrigerator hasbeen builtwith the
LIGHT BULBS doors hinged on theright. Ifyou wish to
ALWAYS USE A 40 WATT, STANDARD hinge the doors on the left,follow these in-
BASE,APPLIANCE TYPE BULB WHEN RE- structions. If it becomes necessary toreturn
PLACING A LIGHT. thehinges to theright side, merely trans-
pose allreferences to "right" and "left"
whenfollowing these instructions.
TOOLS REQUIRED
ENERGY TIPS Phillipsscrewdriver
End wrench (5/16")
FOR EFFICIENT ENERGY USE. Hex-headsocket screwdriver(5/16")
Tableknife
1. Be sure refrigerator is level and ventila-
tion around front grille is not blocked. CHANGING DOORS
2. Check door seals occasionally for leak- 1. Turn thefresh food control to OFF and
age. Check at various places, top, bot- removeall food from the interior.
tom, sides.2. Remove the handles from the doors and
3. Check the temperature; avoid unneces- set aside. On the side of the doors that
sarily cold settings,youaregoing to install the handles,re-
4. Keep freezer full to near capacity,less move the small round screw hole plugs
with a table knife and press them into
cold air is lost during door openings,the holeson theoppositeside of the
5. Let hotdishescool before puttinginto re- doors.
frigeratoror freezer. 3. Using a socket screwdriver or end
6. Coverliquids;ifuncovered,theunit mustwrench,remove thescrews from theup-
work longer, per hinge. Carefully lift the door (includ-
ing upper hinge)off thecenter hinge
7.Cleanrefrigeratorcondenser coilsat least and placeit on apadded surfaceto pre-
twice a year.vent scratching.Avoid losingthespacer
thatwas between thehingeand thecab-
inet top.
4.Using a table knife, pry the plug button
SAFETY TIPScoverfromtheplasticbushingat the top
of the door. Save the cover for future
use.
1.In caseof powerfailure, minimize door
openings. If powerfailureis of longdura- 5. Lift theupper hinge andthespacer
tion, protectfrozenfood byplacing washers from the door and installthem
blocks of dry iceon topofthe packages, at the opposite corner.
or check with alocal frozenfoods locker
plant about temporarystorage. 6. Position the plug button cover, saved
from step 4, over the old hinge bushing
2. Use the three-pronged plug only with a andpress it into place.
grounding receptacle to provide protec-
tion from electricalshock. 7. Pry out the3plastic plug buttons from
3. Unplug refrigerator before cleaning con-the cabinet top andpress them into the
denser or replacing light bulb. opposite corner.
4. Removethe doors fromout-of-userefrig- 8. Lift the center hinge pin out of the bot-
tom door and center hinge. Carefullylift
erator.Preventa child from becoming ac- the lower door off thelower hinge and
cidentallytrappedand suffocating,place iton apadded surface.If themetal
hinge pin pulls out of the lower hinge
when the door is removed, pull it out of
the doorbottomand press it backinto
the hinge.
GOING ON 9. Remove the centerhinge and spacer
VACATION? from the cabinet.Transfer the two
screws fromtheteft end ofthedivider
bar to the right end. Install the center
If you will begone for amonth or less, hinge and spacer on the left end of the
leave thecontrol knob at its usualsetting, divider bar thesame wayit was installed
on theright end. Tighten both screws
During longer absences,(a) removeall until theyare just snug, then turn them
food,(b) disconnectfrom electricaloutlet, (c) one-half turn more.
clean the refrigerator thoroughly,including
defrost pan,(d) leave doorsopen to prevent
odorformation. Continued On Back

10. Pry theplugcoverfromtheplastic plate. With theforefinger of the other
bushing at thetop of the lower door hand bend the nameplate from therear
and press into theplastic bushing on and it willpop out.Install by bending in
the opposite side of the door.at the front using the rear finger as a
lever.
11. Remove the base grille by graspingat
both ends and pulling itstraight out. W---_=---=O_RAL<_JS¢RT
12. Remove thelower hingeandspacer.
13. Rotatethelower hinge counterclock- :..,_,___V: ,
wise 90°and install it(including
spacer) to theleft leg ofthecabinet. __'_
_NO FROST
22. Invert the handles andinstall on oppo-
"-'" OO O site sides of the doors as shown.
II OI 23.Toreplacethebasegrille,lineupitsspr-
ing clips with the square openings in the
cabinetand tap each endin until the
grillelocks in place.
NOTE: It will take extra effortto install the
screws.The screws are self tapping and will 24.Replace all food and return the fresh
have to cut threads in the screw holes, food control to its usual operating posi-
tion.
14. Pull the metalhinge pin from the side of
the lower hinge and place it, including
the spacer washer, into thetop hole. AVO ID
15.Pry out the twoscrew hole plug buttons UNNECNSSARY
onthe bottom left side ofthe top door
and lower door. Remove the door stopsSERVICE CALLS
(metal plates) on the bottom of each
door and install them onopposite sides. BEFORECALLING A TECHNICIAN,CHECK
Pressin the plug buttons in the holeson THE FOLLOWING LIST FOR POSSIBLE
the right side of both doors_ TROUBLES THAT YOU CAN REMEDY
16. Set the lower door on the bottom hinge, WITHOUT DIFFICULTY.
making sure the hinge pin enters the NOISYOPERATION
bushing in thedoor bottom. • Fan noise--normal air flow.
17. While holding the door in a closed posi-• Defrost pan not positioned correctly
tion,take the center hinge pin that was
removed in step 8, and insert it through • Cabinet not level.
the left hole of the center hinge and into • Weak floor.
the bottom door bushing. Makesurethe
long pin goes into the bottom door and • Dishes rattling against each other
the shortpin goes into the top door,Additional motors and controls are used to
18. Set the upper door on the center hinge, provide the improved performance of this
making sure the hinge pin enters the larger capacity refrigerator.Therefore, nor-
door bushing. When you close this door, real operating sounds may be more noticea-
the gasketshould hold it inplace, ble than on themodel it replaced.
19. Making sure to use the same numberoSIZZLING SOUND IN FREEZER
spacers that were originally used be-
neath theupper hinge, install thehinge • Normal sound caused by defrost water
mounting screws.Beforetightening dripping on defrost mechanism
these screws, make sure the top of the
door is level with thecabinet top,and ICE CUBES EVAPORATE
the spacebetweenthe door is equidis- • Coldair moving over icecubescauses
tant acrossthe entirefront.Avoidover-cubes to shrink when not used regularly
tightening thesescrews. Tighten both
untilthey are justsnug, then turnthem ICE CUBES STICKING IN TRAY
in another one-half turn. •Trays may be coated with residuefilm
from minerals in the water. Wipetrays
20.Examinethedoor gasketall aroundeachwith vinegar-soaked cloth until clean. If
door,making sureno gaps arevisible residueisheavy, cleantrays each time re-
between the gasketand cabinet. Ifagap frigerator is cleaned.
shows, trystretching the gasket away
from the doorsothe magnet will contact WARM AIR FROM
the cabinetsurface. CABINET BOTTOM
21. Remove the nameplates from the door • Normalair flow forcondenser
handles and install them on the opposite
handles as shown. To remove the name- CABINET VIBRATES
plates, remove the frontand back in-
serts from the metal handles. There is a• Cabinet not level
hole in the front insert behind the name- • Weak floor

ODOR IN CABINET CABINET LIGHT NOT WORKING REFRIGERATOR RUNS TOO LONG
•Odor producing foods should be covered •Bulb burned out •Modern refrigerators are larger and run
• Interior needs cleaning • No power at outlet colder, which requires more running time.
• Defrost pan needs cleaning • Prolonged door openings.
FRESH FOOD COMPARTMENT • Control set too cold
MOISTURE COLLECTS ON TOO WARM • Condenser needs cleaning.
OUTSIDE SURFACE • Refrigerator controlset too warm • Poor air circulation around condenser.
•Hot humid weatherincreasbs condensa-• Freezercontrolset at coldest position REFRIGERATOR WON'T RUN
tion.As humidity decreases, moisturewill • Prolonged dooropenings
disappear. • Temperature control turned to OFF.
FRESH FOOD COMPARTMENT • Linecord not plugged in.
FOODS DRY OUT TOO COLD • No power at electrical outlet.
(FRESH OR FROZEN) *Refrigeratorcontrolset too cold • House fuse blown.
• Packages not wrapped or sealed properly. FREEZER COMPARTMENT
• Crispernot tightly closed. TOO WARM IF YOU NEED
• Freezercontrol set too warm
• Prolonged door openings SERVICE
WATER ON FLOOR
UNDER CABINET
• Defrost pan missing or not positioned cor- The model number,serial number, and bill
rectlyREFRIGERATOR RUNS TOO of material(BM) number of your model are
FREQUENTLY listed on a serialplate.TheserialplateisIo-
WATER IN FRESH FOOD • Frequent running provides more stable cated at thelower left sideoftheliner wall
COMPARTMENT BoTroM temperatures nextto thecrisperdrawer or theupperleft
front corner of theliner. Referto all of these
• Cabinet not level•Too many door openings numbersin any correspondencewith your
• Drain tube plugged *Prolonged door openings dealer or distributor concerning your model.
Admiral, whose policy is one of continuous product development, reserves the right to change specifications without notice.
IF YOUR APPLIANCE DOES NOT OPERATE SATISFACTORILY,
FOLLOW THESE FOUR STEPS IN ORDER
1. Check the things you can do yourself. These include being sure the appliance is plugged firmly into an appro-
priate receptacle,checking the fuse and replacing it if necessary.Reread the instruction book toinsure that all con-
trols areset properly and recommendations followed.By doing this you can save money.Many unnecessary service
callsresult in the service technician doing whattheownercould have done himself.
2.Check your dealer or the repair servicehe recommends: Follow the procedure outlined under"To Secure
Warranty Service"in thewarranty.
3, Check the manufacturer at his national headquarters if a satisfactory solution to problem is not reach-
ad in steps 1 and 2. Writeto Master Care,Inc.,Manager,ConsumerRelations Department,P.O. Box2845,Bloom-
ington,Illinois 61701,orcalltoll-free number800-447-8371 (illinoisresidents call 800-322-6302). Be sure to include
thefollowing:Themodelnumber of your appliance,serialnumber of your applicance,purchase date,dealer's name
andaddress, and thenameand address of thelastservice company thatserviced yourappliance.
4. If you are not satisfied with the serviceprovided, write to MACAP,theMajorAppliance ConsumerAction
Panel. MACAP is a group of consumerexperts voicing views at thehighest levels ofthemajor applianceindustry.
MACAP receives comments and complaintsfrom applianceowners,studiesindustry practices,and advises industry
of ways to improve its service to customers. Write to MACAP,20 North Wacker Drive,Chicago,Illinois 60606. Be
sure to includeyourname,address and telephonenumber,kind of appliance,brand,model number, date purchased,
serialnumber,dealer's nameand address,servicing agent's name andaddress if differentfrom dealer'slocation of
appliance,and clearly describetheproblem and service required.
Admiral ..,wooo,,o,o.o.°
Schaumburg.fllmols 60196
Printed in U.S.A. Home Appliances 103780-1
Table of contents
Other Admiral Refrigerator manuals


Popular Refrigerator manuals by other brands

arcelik
arcelik 2171 DY A++ user manual

Sanyo
Sanyo mpr-214f - Commercial Solutions Refrigerator instruction manual

Kenmore
Kenmore 6452 - 14.8 cu. Ft. Top Freezer Refrigerator Use and care guide

montpellier
montpellier MICL122 user manual

GE
GE GTV085PANRSG User and care manual

Amica
Amica GS15454W instruction manual


