Admiral NT21L9A-AA72C User manual

REFRIGERATOR
CONTROL
ENERGY SAVER FREEZER FREEZER
AUTOMATIC _RGY DAIRY
REFRIGERATOR SWITCH SHELF ICE MAKER rE[ CONTROL COMPARTN
CONTROL FREEZER DAIRY FREEZER DOOR & STORAGE :T_HFREEZER
iLIG[_ T CONTROL COMPARTMENTS SHELVES BUCKET iT SHELF
i
| II
i
PACKAGE _l_ADJUST,
DIVIDERS EGG STORAGE DOOR BI
CRISPER CANTILEVER MEAT KEEPER STATIONARY CRISPER CANTILEVER MEAT KEEPER
COVER SHELVES & CONTROL SHELVES COVER SHELVES & CONTROL P'_
CRISPERS CRISPER REMOVABLE CRISPERS CRISPER REMOVABLE Di'
BASE GRILLE BASE GRILLE
The modal you have selected may not have all of these features.
Your new refrigerator is designed to p_
ing and reliable operation. Please res
will helpyou operateand maintain
--_Record the model numberand serial
i MOOEL J SERIAL;clNO I_],cprovided. Theinformation is found ir
_'"'"_ _,sv_0/--_J upperleft side.An example of theseUse and Care Guide forfuturerefe_
.[ Model No.
Operating Instru
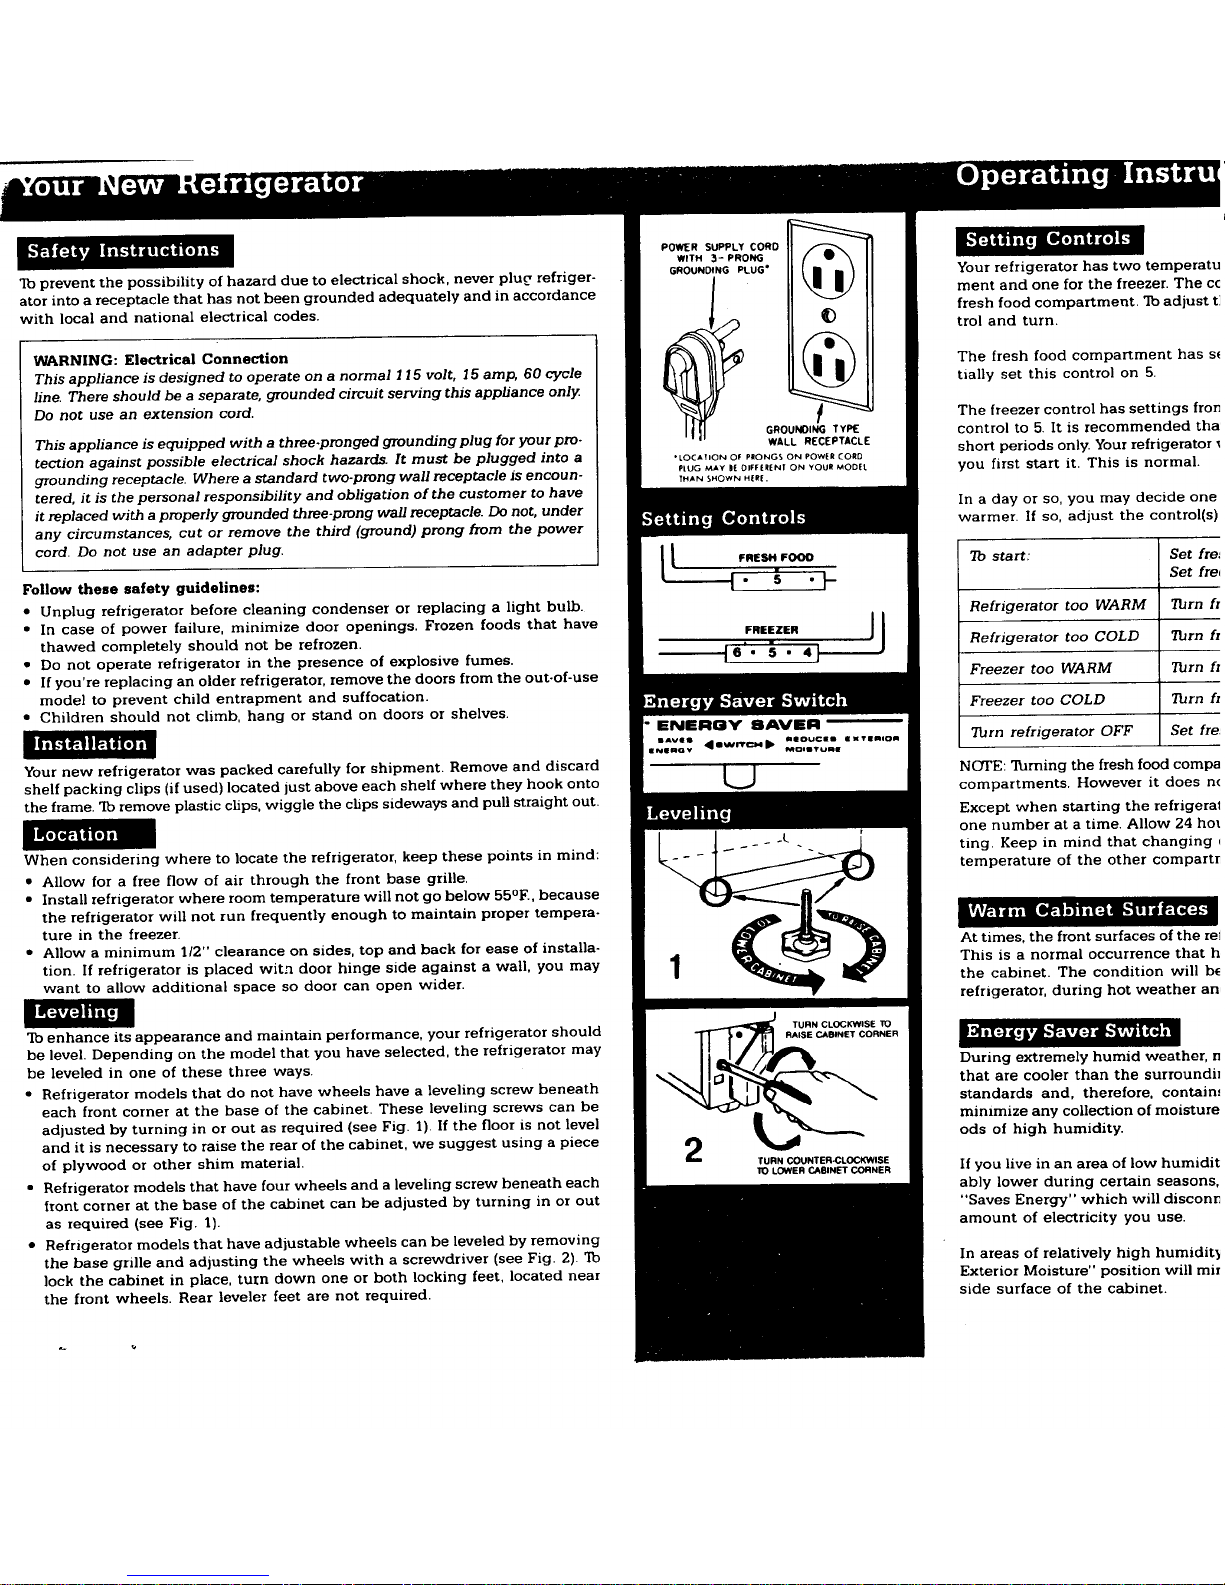
POWER SUPPLY CORD !
WITH 3- PRONG
GROUNDING PLUG"
GROUNOINGTY_
Your refrigerator has two temperatu
To prevent the possibilityof hazard dueto electricalshock, never plug refriger- mentand one forthe freezer. The cc
atorinto a receptacle that has not beengrounded adequately andin accordance fresh food compartment. To adjust t]
with local and national electrical codes,troland turn.
WARNING: Electrical Connection The fresh food compartment has s_
This appliance is designed to operate on a normal 115 volt,15 amp, 60 cycletially set this controlon 5.
line. There should be a separate, grounded circuit serving this applianceonly
Do not use an extension cord. The freezer control has settings fron
control to5Itis recommended tha'
This appliance is equipped with a three.pronged grounding plug foryour pro+WALLR[C[PTACL[ short periods only. Your refrigerator
tection against possible electrical shock hazards.It must be plugged into a "LOC*T,ONOfP,ONGSONPOW_*COP0PLUGMAYB_0P.I,ENtON_OUP_Omt yOU first start it. This isnormal.
grounding receptacle.Where a standard two-prong wall receptacle is encoun- TH*NSHOWNH_,|.
tered,itis thepersonal responsibility and obligation of the customer tohave Ina day or so, you may decide one
it replaced with a properly grounded three-prong wall receptacle.Donot, underwarmer. If so, adjust the control(s)
Setting Controls
any circumstances, cut or remove the third (ground) prong from the power
Follow these safety guidelines: I I" + • }__ Set fre,
•Unplug refrigerator beforecleaningcondenseror replacingalight bulb. Refrigerator too WARM
• in case ofpowerfailure,minimize door openings. Frozen foodsthat have FREEZER JJ RefrigeratortooCOLDlTbrnfr
thawed completely should not be refrozen. I6'o,5 • 4 J
•Donotoperate refrigerator in thepresence of explosivefumes. I
•If you're replacing anolder refrigerator, remove the doors fromthe out+of-useFreezer too WARM ]Turn fr
model to prevent child entrapment and suffocation. Freezer too COLD ] Turn fr
• Children should not climb, hang or stand on doors or shelves. I
Thrn refrigerator OFF ISet fre_
Installation IllOUCll • TllllOm
• PlWrlrcl.I lip _o,ITu"ia•
Yournew refrigerator was packed carefullyfor shipment.Remove and discardU NOTE: 3hmingthe fresh food compa
shelf packing clips (if used) located just above each shelf where they hook onto compartments. However it does n¢
the frame. To remove plastic chps, wiggle the chps sidewaysand pull straight out.Exceptwhen starting the refrigerat
Leveling one number atatime.Allow 24 hoL
Location +-Lting. Keep in mind that changing
When consideringwhereto locatetherefrigerator,keep these points inmind: _._o - _-- _ temperature of the othercompart_
• Allow for a freeflow of air through the frontbase grille.
• Installrefrigerator where room temperaturewill not go below55°E, because
the refrigerator willnot runfrequently enough to maintain proper tempera-
ture inthe freezer. At times,the front surfacesof the ref
•Allow a minimum1/2"clearance on sides, top and back for easeofinstana-This is a normal occurrence that h.
tion.If refrigerator is placed with door hinge side against a wall, you may the cabinet. The conditionwill be
want to allow additional spacesodoor can open wider, refrigerator, duringhot weather an,
I
Leveling
._ll RATlUs_Nc_CLIO_NETK_N_SETURNCLOCKWISETO
To enhance its appearanceand maintainperformance, your refrigerator should RAISECABINETCORNER i_l ll_l[l_tJll%_-'tJ[_ll_lll
helevel. Depending on the model that youhaveselected, the refrigerator may _IDuringextremelyhumid weather, n
be leveled in one of these three ways. _i_ that are cooler thanthesurroundit
•Refrigerator models that donot have wheels have a leveling screwbeneath ___.._ standards and, therefore,contain.,
each front cornerat the base of the cabinet.These leveling screws canbe minimize any collectionofmoisture
adjusted by turningin or out as required (see Fig.1). If theflooris not levelods of high humidity.
and it is necessary to raise the rear ofthe cabinet, we suggest using a piece
of plywood orothershim material.TURNCOUNTER-Ct.OCKWISEIf yOU live in an areaof low humidit
10 LOWERCABINETCORNER
• Refrigerator modelsthat have four wheelsanda leveling screw beneath eachablylowerduring certain seasons,
front corner at the base of thecabinet canbe adjusted by turning in or out"SavesEnergy" which will disconn
as required (see Fig.1).amount ofelectricity you use.
•Refrigeratormodels that have adjustable wheelscan be leveledby removing
thebase grilleand adjusting the wheels with a screwdriver (see Fig.2).To In areas of relatively high humidity
lockthe cabinet inplace, tul:n downone or bothlockingfeet, located near Exterior Moisture"position will mir
the front wheels.Rear leveler feet arenot required,sidesurface of the cabinet.
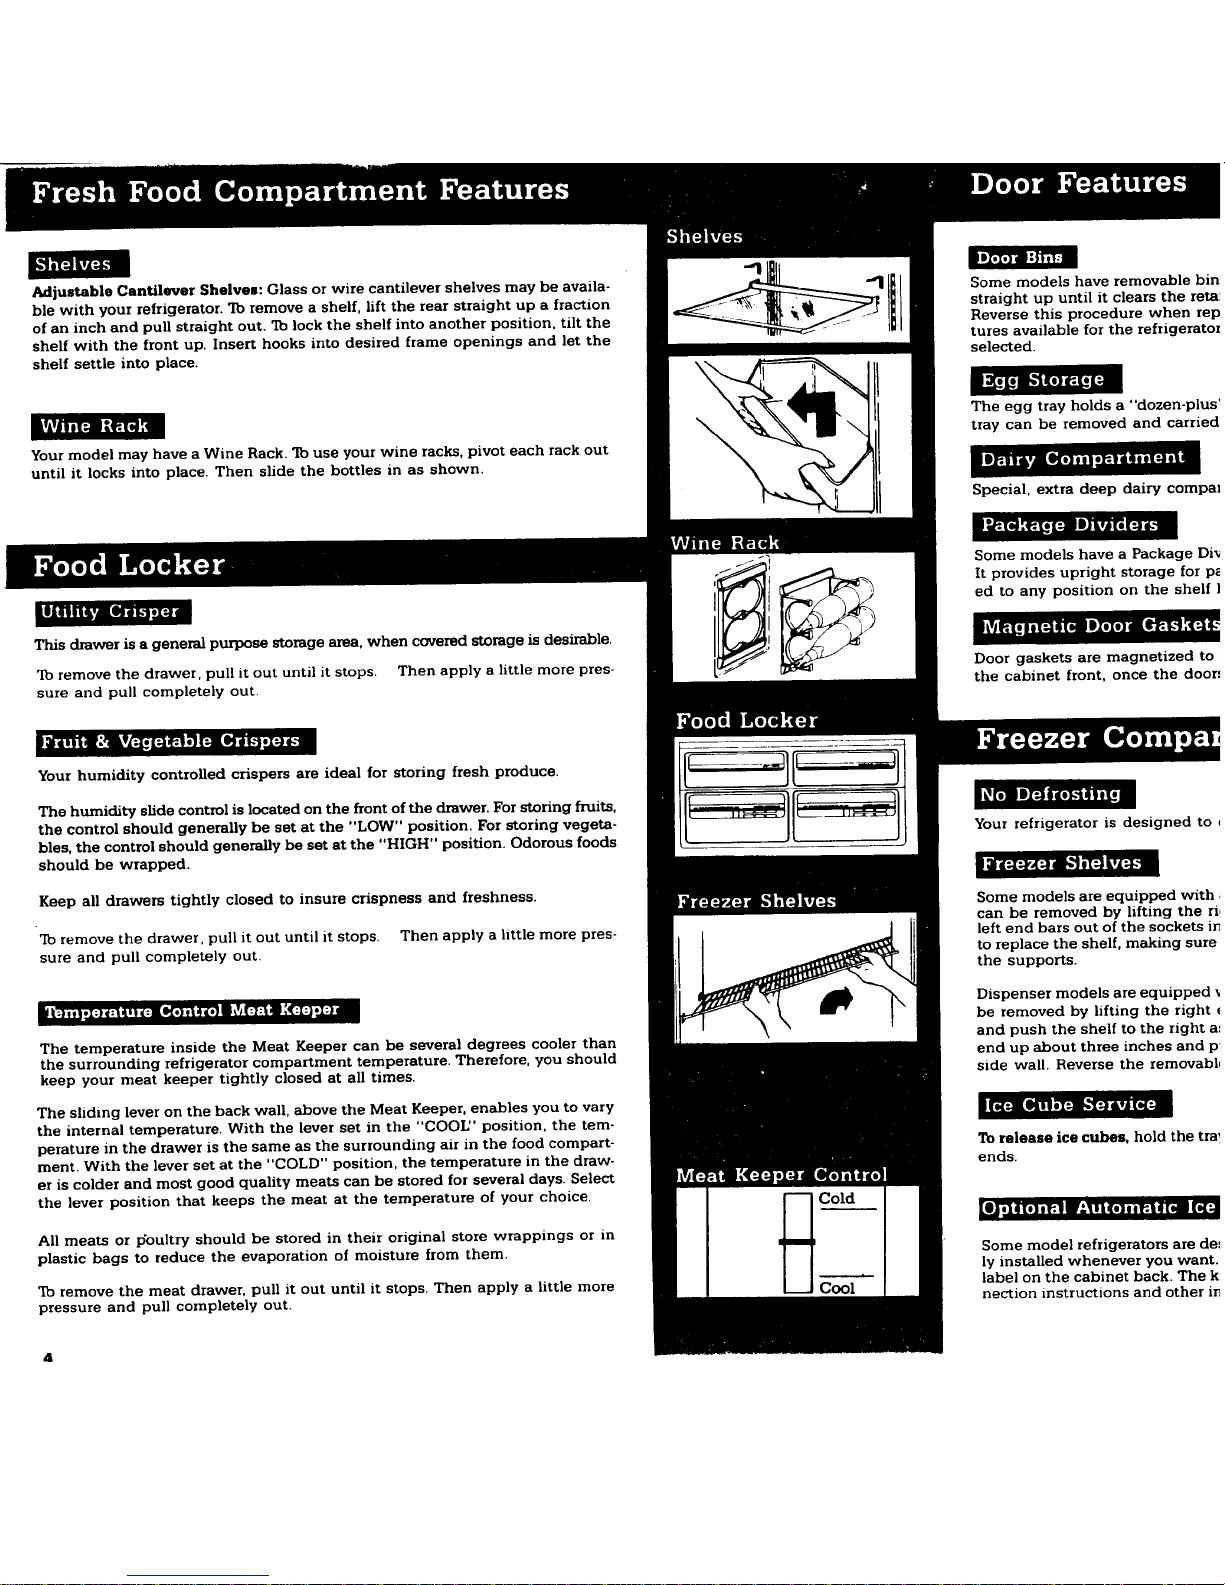
Shelves Door Bins
Adjustable Cantilever Shelves: Glass or wire cantilever shelves may be availa-Some models have removable bin:
ble with your refrigerator. Toremove a shelf,lift therear straight up a fraction straight up until it clears the retai
of an inch and pull straight out. To lock the shelf into another position, tilt the Reverse this procedure when tel:
shelf with thefront up.Inserthooks into desired frame openings and let the turesavailable for therefrigeretol
shelf settleinto place,selected.
Egg Storage
The eggtrayholds a "dozen-plus
tray can beremoved and carried
Yourmodelmay have aWineRack. TO useyour wineracks, pivot each rack out
Wine Rack
Dairy Compartment
until it locks into place. Thenslidethe bottles in as shown.
Special, extra deepdairy compal
/ _ Some models haveaPackageDi_
_-_I_ It provides upright storage forp_
ed to any positiononthe shelf I
_,IILYJ_'P III_Il IIII Ikjlll) IIII'I=I''I '-(_ 4"."
Utility Crisper
This draweris a general purpose storage area,when covered storage is desirable.
To removethedrawer, pull it out until it stops. Then apply a little more pres- Doorgaskets aremagnetized to :
sure andpull completely out.the cabinet front, once the door-'
Yourhumidity controlled crispers are idealfor storing fresh produce. I_---_1"_i I_-----------_JI
Thehumidity slide controlis located on the front of the drawer. Forstoringfruits, Ik'_l_l_ llL+e_'1(ll[il
the control should generallybe set at the "LOW" position, Forstoringvegeta- Your refrigerator is designed to
bles,thecontrol shouldgenerally beset at the "HIGH"position. Odorous foods
should be wrapped.
Keep all drawers tightly closed to insurecrispness and freshness. Some modelsare equipped with
canbe removed by liftingthe ri
To remove the drawer, pull it out untilitstops.Then apply a little morepres- left end bars out of the sockets ir
to replace the shelf,making sure
sure and pull completely out.the supports.
Dispenser models are equipped
beremoved bylifting theright
The temperatureinside theMeat Keepercan be severaldegreescoolerthan and push the shelf to the righta_
the surrounding refrigeratorcompartment temperature. Therefore, you should end up about three inches and pn
keep yourmeat keeper tightly closed at all times, side wall. Reverse the removabh
The sliding lever on theback wall, above the Meat Keeper,enables you to vary llm[=.lll('l'l eI=.ll,,,,",f=..l&+jiol=ml
the internal temperature. With the leverset in the "COOL"position,the tem-
perature in the drawer is the same as the surrounding air in the food compart-To release ice cubes, hold the tra
sent. With the lever set at the "COLD"position,the temperaturein the draw-ends.
eriscolder and most good quality meats can be stored for several days. Select
the leverposition that keepsthe meat at the temperatureof yourchoice. ['_ Cold[l]_.1_l[O]ll:ll:j_11qeilil.=lg[e,il_:. I
U
All meats orpoultryshould be stored intheir original store wrappings or in
plastic bags toreduce the evaporation of moisture from them. Some modelrefrigeratorsare de:
lyinstalled whenever you want.
To removethe meat drawer, pull it out until it stops. Then apply alittlemore_label on thecabinet back. The k
pressure and pull completely out. nection instructions and other ir
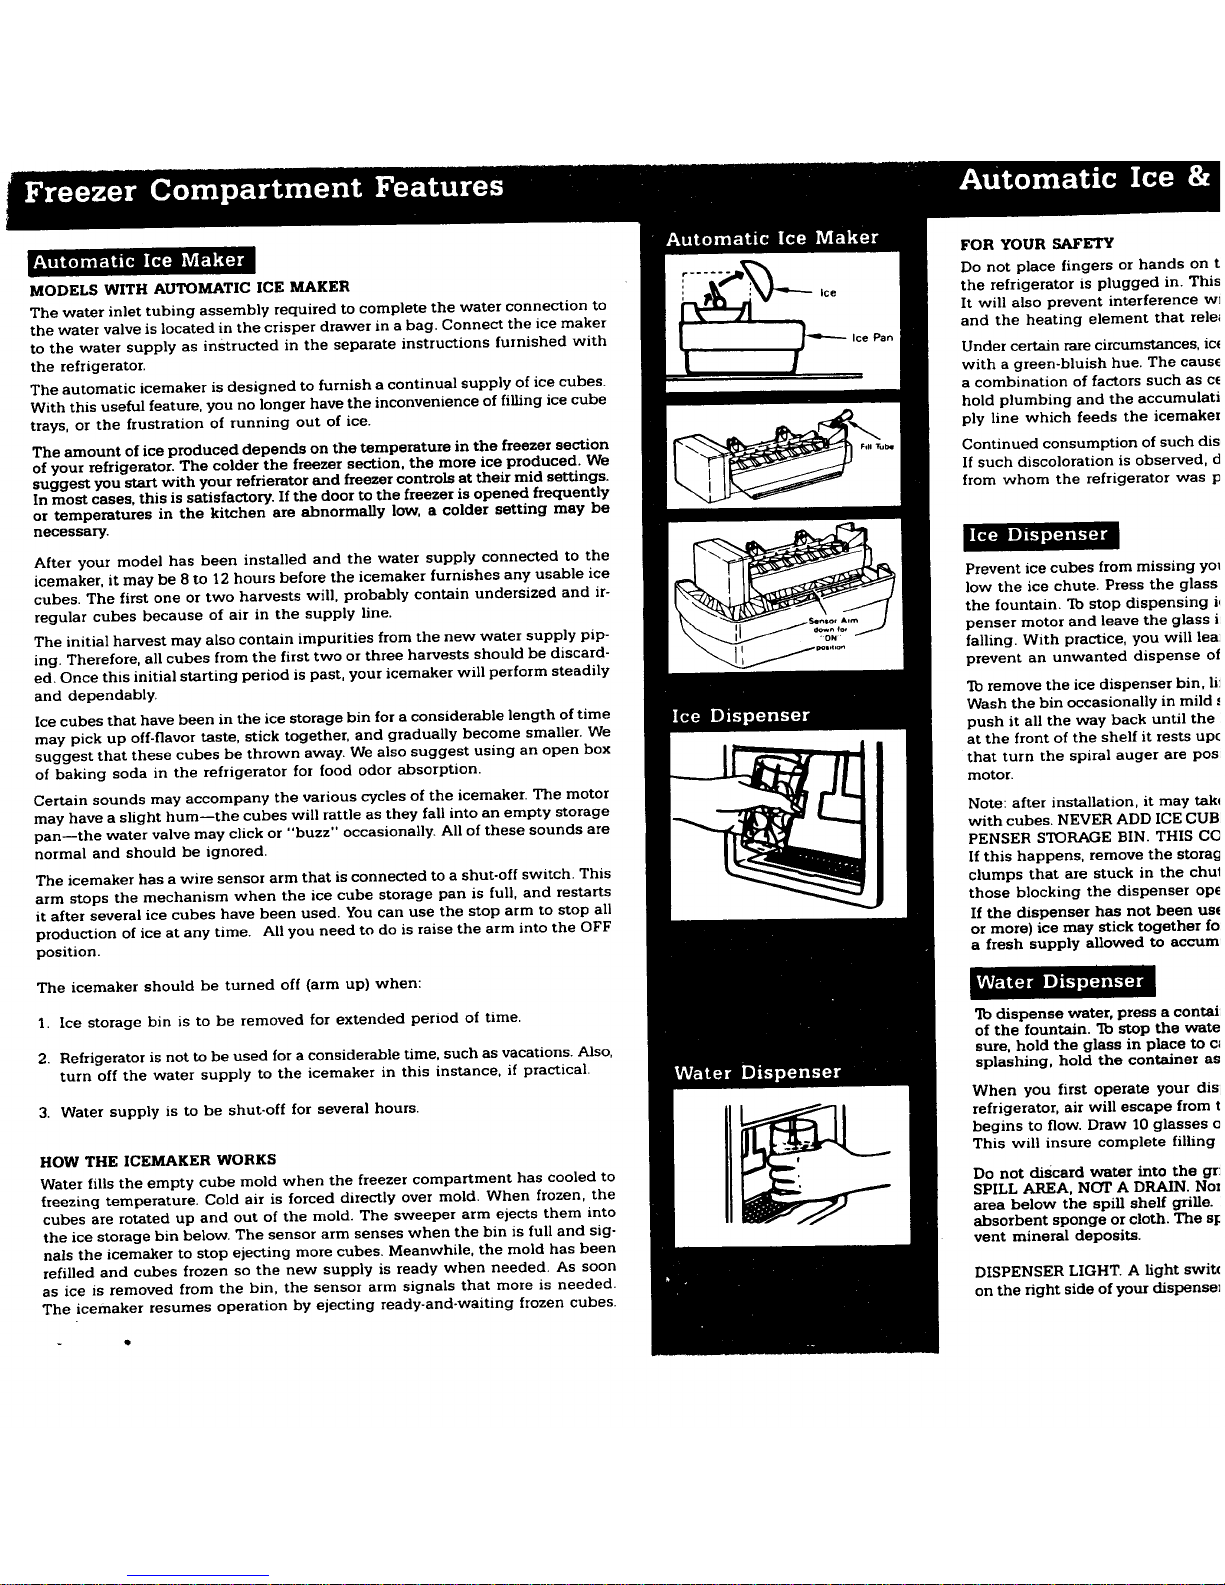
Automatic Ice Maker FOR YOUR SAFETY
Do not place fingers or handson t
MODELS WITH AUTOMATIC ICE MAKER the refrigerator is plugged in.Thi._
ice
The water inlet tubingassembly required to complete the water connectionto It willalso prevent interference w
the water valve islocated in the crisper drawerinabag, Connect the ice makerand the heating element that rele_
to thewater supply as instructed intheseparate instructions furnished with Joe Pa_
the refrigerator.Under certain rare circumstances, ic_
with agreen-bluish hue. Thecaus_
The automatic icemaker is designed to furnish acontinual supplyof ice cubes,a combination of factors such as cE
With this useful feature, youno longer have the inconvenience of filling ice cube hold plumbing and the accumulati
trays, or thefrustration ofrunning out of ice._ __ ply line which feeds the icemaker
The amount of ice produced depends on the temperature in the freezer section _ b, Continued consumption of such dis,
of your refrigerator,The colder the freezer section, the more ice produced. We If such discoloration is observed,(
suggest you start with your refrierator and freezer controlsat theirmid settings.
Inmost cases, thisis satisfactory. If the door to thefreezer isopened frequently from whom the refrigerator was
or temperaturesin the kitchenare abnormally low,a colder setting may be
necessary. Ice Dispenser
After your model has been installed and the water supply connected to the
icemaker, it may be 8 to 12 hours before the icemaker furnishes any usable ice Prevent ice cubes from missing yo_
cubes. The first one or two harvestswill, probably contain undersized and it- low the ice chute. Press the glass
regular cubes because of airin the supply line.the fountain. To stop dispensing i,
The initial harvest may also contain impurities from the new water supply pip- penser motor and leave the glass i
ing.Therefore,all cubes from the first two or three harvests should be discard- falling. With practice, you will lea
ed. Once this initial starting period is past,your icemaker will perform steadily prevent an unwanted dispense of
and dependably. To remove the ice dispenser bin, li:
Ice cubes that have been in the ice storage binfor a considerable length of time Wash the bin occasionally in mild ,,
may pick up off-flavor taste, stick together,and gradually become smaller. We push it all the way back until the
suggest that these cubes be thrown away. We also suggest using an open box at the front of the shelf it rests up¢
of baking soda in the refrigerator forfood odor absorption, that turn the spiral auger are pos
motor.
Certainsounds mayaccompany the various cycles of the icemaker.The motor
may have a slight hum--the cubes will rattle as they fall into an empty storageNote: after installation, it may tak
pan--the water valve may click or "buzz"occasionally. All of these sounds arewith cubes. NEVER ADD ICE CUB
normal and should be ignored. PENSER STORAGE BIN.THIS CC
If this happens, remove the stora_
The icemaker has a wiresensorarmthat isconnected to a shut-off switch. This clumps that are stuck in the chu _
arm stops the mechanism when the ice cube storage pan is full, and restartsthose blocking the dispenser op_
it after several ice cubes havebeen used. Youcan use the stop arm to stop all If the dispenser hasnot been us_
production of ice at any time. All you need to do is raise the arm into the OFF or more) ice may stick together fo
position,afreshsupply allowed to accum
The icemakershould be turned off (arm up) when:
1. Ice storage binisto be removed for extendedperiod of time. To dispense water, press acontai:
of the fountain. To stop thewate
2. Refrigeratorisnot to be used for a considerable time, such asvacations. Also, sure,hold the glass in placeto c_
turn off thewater supply to the icemakerin this instance,ifpractical, splashing, hold thecontainer a.'
Whenyou first operate yourdis
3.HowWatersupply is to be shut-off for severalhours.THEICEMAKER WORKS I1_ Thisbeginsrefrigerator'air will escape fromlwilltOinsureflow.DraWcomplete10glassesfilling¢
Water fills the empty cube mold when the freezercompartment has cooled to Do not discard water into thegr
freezingtemperature. Cold air is forced directly overmold. When frozen, the SPILL AREA, NOT A DRAIN.No1
cubes are rotated up and out ofthe mold. The sweeper arm ejects them into areabelow the spill shelf grille.
the ice storage bin below. The sensor arm senseswhen the bin isfull and sig- absorbent sponge or cloth. The s_
nalstheicemakerto stop ejecting more cubes.Meanwhile,themold hasbeen vent mineral deposits.
refilled and cubes frozen so the newsupplyis ready when needed. As soon
as ice is removed from the bin, the sensorarmsignals that more is needed. DISPENSERLIGHT. Alight swit_
The icemaker resumes operation byejecting ready-and-waiting frozen cubes, onthe right side of yourdispense|
t
DISCONNECT THE POWERCORD BEFORE REPLACING LIGHTBULBS. Always , J//_.,.--- (Non-Dispenser Models Oz
use a40 watt, standard base,appliance type bulb when replacing a light.
DISPENSER LIGHT - DISPENSER MODELS ONLY. For replacement, use a 120V, This refrigerator may have been bui
7 watt bulb. Disconnect the power cord before replacing the light bulb. to the left. Referto the instructio
Tools Required
DISCONNECT POWER CORD BEFORE CLEANING. Your refrigerator can be Phillips screwdriver He:
moved out for cleaning.If yourmodel has anautomatic ice maker, werecom- End wrench . 5/16" Put
mend that youturn the water supply off before moving the cabinet. T27 Torx Driver
After cleaning behind yourmodel, push it back and turnthe levelers clockwise
to lock cabinet in place.
Inside REMOVE To Change theDoors
Clean both compartments and inner door panels with mild soap and water.DO TAPPINGPLATE1.Turn the fresh food control to
NOT use an abrasive powder, solvent,pohsh cleaner or undiluted detergent. REMOVE_._", food fromthe interior.
Use bakingsoda and warm water only on interior compartmentsand interior SCREW 2.Removethe handles fromthe q
door linen. Rinse with clearwater. Donot wash interior partsin yourdishwasher.
Be sure to wring out excess water fromthe sponge or cloth when cleaning in that youare goingto installthe
thearea of controls,lightsorelectrical parts, plugs with a putty knife and p
of the doors.
Youmay notice a slight discoloration appearing at thetop and near thecenter3.Using a socket screwdriver or
of the back wall of the fresh food compartment.This isno causefor alarm, butper hinge. Carefully lift thedog
it should be cleaned off periodically, and place it on a padded surl
Glass shelves can be removed and completely immersed in warm water. AL- spacer that was between the
LOW GLASS TO WARM TO ROOM TEMPERATURE BEFORE IMMERSING. HINGE SiDE4. Using a putty knife, pry the p]
REMOVE TAPPING PLATE the top of the door.Save the
Outside5. Lift the upper hinge and the s!
Keep the finish clean. Wipe with a clean, soft cloth lightly dampened with kitch-
en appliance wax or mild liquid dishwashing detergent. Dry and polish with INSTALL at the opposite corner.
-TAPPING PLATE6. Position the plug button cover
a clean,soft cloth. Do not wipe the refrigerator with a soiled dishwashing cloth
or wet towel. These may leave residue that can erode the paint. Do not use scour-_"_NSTALL ing and press it into place.
ing pads, powdered cleansers,bleach or cleaners containing bleach because 7. Pry out the three plastic plug 1
these products can scratch and weaken the paint finish, into the opposite corner.
Protect the paint finish. The finish on the outside of the refrigerator is a high-8. Unscrewthe hinge pin out of t
quality,baked-on paint finish. With proper care, it will stay new-looking and Carefullylift the lower door o:
rust-free for years. _surface• If the metalhinge pin
You door gaskets are vinyl. They may be cleaned with a baking soda solution, is removed, pull it out of the d
soap and water or with a mild scouring powder• 9. Remove the center hinge and
OPPOSITE SIDE screws from the left end of the
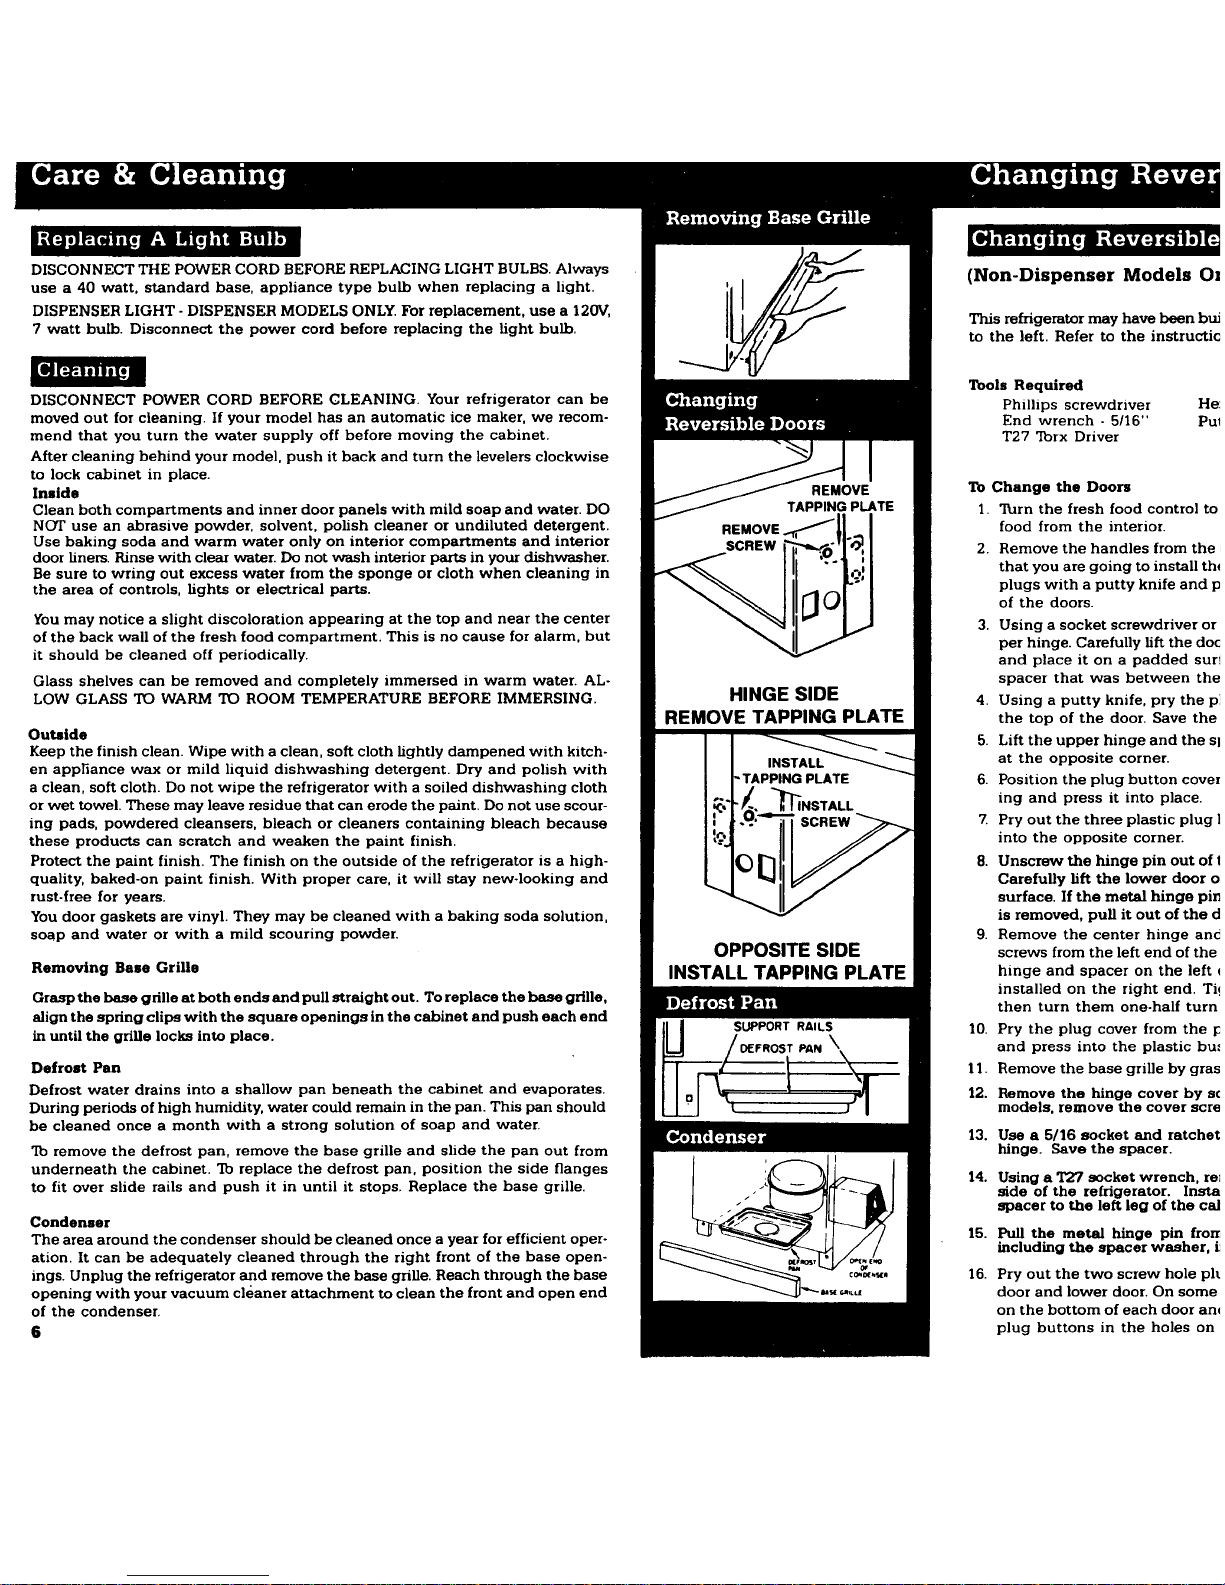
Removing Base Grills INSTALL TAPPING PLATEhinge and spacer on the left (
Grasp the base grille at both ends and pull straight out. To replace the base grille, installed on the right end.Ti!
then turn them one-half turn
align ths spring clips with the square openingsin the cabinet and push each end |SUPPORTRAILS 10. Pry the plugcover from the p
inuntil thegrinslocks into place.
tI/DEFROSTPAN _ and press into the plastic bu_
Defrost Pen _ 1 _--- 11. Remove the base grille by gras
Defrost water drains into a shallow pan beneath the cabinet and evaporates. 12. Remove the hinge cover by s¢
During periods of high humidity, water could remain in the pan. This pan should L models, remove the cover scre
be cleaned once a month with a strong solution of soap and water. 13. Use a5/16 socket and ratchet
To remove the defrost pan, remove the base grille and slide the pan out from , ,, . hinge. Save the spacer•
underneath the cabinet. To replace the defrost pan, position the side flanges I,i__-_ I 14.Using aT27 socket wrench,re]
to fit over slide rails end push it in until it stops. Replace the base grille, side of the refrigerator. Insl_
spacerto the left legof the cat
Condenser
The area around the condenser should be cleaned once a year for efficient oper- 15. Pull the metal hinge pin from
ation. It can be adequately cleaned through the right front of the base open-_• 0_,, including the spacerwasher, h
ings.Unplug the refrigerator and remove the base grille.Reach through the base_ _-,16.Pry out the two screwhole plt
opening with your vacuum cleaner attachment to clean the front and open end _
,,_ _ door and lowerdoor• Onsome
of the condenser,on the bottom of each dooran(
6plug buttons in the holes on

Going On Vacation?
17. Set the lowerdoor on the bottomhinge, making sure the hinge pin enters
the busing in the doorbottom. Ifyou will be gone fora month or ]
18. While holding thedoor in a closed position,take the centerhinge pin that ting.During longerabsences:
was removed in step 8, and screw it through the left hole of the centerhinge
and into the bottom door bushing. Make surethe long pin goesinto the
bottom door mad the short pin goes into thetop door. ._._TR_. u..d)'_ _ "_ 1. Remove all food.
19. Set the upper door on the center hinge, making sure the hinge pin enters __-_2. Disconnect from electrical outle
the door bushing.When you close this door, the gasket should hold it in
place. 3. Clean the refrigeratorthorough
20. Makingsure to use the same number ofspacers that were originally used
beneath the upper hinge, install the hinge mounting screws. Before tight- 4.Leave doors open to prevent oc
ening these screws, make sure the top of the door is level with the cabinet :_ How To Obtain Heplac_
Parts &Service
top, and the space between the door is equidistant across the entire front.
Avoid overtightening these screws. Tighten both until they are just snug
then turn them in anotherone-half turn.Problems? Save yourselfthe nuisa_
21. Examinethedoor gasket all around each door, makingsureno gapsareProblem SolvingTableon theback
visible bet_veenthe gasket and cabinet. If a gap shows,trystretchingthe
gasketaway from thedoor. Themagnetwill contact the cabinet surface. Themerchandise you have purcha
22. On somemodels, remove thenameplatesfrom thedoorhandlesand install and manufactured under strict qua
themon oppositehandles as shown. Theremoval andinstallation ofthetoryand dependableoperation. H,
nameplateswill vary. On certain models, removethescrewsthat attach themay occasionallyrequireadjustmer
nameplates and install themonthe opposite handles.On other models,the you everneed assistance please c
nameplates are removed by inserting a blunt instrument through the hole purchased the refrigerator.
in the back of the handle and popping them out. Install the nameplates Provide the following:
on the oppositehandlesby inserting thetop of the nameplate into the slot -n_ TR_M0fU.®al
and pushingin at thebottom. "_"--_ --_ "_
23. Invert the handles and install onopposite sides of the doors as shown. 1. Model, serial numberand all c
24. Toreplace the base grille,line up its spring clips with the square openings2.State briefly the trouble you a]
in the cabinet and tap each end in until the grille locks inplace.
25. Heplace all food and return the fresh food control to its usual operating
position.Should youstill have a problem al
| _10l'_lO-_,i_,_._'J I0I,II IllI ,I_'_ MajorApplianc
20 NoJ
Chit
• Be surerefrigeratoris level and ventilation around front grille isnot
blocked.
MACAP is anindustry sponsored
• Check door seals occasionally for leakage. Check at various places, top, who receive and act on complair
bottom, sides.
/VOTE:When writing aboutan un
•Check the temperature, avoid unnecessarily cold settings,following information:
• Keep freezer full to near capacity. Less cold air is lost during door a) your name, address an
openings. b) model number, series 1
• Let hot dishes cool before putting into refrigerator or freezer, side ofrefrigerator con
•Cover liquids. If uncovered, the unit must work longer, c) name and address of¢
d) a cleardescription of |

Problem Solving Table Check TableBefore Calling For Service
P
5_/__ LOCATION WARM AIR FROM FREEZER COMPARTMENT-
•Do not installrefrigerator CABINET BOTTOM TOO WARM
where temperature falls • Normal air flow for*Freezer control set too
below 550. condenser circulation, warm.
•Prolonged door openings.
NOISY OPERATION FRONT CABINET SURFACE
•Sound level is more WARM TO THE TOUCHCABINET LIGHT
NOT WORKING
noticeable due to many •Special design to limit
features, condensation during •Bulb burned out
•Cabinet not level, periods of high humidity. • No power at outlet.
• Fan motor noise is normal.
•Weak floor ODOR IN CABINET WATER APPEARS ON
•Food left uncovered. BACK WALL OF
CABINET VIBRATES •Check crisperfor spoiled FRESH FOOD SECTION
•Normal function during
•Cabinetnot level, food. defrost cycle Water flows
• _bing vibration.
•Defrost pan not properly FOODS DRY OUT to the bottom of the
installed. (FRESH OR FROZEN) compartment and drains
•Weak floor.*Packagesnot wrapped or rote the defrostpan
sealed properly. WATER IN FRESH FOOD
WATERON FLOOR • Crisper not tightly closed COMPARTMENT BOTTOM
UNDER CABINET •Temperature controlset too • Cabinet not level
•Defrost pan missing or not cold. •Drain tube plugged.
positioned properly.Remove
base grille to gain access_EXCESSIVE MOISTURE iCE CUBES EVAPORATE
•Defrost pan needsto be IN CRISPER •Cold airmoving overice
emptied due to high • Food notwrapped properly_cubescauses shrinkage,
humidity conditions. •Hot,humid weather especially with limited
SIZZLING SOUND MOISTURE ON OUTSIDE usage.
IN FREEZER SURFACE ICE CUBES STICKING
• Normal sound caused by• This condition can occur IN TRAY
defrost water dripping on during hot and humid • l_ays may be coated with
defrost heater, weather and may be most residue film from minerals
evident during the morning in the water Wipetrays
REFRIGERATOR RUNS TOO hours, with vinegar-soaked cloth
FREQUENTLY •Check energy saverswitch until clean. If residue is
• Frequent running provides position, heavy,clean trays each
more stable temperatures, time refrigerator is cleaned.
•Too many door openings. MOISTUREON INSIDE
•Prolonged door openingsCABINET WALLS AUTOMATIC iCE MAKER
•Can occur during hot,NOT OPERATING
REFRIGERATOR RUNS humid weather with •Stop arm in OFF position.
TOO LONG frequent or prolonged door •Water supply turned off.
•Under normal conditions openings. •Waterpressure too low.
modern refrigerators runa•Door not closing properly. • Freezer too warm
greater percentage of the
time. FREEZER NOT FREEZING ICE DISPENSER
•Warm room temperature. PROPERLY NOT OPERATING
•Prolonged orfrequent door (ice cream, concentrated juice)•Ice )amin the dispenser.
openings. •Productswith high sugar •Ice makernot operating.
•Condenser needscleaning, content may not harden
See detail in operating completely whenfrozen. WATER DISPENSER
NOT OPERATING
manual. FRESH FOOD COMPARTMENT
REFRIGERATOR WON'T RUN TOO WARM : Water supply turned off.
Water pressure too low.
• Temperature control turned •Refrigerator control set too
to OFF warm.
•Powercord not plugged in. *Freezer control set at
• No power at electrical coldest position
outlet. • Prolonged door openings.
• House fuse blown or circuit FRESH FOOD COMPARTMENT
breaker tripped.
•Refrigerator is inautomatic TOO COLD
defrost for approximately •Refrigerator control set too
20 minutescold.
Printed in USA
The manufacturer, whosepolicy isone of continuous product development, reserves the right to changespecifications with
8
This manual suits for next models
5
Table of contents
Other Admiral Refrigerator manuals


