ADO A20 Owner's manual
Attention!
Please keep the instruction manual properly!
To ensure your safety, please read the
instruction manual carefully before using
the electric bicycle to better understand the
performance of the electric bicycle.
ADO EBIKE
USER MANUAL BOOK

02
Required preface
Dear user friends:
First of all, thank you for choosing to buy our products. All the staff of our company
express their heartfelt thanks for your choice! This manual will introduce you to the
common sense and maintenance methods of electric bicycles produced by our compa-
ny. Please read the manual carefully after purchasing to understand the performance,
characteristics, precautions and maintenance common sense of this bicycle, make sure
you use the electric bicycle safely in the best driving condition.
In order to ensure the safety of using our electric bicycle, please be sure to use our
professional spare parts. If you have any questions, please contact our authorized
service station or our company.
Dear users, when purchasing the products of our company, please fill in the" electric
bicycle sales (warranty) registration card" in detail completely and clearly and keep the
"user warranty" properly, deliver the other two copies to the company's resident service
station or distribution unit so that we can contact and serve you in time.
★Important Tips
1.The patterns and text descriptions of this manual are only used as instructions for
operation and are not used as the basis for inspection of products;
2.The illustration in this manual may not match the actual product, and the actual sales
style shall prevail;
3.The company has the right to improve product performance and related configura-
tions without prior notice;
4.This vehicle can only ride alone, and do not carry people.
Your choice-the beginning of our service!" In the following days,we will wholeheartedly
provide you with convenient,timely, fast and satisfactory service! Please read the
instructions carefully before using, and do not use it before knowing the characteristics
of this car (please read carefully for the terms of "danger", "warning" and "attention").
Danger: ignoring this warning can lead to personal accidents. In order to reduce
the harm to yourself or others, special warning must be done or not allowed to do.
Warning: ignoring this warning can cause damage to the vehicle and its equipment,
especially notifing what to do or not to do.
Note: ignoring this warning may cause slight damage to the vehicle and its
equipment or the vehicle cannot run normally, telling what to do or what not to do.

03
Special tips for using security
Dear users, for your safety and prevention of safety accidents, please read and follow the following
tips:
I.When using electric bicycles, you should abide by traffic regulations and pay attention to driving
safety.
(1)It is forbidden for people under 16 years old to drive electric bicycles on the road;
(2)E-bikes should be driven on non-motorized lanes, lower than the maximum speed specified by
local laws and regulations.
(3)Do not lend electric bicycles to people who will not operate to avoid injury;
(4)Electric bicycles shall carry personnel or articles according to laws and regulations;
(5)It is recommended to wear a helmet when riding;
(6)Riding in rainy and snowy days, the braking distance will be prolonged, pay attention to slow
down; Heavy rain and other bad weather, try to avoid traveling.
II. Please pay attention to the safety of electric bicycles.
(1)Electric bicycles should not be parked in the building foyer,evacuation stairs, walkways and
safety exits;
(2)Electric bicycles should not be charged and parked in residential buildings, and should be kept
away from combustibles when charging, and the charging time should not be too long;
(3)Correct use and maintenance of battery:
Please charge the battery for 12 hours for the first time after purchase or long-term storage.
When using it normally, charge it for 12 hours every two months. When not in use for a long time,
please separate the battery from the vehicle power cord, supplement every half a month.
It is forbidden to short circuit the positive and negative poles of the input and output terminals
of the battery pack;
Keep away from children, fire sources and heat sources, and it is forbidden to put the battery
pack into the fire;
Strenuous vibration, impact and extrusion of the battery are strictly prohibited;
Pay attention to waterproof to prevent battery pack from being exposed to water shower and
immersion;
The battery pack should be charged with use. When not in use for a long time, be sure to
remove it from the whole vehicle for storage;
The battery pack should be stored in a clean,dry and ventilated place, and should avoid
contact with corrosive substances, away from fire sources and heat sources;
Warm tips!
1.Water inlet is not guaranteed, please use the original charger to charge;
2.Do not charge in the kitchen, living room, bedroom and other domestic places;
3.It is recommended that the battery life cycle be 2 years to avoid damage caused by aging.
Storage Conditions of battery pack: ambient temperature -20~55°C; Ambient humidity≤
65%RH.The temperature of battery operation: -10~45°C.
Danger: waste batteries shall not be dismantled without authorization, and shall not be
discarded at will to avoid environmental pollution;The waste batteries of this product shall
be recycled by the enterprise or distributors or government designated outlets
Warm tips!
1.Water inlet is not guaranteed, please use the original charger to charge;
2.Do not charge in the kitchen, living room, bedroom and other domestic places;
3.It is recommended that the battery life cycle be 2years to avoid damage caused by aging.

04
Special tips for using security
(4)safe use method of charger:
It is forbidden to place any items on the charger;
It is forbidden to put any liquid or metal into the charger;
It is strictly prohibited to disassemble and modify the charger;
When charging, insert the output of the charger into the charging port of the battery pack first,
and then insert the AC power plug of the charger into the Mains socket; It is forbidden to plug and
remove the power plug with wet hands;
Do not use the charger when thunder and lightning;
Do not play with the charger and battery pack when charging;
Do not use the charger in unstable, excessive lampblack and dust and excessively humid
environments;
Keep good ventilation and heat dissipation conditions when the charger works, and avoid using
the charger in direct sunlight;
When the output of the charger is not connected to the battery pack, do not connect the
charger to the mains for a long time;
During the charging process, the indicator light of the charger is red. When the indicator light
turns green, continue charging for 2 hours to be fully charged;
The normal charging time is 3-10 hours (no more than 12 hours), and the fast charging station
is not allowed to charge.
(5)Precautions for washing:
When washing the bicycle, do not directly splash water on the brake drum, motor and front and
rear axle to prevent water from affecting the service performance and life;
Do not use steam or high-pressure water pipes when washing bicycle ;
Pay special attention to the working condition of the brake after cleaning the vehicle or driving
in the water. After cleaning or driving in the water, the braking effect may decrease. At this time,
pay attention to safety when driving slowly.
(6)Adjustment of handlebar and saddle (if applicable);
When adjusting the handlebar or saddle, be careful not to expose the safety line mark of stem
and saddle pipe;
After adjusting the horizontal pipe, stem, saddle and saddle pipe, pay attention to fastening,
and the recommended torque is 18N.m.
Note: when replacing the charger, it should match the battery model;The special charger
provided by our company must be used, and other Chargers are not allowed to charge the
battery pack.

05
Precautions before riding
Dear users, for your safety and to prevent safety accidents, please do the following checks before
riding. If there is any abnormality,please repair it in time or find a professional repair!
(1)Inspection of power supply circuit and lighting circuit:
Check whether the power supply circuit, lighting circuit and device are damaged; Turn on the
power supply, operate the lighting switch, check whether the headlights and taillights are on, and
whether the brightness of the headlights and taillights is normal;
Check the front and rear brake handlebars respectively to check whether the stop lamp is on
and whether the motor is powered off;
Operate steering lamp switch to check whether the steering indicator and turn signal are
working properly.
(2)Check of brake device:
Check whether the front and rear brakes can work normally; Check the braking effect of the
front and rear brakes to ensure that the brakes are normal and effective;
Confirm whether the power-off switch is normal when the rear wheels are off the ground with
double support of the whole vehicle;
Please check the fastening status of each axle to ensure that the front and rear axles and
handlebars are fastened reliably.
(3)Check the fastening status of handlebar and front and back wheels:
Shake the handlebar up, down , front, back, left and right to check whether it is loose or
pongee;
Shake left and right front and back wheels to check whether there is looseness; whether the
rotating wheel is too tight or stuck.
(4)Tire inspection:
Check whether the tire pressure is normal. Judge whether the air pressure is appropriate
according to the depression of the ground part of the tire. When the air pressure is abnormal, use
the tire pressure measuring instrument to check and adjust it to the normal air pressure;
whether the tire has cracks or abnormal wear;
Whether the tire is embedded with nails, stones and glass;
When the tire is used to the tread wear mark, the tire should be replaced.
(5)Inspection of reflector and license plate:
Check whether the reflector is missing. If it is found missing, contact the after-sales service
immediately to reassemble the reflector of the same specification and model, and the installation
position should be consistent with the original bicycle .Please do not change the position, modify,
disassemble, etc. privately.
Before each use, check that the function of the reflector is normal and the surface of the
reflector is kept clean.
The Reflector device cannot be blocked by luggage, children chair, clothes and other objects,
otherwise it will cause potential safety hazards.
Check whether the license plate is installed firmly, whether the number is clear, whether there
is any damage or pollution, and if there is any should, reinforce, clean or replace it in time.
Before each ride, please make sure that the following items: whether the frame lock,vertical
tube lock, seat tube locking fastener are locked, whether the brake system is normal, and the
tires are full of gas to ensure riding safety!
06
67 8
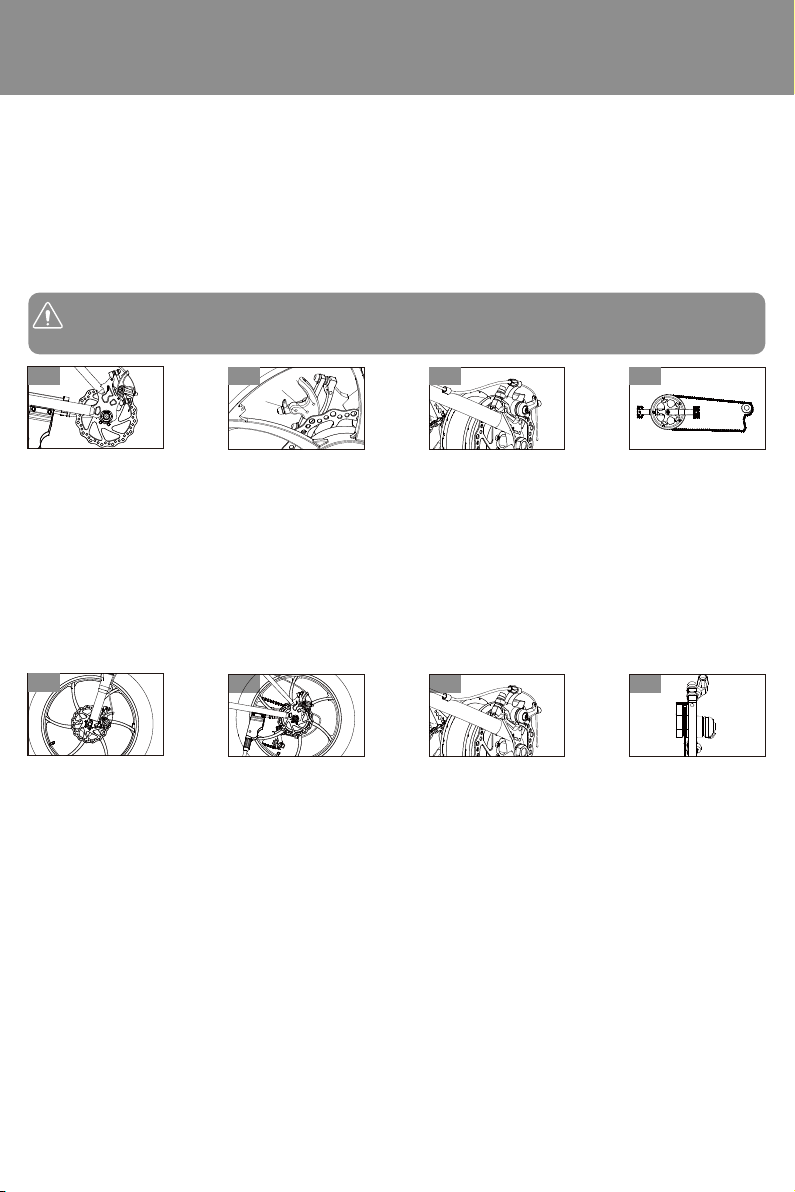
Adjustment methods of each part
I.Adjustment of front and rear brake system: (the adjustment method of front and rear brakes is
the same)
1.The rear integrated disc brake(see figure 1); Adjust the upper and lower nuts of the disc brake to
make the spacing between disc brake and brake caliper 1.5-3mm, adjust the height of disc brake,
and then tighten the nuts.
2.Front integrated disc brake (see figure 2): Adjust the A and B nuts of the disc brake and adjust the
height of the disc brake so that the distance between the disc brake and the caliper is 1.5-3mm. If
the distance is deviated, use the C screw to adjust, and then tighten the nut.
Rotate the Adjusting nut to rotate the Adjusting nut forward, the brake becomes tight, otherwise it
becomes loose. When adjusting, hold the brake handle at the same time, so that when the position
of the brake handle is 1/3 of the total stroke, the brake rubber block can be tightly attached to the
brake drum. (See figure 3)
3.Disc brake: (see Figure 7 and 8)
Key points of disc brake adjustment: there is enough clearance between disc brake and brake pad
(there is no interference between the brake disc and the brake skin when rotating, and the best
braking effect is appropriate) adjust the nut, lengthen about brake cable, check whether the brake
handle has been adjusted to the appropriate tightness; Then test ride to ensure effective and
normal braking.
II.Chain adjustment (see figure 4)
1.Loosen the rear axle left and right fastening nuts, adjust the chain regulator, move the rear
wheels back and forth, and tighten the tightness of the chain so that the sag in the middle of the
chain is 10-15mm.At this time, the tightness of the chain should be suitable for go slick, no
abnormal sound.
2.Keep the center surface of the rear wheel basically in the center surface of the frame, and tighten
the rear axle left and right fastening nuts. (Recommended torque is not less than 30N.m)
III.Front wheel disassembly (see Figure 5)
1.Loosen the left and rear fastening thread of the front axle, remove the nut, remove the front
axle, and remove the front wheel.
2.When assembling, align the center hole of the front wheel with the double arm hole of the
hydraulic front fork, penetrate the front axle into the hole, and tighten the left and right fastening
nuts of the front axle clock wise. After installation, rotate the front wheel, and there shall be no
stuck or loose phenomenon. (The recommended torque is not less than 18N. m)
IV.Rear wheel disassembly (see Figure 6)
1.Pull the motor cable off the connector, turn the car body over(note: Do not touch the handlebar,
head cover, toolbox parts), rotate the rear axle nut, rear brake positioning nut and brake cable in
the counterclockwise direction, unpack the chain joint, and then remove the rear wheel in the
direction of the opening.
Note: To ensure driving safety, brake rubber the working face is worn to 1/2 of brake rubber,
a new brake rubber should be replaced.
ABC
1
5
2 3 4
07
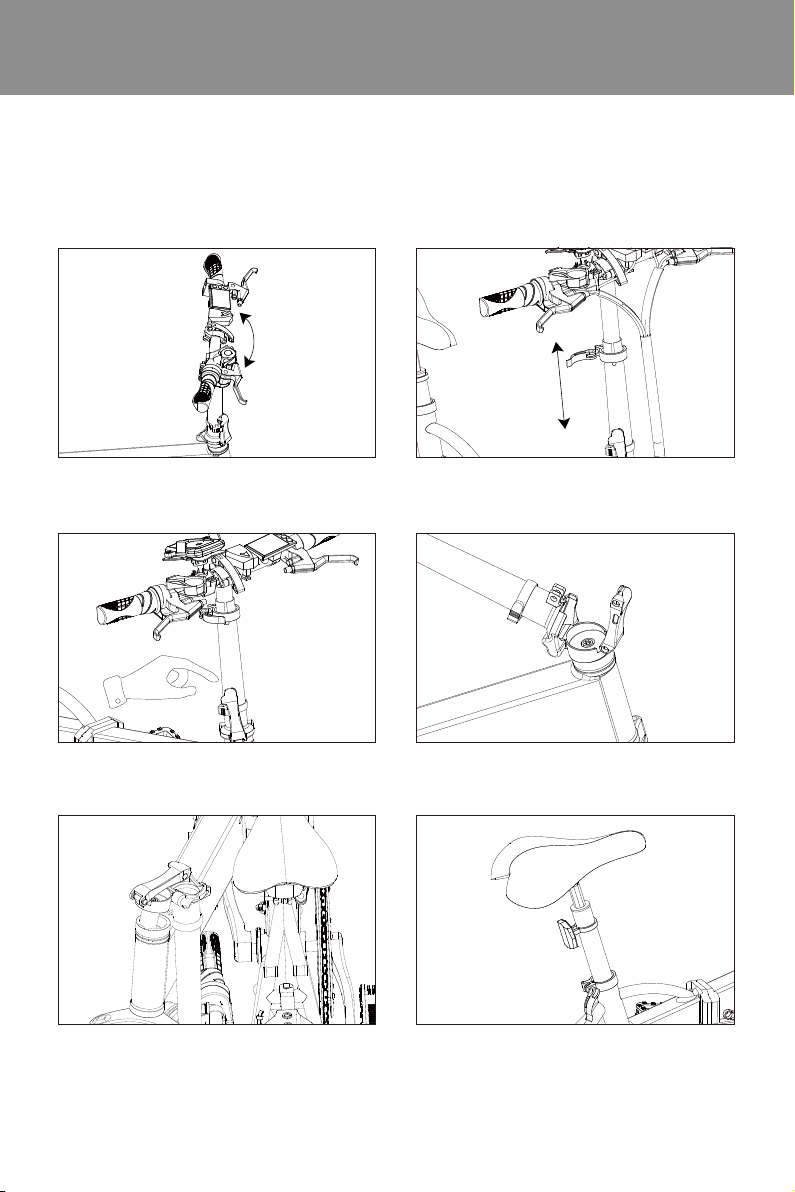
Adjustment methods of each part
V.The folding and expansion methods of folding bicycle are as follows: (the expansion steps are
from ⑩to ①)
①Rotating T handle ②Lower by vertical tube
③Open safety lock ④Rotate vertical tube
⑥Lower seat tube⑤Folding riser
08
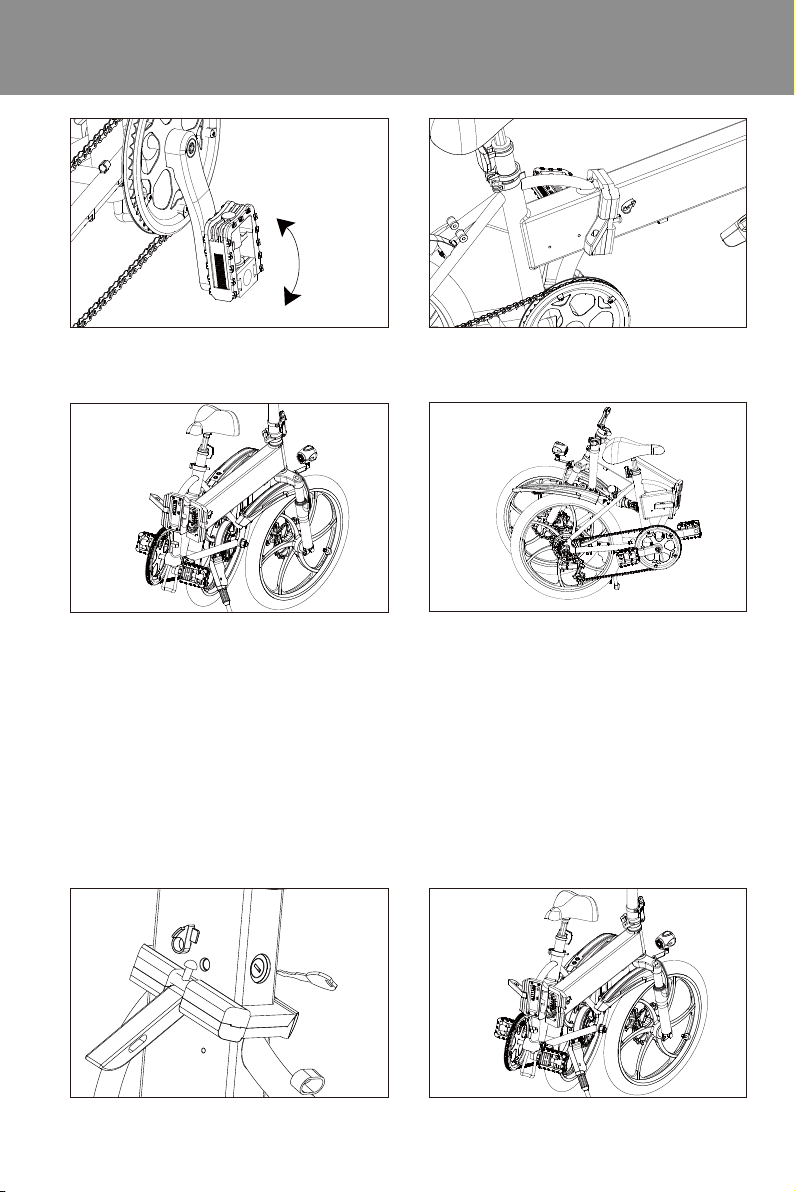
Adjustment methods of each part
VI.Battery installation
The battery is mainly composed of two pieces, cell and protection board PCM (power battery is
generally called battery management system BMS). Cell is equivalent to the heart of the battery,
and the management system is equivalent to the brain of the battery.
Cell is mainly composed of positive electrode material,negative electrode material, electrolyte,
diaphragm and Shell, while the protection board is mainly composed of protection chip(or
management chip), MOS tube, resistor, capacitor, PCB board, etc.
Open the fixed lock with the key. Dial off the power plug, take out the battery, instead, insert the
power plug, lock the battery lock, and confirm that it is safe and firm before riding.
⑦Folding pedal ⑧Open the frame and fold safety lock
⑨Folding frame ⑩Finish folding
1.Open folding connector 2.Fold the vehicle and pull out the key
insert the key to unlock

09
Adjustment methods of each part
VIII.Instructions for using the code table:
1.Press the POWNER button three seconds to start. And press the button for three
seconds to close.
2.After starting up, press the POWER button to switch to display the total mileage, single
mileage and battery voltage.
3.Press the "+" or "." button for a long time to enter the mode setting; Control the gear,
Increase/decrease one gear every time, and follow the 1-3 gear.
Note: First gear to pedal power, no power to handle.
Second gear medium power assist, Third gear high speed power assist.
Note: Before using the bicycle, insert the key and turn it counterclockwise by 45°,
the battery is activated. Finished using the bicycle, turn the key 45° clock wise, the
battery is powered off, and take out the key. Remove the battery step, insert the
key, press it upward and then rotate it 90° clockwise. Note that need to remove the
key and then take out the battery to avoid damaging the key.
3.Take out the battery and charge the
battery separately
4. You can also choosevehicle
charging
Red light indicates normal charging Green
light indicates charging completed
Switch on/off
Battery power Speed display
Assist gear
Vehicle status
Multifunctional display area

10
Electric bicycle fault inspection
and troubleshooting methods
Note: When a fault that cannot be eliminated by yourself or a fault that cannot be
determined, the internal damage of the motor, controller, charger, battery pack,
etc. please send the vehicle to the place of purchase or the company's special
maintenance station for inspection and maintenance. During the warranty period,
please do not open important parts without authorization, otherwise the company
will not guarantee.
Speed regulation failure
or speed less than 10 km/h
1,Low battery voltage
2,Speeder failure
3,Transmission Group failure
1, Fully charge the battery
2.Send to maintenance station
for repair
1, Take out the battery box and
hang it up.
2,Fastening wiring plug
3, Send to maintenance station
for repair
1, Sufficient gas
2, Sufficient power or check the
charger
3, Replace battery
4, It is recommended to use
pedal assist
1, Fastening socket
2,Send to repair station for
replacement
3,Replace fuse
1,Replace new battery
2,Reconnection \fastening
3,Send to maintenance station
for repair
1, Replace motorcycle handlebar
and repair lines
2, Timely charging
3, Replace left and right brake handle
4, Replace controller or motor
Replace damaged parts/
maintenance lines
Check switch position/replace
booster/overhaul line
1,Loose battery wiring
2,Motor wiring plug loose \off
3,Speeder failure
1,The plug is not inserted
properly
2,Charger fuse blown
3,Battery pack fuse blown
1, When starting the electric hub.
the voltage is lower than 30V
2, Battery switching line fall off
3, Monitor connector loose
4, Controller failure
1, Battery under voltage;
2, Left and right brake handle
damage
3, The controller or motor is
damaged
4, Abnormal line
5, Motorcycle handlebar damage
or line difference
1, The startup mode switch or
motorcycle handlebar is
damaged.
2, Abnormal line
1, Incorrect start-up tax switch
overlap or booster damage
2, Abnormal line
1,Insufficient tire pressure
2,Insufficient charging or
charger failure
3,Battery aging or damage
4,There are many uphill \strong
headwinds \heavy load \poor
road Mow temperature
Hub motor does not work
after power on
Insufficient mileage
after charging
Charger not charging
The battery has sufficient
power but no voltage
indicates that the electric
wheel hub is difficult to
After opening electric door
lock, it is found that the
signal part is normal and
the driving part is abnormal.
Abnormal zero start mode
(switch left and right disk)
Non-zero startup mode
exception (switch in
the middle)
Serial Number Fault description Failure cause analysis Troubleshooting methods
1
2
3
4
5
6
7
8

11
Maintenance and Repair
Daily maintenance:
1.The vehicle should be kept clean and clean, and the vehicle should be wiped with dry cloth in
time after being drenched to avoid rusting of parts and short circuit of electrical components.
2.Always check the air storage capacity of the tire to keep it in normal use.
3.The main transmission parts such as front axle, a roar axle, conter axle, front fork, Flywheel and
electric hub should be checked and adjusted frequently to keep the transmission parts flexible
without impact sound and noise; Check the screws and nuts of the whole car, if it is found that it is
loose, it should be tightened in time to prevent the parts from being worn out or causing greater
damage and fracture due to looseness.
4.The braking part should be checked and adjusted frequently to make it in a flexible state, for
example, the gap between the brake rubber and the gate core should not be too large.
5.Always check whether the operating parts and cable are flexible, and ensure that there is no
stagnation, no stagnation, and properly drip lubricating oil from one end of the hose slowly, and
pull the wire rope at the same time, feel that the wire rope slides lightly in the hose.
6.Electric bicycle moving parts should be often injected with a small amount of lubricating oil to
reduce wear and keep riding light, as shown in the following table:
Correct use and maintenance methods of motor, controller and battery:
1.The motor should be kept clean, no foreign matter, corrosive liquid, gas, etc. should enter the
motor, and the motor Shell should not be knocked and baked to avoid damage to the motor.
2. All wires should avoid friction and contact with sharp metal, and the wires should be tied firmly
with the frame.
3.The controller is a high-tech intelligent computer memory program password. If the user opens
the repair by himself, the components will be easily damaged. If the controller fails, please go to
the service department to repair it.
4.This battery is a special battery for electric bicycles. When the electric bicycle is not used for a
long time, the battery should be stored after sufficient electricity, and the electric energy should be
replenished regularly to avoid battery vulcanization caused by long-term under power.
5.The battery cannot be near open flame or high temperature heat source, and the battery cannot
be thrown into the fire. Direct exposure to the sun is strictly prohibited in hot and hot weather.
Note that the tightening torque of front wheel, handlebar core screw rod, saddle pipe
clamping Bolt and saddle clamping Bolt shall not be less than18N.m;The tightening torque of
rear wheel, bottom bracket Cup and bottom bracket Cup lock nut shall not be less than
30N.m
Front axle, center axle, a rear
axle bearing 3# calcium-based lubricating oil Six months to one year
Half a year
Half a year
Half a month
Half a month
3# calcium-based lubricating oil
3 pieces of calcium-base
lubricating oil
30# mechanical oil
30 and mechanical oil
front fork headset
Pedal bearing
Chain
Double support locking plate side
support and transmission parts
Name Handle
horizontal tube stem Saddle Saddle pipe front axle rear axle Center shaft nut
Running torque 18N. m 18N. m 18N. m 18N. m 18N. m 30N. m 30N. m
Lubrication part Lubricant Lubrication cycle
Location Method Time
Center shaft
Front and
rear wheels
brake cable
brake handle
Chain
Front and rear nut, handlebar
core screw, saddle clamping screw
Check whether the bottom bracket Cup is loose/disassemble
the central shaft, wash and change oil, and check the parts.
Check the wheel swing, spoke tension, spokes, mother spoke
for damage; Adjust the wheel
If there is a steel wire at the root of the rolling head,
replace the new brake line.
If there is a steel wire at the root of the rolling head,
replace the new brake line.
Check whether the pin shaft is loose or bulging, and
whether the extension of the chain is too large.
Check for looseness
Check frequently /once every year
The first month/year after the
first new car
Once every month
Once every three months
Once every six months
Once every six months

12
After-sales service and warranty scope
Provide correct operation methods and maintenance items, provide valid car purchase tickets,
warranty cards, and the address and contact number of the warranty unit.
2.Users should operate correctly according to the product manual. Any performance failure
caused by production quality,according to relevant laws and national Three Guarantees regula-
tions,the company shall uniformly fulfill the Three Guarantees obligations.
3.The company is responsible for the repair of faults outside the scope of the Three Guarantees
and the main components after the Three Guarantees period, but the fees shall be charged as
appropriate.
4.If the battery replacement exceeds the Three Guarantees period,the company will supply it at
the ex-factory price, but the battery must be recycled one by one and returned to the battery
manufacturer to ensure safety and avoid environmental pollution.
(-) warranty period for major parts
Details of warranty scope and term
It does not belong to the scope and content of the Three Guarantees:
1.Failure caused by user's failure to use, maintain and adjust according to the "instruction manual.
2.The user disassembles and refits himself, as well as faults caused by non-compliance with the
rules of use.
3.Faults caused by improper use, storage, or accidents.
4.There is no warranty card, and the "receipt link" is not sent back to our company, or vehicles with
inconsistent cards and goods.
5.Wearing parts and consumables shall not be provided in three packs. Including brake, seat bag,
plastic parts, spokes, RIM, brake cable, surface scratch, etc.
6.The cost of self-repair without the consent of the special maintenance unit.
7.After the accessories leave the factory, the shell is scratched or the shell is damaged without
repair. The lead is scratched or broken without repair.
Part name
Frame
Warranty Period (except human factors) Warranty Service content
Natural open welding, desoldering and fracture
phenomena
Paint patches fall off
5 years
12months
12months
12months
12months
12months
12months
15 days
6 months
Free replacement
Free replacement
Free replacement
Free replacement
Free replacement
Half-year renewal and
half-year maintenance
Since the date of delivery,
the capacity is less than
60%. Free maintenance or
replacement
Free repair or replacement
Free replacement
front fork Frame,
Fender, chain cover,
Hanger
Handlebar, RIM,
Sprocket, crank,
Front or rear axle,
Flywheel and other
rotating parts
Motor
Controller. charger
Lithium battery
Inner tube
Paint parts
Fuse, Bulb, cable. switch,
brake shoe
Outer tire
Electroplating parts fall off
Damage or fracture of heat treatment parts
Rotor breaking, casing cracking. Winding damage
Circuit damage and component damage
Excessive capacity drop, no voltage
release, battery safety hazards
Air leakage caused by internal quality problems such
as trachoma will not be replaced after repair.
Large pieces fall off, obviously fade, blister, crack
Vulnerable parts, not covered by warranty
Replacement for cracking within 1 month (non-human factor)

13
Maintenance record
Warranty description:
1.All parts of the vehicle will be guaranteed strictly according to the warranty period.
2.The warranty period starts from the factory date.
3.If you unpack the controller, charger, battery and motor privately, no warranty will be given.
4.Other parts of the whole vehicle will not be guaranteed except for three months due to quality
problems.
5.When the vehicle fails, the maintenance must be carried out at the designated maintenance
point, and the accessories must not be disassembled and assembled privately. Controller, battery
and charger must ensure that all labeling is complete, and no one is damaged.
6.When the vehicle is repaired, relevant certificates such as warranty card, invoice, certificate of
conformity and so on must be presented.
7.Battery warranty adopts one-to-one warranty. In case of battery problems, the battery must be
returned to the manufacturer first. After the battery is tested by the manufacturer, judge whether
the battery is broken according to the battery testing standard, and determine whether the battery
damage is within the scope of warranty, and then carryout warranty.
8.The controller will be maintained for warranty. The replacement of the controller must ensure
that the plug-in is complete for testing. If it cannot be repaired, a new controller will be replaced. If
the controller is damaged manually, it will not be guaranteed.
9.Pay attention to the maintenance of the whole vehicle and avoid riding in the water as much as
possible. The damage of electrical devices caused by water inflow will not be guaranteed.
Date Maintenance content Remarks
14
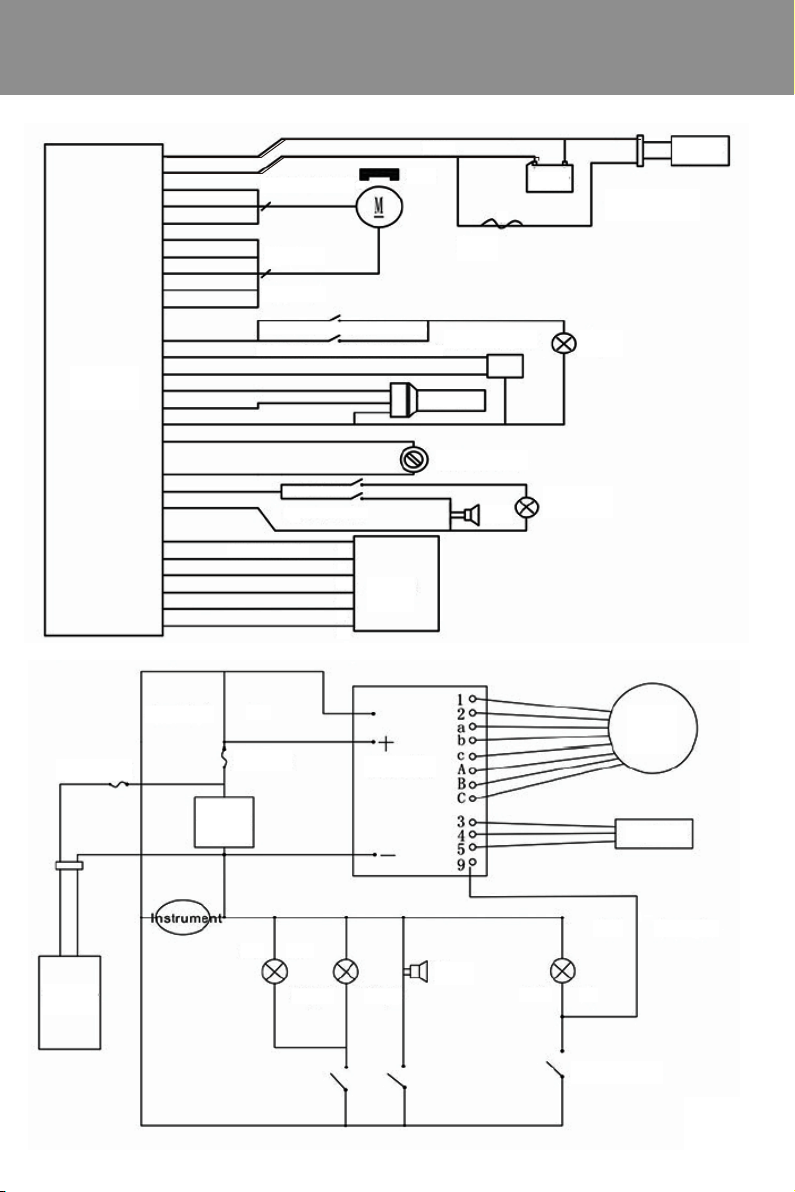
Electrical schematic diagram
II.Chain adjustment (see figure 4)
1.Loosen the rear axle left and right fastening nuts, adjust the chain regulator, move the rear
wheels back and forth, and tighten the tightness of the chain so that the sag in the middle of the
chain is 10-15mm.At this time, the tightness of the chain should be suitable for go slick, no
abnormal sound.
2.Keep the center surface of the rear wheel basically in the center surface of the frame, and tighten
the rear axle left and right fastening nuts. (Recommended torque is not less than 30N.m)
III.Front wheel disassembly (see Figure 5)
1.Loosen the left and rear fastening thread of the front axle, remove the nut, remove the front
axle, and remove the front wheel.
2.When assembling, align the center hole of the front wheel with the double arm hole of the
hydraulic front fork, penetrate the front axle into the hole, and tighten the left and right fastening
nuts of the front axle clock wise. After installation, rotate the front wheel, and there shall be no
stuck or loose phenomenon. (The recommended torque is not less than 18N. m)
IV.Rear wheel disassembly (see Figure 6)
1.Pull the motor cable off the connector, turn the car body over(note: Do not touch the handlebar,
head cover, toolbox parts), rotate the rear axle nut, rear brake positioning nut and brake cable in
the counterclockwise direction, unpack the chain joint, and then remove the rear wheel in the
direction of the opening.
Power negative P+
Motor line
Motor Hall
Front brakes handle power-off switch
Rear brake handle power-off switch
three-way switch
Transfer handle
Headlight switch
speaker switch
Anti-theft
device+
Power supply
electric door lock
Charger
Rear Light
dipped
headlight
Horn
brake lamp
Brake broken wire
Speeder
Contraller
30A fuse
Batter
M
Brake handle
+
-
ACC
A3
w
F5
electric door lack
Headlight
Taillight
Fuse
Fuse
Battery
Charger
charging interface
5A
Controll

15
A16 Product Description
Hardware Configuration
Bicycle type
Tires Size:
Max Speed:
Electric Range:
Assisting Rang:
Load Capacity:
Product Net Weight:
Product Gross Weight:
overall Unit:(L*W*H)
After Folding:(L*W*H)
Packing size:(L*W*H)
Body Material:
Motor Type:
Transmission:
Shock Absorber:
Brake System:
Battery Type:
Battery Capacity:
Battery Charger Power:
Folding Electric Bicycle
16*1.95 inches
25km/h
<45km
<70km
120kg
20kg
24kg
144*53*108cm
79*38*58cm
820*395*640mm
Aluminum alloy 6061
Hall Brushless DC Motor
Shimano 7 speed
Front fork and Body dual model
Front and Rear Double disc brake
Lithium battery
36V/7.8AH
42V/2A(CE/ Safety)
Rear wheel
Motor
Saddle
Battery pack
Pedal
Front wheel
Headlight
Transfer handle
Vehicle Code
engraving position
Front fork

16 Rear wheel
Motor
Rear Light
Saddle
Battery
Transfer handle
Vehicle Code
engraving position
Headlight
Front fork
A20 Product Description
Hardware Configuration
Bicycle type
Tires Size:
Max Speed:
Electric Range:
Assisting Rang:
Load Capacity:
Product Net Weight:
Product Gross Weight:
overall Unit:(L*W*H)
After Folding:(L*W*H)
Packing size:(L*W*H)
Body Material :
Motor Type:
Transmission:
Shock Absorber:
Brake System:
Battery Type:
Battery Capacity:
Battery Charger Power:
Folding Electric Bicycle
20*1.95 inches
25km/h
<60km
<80km
120kg
21kg
25.5kg
155*53*110cm
90*43*70cm
875*380*660mm
Aluminum alloy 6061
Hall Brushless DC Motor
Shimano 7 speed
Front fork and Body dual model
Front and Rear Double disc brake
Lithium battery
36V/10.4AH
42V/2A(CE/ Safety)

17
A20F Product Description
Hardware Configuration
Bicycle type
Tires Size:
Max Speed:
Electric Range:
Assisting Rang:
Load Capacity:
Product Net Weight:
Product Gross Weight:
Overall Unit:(L*W*H)
After Folding:(L*W*H)
Packing size:(L*W*H)
Body Material:
Motor Type:
Transmission:
Shock Absorber:
Brake System:
Battery Type:
Battery Capacity:
Battery Charger Power:
Folding Electric Bicycle
20*4.0 inches (Fat tire)
25km/h
<50KM
<70KM
120kg
29kg
34.5kg
174*53*120CM
98*45*77cm
1010*490*710mm
Aluminum alloy 6061
Hall Brushless DC Motor
Shimano 7 speed
Front fork and Body dual model
Front and Rear Double disc brake
Lithium battery
36V/10.4AH
42V/2A(CE/ Safety)
Rear wheel
Motor
Vehicle nameplate
location
Saddle
Battery pack
Transfer handle
Vehicle Code
engraving position
Headlight
Front fork
Other manuals for A20
1
Table of contents


