Tower Hobbies BEACH BUM User manual

CONNECT WITH US
FACEBOOK.COM/TOWERMAGAZINE
Pin
terest.com/towerpb
2 year limited warranty
BEACH BUM
ELECTRIC BEACH CRUISER
e l e c t r i c B I K E S
1 YEAR LIMITED WARRANTY TOWERELECTRicbikes.COM
@TOWER.LIFE
(858) 362-4082[email protected]
@tower.life

Contents
1. Introduction
A. Assembly Instructions p. 4
B. Installing / Removing the Battery p. 5
C. Saddle Position p. 6
D. Start Up Procedure p. 8
2. Safety
A. Safety Basics p. 9
B. Riding Safety p. 9
C. Wet Weather p. 9
D. Night Riding p. 10
E. Mechanical Safety Check p. 10
F. Changing or Adding Accessories & Components p. 10
3. Tech & Critical Components
A. Battery Guide p. 11
B. LCD Display Guide p. 12
C. Wheels p. 14
D. Brakes p. 14
E. Pedals p. 15
F. Throttle p. 15
4. Service
A. Maintenance Guide p. 16
B. Post Crash Maintenance p. 16
5. Appendix
A. Intended Use p. 17
B. Bicycle and Component Lifespan p. 17
C. Metal Fatigue p. 17
D. Torque Fastening Specifications p. 18
E. LCD Display Defaults and Error Guide p. 18
1

Tower Beach Bum
Owner’s Manual
WARNING
This manual contains important safety, performance and service information. Please read it
before attempting to assemble or use the Tower Beach Bum eBike. This manual will also serve
as an important reference point for continued maintenance and troubleshooting.
Additional safety, performance and service information for specific components on this product
may be available directly from the component manufacturer. In the unlikely event that there is a
discrepancy between this manual and the information provided by a component’s
manufacturer, always follow the manufacturer’s instructions.
All information in this manual should be carefully reviewed. If any questions or concerns arise
while reviewing this material, consult with Tower or a bicycle maintenance professional. Failure
to express concerns about a component’s integrity or safety may result in damage to the
product and expose the user to risk of serious injury or death.
This manual is not intended to be a comprehensive use, service, repair or maintenance manual.
It is impossible to anticipate every situation or condition which can occur while riding, and this
manual makes no representations about the safe use of bicycles under all conditions. Please
see a bicycle maintenance professional for all service, repairs and maintenance.
Questions? Contact us:
858-362-4082
Tower Electric Bikes
1010 Santa Clara Pl.
San Diego, CA 92109
2

1. Introduction
Thank you for choosing Tower Electric Bikes!
The Tower Beach Bum was designed with a SoCal beach vibe and the highest quality
components. This manual contains everything from assembly instructions to safety and
maintenance tips for the Tower Beach Bum electric beach cruiser.
What’s In The Box?
1x: Beach Bum Electric Bike
1x: 48V Battery Charger
1x: 14Ah Samsung Battery
1x: High Visibility Rear Light
1x: LED Headlight
2x: Barefoot Pedals
This bike should be assembled by a trained bicycle maintenance professional.
An instructional video can also be found online at: towerelectricbikes.com
3

A. Assembly Instructions
This bike should be assembled and adjusted by a professional trained bicycle mechanic
Most of the critical components on the Beach Bum eBike will come pre-assembled. This
includes the rear wheel, motor, gear system, and all cabling. The following steps are the best
practices for completing the assembly.
Note: With the exception of the pedals, all fasteners are tightened with a clockwise motion, and
loosened with a counterclockwise motion.
Required Tools For Assembly:
- M4 Hex Key/Driver
- M5 Hex Key/Driver
- M6 Hex Key/Driver
- Pedal Wrench
- Adjustable Spanner/Wrench
- Calibrated Torque Wrench
A.1: Handlebars
- Open the top of the shipping carton and carefully remove the frame.
- Remove all of the protective paper and foam packaging from the frame. Carefully cut the
zipties where necessary.
- Prop the bike up on the rear tire and front forks. Insert the handlebar post into the
headset. Make sure that the post is inserted past the minimum insertion mark (Fig.
1.1). Tighten the stem in a with a M6 hex wrench (Fig. 1.2) until the recommended level
of torque is reached. (Fig. 6.1)
Figure 1.1
Figure 1.2
- Loosen the bolt on the front of the handlebar stem
(Fig. 1.3), then rotate the handlebars towards the
cockpit until the leather handlebar grips are
parallel with the ground. Ensure that the
handlebards are still centered, then tighten the bolt
to secure the handlebar system in place.
Figure 1.3
4

A.2. Front Wheel
- Remove all packaging from the wheel and front fork.
- Loosen the nuts on the wheel axle, so that it can easily fit onto the fork.
- Insert the wheel into the fork so that the rotor slides into the caliper. (Fig 1.4 &1.5)
- Evenly tighten the nuts on the wheel axle to secure the front wheel.
- Lift and spin the front wheel to make sure there is no friction against the disc brake.
- Tighten the nuts until the recommended level of torque is reached. (Fig. 6.1)
Figure 1.4
Figure 1.5
A.3: Pedals
- Look over the pedals before installation; they are threaded specifically to only fit on one
side of the bike. (“L” for rider’s left, “R” for rider’s right)
- Begin the installation by twisting the pedal into the correct pedal arm by hand.
- Once the pedal becomes too difficult to twist, use a pedal wrench to tighten the bolt.
-Important: The left pedal is threaded in the opposite direction, and needs to be
tightened by twisting counterclockwise. This is standard on most bikes.
A.4: Lights
- Loosen and remove the nut, bolt and washer from the fork (right above the wheel).
- Thread the bolt through the hole on the headlight and secure with the washer and nut.
- Tighten using a wrench and a M6 hex driver to ensure a secure fit.
- There will be one loose cable hanging near the headset. Connect the light to the power
supply using this cable.(all three prongs must line up for this connection).
B. Installing / Removing the Battery
B.1: Installing the Battery
- Ensure that both the battery and dock are dry before the installation.
- Remove the battery from all packaging. (The key will be taped to the bubble wrap)
- Insert the battery into the frame from the left side to avoid the chain (with the on/off
switch facing out to the right side of the bike).
5

- Insert the battery at the top of the dock and slide it down into the locked position.
- Once the battery is in the dock, insert and turn the key to lock the battery in place.
- The key should have 180° range of motion. If the key can only turn 90°, the battery is
not correctly housed in the dock, and will need to be re-installed.
B.2: Removing the Battery
- Rotate key to unlock the battery from the dock.
- Use one hand at the bottom of the battery to lift it from the base position of the dock.
- Pull the battery out to the left of the bike frame/battery dock.
C. Saddle Position
A correctly positioned saddle will make the riding experience more comfortable, controlled and
efficient. It is important to spend time finding the correct saddle position. Tower Electric Bike
saddles can be adjusted in 3 ways:
- Height, Angle, Front/Back
C.1: Saddle Height:
- To check the saddle height, begin by sitting on the saddle.
- Place one foot on the center of a pedal and the other on the ground for stabilization.
- Rotate the pedal until it is in the lowest position (Fig 1.6).
● In this position, the leg on the pedal should be almost straight, with a slight bend
in the knee. The rider should also be able to reach the lowest part of the pedal’s
rotation comfortably, without needing to shift any weight.
Figure 1.6
6

- If the saddle height needs to be adjusted, follow these steps:
● Loosen the seat post clamp. (Fig 1.7)
● Increase or decrease the height to a comfortable position.
● Confirm that the saddle is parallel with the bike frame and the seat post is not
past its minimum insertion mark. (Fig 1.8)
● Tighten and close the seat post clamp to secure the seat in place. (Fig 1.9)
Figure 1.7
Figure 1.8
⚠ Warning: Securing the seat post with the “Minimum Insertion Mark” exposed may
cause the seat post or eBike frame to break.
Figure 1.9
C.2: Saddle Angle:
- The saddle angle can be adjusted to provide maximum comfort while riding. The majority
of cyclists prefer their saddle to be horizontal, as it arrives in the box.
- When adjusting the saddle angle, be sure to loosen the clamp sufficiently so that the
teeth in the mechanism have space to rotate. When securing the clamp, tighten it to the
recommended torque (Fig 6.1) to prevent clamp slippage while the bike is in use.
7

C.3: Front and Back Position:
- Adjusting the saddle in this manner will be down to personal preference and will often be
related to rider’s height and arm length. When tightening the front/back position, ensure
that the clamp mechanism is not on the curved part of the rail.
⚠ Warning: After making and changes to the saddle position, ensure that each clamp is
tightened to the recommended torque (Fig 6.1). Loosely fitted clamps may wear the
thread on the movable components. The threading is there to help the components stay
in place by providing resistance. Without this, it may be difficult to maintain saddle
position.
D. Start Up Procedure
⚠ Warning: Do not use this product before reviewing the safety instructions included in
Chapter 2 of this user manual.
- Insert and rotate the key to lock the battery in place.
- Remove the key and confirm that the battery is locked correctly.
- Turn the battery on by flicking the red switch to the on position (-).
- Hold down the [M] button on the LCD display for 2 seconds, to turn on the eBike and
display.
- Use the [+] and [-] buttons to select the desired pedal assistance level. Level 1 is the
lowest level of assistance and Level 5 is the highest. (Fig 6.2)
- Ride safely and have fun!
8

2. Safety
A. Safety Basics
⚠ Warning: It is the responsibility of the rider to know the local laws and rules of the
road. These laws may be different in each area and extend to safety equipment, lighting,
licensing, areas to ride and specific bike traffic laws.
⚠ Warning: Always wear a helmet. Having an accident while not wearing a helmet may
result in serious injury or death.
- This electric bike is designed for use by riders of age 18 and over.
- Riders should have the mental capability, reaction time and physical condition to ride
and manage themselves and this eBike in traffic and other road conditions.
- Ensure that the eBike is the correct size before riding. Control may be compromised if
the eBike is not fitted correctly.
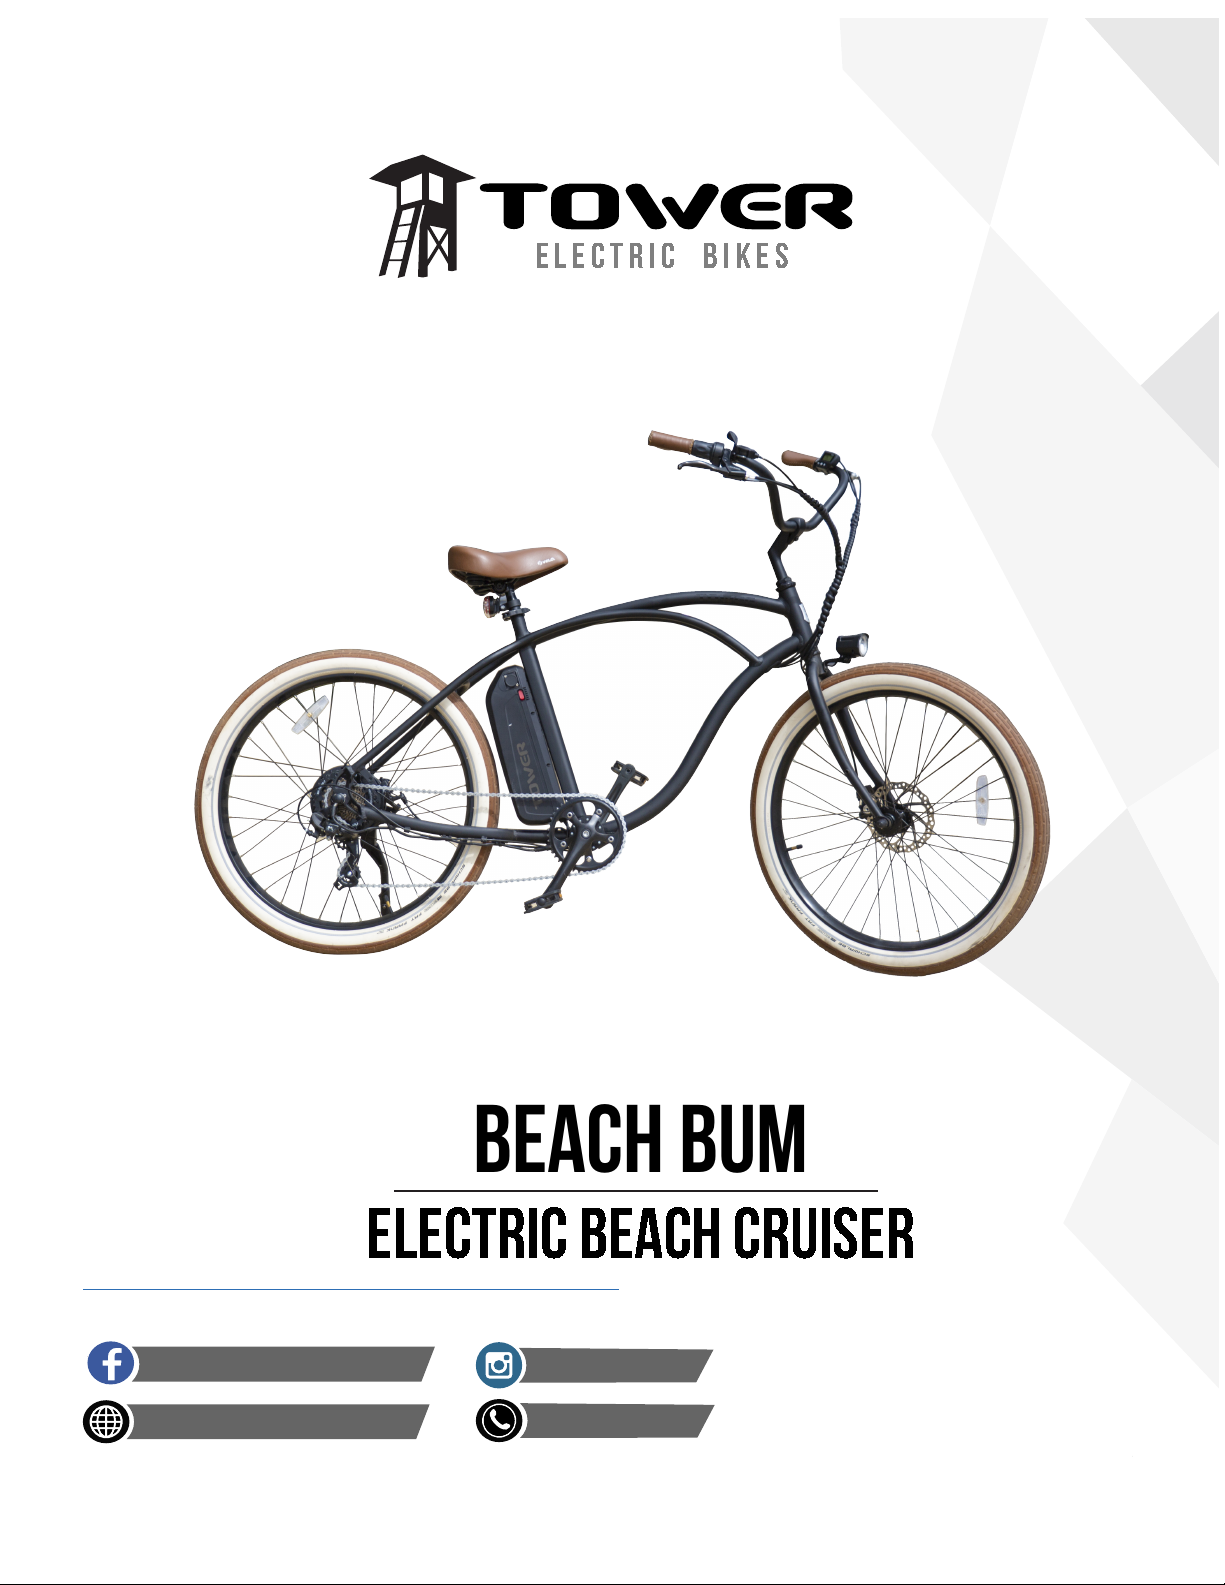
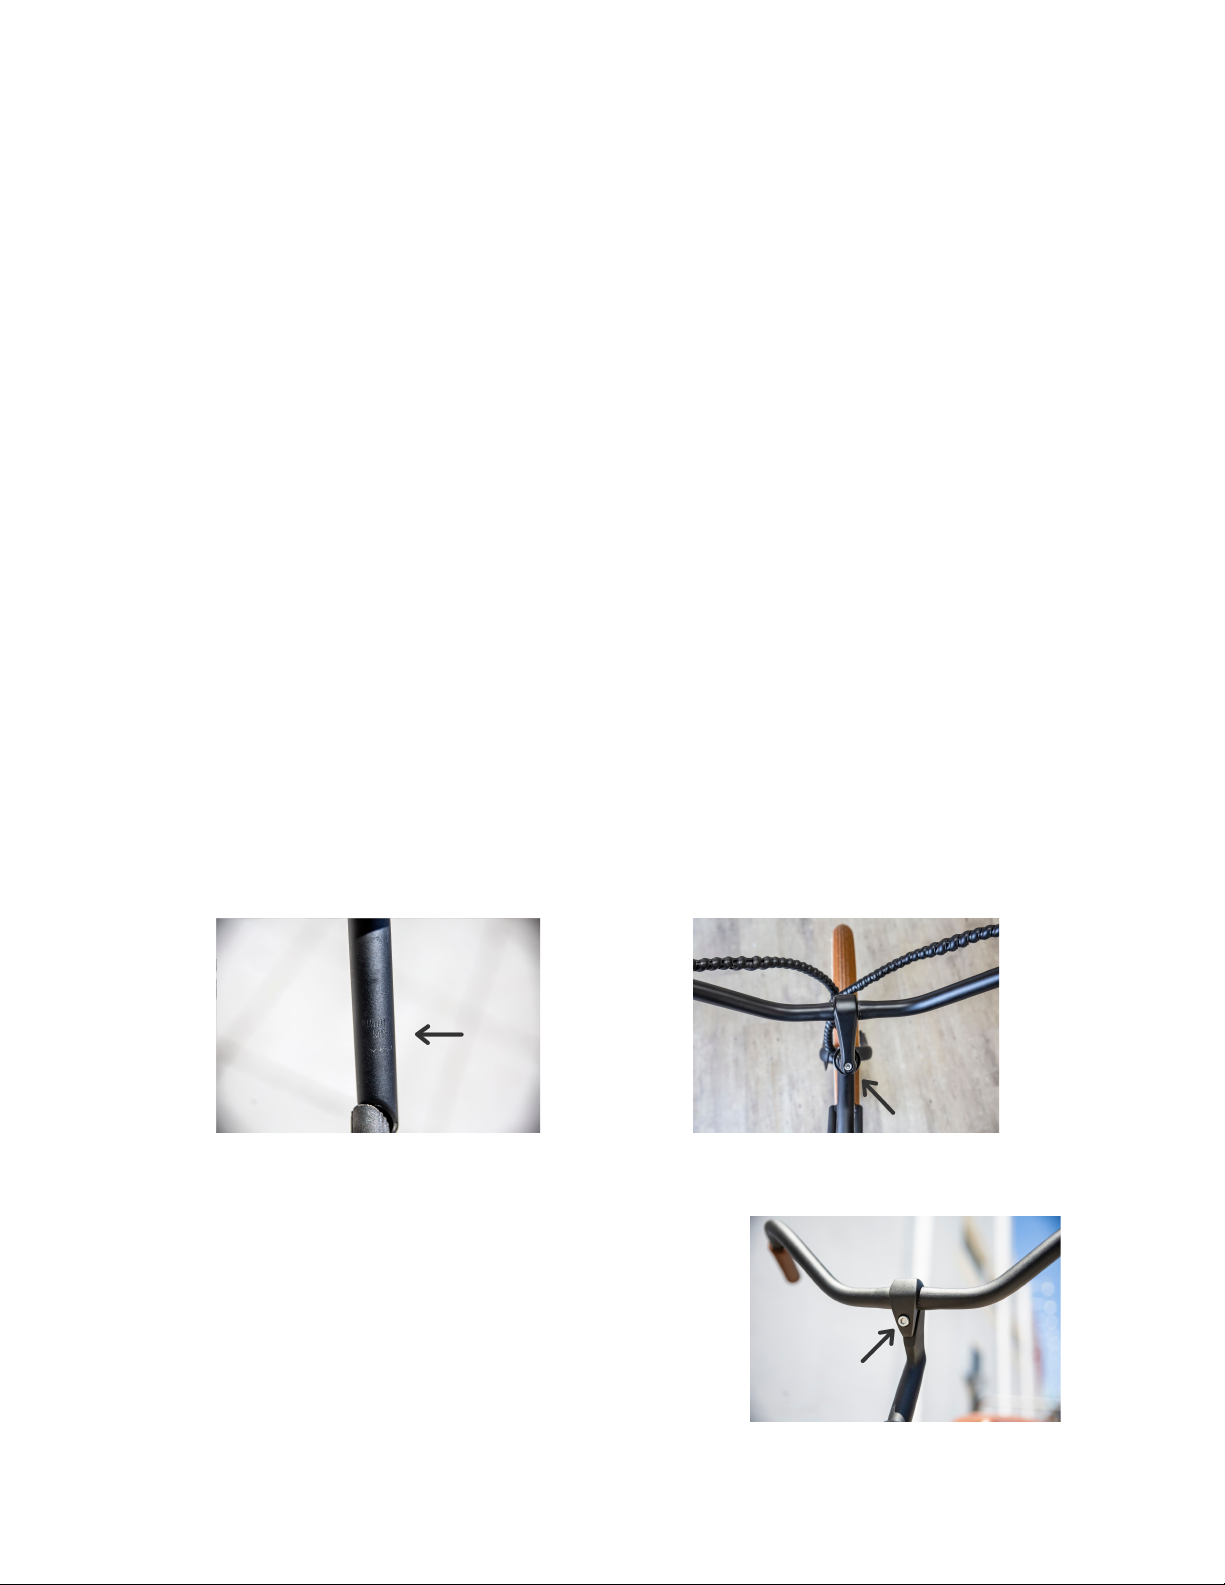
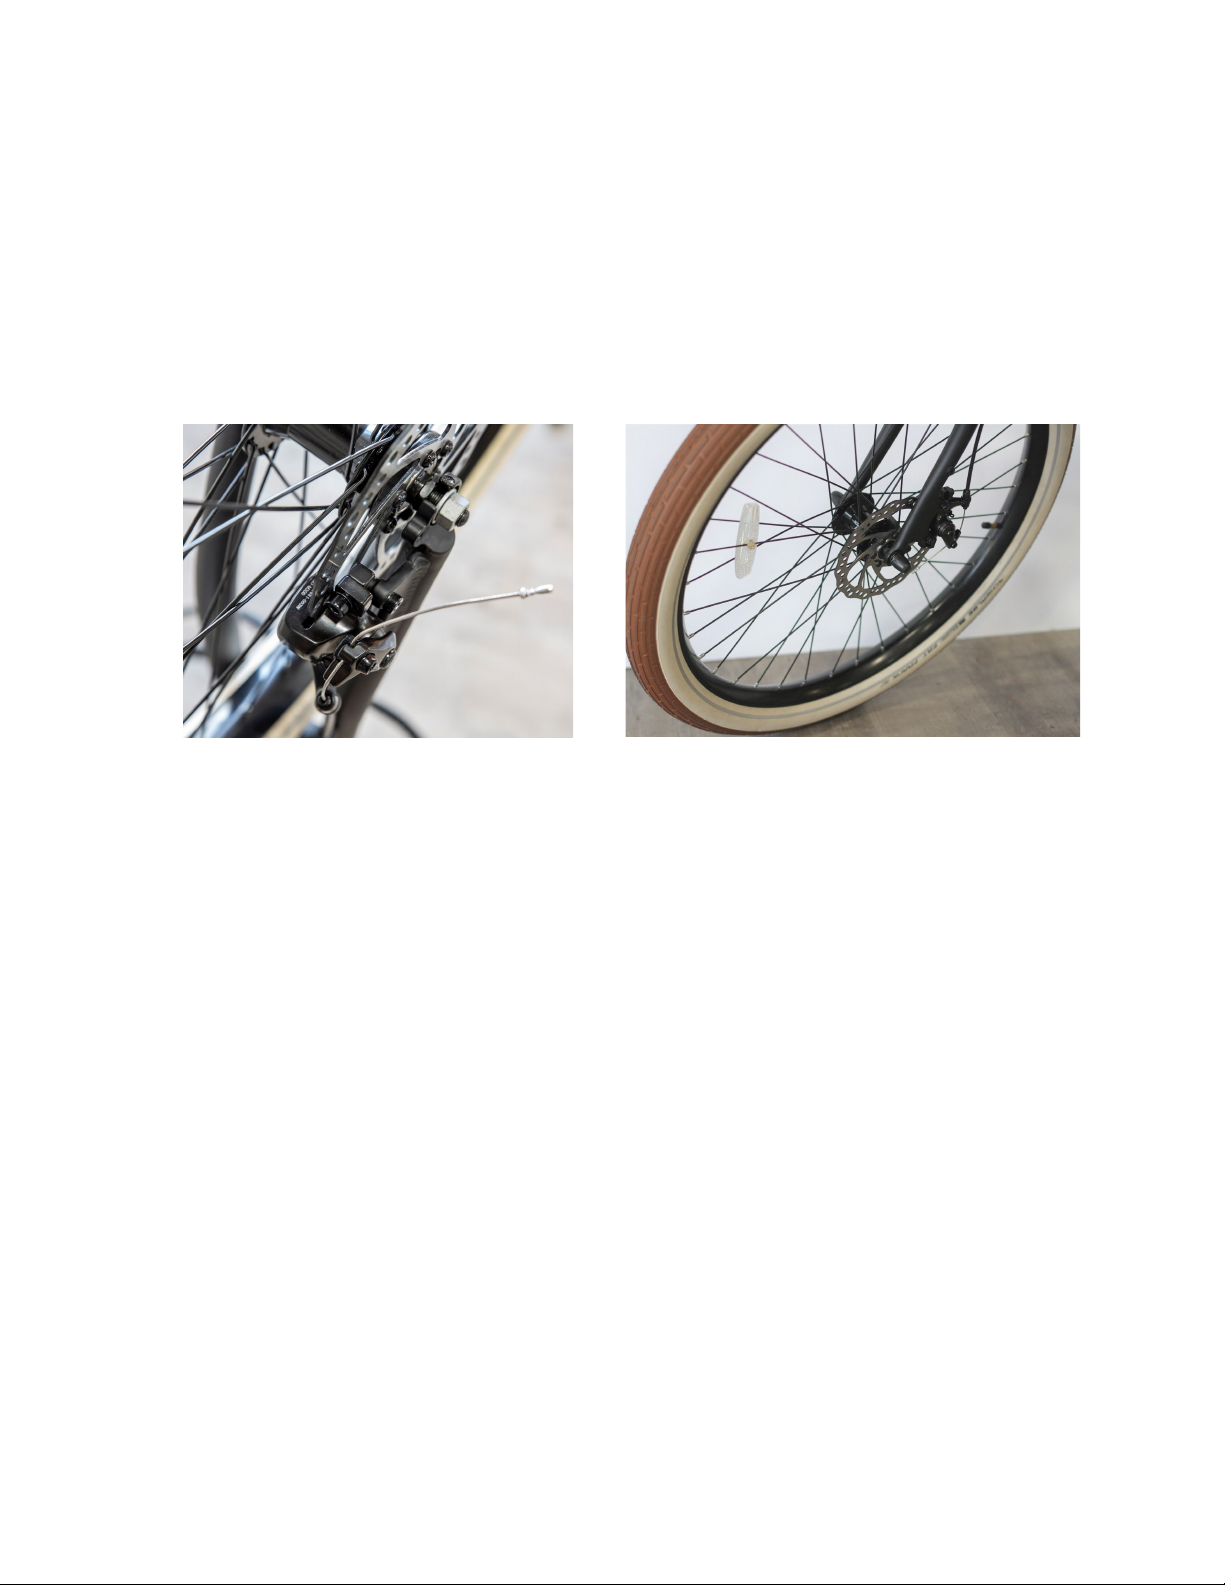
- Perform a quick mechanical safety check before every ride. (Section 2.E)
- Tower Electric Beach Cruisers are not designed for jumping or off-road use.
- The Beach Bum is pre-governed at 18 mph. This can be adjusted in the advanced
settings. Contact Tower customer support for instructions on how to remove the speed
limit. The governor should only be removed for use on private property.
- Always ride at a comfortable speed, and obey local traffic laws.
B. Riding Safety
- When possible, ride in bike lanes or to the far right side of the street. Always ride in the
same direction as the flow of traffic.
- When riding on the street, use hand signals to indicate turns and slowing/stopping.
- Do not ride with objects that may impair vision or control of the eBike.
- Do not hitch off the back of another vehicle.
- Do not ride while under the influence of alcohol or drugs.
- Do not ride at dawn, dusk or in complete darkness without adequate lighting.
C. Wet Weather
⚠ Warning: Wet conditions are a source of many bicycle accidents. Visibility, braking
distance and traction all become impaired.
- When the road surface is wet, the stopping power of all vehicles will be reduced and all
tires will lose grip much more easily. Apply the brakes earlier and more gently in order to
avoid wheel lock and safely stop in wet conditions.
9

D. Night Riding
- Riding at night can be dangerous because visibility for both cyclists and other road users
is considerably reduced. It is highly important for people who decide to ride at night to
have the right equipment and follow these best practices:
● Always have functional front and rear lights when cycling at night. Reflectors are
not an adequate substitute.
● Routinely check the working condition of the reflectors and lights.
● Only remove reflectors when replacing them, they are required by law.
● Wear bright colored clothing to increase vilibility.
E. Mechanical Safety Check
-Nuts, Bolts & Screws: To check for loose components, straddle the eBike and lift the
front tire 2-3 inches off the ground. Release the eBike, and allow the front wheel to drop
and bounce. Listen for any rattling; this may indicate that some parts are loose. Repeat
the same process for the rear tire.
-Tires: Ensure that the tires are inflated to the proper pressure and in good condition
before riding. Slowly rotate the wheel while examining the side walls and threads. Look
out for cracks and objects that may be stuck in the outer layer. If the wheel wobbles or
appears to be off-center, the tire needs to be trued. Bring it to a bicycle maintenance
professional for them to take a look.
-Wheels: Make sure that the wheel rim is undamaged before setting off on a ride.
Damage to the rim will cause weak spots and may become faulty over time.
-Brakes: While stationary, squeeze each brake lever to make sure that there is
resistance. (Rider’s right is the rear brake and left is the front brake). If there is no
resistance, the brakes will need to be tightened. If there is too much resistance, or the
brakes make a squealing sound, the brakes will need to be loosened. Refer to Section
3.D for step-by-step instructions on how to make these adjustments.
-Handlebar grips: Check for cracks, cuts or wear as these can all have an impact on
how well the grip will bond to the handlebars. Loosely fitted handlebar grips can slip off,
potentially resulting in loss of control and falling.
- Battery: Double check that the battery is securely connected, and locked to the frame.
- Cables: Check the exposed cables and wiring to make sure there are no
disconnections.
F. Changing or Adding Accessories & Components
⚠ Warning: Adding aftermarket parts to the Tower Beach Bum may compromise the
construction of the bicycle and the safety of the rider.
- All third-party accessories such as luggage racks, trailers, child seat, basket or tires can
be installed at the risk of the owner. If it is necessary to install additional accessories,
make sure the installation is performed and inspected by a bicycle maintenance
professional.
10

3. Tech & Critical Components
It is important to understand the functionality of the critical components on the Tower Beach
Bum Electric Bike. This section serves as a guide to these components and the technology that
drives them. The critical components discussed in this section are the battery, LCD display,
wheels, brakes, pedals and throttle. Please contact Tower or a local bicycle maintenance
professional with any questions about components that are not listed in this section.
A. Battery Guide
The Tower Beach Bum is powered by a 48V, 14Ah lithium-ion battery. The battery is a critical
component and will be one of the most expensive to replace; follow this battery guide to
maximize its lifespan.
A.1. Charging Time
- Charge the battery after every use to ensure a maximum range for every ride. The
batteries in Tower Electric Bikes do not have any memory effect, so charging the battery
after short rides will not cause any damage.
- From a completely exhausted battery, the charge time is between 7-8 hours.
- Once the battery is 100% charged, the charger will disengage and the LED light on the
charger will turn from red to green.
A.2. Battery Charging Tips
- To maximize the life of the battery, complete a deep discharge (fully draining the battery)
every 30-50 rides.
- The battery does not need to be connected or locked to the bike during charging.
- Always charge the battery indoors, on the ground, and out of direct sunlight.
- Do not cover the charger or battery while charging. Both will be cooled by the air and
should be left with some space for the air to circulate.
- Inspect charger cables and the battery for any cracks or other damage before charging.
A.3. Charging Safety
- Do not leave the battery charging in a house or building unattended. Never charge the
battery near flammable materials. Both the charger and battery will get hot and may
present a fire risk.
- Always charge in a dry environment. If a battery is stored/charged in a moist
environment, moisture may get into the housing and damage the cells in the battery.
After riding in the rain, dry all battery components before charging.
11

- Only use the included Tower charger for the battery. It is calibrated to provide the correct
amount of amperage required for safe charging.
- Never charge the battery with damaged charger cables. Exposed copper or wiring will
result in a greater fire risk.
A.4. Battery Life Best Practices
- Charge the battery as often as possible. The lower the level of charge available in the
battery, the harder it will have to work to extract it.
- Store any extra/unused batteries in a cool, dry place
B. LCD Display Guide
Figure 3.A
The LCD display unit will come pre-mounted to the handlebars of the Tower Beach Bum. This
section covers the general operation of the LCD display unit. A more comprehensive manual
for the unit is included in the eBike packaging, and on towerelectricbikes.com.
B.1. Switching the eBike On/Off
- To switch the system on and off, simply hold the mode [M] button for 2 seconds. The
eBike will automatically turn off when parked for 10 minutes.
B.2. Display Interface
- The default interface that the LCD display will show is “Running Speed”. Repeatedly
press mode [M] to scroll through the additional interfaces: Running speed, trip distance,
trip time, average speed, max speed. Each will display for 2 seconds and before
returning to the default interface.
B.3. Push Assistance
- Holding the down button [-] for 2 seconds to enable push-assist mode. The bike will
begin to move forward at 4mph and “P” will appear on the screen. Release the down
button [-] to disable push-assist mode.
12

B.4. Switching the headlight on and off
- To turn on the headlight, hold the up button [+] for 2 seconds, follow the same process to
turn the headlight off. Note that the LCD display will automatically dim when the
headlight is engaged.
B.5. Assistance level selection
- In the default interface, press [+] to increase the level of pedal assistance, and [-] to
reduce the level. The model has 6 levels of assistance to choose from. Level “0” will
offer no pedal assistance, and will pedal like a traditional bike. Levels 1-5 offer between
40-96% power assistance. Please see Figure 6.B for a breakdown of the default pedal
assistance levels.
B.6. Error code indication
- If there are errors in the electronic control system, the error code will appear
automatically. Please refer to Figure 6.3 for a list of error code definitions.
B.7. General Settings
- Once the eBike system is powered on, hold down both the UP and DOWN buttons for 2
seconds to access the general settings. Press the UP or DOWN button to browse the
menu and the [M] button to select the highlighted setting.
-A password is required to access the general settings. The default password is 1,2,3,4
This password can be changed in the Personalized Settings (Section B.8)
- The general settings include: Clear trip distance, change units from Mi/Km, and slow
start settings.
B.8. Personalized Settings
- Press & hold [+] & [-] buttons for 2 seconds while in general settings menu to access the
advanced personalized settings.
- Advanced personalized settings include: Pedal assistance level, speed limit, and
password settings.
B.9. Recover default settings
- Press and hold the [+] and [M] buttons for 2 seconds to recover default settings. Press
the up [+] or down [-] button to choose “Y” or “N”. Hold the mode button [M] for 2
seconds while “Y” is selected to return the system to default factory settings.
13

C. Wheels
C.1. Front Wheel Assembly
- The front wheel on the Beach Bum is mounted through “drop-outs” in the steering fork.
- The front fork is equipped with a secondary retention device. This is a backup measure
to prevent the wheel from disengaging due to ill fitting bolts. The secondary retention
device is not a substitute for correctly securing the front wheel.
⚠ Warning: Replacing the factory bolts may compromise the secondary retention device.
C.2. Removing The Wheels
- To remove the front wheel, loosen the fasteners a few times until the wheel has come
loose and the nuts have cleared the secondary retention device. Slowly and carefully lift
the frame until the brake disc has cleared the caliper.
- Do not remove the rear wheel unless absolutely necessary. There are critical cables that
run from the battery to the motor via the rear axle, so it’s best to leave this task to an
eBike maintenance professional.
C.3. Tires and Inner Tubes
- The pressure rating is indicated on the sidewalls of the tires. The Schwalbe tires that
come standard on the Beach Bum have an air pressure range of 22-60psi.
- A higher tire pressure will result in a faster acceleration, while a lower tire pressure will
result in a more comfortable ride. Since the Beach Bum model does not have a
suspension system, the recommended tire pressure is 30psi.
⚠ Warning: Never inflate a tire beyond the maximum pressure indicated by the
manufacturer. Over inflation can cause dangerous tire blowouts.
D. Brakes
The brakes on the Beach Bum eBike are Tektro disc brakes. Like a traditional bicycle, activate
the brakes by pulling the brake levers located on the handlebars. The right brake lever
activates the rear brake and the left lever activates the front brake.
D.1. Disc Brake Adjustment
⚠ Warning: Improperly installed, adjusted and worn brakes are dangerous and can
cause an accident resulting in injury or possible death.
14

- Both the front and rear brakes pads
can easily be adjusted by turning the
caliper knob, using a M5 hex wrench
(Fig 3.B).
- If the hand brake lever does not have
enough resistance, the brake pads
can be tightened by turning the knob
clockwise.
- If the brakes are making noise, or if
the wheel can’t rotate freely, the
brake pads can be loosened by
turning the knob counter-clockwise.
Figure 3.B
D.2. Disc Brake Function
- The disc brakes on this electric bike will need to be broken in and tuned up once they
are broken in. Typically the brakes will loosen during the first dozen rides, so it’s a good
idea to bring the eBike to a mechanic for a tune up around 30 days after purchase.
- The ebike control system is equipped with a kill switch that automatically cuts off all
power assistance when the brakes are activated.
- Do not apply the brakes too sharply, as this can cause wheel lock.
- When breaking in the disc brakes, begin at a slow speed and gradually apply the brakes.
It is important to have a feel for how the brakes respond at different levels of pressure.
E. Pedals
- The pedals on the Tower Beach Bum are specifically designed to be used with or without
shoes. Otherwise, they operate the exact same way as a regular bicycle.
- Reminder: the left pedal has a reverse thread pattern and must be installed accordingly
⚠ Warning: Beware of toe overlap. This is when the rider’s toe touches the front wheel when
making a turn while the pedal is in the forwardmost position. This can be avoided by keeping the
inside pedal upright and the outer pedal fully down during a turn.
F. Throttle
⚠ Warning: The throttle combined with the high torque motor creates extremely fast
acceleration. New riders should familiarize themselves with the pedal assist modes before
using the throttle.
- The throttle is located on the right handlebar, and will activate when twisted back.
- Unlike the pedal assist, there is no delay option; the acceleration is immediate.
- There is a small black button below the throttle that can be used to disconnect the
throttle. This can be useful to prevent accidental acceleration.
15

4. Service
⚠ Warning: In order to minimize the risk of an accident and potential injury, it is
important to have the Beach Bum periodically serviced by an electric bicycle
maintenance professional. The level of maintenance required on each eBike will
ultimately be down to the manner in which it is ridden.
A. Tower Electric Bikes Maintenance Guide
The Tower Beach Bum was designed and built to require as little maintenance as possible.
The highest quality components, combined with rust-proof aluminum, remove the majority of
maintenance required for most eBikes. With that being said, in order to minimize the risk of an
accident and/or potential injury, it is imperative to follow these maintenance practices:
- Perform a mechanical safety check before every ride, as outlined in Section 2.E.
-Follow the Battery Guide outlined in Section 3.A.
- Ride conservatively for the first 20-30 rides. There are several components that need to
be broken in before the bike can be ridden at full capacity.
- Monitor the bike for signs of damage or discoloration. Discoloration could be a sign of
stress fatigue, which can lead to breakage.
- Do not submerge any parts of the Tower Beach Bum eBike in water.
- Check the wiring every once in a while to ensure all connections are tight and clean.
- To clean the frame, wipe with a damp cloth and then dry any excess water that remains.
- Store the bike under shelter when possible to minimize exposure to sun and rain.
- Frequently lubricate and clean the chain to prevent rust.
- If a part of the bike becomes scratched or chipped, use some paint (or clear nail polish)
to touch it up and prevent corrosion.
- Make cleaning and lubricating the eBike a monthly routine.
⚠ Warning: All bicycles are subject to wear and tear. The various materials on the bike
will wear at different rates, so it is important to do a full check up routinely. If a particular
part has gone past its life cycle, it could fail unexpectedly.
B. Post-Crash Maintenance
A crash or impact can put unexpected stress on the bike in areas that are not build to withstand
such stress. It is important to conduct a thorough check of the entire bike after an accident. In
the event of an accident:
- First, check for injuries and seek medical help if necessary.
- Next, inspect the bike for damage. If there is structural damage to any of the critical
components, do not ride the bike until it has been inspected by a bicycle maintenance
professional.
16

5. Appendix
A. Intended Use
⚠ Warning: It is important to understand the intended use and limitations of this electric
bicycle. Tower Electric Bikes are designed for a specific type of riding.
A.1 Intended Use: The Tower Beach Bum eBike is designed for general purpose riding on
paved roads, bike paths and gravel or dirt roads on which there is not too much loose terrain
and the wheels do not lose contact with the ground.
Maximum weight capacity: 350 lbs
A.2 Not Intended: Off-road or mountain use, or any kind of jumping. The Tower Beach Bum
does not have suspension or a frame built to withstand the force of jumping. The standard tires
are flat-resistant and can perform on loose terrain, however this is not their intended use. They
are designed to withstand everyday road use and to add a level of comfort to the ride.
B. Bicycle and Component Lifespan
All of the components on every bicycle have a limited useful life. The length of time before the
Tower Beach Bum reaches the point of failure depends on:
- How aggressively the eBike is ridden
- The conditions in which the eBike is ridden
- The level of maintenance conducted
C. Metal Fatigue
- The more use the bike gets, the closer it will come to the end of its life cycle. This is
because the metal frame will experience fatigue, which is the accumulated damage due
to repeated loading.
- Discoloration or staining of a certain part could be a sign that a crack is present. Cracks
begin on a microscopic level and may not be visible to the naked eye for a while. Over
time, cracks will become so prominent that the frame will not be able to carry the
expected load anymore and will result in failure.
- Scratches, dents and gouges create “stress risers”. These are weak points on the bike
where stress will be increased. Pay close attention to these spots and replace the part if
the damage is significant.
- Large cracks may squeak and make noise as during riding, this is a serious red flag. A
bike in good condition should be quiet and free of squeaking and creaking.
17

Factors that shorten bicycle lifespan:
- High mileage
- High rider weight
- Abrasive mud, dirt, sand and soil
- Hard riding
- Crashing and jumping
Factors that extend bicycle lifespan:
- Smooth riding
- Low mileage
- Low rider weight
- Clean riding environment
- No heavy impacts
⚠ Warning: Do not ride a bicycle with any form of crack, bulge or dent. Riding a bike with
cracks in the critical components could lead to sudden failure, and may result in serious
injury or death.
D. Torque Fastening Specifications
- Always use a correctly calibrated torque wrench to tighten the critical fasteners on
the Tower Beach Bum.
- The recommended torque levels for each fastener can be found below (Fig 6.1).
Figure 6.1
E. LCD Display Defaults and Error Guide
Default Pedal Assist Levels
(Figure 6.2)
LCD Error Code Definitions
(Figure 6.3)
18
Other manuals for BEACH BUM
1
Table of contents