Advanced Racing Technologies Lucas AGITATOR User manual
-
----
-
--
-
•
•
..
'
THE
•
•
•
ASSEMBL
.Y
INSTRUCTIONS
,
• •
0
r="\
Q
Ci
0 D Q
c;:"\
I •
c::=-..
{Zl
a a
oa
IXl
craa
-c
•o o
01
\01
C"=
I
C7
D 0 0
t:J
CJ7
Ga
,-w...-'7
--
--
----
-
U1\ CI N G T!:CII N 0 L 0 G
IE
S
•
"THE
FUTURE"
IN
}{
0
SCALE
ON-ROAD
RACING!
•
.
..
•
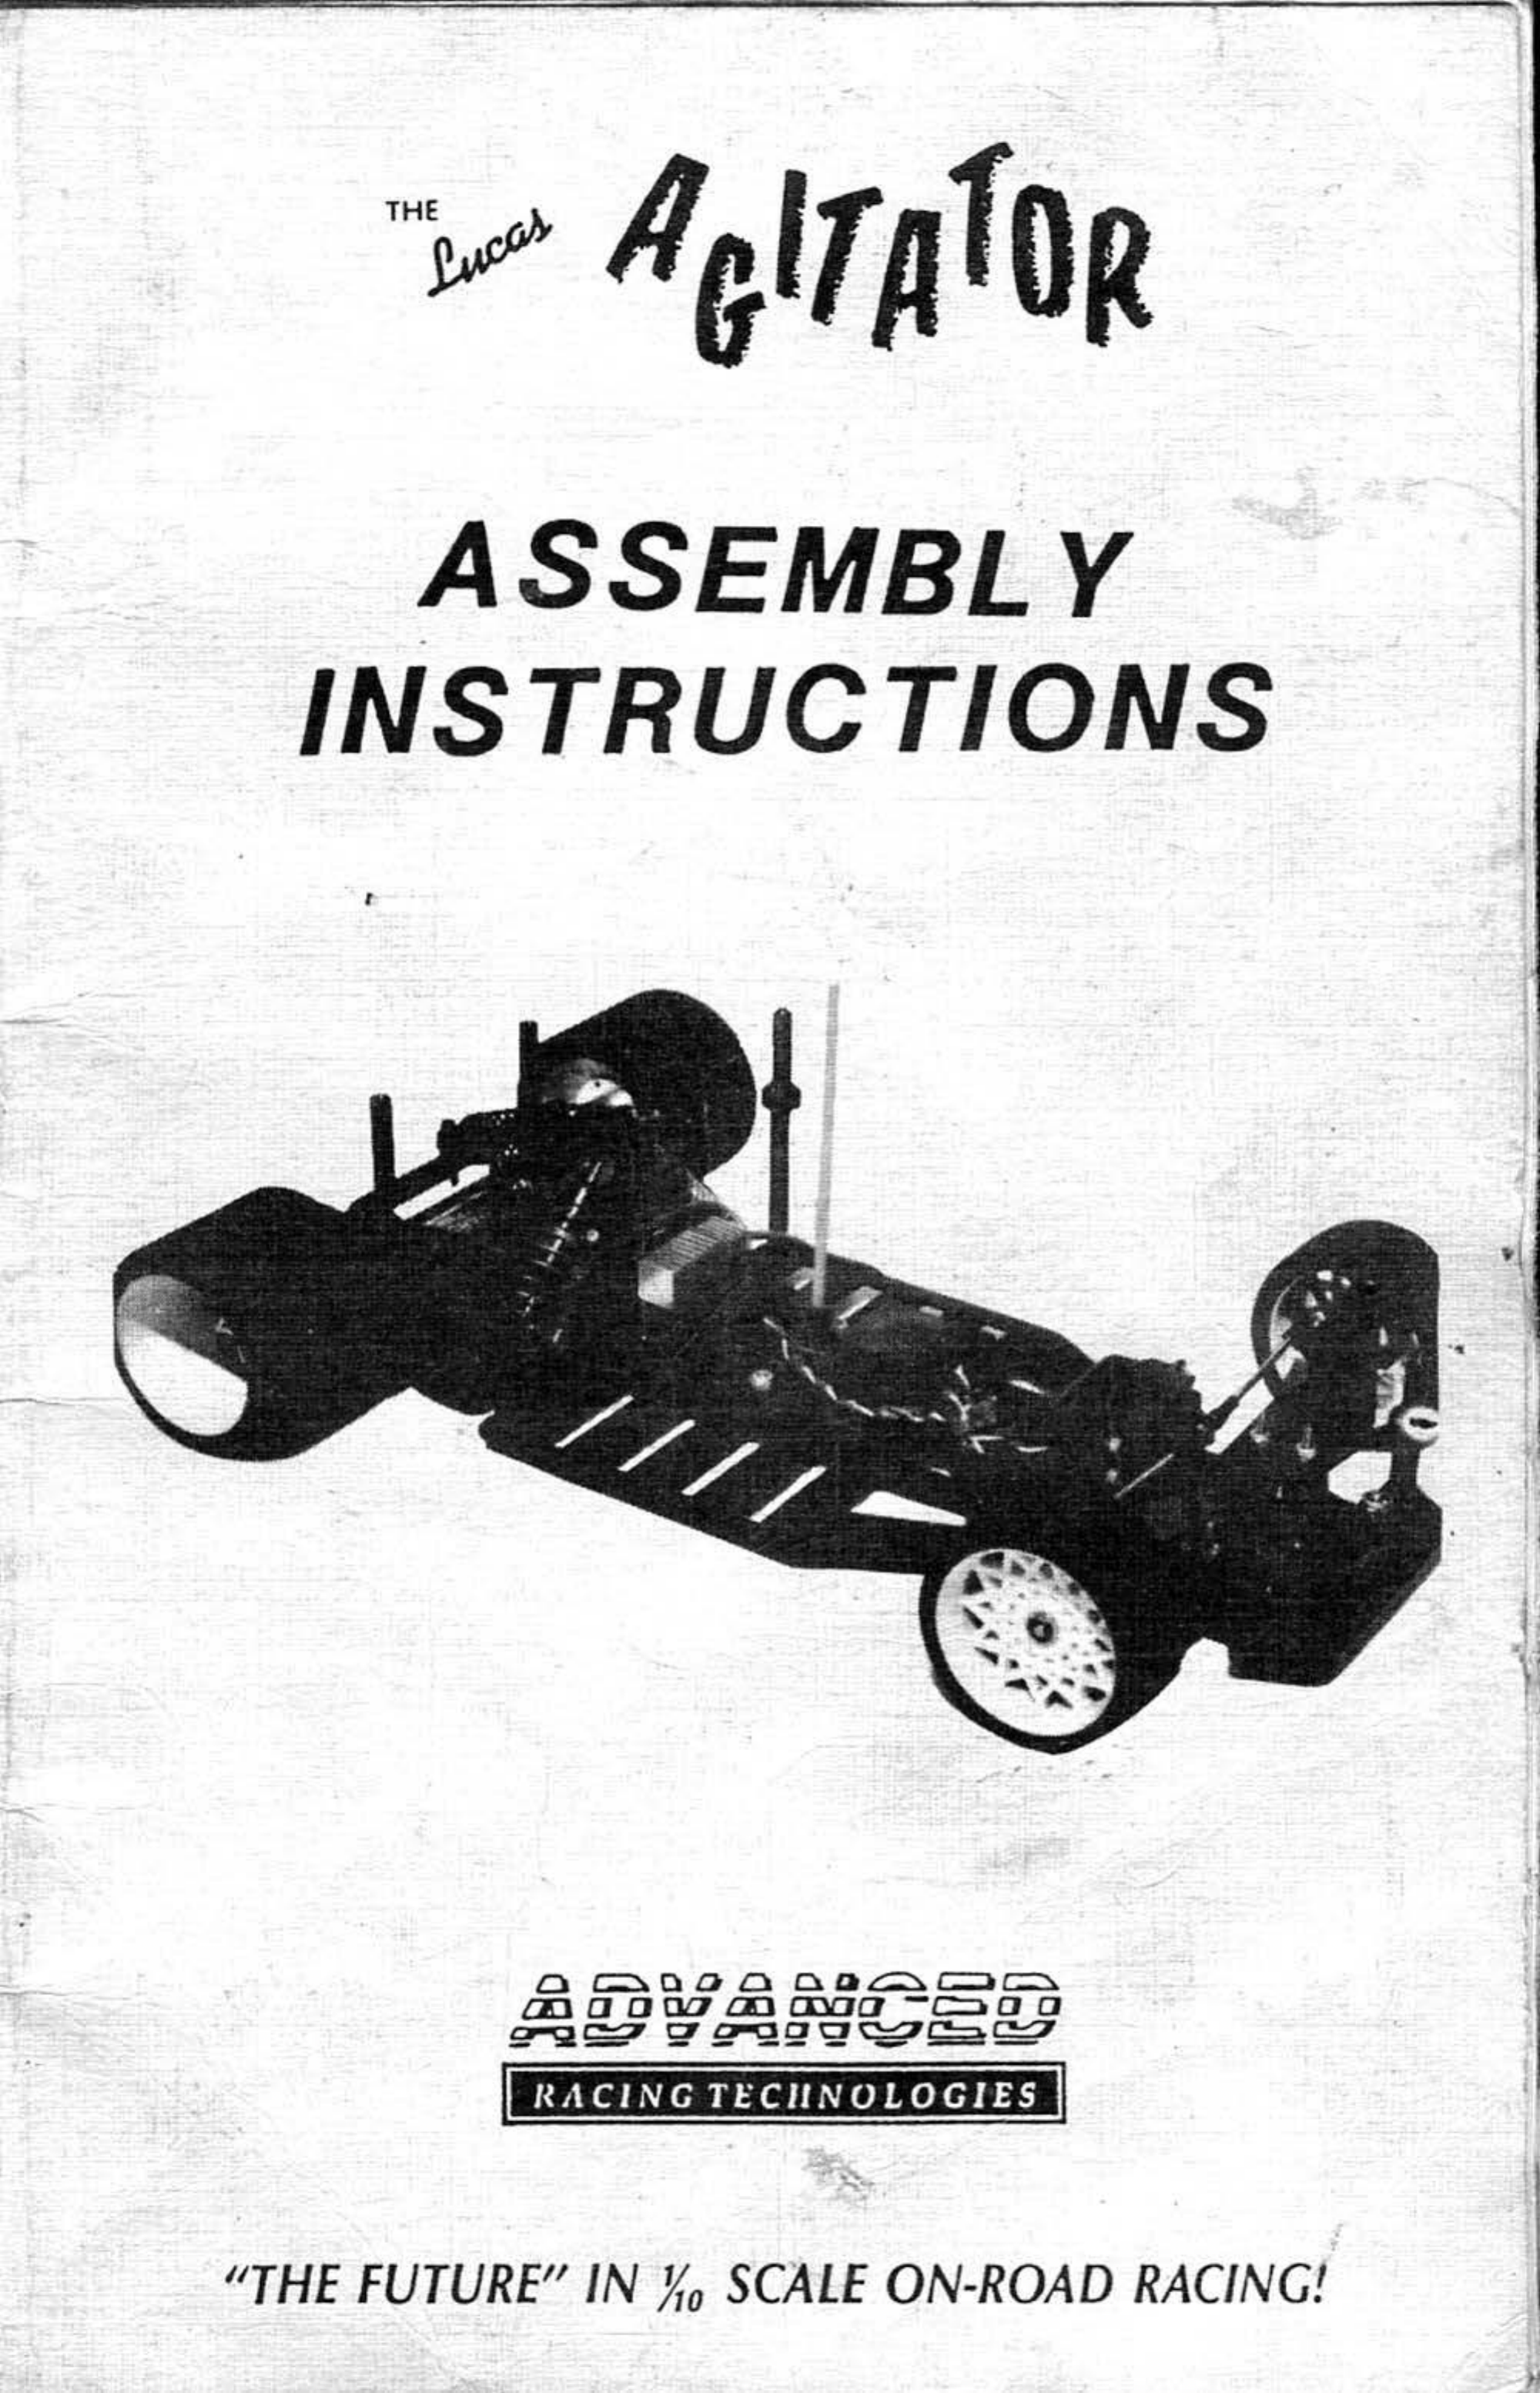
AGITATOR ASSEMBLY INSTRUCTIONS
Thank
you
for
purchasing
the
AGITATOR
1/10
scale
on
road
racer.
We
feel
you
now
possess
THE
BEST
1/10
scale
on
-
road
race
car
availab
l
e.
The
AGITATOR
has
been
developed
over
the
last
year
and
a
half
by
Lucas
Garneau,
regarded
as
one
of
the
best
designers
of
radio
controlled
cars
in
the
country.
Much
testing
and
retesting
has
resulted
in
this,
the
AGITATOR.
Because
of
the
high
quality
built
into
this
kit,
assembly
should
be
very
swift
and
accomplished
with
little
difficulty
.
ASSEMBLY -
To
aake
building
this
car
as
simple
and
pleasant
as
possible,
DO
NOT
OPEN
ANY
OF
THE PARTS
BAGS
UNTIL INSTRUCTED
TO
DO
·
so.
If
you
do,
you
will
mix
up
small
nuts,
bolts,
and
screws,
which
could
aake
asseably
•uch
aore
difficult
.
Each
step
number
is
followed
by
a
"()''.
As
you
coaplete
a
step,
place
a
check
mark
inside
the
''()"
so
you
know
what
steps
you
have
completed
.
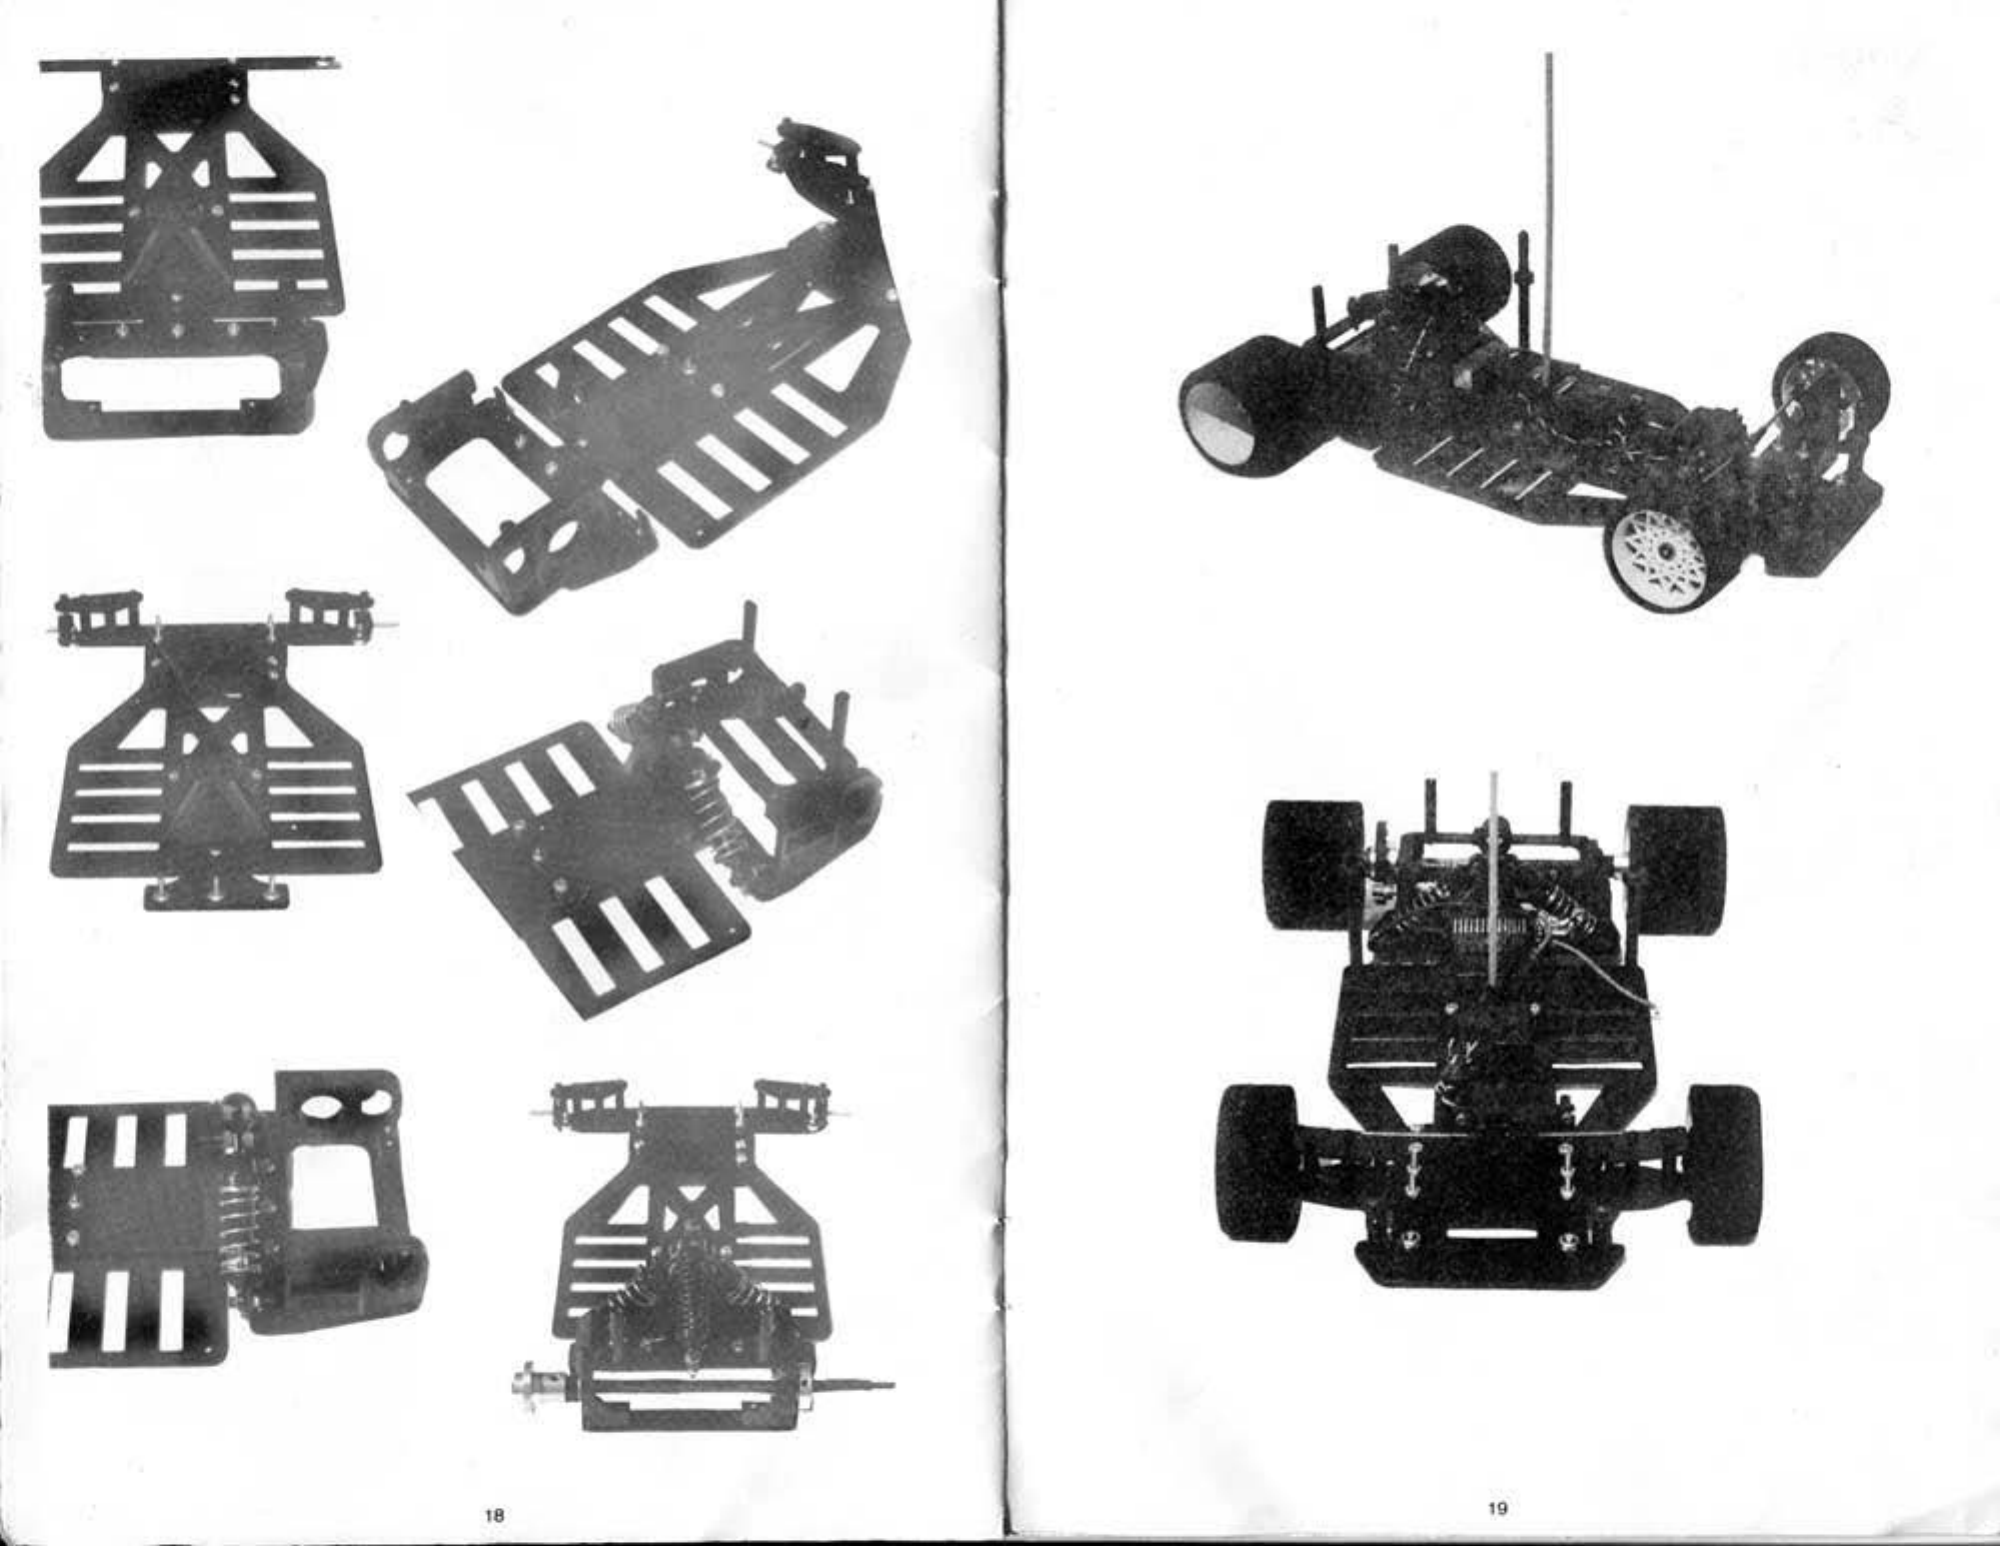
You
will
find
a
coaplete
parts
list
as
well
as
assembly
·
diagraas
and
photos
in
the
back
of
this
aanual.
TOOLS REQUIRED -
Following
is
a
list
of
tools
we
feel
will
be
helpful
in
successfully
building
the
AGITATOR:
3/32
Allen
head
wrench
5/64
Allen
head
wrench
.
050
Allen
head
wrench
Phillips
bead
screwdriver
(#0
and
#1)
11/32"
nut
driver
or
socket
1/4''
nut
driver
or
socket
3/16"
nut
driver
or
socket
Needle
nose
pliers
File
Thread
lock
coapound
X-Acto
knife
Countersink
(optional)
1)
(o/Open
Bag
17.00
and
reaove
the
chassis
pan,
Bag
11
.
00
,
and
Bag
11.20.
Lightly
file
the
top
of
each
battery
slot
of
the
chassis
pan
to
reaove
sharp
edges.
(The
''
top"
is
the
side
opposite
the
countersink
holes).
You
should
also
file
the
edges
of
the
pan
where
the
battery
strapping
tape
will
fit
to
hold
the
batteries
in
place.
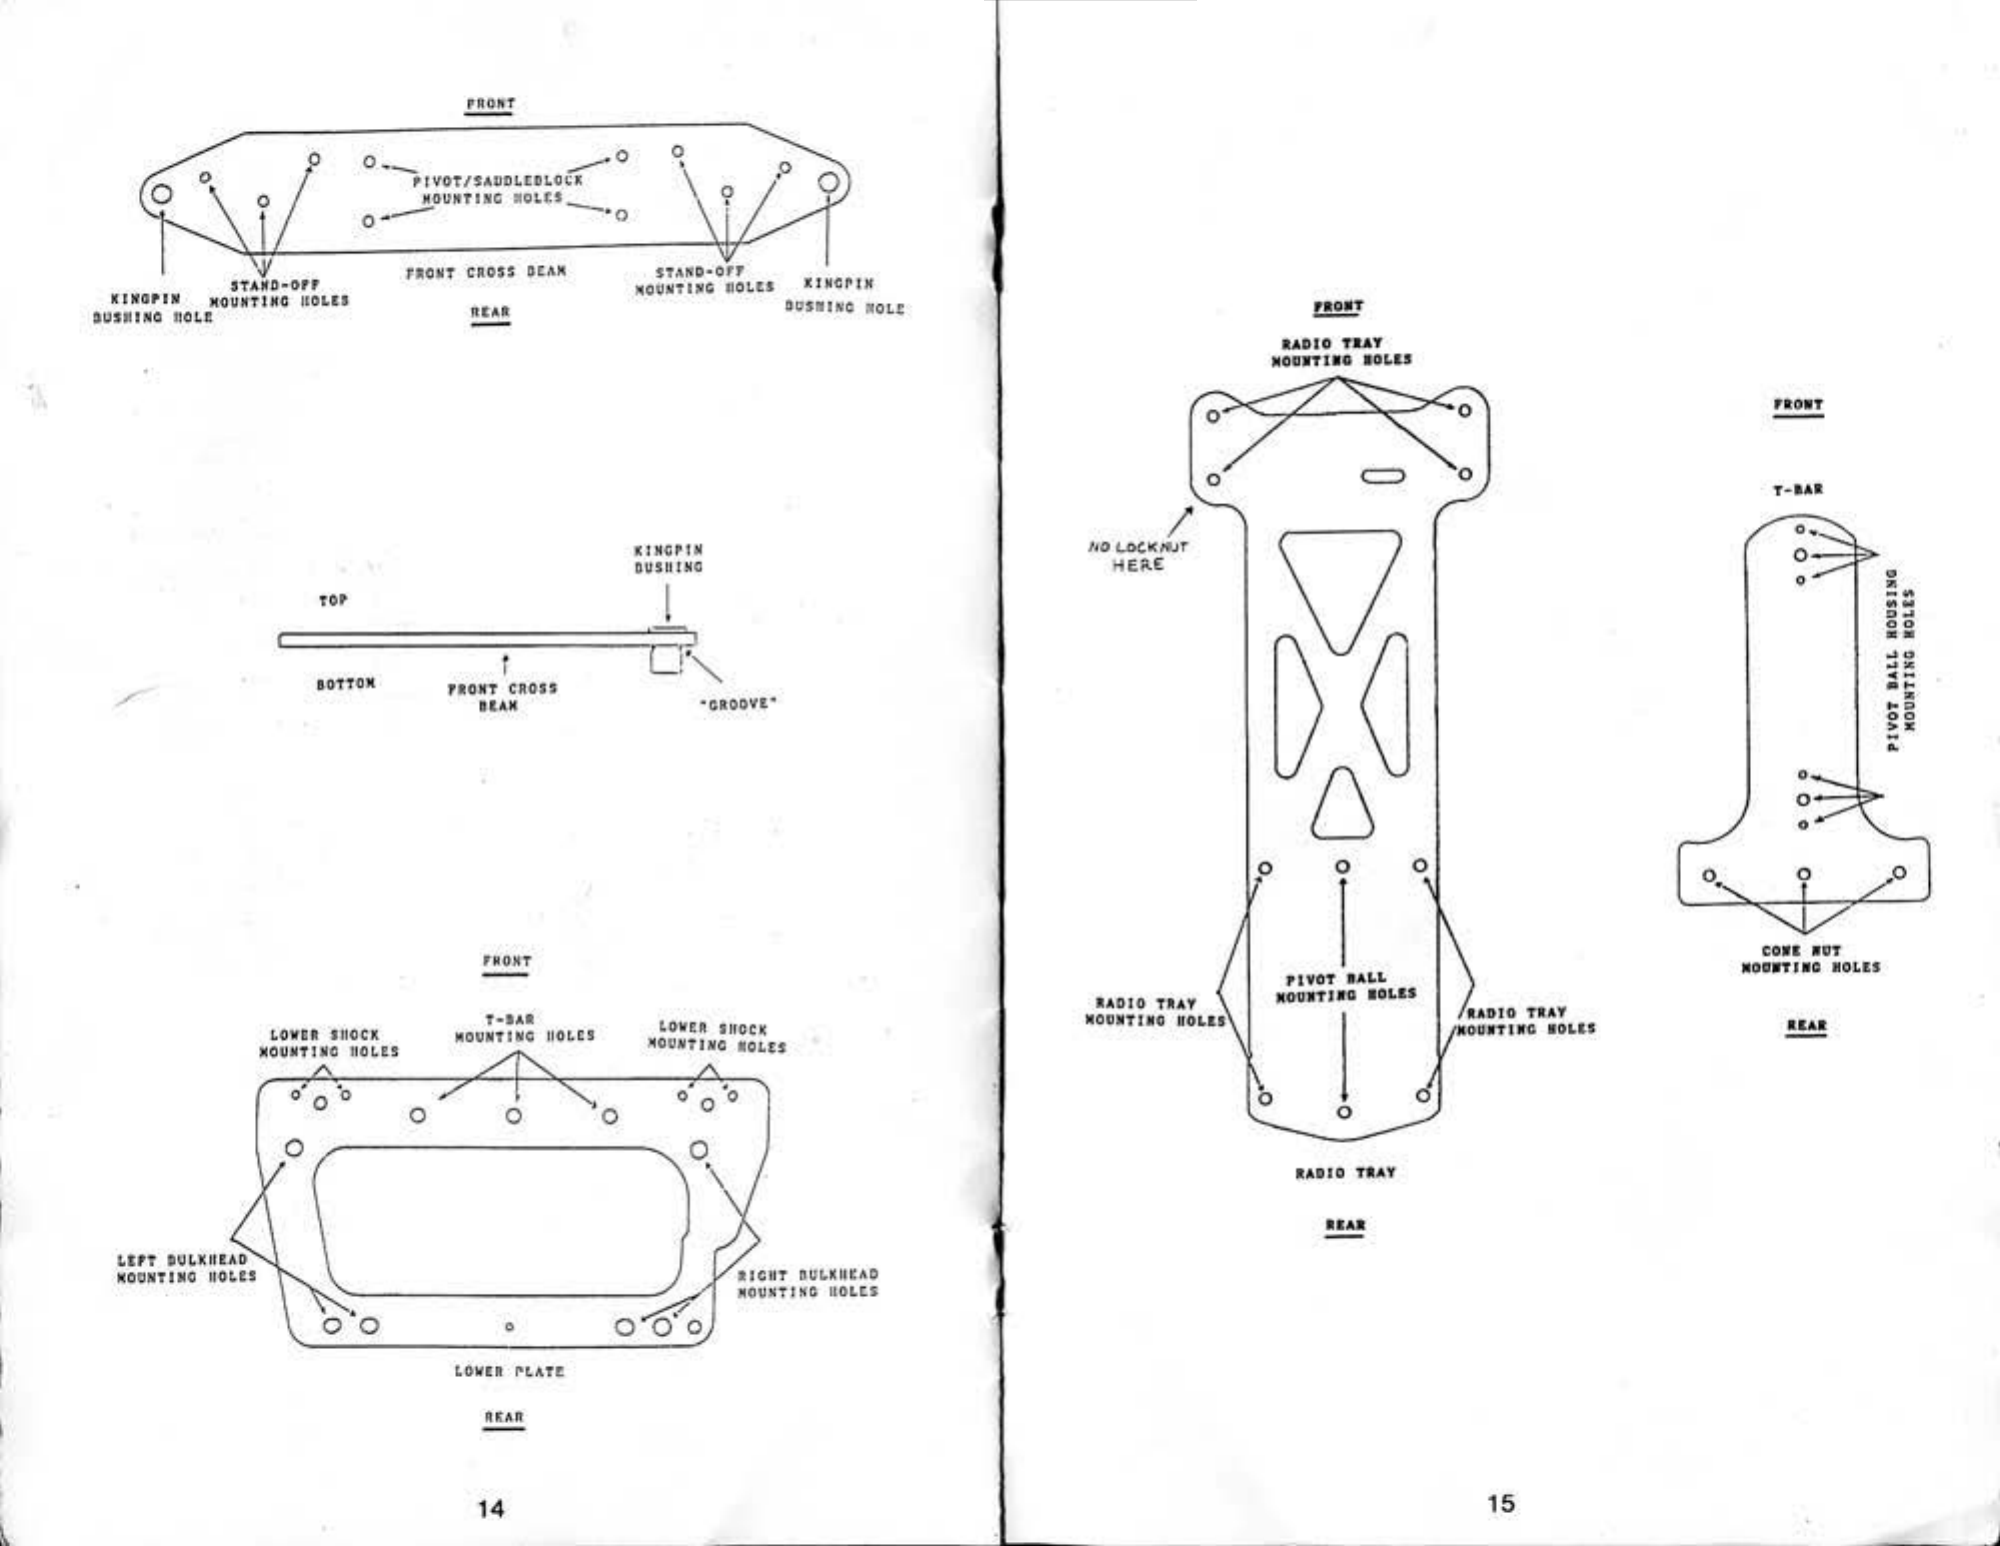
Open
Bag
11.00
and
reaove
the
front
cross
beaa
and
both
upper
"A"
aras
.
Open
Bag
#1
.
20.
Insert
a
kingpin
bushing
into
each
end
of
the
front
cross
beaa
.
It
is
a
snug
fit,
and
the
bushings
should
"snap"
into
place.
The
groove
in
the
bushing
should
show
through
the
bottoa
of
each
end
of
the
front
cross
beaa
(See
cross
beaa
illustration).
Slip
an
o -
ring
over
both
kingpin
bushings
so
that
o-ring
resides
in
groove
of
bushing.
Seat
the
o -
ring
by
placing
a
1/4"
nut
driver
over
the
o-
ring
and
twisting
1/4
turn.
If
the
o-
ring
doesn't
•
l

seat
1
,roporly
,
cou
ntersink
tho
.
hole
sJtahtly
.
Repeat
thJ•
(
)roec
durc
tor
both
upper
• A•
ar••·
c
hecking
ror
proper
O
rl
c
ntatlon
as
shown
In
the
lllu•tratlon.
The
eroove
tn
th~
bushlnu
~h
o uld
sho
w
rroa
top
or
l
r
pp~r
- A·
era•
(See
upper
•A•
ora
tlJu•trotton
) .
De
sure
to
aakc
a
Loft
hand
and
rJeht
lrftrrd
upper
"A•
•r•
.
2)
t)Opcn
Bog •
1.40.
ln!ltall
one B·
el
ip
ont
o
both
s
ue
r·
lng
nx
loa
.
The~
axle
1~
the
one
wltlt
11.
groove
on
each
en11\
Th e
ot
her
pin
s
are
kJnfplns,
which
hAve
erooves
el
os
er
to
the
cont
or
or
the
ptn
. On
ce
you
hav
e
insta
l l
ed
one
&·cUp
onto
eAch (&:de ,
tap
the
11
xl
r:s
Into
the
•
toerlnt:
nr••
·
notlnt:
dfrcctlon
1111
~thown
In
the
lllustratJon.
Thi
s •
ay
be a.
tlght
flt
.
so
you
aay
want
to
tuo
a
vis
e
to
support
the
ateertnr.
ara
.
Set
tho
block
on
t
o~
o(
the
v
ise
and
drive
the
a~le
downwftrd
thr
ough t
he
Sl18'htly
open
v
lsll
jl!lwa
. T
ap
In
untll
axle
I a
ll
l l
the
w
ay
In
bloc~
.
and
£·c
1Jp Js
butt
ed
menJnst
stocr
lne
bl
oc
k .
~ow,
we
'll
ll•so•blc
t l
1o
klncp
Jn• lntQ
th
e
steering
bl
ocks
,
Insert
one
£-cltp
onto
e
nch
klngpln
.
rnser
t k
rneptn
tnto
st
eorlnl
block.
then
tnstall
the
other
B·e
llp
so
the
trooves
tor
tho
E·
eltps
nre
on
either
side
or
the
ateert
ng
block.
Sl
ip
o•
rtng
over
bottoa
or
kJneptn.
Set
this
asse•bly
aside
tor
no
w.
3•
(
~
)Open
Bae
•1
.30
.
lnetoll
the
six
$
tt~~nd·orr.
to
the
front
cross
bea•
as
shown
ln
the
J
JJustrotion
UJ
inr.
the
supplied
4 w
40
X 1/ 4•
allen
bead
cbp
screws
,
Slip
the
•teertnc
block
asse
abJy
into
the
k
Jnepin
bush
ln&s
of
the
rront
croa
s
b
e~•
-
The
kingpin
o- r l
ng
s
lnstn
l
led
In
Step
f2
shou
ld
rcat
on
the
top
or
the
front
cros~·beaa
ktnrpln
bushtnc.
Sl
ip
a
~u9penaton
spring
onto
each
kJncpJn
.
Place
th~
upper
MA M
eras
over
kingpins
so
that
the
upper
nAn
ara
kingpin
bushlnea
slip
onto
ktnrptns.
Al !an
standoffs
wtth
the
holes
tn th
e
upper
•A•
era
s
and
~
use
stx
•ore
4•
40
x
1/4
•
allen
head
eap
screw
s
to
lnstall
.
Cheek
ror
saootb
~p
and
down
oporfttlon
of
front
suspension.
'
4)
~
W
e
are
now
eoJnr
to
as
s
eable
the
fro
nt
end
to
the
choaa
l
~
.
Open Bar.
11 .~ 0
.
Slip
two
~ -
40
X t •
flat
11ead
screws
tl1routh
one
aJde
of
tho
front
of
the
cho•
s
ts
In
the
saddleblock
pi
vot
•ountlng
h
oles
shown
ln
the
il
lustrat
ion
.
Sllp
a
pJvot
blo
ck
over
the
screws
. The
pivot
block
Js
shaped
ll k ~
a
hal(-cJrele.
Plea
se
note
t
hat
th
e
bolos
In
the
pJvot
blocks
nrc
Angled
In
one
direction
on
ly
.
Theao
holes
should
be l
n$tslled
so
that
tbo
anelod
edto
or
the
bloek
Js
oriented
towards
tho
renr
or
the
cor.
Both
pivo
t
bloek1
have
a
whit
e
aark
on
the•
. The
propor
orientation
or
tile
p
ivot
block
ls
wtth
the
whltc
aark
on
the
block
FACING
PORWARD.
In•ta
l l s
&ddleblock
onto
the
screws
.
ttchtenlnc
equally
rroa
one
~crew
to
tl1e
other
.
Continue
thh
procedure
untJ
1
the
p i
vot
bloek
ls
snue
against
the
chassis
pan
.
and
the
saddle
bloek
ts
level
-.
2
and
rtraly
sot
aaaJnst
the
pJvot
block.
Re
peat
ror
th
o
other
s
ide
.
Thls
Aa
seably
allow&
you t o n•lJu
st
the
caster
or
the
cor
.
We
wtll
adjust
th
e
eas
ter
Jotor
.
Mow
slide
the
front
ero
s •
boa•
a•aeably
over
t he
tour
•erev•
Ju
st
Insta
lled
.
TJChte
n wi
th
4·40
locknute
.
You
aay
need
to
uso
a
pbJllJps
sc
rewdriver
to
hold
the
screws
.
In
plaee
wh
i
le
tlehton
Jnt
the
l
.~
l
a
.
5)
flop
cn
Bae
t4
.0
0 and r
eao
ve
the
T•
bl\r
. O
pqn
bog
.r4 .10.
Jn•taJ)
thr
ee
4·40
X 1/ 2•
rJot
hoed
1Cr
0
WS
thrOU#h
the
thr
ee
eo~
nt
crs
unk
hol
e•
I n
rc~r
or
the
T•
bar(See
T•
Da
r
tllust
r
ntlo
n
).
Sc~e
w
4 e
one
nut
ont o eBc h
•c:~
r
ew
unti
l
tlt
l\
t,
It
Is
adv
t•eblc
to
usc
t
hre
ad lock
co
apo
u
nd
her
e.
Set
~slde
the
o·
rJne•
~nd
l
oc
kn
ut
s
tor
the
t!ae
bc
ln
f . Open Dog
t4.2
0 . Sl i J) t he sh
ort
er
5• 40
al
le
n
head
eap
screw
through
the
bottOM
o!
one
...
pJ
vo
t
ball
asseably
and
att~c
h
to
the r
ear
or
T·
bar
uelnt.
t wo 2• 5ff
flat
bead
s
crews
. Rep
ea
t
thlu
9t
ep
ue
tn
c tbe
lon
ge
r 5•
40
alton
h
ead
cop
sc r ew
th
. ou
r.h
th
e
r~ont
ot
t
he
T· b
ar
.
Aeter
to
the
T·9ar
tJJu•t
r
atlo
n f
or
prop
e r or
lent
fttl
on .
6•
I'{Open
Oar
t
S.
OO
and
rcaove
t
he
r;ad
to
tray.
lnata!l
the
T•
bar
to
tho
radio
tr
ey
ustn
r
tho
two
5·4
0
loek
nu
t s
fro•
Oae •
4.20
. M
hen
l
oo
king
rroa
rear
or
the
tray
to
rront,
thto
••all
slot
l
rr
the
tray
should
be
racine
the
rteht
ti
de
.
Fro•
lh
l a
or
i
entation.
the
f·bar
t a
ln•talled
on
the
bottoa
or
tray
. C
heck
photo
.
1)
ci
open
Bae 1
5,
10,
Slip
t ho two
lo
n
a e~t
4-
40
flat
bead
scre
ws
into
th
e
re~
r
•oat
holet
or
the
chassis
pan
,
a
lonr
the
tide
of
th
o
T·ba
r
cro
ov
e.
Turn
the
ebaa
aJa
on
Its
sJde
and
wl!p
the
4-4
0 x 5/ 8•
ttnt
he
ad
sc
r ew•
into
locationt
shown
on
dlftgra
a . To keep t
he
scre
w•
tro•
tftl)lne
out,
J
ay
a
book.
or
the
AGITATOR
box up
agaln&t
the•
. Lay
chassis
back
down
wltl
l S
QrC
NS
stte
k
Jn
f
out
the
top
s
ldc
of
th~
cha•s
l
s.
Slide
the
aluatnua
radlo
tra
y
atand
-
otfa
onto
each
ecrew.
~ON
tnata
l t • ·
•o
l
ocknu
ts
onto
onto
ell
scr
e
ws
except
the
two
rear
aost
on
o
s,
and
the
acrc
w
located
behind
the
forward
aoet
·
left
hand
radio
troy
•ountlnt
serev
.
Refer
to
tho
r•dlo
tray
diAgra•
for
this
locatJon.
JnatcJl
the
'hoek
br
l
dre
to
the
chassis
lnto
the
two
rear
•ost
re•a1nint
screws
In
radio
tray
. Be s
ure
the
notch
ln
the
bridae
1•
f
ac
ing
the
rear,
so
the
notch
enclo•cs
the
5•
40
nut
us
ed
when
ln•ta1J1
ng
the
T·bar
to
the
rad
io
tray
.
8)
Mopen
Bet
15.
20
.
Install
servo
•ounts
to
your
steer
ing
•or
vo
uslnt
t he
four
• 2
$Crews
11nd
tho
t
wo
cover
plat~•
provldr.d
.
Set
the
coapleted
servo
sste•bly
on
tho
radio
tray.
Tteht~n
the
tort
se
rv
o
•ount
to
the
rcaalnlna
rad
Jo
tray
scr
e w.
Th~
left
hand
se
rv
o
ao
unt
doubles
aa
a
loeknut
.
SlJp
the
••
vftsh
or on
to
the
•·•0
X 114 •
allen
head
cap
screw,
Turn
chatsit
up
s
ide
down
and
slJp
tcre
w w/
woaher
throueh
eroove
In
rodto
tray
.
•

Sc
r
ew
Jn~o th~
rJght
h
un'
!
•e
rvo
ao
,lnt
n
ncl
tl&hten
. The
tlot
ol
lowa
ror
dJrrert
ltg
servo
sJ~us.
If
ncces~ar~.
r11~
out
the
slot.
You
wftnt
the
outp1
1t
shaft
o r
the
•
teerlne
servo
to
be
o•
close
tn
tltn
ce
nter
!Jne
or
the
chas
sis
os
P05$Ibl
e.
0)
M'open
llltf!
•
3.00
,
:1.10,
3.20,
01n
d
3.30.
1nst1lll
the
rleht
hnnd
bulkl•cac
l
to
ttae
towor
plht~ U8ln~
throe
B
-32
r
t~t
l
tend
screws.
l
ttsta
l l
nil
thre~
oororc
tlt:htertlnc
.
Ropoot
tor
the
lert
b~nd
buJkheftd
.
Reterrlne
to
the
uppor
plftto
tllustratJon
ln~tltll
tlto
two
~In c
tultes
to
the
upper
plnto
u•lne
two
4-40
X
l
/
•1
~
nllen
l
t
~nd c~p
sc
r
ew~
.
Th~~
e
xernw•
n-~
be
extr~a•t
l
y
liJ~t
t
t.
~o
y0
11
•GY
want
to
use
~O•e
ririe
-
toothed
pller~
to
l1ol d
the
tub~s
In
plAce
. S1:t
ftslde
tl1e tJp
Jt
er
l•laLe
ft111J
tbe
re•olntng
•1
·•
10 X
11
~ ·
aJ
I
~n
h~ad
cop
scr•:~~
-
10)
(~pen
Bae
•3
.<t0.
Instal
l
the
rtr.ht.
s
hock
aount
brtlckot
using
two
2·56
rJat
head
screws
. Thn
t~l~
on
Ll1e
•hock
Mount
wltll
the
sln~ln
holn
eust
ra
oe
rorwsrd
and
t
ow
atrda
th.,
outside.
the
shock
br
ftcket
18
\3pped.
so
don
' t
overtighten
!
Thre•d
Jock
c:oapound
Js
rocoaaend~d
here
.
Repeat
for
lcrt
side.
Take
tltc
r
ear
pot!
aaso•bl~
nnd
lightly
chnaror
tb~
S
holes,
top
nne!
botton,
along
tho
rront
or
the
low
er
plate
~•Jng
an
x-
Acto
kntrn.
count~r~lnk,
etc
.
Slip
ronr
r
od
asseably
over
tbe
T-bnr
a~SOftbly
so
tllllt
th~
cone
nttt&
>llp
tnto
the
cha•f1
1
rod
holC$
.
Pres•
t l
t18
88$0nbly
r l
r•lf
ll
\tO
cone
nuts
to
socur~
I
nto
·p
loce
. IJ&Inc
the
har
dwllrt!
fro&
Bac
1
•1.10
,
xllp
o-rl
l
tta
over
va~
h
bc1
ll
ftnd $Crew
on
locknuts
until
o-rlnr.
ls
Just
sJJcbtly
coMprdsaed
.
We
w
ill
ndju~t
l i
te
•
·oar
end
as~cably
lAter
.
tl)()Open
8ft~
• 3 .
50
mnd
3.GO.
Ass
t
•abl~
tl1~
three
shock~.
o
n~
Bt
a
ti•c
nccordln1:
to
tit~
ene
lo
8od
dtnurna
.
Trl•
fl
;
uh
fr
ott
:~11
plesUc
Pftl'lS.
Start
~odth
the
l'hocll
bo~y
.
I)
l11~tall
an
o- r
lng
, til•'
tltlll
w
~s
ht:r
.
~110ll1
~r
o-rlnt:
.
nnd
then
Ute-
thJc:)(er
washer
.
St:cllro
wllh
:a
c:lrcltp.
The
clip
$l
t
ould
snap
Into
~11
~
Jtroove
Ju8l
Jn•lde
the
~hoc
k
body
,
21
Slip
pl&ton
w
ith
si
~gle
n
otch
011to
the
piston
I'Od
on
~nd
orpogtle
tl1n
thrcndad
end
.
S~cure
w
llh"
seiJlt
e
..
cJlp,
u11lne
nc:~dle
nos~
pller!
.
SMa
l l
screMd
l•lvor,
etc
•.
3t
Cont
tl
1r
cuded
end
or
piston
rod
Ytth
oSl
and
cnr~rully
Pll
&h
shaft
lbrouth
shock
bo
dy
ns
shown
on
the
dta~r"•
·
Scr~w
tow~r
•11oek
aour1t
OlltO
piston
rod.
~l
Pi
l l
shock
w
ith
supplied
oil
os
shown.
Wor~
p1&to~
o•senbly
up
nnd
down lO
r~aov
e
Bny
exlsttnc
itlr
bubbl«a
.
Add
•ore
oJl
u
nl
it
It
1~
even
wlth
tl1c r
J•
or
tha
$ltoc~
bod~.
S,
Plncc
tultb,!r
bladder
In
to
shoek
top
cap
.
~ak•• ~11re
tu
•ent
bladder
evenly
Jr'
tl1e
cap.
Slowly
&er~w
on s t
,ock
cap
ur1tll
snug.
Wo
r k
p!
ston
up
a
nd
do
wn
1t1
1d
ehec
k (OJ'
le
.flk"
lt
(l
,
Soac
t~akace
or
otl
wltllc
tiRt
l
tC!tl
a
•'
:
Js
d~atrablo
In
order
to
ell
~Jnat
e
any
ntr
Jn&i(le
th~
shock.
Slld~
shook
adjusting
co
J
iftr
o~to
shock
body
And
Install
'
•
I
~o
l
lar
tlehtcntng
a~rew.
Oo
not
tlthten
entirely.
Sl
ide
•p
r l
ng
onto
3ho~k
.
Start
with
•liver
sprlnes
tor
the
s!de
shocks
and
a
black
sprt
n•
for
the
top
shock
.
The
al
lv
or
aprlnga
are
stirrer
t
han
tbe
blnck
sprt
nr.
a.
lnstoiJ
•
pr!nc
re
tainer
and
snap
It
o
nto
low
er
shock
aou
n
t.
Take
the
ruel
tubtne
fro~
l
~nc
13 ,
<t0
'
ond
c u t
three
114•
pJccos
.
Install
a
ate~l
ball
pivo
t
In
the
lower
aoun
ta
or
a l l
three
shoc
k
$,
In
stal
l a
t/ol~
p
ictce
ln
the
upper
a o
unt
or
the
lone
thoc
k , ftnd n 1
/"•
piece
In
the
top
·
~unt
of
both
s
ldo
s
hoek
a.
Do
this
by
lub-
rJ~at!nc
t ho
tubl
n&
w
ith
oil
,
and
t w
latt
ne
th
e
tubing
Into
t
he
•ount.
Uatnr.
t
ho
•ountlnv.
hardwn
r o
froa
oar.
13 .
40
,
you
dlJ
rJnd
th
r
ee
long,
and
three
!lhort
nllcn
bead
ca
p
•crews
.
Put
one
long
one
In
the
top
•oun
t
or
the
abor
t
8ho~kt
by
thread
ing
throur.b
tubing
.
Be
sure
to
slip
a t 4
washer
onto
the
sc
r
(l
w
before
throadlnc
through
the
tubln£
. Repea t
ror
the
ot
h
er
short
shoc
k .
Using
the
shorter
allen
bead
~ap
a~rc
w
s.
th
r
e~d
thea
tnto
the
lower
shoc
k
aount
a
or
the
short
shoCk$
.
Jn
at
all
the
abo
rt
sh
ocks
to
the
bridge,
bo
ltl
ne
tl1~
GJJcn
head
cap
sere
v e
Into
the
oulcr•osl
bole
of
the
bridge
.
Re
p
eat
for
lhe
other
short
•hock.
T
ighten
down
so
tho
tubing
boeo
•
e•
•lt
ehtly
c
oap
~e•s~
d.
Sllp
b
olt
throuth
low
er
shock
br4cket
rr
o• t
he
rro11l.
S~cur~
w
ith
o
~
lni
4-40
locknut
.
12){)To
Install
t
he
l
one
top
shoe
k.
plaeo
lont:
allen
h
eed
c•p
•cre
w a
nd
wa
s
her
t
hrough
top
•hock
ao
unt
or
shock
.
Place
sho
r t
alien
hood
cop
scre
w
and
wa
a
ber
through
bottoa
shock
•o
unt.
SJJp
t
he
b
lac
k
~paeer
over
bolt
of
top
s
hook
aount,
and
aore
w
Into
the
brldge
until
tublnr.
sta~ts
to
eoapress.
Rear
bolt
goes
through
rco
r
bo
lo
or
upper
plate
and
ls
secured
In
pl~ce
w
ith
n 4-
40
loc
knut
.
Tighten
until
tubJne
Js
coapressed
a
lltt
Je
.
J3)(
~
pc
n
Oac
t
6.0
0
and
6 .
to.
The
thr
ee
dlrrer
cnt
caas
auppiJed
allo
w
you
to
adjust
the
r J
de
be
lr.
ht
or
the
eor
.
~~
re
c
oaa~nd
using
the
•ldd
le
ca
•
as
4
'tor
ttne
p
oin
t . T
ire
d!aaeter
wlJI
deter
•
Jne
wh
ich
ca
•
to
uae.
You
are
try
in
g
to
low
er
the
ride
height
or
t he
ear
without
dracctnc
the
ehaasJs
on
the
ground.
Jasta
l l a
r
ear
be
artn
r.
tn
to
ceeh
or
the
r
ea
r
e~l
e
~o•s.
Open
DG&
16
.
10
~nd
6.30
.
T
a k ~
out
dlttcrcntJal
center
hub
Cro•
Oag
1
6.1
0 a nd
th
e 8
·32
X
$/32.
~~t
~crew
rroa
Doe
f
$,30.
Us
ing
e
5/64
allen
wren
ch
lbrc~d
set
screw
into
hub
part
WftY
only
and
altdo
th
e hub
over
tt
te
graphJto
axle
w
ith
the
ltp
of
the
bub
raet
nr.
the
thr~aded
end
of
tho
r.raph1t
e
Axle
.
Align
set
scre
w
hole
ln
axle
w!th
the
1et
s~ re
w
Jn
th~
hub
Gnd
tlcht
en
so
that
s~t
10
rew
seats
Into
oxle
h
ole
.
TH&
SET
SCREW
MUST
08
SEATED
IK
THE AXLE
HOLE
SO
THE
HIJB
CANNOT
SL
IP
ON
AXLE
SKAPT.
14)()0pen
Oae:
lo
ne
end
N
ov
sttdo
10 .
20.
Sllde
one
tblek
thru•t
w
as
her
onto
or
axle
.
followed
by a
blue
thrust
bearJnc.
the
axl
e,
(IB
l
end
fJral,
thro
u
ch
right
lta
nd
•
•
(
bu
l
kheod.
and
th•n
th~ourh
the
le
tt
bulkhead
.
SJJde
a
blue
thrust
beartnc
, a
thick
t l
1ruat
w
asl
•
er
,
and
then
t he
black
nylon
spacer
onto
lett
aJde
or
the
axle.
Install
3/JG~
set
scre
w
rroa
nay,
#0,30
lnto
left
w
heel
hub,
Sl
id
e t he l
eft
bub
onto
axle
until
It
ts
flush
eealnst
the
nylo
n
spacer.
Tighten
set
scre
w
unt
i l
rcatatanee
ts
fe
l t .
At
this
point,
loos
en
the
screw.
Re•ove
tlse
ll
ub
and
tile
a
flat
sp
o t
Jn
tho
e
rcn
w
hore
the
aet
screw
leaves
a
•ark
on
the
a xl e .
RoJnstall
hub
as
before,
aak
Jn
e
sure
the
tftt
screw
l
Jnoa
up
wi
th
th~
newly
c r
eated
flat
t
pot.
The
axle
aasea
b
ly
aho
u ld
have
a a i Jr.ht
{.0
05)
aaount
or
atde
to
alde
tree
play.
~~·~lace
a
laree
dltferentlal
rJne
fro•
Bag 16
.20
onto
the
center
hub
.
Install
a
beartne
fro•
Bag
8
6.40
Into
th~
center
of
the
spur
tear
of
you
r
choice.
You
can
use
standard
l / i 2
scale
differential
gears
or
3 2 ,
48,
or
64
pitch.
In
stall
d
ifferential
balls
Into
the
rear.
Lig
ht
l y
lu
brlca
t~
differential
ball
s
with
silicone
erease
and
place
~~ar
on
tho
o~le
with
bearlna
f
lonre
facing
out
w
ards.
Plac~
othe
r l
arre
differe
n
tial
rlnr
on
to
the
rear
.
Instal
l
ball
bear
tnr
on
each
on
d
of
t
he
rtrht
hand
w
heel
bub.
Slip
tho
hub
o
nt
o
th
e
ax
le
,
aak
lnr
sure
t ho
rJd
r e
ot
the
hub
Is
flr•Jy
se
a
ted
tn
t he
lerro
dlfferent
Jal
rt
n
e.
Slide
a
blue
thrust
bsorJn
r .
thJn
tbrutt
w
asher
, a
be
l
lvi
l
le
washer.
and
8-
32
locknut.
Ti
ghten
nut
ju
st
until
no
slop
is
f e l t
fro
•
side
to
side
.
We
will
do
final
dJ
f
!orontJal
adjuttaents
later
on.
At
thls
point.
you
can
aount
your
rtas
and
tires
(not
in
cl
u
ded)
to
t hs l
eft
a
nd
r1eht
hubs
usinc
the
4 ~
40
allen
bead
cap
sc
r cwt
pr
ov
id
ed
ln
Bar
16 .
30
. TRC.
B
OLt
S
~.
and
T. N
rlas
~ro
dessa
ned
to
tit
the
hub
s.
Wbon
ustn1
BOLINK
hubs
you
•ay
tind
l t
necessary
to
s
crap•
•~•e
f
lash
fr
oa
the
ins
i
de
of
th
e
ria
usin
g a n
X-Acto
knl
r e
or
ra~or btad~
.
16)(}ln
s
taJ1
the
fro
nt
body
posts
( s
hort)
fro•
Bae
82
.0
0
to
th~
buaper
u
aint
th
e
outeraoat
h
oles
In
the
bu
ap
er,
and
t wo
8-32
X 1/ 2
pa
n
head
sc
rew
s.
To
tnst~l)
thea
you
•oy
Nant
to
use
a
piece
ot
au
sle
w
Jre
&n
d
pu
t
it
throueh
th~
body
clip
hole
to
hold
the
pos
t
whi
le
tlcht
enJn
c
th
e
scre
ws .
Pl
aco
tho
buap
er
aasea
b
ly
on
top
o!
th
e
f
ront
end
o f
tbe
chassis
and
slip
t wo 8 ·
32
x
112
·
tl
at
bead
scre
ws
throug
h
botto•
of
chassis,
buaper,
and
secure
Ni t h
locknuts.
A
lternatel
y ,
you
aay
in
stall
tho
body
p
osts
on
the
center
2
holes
wi
tho
ut
the
loc
knu
ts
to
suit
differe
nt
body
s
tyles
.
Attach
rear
b
ody
posts
ualne
the
4-40
X
1/2
flat
head
scre
w
s.
Use t he a
aa
e
pr
ocedure
to
instal
l
thea
as
y
ou
di
d t
or
the
f r
ont
.
Put
set
ser~
w
a
tnto
body
post
coll
ars
.
$lip
colla
r s
onto
tht
posts
and
tlthten
the
set
acreNs
wh
en
the
d
es
ired
colla
r
heteht
is
achieved
for
t ho
body
'
you
arc
u
stna.
Do
not
over
ttchten
th
ese
set
tcre
w
t.
1
7}()0pen
Bee
11
.
10.
In
stal
l a
steel
steering
eup
bal
l
•
through
the
L
OP
of
~ach
sto~rlng
block.
Rca• I ol e
slig
ht
ly
to
t1
e
lp
start
throadtng
tn
t he
ball.
A 3 /
J&
•
nut
dr
i
ver
1s
a
dvised
h
ere
.
Place
a
plain
nut
on
Lhe
other
end
an
d
tighten
. T
hr
ead
boll
cups
onto
each
end
ot
the
t
hreaded
tie
rod•
approxlaately
1/4
•,
J
natall
steel
ball&
i n
to
your
•ervo
snvor
.
W
~
rcco••end
Ki•brough
se
rvo
savor•.
which
a r e
nv~llHblc
fr~a
•ost
hobby
shops
.
Snap
ball
ends
Into
c~ch
tte~rlnc
ar•
and
the
• •
rvo
save
r .
We
wtll
adjust
the
to~-ln
later
on
.
!S){)Open
Bar
1
1.00
and
in
st
all
two
fro
nt
bearings
Into
c~ch
or
your
front
w
heels.
Sl Sde
nylon
o~le
spacers
onto
the
f
r~ nt
axlo
to
eltatnate
any
side
to
side
slop
o
nce
you
insta
l l
the
axle
e
-e
ltp
fro~
aae
11.1
0.
19
)(1F
in
dtn
r
the
antenna
aount
f r
o•
bat
14 .
20
.
ln
ate
l l
it
with
larrcst
hole
up
onto
the
5-40
screw
froa
the
front
T-
bar
pivo
t
ba
l
l.
You
aev
need
to
cha•!or
tho
h
ole
In
the
aoun
t
with
a X•
Acto
knife
.
Servo
tape
the
receiver
between
the
stcer
tn
e
se
rv
o
and
the
antenna
• o
unt.
Threa
d
antenna
wire
t
nlo
the
yel
lo
w
antenna
whip
ond
pr
e
sa
it
Into
the
plastlc
a n
tenna
aount
.
If
your
antenna
wlt
e
le
too
long
then
you
••Y
w
ts
b
to
re
aove
tho
rod
antenna
cep
and
press
Jt
over
t he
exce~s
wire
to
ltt
It
fly
free
.
DO
NOT
CUT
ANY
EXCESS
RECEJV£R
WIR
E! THIS WILL
OETUNE
YOUR
AAOIOt
Insta
l l
your
electronJc
speed
con
tr
ol
w
ith
s~rvo
tape
bet
w
een
the
ante
nna
aount
and
the
shock
brtdr.
e.
Throed
the
aotor
wires
thtoueh
th•
center
of
the
•hock
brJdRe
.
PJnJah
hook
tn
e
up
se
rv
o.
receiver
.
and
spet
d
co
n
trol
a s
per
t
he
•anufacturcr's
instructions.
Y
ou
have
no
w
coopletely
n
sseab
i
ed
your
AGITATOR.
but
be
oure
to
read
the
tolJowtnc
tuning
tJ
p
s.
1 •

DIPPBRBNTlAL
AOJUSTHENT
TIChtea
th«
8-32
loc
k a~t
1/1
to 1/ 4
turn
at
n
tl
•
a.
Uoldlnc
bot
h
rear
t i r es ,
try
t•
•
ovo
t~e
apDr
re
ar
w
ltb
your
rlcht
t•u
ab
, Tbo
dJff•r•ntlal
11
a4J••tc~
whe •
the
~ear
w
JII
b~arly
•
•••
wi
th
•
•ch
forc
e.
Ute
a
tlrhter
differential
t
or
bieber
blta
trackt
,
an4
a
looser
dlrfereattal
for
lo
w
er
bit
e
trac
k
s.
DO
•or
overtlahten.
TIR!
StLECTlOM
There
*re
several
•anufActurera
who
s
ell
3 w
ldo
toloc
\lon
of
r~bber
co•pounda
r
or
R/C
on-rond
carA
. The
toftneMa
or
hardnt••
or
th~
rubber
you
select
to
run
o~
your
c~r
drpt
,
nd
s
ereatly
on
the
su
rface
you
w111
b~
raclne
your
cnr
u''·
uM
wnll
N•
th
o
typ
e
of
cor
you
aro
r~oln£,
Ooncr GJ
iy
speaklne.
the
riranoa•
or
the
rubber
aval
la bl ~
It
•lc•
•oted
by
a
color
. Tl
1t
:
rollow
lnn •-
th
e
ranee
of
rubber
curronlly
ovftllftble
:
ORA~
OS
e~uE
GR!EN
YE
L
LOV
ItO
PlAMSST
SOftiS
T
we
have
fo~nd
that
the
best
startlbC
point
ror
M
OST
track
condition•
Ja
the
ORII"
eoapound.
front
and
r
ea
r . Re• e
aber
.
thla
Ia
J~•t
•
•tertlnl
point
.
You
aa y f
lt
ld t
hat
•
dtfCerant
firaneaa
.
or
•
CO
MIJNATI
ON
of
flr•netses
w
orka
beat
tor
you
.
PRO
MT
TO£
-
IN
ADJUST
ME
NT
The
toe
•
ln
onrlo
or
lh~
rront
w
l
te~l$
l•
the
horltontM
l
~ne
l
c
b~
tv
een
the
rront
two
w11oel
s.
The
ftnO\
I
nt
of
to
e•
1n •bY
vnry
fro•
0
d ~
r ruot
Cntutrftl)
to
4
dear
•
~••
(aaxt•u•)
. Tt1u
auro
t
oo•ln,
the
•or
a
atretrht
•
llno
•
tabtJity.
but
less
•teer
lne
atn
tl
tlvlty
, The
1•••
toe
·l••
you
hnve ,
the
I0$1
atrateh
t-
l
lnc
•tftblllty,
but
you
wtll
&fttn
Increased
t
tcerlnr
sensitivity,
The
toe
•l
n
en1
1e
ta
adJusted
by
turnlne
tl•n
stccrlne
rod
ball
-
Joints
IN
ror
a
ore
tteerlnr
s e
ns
i
tivity
,
•nd
OUT
for
less
tteerlftl
tonaJtlvlty
.
Toe
•
lo
w
ill
dep
end
on
wbleh
track
you
are
raelne
.
lxpert
a
ant
un
til
you
reach
the
tot
•
ln
that
best
aatehet
tbe
tra
ck
eed
your
drlvlnl
ability
.
8
PROMt
IMO
A
DJUST
M
ENT
TIPS
tooaen
tba
fo~r
(4
)
locknut•
oa
tbe
top
of
the
front
cro
asbsaa
at
least
five
(
$)
co
a
plete
turns
.
For
laaa
c
aater
1
Looaen
Croat
bolts
on
the
• •
deralde
of
the
ch
asa
la.
LooaeD
ea
cb aft
equal
a•
oaat,
I . e .
oae
torn
each.
TbeD
ttcbteo
the
rear
bolts
the
aa
ae aa
ount
on
each
aide.
Loosen
rear
bolts
on
the
vnd
a
ralde
or
the
chaa
a1s
.
Looaen
each
an
equal
a a
ount,
J.e
.•
ono
turn
each.
Then
tighten
front
bolt•
the
sn
• e
n•od~t
on
cae
h
aide
.
Mow
re
-
ttuhten
\he
fo~r
lo
ck
nuts
on
tl10
too
or
\he
croaabe•
• ·
Do
not
ov
ortJe
h
ton
.
No
w r
c-ndj\lat
t he
tro~t
tot-in
or
too
•
out
.
fr
ont
w
heel
RAC&
TIPS
lncrea
ted
tatter
w
Jll
alv~
you
•ore
htch
apa
ed
ataarlftl
to
a
polnt
.
At
this
polnt
you
w
ill
start
to
•ac
rub
•
the
tron\
tlrea
.
Oecreaaed
caster
w
lJl
rJve
a
ora
lo
w
apeed
atearlftl•
but
tbe
car
w
ill
bcEln
to
puab
on
hllh
apeed
turna
.
AJ
•
aya
uaa
poaltlva
caster,
or
zero
decrees
Cw
blcb
la
whan
the
ktncpln
Ia
ttral1bt
up
and
do
w
n)
.
T~e
c
ar
uauall
y
worka
beat
wJtb
two
to
four
da
1r
ae
a
of
caster
.
If
the
car
Ia
a
little
too
aenaltlvc
tbroutb
the
lafteld,
add
one
decree
of
e
aster
to
•de
-
sensltlaa
•t~e
ateert•l
·
tr
t~e
car
•pusb
e•
•
at
~ilh
spae4s
add
one
decre
e
of
caster
.
Do
not
ex
ceed
six
de&reea
of
c
aster
,
or
you
w
ill
o
tart
to
sc
rub
tbe
Croat
tires
and
lose
speed
in
the
corears
.
If
addl
nl
one
de1ree
does
not
belp
ead
yo~
bsve
•• a x
ed
out•
et
•tx
deer•••·
chan
ce
the
rro
at
ttraa
to
a
aofter
co
•
pound
.
Ca
•b
er
aay
be
edjuated
by
addJnc
paper
1blaa
to
tbe
s
ide
•
of
tbe
boJtt
bet
w
een
tho
taddlobSock
and
the
rront
•
cro••
bee
• .
9
--
-
--
--------------
--
R!AR S
IDE
S H
OC
~
TW!
AK
ADJU
STM
E
NT
The ob
ject
o t tw
ea
k
lng
the
au•penslon
on
tl•~
c~r
ts
to
set
the
•p
rtn
a ra
te
•
equal
on
all
tour
~ornera
of
the
car.
Thts
ts
a t t
aine
d by
adjutttnr.
the
s p
rln(
t~n-
l
on
nn
tho
si~Q
~hocks
In
th
e
rear
.
10
se
t t he
tn
Jt
Jal
t
WfiBk
on
tbe
eer
.
re•ove
all
thrne
ilhnok
s.
t\ow.
tnatall
t he
aotllr
nnd
dtCferontll'll.
xext.
llllSt~t
ll
tht!
rJv.
ht
stde
•hock
(aotor
s J
de).
SOM
adJull\
t he
•hoo
k
co
l
hc:
(
\o
!liH
thf!
R
prln
g
te
n
tJon)
up
or
dnwn
to
get
tho
reRr
l
ower
p)ntc
J~v~
l
wlt
ll
t he c
ho
t•J•
p)a\1,
or
ns
close
B5
posalbJ&
.
~ o
w Jn•~alt
the
l
t!ft
sldo
roMr llh
nt!'
k . t\ow
!ldju5
1.
coJlor
\ up
or
down tO
get
the
renr
low~r
pl
~te
l~vel
ohftSa ls pl a t e.
e,.he
shock
wl l h
the
Nf!Xt
,
Instal
l
the
rea
r
Cfllll~""r
shock
and
down lo
~
et
the
r~ar
plftlf!
l
evel
l;o
batteries
a r e
lntJ\ol
led
ln
tl'le
c:"r
.
a<
I
Ju•t
th~
collar
up
tl1n
ehft$SJs
. w
he
n
.,
<be
To
ad
juflt
batteries,
the
rtn
ll l tw
ea
k ,
•oto
r .
radio.
and
t he
car
aust
I
J~
r
eady
to
tires
all
inatnlle
d .
run
. 1•
e.
Pleco
th~
oar
on a
flat.
lov~l
•urfftc~
(d~flk
lop,
K
lft"3
~lntn.
e
tc
. I . Sow
uJtn«
the
\tp
of
an
X-~ cto
knife.
ce
n
ter
the
blndo
on
thn
lo
w
er
re"
r
platft.
directly
b~luw
the
re~r UP
I
>~r
shock
ao11
11t
In
sull
hole
provided
.
Utlnt
t
h~
kntre.
slowly
lift
the
car
troa
Jts
re~t
l
n~
position
nnd
w
atch
the
botlo~
Qf
lh~
reBr
1
.
lro~.
I t
tbe
le
t t r
ear
t1rt
J J
ft
t
fro
•
1t
s
res
t
ing
p
)ftCP
f
irst.
th~
o~r
t•
utd
to
b•t l.l(HtT
na
the
left
sJde
,
ot
tho
rl
P.
hl
'
.td.-
h
IIMAVY
.
To
adjuat,
l
oou
n
tht
eoJlar-
on
the
le
ft
sl
cl
e
11hDc:k
1uitl
.J~ove
It
do
wn
~
••e
l l aa
ount
(l
/
32.
1/ lfi t
Klld
r n -
tlg
l
•t
~n
co
l
lar
end
rt~h~c
k
.
You
~
a
nt
both
tir-es
to
lift
off
tht
~urraoe
A1
Ti
l£
SAME
T
I~ S.
t r
the
rig
ht
ro
a r
tir~
llftt
orr
first
,
lous~n
tl1o
rlg
l
1t
ai
de
shoc
k oo l l a r
en
d aovft
lt
down ft
••a
l l
aaiuttt
lJ
/32 . 1/
181
and
re
-t
lRhten
co
llar
and
recl1eek.
t r
one
sldl!
Iitts
otf
A
tftr~
~
a~tount
i . e .
1/4
inch
or
110re.
Jooten
one
sh
o
ck
coll111r ond
tighte
n
the o
thor
co1 1
er
on
the
OPP••slte
sh
ock
.
RAC£
TIP
~
Jf
th
e
race
car
turBa
one
djrec\l~n
bAttn
•· tl1ftn
~he
ott
1
~r.
check
tor
a
slight
twea
k .
ff
th~
r~t
~C
CHr
~p
i
n
"
ou
t
In
one
di
r
ection.
cbflck
for
a
aa
jo
r tweak .
RACE
TI
P:
ALW
AY$
cheek
tweak
botor~
ovor~
run
.
AGITATOR P
ART
$ lAG
CO
MTE
•T
S LI ST
P
ROH
T
BMD
8AO
• 1
.00
Pro
nt c
ro
11
be
aa
an
d
uppe
r
ar
• s
1.1
0
1.20
1.
30
1.
40
-
Ste
e r i nc l t
nka
ce b
ee
Ki n
epin
bus
hin
a
bar
Stand
-
ort
bo
c
Sus
p
ens
1
on
bar
1 0
&0
-
1.&
0
Front
bloc
k
bae
Pront
bearinr
baf
BODY
POST
BAG
- 2.
00
Bo
dy
po
ets.
collars
,
and
front
bu
•p
cr
2
.10
-
NJec
.
scr
ews
REAR
POD
8AO - 3
.0
0
3 . 10 - L. H. a R.
U,
blo
cks
an
d
ea
• •
3 . 20
Tap
•
botto
• pl
ot&$
a w
tn
c
tub
es
3 .
30
• M
isc
. ac
re
wa
3 . 40 Shock aount a w/
har
dw
are
3 .
50
-
Shor
t
ehock
3 .
80
L
onr
Shoc
k
• y•
BAR
BA
G - 4 . 00
"t "
bar
4 . 10 - Cone
nu
ta v/
hard
w
are
4 . 20 •
Pivot
ball3
v /
har
dw
are
a
ant
e
nna
a
oun
t
RA
DIO
P
LA
T£
BAG - 5
.00
Ra
d Jo
pla
te
5 .
10
S
ta
n d -
off~
V/
hard
•
ar
e
$.2
0 - Se
rv
o
aounta
v/
bard
•
aro
REAR
AXLB
B
AG
- 6 . 0 0
G
ro
phi
te
re
a r
axle
•.
10
IL
20
6 .
30
6.
f.O
- L. a . a R. H.
bub
a •
dJtfer
e n
tJaJ
hu b
• Dl
fterentla
l
rtna
• a t hr u
at
wa
ahe
ra
Hub
ba
r dw
are
(bolts
A s
et
a
cre
w
a)
Roe r
bear
1
nr
•
CB
A
SSIS
BAG
-
'1'
. 0 0
C
hos
sh
pan,
an
t e nna •••t •••
tip
•••
LOO
-
Proot
••
•
••
•
•••2 . 0 0 -l!lody
poet
•
••
••a
3.00
-R
ear
•••
•••
•••
LOO
-"
T"
bar
••
•
•••$ .oo -
Ra
di o p
ht
e •
••
•••
&.0
0 -
Rear
a x
le
•••

,.,.,.
ClldSIJ
'All
I
UIIII'III
N
OCIJIT
111
0 1101.11 Q
0
··
--'==
::....:
=:.._
.
'lYOT/
SA
ODLLIL
OC
l
aOif
l't
l
ii
S
lOU
t
U
..
t U
Oit
TIU'f'
a
ee
nu
c
•ous
0
0
.o
.__I
_
__..I
I
0
lUl
IOOY
POST
"
0\IIIITIJIC
1101.1
I
D
I
o·
,lYOt
i
SAOOllt~
el
II
OUIITU'C
IOLI.S
U on U .IUO
ttA
'f'
•ou-
..-TIIIC.
aou s
0 O Ll _ _
__,l
lltl<ll
UO
I O
UA'I'
)I
OUU
1
110
II
O
I.U
0 0
12
c___
__
)
I
0
lCAll IOOY
P0$
T
JI
OII
IITUI
G
1101.1!
..
,
<
A
liLt
I
I
U
PT
I O
UI
IU.
)I
I.
I
TJIIC
IIOLCS
0
0 I
....
f A,
AJJ..
.L
I.
H(O
8l«IC
w
nc
•'
DII\£C.1'IO#'I
...
,.,
STU
I.-C
II.O
C
I'
0
ltl
lt
"Uf
IIO!
Ifl
..-c::
IIO
LL
CUUIII
UIU
U C
AUUIL
T
-
STt
i
ii
• C I
LOU
AU U
II.T
·
·
·
·~·
·
.
..
.,..
.t.St&
• I
LT
•
...
.,
S'TC!tl f
ll
¢
ILI
I(
l.
o.
.,..-
-----
~
0 0
V
UI
G
Ttllt
;~ov•tt
•
c
tru.r:
Ttr
:1t<1:
.
O.
ITU
C
IIUS
"
13
III
IIC 1'1Uil
JIOUIIT itiC
II
l
LI:
~
l
iC
IT
IO
U .
IlUO
•••
n~ac
aous
•
un
DU
Litllfllo
kC
tlliltUIO
!IOU!
Plt0111
o
~
-
_...,....o
r I
V0T/$AVOLULO~II:
f!OIUtTUIG I
OLU
o
..
___.
- ·o
'"
1011'0)1.
LOW
U SIIOCK
JIO
\
UIT
1110
IICL
ts
o' 0 ·o
0
o'o
F-OIIt
CROSS aCAit
0
PlCJit
CIIOU
I
lAM
PliO
)It
T•IAt
MOIJMTUIO
IICLU
o 'o
•
LOII!II
l'tA.tL
lll!i
.
lllt
14
stA
ii'
O~O,
MOU
II
TIJIW
l
OLtS
k i MC,
IM
llOSIINC
I
OU:
II:HIGPUI
CI!SIIJ.II
<i
t.OV£11
SIICCI(
MOUMTINC
IOU$
0
•
ti
CIIT Dl!t.ICIICAO
110\UIT I
II'C
IIOltS
0
IAOIO
T1
4
'1'
M
OD.TUIG
ll
OUt
ltAOIO TltAT
M
OO
I T
II
O
IOLU
0
=
0 0
I
PIVOT I
.A
LI.
a
oo
n
uo
1ou
s
I 0
0
..
...
.
0
o.
15
..;O
WT
t-•
••
CO
l i l OT
I
OO
I T U O
IIOUS
•
•
--
••
·~
••
• •
••
~·
·-
·-
•
••
00
••
-
•
0

/
•
16
17
18
••

•
··'
•
i
•
•
•
~
-
.
' .
•
•
•
•
' f • • •
•
.·
,:.
F.j
:
.w
.
'
J
.
. .
•
•
-
•
•
'•
•
•
I
•
I
•
•
•
.
..
.
•
.460
CYPRESS
LANE,
SUITE
F · ·
EL
CAJON,
CA
92020
(619) 441-8595 •
•
'.
•
--
•
•
•
...
-

•
•
-
PART
NUMBER
1000
1001
1002
1003
1004
2000
2001
2002
2003
2004
2005
2006
2007
2008
2009
2010
2011
2012
2013
20
14
2015
2016
2017
2018
~<lH\
2020
12021
2022
2023
2024
2025
2026
2027
2028
2029
2030
2031
2032
2033
2034
2035
2036
2037
2038
2039
2040
2041
2042
2043
2044
2045
2046
2047
2048
2049
2050
2051
2052
2053
2054
PRODUCT
.
DESCRIPTIO
N
AGITATOR
FIBERGLASS
KIT
A
GITATOR
"
PRO"
GRAPHITE
KIT '
AGITATOR
"PRO"
GRAPHITE
CONV.
KIT
(FOR
•1000)
AGITATOR
''JR. "
FIBERGLASS
KIT
AGITATOR
CONVERSION
KIT
(FOR
•1003
"JR.")
BATTERY
DISCHARGE
RESISTORS
(2)
RC12L
HIGH
PERFORMANCE
SUSPENSION
K
IT
BATTERY
BRAID.
6
INCH
BATTERY
BRAID.
9
INCH
BATTERY
BRAID
,
12
IN
CH
SU
RE
HOLD
SERVO
TAPE.
1" X 3
FT
.
SELF
STICK
VELCRO
-
FOUR
4"
STRIPS
BLACK
FIBERGLASS
(
.062
) - 4" X
4''
BLACK
FIBERGLASS
(
.062)
-
4''
X
8''
BL
A
CK
FIBERGLASS
(
.
0~2
)
-
4'
' X
12
''
BLACK
FIBERGLASS
{.062)
- 3'' X 6''
BLACK
FIBERGL
AS
S
{.062
) -
6''
X 12''
BL
ACK
FIBERGLASS
(.062)
-6'' X 16''
BLACK
FIBERGLASS
{.093
) - 4
''
X
4'
'
BLACK
FIB
ER
GLASS
(...09-3 ) -
4"
X 8"
BLACK
F
IB
ERGLASS
[ .093) -4'' X
12
''
BLACK
FIBERGLASS
(.093}
-3'' X 6''
'
BLACK
FIBERGLASS
(.093)
-6'' X
12
''
BLACK
FIBERGLASS
( .093) - 6" X 16"
C
nAP\\l1't
~1'0r:K
t
.OG5)
1"
..-
JM'P
qn
G
RAPHITE
STOCK
( .065) -4
..
X 8"
GRAPH
ITE
STOCK
(
.065)
4"
12''
GRAPH
ITE
STOCK
{.065) -3" X
6"
GRAPHITE
STOCK
(
.
06~)
-
6''
X 12''
GRAPHITE
ST
OCK
{.065) -
6..
X J6"
GRAPHfTE
STOCK
( .085) -
4''
X
4''
GRAPHITE
STOCK
( .085) -
4"
X 8"
GRAP
HITE
STOCK
( .085) -4 " X
12
"
GRAPHITE
STOCK
( .085) -3'' X 6"
GRAP
HITE
S
TOC
K {.0851 -6" X 12"
G
RAPHITE
STO
CK
(.08~)
-
6'' X 16''
FLeORESCE~
T
PA
IXT. 1
OZ.
ROCKET
RED
F
LUORESCENT
PAINT. l
OZ.
FIRE
ORANGE
F
LUO
RE
SC
ENT
PAINT. 1
OZ.
BLAZE
ORANGE
FLUORESCENT
PAINT
. l
OZ
.
SAT~RN
YELLO
W
FLUORESCENT
PAINT.
1
OZ
.
SIGNAL
GREEN
FLUORESCENT
PAINT.
l
OZ.
LIGHTNING
YELLOW
FLUORESCENT
PAINT. 2
OZ
.
RO
CKEl
RED
FL
VO
RESCENT
PAINT. 2
OZ
.
FJRE
O~ANGE
FLUORESCENT
PAINT, 2
OZ.
BLAZE
ORANGE
FL
UO
RESCENT
PAINT.
2
OZ.
SATURN
YELLO
W
FL
UOR
ESCE
NT
PAINT.
2
OZ
.
SIGNAL
GREEN
FLUORESCENT
PAINT, 2
OZ
.
LIGHTNING
YELLO
W
THINNER.
2
OZ
.
5
WT
.
NA
T
URAL
SHOCK
OIL
- 2
OZ.
10
WT
.
NATURAL
SHOCK
OIL
- 2
OZ
.
15
WT
.
NATURAL
SHO
CK
OIL-
2
OZ.
20
WT.
NAT
URAL
SHOCK
OIL
- 2
OZ.
30
WT
.
NATURAL
SHOCK
OIL
-2
OZ.
40
WT
.
NATURAL
SHOCK
OIL -2
OZ
.
SO
WT
.
NATURAL
SHOCK
OI
L - 2
OZ.
70
WT.
NATU
RAL
SHO
CK
OIL -2
OZ
.
BATTERY
BRAID
, SIX -l
INCH
PCS.
MOT~R
M
OU
NT
SCREWS
(QTY:
4 )
"BODY
PREP"
LEXAN
BODY
CLEANER
2
OZ
.
-
-
•
SUGG.
RET
A
IL
320.00
360.00
85.00
190.00
135.00
2.50
10.00
2.50
3.00
3.50
2.50
2.75
I.
75
3.25
4 .75
2.00
7.00
9 .25
2
.50
4 .50
6
.50
2.7
5
9
.50
12.50
9
~
7.5
19.25
28.75
II
.00
43.00
57.25
10.75
21
.25
31.75
12.25
47.50
63.25
2.75
2.75
2.75
2.75
2.75
2.75
4.75
4 .75
4.75
4.75
4.75
..
4.75
2
.00
2.25
2. 25
2. 25
2.25
2. 25
2.2
5
2
.25
2.2
5
3.00
1.
50
2.75
-
•
-
-
I
•
•
•
•
'
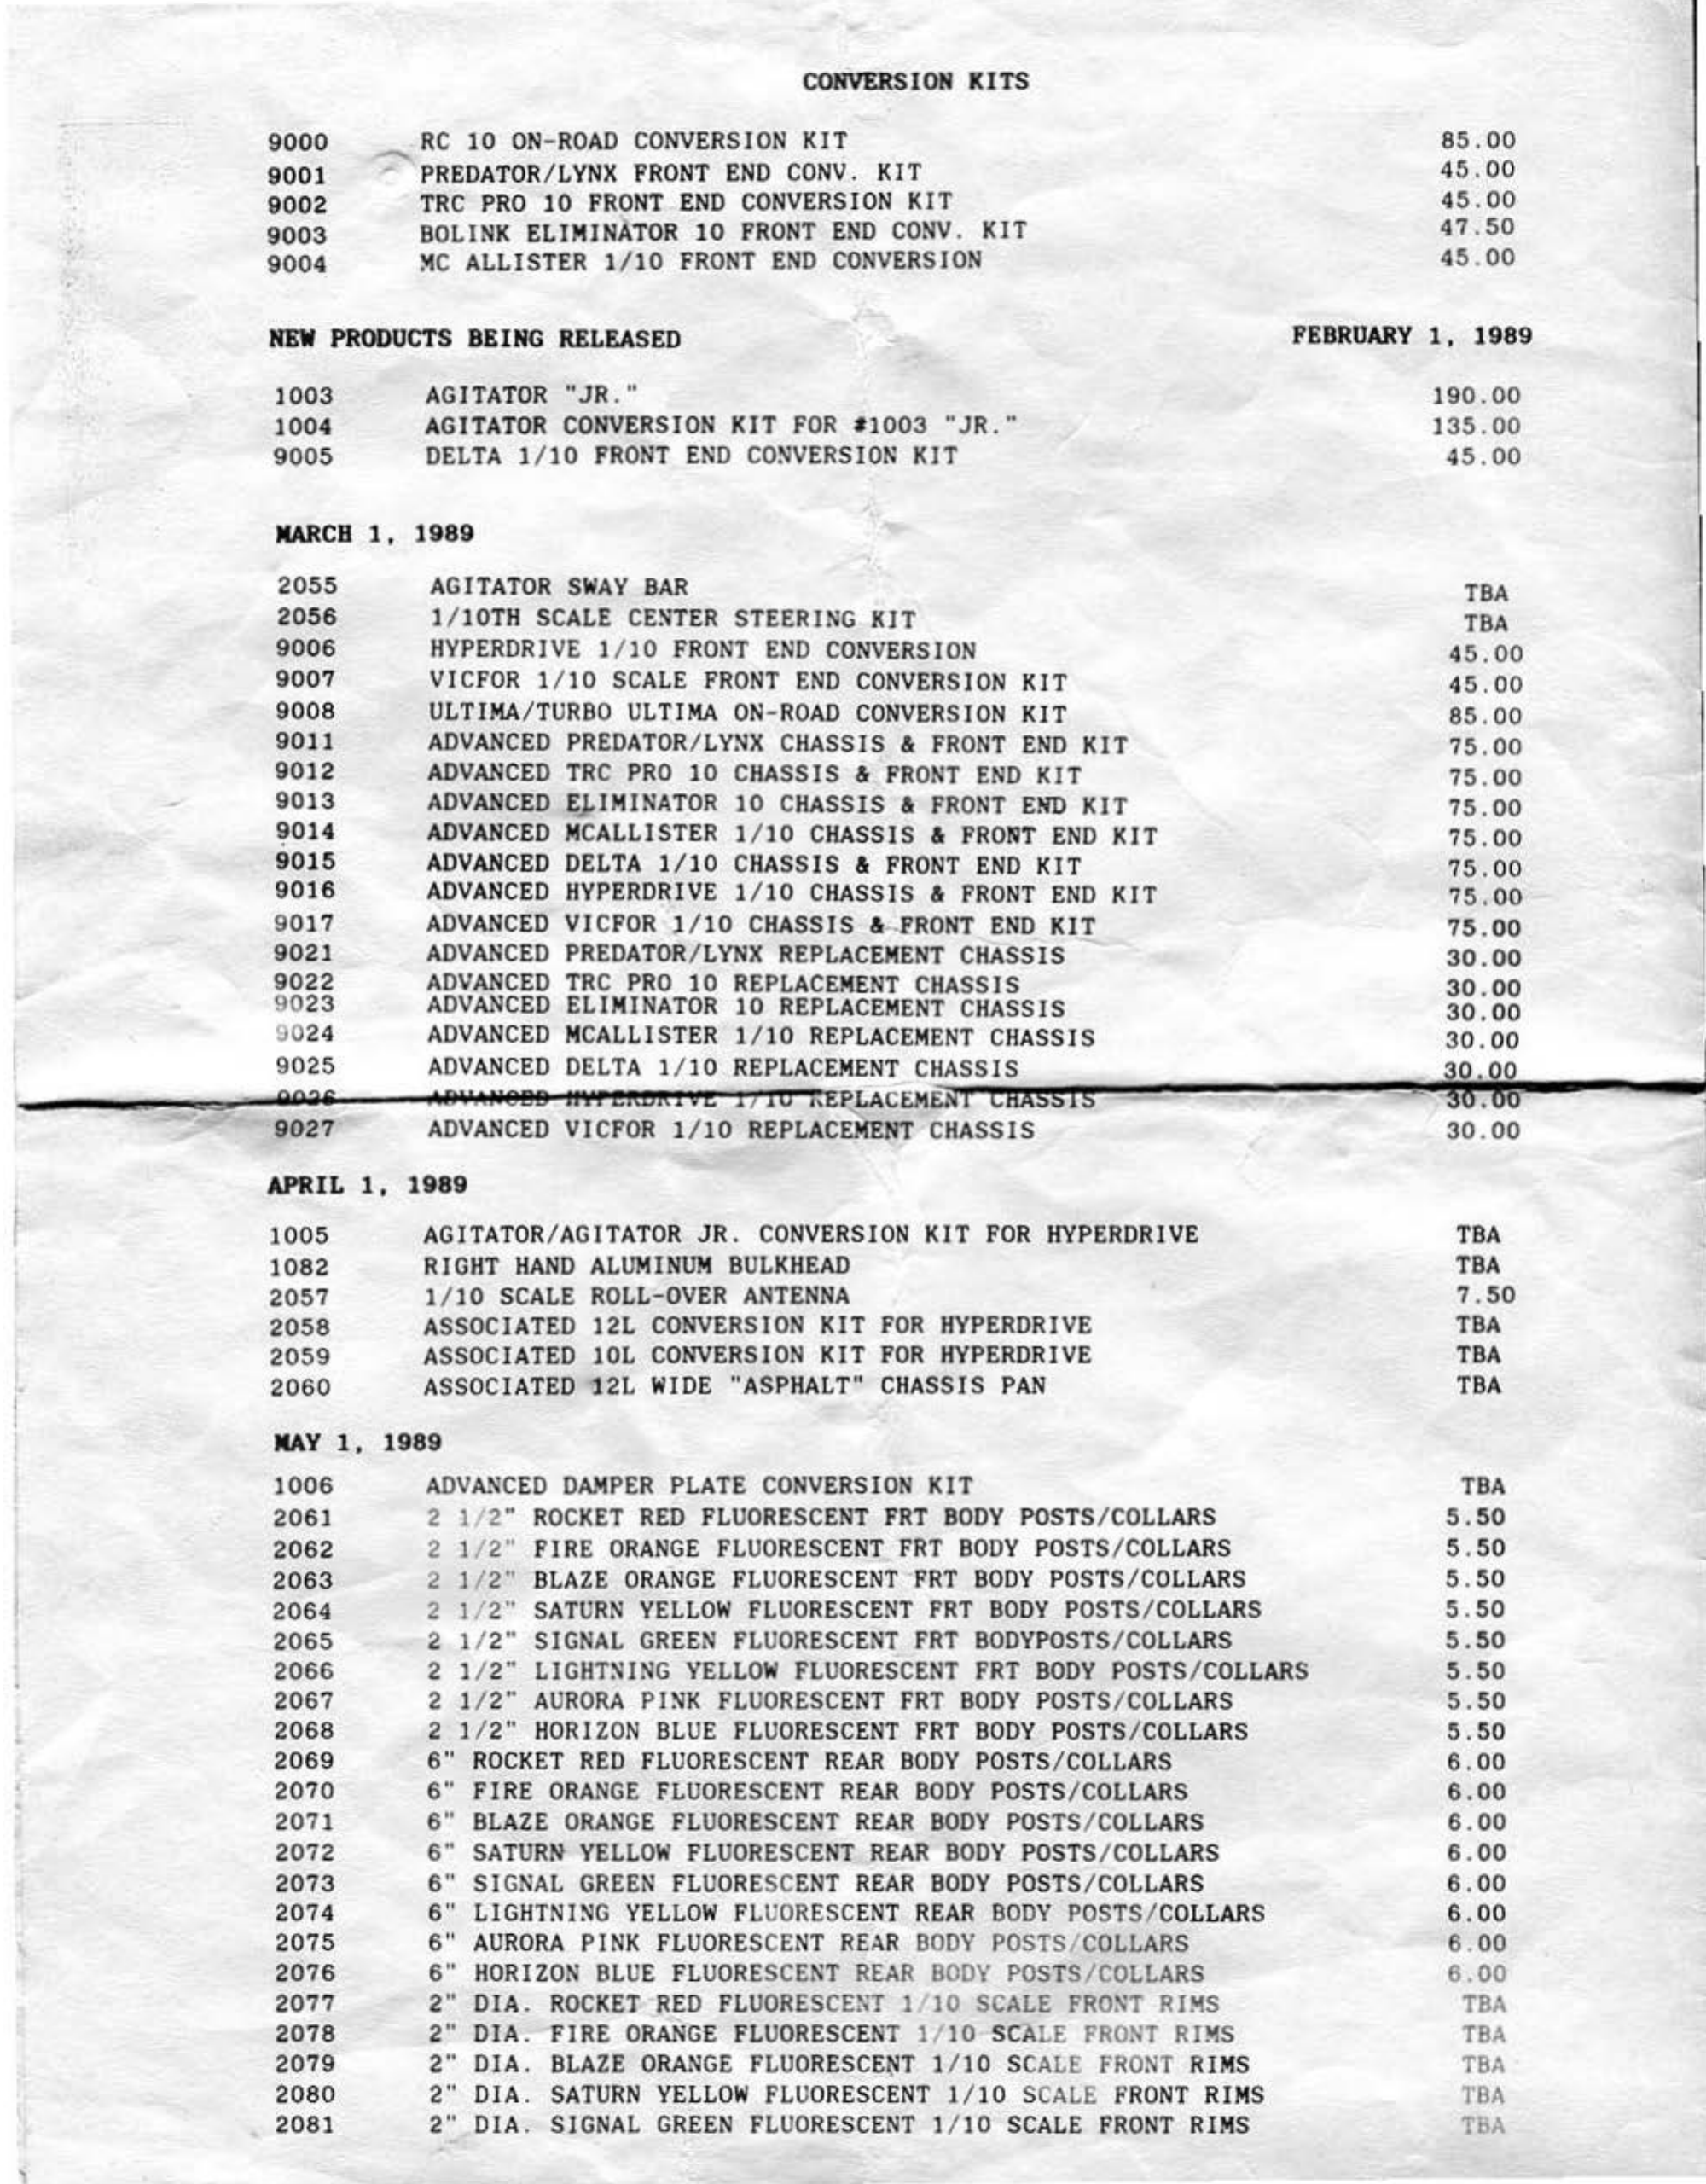
9000
9001
9002
9003
9004
CONVERSIO
N
KITS
-
RC
10
ON-ROAD
CONVERSION
KIT
~
PREDATOR/LYNX
FRO
NT
END
CONV.
KIT
TRC
PRO
10
FRONT
END
CONVERSION
KIT
BOLINK
ELIMINATOR
10
FRONT
END
CONV
.
KIT
~C
ALLISTER
1/10
FRONT
END
CONVERSION
85.00
45
.00
45. 00
47
.50
4
5.
00
NBW
PRODUCTS
BEING
RELEASED
FE
BRUARY
1,
1989
1003
1004
9005
AGITATOR
"JR ."
AGITATOR
CONVERSION
KIT
FOR
11003
"JR."
DELTA
1/
10
FRONT
END
CO~VERSION
KIT
190 .00
135
.00
45
.0
0
MARCH
1,
1989
AGITATOR
SWAY
BAR
TBA
1/
10TH
SCALE
CENTER
STEERING
KIT
TBA
HYPERDRIVE
1/ 10
FRONT
END
CONVERSION
45.00
VICFOR
1/ 10
SCALE
FRONT
END
CONVERSION
KIT
45.00
ULTIMA/TURBO
ULTIMA
ON
-
ROAD
CONVERSION
KIT
85 .00
ADVANCED
PREDATOR
/
LYNX
CHASSIS
&
FRONT
END
KIT 75.00
ADVANCED
TRC
PRO
10
CHASSIS
&
FRONT
END
KIT 75.00
ADVANCED
EJ.IMINATOR
10
CHASSlS
&
FRONT
END
KIT 75.00
ADVANCED
M
CALLISTER
1/ 10
CHASSIS
&
FRONT
END
KIT
75.00
ADVANCED
DELTA
1/10
CHASSIS
&
FRONT
END
KIT
75.00
ADVANCED
HYPERDRIVE
1/10
CHASSIS
&
FRONT
END
KIT 75 .00
ADVANCED
VICFOR
l/10
CHASSIS
&
-FRO
NT
END
KIT
75.00
ADVANCED
PREDATOR
/
LYNX
REPLACEMENT
CHASSIS
30.00
ADVANCED
TRC
PRO
10
REPLACEMENT
CHASSIS
30.00
ADVANCED
ELIMINATOR
10
REPLACEMENT
CHASSIS
30.00
2055
2056
9006
9007
9008
9011
9012
9013
9014
9015
9016
9017
9021
9022
9023
9024
9025
ADVANCED
M
CALLISTER
1/ 10
REP
LA
CE
M
ENT
CHASSIS
30.00
l
ADVANCED
DELTA
1/ 10
REPLACEMENT
CHASSIS
30.00
.
o\8Vt~Jfj8!8
fl'l'i
!IWK
. VL l I I0
KEPLA
CE
M~
~
~1~
'
TtiHA:r!:'SS!:"'"'i
S~-=~~~~~~
-
2
""="'!1'!!
-
o£2•
t3fro.,
.
ofrio~---
...
~
OOQi
9027
ADVANCED
VICFOR
1/
10
REPLACEMENT
CHASSIS
30.00
APRIL
1,
1989
1005
1082
2057
2058
2059
2060
AGITATOR/AGITATOR
JR.
CONVERSION
KIT
FOR
HYPERDRIVE
RIGHT
HAND
ALUMINU
M
BULKHEAD
1/
10
SCALE
ROLL-OVER
ANTENNA
ASSOCIATED
12L
CONVERSION
KIT
FOR
HYPERDRIVE
ASSOCIATED
lOL
CONVERSION
KIT
FOR
HYPERDRIVE
ASSOCIATED
12L
WIDE
"
ASPHALT"
CHASSIS
PAN
NAY
1,
1989
1006
2061
2062
2063
2064
2065
2066
2067
2068
2069
2070
2071
2072
2073
2074
2075
2076
2077
2078
2079
2080
2081
ADVANCED
DAMPER
PLATE
CONVERSION
KIT
2 1 2"
ROCKET
RED
FLUORESCENT
FRT
BODY
POSTS
/
COLLARS
2 1/ 2"
FIRE
ORANGE
FLUORESCENT
FRT
BODY
POSTS
/
COLLARS
2 1/
2"
BLAZE
ORANGE
FLUORESCENT
FRT
BODY
POSTS/COLLARS
2
1/2"
SATURN
YELLOW
FLUORESCENT
FRT
BODY
POSTS
/
COLLARS
2
1/
2"
SIGNAL
GREEN
FL
U
ORESCENT
FRT
BODYPOSTS
/
COLLARS
2 1/ 2"
LIGHT:-IING
YELLOW
FLUORESCENT
FRT
BODY
POSTS
/
COLLARS
2 1/ 2"
AURORA
PIN
K
FLUORESCENT
FRT
BODY
POSTS
/
COLL
ARS
2 1/ 2"
HORI
ZON
BLUE
FLUORESCENT
FRT
BODY
POSTS
/
COLLARS
6"
ROCKET
RED
FLUORESCENT
REAR
BODY
POSTS
/
COLLARS
6" FIRE
ORANGE
FLUORESCENT
REAR
BODY
POSTS
/
COL
LARS
6"
BLAZE
ORANGE
FLUORESCENT
REAR
BODY
POSTS
/
COLL
ARS
6"
SATURN
YELLOW
FLUORES
C
ENT
REAR
BODY
POSTS
/
COLL
ARS
6" SIG
NAL
GREEN
FLUORE
SC
ENT
REAR
BODY
POSTS
/
COLL
ARS
6"
LIGHTNING
YELLOW
FL
UO
RESCENT
REAR
BODY
POSTS
/
COLLARS
6"
AURORA
PINK
FLUORES
C
ENT
REAR
BODY
POSTS
/ C
OL
L
ARS
6"
HORIZON
BLUE
FLUORE
SC
ENT
RE
AR
BODY
PO
ST
S/COLLAR
S
2"
DIA.
ROCKET
RED
FLUORES
CENT
1 '
10
SC
A
LE
FRONT
RI
MS
2"
DIA.
FIRE
ORANGE
FLUORESCENT
1/
10
SCA
LE
FRONT
RIMS
2"
DIA.
BLAZE
ORANGE
FLUORESCE!'T
1/
10
SC
ALE
FRONT
RI
MS
2"
DIA.
SATURN
YELLOW
FLUORESCENT
1/ 10 S
CALE
FRO
NT
RIMS
2"
DIA
.
SIGNAL
GREEN
FLUORESCENT
1/
10
SCALE
FRONT
RIMS
TBA
TBA
7.50
TBA
TBA
TBA
TBA
5 .50
5 .50
5. 50
5. 50
5. 50
5 .50
5. 50
5.50
6.00
6.00
6. 00
6. 00
6.00
6.00
6 .00
6.00
TBA
TBA
TBA
TBA
TBA
J

PART
NUMBER
2082
2083
2084
2085
2086
2087
2088
2089
2090
2091
2092
t>
,
\P
,T
NUMBE
R
1010
lOll
1012
1013
1014
1015
1016
1017
1018
1019
1020
1021
1022
1023
10
24
1025
1026
1027
1028
1029
1030
10:il
10
32
11133
10
::1
4
1035
1036
1037
1038
1039
1040
1041
PRODUCT
DESCRIPTION
2
..
DlA.
LIGHTNING
YELLOW
FLUORESCENT
1/10
SCALE
FRONT
RIMS
2"
DIA.
AURORA
PINK
FLUORESCENT
l
/10
SCALE
FRONT
RIMS
2" DIA.
HORIZON
BLUE
FLUORESCENT
1/10
SCALE
FRONT
RIMS
2" DIA.
ROCKET
RED
FLUORESCENT
1/10
SCALE
REAR
RIMS
2" DIA. FIRE
ORANGE
FLUORESCENT
1/10
SCALE
REAR
RIMS
2" OIA.
BLAZE
ORANGE
FLUORESCENT
1/10
SCALE
REAR
RIMS
2"
DIA.
SATURN
YELLOW
FLUORESCENT
1/10
SCALE
REAR
RIMS
2"
DIA.
SIGNAL
GREEti
FLUORESCENT
1/10
SCALE
REAR
RIMS
2" DIA.
LIGHTNING
YELLOW
FLUORESCENT
1/10
SCALE
REAR
RIMS
2"
DIA.
AURORA
PINK
F~U0RESCENT
1/10
SCALE
REAR
RIMS
2"
DJA
.
HORIZON
BLUE
PLUORESCENT
1/10
SCALE
REAR
RIMS
UNDER
OBVELOPMEHT
_,/
STATE-OF-THE-ART
1
/12
SCALE
ON-ROAD
CAR
-/
••
* *
-
1/10
SCALE
ON-ROAD/OVAL
4
WHEEL
DRIVE
RACE
C
AR
....
* •
CO
MP
UTERIZED
TRACK
/
RACE
MANA
GE
M
ENT
AND
SCORING
SYSTEM
--
UNDER
S
IOll
~
!
AGITATOR
SPAR!
PARTS
LIST
PR
ODUC
T
DESCRIPTION
AGITATOR
CHASSIS.
GLASS
FRONT
BODY
POST.
DELRIN
(2)
f
BODY
POST
COLLAR,
DELRJN
(2)
FRONT
BUMPER,
KYDEX
FRONT
END
KIT
P
IVOT
BLOCK.
DELRI
N (2)
SADDLE
BLOCK.
DELRIN
(2)
'
FRONT
CROSSBEAM.
GLASS
UPPER
SUSP.
PLATE.GLASS
(2)
FRONT
END
STAND-OFF.
DELRIN
(6)
KINGPIN
BUSHING
W
/0
-RING
(2)
PRT.
SUSP.
SPRING
.014
(2)
FRT.
SUSP.
SPRING
.016
(2)
_
FRT.
SUSP.
SPRING
.022
(2)
FRONT
AXLE
W/ E- CLIPS (2)
~
FRONT
STEERING
BLOCK
(2)
FR
O
NT
KI
N
GPIN
W/ E-CLIPS
(2)
STEERING
BALL
WITH
CUP
(2)
STEERING
CUP
ONLY
(2)
STEERING
ROD
(2)
SERVO
M
OUNT,
DELRIN
RADIO
TRAY.
GLASS
RADIO
TRAY
STAND-OFF
(3)
"
T"
BAR.
GLASS
CONE
NUT
W/ 0-
RJNG
PIVOT
BALLS
PIVOT
BALL
HOUSING
(2)
5-40
BOLT
W
/NUT
(2)
REAR
SHOCK
BRIDGE.
DELRJN
SHORT
SHOCK
W/SPRING
LONG
SHOCK
W/
SPRING
LOWER
SHOCK
MO
UNT
(2)
•
-
_..._
..._
SUGG.
RBTAIL
TBA
TBA
TBA
TBA
TBA
TBA
TBA
TBA
TBA
TBA
TBA
SUGG
RET
AIL
24.00
8.50
2.00
2.50
50.00
11
.25
10.00
4 .50
2.50
3.00
5.50
2.
25
.
2.25
2.25
2.25
2.50
4.50
2.50
1.00
2.00
2.50
8
.0
0
1.00
5.00
9.
75
ll
'75
3.
75
1.75
30.00
17.50
17.50
6 .00
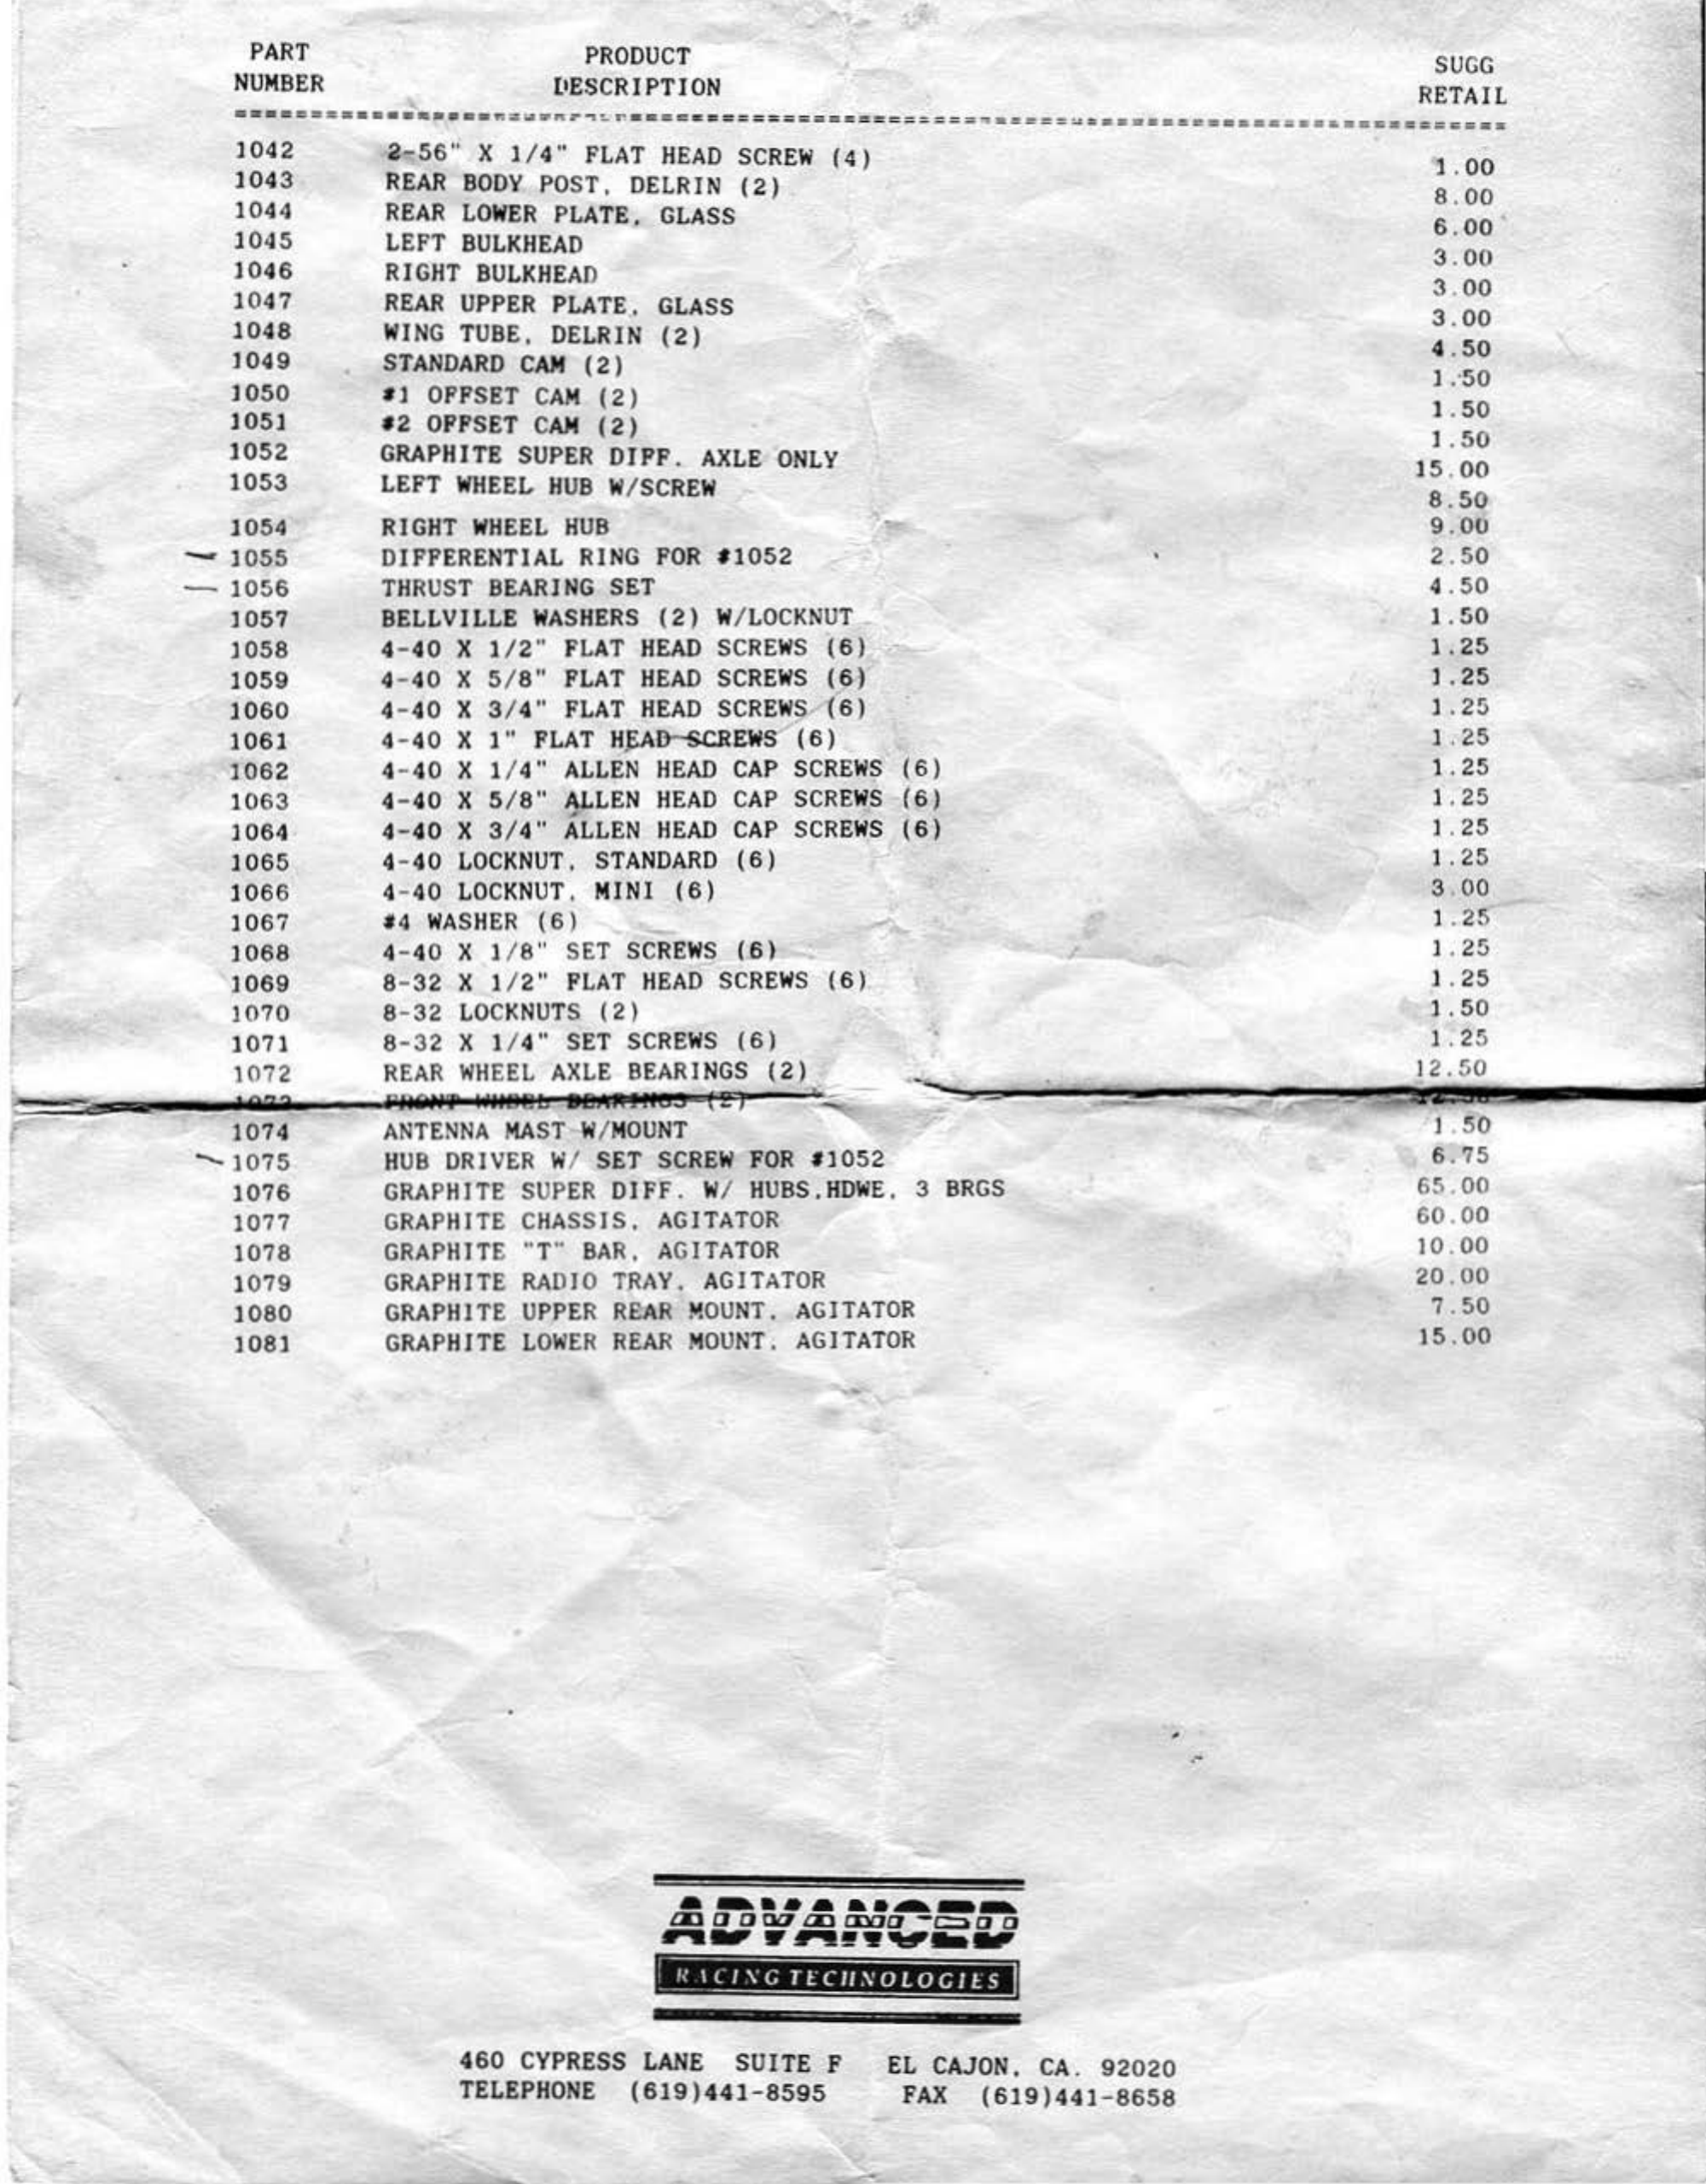
I
PART
NU
M.
BER
1042
1043
1044
1045
1046
1047
1048
1049
1050
1051
1052
1053
1054
-1
055
-1056
1057
1058
1059
1060
1061
1062
1063
1064
1065
1066
1067
1068
1069
1070
1071
PRODUCT
l•ESCRIPT
I
ON
2
-56"
X
1/4"
FLAT
HEAD
SCRE
W (4)
REAR
BODY
POST,
DELRIN
(2}
REAR
LO
W
ER
PLATE,
GLASS
LEFT
BULKHEAD
RIGHT
BULKHEAD
REAR
UPPER
PLATE
,
GLASS
W
ING
TUBE,
DELRIN
(2)
STANDARD
C
AM
(2)
1 1
OFFSET
CAM
(2)
1 2
OFFSET
C
AM
(2)
GRAPHITE
SUPER
DIPF.
AXLE
ONLY
LEFT
W
HEEL
HUB
W/SC
RE
W
RIGHT
W
HEEL
HUB
DIFFERENTIAL
RING
FOR
11052
THRUST
BEARING
SET
BELLVILLE
W
ASHERS
(2)
W
/LOC
KN
UT
4-40 X 1/ 2"
FLAT
HEAD
SCREWS
(6)
4- 40 X
5/8"
PLAT
HEAD
SCRE
WS
(6~
4- 40 X
3/
4"
FLAT
HEAD
SCRE
WS
(6)
4-
40
X
1"
PL
AT
H~D-SCREWS
(
6)
4- 40 X 1/ 4"
ALLEN
HEAD
CAP
SCREWS
4-
40
X
5/8"
ALLEN
HEAD
CAP
SCRE
WS
'
4- 40 X
3/4"
ALLEN
HEAD
CAP
SCRE
WS
4-
40
LOC
KN
UT.
STA
N
DARD
(6)
4-
40
LOCK
N
UT.
MINI
(6)
14
W
ASHER
(
6)
4- 40 X 1/ 8"
SET
SCRE
WS
(6)
8- 32 X 1
/2"
PLAT
HEAD
SCRE
WS (6)
8-32
LO
C
KNUT
S (2)
8-32
X 1/
4"
SET
SCRE
WS
(6)
(
6)
(6)
(6)
REAR
WHEEL
AXLE
BEARINGS
(2}
~C~
~·~
~-~--_.
·
g~g~a------~PA~i~tHtP~U~U8~8~b~le~/i~~·!~fi6~3
~(~
;
L
~')
--~
~
~
.
--
ANTENNA
MAST
W/ M
OUNT
1072 -
I
-
-
1074
.......
1075
1076
1077
1078
1079
1080
1081
HUB
DRIVER
W/
SET
SCRE
W
FOR
11052
GRAPH
I
TE
SUPER
DIFF . W/
HUBS.HD
W
E.
GRAPHITE
CHASSIS.
AGITATOR
3
BRGS
GRAPHITE
"T"
BAR.
AGITATOR
GRAPHITE
RADIO
TRAY.
AG
ITATOR
GRAPHITE
UPPER
R~AR
M
OU
NT.
AGITATOR
GRAPHITE
LOWER
REAR
MO
U
NT
.
AGITATOR
..
-··-
··---
llll
a a
aa
£lD
al!Ja
-r:=
a o
"~
·~~,"*~~
460
CYPRESS
LANE
SUITE
F
TELEPHONE
(619)
44
1- 8595
EL
CAJON,
CA.
92020
PAX
(619)441-8658
.-
SUGG
1.00
8 .00
6.00
3.00
3. 00
3. 00
4
.50
I :
50
1.50
1.
50
15
.
00
8.50
9.00
2.50
4.50
l.
50
l.
25
].
25
l.
25
l.
25
1.
25
l.
25
l.
25
].
25
3 00
l.
25
].
25
I.
25
1 . 50
I.
25
1
2.50
!.50
6.
75
65 .00
60.00
10.00
20.00
7 .50
15
.00
Table of contents
Popular Motorized Toy Car manuals by other brands

VBC Racing
VBC Racing Lightning10 instruction manual

Aria Child
Aria Child Rollplay 6V R8 Spyder Customer service guide

DF-models
DF-models DF-4J Crawler XXL manual

Silverline
Silverline SLK 114 Assembly instructions

Mugen Selki
Mugen Selki E0001 MBX-5 CAR KIT instruction manual

REVELL
REVELL Sd. Kfz. 7 manual


Eduard
Eduard Krupp Protze 6x4 1/48 quick start guide

Land of B.
Land of B. Rollin' Riders quick start guide

HBX
HBX 1/10th Scale Electronic Rock Crawler 5628 instruction manual

Enabling Devices
Enabling Devices Hello Kitty 1454 user guide

Eduard
Eduard 36 062 manual

Propel Trampolines
Propel Trampolines Savage instruction manual