FMS 1:24 FCX24 UNIMOG User manual

Instruction Manual
操作手册
1:24 FCX24
UNIMOG
MAN-G0253

感谢您购买我们的产品。
本手册旨在帮助您正确操作、维护和修理车辆。由于本品所涉部件多数为特有部件,请保留本手册作为未来参考之用。
本产品由精密部件组成,并非玩具,因此不适合 14 岁以下的少年或儿童使用。 未成年人操作时应有成人陪同。 未能以安全的方式操
作或维护本产品可能会导致人身伤害。 以安全的方式操作本产品是所有者的责任。FMS及其分销商对使用本产品可能导致的任何和所
有人身伤害和/或财产损失概不负责。
Safety Precautions
2
•
•
•
•
•
•
•
•
•
Thank you for purchasing our products.
This manual is written to assist you in properly operating, maintaining and repairing the vehicle. As many of the
components used are unique to this product, please retain this manual as a future reference. Composed of
precision-made components, this product is not a toy, thus it is not suited for children under 14 years of age. Minors
should be accompanied by an adult when operating. Failure to operate or maintain this product in a safe manner can
result in bodily harm. It is the owner responsibility to operate this product in a safe manner. FMS and its distributors
are not responsible in any way for any and all bodily harm and/ or property damage that may result from the use of
this product.
MADE IN CHINA
This product is not a toy! (14+) Recommended for ages 14 and up. Adult supervision
required for ages under 14 years old. Contains small parts, keep out of reach of children 3
years of age and younger.
使用前请仔细阅读本手册。我们不对任何故意损坏或不当使用负责。这个产品不是玩具!建议14岁及
以上者使用。14岁以下的用户,需要在成年人监督下使用。本产品部分包含小零件,请务必保证3岁及
以下儿童不能接触本产品。
安全保障措施
Introduction 指引
Safety, precautions and warnings 安全、预防措施及警告
Replace damaged components with original factory-parts.
Pay special attention to the polarity of all vehicle wiring.
Use common sense when selecting the environment to operate your vehicle. Do not operate near power cables,
cellular/radio towers, water or unstable terrain. The operator is solely responsible for their actions.
The product is composed of precision electrical components. It is critical to keep the product away from moisture
and other contaminants.
Always check the radio range of the vehicle prior to operation in order to prevent radio loss or interference.
Operate this product within your ability. If the vehicle is dangerous to retrieve, it never worth the risk.
Always turn on the transmitter before connecting the battery on the model. When turning off the model, always
disconnect the battery first, and then turn off the transmitter. If this order is reversed, the model may become
uncontrollable and cause serious damage.
Never allow transmitter batteries to run low as it may cause loss of vehicle control.
Plastics on the vehicle are susceptible to damage or deformation due to extreme heat and cold climate. Do not store
the model near any source of heat such as oven or heater. Store the model indoors, in a climate-controlled, room
temperature environment.
请使用原厂部件更换损坏的部件。
特别注意所有车辆接线的正负极。
务必选择合适的环境操作遥控模型,所选环境需远离电缆、无线电塔、水域及不稳定地形。本品操作者对其行为全权负责。
本品由精密电子部件构成。请勿将本品暴露于潮湿的环境或者其他污染物中,以免损坏。
确保每次操作前检查车辆的无线接收范围,以防止无线信号丢失或受干扰。
在您的能力范围内操作此产品。在任何时候,如果车辆操作有危险,则绝对不值得冒险。
通电方式:务必先开遥控器再将车通电。断电方式:务必先将车断电再关遥控器。以上顺序如逆转,则可能引起遥控模型失控,
导致人身伤害或财产损失。
遥控器电池电量不足时,不要操作模型车,以免失控。
模型产品上的塑胶件容易因极冷或极热气候出现变形或损坏的状况。所以请将模型产品存放在气候受控的室温环境中,切勿靠近
任何热源,如烤箱或暖器等。
•
•
•
•
•
•
•
•
•

3
This equipment has been tested and found to comply with the limits for a Class B digital device pursuant to part 15
of the FCC rules. These limits are designed to provide reasonable protection against harmful interference in a
residential installation. This equipment generates, uses and can radiate radio frequency energy and, if not installed
and used in accordance with the instructions, may cause harmful interference to radio communications.
However, there is no guarantee that interference will not occur in a particular installation. If this equipment does
cause harmful interference to radio or televison reception, which can be determined by turning the equipment off
and on, the user is encouraged to try to correct the interference by one or more of the following measures:
-- Reorient or relocate the receiving antenna.
-- Increase the separation between the equipment and receiver.
-- Connect the equipment into an outlet on a circuit different from that to which the receiver is connected.
-- Consult the dealer or an experienced radio/TV technician for help.
To assure continued compliance, any changes or modifications not expressly approved by the party responsible for
compliance could void the user's authority to operate this equipment. (Example use only shielded interface cables
when connecting to computer or peripheral devices).
This equipment complies with Part 15 of the FCC Rules. Operation is subject to the following two conditions:
(1) This device may not cause harmful interference, and
(2) This device must accept any interference received, including interference that may cause undesired operation.
Caution!
The manufacturer is not responsible for any radio or TV interference caused by unauthorized modif ications to this
equipment. Such modifications could void the user authority to operate the equipment.
1. Move all your channels to the desired position.
2. Select [All channels] and then [Yes] in the confirmation box.
Radio System
Pay close attention to the following symbols and their meanings. Failure to follow these warnings could cause
damage, injury or death.
无线电系统
Certifications 认证相关
Safety symbols 安全符号
DoC Declaration DoC 自我说明
Appendix 1 FCC Statement
Environmentally friendly disposal
CE Warning CE 警告语
仔细阅读以下符号及其相关说明,如不按照以下指引进行操作,可能会导致设备损坏或人员伤亡。
特此,我们声明无线电设备【FMS-G3&FMS-R3A】符合 RED 2014/53/EU。
FCC ID: 2A2UNR3A00
Old electrical appliances must not be disposed of together with the residual waste, but
have to be disposed of separately. The disposal at the communal collecting point via
private persons is for free. The owner of old appliances is responsible to bring the
appliances to these collecting points or to similar collection points. With this little personal
effort, you contribute to recycle valuable raw materials and the treatment of toxic
substances.
Hereby, we declare that the Radio Equipment [【FMS-G3&FMS-R3A] is in compliance with RED 2014/53/EU.
The antenna(s) used for this transmitter must be installed to provide a separation distance of at least 20 cm from all
persons and must not be co-located or operating in conjunction with any other transmitter. End-users and installers
must be provided with antenna installation instructions and transmitter operating conditions for satisfying RF
exposure compliance.
发射机的天线必须距离所有人员或其他发射机至少 20 厘米的间隔距离。必须将天线安装说明和满足射频讯号辐射的发射机操作
规范提供给终端用户和安装人员。

Prohibited
Mandatory
4
Attention Not following these instructions may lead to minor injuries.
如果使用者不按照说明方法操作,有可能导致操作者或他人受到轻微伤害。注意
Warning Not following these instructions may lead to major injuries.
警告 如果不按照说明方法操作,可能导致操作者或他人遭受较大伤害。
Danger Not following these instructions may lead to serious injuries or death.
危险 如果不按照说明方法操作,可能导致操作者或他人严重受伤,甚至遭受生命危险。
Safety Guide 安全信息
禁止
强制
•
•
•
•
•
•
Do not use the product at night or in bad weather like rain or thunderstorm. It can cause erratic operation
or loss of control.
Do not use the product when visibility is limited.
Do not use the product on rain or snow days. Any exposure to moisture (water or snow)may cause
erratic operation or loss of control.
Interference may cause loss of control. To ensure the safety of you and others, do not operate in the
following places:
1. Near any site where other radio control activity may occur
2. Near power lines or communication broadcasting antennas
3. Near people or roads
4. On any body of water when passenger boats are present
Do not use this product when you are tired, uncomfortable, or under the influence of alcohol or drugs.
Doing so may cause serious injury to yourself or others.
The 2.4GHz radio band is limited to line of sight. Always keep your model in sight as a large object can
block the RF signal and lead to loss of control.
•
•
•
•
•
Misuse of this product may lead to serious injury or death. To ensure the safety of you and your equip-
ment, read this manual and follow the instructions.
Make sure the product is properly installed in your model. Failure to do so may result in serious injury.
Make sure to disconnect the receiver battery before turning off the transmitter. Failure to do so may lead
to unintended operation and cause an accident.
Ensure that all servos operate in the correct direction. If not, adjust the direction first.
Make sure the model stays within the systems maximum range to prevent loss of control.
•
•
•
•
•
•
请不要在夜晚或雷雨天气使用本产品,恶劣的天气环境有可能导致遥控设备失灵。
请不要在能见度有限的情况下使用本产品。
请不要在雨雪或有水的地方使用本产品。如果有液体进入到系统内部,可能会导致运行不稳定或失灵。
信号干扰可能导致设备失控。为保证您和他人的安全,请不要在以下地点使用本产品:
1、基站附近或其他无线电活跃的地方
2、人多的地方或道路附近
3、有客船的水域
4、高压电线或通信广播天线附近
当您感到疲倦、不舒服,或在摄入酒精或服食导致麻醉或兴奋的药物后,不要操作本产品。否则可能对自己或他人
造成严重的伤害。
2.4GHz无线电波段完全不同于之前所使用的低频无线电波段。使用时请确保模型产品在视线范围内,大的障碍物将
会阻断无线电频率信号从而导致遥控失灵模型失控。
•
•
•
•
•
遥控设备使用不恰当可能导致操作者或他人严重受伤,甚至死亡。为保证您和设备的安全,请仔细阅读使用说明书
并按照要求进行操作。
使用前必须确保本产品与模型安装正确,否则可能导致模型发生严重损坏。
关闭时,请务必先关闭接收机电源,然后关闭发射机。如果关闭发射机电源时接收机仍然在工作,将有可能导致遥
控设备失控或者引擎继续工作而引发事故。
操控时,请先确认模型所有舵机的动作方向与操控方向一致。如果不一致,请调整好正确的 方向。
当遥控距离较远时,有发生失控的可能,请适当缩短遥控距离。

5
Product Introduction
Unimog is an abbreviated name, which stands for "Universal-Motor-Gerät" in German, meaning "universal motorized
device." In the late stages of World War II, influenced by the Morgenthau Plan, Germany was required to divest its
military industry. German engineers, with nothing to do in the military sector, turned their focus to designing agricultural
machinery. Albert Friedrich, former head of aircraft engine design at Daimler-Benz, was one of those engineers. His
idea began with a simple sketch, resulting in a machine with full-time four-wheel drive, equipped with differential locks,
portal axles, and the ability to power external devices.
The new vehicle not only achieved great success in agriculture but also gained favor from the public sector. Customers
requested standardized power take-off interfaces for the Unimog to enable the installation of a wider variety of tools. In
the autumn of 1950, Daimler-Benz took over the entire Unimog project, and production was relocated to the original
load-carrying vehicle factory in Gaggenau. In 1953, the Mercedes-Benz three-pointed star emblem replaced the early
Unimog's bull head logo and has been used ever since. The Unimog 421 series was manufactured between 1966 and
1989 and was widely used in agriculture, forestry, firefighting, and other sectors.
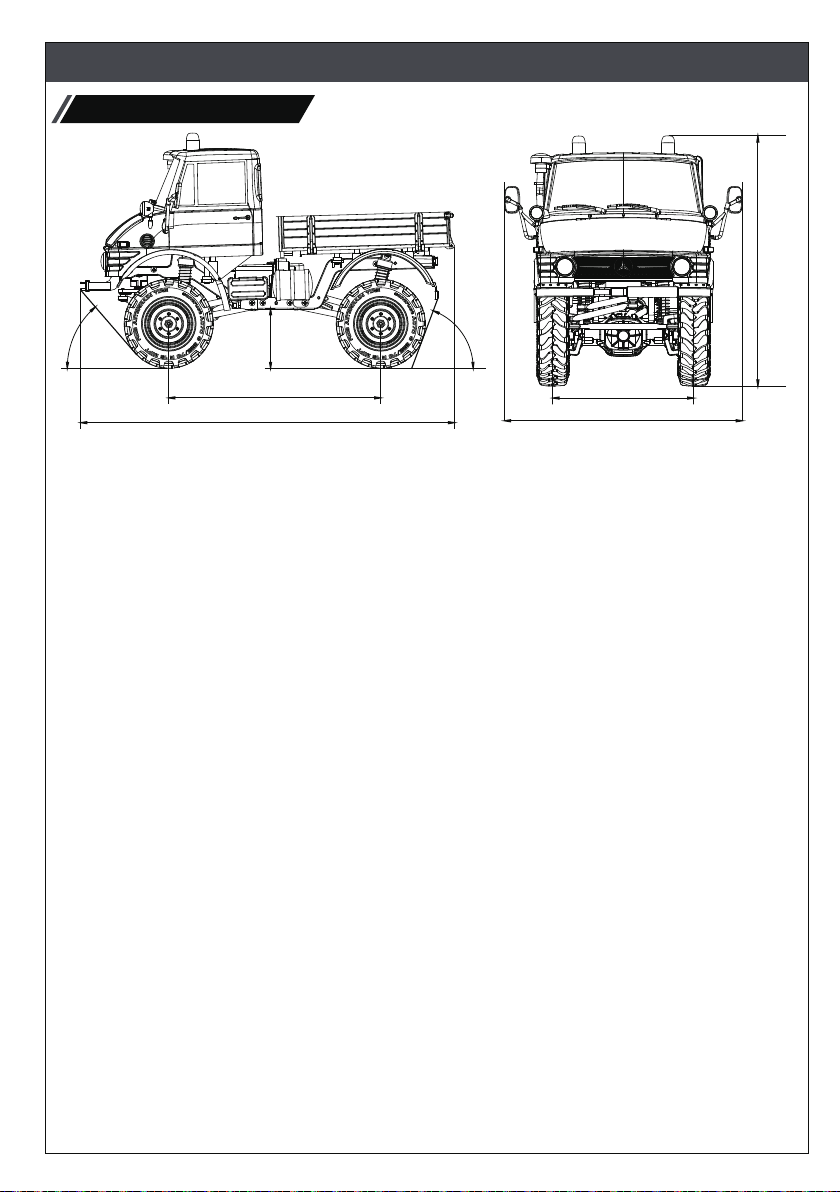
Authorized by Daimler-Benz AG, this 1/24 scale remote-controlled simulation model of the Unimog421, introduced by
FMS, maintains a consistently high level of visual simulation. This model is designed for typical special transport
scenarios and can handle transportation tasks in complex road conditions. It features a highly restored grille, widened
rear-view mirrors and snorkel, and two orange warning lights on the roof. Through the windows, you can see the
exquisite dashboard and cabin interior. The engine hood can be opened, providing convenience for battery replace-
ment, and it also serves as a storage space for the electronic board of the remote control system. In addition, the rear
cargo compartment and the three-side wall panels are made of wood. We have carved intricate patterns on the model
car to simulate the texture of real wood.
Unimog adopts the FCX24 series high-performance crawler chassis (with added realistic parts like fuel tank, accumu-
lator on). The car frame is made of high-strength nylon. Compared to the trapezoidal beam spliced by metal side
beams and plastic trusses, the overall weight is lighter and the strength is higher. The mid-mounted power assembly
has a low center of gravity and integrates the 2-speed transmission, transfer case and 130 motor. The power is
transmitted to the front and rear axles through the universal joint drive shaft. The axles are equipped with wheel side
reducers, commonly known as "portal axle", which can increase the ground clearance of the differential tooth pack and
improve passability.
The crawlers are generally equipped with front and rear straight axles to simulate the locked state of the real car
differential to improve off-road passing ability. The FCX24 is equipped with a straight axle by default, but the planetary
gear differential can also be replaced with high-viscosity silicone oil to simulate the driving effect of an LSD limited-slip
differential. After installing the differential, the ultimate climbing ability will be reduced, but a smaller turning radius and
a more stable high-speed driving quality can be obtained. Simply put, the straight axle is suitable for extreme climbing,
and the limited-slip differential is suitable for high-speed off-road. The choice is yours.
产品信息
Background 产品背景
About Model产品介绍
Unimog是一个缩写名称,全称为"Universal-Motor-Gerät",意思是“万能机动工具”。二战后期的德国阴云密布,受摩根索计划(
Morgenthau Plan)影响,德国必须剥离军工产业,德国工程师们无事可做只能转而设计农用机具。戴姆勒-奔驰公司飞机发动机设计部
门前负责人阿尔伯特·弗里德里希(Albert Friedrich)就是其中之一,他的想法从一张草图开始,全时四轮驱动,配备差速锁,门式桥,前后
桥都可输出动力来驱动外接设备的机器由此诞生。
新车不仅在农业方面大获成功,还受到公共部门的青睐,客户要求乌尼莫克配备标准化的取力器接口,以便安装更多种类的工具。
1950年秋天,戴姆勒-奔驰接手整个乌尼莫克项目,生产迁至位于加格瑙的原载重车工厂。1953年奔驰三叉星徽取代了早期乌尼莫克的牛
头标应用至今。乌尼莫克421系列制造于1966-1989年间,广泛地应用于农业、林业、消防等单位。

6
Product Introduction
The two-speed mechanical transmission is operated by a 9g steering gear that can be switched using the third channel
on the remote control. The low gear reduction ratio is 99, which is larger than that of similar products currently on the
market. The torque output is strong, and easy for extreme climbing. The high gear reduction ratio is 24.75, and the
speed is higher than that of all similar products currently on the market. In addition to enjoying the charm of mechanical
shifting, the two-speed transmission enables more ways to enjoy your driving experience.
At present, a variety of upgraded and modified parts such as metal link rods, metal differential, metal universal joint
drive shaft, metal gears, brass wheel counterweights, etc. have been launched to match the FCX24 chassis. In
addition to further improving the performance of the vehicle, these parts also provide a variety of personalized options.
Unimog dominates all kinds of complex terrain. As always, you can trust FMS.
产品信息
Features 产品特点
由戴姆勒-奔驰汽车公司授权,FMS模型出品的这款遥控仿真模型车1/24 乌尼莫克421(Unimog 421)在外观仿真度方面仍旧保持一
贯的高水准。这款模型的设定是典型的特种运输形态,可以胜任复杂道路条件下的运输工作。车头标志性的进气格栅刻画极其精细。车上
装有加宽的后视镜和涉水器,车顶有两个橘黄色的警示灯,透过车窗可以看到精美的仪表盘和座舱内饰。引擎盖可以打开,方便更换电池
,同时这里也是遥控系统电子板的收纳空间。此外,后货斗三面均可打开,方便装卸货物。实车货斗地板和三面门板都是木制的,我们在
这里雕刻了精细的纹理模拟实木的质感。
乌尼莫克采用FCX24系列高性能攀爬底盘(在底盘上增加油箱、电瓶等像真组件),车架采用高强度尼龙一体成型,相比金属侧梁加
塑胶桁架拼接的梯形大梁,整体重量更轻,强度更高。中置动力总成重心低,将2档变速机构、分动箱和130电机整合为一体。动力通过万
向节传动轴传输到前后两个车桥,车桥装有轮边减速器,俗称“门桥”,可以加大差速器的离地间隙,提高通过性。
攀爬车一般搭配前后直轴,模拟真车差速器锁止状态,以提高越野通过能力。FCX24默认搭载直轴,但也可以更换为行星齿差速器,
搭配高粘度硅油,模拟LSD限滑差速器的行驶效果。安装差速器后极限攀爬能力将会降低,但可以获得更小的转向半径,更稳定的高速行
驶品质。简单的说直轴适合极限攀爬,限滑差速器适合高速越野,任君选择。
两档变速箱使用遥控器第三通道,通过一颗9G舵机操作,低速档减速比99,大于目前市面上的同类产品,低扭输出强劲,极限攀爬
游刃有余。高速档减速比24.75,车速大于目前市面上所有同类产品,除了机械变速的魅力外,还可以组合多种玩法,在各种地形条件下体
会不同的操控乐趣。
目前配合FCX24底盘已经有金属拉杆、金属差速器、金属万向节传动轴、金属齿轮、黄铜轮毂配重等多款升级改装零件上市。这些零
件除了进一步提升车辆性能外,还提供多种个性化的选择。
● 戴姆勒-奔驰汽车公司授权产品
● RTR组装完成品
● 微型两档机械变速
● 仿真硬塑料车壳
● 遥控灯光系统
● 门式车桥(金属齿轮)
● 金属齿转向舵机
● 4连杆悬挂
● 高强度混纤尼龙一体成型车架
● 活动式功能引擎盖
● 像真驾驶艙内饰
● 喷涂完成车壳,三款涂装可选
● 金属拉杆、金属差速器、金属万向节传动轴、金属齿
轮、黄铜轮毂配重等多款升级改装件可选
● DAIMLER-BENZ AG LICENSED PRODUCT
● READY TO RUN MODEL
● TWO-SPEED TRANSMISSION
● ABS HARD BODY
● REMOTE CONTROL LIGHTING SYSTEM
● PORTAL AXLE (METAL GEAR)
● METAL GEARS STEERING SERVO
● FOUR LINK SUSPENSION
● HIGH STRENGTH INTEGRATED NYLON
FRAME
● FUNCTIONAL HOOD
● RESTORED INTERIOR FEATURES
● PAINTED BODY, THREE COLORS AVAILABLE
● OPTIONAL MODIFICATION PARTS,LIKE METAL
LINK RODS, METAL DIFFERENTIAL, METAL
UNIVERSAL JOINT DRIVE SHAFT, METAL
GEARS, BRASS WHEEL COUNTERWEIGHTS,
ETC. AVAILABLE

7
Product Introduction
● Length:249mm
● Width:153mm
● Height:160mm
● Wheelbase:142mm
● Tire F/R :Φ 59*20mm
● Minimum Ground Clearance: 40mm
● Approach Angle: 49°
● Departure Angle: 69 °
● Motor: 130 Brushed motor
● Battery : 2S Lipo 7.4V 380mAh x1
● Remote control distance: 30m
● Approx. operating duration time: 20mins
● Remote control: G3+ R3A transmitter, receiver with
ESC group control board
产品信息
● 车长: 249mm
● 车宽: 153mm
● 车高: 160mm
● 轴距: 142mm
● 轮胎: Φ 59*20mm
● 离地间隙: 40mm
● 接近角: 49°
● 离去角: 69 °
● 电机:130有刷电机
● 电池:2S Lipo 7.4V 380mAh
● 遥控距离:30m
● 续航:20mins
● 遥控:G3 + R3A 发射器,接收机/电调(二合一)
Specification 产品参数
49°
69°
40mm
142mm
249mm 153mm
90mm
160mm

8
The product adopts the 2.4GHz AFHDS 2A-BS Automatic Frequency Hopping Digital System which consist of
FMS-G3 transmitter and FMS-R3A receiver. It supports two-way transmission, featuring 3-channel and compatible
with variety of car models.
本系统采用 2.4GHz AFHDS 2A-BS 协议,由 FMS-G3 发射机和 FMS-R3A 接收机组成。支持双向传输、共输出 3
个通道、兼容多种车模型。
Transmitter instruction 发射机介绍
Transmitter instruction 发射机概览
[1] Steering Wheel CH1
方向手轮 CH1
[2] Throttle Trigger CH2
油门扳机 CH2
[3] Three-position Switch CH3
三档开关 CH3
[4] Lanyard Eye
挂绳孔
[5] Handle (AAA*4 batteries can be installed inside)
手柄( 内可安装 AAA*4 电池)
[6] LED
指示灯
[7] BIND Button (Binding, turn on or off the car light
or reset data)
BIND 按键(对码)(对码、开启关闭车灯或数据复位)
[8] ST- Button (To decrease the trim and travel value of CH1)
ST- 复位按键(减小 CH1 微调和舵量
[9] TH- Button (To decrease the trim and travel value of CH2)
TH- 复位按键(减小 CH2 微调和舵量)
[10] Power Switch
电源开关
[11] REV Button (To reverse the CH1 or CH2)
REV 复位按键(控制 CH1 或 CH2 方向)
[12] ST+ Button (To increase the trim and travel value of CH1)
ST+ 复位按键(增加 CH1 微调和舵量)
[13] TH+ Button (To increase the trim and travel value of CH2)
TH+ 复位按键(增加 CH2 微调和舵量)
[1]
[2]
[3]
[4]
[5]
[6]
[7]
[8]
[9]
[11]
[12]
[13]
[10]
Transmitter Instruction 发射机概览

9
[1] Motor Interface
马达接口
[2] Battery Lines(Molex51005
Female Interface)
电池接线 (Molex51005 母座接口 )
[3] Power Switch
开关盒
[4] Antenna
天线
[5] LED
指示灯
[6] CH3
CH3
[7] CH1
CH1
[8] Car Light
车灯
Overview 接收机概览
The LED Status of the Receiver 接收机指示灯
The LED status indicates the power supply state of the receiver and its working state.
Off: The receiver is not powered on.
Light on in red: The receiver is connected to the power supply. It works normally.
Fast flashing: The receiver is in the bind mode.
Slow flashing: The LED flashes slowly when the transmitter is powered off, unbound, or no signal.
接收机状态指示灯用于指示接收机的电源及工作状态。
灭:接收机电源未接通。
红灯常亮:接收机已连接电源,并正常工作。
快速闪烁:接收机处于对码状态中。
慢速闪烁:发射机未开机或未对码,无信号情况。
[1] [6]
[7]
[8]
[4] [5]
[2]
[3]
All the servos' interfaces and the car light interface are 1.25 mm standard pins, and the motor interface is PH2.0
female interface. They are for connecting the receiver to each terminal part of the model.
舵机接口和车灯接口均为 1.25 mm 的标准端子座,马达接口为 PH2.0 母座端子,用于连接接收机与模型的各个终端部件。
Interface 接口
It is an external antenna.
本接收机天线为外置单天线。
Antenna 接收机天线
Caution Do not pull the antenna of the receiver. Do not tie the antenna and the servo cable together.
小心 不要拉扯接收机的天线,也不要将天线和舵机连接线绑在一起。
Note
Do not put the antenna close to the metal materials, because this will affect the signal strength of the
receiver. Keep the receiver's antenna at least 1cm away from conductive materials such as carbon
or metal.
警告 接收机天线需远离导电材料,例如金属棒和碳纤物质。为避免影响正常工作,请确保接收机天线和导电材料之间至少有
1cm 以上的距离
Transmitter Instruction 发射机概览

10
The transmitter has a built-in antenna. When the transmitter starts to work, the antenna automatically operate, without
additional operations.
Make sure that the receiver is mounted in an appropriate location within the model, to ensure a stable signal,
Pay attention to the following when installing the receiver:
1. Make sure the receiver is not installed near ESCs or other sources of electrical noise.
2. Keep the receivers antenna away from conductive materials such as carbon or metal. To ensure normal function
make sure there is a gap of at least 1cm between the antenna and the conductive material.
请结合相应模型的结构选择合适的位置安装接收机, 同时为了确保接收机的性能和遥控距离的稳定,并防止外界干扰,
安装过程中请注意以下事项:
1.确保接收机安装在远离电机,电子调速器或电子噪声过多的区域。
2.接收机天线需远离导电材料 , 例如金属棒和碳纤物质。为了避免影响正常工作,请确保接收机和导电材料之间至少有 1厘米以上的距离。
本发射机天线为内置天线,发射机开始工作,天线自动工作,无需单独进行操作 !
Getting Started 使用前准备
Transmitter Antenna 发射机天线
Receiver and Servo Installation 接收机与舵机安装
Installing Transmitter Battery 发射机电池安装
Caution To prevent damage do not power on the receiver during installation.
小心 准备过程中,请勿连接接收机电源,避免造成不必要的损失。
Danger Only use specified battery (X4 AAA batteries).
危险 仅使用厂家指定的电池。
请勿打开、拆卸或自行维修电池。
Danger Do not open, disassemble, or attempt to repair the battery.
危险
请勿挤压、刺穿或接触电池的金属端子。
Danger Do not crush/puncture the battery, or short the external contacts.
危险
请勿将电池置于高温环境或液体中。
Danger Do not expose to excessive heat or liquids.
危险
Danger Do not drop the battery or expose to strong shocks or vibrations.
危险 请注意防止电池跌落、碰撞或振动。
Danger Always store the battery in a cool, dry place.
危险 请将电池存放在干燥阴凉的环境中。
Danger Do not use the battery if damaged.
危险 如果电池损坏,请立即停止使用。
Battery Type: AAA
Follow the steps below to install the batteries:
1. Open the battery compartment cover.
2. Insert 4 AAA batteries with the correct polarity. Make sure it is connected with the correct polarity to avoid damage.
3. Replace battery compartment cover.
Low battery alarm: When the battery is lower than 4.2V, the transmitter will give a alarm with the LED flashing slowly.

11
Getting Started 使用前准备
电池类型使用:AAA 电池
请按照以下步骤安装发射机电池:
1. 打开电池仓盖。
2. 将 4 颗电量充足的 AAA 电池装入电池仓内,注意正负极方向并确保电池上的金属端子与电池仓内的金属端子接触。
3.盖好电池仓盖。
低电量报警:当电量低于 4.2V 时,发射机即发出声音报警同时 LED 慢闪
Follow the steps below to turn on the transmitter:
1. Check to make sure that the batteries are fully charged and installed correctly.
2. Toggle the Power Switch to the [ON] position, and the LED will be solid on.
3. Connect the receiver to power.
Note: For safety always power on the transmitter before the receiver.
The LED status indicates the power supply state of the transmitter and its working state.
Off: The transmitter is not powered on. Fast flashing: The transmitter is in the bind mode.
Slow flashing: Low voltage alarm Gradual: The transmitter is in Sleep mode or in Idle alarm state.
Three-flash-one-off: The transmitter is in standby state, while the bound receiver is powered off, unbound, or nosignal.
Operation Guide 操作指引
The LED Status of the Transmitter 指示灯
Caution Operate with caution in order to avoid damage or injury.
小心 此时系统已启动,请谨慎操作,否则可能导致产品损坏或人员伤亡。
请按照以下步骤进行开机:
1.检查系统状态,确电池电量充足并正确安装;
2.将开关拨到 [ON] 位置,指示灯常亮;
3.接收机通电。
注:为保障模型及人员安全,使用时请先打开发射机再给接收机通电
发射机状态指示灯用于指示发射机的电源及工作状态。
灭:发射机电源未接通。 快速闪烁:发射机处于对码状态中。
慢速闪烁:低电压报警。 呼吸灯闪烁:发射机处于休眠模式或闲置报警状态。
三闪一灭:发射机处于待机状态,但对码的接收机未开机、已关机或掉码。
Power-on 开机
The transmitter and receiver have already been bound at the factory.
However if the receiver needs to be replaced or additional receivers bound follow these steps:
1. Turn on the transmitter while holding the bind button to put the transmitter into bind mode. Meanwhile the LED will
flash quickly, and release the bind button.
2. The receiver will power on and wait for 1 second,if without connection, it will enter the binding state automatically;
3. The receiver's LED is solid on, indicating the binding is successful.
4. Check to make sure the transmitter and receiver functions are working correctly, repeat steps 1 to 3 (binding
process) if any problems arise.
Note: If the binding is not completed within ten seconds, the LED of the receiver will enter its slow flashing state.
对码
Binding

12
Operation Guide 操作指引
发射机和接收机在出厂前已对码成功。
如需更换其他的发射机或接收机,请按照下述步骤重新对码。本发射机支持双向传输,对码步骤如下:
1.按住发射机的 BIND键,并将 POWER键拨至 [ON] 位置 ,发射机即进入对码状态,此时发射机机指示灯快闪 ,松开对码键;
2.接收机通电进入对码状态;
3.接收机 LED 灯常亮,即对码成功(发射机对码成功后自动退出对码状态);
4.检查发射机、接收机是否正常工作。如需重新对码,请重复以上步骤。
注:若十秒内对码没有完成,接收机 LED 指示灯进入慢闪状态。
Danger Make sure to disconnect the receiver power before turning off the transmitter. Failure to do so may
lead to damage or serious injury.
危险 关闭时,请务必先关闭接收机电源,再关闭发射机,否则可能导致模型损坏、人员受伤。
This function is used to set the neutral position for throttle trigger and steering wheel.
Every transmitter is calibrated before leaving the factory, however if recalibration is required, please follow these
steps:
1. Turn and hold the wheel clockwise to the max travel point and push the throttle forwards as far as possible, then
turn on the transmitter. It will enter calibration mode. The buzzer sounds shortly in cycle for prompt.
2. Turn the steering wheel to max and min travel point in clockwise and counterclockwise. Then push/pull the trigger
to forward/backward as far as it will go. The wheel and trigger go back to the neutral position. Once calibration is
fininshed by press the bind key to save and exit.
• If the calibration is completed successfully, the transmitter will exit calibration mode by pressing BIND
button,meanwhile the buzzer will prompt with one short beep, and afterwards, the transmitter is in standby mode
with the LED in three-flash-one-off state.
• If the calibration is failure, the transimitter can not exit the calibration mode by pressing BIND button.
用于方向手轮和油门扳机的中位角度修正。
发射机在出厂前已校准完成,如需要重新校准,请按照以下步骤执行。
1. 将发射机手轮顺时针打到最大,前推油门扳机至最大,并将 POWER 键拨至 [ON] 位置,即进入摇杆校准模式(指示灯常亮),蜂鸣器
短响一声循环提示;
2.将手轮和扳机行程打到最大和最小后 , 回至中位位置。然后按 BIND 键保存并退出校准模式。
• 若校准成功按 BIND按键可退出校准模式,蜂鸣器短响一声循环提示,随后发射机进入待机模式(指示灯三闪一灭 );
• 若校准未通过,按 BIND 按键无效,即不能退出校准模式。
Follow the steps below to turn off the system:
1. Disconnect the receiver power.
2. Toggle the transmitter's Power Switch to the OFF position.
请按照以下步骤关机:
1.断开接收机电源;
2.将 POWER 键拨到 [OFF] 位置,使发射机关闭。
摇杆校准
Stick Calibration
关机
Power Off
The transmitter outputs a total of 3 channels, the function assignment and settings are as follows.
该发射机共输出 3 个通道,功能分配及设置如下:
System Functions 系统功能
Channel Description 通道说明

13
System Functions 系统功能
Channel
通道 Assigned Control
已分配的控件 Function
功能
CH1 Steering Wheel
方向手轮 Steering (To make the model car to turn right or left.)
(To control the model car to move forward or backward.)
方向(控制车子左右转向。)
CH2 Throttle Trigger
油门扳机 Throttle
油门(控制车子前后行驶。)
CH3 Three-position
switch CH3
三档开关 CH3
Fast-/Median-/slow-position servo channel, to switch the speed positions of the
model car.
Toggle the control to switch between fast-position and slow-position.
快中慢档舵机通道,切换车子速度档位。
拨动控件切换快档和慢档。
Under normal power-on, quickly press the REV button twice within 1 second to enter the mode, and the green light
will flash. Select the appropriate drag brake setting value as shown below, press the corresponding button, and then
quickly press the REV button twice within 1 second to exit
ST-: 0%
ST+: 50%
TH-: 75%
TH+: 100%
Press the BIND button to cycle through with and without brake
正常开机状态下, 1秒內快速按REV按键兩下进入模式,此时绿灯闪亮, 在下列按键里选取所需拖刹设定值,按一下选定,再快速按REV按
键兩下退出模式
ST- 为 0%
ST+为 50%
TH- 为 75%
TH+ 为 100%
短按BIND按键循环切换带刹车和不带刹车功能
Drag brake function (default:0%) ,factory setting 100% + brake function
(default: without brake) ,factory setting with brake
拖刹功能(默认:0%),厂设为100% + 刹车功能 (默认:没刹车) 厂设为有刹车
Under normal power-on, quickly press the BIND button twice within 1 second to enter the mode, and the green light
will flash. Press the corresponding button to adjust to the appropriate state, and then quickly press the BIND button
twice within 1 second to exit.
ST+/-: Increases /decreases adjustment step
TH+/-: Increases /decreases servo travel
正常开机状态下, 一秒內快速按BIND按键兩下进入模式,此时绿灯闪亮,短按下列按键调整至所需状态后,快速按BIND按键兩下退出模
式。
ST-/+ 为换档舵机微调
TH-/+ 为换档舵机舵量
Trims and travel of gear shift servo 换档舵机微调/舵量

14
System Functions 系统功能
To reverse the output direction of the channel.
• When the steering wheel is located in the maximum travel or minimum travel, press the REV button to reverse CH1.
When you press once, it switches once.
• When the throttle trigger is at the maximum or minimum travel and the steering wheel is in the neutral position at the
same time, press the REV button to reverse CH2. When you press once, it switches once. When the reverse action
of the channel takes effect, the buzzer will sound shortly for prompt.
Note: Pay special attention on throttle channel reverse opration due to safety concern, as the model car will move in
full speed when the trigger is at full throttle position!
该功能用于调整通道的动作方向。
• 方向手轮位于最大行程或最小行程时,按 REV 按键可使通道 1 反向,按一次切换一次;
• 油门扳机位于最大行程或最小行程时,同时方向手轮位于中位时,按 REV 按键可使通道 2 反向,按一次切换一次。通道反向动作生效
时,蜂鸣器短响一声提示。
注:油门通道反向时,请注意安全(最大油门时车子会以全速运动)!
Channel Reverse 通道反向
To adjust the trim value of the channel.
• When the steering wheel is in the neutral position, press the ST+/- button to adjust CH1 trim.
• When the throttle trigger is in the neutral position, press the TH+/- button to adjust CH2 trim.
ST+/TH+: Increase the trim value. ST-/TH-: Decrease the trim value. Trim range: -150 us – 150 us; The step is 5us;
by default, it is 0.
When the trim setting action takes effect, the buzzer will sound shortly for prompt. If you press and hold it, the value
remains changes continuously. The buzzer will sound twice for prompt when the trim is across the neutral position.
And when it reaches the endpoint, the buzzer will sound long for prompt.
该功能用于调整通道微调。
• 当方向手轮位于中位时,按 ST+/- 按键,可调整通道 1 微调;
• 当油门扳机位于中位时,按 TH+/- 按键,可调整通道 2 微调。
ST +/TH+:增大微调值, ST -/TH-:减少微调值,微调调节范围:-150us~150us,调节步进为 5us,默认为 0。
微调设置动作生效时,蜂鸣器短响一声提示,长按快速调节,微调过中位时,蜂鸣器响两声提示;到终点时长响一声提示。
Trim Setting 微调
To adjust the travel range value of the channel.
• When the steering wheel is located in the maximum travel or minimum travel, press the ST+/- button to adjust CH1
travel value.
• When the throttle trigger is at the maximum or minimum travel, press the TH+/- button to adjust CH2 travel value.
ST+/TH+: Increase the travel value. ST-/TH-: Decrease the travel value. Travel range: 0-120%, by default, it is
100%,the step is 5%.
When the travel setting action takes effect, the buzzer will sound shortly for prompt. If you press and hold it, the value
remains changes continuously. The buzzer will sound long for prompt when reaching the endpoint.
该功能用于调整通道的舵量。
• 方向手轮位于最大行程或最小行程时 ,按 ST+/- 按键,可调节通道 1 舵量;
• 当油门扳机方向手轮位于最大行程或最小行程时时,按 TH+/- 按键,可调节通道 2 舵量。
ST+/TH+:增加舵量值,ST-/TH-:减小舵量值,调节范围:0-120%(默认 100%),步进为 5%。
舵量设置动作生效时,蜂鸣器短响一声提示,长按快速调节,舵量至终点时,蜂鸣器长响一声提示。
D/R Setting 舵量调节

15
System Functions 系统功能
The failsafe function is used to protect the model and personnel when the receiver is out-of-control. The CH2 will be in
brake mode when the receiver is out-of-control.
By default, and the receiver will keep outputting the last channel value in case of out-of-control.
• When the transimitter is in normal working state, press and hold the BIND button for 3S to start the failsafe function.
The current channel value is set as the failsafe value. The buzzer will sound long for prompt after the setting is
successful.
Note: When the transmitter binds with a receiver once more, the failsafe setting will restore to default setting
此功能用于当接收机无法正常收到发射机的信号不受控制时,保护模型和操作人员的安全。 失控后 CH2 通道进入刹车状态。
该发射机默认未设置时接收机通道保持最后输出。
• 开机正常状态下,长按对码按键 3S 触发失控保护设置,将当下的通道值作为失控保护值。动作设置成功时,蜂鸣器
长响一声提示。
注:重新对码时恢复默认设置。
To reset the function data.
• Press and hold the BIND button and REV button while powering on the transmitter, to reset the function data, and
the buzzer will sound long for prompt.
Note: The failsafe setting, binding information and stick calibration will not be reset.
此功能用于将发射机功能参数恢复为默认值。
• 按住发射机的 BIND 键和 REV 键后,并将 POWER 键拨至 [ON] 位置 , 即恢复数据,蜂鸣器长响一声提示。
注:失控保护设置、对码信息和摇杆校准数据不复位。
Failsafe Setting 失控保护
Reset Data 数据复位
The transmitter will go into idle alarm state when there is no operation over 10 minutes.
• When the transimitter is in idle alarm state, the transmitter LED is in gradual light state, the buzzer sounds twice
quickly in cycle for prompt. Operations of any control on the transmitter will cancel the alarm, as a result of the exit of
the idle alarm state.
当发射机未操作时间大于 10 分钟时,即进入闲置报警状态。
• 在此状态下,发射机指示灯为呼吸灯闪烁状态,蜂鸣器循环快响两声提示;操作发射机上的任意控件将解除并退出闲置报警状态。
Idle Alarm 闲置报警
When the transmitter has been in idle alarm state over 2 minutes, it will enter the sleep mode.
• In this mode, the transmitter LED is in gradual light state, the buzzer is off and the RF is off. The transmitter will enter
low power consumption state, and no responsive in case of operations of any control. To exit the sleep mode, power
off the transmitter and restart it.
当发射机处于闲置报警状态时间大于 2 分钟时,即进入休眠模式。
• 在此模式下,发射机指示灯为呼吸灯闪烁状态,蜂鸣器关闭,RF 关闭,发射机将停止一切工作,进入低功耗休眠状态。此时操作任意
控件发射机都无响应。必须关闭电源重启发射机才能退出休眠模式。
Sleep Mode 休眠模式

When the transmitter voltage has lower than 4.2V, it will enter the low voltage alarm state.
• When the transimitter is in low voltage alarm state, the transimtter LED will be in gradual status and will sound
shortly for prompt.the buzzer.
Note: The RF is off when the batteries voltage is lower than 3.5V for the model's and the system's safety.
当发射机电池电压低于 4.2V 时,即进入低电压报警状态。
• 在此状态下,发射机指示灯为慢闪状态,蜂鸣器短响一声循环提示。
注:为保护系统和模型的安全,电池电压低于 3.5V 时,无线系统将停止工作。
Low Voltage Alarm 低电压报警
16
System Functions 系统功能
FMS-R3A Function Instructions FMS-R3A 功能说明
When the transmitter is in normal state, once it detects the bound receiver has turned off, or disconnected over 2S,
the transmitter LED will be in three-flash-one-off state for prompt.
Note: When the transmitter received the information of the bound receiver again, it will exit the offline prompt state.
当发射机在正常工作状态下,检测到已对码的接收机未开机、已关机或掉码时间大于 2S 时,发射机指示灯三闪一灭提示。
注:若收到已对码的接收机回传信息后,即退出离线提示状态。
Offline Prompt 离线提示
• Make sure the product is installed and calibrated correctly, failure to do so may result in serious injury.
• Make sure the receiver's battery is disconnected before turning off the transmitter, failure to do so can result out of
control. Unreasonable setting of the Failsafe may cause accidents.
• Make sure the receiver is mounted away from motors, electronic speed controllers or any device that emits
excessive electrical noise.
• Keep the receiver's antenna at least 1cm away from conductive materials such as carbon or metal.
• Do not power on the receiver during the setup process to prevent loss of control.
• 使用前必须确保本产品与模型安装正确,否则可能导致模型发生严重损坏。
• 关闭时,请务必先关闭接收机电源,然后关闭发射机。如果关闭发射机电源时,接收机仍然在工作,将会导致遥控设备失控。失控保护设
置不合理可能引起事故。
• 确保接收机安装在远离电机或电子噪声过多的区域。
• 接收机天线需远离导电材料,例如金属棒和碳物质。为了避免影响正常工作,请确保接收机天线和导电材料之间至少有 1厘米以上的距离。
• 准备过程中,请勿连接接收机电源,避免造成不必要的损失。
Attentions 注意事项
The receiver has low voltage protection and overheating protection function.
• Low voltage protection: When the voltage of the receiver is lower than 6.4V, all channels have no output.
• Overheating protection: When the receiver temperature is too high, CH2 motor channel has no output and CH1
channel has normal output. When the temperature returns to be normal, the overheat protection function becomes
unavailable, that is, the normal output of CH2 resumes.
本款接收机具有低压保护和过热保护功能。
• 低电压保护:接收机电池电压低于 6.4V 时 , 所有通道无输出。
• 过热保护:当接收机温度过高时 , CH2 马达通道无输出 , CH1 通道正常输出;当温度恢复正常时,则退出过热保护功能,即 CH2 恢复正常
输出。
Protect Function 保护功能

17
FMS-R3A Function Instructions FMS-R3A 功能说明
When the receiver and the transmitter has connected normally, press the BIND button to turn on or turn off the car
llight. By default, the car light is off.
在发射机与接收机正常通信状态下,短按发射机 BIND 按键开或关闭车灯。默认为关闭状态。
Car Light Control 车灯控制方式
The receiver supports the failsafe function, it needs to be set at the transmittter side, refer to Failsafe for details.
本接收机支持失控保护功能,需要发射机端设置,操作步骤请查看 [失控保护 ]。
Failsafe 失控保护
G3 Specifications G3 产品规格
• Product Model: FMS-G3
• Compatible Receivers: FMS-R3A
• Compatible Models: 1:18, 1:24 simulation cars or climbing cars
• Number of Channels: 3
• RF: 2.4GHz ISM
• Maximum Power: < 20dBm (e.i.r.p.) (EU)
• 2.4G Protocol: AFHDS 2A-BS
• Distance: >100m (Ground distance without interference)
• Resolution: 1024
• Input Power: 6V DC or 1.5AAA*4
• Working Current: 10mA (Static);120mA/6V (Dynamic)
• Charging Port: No
• Low Voltage Alarm: < 4.2V
• Antenna: Built-in single antenna
• Data Port: No
• Temperature Range: -10℃~ +60℃
• Humidity Range: 20% ~ 95%
• Online Update:No
• Color:Blue
• Dimensions: 115.2*75.5*145mm
• Weight: About 113g
• Certification: CE, FCC ID:2A2UNG300
• 产品型号:FMS-G3
• 适配接收机:FMS-R3A
• 适配模型:1:18、1:24 仿真或攀爬准模型车
• 通道个数:3
• 无线频率:2.4GHz ISM
• 发射功率:< 20dBm
• 无线协议:AFHDS 2A-BS
• 遥控距离:>100m(空旷无干扰地面距离)
• 通道分辨率:1024 级
• 输入电源:6V DC 或 1.5AAA*4
• 工作电流:10mA(静态);120mA/6V(动态)
• 充电接口:无
• 低电压报警:< 4.2V
• 温度范围:-10℃~+60℃
• 湿度范围:20%~95%
• 天线类型:内置单天线
• 数据接口:无
• 发射机颜色:蓝色
• 在线更新:无
• 外形尺寸:115.2*75.5*145mm
• 机身重量:113g 左右
• 认证:CE, FCC ID:2A2UNG300
Transmitter Specifications 发射机规格
• Product Model: FMS-R3A
• Compatible Transmitters: FMS-G3
• Compatible Models: 1:18\1:24 simulation cars or climbing cars
• Applicable Motors: 130 brushed motor
• PWM Channels:2
• Number of Lights:1
• RF: 2.4GHz ISM
• 2.4GHz Protocol: AFHDS 2A-BS
• Input Power: 2S Lithium batteries
• Continuous / Peak Current: 10A/40A
• BEC Output: 5V/1A
• Maximum Power: < 20dBm (e.i.r.p.) (EU)
• Distance: >100m (Ground distance without interference)
• Antenna: External antenna
• Data Output: PWM
• Resolution: 1024
• Temperature Range: -10℃~ +60℃
• Humidity Range: 20% ~ 95%
• Online Update:No
• Dimensions: 32*24.4*12mm
• Weight: 8g
• WaterProof:PPX4
• Certification: CE, FCC ID: 2A2UNR3A00
Receiver Specifications 接收机规格

VEHICLE SETUP
18
NOTE
1. If it is not in use for a long time, unplug and take off the battery to prevent battery leakage.
2. Do not open, disassemble, or attempt to repair the battery.
3. The battery needs to be disconnected from vehicle before it can be charged
4. Do not charge battery in vehicle.
车辆设置
Connecting the battery 连接电池
注意:
1、如果长时间不用,请拔下电池,以防电池损坏。
2、不要打开、拆解或试图维修电池。
3、在给电池充电之前,需要先断开电池与车辆的连接。
4、请勿在车内给电池充电。
G3 Specifications G3 产品规格
• Charging Port: No
• Low Voltage Alarm: < 4.2V
• Antenna: Built-in single antenna
• Data Port: No
• Temperature Range: -10℃~ +60℃
• Humidity Range: 20% ~ 95%
• Online Update:No
• Color:Blue
• Dimensions: 115.2*75.5*145mm
• Weight: About 113g
• Certification: CE, FCC ID:2A2UNG300
• Antenna: External antenna
• Data Output: PWM
• Resolution: 1024
• Temperature Range: -10℃~ +60℃
• Humidity Range: 20% ~ 95%
• Online Update:No
• Dimensions: 32*24.4*12mm
• Weight: 8g
• WaterProof:PPX4
• Certification: CE, FCC ID: 2A2UNR3A00
• 产品型号:FMS-R3A
• 适适配发射机:FMS-G3
• 适配模型:1:18、1:24 仿真或攀爬准模型车
• 适配电机:130 有刷电机
• PWM 通道:2
• 车灯组数:1
• 无线频率:2.4GHz ISM
• 无线协议:AFHDS 2A-BS
• 输入电源:2S 锂电
• 持续 / 峰值电流:10A/40A
• BEC 输出:5V/1A
• 发射功率:< 20dBm
• 遥控距离:>100m(空旷无干扰地面距离)
• 温度范围:-10℃~+60℃
• 湿度范围:20%~95%
• 数据输出:PWM
• 天线类型:外置单天线
• 通道分辨率:1024 级
• 在线更新:无
• 外形尺寸:32*24.4*12mm
• 机身重量:8g 左右
• 防水等级:PPX4
• 认证:CE, FCC ID: 2A2UNR3A00
Open the engine hood as shown, load the
battery into the battery compartment.
Connect the battery plug to the female
connector of the receiver/ESC combo unit,
and then close the engine hood.
The battery plug :51005 2P Male Battery
compartment size:43 x 20 x 14mm
如图所示,打开引擎盖,将电池放入电池舱;将电
池插头连接到接收机/电调一体装置的母头,然后关
闭引擎盖。
电池插头:51005 2P 公头
电池仓尺寸:43 x 20 x 14mm

19
• 不要使用Nicd、NIMH或任何其他类型的充电器给LIPO锂聚合物电池充电。请使用LIPO锂聚合物的专用充电器给LIPO锂聚合物电池
充电。
• 请勿在无人看管的情况下充电。
• 电池请勿过充。
• 请勿将电池放置在易燃、不耐热的表面上充电。
• 总是使用安全袋或安全容器给电池充电。保证电池在任何时候都不过热。电池温度超过140华氏度(60℃)则易造成损坏,甚至引发
火灾。
• 请勿将电池长期置于模型产品内,更勿在模型产品内直接充电。
• 请勿给电池放电,以免损坏电池。
• 任何时候请勿将电池暴露在水或湿气之中。
• 请勿在明火或加热器附近储放电池。
• 请勿与其他未组装或预组装的电池混用。
• 需将电池存放在远离儿童的安全位置。
• 模型如出现任何碰撞,需立刻拆除电池。
• 即使出现微小的损坏,也需仔细检查电池和连接器。
• 注意:使用后电池可能会发热,需让电池冷却到室温后再进行充电。
• 请勿让电解液接触眼睛或皮肤。如电解液不慎接触到身体的任何部位,请立即进行清洗。
• 请勿替换或修改电池组的连接器或电线。
• 在进行充电或其他任何操作之前需检查电池的状况。
• 请勿造成电池短路。
• 请勿直接接触已泄漏或已损坏的电池。
• 请勿超出建议温度范围充电电池(0度-45度)。
VEHICLE SETUP 车辆设置
Battery Precautions 电池注意事项
•
•
•
•
•
•
•
•
•
•
•
•
•
•
•
•
•
•
•
•
Never charge a lithium polymer battery with a charger designed for Nicd, NIMH, or any other type of battery chemis-
try. Use ONLY charger designed for LiPo battery.
Do not leave LiPo battery unattended during charging.
Do not overcharge the battery.
Always charge LiPo batteries on non-flammable, heat-resistant surfaces.
Always use a LiPo-safe bag or container while charging. Do not allow LiPo cells to overheat at any time. Cells which
reach greater than 140 Fahrenheit(60℃) will usually become damaged and will catch fire.
Do not charge the LiPo pack while it is still in the model. Never charge or store battery packs in a vehicle.
Do not discharge LiPo, doing so will damage the battery.
Do not expose LiPo cell to water or moisture at any time.
Do not store battery near open flame or heater.
Do not assemble LiPo cells or pre-assembled packs together with other LiPo cells or packs.
Always store LiPo battery in a secure location away from children.
Always remove the LiPo battery if model is involved in any kind of crash.
Carefully inspect the battery and connectors for even the smallest damage.
CAUTION: Cells may become hot after usage. Allow the pack to cool to room temperature prior to recharging.
Do not allow the electrolyte to get into eyes or on skin. Wash affected areas immediately if they come into contact
with electrolyte.
Do not alter or modify connectors or wires of a LiPo battery pack.
Always inspect the condition of the battery before charging and operating.
Do not short circuit the LiPo battery.
Do not have contact with a leaky/damaged battery directly.
Do not charge battery out of recommended temperature range(0℃-45℃).

C3017
C3040
C3281
C3087
C3282
C3283
C3284
C3285
C3286
C3287
C3288
C3289
C3290
C3291
C3292
C3293
C3294
C3295
C3296
C3297
C3298
C3299
C3300
C3301
C1389
C3001
C3012
C3013
C3014
C3015
C3016
C3018
C3019
C3020
C3021
C3022
C3023
C3025
C3111
C3026
C3027
C3028
C3030
C3031
C3032
C3033
C3034
C3035
C3036
Front axle assembly
Nud tire
Front bumper
Oil shock absorbers assembly
Rearview mirror and wiper
Window
Car body green
Car body red
Car body gray
Mini hinge
Snokle and handel
Hood green
Hood red
Hood gray
Light cup set green
Light cup set red
Light cup set gray
Lens
Dash board set
Fender
Seat
Car hopper green
Car hopper red
Car hopper gray
Lipo battery 2s 7.4v 380mAh
Girder
Transmission gear box assembly
Transmission box shaft
Transmission gear box plastic
Gear set
Steering link set
Axle plastic parts
Portal axle cover
C hub set
Portal axle set
Rear wheel shaft set
Front dog bone set
CVD axle set B
servo saver set
Rear axle assembly
Servo mount
Rod set
Pinion gear
Wheel hex adpator
130 motor
Screw
Screw nut
Steering servo
Variable speed servo
前桥总成
泥地轮胎
前防撞
避震器
后视镜及雨刷
车窗
车壳 绿
车壳 红
车壳 灰
金属合页
进气喉,车门手柄
车头盖 绿
车头盖 红
车头盖 灰
灯杯 绿
灯杯 红
灯杯 灰
灯片
仪表盘
档泥板
座椅
车斗 绿
车斗 红
车斗 灰
电池7.4V 2S 380mAh
大梁
驱动牙箱成品
齿轮箱传动轴
传动箱胶件
齿轮
转向杆
直桥胶件
门桥胶件
C座套件
门桥轴
后轮轴
狗骨
传动轴 B
转向舵机保护套装
后桥总成
舵机座
连杆
电机齿
六角接合件
130电机
螺丝套装
螺母
转向舵机
換档舵机
20
Spare parts list 配件列表
C3039
C3059
C3063
C3074
C3075
C3080
C3081
C3060
C3061
C3062
C3064
C3066
C3067
C3069
C3070
C3073
C3083
C3110
C3112
C2051
C3131
C3132
C3007
C3302
C3303
C3181
C3304
C3305
Bearing set
Portal axle metal gear
CVD axle set A
ball head screw
Double ball head screw
M4 aluminium ball head
Shift lever
All terrain wheel
Metal differential
Metal transmission gear
Metal rod set
Metal drive gear
130 motor heat sink
Metal universal joint drive shaft
130 high speed motor
Aluminum shock absorber
Metal y shape fornt/rear axle
connecting rod
Aluminum axle
Bevel gear for axle
Usb 2s lipo charger cable
Metal steering servo arm
Brass rod set (black)
Wheel
Light set
G3 + R3A transmitter receiver set v3
G3 transmitter v3
R3A receiver v3
Gas tank and accessory
五金轴承
门桥金属齿轮
传动轴A
单球头螺丝
双球头螺丝
M4铝波头
换挡拉杆
全地形车轮成品
金屬差速器
变速箱金属齿
金属拉杆
金属差速器驱动齿轮
130电机散热片
金属万向节传动轴
130 高速电机
铝合金减震器
金属八字拉杆
铝合金直桥
直桥大伞齿
USB 平衡充电器 7.4V
金属转向摇臂
黄铜连杆套装 (黑色)
轮芯
灯线组
G3 + R3A 发射器/电调
接收器 V3
G3 发射器
R3A 电调接收器 V3
12405 气罐及配件
Table of contents
Other FMS Motorized Toy Car manuals

FMS
FMS 11802 ROC004RTR User manual

FMS
FMS HUMMER H1 User manual

FMS
FMS 11035 User manual

FMS
FMS 1:12 TOYOTA FJ45 Pick-up User manual

FMS
FMS DPFMS10602RTR User manual

FMS
FMS TOYOTA LC80 Land Cruiser User manual

FMS
FMS 1/12 Land Rover II Series User manual

FMS
FMS 1:24 FCX24 MAX SMASHER User manual

FMS
FMS 1/24 FMT24 CHEVROLET COLORADO User manual

FMS
FMS HT-TX02 User manual
Popular Motorized Toy Car manuals by other brands

Tamiya
Tamiya MERCEDES-BENZ SLS AMG GT3 instructions

Aiyaplay
Aiyaplay 370-221V00 instruction manual

RC4WD
RC4WD Gelande II manual

Lean Cars
Lean Cars CH9935 Installation and operating manual

Vaterra
Vaterra 2015 Ford Mustang V-100 RTR owner's manual

Mattel
Mattel READY FOR ACTION MATCHBOX POP UP DELUXE instructions