AEA A840 User manual

ribbonmics & preamps since 1964
www.ribbonmics.com | tel: +1-626-798-9128 | fax: +1-626-798-2378
m
a
d
e
i
n
c
a
l
i
f
o
r
n
i
a
aea a840
PHANTOM-POWERED VERSION OF THE R84
{OWNER’S MANUAL }
Revision 4, April 2016

{WELCOME}
Congratulations on your purchase of the AEA A840 microphone. The
A840 delivers the same award-winning sound as its passive sibling, the
R84. With 12dB more sensitivity and a high-current output, the A840
delivers articulate sound in situations that can challenge a passive
ribbon: handling long cable runs or matching low-gain vintage preamps.
The signal strength and flexibility of active JFET electronics combined
with the luxurious warmth of a Big Ribbon™ all wrapped up in an af-
fordable package is what sets this microphone apart. These aspects,
combined with the reduced proximity effect, make the A840 incredibly
well suited for both close-up and ambient mic applications. It’s just as
versatile as an R44, flattering voice, strings, brass and drums alike.
Protect it from puffs of air, phantom power, and tramp iron, and it is
nearly invulnerable. Treat it well, and it will last decades.
Your A840 microphone is 100% handcrafted in Pasadena, CA. AEA is a
family owned company with a small crew of skilled technicians – most of
them being musicians themselves. Proudly independent, we still manu-
facture all our ribbon microphones and preamps by hand from locally
sourced parts.
We hope that the A840 will help you capture many magical performanc-
es that touch the heart. This manual will help ensure that you get the
best sound and longevity from your new microphone. Please become
part of the AEA community by sharing your experiences with the A840
via e-mail, phone or our social media channels.
Wes Dooley
President of AEA
2

{TABLE OF CONTENTS}
WELCOME 2
INTRODUCTION 4
GENERAL GUIDELINES 4
APPLICATION ADVICE 5
“This Side” vs. “That Side” 5
Controlling Leakage 6
Proximity Effect 7
APPLICATION EXAMPLES 8
Vocals 8
Acoustic Guitar 8
Electric Guitar 9
Brass & Woodwinds 9
Strings 10
Piano 10
Drums & Percussion 11
PRECAUTIONS 11
Phantom Power 11
Wind Gusts 12
Tramp Iron 12
Magnetic Stray Fields 13
Microphone Positioning 13
SPECIFICATIONS 14
WARRANTY 16
SUPPORT 16

{INTRODUCTION}
The A840 is a pill-shaped, side-address, phantom-powered ribbon
microphone with a bidirectional (or figure-of-8) pickup pattern. It is
assembled with the same Big Ribbon™ and tuning (16.5 Hz) as the R44
and shares many of the unique sound characteristics with its historic
predecessor. With phantom-powered JFET electronics and a custom
German transformer, the A840 achieves optimal performance with a
wide choice of preamps ranging from vintage high-end models to USB
audio interfaces in home studio setups. Designed to accommodate
distant and medium miking duties, it exhibits a flat frequency response
when placed 3 feet (1 meter) away from the source. As a result, the mic
performs well on a variety of recording applications including vocals,
brass, strings, woodwinds, guitars, and drums. The A840 microphone
continues to gain followers with its natural sound, articulate midrange,
and forgiving nature. Whether used for vocals or instruments, its perfor-
mance is intimate, warm and detailed, yet never harsh.
{GENERAL GUIDELINES}
If using a USB or battery-powered audio interface, make sure the unit is
capable of providing 48-volt powering. IEC specifies P48 power which
should be able to deliver 10 milliamps per input. The phantom current
draw for active AEA ribbon mics is 7 milliamps. Please check the
current values available on your unit to ensure that it delivers at least 7
milliamps.
To maintain the best performance from your new AEA A840
microphone, take note of these four basic rules:
1) Keep the microphone covered when it is not in use.
2) Always use a sturdy microphone stand.
3) Never expose the microphone to strong air turbulence.
4) Be nice to the microphone, and it will be nice to you.
1) Keeping the microphone covered when it is not in use will reduce the
possibility of damage that might result from a sudden gust of air coming
from air-conditioning or an open door or window. Place the supplied
protective bag over the microphone when it is not in use. For long term
storage, place the microphone in its protective case.
4
2) While the A840 was designed to work well with all standard
microphone stands, a high-quality boom stand will make your life a little
bit easier. Mounting the microphone on a strong, sturdy microphone
stand with a heavy base (or tripod) is essential. If you are using a boom,
make sure that it is properly balanced and that the tripod legs are
positioned appropriately to prevent tipping.
3) Ribbon microphones can withstand very high SPL (Sound Pressure
Level) without difficulty, but can be damaged easily by a sudden, strong
gust of air or high levels of very low frequency sound waves (like from
a kick drum or bass cabinet). This can stretch the ribbon, causing the
microphone to start sounding flabby. To avoid possible damage, follow
this simple procedure when positioning the microphone: put the back
of your hand where the mic will be; if you can feel the motion of air on
your hand, place a pop-filter between the microphone and the source of
the wind gusts or simply pull the mic further back. When recording kick
drums or bass guitar cabinets, angle the microphone to make sure that
no wind blasts hit the microphone directly on-axis from the front or back.
4) Your A840 is a valuable and important investment. Like any piece of
recording equipment or musical instrument, it requires common sense
and good basic care to keep it working properly. Given simple, basic
care as described above, your new microphone will perform admirably
for decades.
{APPLICATION ADVICE}
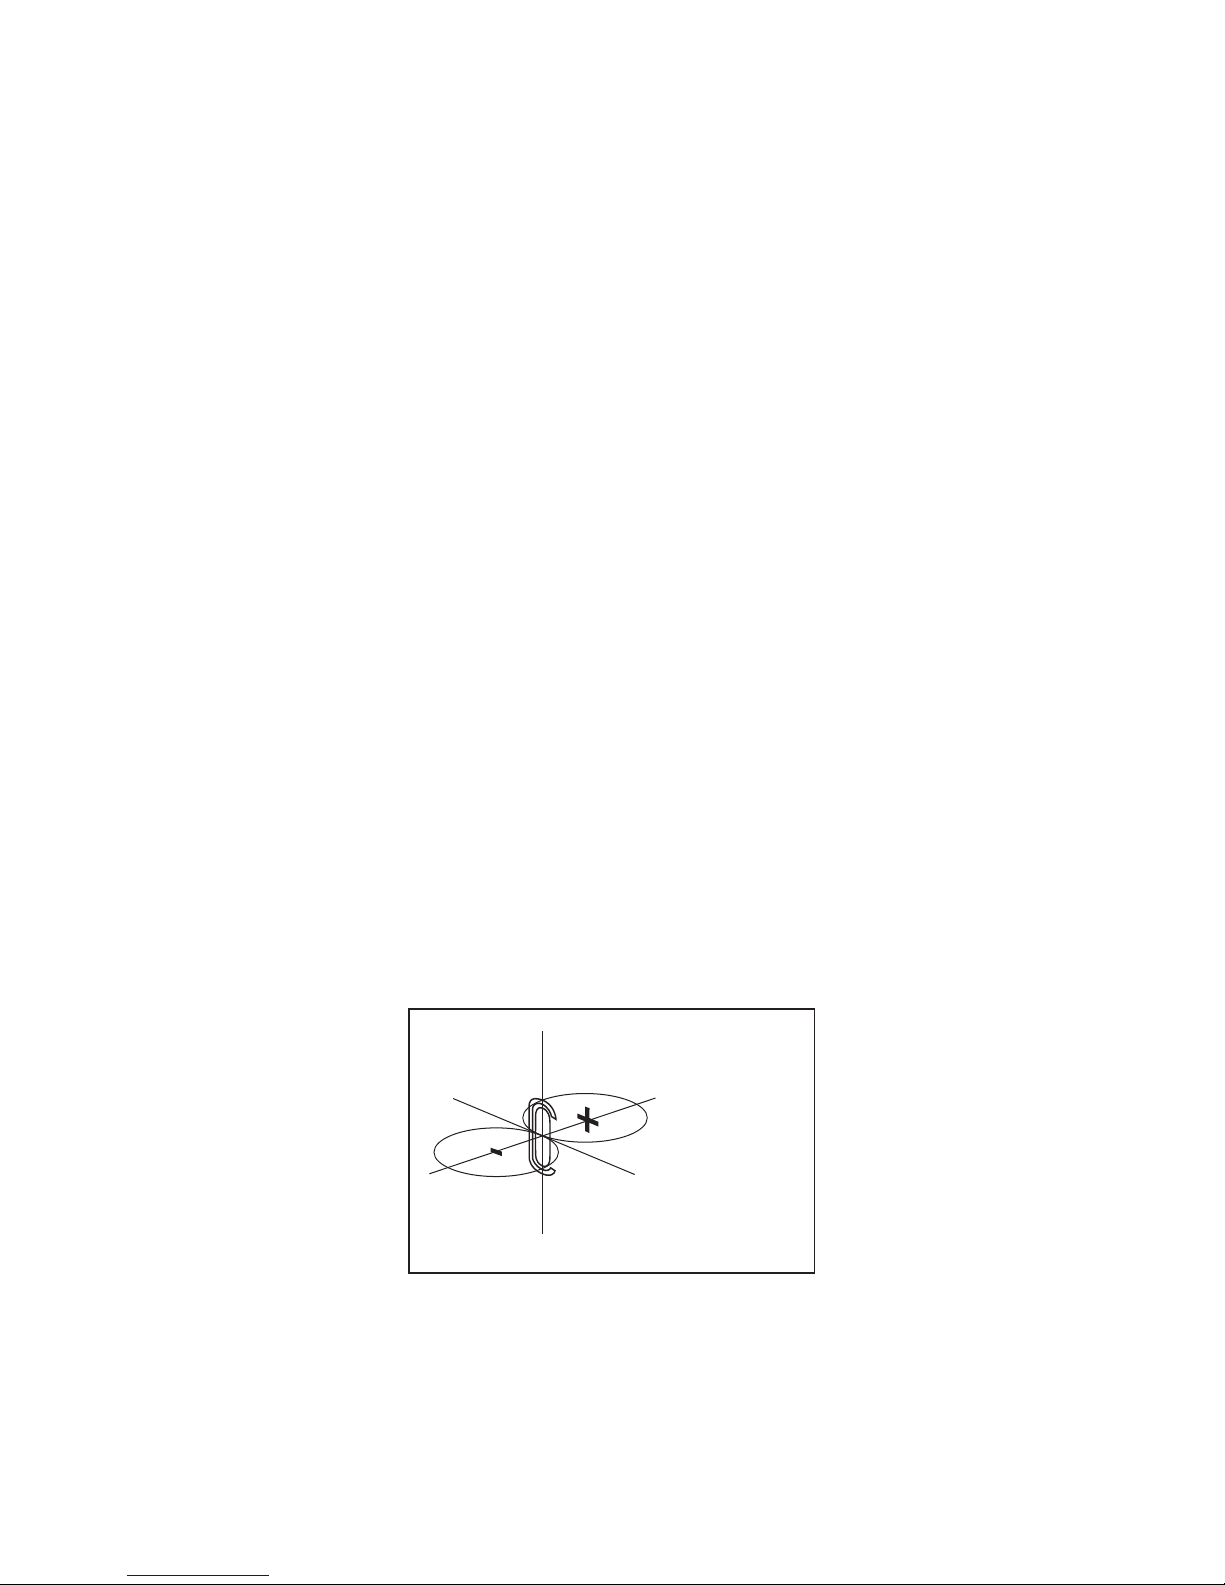
“This Side” vs. “That Side”
Here is an illustration of the pickup pattern of the A840. The AEA logo
on the front of the A840 points directly towards the ‘principal axis’ (+)
indicated in the diagram.
Figure-of-8 microphones are constructed with positive polarity on the
front and negative polarity on the back. Positive pressure on the front
Null Plane
Principal Axis
5

side of the ribbon produces a positive voltage on Pin-2, with respect to
Pin-3 on the output connector.
The sound of your A840 is slightly different between the front and the
back — subtle, but sufficient to offer two “flavors.” In addition to polarity,
this is the result of using two wraps of grille cloth on the back and only
one on the front. When using the rear lobe, remember to invert the
polarity on your preamp or DAW. This ensures your recordings with the
back lobe will be in-phase with other microphones.
Controlling Leakage
A significant and ever-present challenge in contemporary studio
recording is minimizing “bleed” (also called “leakage” or “crosstalk”)
from nearby instruments into the various microphones. The deep nulls
of bidirectional ribbon microphones provide good rejection of unwanted
sounds, which also can be beneficial in sound reinforcement situations
where feedback is always a threat. While gobos can be effective in
isolating performers from each other, they introduce their own set of
problems - not the least of which are reflections in close proximity to
the performers and/or microphones that result in comb-filter distortions.
Since gobos usually are bulky, they also inhibit the ability of the
musicians to hear and see each other easily. Such a setup requires
complex and often cumbersome headphone monitor mixes for the
musicians.
Since the A840 is bidirectional, it exhibit nulls at right angles to the
principal axis. These nulls produce a “plane of rejection” around the
sides, top and bottom of the mic that can be used effectively to reduce
leakage. Simply arrange the musicians so that nearby instruments are
placed in the “null” of their neighbor’s microphone, and vice versa.
Although this does not entirely eliminate the need for gobos, it can
significantly reduce their number.
Keep in mind that a certain degree of bleed does not necessarily have
to be bad. For some styles and genres it can in fact be beneficial to
embrace a little bit of bleed in order to create cohesive and natural
sounding recordings. The important thing to listen for is whether or
not other instruments that bleed into a specific instrument microphone
still sound natural. You will generally find that well-designed ribbon
microphones like the A840 capture a natural off-axis sound, which
means that bleed from other instruments can contribute to the overall
sound in a pleasing way.
6
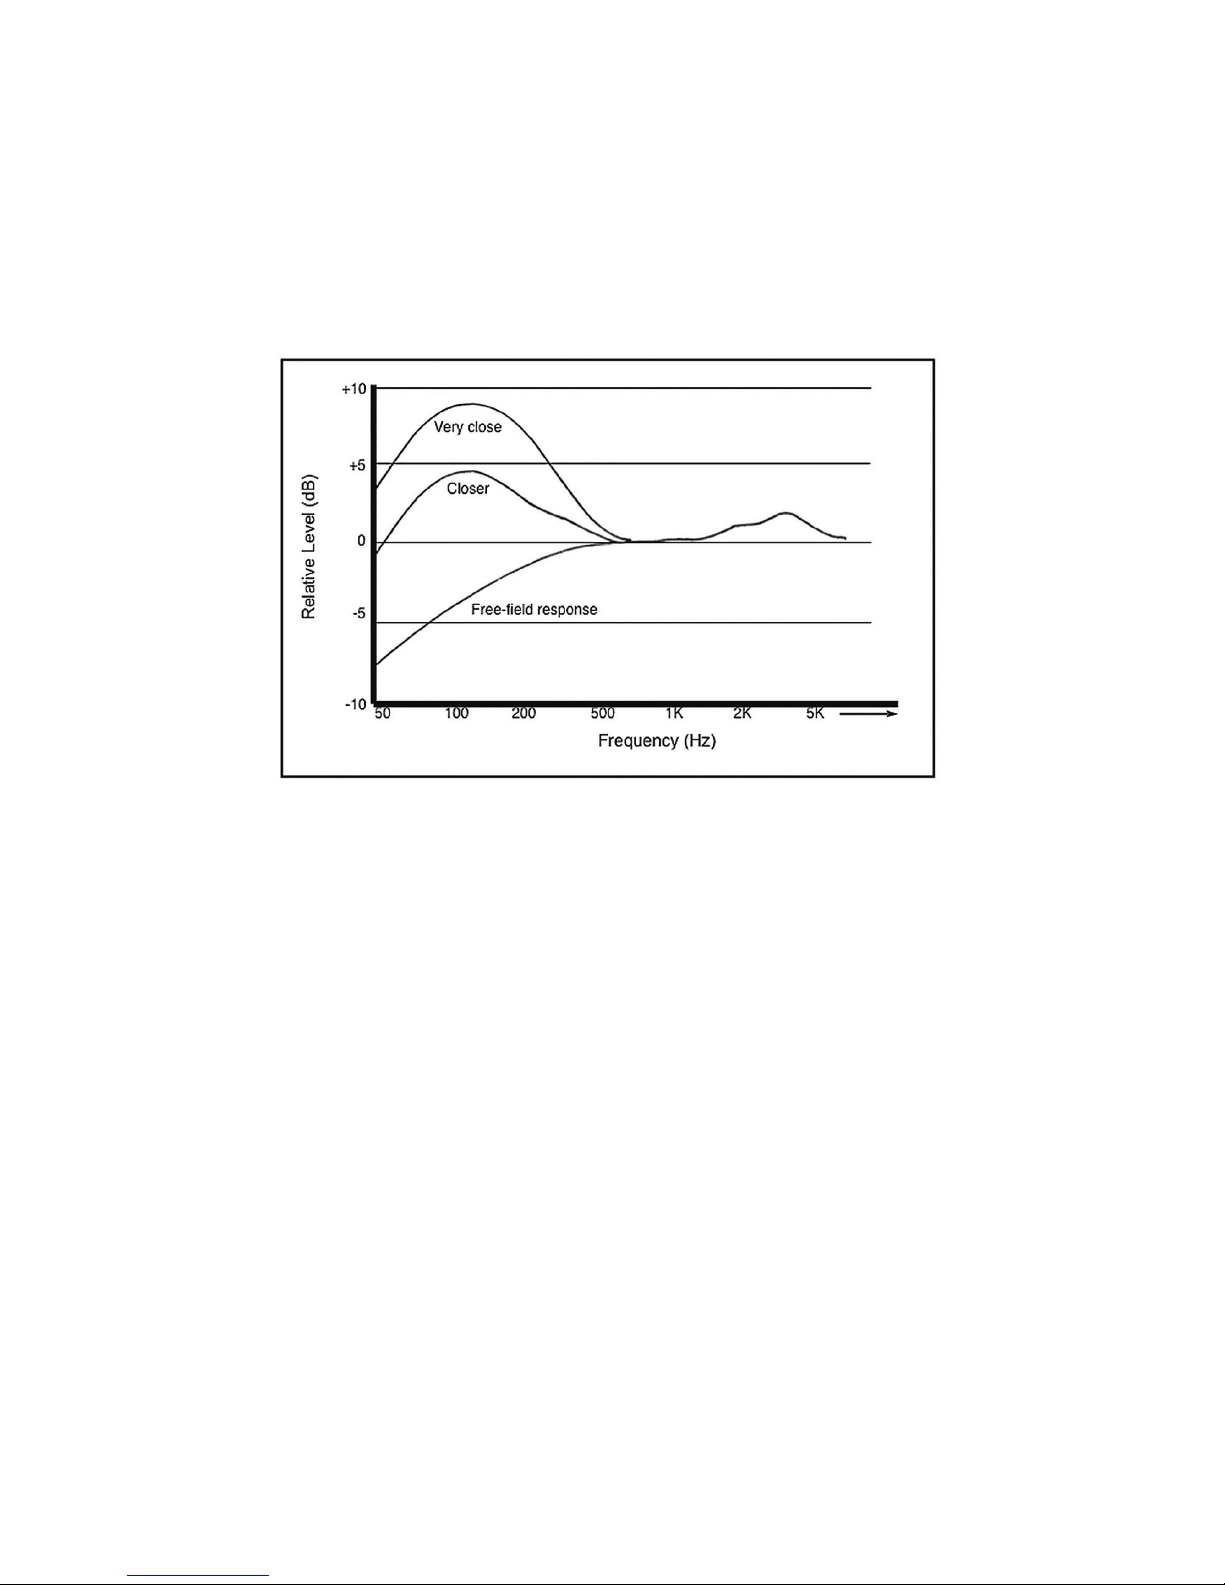
Proximity Effect
Proximity effect is a characteristic of all directional microphones; it
is a rise in low-frequency response that increases at closer working
distances. While this can be used to good effect, particularly with male
voices to give them an enhanced richness and depth, the potential
trade-off is reduced articulation or clarity that can result from the
masking effect on the treble due to “excessive” bass boost.
The R44’s proximity effect begins at six feet (1.8 M) and can become
huge. The RCA 44 was developed when studios were larger and mics
were rarely used close up. The A840 has a more moderate proximity
effect, better suited for closer use in contemporary studios. Designed
to accommodate distant and medium miking duties, exhibits a flat
frequency response when placed 3 feet (1 meter) away from the source
Experienced vocalists instinctively locate the proper working distances
for the microphones they are using. From as early as the 1930s,
Frank Sinatra always kept one hand on the microphone stand while
singing. Some joked that he simply was steadying himself, but more
knowledgeable people noticed that he would bring the mic closer for
more intimate moments, and then move it farther away when he belted
out a line. This technique became known as “working the mic.” A
simple technique for maintaining the proper working distance from the
microphone is to place a pop-screen between the performer and the
microphone. By doing this, nothing need be said to the performers, as
they naturally will work at the distance you have established.
7

Application Examples
Your ears are obviously the best judge of microphone choice and
placement, but AEA has garnered a great deal of experience testing
the A840 in a variety of recording settings and talking to experienced
musicians and engineers. As a result we suggest the following
guidelines to help you to achieve optimum results when using the A840.
Watch the videos on our website (www.ribbonmics.com, www.
AEAsessions.com) and on our YouTube channel (www.youtube.com/
AEAribbonmics) for more tips and tricks for our microphones and
preamps.
Vocals
Our experience with the A840 is that it sounds best on vocals when
used at a distance of 6 to 24 inches (15-60 cm). However, you may find
that positioning the microphone closer or further away from the singer
yields better results depending on the voice, the room or the musical
style. When recording at 6 inches (15 cm) or closer, it is advisable to
have a pop filter handy. The ribbon is well protected from damaging
plosive blasts, but to avoid noises from wind blasts, we recommend
using a pop filter.
If you are recording a musician who sings and plays an instrument at the
same time, you can make use of the exceptional rejection offered by the
90º “null” planes of the bidirectional pickup pattern to reduce the pickup
of the instrument in the vocal microphone.
Acoustic Guitar
When recording a solo acoustic guitar a good starting point is to
position the A840 4 to 8 inches (10-20 cm) away from the guitar
roughly pointing at the 12th fret or where the neck meets the body.
This placement will capture clear midrange and pick articulation with a
balanced low end.
Since the bass response of the A840 is sensitive to the miking distance,
try rotating the mic to use its excellent horizontal off-axis performance to
find the “sweet spot”. Try pulling the microphone away from the guitar in
increments of 1 to 2 inches (2-5 cm). Listen to the guitar up close and
when you find a spot that sounds good, try putting the A840 there. Let
your ears be your guide.
8

Electric Guitar
To capture an authentic and balanced guitar tone with your A840,
place the mic directly in front of the amp grille. Locate the center of
the speaker cone and place the A840 4 to 8 inches (10-20 cm) away
from the speaker. Pointing the mic at the center of the cone will deliver
a very direct, “in-your-face” sound. This is the spot that will obtain the
most high-frequency content. If it sounds too harsh, try moving the
microphone slightly off center of the speaker cone. You can also try
positioning the A840 at an angle. You will find that small differences in
positioning can make huge differences in the sound,
so experiment until you find the spots you like. Close up, the A840
is very good at spotlighting a speaker’s unique sounds at various
locations.
When using multiple microphones on a guitar cabinet at the same time,
it is important to pay attention to the phase relationship between the
different signals. Try to position the different microphones as close
to each other as possible to avoid phase problems caused by sound
arriving at the microphones at slightly different path lengths. Make sure
to listen to the combined signal summed to mono to catch potential
comb filtering that could be caused by out-of-phase signals. If you are
recording with the back lobe of the A840, it is important to invert the
polarity on the preamp or DAW.
For a more natural sound that captures the sound of the amp in your
room, try moving the microphone back a couple of feet.
Brass and Woodwind
The A840 has become one of the top go-to microphones to record
brass instruments for engineers and musicians alike. Whether live or
in the studio, the A840 is known for capturing the full-bodied sound
of brass and woodwind instruments. Soprano saxophone, trumpet,
and most high- pitched brass and woodwind instruments are known
to have “edgier” or “brilliant” frequency characteristics. The A840’s
smooth treble response is great at preserving these frequencies without
aggravating the striking tonal qualities.
Depending on the instrument’s dynamic range, we recommend starting
by positioning the A840 8 to 16 inches (20-41 cm) away from the
source.
9

Unlike brass instruments, whose sound emanates entirely from the
bell, woodwinds produce sound from the entire length of the body of
the instrument. When mics are placed favoring the bell, only lowest
fundamentals dominate. For a focused sound, use the yoke mount
(not the mic stand) to point the microphone on axis so that its pickup
encompasses the entire instrument.
If you are concerned about wind blasts, use a pop filter, or position the
microphone slightly off axis.
Strings
The A840 excels at capturing the richness and full sound of string
groups and string soloists. For string soloists, start by positioning the
A840 3 to 5 feet (1-2 m) on axis towards the sound hole. To achieve
a balanced string group sound, try placing the A840 5-8 feet (2-3
m) away (either in front or above) from the section. Use the A840’s
excellent null points to isolate the A840’s pick up from other sources.
If you desire more ambiance texture, pull the microphone further away
from the source.
A840s in a Blumlein configuration (coincident pair at 90-degree angle)
positioned at a distance of 10 to 15 feet (3-5 m) from a string section
will capture a deep and wide image.
For bass string instruments that are bowed and plucked, placing the
A840 about a foot away (0.3-0.5 m) will give you a very nice and
defined low end. The proximity effect of the A840 can be used to your
advantage.
Piano
The A840 delivers a great sound as a close-up and distant mic on both
upright and grand pianos. On a grand piano we have found two
positions to be particularly useful:
1. Spaced pair of A840s looking at the hammers in the front. You will
need to remove the lid of the grand piano. This position will yield a very
natural, hi-fi sound. It is common to pull the mics farther out of the piano
than you would with a pair of condensers. You can change the amount
of natural room reverb by changing the distance between the mics and
piano.
2. Blumlein pair (coincident pair at 90-degree angle) of A840s
10

positioned on the side of the piano facing the player: one microphone
pointing towards the treble side of the piano, and the other microphone
facing towards the bass side that can result in a larger than life
recording.
Drums and Percussion
Whether as an overhead configuration, or mono drum room, the A840’s
extended low end and smooth high end gives your drum sound that
thickness, warmth, and detail without unintended harshness. For mono
drum room, start by positioning your A840 at head level 9 feet (3 m) in
front of the kit. Depending on the size of the room and kit arrangement,
you may want to position the A840 further away if you wish to capture
more room ambiance.
Another popular technique to record drum overheads is to set up the
mics in a Blumlein configuration (coincident pair at 90-degree angle)
above the head of the drummer with each mic pointing in a different
direction. This will give you a very wide image of the drums that sounds
like you are in sitting center stage.
Both of these techniques also work well for recording the sound of the
room. The closer the A840s are positioned to the drummer, the more
direct sound and less room ambiance will be captured by the mics.
{PRECAUTIONS}
Most ribbon microphones need little, if any, maintenance. Given proper
care they last for decades. Bing Crosby’s personal RCA-44BX (now in
the collection of the Pacific Pioneer Broadcasters in Hollywood) sounds
as good today as it did when he recorded his radio broadcasts in the
1940s.
A few simple precautions will help you to keep your AEA A840 working
well for life.
Phantom Power
Although the A840 needs a standard 48V phantom power source
to operate, you should still make sure that phantom power is turned
off before plugging and unplugging the microphone. The loud pops
that occur when the microphone is plugged in with phantom power
11

engaged can damage speakers, headphones, and ears. Since passive
ribbon microphones or other transformer-coupled microphones are
particularly sensitive to phantom power, it is always recommended to
disengage phantom power before plugging and unplugging any ribbon
microphones.
The phantom current draw for active AEA ribbon mics is 7 milliamps.
IEC specifies P48 power which should be able to deliver 10 milliamps
per input. Some USB and battery-powered audio interfaces will not
deliver this. Please check the current values available on your unit to
ensure the best performance.
Wind Gusts
A second and equally important rule is never blow directly into any
microphone to test it. Not only does this force moisture and dirt into
the microphone, strong air movement also can stretch the ribbon
and while it may not break, it nonetheless could significantly degrade
the microphone’s performance. The ribbon in the A840 is protected
by multi-layered screens and grille cloths to provide superior wind
protection. Nonetheless, using it outdoors requires special care to
avoid wind which can damage the ribbon. Indoors, however, it is
also important to avoid serious air movement from stage curtains,
open windows, doors, or air-conditioning systems. High SPL sound
sources do not usually pose a problem because AEA’s active ribbon
microphones can handle 130 dB SPL or more without difficulty. It
is only those “explosive” sources that produce a strong blast of air,
such as the bass port on an electric guitar or bass amp, a guitar being
plugged (or unplugged) while the amp level is turned fully up, an on-
axis kick-drum (particularly with a port on the head), that are potentially
damaging. If you are unsure about how much wind is hitting the
microphone, place the back of your hand where the microphone is going
to be. If you can feel significant wind blasts, angle the microphone or
use a pop screen to avoid direct hits.
Tramp Iron
Minute iron particles, sometimes known as “tramp iron,” are common
within our environment. AEA ribbon microphones contain powerful
magnets that produce strong magnetic fields. These fields can attract
any ferric metal near the microphone that, if they are small enough, can
penetrate the outer screening and work their way inside the microphone.
Over time, this “tramp iron” can build up sufficiently in the magnetic gap
12

to rub against the ribbon causing distortion, electrical shorts or tearing
of the ribbon. The best prevention is to keep the microphone covered
with the supplied plastic bag when it is not in use.
The A840 was designed to be less sensitive to external interference. Its
design attracts less “tramp iron” while retaining the overall sound and
20 Hz bass response of the original RCA 44.
Under no circumstances should you disassemble and take the grille off
of the microphone as this could allow tramp iron to enter the narrow gap
between the ribbon and the pole pieces. Disassembling the microphone
will VOID your warranty.
Magnetic Stray Fields
Ribbon microphones are fundamentally prone to picking up strong
external magnetic fields caused by light dimmers or nearby power
transformers. Guitar players will know this phenomenon from single-coil
pickups. Even though much attention was paid to suppressing such
sensitivity to external magnetic fields in the design of the A840, it is still
possible that you might encounter this problem. If you should pick up
a hum, try rotating or moving the microphone to find a spot where the
hum disappears, and try eliminating potential sources of stray magnetic
fields. You can use the microphone to find where hum is originating.
Rotate the mic for maximum interference and move it back and forth to
sense its direction.
The high-performance magnets used in AEA microphones are incredibly
strong, and a significant amount of stray magnetic field lines surround
the microphone. Avoid placing the microphone in close proximity to hard
drives, credit cards, analog tape, or any other magnetically sensitive
items to prevent any data loss.
Microphone Positioning
The A840 was designed with placement versatility and vibration
isolation in mind. The microphone body is supported by a U-shaped
yoke. To obtain the shock mount benefits of the A840, we suggest
adjusting the swivel mount towards the source then positioning the
angle of the mic stand.
The A840 includes a fixed captive XLR cable which is routed from the
bottom of the mic and secured to the yoke mount. Securing the XLR
13

cable to the stand is suggested to avoid accidents. To complete isolation
of the microphone from external sources of mechanical noise, it is
important to provide a slack loop by tying the microphone cable tightly to
the microphone stand with a cable tie, shoelace, or string. (A Velcro® tie
will not be tight enough.
14
{SPECIFICATIONS}
Operating Principle:
Directional Pattern:
Frequency Range:
Maximum SPL:
Sensitivity:
Output Impedance:
Recommended Load Impedance:
Phantom Power:
Polarity:
Polar Response:
Horizontal:
Vertical
Transducer Element Material:
Thickness:
Width:
Length:
Microphone Dimensions:
Height:
Width:
Depth:
Weight with cable:
Shipping Weight:
Connector:
Pressure gradient transducer
Bidirectional
<20 Hz to >20 kHz
141 + dB SPL (1% third harmonic > 1 kHz)
6.3 mV/Pa (-44 dBv/Pa) into unloaded circuit
92 Ωbroadband
1.0K Ωor greater
P48 phantom power, 7 mA
Pin 2 high for positive pressure on front of
microphone
Native bidirectional, figure-of-8 pattern
Up to 90 dB rejection at right angles to the
front/back axis.
Level changes with angle of incidence, but
frequency response is consistent.
Pure aluminum corrugated ribbon
1.8 µm
0.185 in (4.7 mm)
2.35 in (59.7 mm)
11.6 in (29.5 cm)
3.9 in (9.9 cm)
2.5 in (6.4 cm)
3 lb (1.36 kg)
4 lb (1.8 kg)
XLR-3M
Accessories Included:
Vertical softcase, user manual, captive 10” (3 meter)
output cable with XLR-3M connector.
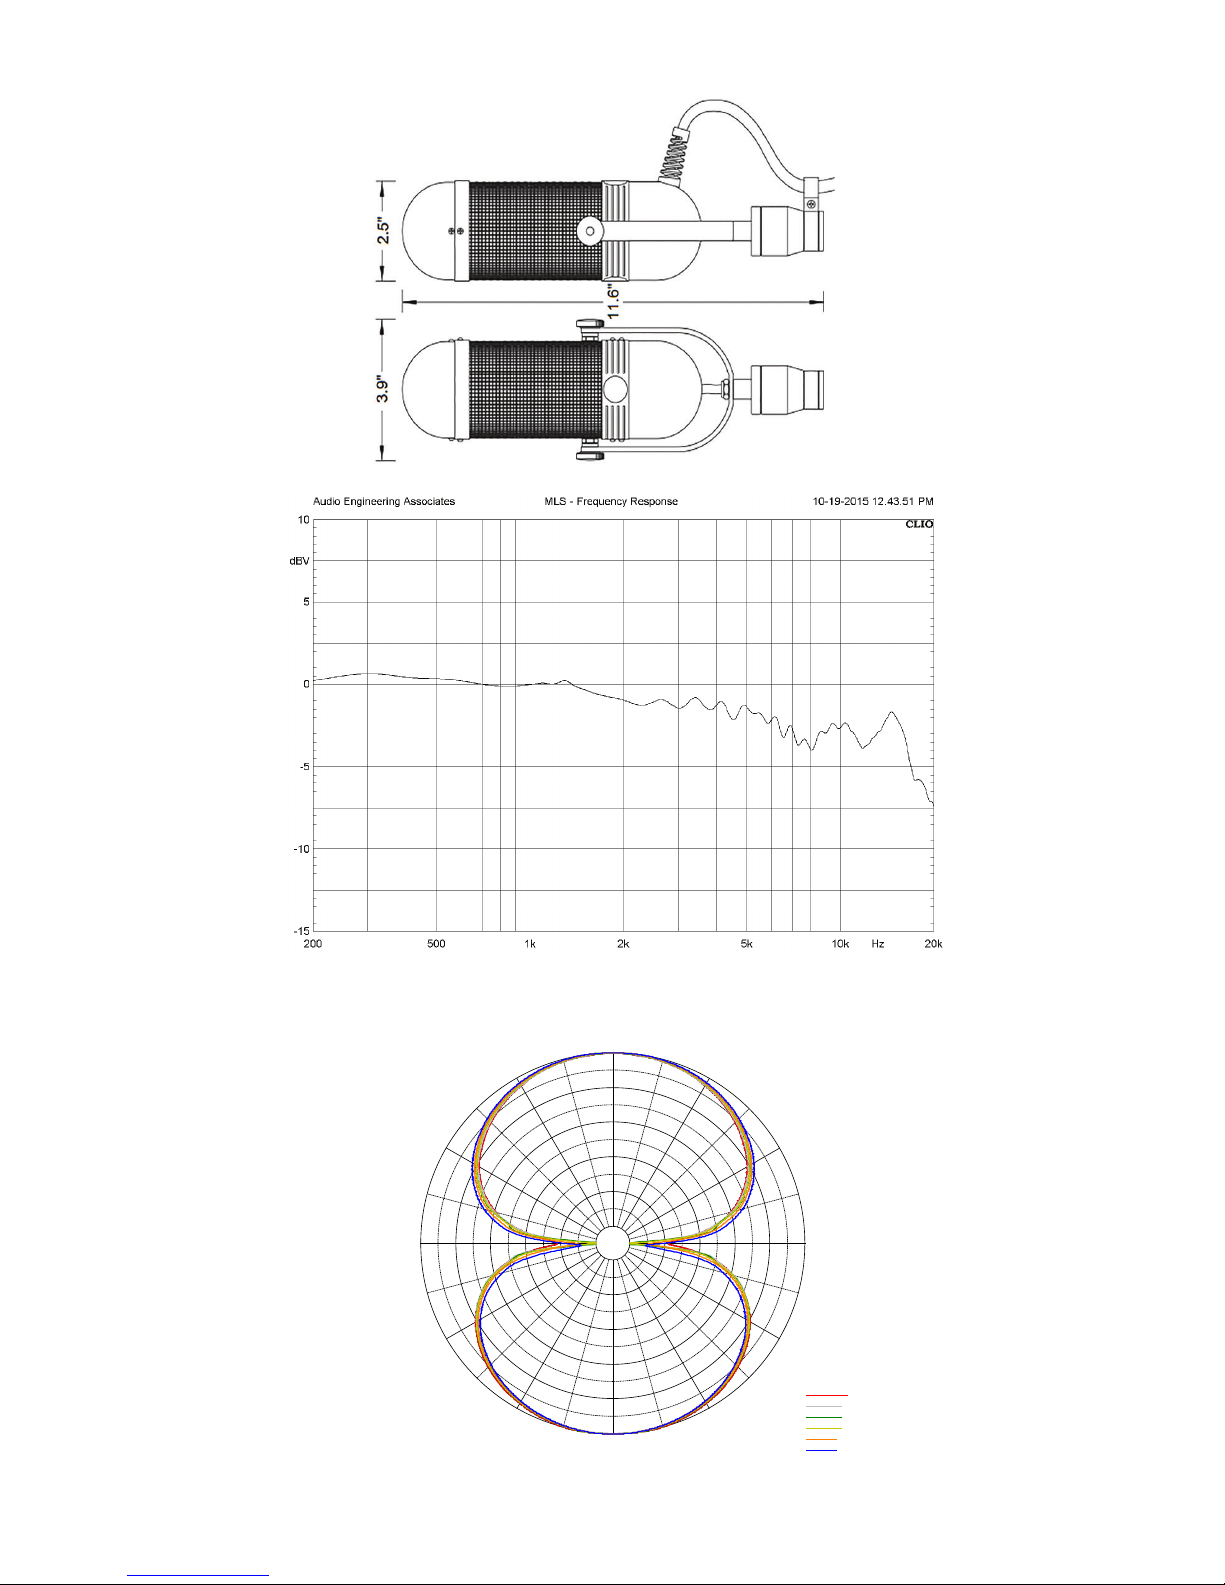
0
-6
-12
-18
-24
-30
dB 30°
60°
90°
120°
150°
180°
-150°
-120°
-90°
-60°
-30°
10000Hz
4000Hz
2000Hz
1000Hz
500Hz
200Hz
Directivity
15
Data below 200 Hz omitted due to measuring room restrictions.
0 dBr is equivalent to 6.3 mV/Pa at 1kHz.
Normalized to 0 dBr at 1kHz.

{WARRANTY}
Your A840 microphone comes with a one-year limited warranty on parts
and labor, shipping not included. Please see the supplied warranty card
for details.
Registering your microphone with AEA will extend the warranty to a full
three years. Simply fill out the supplied registration form and send it to:
Audio Engineering Associates
1029 N. Allen Ave
Pasadena, CA 91104
You may also register your AEA equipment online at:
http://www.ribbonmics.com/aea/form.php
{SUPPORT}
If you should encounter any problems with your microphone, or if you
have questions regarding using the A840 in specific application, please
contact our customer support team at support@ribbonmics.com
To talk to a live human being, call +1 (626) 798-9128, between 9:00 -
5:00 pm PST Monday through Friday.
Manufactured by AEA Ribbon Mics & Preamps
1029 N. Allen Ave. Pasadena, California 91104, USA
Tel: +626-798-9128 Fax: +626-798-2378 www.ribbonmics.com
Table of contents
Other AEA Microphone manuals


