AEG MMS 4204 Technical specifications

Bedienungsanleitung/Garantie
Istruzioni per l’uso/Garanzia
Instruction Manual/Guarantee
Multimedia Stick – MP3 Player / USB 2.0
Pen drive multimediale – lettore MP3 / USB 2,0
Multimedia Stick – MP3 Player / USB 2.0
MMS 4204
05-MMS 4204 AEG 1 07.02.2006, 9:17:50 Uhr

2
DEUTSCH
Inhalt
Übersicht der Bedienelemente Seite 3
Bedienungsanleitung Seite 4
Technische Daten Seite 9
Garantie Seite 9
ITALIANO
Indice
Elementi di comando Pagina 3
Istruzioni per l’uso Pagina 10
Dati tecnici
Pagina 15
Garanzia Pagina 15
ENGLISH
Contents
Overview of the Components Page 3
Instruction Manual Page 16
Technical Data Page 20
Guarantee Page 20
JE˛ ZYK POLSKI
Spis tres´ci
Przegląd elementów obłsugi Strona 3
Instrukcja obsługi Strona 43
Dane techniczne Strona 46
Gwarancja Strona 47
C
ˇ ESKY
Obsah
Přehled ovládacích prvků Strana 3
Návod k použití Strana 48
Technické údaje Strana 51
Záruka Strana 52
MAGYARUL
Tartalom
A kezelő elemek áttekintéseé Oldal 3
A hasznalati utasítás Oldal 53
Műszaki adatok Oldal 56
Garancia Oldal 57
ITALIANO DEUTSCHENGLISH
05-MMS 4204 AEG 2 07.02.2006, 9:17:54 Uhr

3
Übersicht der Bedienelemente
Elementi di comando
Overview of the Components
05-MMS 4204 AEG 3 07.02.2006, 9:17:54 Uhr

4
DEUTSCH
256MB MP3 Player
Einführung
Vielen Dank für den Kauf dieses MP3 Players.
Vielleicht sind Sie bereits mit dem Gebrauch eines
ähnlichen Produktes vertraut; nehmen Sie sich jedoch
dennoch bitte die Zeit, diese Anleitung zu lesen. Die
Anleitung ist dazu gedacht, dass Sie sich mit den vielen
Funktionen des Gerätes vertraut machen und um sicher-
zustellen, dass Sie dem erworbenen Produkt das Beste
abgewinnen können.
Sicherheit ist wichtig
Um Ihre und die Sicherheit anderer zu garantieren, ach-
ten Sie bitte darauf, dass Sie die Sicherheitsanweisungen
lesen, bevor Sie dieses Produkt bedienen.
Bewahren Sie diese Information für spätere Rückfragen
an einem sicheren Ort auf.
Copyright
Bitte beachten Sie, dass die Musikstücke, die Sie
aufzuzeichnen gedenken eventuell einem Copyright (Ur-
heberrecht) unterstehen. Das Kopieren und die Verteilung
von Musikdateien ohne die Genehmigung des Urhebers
verstößt gegen das Copyright (Urheberrecht). Zuwider-
handlungen gegen dieses Gesetz können zu strafrecht-
licher Verfolgung führen. Falls sie Zweifel haben, lassen
Sie sich beraten, bevor Sie Ihre Aufzeichnungen machen.
Hinweis: Das Erscheinungsbild Ihres MP3 Players kann
unter Umständen vom in dieser Anleitung gezeigten
Modell abweichen.
Allgemeine Sicherheitshinweise
Bitte alle Sicherheitsinformationen vor Gebrauch
lesen.
• Lesen Sie vor Inbetriebnahme dieses Gerätes die
Bedienungsanleitung sehr sorgfältig durch und
bewahren Sie diese inkl. Garantieschein, Kassenbon
und nach Möglichkeit den Karton mit Innenverpa-
ckung gut auf.
• Benutzen Sie das Gerät ausschließlich für den priva-
ten und den dafür vorgesehenen Zweck. Dieses Ge-
rät ist nicht für den gewerblichen Gebrauch bestimmt.
• Halten Sie das Gerät vor Hitze, direkter Sonnenein-
strahlung, Feuchtigkeit (auf keinen Fall in Flüssigkeit
tauchen) und scharfen Kanten fern.
• Benutzen Sie das Gerät nicht mit feuchten Händen.
• Verwenden Sie das Gerät nicht in einer feuchten oder
schwülen Umgebung.
• Um elektrischen Stromschlag zu vermeiden, darf die-
ses Gerät nicht Tropf- oder Spritzwasser ausgesetzt
werden.
• Keine offenen Flammen, wie brennende Kerzen, auf
das Gerät stellen.
• Vor der Entsorgung des Gerätes die Batterien entfer-
nen und diese einer entsprechenden Batteriesammel-
stelle zufügen.
Wartung
• Im Innern dieses Gerätes befinden sich keine vom
Benutzer zu wartenden Teile.
• Wenden Sie sich zur Wartung an qualifiziertes Kun-
dendienstpersonal.
• Ziehen Sie Ihren Händler zu Rate, wenn Sie jemals
Zweifel bezüglich der Installierung, Bedienung oder
der Sicherheit dieses Gerätes haben.
Übersicht der Bedienungselemente
1 왘II (Wiedergabe/Pause/Stopp/ Power ein/aus) Taste
2 + Lautstärketaste (Suchlauf vorwärts)
3 - Lautstärketaste (Suchlauf rückwärts)
4 MIC (Mikrofon)
5 Batteriefach
6 MENU
7 LCD Display
8 Tastensperre
9 Kopfhöreranschluss
10 USB Anschluss
11 SD/MMC Card Schlitz
12 POWER ON/OFF Schalter
13 Kontrollleuchte
14 Batteriefachentriegelung
15 Batteriefach
16 DC 6V Anschluss
17 3,5 mm Stereo-Klinkenstecker
18 Lautsprecher
19 Aufsteller
Zu Beginn…
Lesen Sie diese Anleitung vor Gebrauch.
Entnehmen Sie das Gerät vorsichtig aus der Verpackung.
Verpackungsinhalt
In der Verpackung sollten Sie Folgendes finden:
• MP3 Player.
• Stereoohrhörer.
• USB Anschlusskabel.
• Bedienungsanleitung.
• Windows 98 Treiber CD.
Batterie einlegen / MP3 Player
1. Öffnen Sie das Batteriefach (5) auf der Unterseite
des Gerätes, indem Sie die Batteriefachabdeckung in
Richtung 왗III (Öffnen) schieben.
2. Wenn die Batteriefachabdeckung ausgehakt ist,
klappen Sie sie nach oben.
3. Legen Sie 1 Micro Batterie des Typs R03 „AAA“ 1,5V
ein. Achten Sie auf die richtige Polarität (siehe Ge-
räteseite)! Wird das Gerät längere Zeit nicht benutzt,
entnehmen Sie die Batterie, um ein „Auslaufen“ von
Batteriesäure zu vermeiden.
4. Schließen Sie die Batteriefachabdeckung wieder, bis
sie hörbar einrastet.
Batterie einlegen / Lautsprecher
(nicht im Lieferumfang enthalten)
1. Öffnen Sie das Batteriefach (15) auf der Rückseite
der Lautsprecher, indem Sie die Batteriefachentrie-
gelung (14) drücken und die Abdeckung nach hinten
abziehen.
05-MMS 4204 AEG 4 07.02.2006, 9:18:01 Uhr

5
DEUTSCH
2. Legen Sie 4 Batterien des Typs R03 „AAA“ 1,5V ein.
Achten Sie auf die richtige Polarität (siehe Batte-
riefachboden)! Wird das Gerät längere Zeit nicht
benutzt, entnehmen Sie bitte die Batterien, um ein
„Auslaufen“ zu vermeiden.
3. Schließen Sie die Batteriefachabdeckung wieder, bis
sie hörbar einrastet.
Achtung:
• Batterien gehören nicht in den Hausmüll. Bitte geben
Sie verbrauchte Batterien bei zuständigen Sammel-
stellen oder beim Händler ab.
• Werfen Sie Batterien niemals ins Feuer.
• Ungleiche Batterietypen oder neue und gebrauchte
Batterien dürfen nicht zusammen verwendet werden.
Betrieb der Lautsprecher über Netzteil
(nicht im Lieferumfang enthalten)
• Verwenden Sie ein handelsübliches 6 V / 350 mA
Netzteil.
• Stecken Sie das Netzteil in den dafür vorgesehene
DC 6 V Anschluss (16) und dann in eine vorschrifts-
mäßig installierte 230 V/50 Hz Steckdose.
Installierung des Treibers
Minimale Systemvoraussetzungen:
• Pentium 133 MHz oder höher
• Microsoft ® Windows ™ 98 SE/ME/2000/XP/
Server 2003
• RAM 20 MB
• USB Port (2.0)
Wenn Ihr Computer mit Windows 2000 oder neuer
arbeitet, benötigt der MP3 Player keine besondere Soft-
ware oder Treiber. Das Gerät setzt allerdings auch die
Installation der aktuellen Service-Pack-Version voraus.
Bei Problemen sollten Sie daher versuchen, das aktuelle
Service Pack von Microsoft für das jeweilige Betriebssys-
tem zu installieren. Sie erhalten es unter anderem unter:
http://www.microsoftupdate.com.
Wichtig: Windows 98 Benutzer müssen den Treiber in-
stallieren, bevor das Gerät mit dem Computer verbunden
wird. Der PC muss u.U. neu gestartet werden.
• Legen Sie die mitgelieferte Treiber-CD in das CD-
ROM-Laufwerk Ihres PCs ein.
• Klicken Sie auf „Treiber“.
• Folgen Sie den nun erscheinenden Installationsan-
weisungen.
Verbindung des MP3 Players mit Ihrem PC
1. Schließen Sie den MP3 Player, mittels USB Verbin-
dungskabel, an Ihren PC an.
2. Stecken Sie den kleineren USB Anschluss in die USB
Anschlussbuchse (10) des MP3 Players und das an-
dere Ende in einen freien USB Anschluss Ihres PCs.
3. Wenn die Verbindung erfolgreich hergestellt wurde
erscheint im Display “READY“.
4. Der MP3 Player erscheint als Wechseldatenträger
und kann als solches auch verwendet werden.
5. Zum Speichern und Exportieren von Dateien verfah-
ren Sie entsprechend der Betriebssoftware Ihres PCs.
6. Wenn die Dateien übertragen wurden, melden Sie
den MP3 Player zuerst von Ihrem PC ab. Verfahren
Sie entsprechend der Betriebssoftware Ihres PCs, um
Hardware sicher zu entfernen.
Hinweise:
• Entfernen Sie niemals den MP3 Player vom PC
während des laufenden Datenaustausches. Dieses
gilt auch, wenn der Datenfluss zum Erliegen kommen
sollte. Um den MP3 Player vom PC zu trennen, be-
folgen Sie die Hinweise Ihrer PC-Software, um Hard-
ware bzw. Wechseldatenträger sicher zu entfernen.
•Ein Datenaustausch zwischen externem Speicher
(SD/MMC) und internem Speicher (MP3 Player) könn-
te zu einer Fehlfunktion führen. Wollen Sie dennoch
Dateien vom z.B. internen Speicher zur SD/MMC
Card transferieren, speichern Sie die Dateien zuerst
auf Ihrem PC zwischen. Schieben Sie anschließend
die Dateien auf die SD/MMC Card.
• Wir sind nicht verantwortlich für den Verlust von
Dateien, der durch die nicht vorschriftsmäßige Bedie-
nung entstanden ist.
• Das Gerät ist nicht DRM kompatibel!
Bedienung des MP3 Players
Den MP3 Player einschalten
Um den MP3 Player einzuschalten, halten Sie die 왘II
Taste (1) gedrückt, im Display erscheint kurz die Anzeige
“AEG“.
Den MP3 Player ausschalten
1. Halten Sie die 왘II Taste gedrückt, bis im Display die
Anzeige „POWER OFF“ erscheint und der Fort-
schrittsbalken 100% erreicht hat.
Hinweis: Der MP3 Player schaltet sich automatisch aus,
wenn er für kurze Zeit im Stopp- bzw. Pausen-Modus
nicht mehr bedient wird.
Wenn der MP3 Player wieder eingeschaltet wird und
die 왘II Taste (1) betätigt wird, beginnt das Gerät mit der
Wiedergabe des ersten Musikstücks.
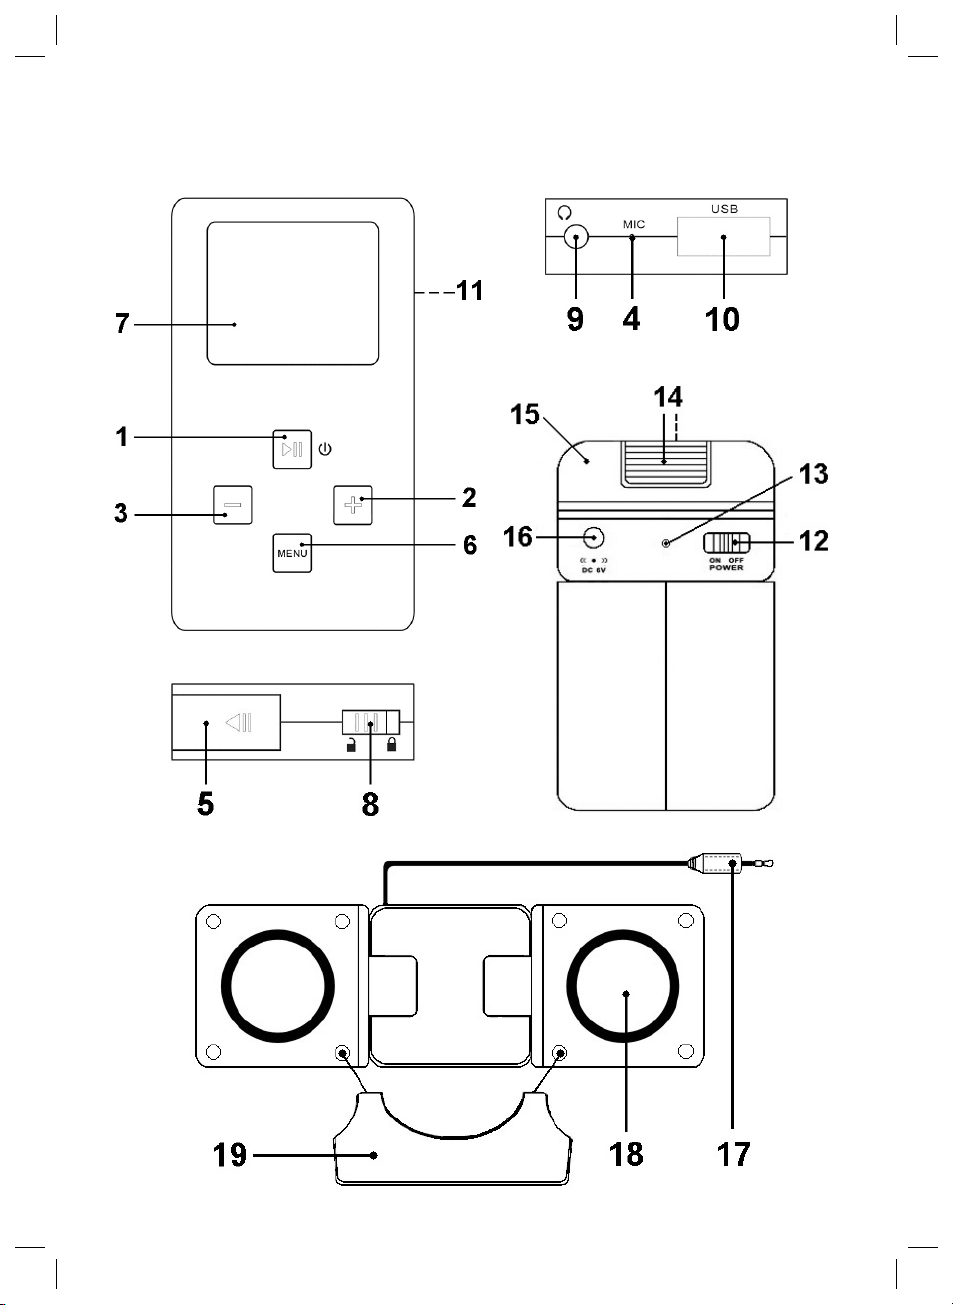
Ohrhörer (9)
Benutzen Sie für den Kopfhörerbetrieb einen Kopfhörer
mit einem 3,5 mm Stereo-Klinkenstecker, den Sie in den
Kopfhöreranschluss stecken.
Wiedergabe einer Musikdatei
1. Schalten Sie den MP3 Player ein.
2. Drücken Sie die 왘II Taste (1), um die Wiedergabe zu
starten (왘erscheint im Display).
3. Die Wiedergabe, der auf dem Gerät gespeicherten
Dateien, beginnt.
4. Durch kurzes Drücken der 왘II Taste (1) können Sie
die Wiedergabe unterbrechen (II erscheint im Dis-
play).
5. Drücken Sie kurz die 왘II Taste (1) erneut, um die
Wiedergabe an derselben Stelle fortzuführen.
05-MMS 4204 AEG 5 07.02.2006, 9:18:02 Uhr

6
DEUTSCH
Hinweis: Wenn eine SD/MMC Karte installiert ist, werden
Musikstücke von der SD/MMC Karte zuletzt wiedergege-
ben ( erscheint im Display).
Lautstärke regeln
1. Um die Lautstärke zu erhöhen, halten Sie die „+“
Taste (2) gedrückt, bis die gewünschte Lautstärke
erreicht ist.
2. Um die Lautstärke zu verringern, halten Sie die “-”
Taste (3) gedrückt, bis die gewünschte Lautstärke
erreicht ist. Der Lautstärkepegel wird durch eine
Lautstärkeleiste im Display angezeigt.
Achtung: Das Hören bei hoher Lautstärke kann die
Ohren des Hörers schädigen.
Zur vorigen/nächsten Datei springen
- (3): 1 x drücken = Beginnt das aktuelle Lied wieder
von vorne.
2 x drücken = Springt zum vorherigen Titel.
3 x drücken = Spielt ein Lied davor usw.
+ (2): Mit dieser Taste können Sie zum nächsten bzw.
übernächsten Titel springen usw.
Wiedergabe stoppen
Halten Sie bei einem laufenden Musikstück die 왘II Taste
(1) gedrückt, bis im Display die Anzeige “왎“ erscheint.
Tastensperre
Die Tastensperre macht alle Tasten auf dem MP3 Player
funktionslos. Dies verhindert, dass Sie versehentlich
Tasten drücken, während Sie den MP3 Player unterwegs
benutzen.
1. Um die Tastensperre zu aktivieren, schieben Sie den
Schalter (8) in Richtung des geschlossenen Schloss-
Symbols. Das Schloss Symbol erscheint im Display.
2. Um die Tastensperre aufzuheben, schieben Sie den
Schalter in Richtung des geöffneten Schloss-Sym-
bols. Das Schloss Symbol im Display erlischt.
Hauptmenü
Im Hauptmenü haben Sie die Möglichkeit, zwischen den
Modi PLAY MODE (Wiedergabemodus), EQ (Equalizer),
DELETE (Löschen), SETTINGS (Einstellungen), MUSIC
(Musik), MICROPHONE (Mikrofon) zu wählen.
• Um das Hauptmenü aufzurufen, drücken Sie die
MENU Taste (6).
Im Menü navigieren
1. Drücken Sie die „+“ (rechts) oder „-“ (links) Taste
(2/3) im Hauptmenü, um den gewünschten Modus
auszuwählen. Das Menübild des jeweils angewählten
Modus wird im Display dunkel hinterlegt.
2. Drücken Sie MENU (6), um Ihre Wahl zu bestätigen
und in das entsprechende Untermenü zu wechseln.
Hinweis: Das Gerät verlässt das Menü nachdem Sie
eine Einstellung vorgenommen haben bzw. wenn Sie ca.
5 Sekunden keine Taste betätigt haben.
Wiedergabemodus (PLAY MODE)
Ihr MP3 Player hat eine Reihe von Wiederholungs- und
Zufalls-Modi für die Wiedergabe. Die verfügbaren Wie-
dergabemodi lauten wie folgt:
• A-B (Passage wiederholen)
Passagen innerhalb einer Musikdatei können ausge-
wählt und wiederholt werden.
1. Drücken Sie während der Wiedergabe, im
gewünschten Musikstück, die MENU Taste (6)
wenn der Anfangspunkt erreicht ist von dem an
die Wiederholung erfolgen soll ( erscheint im
Display).
2. Drücken Sie beim Erreichen des Endpunktes
die Taste MENU (6), an dem die Wiederholung
enden soll ( erscheint im Display). Das Gerät
befindet sich nun im A-B Modus und beginnt mit
der Wiederholungs-Wiedergabe.
3. Drücken Sie die MENU Taste (6) erneut, um den
A-B Modus zu deaktivieren.
• REPEAT TRACK (Wiederholung 1)
Das ausgewählte Musikstück wird wiederholt, bis die
Wiedergabe gestoppt oder der Wiedergabemodus
geändert wird.
• REPEAT ALL (Wiederholung alle)
Alle Musikstücke des MP3 Players werden der Reihe
nach wiedergegeben und dann wiederholt bis die
Wiedergabe gestoppt oder der Wiedergabemodus
geändert wird.
• SHUFFLE REPEAT (Wiederholte Zufallswiedergabe)
Die Musikstücke werden in Zufallsreihenfolge wieder-
gegeben und dann wiederholt, bis die Wiedergabe
gestoppt oder der Wiedergabemodus geändert wird.
• SHUFFLE ONCE (Zufallswiedergabe)
Jedes Musikstück wird in einer zufälligen Reihenfolge
wiedergegeben. Die Wiedergabe stoppt, wenn alle
Stücke wiedergegeben wurden.
• NORMAL
Musikstücke werden der Reihe nach wiedergegeben.
Der derzeit ausgewählte Wiedergabemodus wird unten
im Display (7) angezeigt. Wenn im Display kein Wieder-
gabemodus erscheint, ist „NORMAL“ ausgewählt.
Equalizer (EQ)
Ihr MP3 Player hat 5 voreingestellte Equalizer Einstellun-
gen, welche die Wiedergabe gemäß des entsprechenden
Audioausgangstyps angleichen.
Die sechs Einstellungen lauten wie folgt:
• ROCK
• JAZZ
• CLASSICAL (Klassik)
• POP
• NORMAL (keine Equalizer Funktion)
• CANCEL (Menü verlassen)
Die derzeit ausgewählte Equalizer Einstellung wird auf
der unteren Seite im Display (7) angezeigt. Wenn keine
Equalizer Einstellung angezeigt wird, ist die Einstellung
„NORMAL“ (keine Equalizer Funktion) ausgewählt.
05-MMS 4204 AEG 6 07.02.2006, 9:18:04 Uhr

7
DEUTSCH
Musikdatei löschen (DELETE)
1. Wählen Sie das Mülltonnensymbol aus.
2. Drücken Sie MENU Taste (6) zur Bestätigung.
3. Um das aktuelle Musikstück zu löschen, drücken Sie
die „+“ (rechts) oder „-“ (links) Taste (2/3) um das
Mülltonnensymbol anzuwählen.
4. Drücken Sie die MENU Taste (6) zur Bestätigung
(DELETING… erscheint im Display).
5. Um das aktuelle Musikstück nicht zu löschen, drücken
Sie die „+“ (rechts) oder „-“ (links) Taste (2/3) um das
X(CANCEL) anzuwählen.
6. Drücken Sie die MENU Taste (6) zur Bestätigung.
Alle Musikdateien löschen
Um alle Musikdateien auf einmal zu löschen gehen Sie
wie folgt vor:
1. Wählen Sie das Mülltonnensymbol (ALL) aus.
2. Drücken Sie MENU Taste (6) zur Bestätigung.
3. Um alle Musikstücke zu löschen, drücken Sie die „+“
(rechts) oder „-“ (links) Taste (2/3) um das Müllton-
nensymbol anzuwählen.
4. Drücken Sie die MENU Taste (6) zur Bestätigung
(DELETING… erscheint im Display).
5. Um die Musikstücke nicht zu löschen, drücken Sie
die „+“ (rechts) oder „-“ (links) Taste (2/3) um das X
(CANCEL) anzuwählen.
6. Drücken Sie die MENU Taste (6) zur Bestätigung.
Systemeinstellungen (SETTINGS)
Im Menü SETTINGS haben Sie folgende Menüpunkte zur
Auswahl: CONTRAST (Kontrast), BACKLIGHT (Hinter-
grundbeleuchtung), LANGUAGE (Sprache), IDLE SHUT-
DOWN (Automatische Abschaltung), INFORMATION.
Kontrast Einstellung des Kontrastes des
Displays.
Hintergrundbe-
leuchtung Einstellung der Hintergrundbeleuch-
tung des Displays.
Sprache Einstellung der Sprachausgabe des
Displays.
Automatische
Abschaltung Einstellung für die automatische
Abschaltung des Gerätes.
INFORMATION Siehe unten
Im Untermenü INFORMATION haben Sie folgende
Menüpunkte zur Auswahl: VERSION (Software-Version),
TOTAL SPACE (Speicherplatz gesamt), FREE SPACE
(Freier Speicherplatz), TRACK COUNT (Titelanzahl),
CANCEL (Menü verlassen)
Software-
Version Informationen zur verwendeten
Software-Version.
Speicherplatz
gesamt Informationen zur Speicherplatz-
größe.
Freier Speicher-
platz Informationen zum Speicherstatus.
Titelanzahl Informationen zur Gesamtanzahl der
gespeicherten Musiktitel.
Musik (MUSIC)
Um vom Mikrofon Modus wieder zurück in den MP3
Modus zu wechseln.
Mikrofon (MICROPHONE)
Um vom MP3 Modus in den WAV Modus zu wechseln.
1. Halten Sie die MENU Taste (6) gedrückt um die
Aufnahme zu starten.
2. Um die Aufnahme zu stoppen, drücken Sie die 왘II
Taste (1).
Hinweis:
• Um die Aufnahme wieder zu löschen gehen Sie
bitte vor wie unter „Musikdatei löschen (DELETE)“
beschrieben.
• Achten Sie bei jeder Aufnahme darauf, dass das
Mikrofon in Richtung der Geräuschquelle zeigt und
nicht durch Gegenstände, Hände etc. blockiert wird.
Installierung einer SD/MMC Karte
Der MP3 Player ist mit SD/MMC Speicherkarten (bis zu 1
GB) kompatibel.
1. Drücken Sie die SD/MMC-Card in die vorgesehene
Öffnung (11), bis sie mit einem „Klick“ einrastet. Im
Display erscheint die Anzeige .
2. Zum Abspielen einer SD/MMC Card gehen Sie
bitte vor, wie unter „Wiedergabe einer Musikdatei“
beschrieben.
Bitte beachten Sie zu den SD/MMC Karten folgende
Hinweise:
Wenn eine SD/MMC Karte installiert ist, werden Musik-
stücke von der SD/MMC Karte zuletzt wiedergegeben
(erscheint im Display).
Hinweis zum Einführen der SD/MMC Karte
Die Karte wird so in den Schlitz eingeführt, dass noch ein
wenig von der Karte herausschaut. Drücken Sie nicht zu
fest auf die Karte, damit Sie weder die SD/MMC Karte
noch den eingebauten Kartenschlitz beschädigen.
Wenn der MP3 Player die SD/MMC Karte nicht lesen
kann, muss diese eventuell auf FAT Format umformatiert
werden.
Hinweis: Wenn Sie eine SD/MMC Karte im MP3 Player
verwenden, ist der Stromverbrauch höher. Probleme kön-
nen auftreten, wenn Sie versuchen den MP3 Player mit
einer installierten SD/MMC Karte einzuschalten. Wenn
dies der Fall sein sollte, legen Sie eine neue Batterie ein.
Um Batteriestrom zu sparen, entfernen Sie die SD/MMC
Karte, wenn Sie diese nicht gebrauchen.
Entfernen einer SD/MMC Karte
Vergewissern Sie sich, dass der MP3 Player ausgeschal-
tet ist. Drücken Sie erneut auf die SD/MMC-Card um
diese wieder zu entnehmen.
05-MMS 4204 AEG 7 07.02.2006, 9:18:05 Uhr

8
DEUTSCH
Störungsbehebung
Bevor Sie eine Wartung dieses Players verlangen, prüfen
Sie die untenstehende Tabelle nach möglichen Ursachen
des Problems. Ein paar einfache Checks oder Verände-
rungen durch Sie können unter Umständen das Problem
beheben und die korrekte Funktionsfähigkeit wiederher-
stellen.
Der MP3 Player
funktioniert
nicht.
Prüfen Sie die Kapazität und die
Polarität der Batterie.
Vergewissern Sie sich, dass die Ver-
riegelungsfunktion ausgeschaltet ist.
Vergewissern Sie sich, dass die ko-
pierten Dateien nicht geschützt sind.
Musikdateien
können nicht
wiedergegeben
werden.
Vergewissern Sie sich, dass der
Speicher MP3/WMA Dateien enthält.
Vergewissern Sie sich, dass die ko-
pierten Dateien nicht geschützt sind.
Stellen Sie sicher das es sich nicht
um eine DRM geschützte Datei
handelt.
Massenspei-
chergerät wird
nach Anschluss
an den PC nicht
gefunden.
Vergewissern Sie sich, dass das USB
Gerät (MP3 Player) installiert und
korrekt angeschlossen ist.
Wenn Sie mit Windows 98 arbeiten,
stellen Sie sicher, dass Sie die Trei-
ber der mitgelieferten CD installiert
haben.
Starten Sie den Computer noch
einmal.
Kein Ton. Vergewissern Sie sich, dass die ko-
pierten Dateien nicht geschützt sind.
Prüfen Sie, ob die Ohrhörer korrekt
mit dem MP3 Player verbunden sind.
Prüfen Sie, ob die Lautsprecher kor-
rekt mit dem MP3 Player verbunden/
eingeschaltet sind.
Prüfen Sie, ob die Lautstärke leise-
geregelt ist.
Stellen Sie sicher das es sich nicht
um eine DRM geschützte Datei
handelt.
Menü-Übersicht
Hautmenü Untermenü
PLAY MODE *
(Seite 6) A-B
REPEAT TRACK
REPEAT ALL
SHUFFLE REPEAT
SHUFFLE ONCE
NORMAL
EQ *
(Seite 6) ROCK
JAZZ
CLASSICAL
POP
NORMAL
CANCEL
DELETE *
(Seite 7)
CANCEL
SETTINGS *
(Seite 7) CONTRAST 0%-100%
BACKLIGHT OFF
3 SECONDS
5 SECONDS
10 SECONDS
15 SECONDS
LANGUAGE
IDLE SHUTDOWN OFF
2 MINUTES
5 MINUTES
10 MINUTES
30 MINUTES
INFORMATION VERSION
TOTAL SPACE
FREE SPACE
TRACK COUNT
CANCEL
MUSIC *
(Seite 7)
MICROPHONE *
(Seite 7)
* Für genauere Erklärungen sehen Sie bitte im entspre-
chenden Abschnitt nach.
05-MMS 4204 AEG 8 07.02.2006, 9:18:07 Uhr

9
DEUTSCH
Technische Daten
Modell ..............................................................MMS 4204
Strom
Stromzufuhr ...........1x 1,5V AAA (R03) Micro Batterie
Batterielebensdauer ....................................8 Stunden
je nach verwendetem
Batterietyp bzw. Marke.
Allgemeines
Größe .................................92 (L) x 51,5 (B) x 16 (T) mm
PC Interface ............................................USB Version 2.0
Interner Flash Speicher .........................................256MB
Digitales Musikformat ..................................... MP3, WMA
Abspielbare Bit-Raten................................. 32 - 320 kBit/s
Aufnahme Sampling Frequenz .................................8 kHz
Ausgang Frequenz ...................................... 20 Hz-20 kHz
SNR..........................................................................90 dB
Technische Änderungen vorbehalten!
Konformitätserklärung
Hiermit erklärt die ETV Elektro-Technische Vertriebs-
gesellschaft mbH, dass sich das Gerät MMS 4204 in
Übereinstimmung mit den grundlegenden Anforderun-
gen, der europäischen Richtlinie für elektromagnetische
Verträglichkeit (89/336/ EWG) befindet.
Eine Kopie der Konformitätserklärung können Sie über
die angegebene Telefonnummer beziehen.
02152/2006-666
Garantie
Wir übernehmen für das von uns vertriebene Gerät eine
Garantie von 24 Monaten ab Kaufdatum (Kassenbon).
Innerhalb der Garantiezeit beseitigen wir unentgeltlich
die Mängel des Gerätes oder des Zubehörs*), die auf
Material- oder Herstellungsfehler beruhen, durch Repa-
ratur oder, nach unserem Ermessen, durch Umtausch.
Garantieleistungen bewirken weder eine Verlängerung
der Garantiefrist, noch beginnt dadurch ein Anspruch auf
eine neue Garantie!
Als Garantienachweis gilt der Kaufbeleg. Ohne diesen
Nachweis kann ein kostenloser Austausch oder eine
kostenlose Reparatur nicht erfolgen.
Im Garantiefall geben Sie bitte das komplette Gerät in
der Originalverpackung zusammen mit dem Kassenbon
an Ihren Händler.
*) Schäden an Zubehörteilen führen nicht automatisch
zum kostenlosen Umtausch des kompletten Gerätes.
Wenden Sie sich in desem Fall bitte an unsere Hotline!
Glasbruchschäden bzw. Brüche von Kunststoffteilen sind
grundsätzlich kostenpflichtig!
Sowohl Defekte an Verbrauchszubehör bzw. Verschleiß-
teilen (z.B. Motorkohlen, Knethaken, Antriebsriemen,
Ersatzfernbedienung, Ersatzzahnbürsten, Sägeblättern
usw.), als auch Reinigung, Wartung oder der Austausch
von Verschleißteilen, fallen nicht unter die Garantie und
sind deshalb kostenpflichtig!
Die Garantie erlischt bei Fremdeingriff.
Nach der Garantie
Nach Ablauf der Garantiezeit können Reparaturen
kostenpflichtig vom entsprechenden Fachhandel oder
Reparaturservice ausgeführt werden.
Bedeutung des Symbols „Mülltonne“
Schonen Sie unsere Umwelt, Elektrogeräte gehören nicht
in den Hausmüll.
Nutzen Sie die für die Entsorgung von Elektrogeräten
vorgesehenen Sammelstellen und geben dort Ihre Elek-
trogeräte ab, die Sie nicht mehr benutzen werden.
Sie helfen damit die potenziellen Auswirkungen, durch
falsche Entsorgung, auf die Umwelt und die menschliche
Gesundheit zu vermeiden.
Sie leisten damit Ihren Beitrag zur Wiederverwertung,
zum Recycling und zu anderen Formen der Verwertung
von Elektro- und Elektronik-Altgeräten.
Informationen, wo die Geräte zu entsorgen sind, erhalten
Sie über Ihre Kommunen oder die Gemeindeverwaltun-
gen.
In vielen Ländern der EU ist die Entsorgung von Elek-
tro- und Elektronik-Altgeräten über den Haus- und/oder
Restmüll ab 13.8.2005 verboten.
In Deutschland ab 23.3.2006.
05-MMS 4204 AEG 9 07.02.2006, 9:18:08 Uhr

10
ITALIANO
Lettore MP3 256MB
Introduzione
La ringraziamo per l’acquisto di questo lettore MP3.
Forse Lei ha già pratica con l’uso di un prodotto simile,
ciò malgrado La preghiamo di prendersi il tempo di legge-
re queste istruzioni per l’uso. L’introduzione ha lo scopo di
farLe conoscere le molte funzioni dell’apparecchio al fine
di garantire che Lei possa trarre il massimo dal prodotto
acquistato.
La sicurezza è importante
Per garantire la Sua sicurezza e quella degli altri La
preghiamo di leggere attentamente queste avvertenze di
sicurezza prima di far uso del prodotto.
Conservare queste informazioni in un luogo sicuro per
chiarimenti successivi.
Copyright
Tenga presente che i brani musicali che Lei registra sono
eventualmente soggetti a copyright (diritti d’autore). Copi-
are e distribuire file musicali senza il permesso dell’autore
costituisce una violazione del copyright (diritto d’autore).
Le infrazioni di questa legge possono essere perseguite
penalmente. Se ha dei dubbi, si faccia consigliare prima
di effettuare registrazioni.
Avvertenza: L’aspetto esterno del Suo lettore MP3 può
eventualmente differire dal modello indicato in queste
istruzioni per l’uso.
Avvertenze di sicurezza generali
Leggere tutte le informazioni sulla sicurezza prima
dell’uso.
• Leggere molto bene le istruzioni per l’uso di questo
apparecchio prima della sua messa in funzione e pos-
sibilmente conservarle con il certificato di garanzia, lo
scontrino e possibilmente la scatola con l’imballaggio
interno.
• Usare questo apparecchio esclusivamente per l’uso
privato e previsto. Questo apparecchio non è destina-
to all’uso commerciale.
• Proteggere l’apparecchio da calore eccessivo, espo-
sizione diretta ai raggi solari, umidità (non immergere
assolutamente in liquidi), e spigoli vivi.
• Non usare l’apparecchio con le mani umide.
• Non impiegare l’apparecchio in un ambiente umido o
afoso.
• Per evitare un corto circuito elettrico questo appa-
recchio non deve essere esposto a spruzzi o gocce
d’acqua.
• Non mettere sull’apparecchio fiamme aperte, come
candele accese.
• Prima dello smaltimento dell’apparecchio rimuovere le
batterie e conferirle in un apposito centro di raccolta.
Manutenzione
• All’interno di questo apparecchio non ci sono pezzi
soggetti a manutenzione da parte dell’utente.
• Per la manutenzione rivolgersi a personale qualificato
del servizio assistenza.
• In caso di dubbi sull’uso o sull’installazione o sulla si-
curezza di questo apparecchio rivolgersi al venditore.
Elementi di comando
1 Tasto 왘II (riproduzione/pausa/stop/ power on/off)
2 Tasto + Volume (ricerca avanti)
3 Tasto - Volume (ricerca indietro)
4 MIC (Microfono)
5 Vano batterie
6 MENU
7 Display LCD
8 Blocco tasti
9 Collegamento cuffie
10 Collegamento USB
11 Fessura scheda SD/MMC
12 Interruttore POWER ON/OFF
13 Indicatore luminoso di controllo
14 Sbloccamento vano batterie
15 Vano batterie
16 Collegamento DC 6V
17 Spina per jack stereo 3,5 mm
18 Altoparlanti
19 Supporto
All’inizio…
Leggere queste istruzioni prima dell’uso.
Togliere l’apparecchio con cautela dall’imballaggio.
Contenuto dell’imballaggio
Nell’imballaggio troverete quanto segue:
• Lettore MP3
• Auricolare stereo
• Cavo di collegamento USB
• Istruzioni per l’uso
• Windows 98 driver CD.
Inserire la batteria / Lettore MP3
1. Aprire il vano batterie (5) sul fondo dell’apparecchio
spingendo la copertura del vano batterie in direzione
왗III (aprire).
2. Quando la copertura del vano batterie è sganciata,
sollevarla verso l’alto.
3. Inserire 1 microbatteria tipo R03 “AAA” 1,5V facendo
attenzione che i poli coincidano (vedi il lato dell’ ap-
parecchio)! Se l’apparecchio non viene usato per un
periodo di tempo prolungato, togliere le batterie per
evitare l’ossidazione.
4. Richiudere la copertura del vano batterie fino a quan-
do si sento lo scatto d’innesto.
Inserire la batteria / Altoparlanti
(Le batterie non sono incluse nella fornitura)
1. Aprire il vano batterie (15) sulla parte retro dell’ appa-
recchio, premendo lo sbloccamento (14) del vano e
spostando il coperchio all’ indietro.
2. Inserire 4 batterie del tipo R03 „AAA“ 1,5 V. Fare
attenzione ad inserire i poli correttamente (fondo
del vano batterie)! Nel caso in cui l’apparecchio non
venga utilizzato per periodi di tempo prolungati, si
consiglia di estrarre le batterie allo scopo di evitare
che si verifichino fuoriuscite dell’acido delle batterie
stesse.
3. Richiudere la copertura del vano batterie fino a quan-
do si sento lo scatto d’innesto.
05-MMS 4204 AEG 10 07.02.2006, 9:18:09 Uhr

11
ITALIANO
Attenzione:
• Non gettare le batterie nei rifiuti domestici. Portare le
batterie usate nei centri di raccolta competenti o al
venditore.
• Non buttare mai le batterie nel fuoco.
• Non impiegare contemporaneamente batterie di tipo
diverso o batterie nuove insieme a batterie usate.
Funzionamento altoparlanti tramite la rete
(non incluso nella fornitura)
• Usare un normale alimentatore in commercio da
6V/350 mA.
• Inserire l’alimentatore nel collegamento previsto da
DC 6 V (16) e poi in una presa regolarmente installata
da 230 V/50 Hz.
Installazione del driver
Premesse minime di sistema:
• Pentium 133 MHz o più
• Microsoft ® Windows ™ 98 SE/ME/2000/XP/Server
2003
• RAM 20 MB
• USB Port (2.0)
Se il Suo computer lavora con Windows 2000 o versioni
successive, il lettore MP3 non necessita di software o
driver particolari. Tuttavia l’apparecchio presume anche
l’installazione dell’attuale versione del Service Pack. In
caso di problemi si dovrebbe perciò cercare di installare
l’attuale Service Pack di Microsoft per il relativo sistema
operativo. E’ disponibile tra l’altro in:
http://www.microsoftupdate.com.
Importante: gli utenti di Windows 98 devono installare
il driver prima di collegare l’apparecchio con il computer.
Eventualmente si deve riavviare il computer.
• Inserire il CD-driver accluso alla fornitura nell’unità
CD-ROM del PC.
• Cliccare su “driver”.
• Seguire dunque le indicazioni per l’installazione che
appaiono.
Collegamento del lettore MP3 con il PC
1. Collegare il lettore MP3 con il computer per mezzo
del cavo di collegamento USB.
2. Inserire il collegamento USB più piccolo nella presa
di collegamento USB (10) del lettore MP3 e l’altra
estremità in un collegamento USB libero del PC:
3.
A collegamento avvenuto nel display appare “READY”.
4. Il lettore MP3 appare come supporto dati rimovibile e
come tale può essere anche utilizzato.
5. Per salvare ed esportare file procedere conforme-
mente al software operativo del PC.
6. Se i file sono stati trasmessi, effettuare innanzitutto
il logoff del lettore MP3 dal PC. Per rimuovere con
sicurezza l’hardware procedere conformemente al
software operativo del PC.
Avvertenze:
• Non staccare mai il lettore MP3 dal PC mentre lo
scambio dati è in corso. Questo vale anche qualora il
flusso dati dovesse arrestarsi. Per staccare il lettore
MP3 dal PC, seguire le avvertenze del software del
PC per la rimozione sicura di hardware o supporto
dati rimovibile.
•Una sostituzione dati tra memoria esterna (SD/MMC)
e interna (lettore MP3) potrebbe causare un malfun-
zionamento. Se tuttavia si desidera trasferire file p.e.
dalla memoria interna alla scheda SD/MMC, salvare
prima i file sul PC. Trascinare infine i file sulla scheda
SD/MMC.
• Noi decliniamo qualsiasi responsabilità per la perdita
di file generata dall’uso non conforme.
• L’ apparecchio non è compatibile in DRM!
Uso del lettore MP3
Accendere il lettore MP3
Per accendere il lettore MP3, tenere premuto il tasto 왘II
(1), nel display appare per un attimo l’indicazione “AEG”.
Spegnere il lettore MP3
1. Tenere premuto il tasto 왘II premuto, fino a che nel
display appare l’ indicazione „POWER OFF“ e la
barra di progresso ha raggiunto il 100% .
Avvertenza: Il lettore MP3 si spegne automaticamente
se nel modo pausa o stop non viene più usato per un po’.
Quando il lettore MP3 Player viene acceso nuovamente
e premuto il tasto 왘II (1), significa che l’ apparecchio
comincia la riproduzione di un brano.
Auricolari (9)
Per il funzionamento con cuffie, usare una cuffia con
spina per jack da 3,5 mm che viene inserita nel collega-
mento cuffie .
Riproduzione di un file musicale
1. Accendere il lettore MP3.
2. Premere il tasto 왘II (1) per avviare la riproduzione
(nel display appare 왘).
3. Ha inizio la riproduzione dei file salvati
sull’apparecchio.
4. Premendo per un attimo il tasto 왘II (1) si può inter-
rompere la riproduzione (nel display appare II).
5. Premere di nuovo per un attimo il tasto 왘II (1) per
continuare la riproduzione nello stesso punto.
Avvertenza: Se si installa una carta SD/MMC, succede
che i brani della carta SD/MMC verranno riprodotti per
ultimo (nel display appare ).
Regolare il volume
1. Per alzare il volume, tenere premuto il tasto “+“ (2)
finché si raggiunge il volume desiderato.
2. Per ridurre il volume, tenere premuto il tasto “-“ (3)
finché si raggiunge il volume desiderato. Il volume
desiderato viene visualizzato nel display attraverso un
barra volume.
Attenzione: l’ascolto ad alto volume può danneggiare
l’udito di chi ascolta.
05-MMS 4204 AEG 11 07.02.2006, 9:18:11 Uhr

12
ITALIANO
Per passare al file precedente/successivo
- (3): pressione di tasto 1 x = la canzone attuale inizia
di nuovo da capo.
pressione di tasto 2 x = ritorno al titolo prece-
dente.
pressione di tasto 3 x = si riproduce una canzo-
ne precedente ecc.
+ (2): Con questo tasto si può avanzare di uno o due
titoli.
Interrompere la riproduzione
Durante la riproduzione di un brano musicale tenere
premuto il tasto 왘II (1) finché nel display appare “왎”.
Blocco tasti
Il blocco tasti rende inattivi tutti i tasti sul lettore MP3.
Questo impedisce che si premano accidentalmente tasti
mentre si usa il lettore MP3 in viaggio.
1. Per attivare il blocco tasti, spostare l’ interruttore (8)
in direzione del simbolo di un chaivistello chiuso. Il
simbolo del chiavistello appare sul display.
2. Per annullare il blocco tasti, spostare l’ interuttore in
direzione del simbolo del chiavistello aperto. Il simbo-
lo del chiavistello scompare dal display.
Menu principale
Nel menu principale si ha la possibilità di scegliere tra
PLAY MODE (modulo di riproduzione), EQ (equalizer),
DELETE (cancellare), SETTINGS (impostazioni), MUSIC
(musica) e MICROPHONE (microfono).
• Per raggiungere il menu principale, premere il tasto
MENU (6).
Navigare nel menu
1. Premere il tasto „+“ (a destra) oppure „-“ (a sinistra)
(2/3) nel menu principale, per scegliere il modulo
desiderato. L’ immagine del menu del modulo scelto
attualmente appare nel dsplay su uno sfondo scuro.
2. Premere MENU (6), per confermare la scelta e cambi-
are nel sottomenu corrispondente.
Nota: L’ apparecchio non indicherà più il menu dopo aver
effettuato un’ impostazione oppure se non si ha premuto
un tasto per ca. 5 secondi.
Modo di riproduzione (PLAY MODE)
Questo lettore MP3 ha una serie di modi di ripetizione e
random per la riproduzione. I modi di riproduzione dispo-
nibili sono i seguenti:
• A-B (ripetizione dei passaggi)
Si possono scegliere e ripetere alcuni passaggi entro
un file di musica.
1. Durante la riproduzione nel brano di musica
desiderato, premere il tasto MENU (6) se si ha
raggiunto l’ inizio dove la ripetizione deve essere
effettuata (nel display appare ).
2. Premere il tasto MENU (6) quando si ha raggiunto
la fine desiderata della ripetizione (nel display ap-
pare ). L’ apparecchio si trova ora nel modulo
A-B e inizia con la riproduzione della ripetizione.
3. Per deattivare il modulo A-B, premere nuovamen-
te il tasto MENU (6).
• REPEAT TRACK (riproduzione 1)
Il brano musicale selezionato viene ripetuto finché si
arresta la riproduzione o viene modificato il modo di
riproduzione.
• REPEAT ALL (riproduzione tutti)
Tutti i brani musicali del lettore MP3 vengono riprodot-
ti in ordine successivo e poi ripetuti finché si arresta la
riproduzione o si cambia il modo di riproduzione.
• SHUFFLE REPEAT (ripetuta riproduzione casuale)
I brani musicali vengono riprodotti in ordine successi-
vo casuale e poi ripetuti finché si arresta la riproduzio-
ne o si cambia il modo di riproduzione.
• SHUFFLE ONCE (riproduzione casuale)
Ogni brano musicale viene riprodotto in un ordine
casuale. La riproduzione si arresta quando tutti i pezzi
sono stati riprodotti.
• NORMAL
I brani musicali vengono riprodotti in ordine succes-
sivo.
Il modulo di riproduzione scelto attualmente viene indica-
to sotto nel display (7). Se nel display non appare nessun
modo di riproduzione, è selezionato “NORMAL”.
Equalizer (EQ)
Il lettore MP3 ha 5 impostazioni Equalizer prestabilite che
compensano la riproduzione conformemente al tipo di
uscita audio.
Le 6 impostazioni sono le seguenti:
• ROCK
• JAZZ
• CLASSICAL (classico)
• POP
• NORMAL (nessuna funzione Equalizer)
• CANCEL (uscita menu)
L’ impostazione dell’ equilizer scelta attualmente viene
indicata nel (7). Se non viene visualizzata nessuna
impostazione Equalizer, è selezionata l’impostazione
“NORMAL” (nessuna funzione Equalizer).
Cancellare un file di musica (DELETE)
1. Scegliere il simbolo del recipiente portarifiuti .
2. Premere il tasto MENU (6) per confermare.
3. Per cancellare un brano di musica premere il tasto „+“
(a destra) oppure „-“ (a sinistra), (2/3) per scegliere il
simbolo del porta rifiuti..
4. Premere il tasto MENU (6) per confermare.
(nel display appare DELETING…).
5. Per non cancellare l’ attuale brano, premere il tasto
„+“ (a destra) oppure „-“ (a sinistra), (2/3) per sceglie-
re X(CANCEL).
6. Premere il tasto MENU (6) per confermare.
05-MMS 4204 AEG 12 07.02.2006, 9:18:12 Uhr

13
ITALIANO
Cancellare tutti i file di musica
Per cancellare di colpo tutti i file di musica, proseguire
come segue:
1. Scegliere il simbolo del recipiente portarifiuti
(ALL).
2. Premere il tasto MENU (6) per confermare.
3. Per cancellare tutti i file di musica premere il tasto „+“
(a destra) oppure „-„ (a sinistra) (2/3) per scegliere il
simbolo del recipiente per rifiuti.
4. Premere il tasto MENU (6) per confermare.
(nel display appare DELETING…).
5. Per non cancellare i brani di musica, premere il tasto
„+“ (a destra) oppure „-„ (a sinistra) il tasto (2/3) per
scegliere X(CANCEL).
6. Premere il tasto MENU (6) per confermare.
Impostazione sistemi (SETTINGS)
Nel menu SETTINGS si ha la scelta tra i seguenti punti:
CONTRAST (contrasto), BACKLIGHT (illuminazione di
sfondo), LANGUAGE (lingua), IDLE SHUTDOWN (dis-
connessione automatica), INFORMATION.
Contrasto Impostazione del contrasto del
display.
Illuminazione di
sfondo Impostazione dell’ illuminazione di
sfondo del display.
Lingua Impostazione dell’ uscita vocale del
display.
Disconnessione
automatica Impostazione della disconnessione
automatica dell’ apparecchio.
INFORMATION Vedi sotto
Nel sottomenu INFORMATION si possono scegliere i
punti seguenti: VERSION (versione software), TOTAL
SPACE (memoria totale), FREE SPACE (memoria libera),
TRACK COUNT (numero dei brani), CANCEL (uscire dal
menu).
Versione soft-
ware Informazioni sulla versione software
in uso.
Memoria totale Informazioni sul volume spazio della
memoria.
Memoria libera Informazioni sullo stato della me-
moria.
Numero dei
brani Informazioni sul numero totale die
brani memorizzati.
Musica (MUSIC)
Per cambiare dal modulo microfono a quello MP3.
Microfono (MICROPHONE)
Per cambiare dal modulo MP3 in quello WAV.
1. Per avviare la registrazione tenere premuto il tasto
MENU (6).
2. Per terminare la registrazione premere il tasto 왘II (1).
Nota:
• Per cancellare la registrazione, proseguire come
descritto in „Cancellare i brani (DELETE)“ .
• Fare attenzione ad ogni registrazione che il microfono
sia posizionato in direzione della fonte del suono e
non sia invece bloccato da altri oggetti, mani, ecc.
Installazione di una scheda SD/MMC
Il lettore MP3 è compatibile con le schede di memoria
SD/MMC (fino a 1 GB).
1. Premere la scheda SD/MMC nell’apertura (11) previs-
ta finché si arresta a scatto con un “clic“. Nel display
appare .
2. Per riprodurre una scheda SD/MMC procedere come
descritto in “Riproduzione di un file musicale”.
Osservare le seguenti indicazioni riguardanti le carte
SD/MMC:
Quando si istalla una carta SD/MMC, i brani della carta
SD/MMC verranno riprodotti per ultimo ( appare nel
display).
Avvertenza per l’introduzione di una scheda SD/MMC
La scheda viene introdotta nella fessura in modo che
un po’ spunti ancora fuori. Per evitare di danneggiare
la scheda SD/MMC o la fessura scheda integrata non
esercitare troppa pressione sulla scheda.
Se il lettore MP3 non riesce a leggere la scheda
SD/MMC, può darsi che debba essere riformattata sul
formato FAT.
Avvertenza: Se si impiega una scheda SD/MMC nel
lettore MP3, il consumo di corrente è maggiore. Se si
tenta di accendere il lettore MP3 quando è installata
una scheda SD/MMC, possono presentarsi problemi. In
questo caso inserire una batteria nuova. Per risparmiare
corrente della batteria rimuovere la scheda SD/MMC
quando non serve.
Rimozione di una scheda SD/MMC
Accertarsi che il lettore MP3 sia spento. Premere di
nuovo la scheda SD/MMC per estrarla.
05-MMS 4204 AEG 13 07.02.2006, 9:18:21 Uhr

14
ITALIANO
Rimozione guasti
Prima di richiedere una manutenzione del lettore control-
lare la tabella sottostante per trovare una possibile causa
del problema. Con qualche semplice controllo o modifica
potete rimuovere eventualmente il problema e ripristinare
il funzionamento corretto.
Il lettore MP3
non funziona.
Controllare la carica della batteria e
l’inserimento corretto dei poli.
Accertarsi che la funzione blocco sia
spenta.
Accertarsi che i file copiati non siano
protetti.
I file musicali
non vengono
riprodotti.
Accertarsi che la memoria MP3/WMA
contenga file.
Accertarsi che i file copiati non siano
protetti.
Assicurarsi che non si tratti di un file
protetto DRM.
Non si trova
l’apparecchio
della memoria
di massa dopo
il collegamento
al PC.
Accertarsi che l’apparecchio USB
(lettore MP3) sia installato e sia
collegato correttamente.
Se si lavora con Windows 98, accer-
tarsi di avere installato i programmi
driver dei CD acclusi.
Riavviare il computer.
Non c’è audio. Accertarsi che i file copiati non siano
protetti.
Controllare che gli auricolari siano
collegati correttamente con il lettore
MP3.
Esaminare che gli altoparlanti siano
collegati/accesi correttamente con il
lettore MP3.
Controllare se il volume è basso.
Assicurarsi che non si tratti di un file
protetto DRM.
Tabella menu
Menu
principale Sottomenu
PLAY MODE *
(Pagina 12) A-B
REPEAT TRACK
REPEAT ALL
SHUFFLE REPEAT
SHUFFLE ONCE
NORMAL
EQ *
(Pagina 12) ROCK
JAZZ
CLASSICAL
POP
NORMAL
CANCEL
DELETE *
(Pagina 12)
CANCEL
SETTINGS *
(Pagina 13) CONTRAST 0%-100%
BACKLIGHT OFF
3 SECONDS
5 SECONDS
10 SECONDS
15 SECONDS
LANGUAGE
IDLE SHUTDOWN OFF
2 MINUTES
5 MINUTES
10 MINUTES
30 MINUTES
INFORMATION VERSION
TOTAL SPACE
FREE SPACE
TRACK COUNT
CANCEL
MUSIC *
(Pagina 13)
MICROPHONE *
(Pagina 13)
* Per spiegazioni specifiche vedi i corrispondenti capi-
toli.
05-MMS 4204 AEG 14 07.02.2006, 9:18:22 Uhr

15
ITALIANO
Dati tecnici
Modello............................................................MMS 4204
Corrente
Alimentazione .......... microbatteria 1x 1,5V AAA (R03)
Durata della batteria ............................................ 8 ore
a seconda del tipo o marca
adi batteria impiegata.
Informazioni generali
Misura...............92 (lungh.) x 51,5 (largh.) x 16 (prof.) mm
Interfaccia PC........................................Versione USB 2.0
Memoria Flash interna............................................256MB
Formato musicale digitale................................ MP3, WMA
Bit-rate leggibili........................................... 32 - 320 kBit/s
Registrazione Sampling frequenza........................... 8 kHz
Uscita frequenza.......................................... 20 Hz-20 kHz
SNR..........................................................................90 dB
Questo apparecchio è stato controllato sulla base di tutte
le direttive CE attuali in vigore in questo settore, quali per
esempio la normativa in materia di compatibilità elettro-
magnetica e la direttiva in materia di bassa tensione, ed
è stato costruito conformemente alle norme di sicurezza
più moderne.
Con riserva di apportare modifiche tecniche.
Garanzia
Per l’apparecchio da noi messo in commercio ci assu-
miamo una garanzia di 24 mesi dalla data di acquisto
(scontrino).
Durante la garanzia noi ci impegniamo ad eliminare gra-
tuitamente i guasti dell’apparecchio o degli accessori*),
dovuti a difetti di materiale o di fabbricazione, riparandoli
o, a nostra discrezione, sostituendoli. Le prestazioni in
garanzia danno luogo a una proroga della garanzia né
danno diritto ad una nuova garanzia!
Per la garanzia è sufficiente lo scontrino di acquisto.
Senza questo scontrino non sussiste il diritto né ad una
sostituzione né ad una riparazione gratuita.
Nel caso si ricorra alla garanzia, restituire al riven-
ditore l’apparecchio completo in ogni sua parte,
nell’imballaggio originale unitamente allo scontrino.
*) Danni agli accessori non giustificano automaticamente
lo scambio gratuito dell’apparecchio completo. Si prega
di mettersi in contatto con la nostra centrale telefonica.
Danni alle parti di vetro oppure fratture ai pezzi di materia
plastica sono obbligatoriamente a spese del cliente.
La riparazione di pezzi d’uso ovvero soggetti a logora-
mento (cursori, ganci impastatori, cinghie di trasmissione,
telecomandi di ricambio, spazzolini di ricambio, lame di
seghe ecc.) come anche operazioni di pulizia e manuten-
zione o la sostituzione di pezzi soggetti a logoramento
non rientrano nella garanzia e quindi sono a pagamento!
La garanzia si annulla nel caso di intervento da parte di
terzi.
Dopo la garanzia
Al termine della garanzia le riparazioni possono essere
eseguite dietro pagamento dal corrispettivo negozio
specializzato o servizio riparazioni.
Significato del simbolo „Eliminazione“
Salvaguardare l’ ambiente, gli elettrodomestici non vanno
eliminati come rifiuti domestici.
Per l’ eliminazione degli elettrodomestici, fare uso die
posti di raccolta previsti per questo tipo e porre quegli
elettrodomestici che non sono più in uso.
Si contribuisce così ad evitare un effetto potenziale sull’
ambiente e sulla salute, dovuto magari ad una eliminazi-
one sbagliata.
Questo significa un contributo personale alla riutilizza-
zione, al riciclaggio e altre forme di utilizzazione di elettro-
domestici ed apparecchi elettronici usati.
Si possono trovare le corrispondenti informazioni sugli
appositi luoghi di raccolta, nelle amministrazioni die
comuni.
In molti paesi della Comunità Europea l’ eliminazione di
elettrodomestici oppure apparecchi elettronici è vietata se
eseguita insieme ai rifiuti domestici. Questo vale a partire
dal 13.8.2005.
In Germania a partire dal 23.3.2006.
05-MMS 4204 AEG 15 07.02.2006, 9:18:23 Uhr

ENGLISH
16
256MB MP3 Player
Introduction
Thank you for purchasing this MP3 player.
Maybe you are already familiar with how to use a similar
product; still, we kindly ask you to take the time to read
these instructions. This operation manual is intended for
you to familiarise yourself with the many functions of the
device and to ensure that you obtain the best results from
the product which you have purchased.
Safety is important
To guarantee your safety and the safety of others please
be sure to read the safety instructions with care before
using this product.
Keep this information in a safe place for later reference.
Copyright
Please observe that the music you intend to record may
by copyrighted. The reproduction and distribution of
music files without permission of the originator infringes
upon copyright. Violations of this act may render you liab-
le to criminal prosecution. In case of doubt, seek advice
before recording.
Note: The appearance of your MP3 player may differ
from the model shown in this manual.
General Notes on Safety
Please read all safety information before operation.
• Read the operation instructions carefully before
operating this device and store the manual inclusive
of the warranty, receipt of purchase and possibly the
box including the interior packaging in a safe place.
• Use the device exclusively for private and for the
intended purposes only. This device is not intended
for commercial operation.
• Keep the device away from heat, direct exposure
to sunlight, humidity (do not immerse in fluids) and
sharp edges.
• Do not operate the device with wet hands.
• Do not operate the device in a humid or sultry envi-
ronment.
• To avoid an electrical shock do not expose this device
to drops of water or splash water.
• Do not place open flames such as a burning candle,
on top of the device.
• Prior to disposing of the device, remove the batteries
and return to a battery collection point.
Maintenance
• The inside of this device does not hold any parts
which require maintenance by the user.
• For maintenance, please refer to a qualified customer
services point.
• Consult your dealer if you are in any doubt with regard
to the installation, the operation or the safety of this
device.
Overview of the Components
1 왘II (Play/Pause/Stop/Power on/off) button
2 + Volume control (forward search)
3 - Volume control (reverse search)
4 MIC (Microphone)
5 Battery compartment
6 MENU
7 LCD Display
8 Key lock
9 Headphones connection
10 USB connection
11 SD/MMC card slot
12 POWER ON/OFF switch
13 control lamp
14 Battery compartment release
15 Battery compartment
16 6V DC connection
17 3.5 mm Stereo jack plug
18 Loudspeaker
19 Stand
First…
Read these instructions prior to using the device.
Carefully remove the device from its packaging.
Content of packaging
The packaging should contain the following:
• MP3 player
• Stereo ear phones.
• USB connection cable.
• Operation manual.
• Windows 98 CD driver.
Inserting the battery / MP3 player
1. Open the battery compartment (5) to the bottom of
the device by sliding the battery cover toward 왗III
(open).
2. Once the battery compartment’s cover is open, fold it
up.
3. Place 1 Micro battery, type R03 “AAA” 1.5V in the
compartment. Observe the correct polarity (see side
of the device)! If the device is not used for a longer
period of time, remove the battery to prevent the
battery from leaking acid fluid.
4. Close the cover of the battery compartment until you
hear it catch.
Inserting the battery / Loudspeaker
(Batteries not supplied)
1. Open the battery compartment (15) on the rear of the
loudspeakers by pressing the battery compartment
release (14) and pulling off the cover towards the
back.
2. Insert 4 batteries of type R03 „AAA“ 1,5 V. Please
ensure that the polarity is correct (see the inside of
the battery compartment)! If the device is not used for
a long period of time, remove the batteries to avoid
the spilling of battery acid.
3. Close the cover of the battery compartment until you
hear it catch.
05-MMS 4204 AEG 16 07.02.2006, 9:18:24 Uhr

ENGLISH
17
Attention:
• Batteries must not be disposed of as regular hou-
sehold waste. Please return used batteries to the
respective collection points or to the retailer.
• Never throw batteries into an open fire.
• Different types of batteries of new and used batteries
must not be used at the same time.
Operating the Loudspeakers by the Mains Adapter
(not supplied)
• Please use a standard commercially available 6 V /
350 mA power pack.
• Insert the power pack into the 6V DC connection (16)
provided and then into a correctly installed 230V/50Hz
power socket.
How to Install the Driver
Minimum system requirements:
• Pentium 133 MHz or more
• Microsoft ® Windows ™ 98 SE/ME/2000/XP/
Server 2003
• RAM 20 MB
• USB Port (2.0)
If your computer runs on Windows 2000 or a more recent
system, your MP3 player does not require any particular
software or drivers. However, the device does require the
latest service pack version to be installed. In the event of
problems try to install the current Microsoft service pack
for the respective operating system. For this, go to:
http://www.microsoftupdate.com.
Important: Windows 98 users must install the driver prior
to hooking up the device with the PC. The PC may have
to be restarted.
• Place the supplied CD driver into the CD-ROM drive
of your PC.
• Click on ‘Driver’.
• Follow the instructions on how to install.
Connecting the MP3 player with your PC
1. Connect the MP3 player using the USB connection
cable, with your PC.
2. Insert the smaller USB connection into the USB jack
(10) of the MP3 player and the other end into a vacant
USB connection of your PC.
3. Once the connection has been successfully establis-
hed the display will read “READY”.
4. The MP3 player is displayed as a removable medium
and can be used as such.
5. To store and export files, proceed as stated in the
operating software of your PC.
6. Once the files have been transferred, first unlog the
MP3 player from your PC. Proceed as stated in the
operating software of your PC to safely remove the
hardware.
Note:
• Never remove the MP3 player from the PC during
data transfer. This even applies if the data transfer
should come to a halt. To separate the MP3 player
from the PC, follow the notes of your PC software to
safely separate hardware, i.e. the removable medium.
• Data transfer between external memory (SD/MMC)
and internal memory (MP3 Player) could cause a
malfunction. If you nonetheless wish to transfer files
from e.g. the internal memory to the SD/MMC card
first save your files on your PC. Then copy the files
onto the SD/MMC card.
• We can not be held responsible for the loss of files as
a result of improper operation.
• The device is not DRM-compatible.
How to operate the MP3 player
Switching the MP3 player on
To switch on the MP3 player hold the 왘II button (1) down;
the display briefly shows “AEG”.
Switching the MP3 player off
1. Keep the 왘II button pressed down until the words
„POWER OFF“ appear in the display and the progress
bar has reached 100%.
Note: The MP3 player switches itself off automatically if
not operated for a shorter period of time while in stop or
pause mode.
When the MP3 player is switched on again and the 왘II
button (1) is pressed, the device begins to play back the
first piece of music.
Earphones (9)
If you want to listen on headphones you should use
headphones with a 3.5 mm jack plug inserted into the
headphone socket.
Playing a music file
1. Switch on the MP3 player.
2. Press the 왘II button (1) to start playback (display
reads 왘).
3. Playing of the files stored on the device starts.
4. Briefly press the 왘II button (1) to pause playback
(display reads II).
5. Briefly press the 왘II button (1) again to continue
playback from the same point.
Note: If an SD/MMC card is installed, music from the
SD/MMC card is played back last (display reads ).
Volume control
1. To increase the volume, press and hold the “+” button
(2) until the desired volume has been set.
2. To decrease the volume, press and hold the “-” button
(3) until the desired volume has been set. The volume
level is indicated by a volume bar on the display.
Attention: Listening at high volumes can harm your ears.
05-MMS 4204 AEG 17 07.02.2006, 9:18:25 Uhr

ENGLISH
18
Skip to previous/next file
- (3): press 1 x = Starts playing the currently playing
track from the start.
press 2 x = Skips to the previous track.
press 3 x = Plays one track before that, etc.
+ (2): Use this button to skip to the next track, or the
track after the next.
Stop playback
While a track is playing, press and hold the 왘II button (1)
until the display reads “왎”.
Key lock
The key lock inhibits the operation of all buttons on the
MP3 player. This prevents you from accidentally activa-
ting buttons while using the MP3 player when you are out.
1. In order to activate the keylock, push the switch (8)
in the direction of the closed lock symbol. The lock
symbol appears in the display.
2. In order to cancel the keylock, push the switch in the
direction of the open lock symbol. The lock symbol in
the display goes off.
Main Menu
In the main menu it is possible to choose between the
PLAY MODE, EQ (Equalizer), DELETE, SETTINGS,
MUSIC and MICROPHONE.
• In order to call up the main menu press the MENU
button (6).
Navigating in the Menu
1. Press the „+“ (right) or „-“ (left) button (2/3) in the main
menu to select the desired mode. The menu image of
the selected mode appears in the display with a dark
backing.
2. Press MENU (6) to confirm your selection and change
to the corresponding submenu.
Note: The device exits from the menu after you have
changed a setting or if you have not pressed a button for
approximately 5 seconds.
Playback mode (PLAY MODE)
Your MP3 player features a number of repeat and random
modes for playback. These are the available playback
modes:
• A-B (Repeat Passage)
Passages within a music file can be selected and
repeated.
1. During playback press the MENU button (6) in the
desired piece of music when the starting point is
reached from where the music should be repeated
(display reads ).
2. Press the MENU button (6) when the point is
reached at which the repeat should end (display
reads ). The device is now in the A-B mode
and begins with repeat playback.
3. Press the MENU button (6) again to deactivate the
A-B mode.
• REPEAT TRACK (Repeat 1)
The selected track is repeated until repeat is stopped
or the playback mode is changed.
• REPEAT ALL (Repeat all)
All tracks of the MP3 player are played in the se-
quence as saved and then repeated until playback is
stopped or the playback mode is changed.
• SHUFFLE REPEAT (Repeat random play)
The tracks are played in random order and then
repeated until playback is stopped or the playback
mode is changed.
• SHUFFLE ONCE (Random play)
Every track is played in a random order. Playback
stops when all tracks have been played.
• NORMAL
Tracks are played in the order as saved.
The currently selected playback mode is shown in the
bottom of the display (7). If the display does not indicate
any play mode then “NORMAL” playback mode has been
selected.
Equalizer (EQ)
Your MP3 player features 5 equalizer pre-settings which
adjust playback to the respective type of audio input.
The 6 settings are:
• ROCK
• JAZZ
• CLASSICAL (classic)
• POP
• NORMAL (no equalizer function)
• CANCEL (Exit from the Menu)
The currently selected equalizer setting is shown at the
bottom of the display (7). If no equalizer setting is indica-
ted, then the “NORMAL” setting (no equalizer function) is
activated.
Deleting a Music File (DELETE)
1. Select the dustbin symbol .
2. In order to delete the current piece of music, press the
„+“ (right) or „-“ (left) button (2/3) in order to select the
dustbin symbol.
4. Press the MENU button (6) to confirm.
(DELETING… appears in the display).
5. In order not to delete the current piece of music, press
the „+“ (right) or „-“ (left) button (2/3) to select the X
(CANCEL).
6. Press the MENU button (6) to confirm.
Delete all music files
In order to delete all music files at once, please proceed
as follows:
1. Select the dustbin symbol (ALL).
2. Press the MENU button (6) to confirm.
3. To delete all music items press the “+” (right) or “-“
(left) button (2/3) to select the dustbin symbol.
4. Press the MENU button (6) to confirm.
(DELETING… appears in the display).
5. If you do not wish to delete any music files, press
the “+” (right) or “-“ (left) button (2/3) to select the X
(CANCEL).
6. Press the MENU button (6) to confirm.
05-MMS 4204 AEG 18 07.02.2006, 9:18:26 Uhr

ENGLISH
19
System Settings (SETTINGS)
In the SETTINGS menu you can select from the following
items: CONTRAST, BACKLIGHT, LANGUAGE, IDLE
SHUTDOWN (automatic shutdown), INFORMATION.
Contrast Adjustment of the contrast of the
display.
Backlight Adjustment of the background lighting
of the display.
Language Adjustment of the language on the
display.
Automatic
shutdown Setting for the automatic shutdown of
the device.
INFORMATION See below
In the INFORMATION submenu you can select from the
following menu items: VERSION (software version),
TOTAL SPACE, FREE SPACE, TRACK COUNT,
CANCEL (exit from menu).
Software
Version Information on the software version
used.
Total space Information on the size of storage
space.
Free space Information on storage status.
Track count Information on the total number of
stored music tracks.
MUSIC
To change from the microphone mode back to the MP3
mode.
MICROPHONE
To change from the MP3 mode to the WAV mode.
1. Keep the MENU button (6) pressed to start recording.
2. To stop recording, press the 왘II button (1).
Note:
• In order to delete the recording again please proceed
as described under „Deleting a Music File (DELETE)“.
• Whenever you are recording please ensure that the
microphone is pointing in the direction of the sound
source and is not blocked by objects, hands etc..
Installing a SD/MMC card
The MP3 player is MMC/SD memory card-compatible (up
to 1 GB).
1. Press the SD/MMC card into the opening provided
(11) until it clicks into place. appears in the display.
2. To play a SD/MMC card, please proceed as described
under “Playing a Music File”.
Please note the following with respect to SD/MMC
cards:
If an SD/MMC card is installed, music is played back last
from the SD/MMC card ( appears in the display).
Notes on how to insert the SD/MMC card:
The card is inserted into the slot as such that it slightly
protrudes. Do not use excessive force to insert the card,
so as not to damage the SD/MMC card or the built-in
card slot.
If the MP3 player can not read the SD/MMC card, it may
have to be reformatted to FAT.
Note: When using a SD/MMC card in the MP3 player the
power consumption increases. Problems may occur when
you attempt to switch on the MP3 player with an installed
SD/MMC card. If this is the case, insert a new battery. To
save on battery power, remove the SD/MMC card when
not in use.
Removing a SD/MMC card
Ensure that the MP3 player is switched off. Press the
SD/MMC card again in order to remove it.
Troubleshooting
Before requesting a service for this player, please check
the following table for possible causes. A few simple
checks or changes may remedy the problem and restore
the correct operability of the device.
The MP3 player
does not work.
Check the capacity and the polarity of
the battery.
Ensure that the locking function is not
activated.
Ensure that the copied files are not
protected.
Music files do
not play.
Ensure that the MP3/WMA memory
contains files.
Check if the copied files are protec-
ted.
Please ensure that it is not a DRM-
protected file.
Mass storage
device is not
located following
hook-up with
PC.
Check if the USB device (MP3 player)
is installed and correctly hooked up.
When working under Windows 98
ensure that the driver of the supplied
CD has been installed.
Restart your computer.
No sound. Ensure that the copied files are not
protected.
Check if the earphones are correctly
hooked up with the MP3 player.
Check whether the loudspeakers are
correctly switched on/connected with
the MP3 player.
Check if the volume is set to low.
Please ensure that it is not a DRM-
protected file.
05-MMS 4204 AEG 19 07.02.2006, 9:18:28 Uhr

ENGLISH
20
Menu Overview
Main Menu Submenu
PLAY MODE *
(Page 18) A-B
REPEAT TRACK
REPEAT ALL
SHUFFLE REPEAT
SHUFFLE ONCE
NORMAL
EQ *
(Page 18) ROCK
JAZZ
CLASSICAL
POP
NORMAL
CANCEL
DELETE *
(Page 18)
CANCEL
SETTINGS *
(Page 19) CONTRAST 0%-100%
BACKLIGHT OFF
3 SECONDS
5 SECONDS
10 SECONDS
15 SECONDS
LANGUAGE
IDLE SHUTDOWN OFF
2 MINUTES
5 MINUTES
10 MINUTES
30 MINUTES
INFORMATION VERSION
TOTAL SPACE
FREE SPACE
TRACK COUNT
CANCEL
MUSIC *
(Page 19)
MICROPHONE *
(Page 19)
* For more detailed explanations please see the corres-
ponding section.
Technical Data
Model ...............................................................MMS 4204
Power
Power supply ..........1x 1,5V AAA (R03) Micro Batterie
Battery life....................................................... 8 hours,
depending on battery type or brand used.
General
Dimension.......................... 92 (L) x 51,5 (W) x 16 (D) mm
PC Interface.............................................USB Version 2.0
Internal Flash memory............................................256MB
Digital music format......................................... MP3, WMA
Playable bit rates ........................................ 32 - 320 kBit/s
Recording sampling frequency................................. 8 kHz
Output frequency......................................... 20 Hz-20 kHz
SNR..........................................................................90 dB
This device has been tested according to all relevant cur-
rent CE guidelines, such as electromagnetic compatibility
and low voltage directives, and has been constructed in
accordance with the latest safety regulations.
Subject to technical changes without prior notice!
Guarantee
The device supplied by our Company is covered by a
24 month guarantee starting on the date of purchase
(receipt).
During the life of the guarantee any fault of the device or
its accessories *) ascribable to material or manufacturing
defects will be eliminated free of charge by repairing or, at
our discretion, by replacing it. The guarantee services do
not entail an extension of the life of the guarantee nor do
they give rise to any right to a new guarantee!
Proof of the guarantee is provided by the proof of
purchase. Without proof of purchase no free replacement
or repair will be carried out.
If you wish to make a claim under the guarantee please
return the entire machine in the original packaging to
your dealer together with the receipt.
*) Damage to accessories does not mean automatic free
replacement of the whole machine. In such cases please
contact our hotline. Broken glass or breakage of plastic
parts are always subject to a charge.
Defects to consumables or parts subject to wearing
(e.g. motor pistons, kneading blades, drive shafts, spare
remote control, spare toothbrushes, saw blades, etc.) as
well as cleaning, maintenance or the replacement of said
parts are not covered by the guarantee and hence are to
be paid!
The guarantee lapses in case of unauthorized tampering.
05-MMS 4204 AEG 20 07.02.2006, 9:18:29 Uhr
Table of contents
Languages:
Other AEG MP3 Player manuals