AEG KE7415002 User manual

KE7415001
KE7415002 EN
FR
DE
NL
ES
2
24
46
68
90
USER MANUAL
NOTICE D’UTILISATION
GEBRUIKERSHANDLEIDING
ANWENDERHANDBUCH
MANUAL DEL USUARIO
BUILT IN ELECTRIC OVEN
FOUR INTÉGRÉ
INBOUWOVEN
EINBAUBACKOFEN
HORNO INTEGRADO

2
FOR PERFECT RESULTS
Thank you for choosing this AEG product. We have
created it to give you impeccable performance for many
years, with innovative technologies that help make
life simpler - features you might not find on ordinary
appliances. Please spend a few minutes reading to get
the very best from it.
ACCESSORIES AND CONSUMABLES
In the AEG webshop, you’ll find everything you need
to keep all your AEG appliances looking spotless
and working perfectly. Along with a wide range of
accessories designed and built to the high quality
standards you would expect, from specialist cookware
to cutlery baskets, from bottle holders to delicate
laundry bags.
Visit the webshop at:
www.aeg-electrolux.com/shop

3
Contents
CONTENTS
Operating instructions
Safety information
Product description
Control panel
Oven functions
Before using for the first time
Using the oven
Cooking tables
Child lock function
Oven safety cut-out
Water cleaning function
Care and cleaning
Environments concerns
What to do if…
Technical data
Installation
03
04
05
06
07
09
09
13
17
17
17
18
20
20
21
21
The following symbols are used in this
user manual:
Subject to change without notice.
Environmental information.
General information and tips.
Important information concerning
your personal safety and information
on how to avoid damaging the
appliance.

4Safety information
SAFETY INFORMATION
In the interest of your safety and to ensure the correct use, before installing and first
using the appliance, read this user manual carefully, including its hints and warnings. To
avoid unnecessary mistakes and accidents, it is important to ensure that all people using
the appliance are thoroughly familiar with its operation and safety features.
Save these instructions and make sure that they remain with the appliance if it is
moved or sold, so that everyone using it through its life will be properly informed
on appliance use and safety.
Correct use
• The oven must not be operated with the door open.
• The manufacturer will not be held responsible if this oven is used for anything other
than domestic purposes.
• Only use the oven when it is installed within kitchen units.
• Do not store oils, fats or inflammable materials inside the oven, as it could be
dangerous if the oven is switched on.
• Do not lean or sit on the open door of the oven as it could damage the door and be
dangerous for you.
• Do not cover the bottom of the oven with aluminium foil, as it could affect cooking
and damage the interior enamelling of the oven.
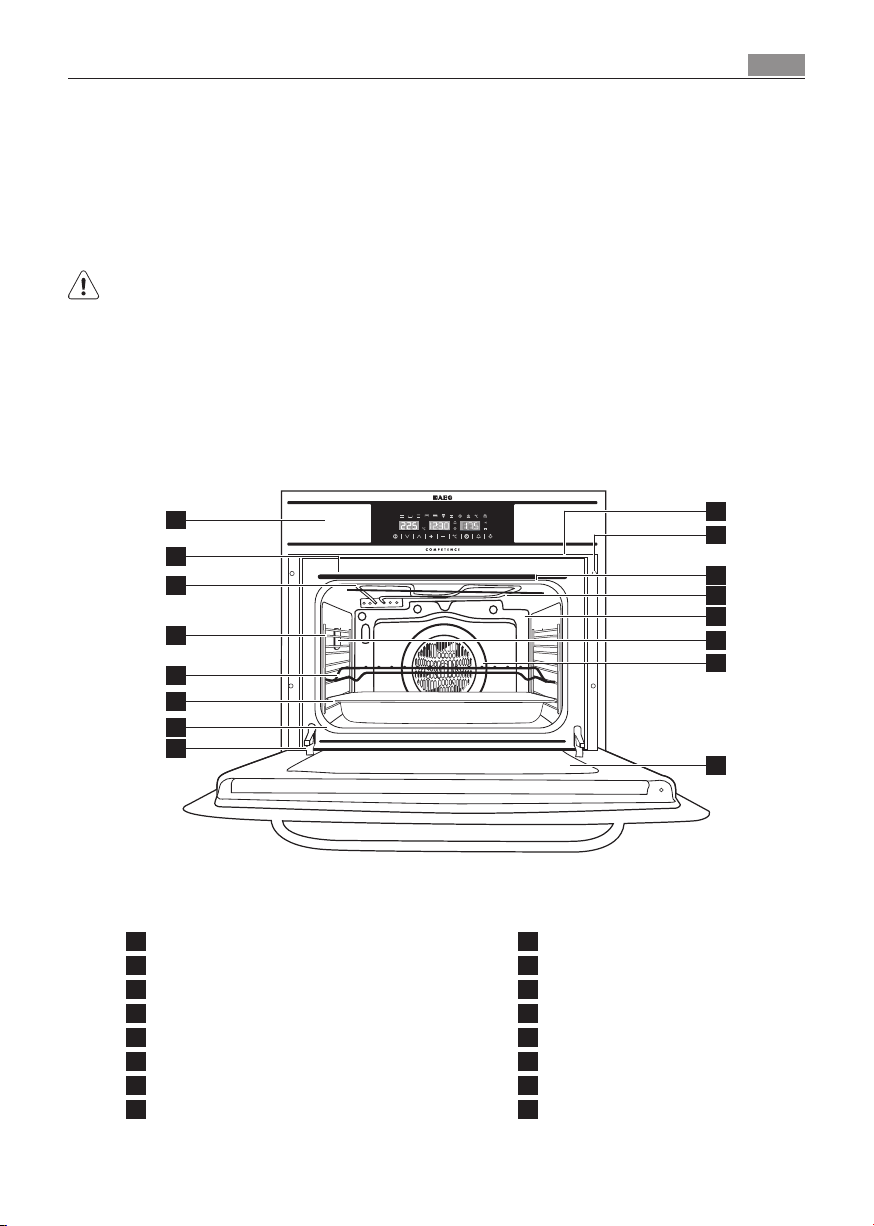
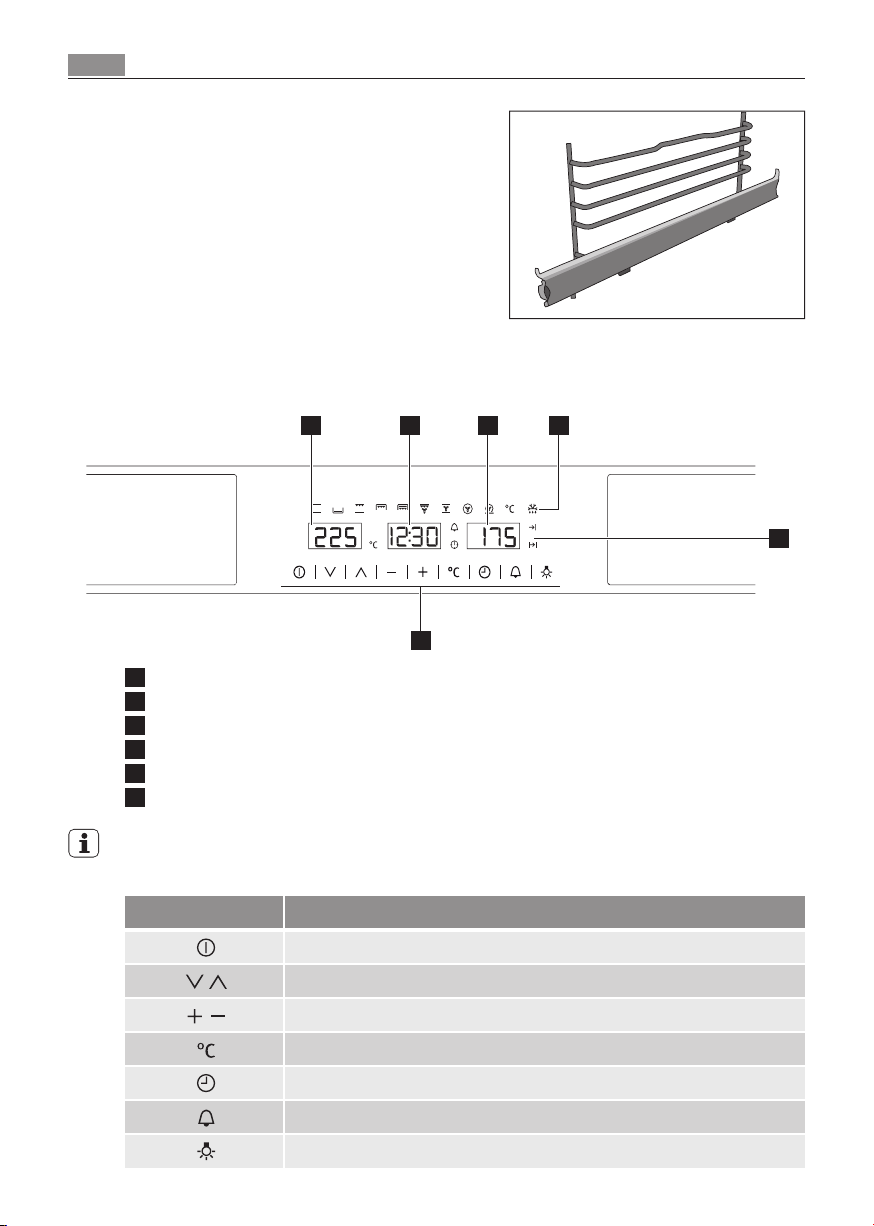
• To use the oven, insert the Deep Roasting Pan or rack supplied onto the side guides
inside the oven. The Deep Roasting Pans and racks are fitted with a system to facilitate
partial extraction and make handling easier.
• Do not put containers or food on the floor of the oven. Always use the Deep Roasting
Pans and Wire Shelfs.
• Do not spill water on the floor of the oven while it is working as this could damage the
enamel.
• While using the oven, open the door as little as possible to reduce electricity
consumption.
• Use protective gloves if you need to work inside the hot oven.
• To cool the oven, open the door to allow ventilation and odours to escape from inside.
• In recipes with a high liquid content, it is normal for condensation to form on the oven
door.
Child safety
• The appliance is not intended for use by young children or infirm persons without
supervision. Young children should be supervised to ensure they do not play with the
appliance.
• Do not allow children to approach the oven while it is in use, as high temperatures can
be reached.
Installation
• Check your oven for any transport damage. Never connect a damaged machine. If your
oven is damaged contact your supplier.
• All packaging must be removed before use.
• Any electrical work required to install this appliance must be carried out by a qualified
and competent person.

5
Product description
• For safety reasons it is dangerous to alter the specifications or attempt to modify this
product in any way.
• Never use the oven if the electrical supply cable is damaged; or if the control panel,
work top or plinth area are damaged such that the inside of the appliance is freely
accessible. Contact your local Service Force centre, in order to avoid hazard.
• All sides of the oven must never be drilled to prevent damage to hydraulic and electric
components.
Warning!
For electrical connection carefully follow the instructions given in specific paragraphs.
PRODUCT DESCRIPTION
15
13
12
16
8
7
6
5
4
3
1
2
14
11
10
9
1Control Panel
Oven Seal
Grill Element
Shelf Support Runners
Wire Shelf
Deep Roasting Pan
Hinge
Door
3
2
5
4
6
8
7
9Air Outlet
Fixing to Unit
Grill Screen
Smoke Outlet
Rear Panel
Light
Fan
Large Interior Glass Door
11
10
13
12
14
16
15

6Control panel
Oven Shelf Runner (KE 7415001)
2 side rails with 1 telescopic runners.
CONTROL PANEL
The oven will only work if the time of day has been set.
However, the oven can also be operated without any programme.
1
2 3 4 5
6
1Buttons
Temperature display
Time display
Time functions display
Oven functions
Indicator lights
3
2
5
4
6
Buttons Function
To switch appliance on or off
To Select oven functions
To set temperature and time values or defrosting level
To set temperature values
To select clock functions
To set minute minder
To switch light on or off
4
3
2
1

7
Oven functions
OVEN FUNCTIONS
Conventional
Lower element
Grill and Lower
element
Single Grill
Dual Grill
Dual Grill
with fan
Conventional
with fan
Turbo
It is used for sponges and cakes where the heat received must be
uniform to achieve a spongy texture.
Heat only from beneath. Suitable for heating dishes and raising pastry
and similar.
Special for roasts. It can be used for any piece, whatever its size.
For preparing dishes with superficial roasting.
It allows the outer layer to be browned without affecting the inside of
the food. Ideal for flat food, such as steaks, ribs, fish, toast.
Allows greater surfaces to be prepared, than with the grill, together with
higher power reducing the time required for browning of the food.
Allows uniform roasting at the same time as surface browning. Ideal
for grills. Special for large volume pieces, such as poultry game etc. It
is recommended to put the item on a rack with a Deep Roasting Pan
beneath to collect the stock and juices.
Suitable for roasts and cakes. The fan spreads the heat evenly throughout
the inside of the oven to reduce cooking time and temperature.
The fan distributes the heat produced by an element located at the rear
of the oven.
Due to the uniform heat distribution, it allows roasting and baking to
take place at two heights at the same time.
Indicator lights
Oven temperature
Cooking duration
End of cooking
Flashes when setting temperature is carried out.
Illuminates when a programmed cooking duration is set and will start
flashing when the cooking time is over.
Illuminates when a programmed end of cooking is set and will start
flashing when the cooking time is over.
Minute minder
Time of day
Illuminates when the minute minder alarm is set.
Flashes when setting the time of day is carried out.

8Oven functions
Recommendations for Defrosting Food
The defrost function works by means of a 2-level system of hot air. HI is for meats in
general and LO is for fish, cakes, pastries and bread. When selecting the defrost function,
select HI or LO on the temperature display by pressing on the temperature button and
then the buttons.
• Unpackaged food should be placed on the oven Deep Roasting Pan or on a dish.
• Defrost large pieces of meat or fish by placing them over the Wire Shelf with a Deep
Roasting Pan underneath to collect any liquid.
• Meat and fish do not need to be completely thawed before cooking. Condiments can
be added once the surface is soft.
• Food should always be cooked after defrosting.
• Do not refreeze defrosted food.
See the following chart for defrosting times and temperature levels:
FOOD LO LEVEL
Weight Time
HI LEVEL
Weight Time
1/2 Kg 35 min
1/2 Kg 25 min
1/2 Kg 30 min
1 Kg 40 min
1 Kg 75 min
1,5 Kg 90 min
1/2 Kg 40 min
1/2 Kg 60 min
Bread
Cake
Fish
Fish
Chicken
Chicken
Rib steak
Minced meat
Minced meat 1 Kg 120 min
Caution!
While using the Grill, Dual Grill or Dual Grill with fan, the door must be kept closed.
Lower element
with fan
Low
temperature
cooking
Defrosting
Ideal for baking pizzas, pies, and fruit tarts or sponges.
Designed to cook casseroles, stews, etc, in the traditional way, and for all
recipes specifying long cooking times and low heat.
For the best results, we recommend using covered casserole pans with
lids, first making sure that they can be used in the oven.
For defrosting e.g. gateaux and flans, butter, bread, fruit or other frozen
foods.

9
Using the oven
BEFORE USING FOR THE FIRST TIME
Carefully read this Instruction Manual to achieve the best results from your oven. Due
to the manufacturing process there may be residues of grease and other substances. To
eliminate these, proceed as follows:
• Remove all the packaging material, including the protective plastic, if included.
• Select the or function at 200ºC for one hour. To do so, consult the feature list
provided with this manual.
• To cool the oven open the door to allow ventilation and odours to escape from inside.
• After cooling, clean the oven and the accessories.
During the first use, fumes and odours may occur and the kitchen should therefore be
well ventilated.
USING THE OVEN
In the event of a power failure, all the settings (time of day, programme setting or
programme in operation) will be cancelled. When the power is restored, the numbers in
the display will flash, and the clock/timer has to be reset.
Caution!
The electronic clock features Touch-Control technology. To operate, simply touch the
glass control symbols with your fingertip.
The touch control sensitivity continuously adapts to changing conditions. Ensure that the
glass front of the control panel is clean and free of any obstacles when turning on the
oven.
If the clock does not respond correctly when you touch the glass, you will need to turn
off the oven for a few seconds and then turn it back on. By doing this, the buttons adjust
automatically and will react once more to fingertip control.
Setting the Electronic Clock
When turning your oven on, you will see the clock flashing 12:00 . Set the clock by
touching the symbols on the glass.
You will hear 2 beeps confirming the time has been set.
If you want to change the time, turn the oven off. Touch the clock button until the
indicator flashes.
Change the time by touching the buttons. The two beeps you hear after that will
confirm the new time has been set.
Manual operation
After setting the clock, the oven is ready for use:
1 Press the On button .
2 Press to select the desired cooking
function.

10 Using the oven
3 The temperature display will show the preset
temperature for that cooking function.
Press on the temperature button to
change it. Select the desired temperature by
pressing on the buttons.
4 The top oven cavity will start to heat up.
Functions
will start the fast preheating function for a few minutes.
The oven will beep when it reaches the selected temperature.
Caution!
This preheating function turns on the turbo motor at the back of the top oven cavity.
5 During oven heating, the temperature
degree symbol on the temperature display
will flash to show that the food is being
heated.
6 Press on the Off button to stop cooking.
Caution!
When cooking has finished, you will notice that oven cooling feature will work until the
temperature inside the oven has been suitably lowered.
Oven Lighting
The inside light will go on:
– When the oven door is open. If the door is not
closed after a certain time, the light will turn
off to reduce power consumption.
– When any cooking function is selected. The
light will turn off after a certain time.
If you want to turn the light on during cooking,
just touch the Oven Light button . If you want
to turn off the light press the the Oven Light button .

11
Using the oven
Electronic clock functions
Electronic programmer functions
Cooking Duration This function allows you to programme cooking time length, after which
the oven will turn off automatically.
Programming Cooking Time:
1 Press on the clock button . The symbol will light up.
2 Select the cooking time by pressing the buttons.
3 Two consecutive beeps will then sound and the display will show the
remaining cooking time. The symbol will flash slowly to indicate
that the oven will switch itself automatically.
4 Select a cooking function and temperature.
5 Once the cooking time is complete, the oven will turn off, an alarm
will sound and the symbol will flash more quickly.
6 Press on any button on the control panel to stop the alarm.
You can change the programmed time whenever you want by touching
the clock button and then on the buttons.
The two beeps you hear after that will confirm the new time has been set.
End of cooking This function allows you to programme the time for cooking to stop,
after which the oven will turn off automatically.
Programming the Cooking Stop Time:
1 Press on the clock button several times until the symbol lights
up.
2 Select the cooking stop time by pressing the buttons.
3 Two consecutive beeps will then sound and the display will show the
remaining cooking time. The symbol will flash slowly to indicate
that the oven will switch itself automatically.
4 Select a cooking function and temperature.
5 Once it is the set time, the oven will turn off, an alarm will sound and
the symbol will flash more quickly.
6 Press on any button on the control panel to stop the alarm.
You can change the programmed cooking stop time at any moment by
pressing on the clock button until the symbol flashes and then
by pressing on the buttons. The two beeps you hear after that will
confirm the new time has been set.
You can use this function even if you are already cooking with the oven.
If this is the case, follow all of the above instructions except No. 4.

12 Using the oven
Electronic programmer functions
Cooking duration
and End of cooking
time combined
This function allows both cooking time length and the stop time to be
programmed. With this function, the oven switches on automatically at
the set time and operates for the cooking time it has been programmed
for. It switches itself off automatically at the entered stop time.
1 Press on the clock button . The symbol will light up.
2 Select the cooking time by pressing the buttons.
3 Two consecutive beeps will then sound, and the display will show the
remaining cooking time. The symbol will flash slowly.
4 Press on the clock button several times until the symbol
lights up.
5 Select the cooking stop time by pressing the buttons.
6 This will be confirmed by two beeps. The current time will show on
the display and the symbol will remain lit.
7 Select a cooking function and temperature.
8 The oven will remain off, with the symbol lit and the symbol
flashing slowly. The clock will show the current time and the inside
light will remain off. The oven is now programmed.
9 When it is time to start cooking, the oven will switch on and will
operate for the programmed cooking time. The time function display
will show the remaining cooking time.
10 Once the set time is reached, the oven will turn off, an alarm will
sound and the and symbols will flash.
11 Press on any button on the control panel to stop the alarm.
If you wish to change the cooking stop time while cooking is in
progress, press on the clock button until the symbol flashes.
You can then change the cooking stop time by pressing on the
buttons.
The two beeps you hear after that will confirm the new time has been set.
Minute minder A beep will go sound when the set time has finished, whether the oven is
on or off.
Programming the Minute Minder:
1 Press on the minute minder button . The symbol lights up.
2 Select the length of time after which you want the alarm to sound by
pressing on the buttons.
3 You will then hear two beeps; the display will show the time left be-
fore the alarm sounds and the symbol will flash slowly, indicating
that the timer has been set.
4 Once the programmed time has passed, an alarm will sound and the
symbol will begin to flash more quickly.
5 Press on any button on the control panel to stop the alarm.
You can change the programmed time whenever you want by touching
the minute minder button until the symbol flashes, and then
touching the buttons. The two beeps you hear after that will
confirm the new time has been set.
Cooking duration
and End of cooking
time combined

13
Cooking tables
COOKING TABLES
The Cooking Tables show examples of temperature ranges and approximate cooking
times. The cooking mode depends on the model.
For the best results we recommend the oven to be preheated with the function or
for 10 minutes.
STARTERS Weight
(Kg)
Deep Roasting
Pan Position
Cooking
Mode Temperat.
(ºC)
Time
(min) Receptacle
Baked rice 1,0 Lower 180-200 25-30 Shallow
oven dish
170-190 20-25
Pasty 1,2
Intermediate
170-190 45-50 Deep Roasting
Pan
160-180 30-35
Vegetable
Pastry 1,0
Intermediate
190-210 25-30
Shallow dish
180-200 25-30
170-190 35-40Lower
Vegetable Pie 1,0
Intermediate
190-210 55-60 Shallow dish
170-190 45-50
Baked
potatoes 1,0 Lower 180-200 55-60 Deep Roasting
Pan
180-200 40-45
Pizza 0,6
Intermediate
190-210 15-20 Wire Shelf
170-190 10-15
Quiche 0,8
Intermediate
180-200 40-45
Quiche Mould
160-180 35-40
170-190 40-45
Stuffed
tomatoes 0,8
Intermediate
170-190 10-12 Deep Roasting
Pan
160-180 10-12
Lasagne 1,0
Intermediate
180-200 8-10 Shallow dish

14 Cooking tables
MEAT Weight
(Kg)
Deep Roasting
Pan Position
Cooking
Mode Temperat.
(ºC)
Time
(min) Receptacle
Suckling Pig 1,4
Intermediate
190-210 70-75
170-190 70-75
Rabbit 1,2
Intermediate
180-200 55-60
170-190 45-50
170-190 30-35
Sausages 0,6 higher 190-210 10-15
Lamb 1,0
Intermediate
190-210 50-55
170-190 45-50
180-200 50-55
Salted Pork
Loin 0,6
Intermediate
170-190 35-40
170-190 40-45
Chicken 1,2 Lower 190-210 50-55
170-190 45-50
Roast-beef 0,6
Intermediate
190-210 30-35
180-200 25-30
190-210 30-35
Fillet Steak
Pastry 1,0
Intermediate
180-200 35-40
160-180 30-35
Brochettes 0,3 Higher 180-200 10-12
Deep Roasting
Pan
Deep Roasting
Pan
Wire Shelf
Deep Roasting
Pan
Deep Roasting
Pan
Deep Roasting
Pan
Deep Roasting
Pan
Deep Roasting
Pan
Wire Shelf

15
Cooking tables
FISH Weight
(Kg)
Deep Roasting
Pan Position
Cooking
Mode Temperat.
(ºC)
Time
(min) Receptacle
Red Bream 1,0
Intermediate
180-200 25-30
170-190 20-25
Fillet of Fish 1,0 Higher 170-190 15-20
Salted Dorado 1,0
Intermediate
190-210 25-30
180-200 25-30
Sardines 1,0 Higher 180-200 10-15
Sole 1,0
Intermediate
170-190 15-20
160-180 10-15
Sea-bass 1,0
Intermediate
190-210 20-25
180-200 10-15
Hake 1,1
Intermediate
190-210 25-30
180-200 20-25
Fish Pie 1,1
Intermediate
190-210 60-65
190-210 60-65
Salmon in
greased paper 1,0
Intermediate
180-200 20-25
170-190 15-20
Trout 1,1
Intermediate
190-210 20-25
Deep Roasting
Pan
Wire Shelf
Deep Roasting
Pan
Wire Shelf
Deep Roasting
Pan
Deep Roasting
Pan
Deep Roasting
Pan
Casserole dish
Deep Roasting
Pan
Deep Roasting
Pan
180-200 15-20

16 Cooking tables
CAKES AND
DESSERTS Weight
(Kg)
Deep Roasting
Pan Position
Cooking
Mode Temperat.
(ºC)
Time
(min) Receptacle
Flan 0,8
Intermediate
160-180 55-60
150-170 50-55
Sponge Cake 0,5
Intermediate
150-170 35-40
170-190 30-35
160-180 30-35
Swiss Roll 0,5
Intermediate
170-190 10-15
160-180 10-15
Biscuits 1,0
Intermediate
160-180 20-25
150-170 20-25
Vol-au-vents 0,3
Intermediate
170-190 20-25
160-180 15-20
Cup Cakes 0,7
Intermediate
160-180 20-25
160-180 20-25
Baked Apples 0,5
Intermediate
180-200 30-35
170-190 20-25
Meringue 0,35
Intermediate
100-120 70-75
100-120 60-65
Baked bananas 0,5
Intermediate
180-200 20-25
170-190 15-20
Plum-Cake 0,6
Intermediate
170-190 55-60
160-180 50-55
Apple Pie 0,8
Intermediate
170-190 45-50
160-180 40-45
Cheesecake 0,8
Intermediate
180-200 40-45
Bread Mould
Cake Mould
Deep Roasting
Pan
Deep Roasting
Pan
Deep Roasting
Pan
Deep Roasting
Pan
Deep Roasting
Pan
Deep Roasting
Pan
Casserole dish
Cake Mould
Deep Roasting
Pan
Cheesecake
Mould
170-190 40-45

17
Child lock function
CHILD LOCK FUNCTION
This function locks the oven, preventing small
children from playing with it.
To turn on the function, press on the and
buttons until you hear a long beep.
The oven is now locked.
If the oven is Off the word SAFE appears on the
time display.
When the oven is on all the buttons keys are
locked except the Off button .
To switch off the child lock, touch the and buttons simultaneously until you hear a
long beep and SAFE goes out in the display.
OVEN SAFETY CUT-OUT
If not switched off after a certain time, or if the temperature is not modified, the oven
switches off automatically.
The oven switches itself off when the oven temperature is:
50-120ºC after 12,5 hours
120-200ºC after 8,5 hours
200-250ºC after 5,5 hours
Press any button for using the appliance after a safety cut out.
The safety cut-out is cancelled if the clock function DURATION or END is set.
WATER CLEANING FUNCTION
About this function
In order to keep you appliance working properly it should be regularly cleaned to prevent
any build up of food, deposits or greases. This function can help to make the cleaning
process easier and more convenient for you.
How it works
By using heat, Steam and few drops of washing up liquid food deposit are loosened and
softened enough to make their removal much easier-eliminating the need to scrub the
enamel and avoid any scratches on the surface.
How to use
• Remove all internal components (side shelves support/Wire Shelfs/pans ) before use.
• Put 500 ml approximately of water with a few drops of washing up liquid added into
a large absorbent sponge which is placed on the base of the oven cavity.
• If the oven cavity is heavily soiled, you may want to leave the solution to soak for a
short time.
• Close the oven door
• Select the “Bottom” function at a temperature of 220°C
• Select with the Timer a period of 5 minutes

18 Care and cleaning
• After the cycle is finished please wait 15 minutes before opening the door.
• Make sure that the appliance is switched off.
• Use the large absorbent sponge to remove any excess of water from the base of the
cavity.
• You can now clean the inside of the oven
• Make sure at the end to dry all the inside and the surround of the appliance,
particularly the door seals.
CARE AND CLEANING
Caution!
Before carrying out any work, the appliance must be disconnected from the mains
electricity supply.
Cleaning the Inside of the Oven
• The inside of the oven should be cleaned to remove food and grease deposits, which
can give off smoke or odours and cause stains to appear.
• With the oven cold and for enamelled surfaces (e.g. the floor of the oven) use a nylon
brush or sponge with warm soapy water. If using special oven cleaning products, use
only on enamelled surfaces and follow the manufacturer’s instructions.
Caution!
Do not clean the inside of your oven with a steam or pressurised water jet. Do not use
either metallic scouring pads or any material that could scratch the enamel.
Cleaning the Oven Exterior and Accessories
Clean the outside of the oven and the accessories with warm soapy water or with a mild
detergent.
Caution!
Never use metallic scouring pads or commercial or scouring powders that could scratch
the enamel. For stainless steel surfaces, proceed with care and only use sponges or cloths
that cannot scratch them.
To clean the outside of the oven do not attempt to remove the controls, as for this, the
oven has to be first removed from the kitchen unit.

19
Care and cleaning
Cleaning the Large Interior Glass Door
Warning!
Be careful: the oven door closes when the interior glass is removed.
1. Open the oven door.
2. Pull the glass upwards from the bottom (A).
3. The interior glass is now free. Remove it.
4. Clean the interior glass and the inside of the
oven door.
5. Insert the supports on the interior glass
into the grooves at the top of the door (B).
6. Lower the glass into the door (C).
7. The glass is fixed to the door by pressing the
two lower supports (D) while pushing the
glass into the door (E).
Changing the oven bulb
Caution!
To change the bulb, first ensure that the oven is
disconnected from the power supply.
1. Ease out the Shelf Support Runnerss,
releasing them from the bolt (F).
A
E
D
C
B
F

20 Enviroments concerns
2. Loosen the lens from the lamp holder with
the help of the appropriate tool. Exchange
the bulb.
3. Replace the lens, making sure it fits in the
correct position without forcing it.
The replacement bulb must be temperature resistant to 300 °C. These can be ordered
from the Technical Service Department.
ENVIROMENTS CONCERNS
The symbol on the product or on its packaging indicates that this product may not be
treated as household waste. Instead it shall be handed over to the applicable collection
point for the recycling of electrical and electronic equipment. By ensuring this product
is disposed of correctly, you will help prevent potential negative consequences for the
environment and human health, wich could otherwise be caused by inappropriate waste
handling of this product. Please contact your local city office, your household waste
disposal service or the shop where you purchased the product.
Ecological Packaging
The packaging materials are completely recyclable and can be used again. Check with
your local authority on the regulations for disposing of this material.
WHAT TO DO IF…
If the appliance is not working correctly, please check the following before contacting
the Electrolux Service Centre.
This manual suits for next models
2
Table of contents
Languages:
Other AEG Oven manuals

AEG
AEG BEB355020M User manual

AEG
AEG BPB331021M User manual

AEG
AEG BE3003001M User manual

AEG
AEG COMPETENCE 5231 B User manual

AEG
AEG BP532310M User manual

AEG
AEG BEB230010M User manual

AEG
AEG BPK948330T User manual

AEG
AEG BPK744L21M User manual

AEG
AEG COMPETENCE 824 B User manual

AEG
AEG BE1400300X User manual

AEG
AEG COMPETENCE 3120 B User manual

AEG
AEG COMPETENCE 3050 B User manual

AEG
AEG BH 8.04 User manual

AEG
AEG COMPETENCE B4140-1 User manual

AEG
AEG EE3313091 User manual

AEG
AEG Competence 3201 B User manual

AEG
AEG BPK744L21M User manual

AEG
AEG COMPETENCE 53080 B User manual

AEG
AEG BSE782380B User manual

AEG
AEG EP3003011 User manual