AEG OKO_SANTO SUPER User manual

ÖKO_SANTO SUPER
Electronic Refrigerator
Operating Instructions
818 17 01-00/7

2818 1701-00/7
Dear customer,
Before placing your new refrigerator/freezer into operation please read
these operating instructions carefully. They contain important
information for safe use, for installation and for care of the appliance.
Please keep these operating instructions for future reference. Pass them
on to possible new owners of the appliance.
Important! These operating instructions are for use with several
technically comparable models with varying accessories. Please observe
the notes which apply to your model.
1Notes which are important for your safety or for the proper
functioning of the appliance are stressed with a warning triangle and/
or with signal words (Warning!, Caution!, Important!). Please observe
the following carefully.
0This symbol guides you step by step in the operation of the appliance.
3Supplementary information regarding operation and practical
applications of the appliance appear after this symbol.
2Tips and notes concerning economical and environmentally sound use
of the appliance are marked with the cloverleaf.
Explanations of the technical terminology used in the operating
instructions can be found at the end in the section "Technical
Terminology".
The operating instructions contain instructions for the correction of
possible malfunctions by the user in the section "Something not
working". If these instructions should not be sufficient, please contact
your local AEG Service Force Centre.
P
r
i
nte
d
on paper manu
f
acture
d
w
i
t
h
env
i
ronmenta
ll
y soun
d
processes.
he who thinks ecologically acts accordingly ...

818 1701-00/7 3
Contents
Important Safety Instructions . . . . . . . . . . . . . . . . . . . . . . . . . . . . . . . . . . . . 5
Environmental Information . . . . . . . . . . . . . . . . . . . . . . . . . . . . . . . . . . . . . . 7
Packaging . . . . . . . . . . . . . . . . . . . . . . . . . . . . . . . . . . . . . . . . . . . . . . . . . . . . . . 7
Old Appliances . . . . . . . . . . . . . . . . . . . . . . . . . . . . . . . . . . . . . . . . . . . . . . . . . . 7
Appliance Transport . . . . . . . . . . . . . . . . . . . . . . . . . . . . . . . . . . . . . . . . . . . . 7
Before Use . . . . . . . . . . . . . . . . . . . . . . . . . . . . . . . . . . . . . . . . . . . . . . . . . . . . . 8
Packaging . . . . . . . . . . . . . . . . . . . . . . . . . . . . . . . . . . . . . . . . . . . . . . . . . . . . . . 8
Installation . . . . . . . . . . . . . . . . . . . . . . . . . . . . . . . . . . . . . . . . . . . . . . . . . . . . 9
Installation Location . . . . . . . . . . . . . . . . . . . . . . . . . . . . . . . . . . . . . . . . . . . . . 9
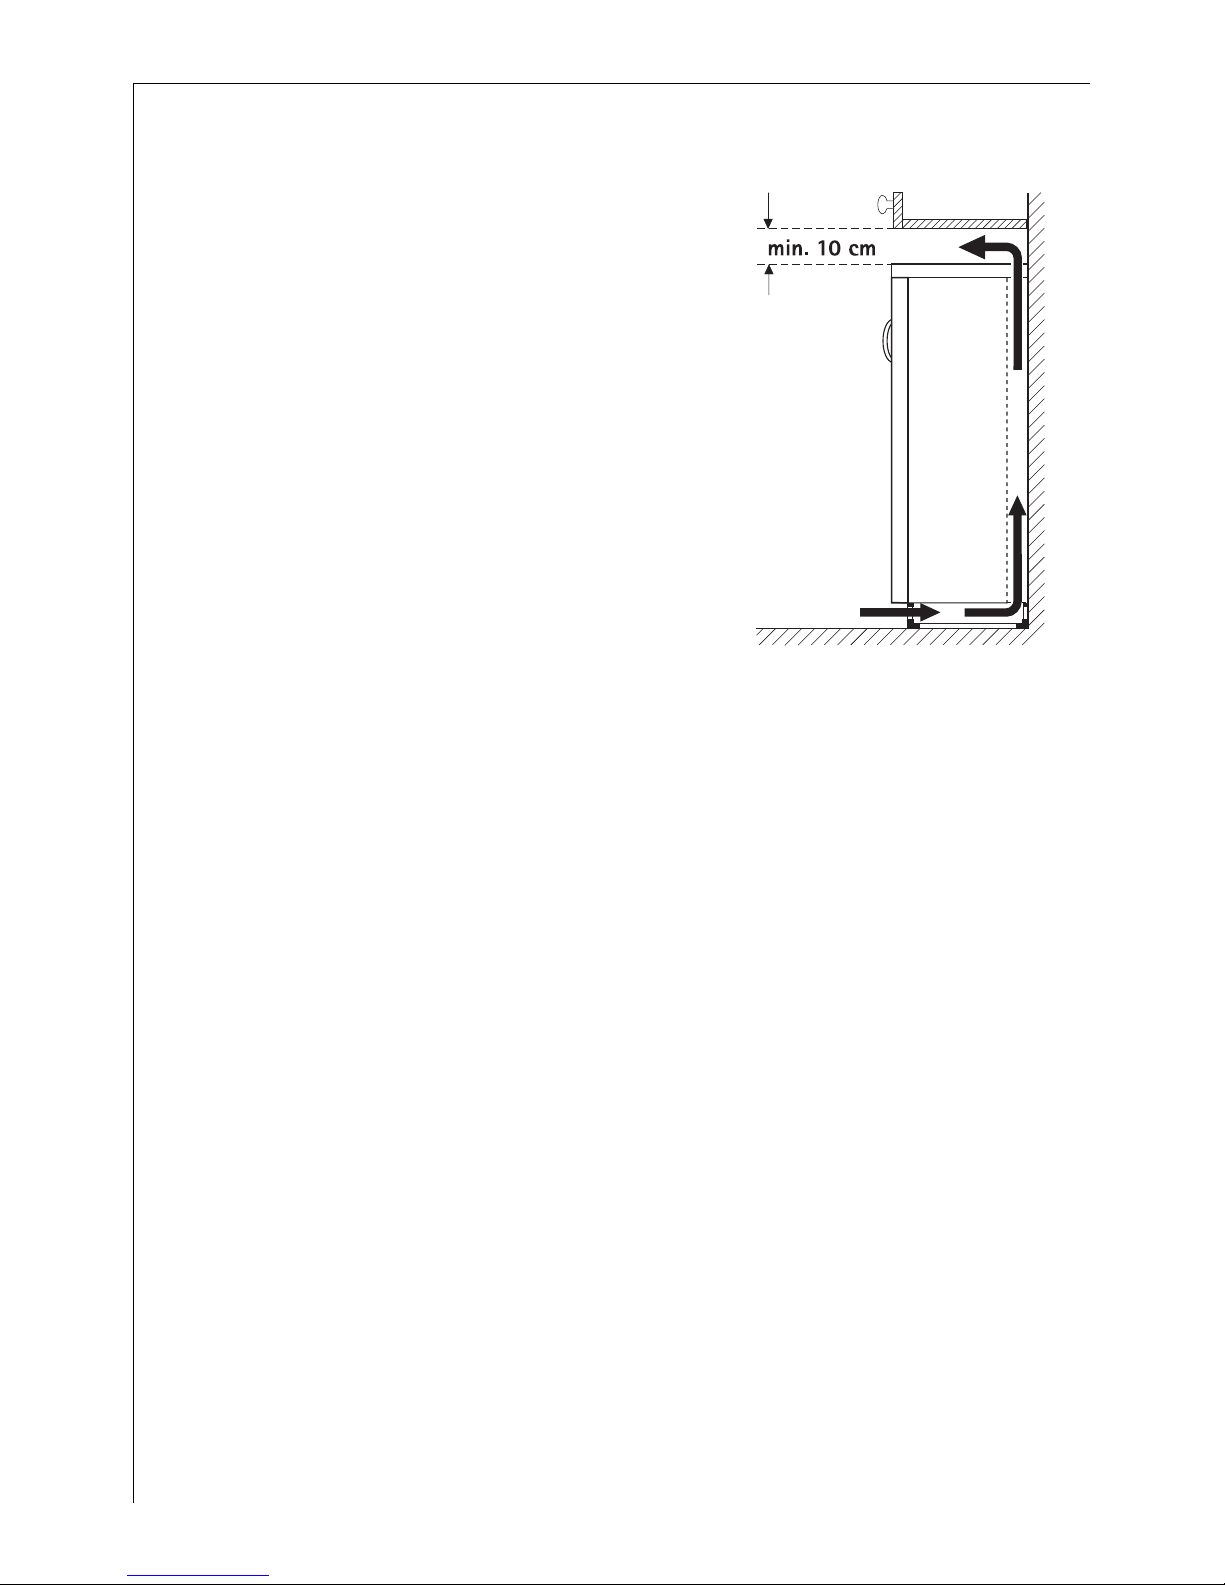
The refrigerator needs ventilation . . . . . . . . . . . . . . . . . . . . . . . . . . . . . . . . . . 10
Appliance Alignment . . . . . . . . . . . . . . . . . . . . . . . . . . . . . . . . . . . . . . . . . . . . . 10
Electrical Connection . . . . . . . . . . . . . . . . . . . . . . . . . . . . . . . . . . . . . . . . . . . . 11
Changing Over The Door Hinges . . . . . . . . . . . . . . . . . . . . . . . . . . . . . . . . . . 12
Opening the door . . . . . . . . . . . . . . . . . . . . . . . . . . . . . . . . . . . . . . . . . . . . . . . 14
Appliance Description . . . . . . . . . . . . . . . . . . . . . . . . . . . . . . . . . . . . . . . . . . . 15
View of Appliance . . . . . . . . . . . . . . . . . . . . . . . . . . . . . . . . . . . . . . . . . . . . . . . 15
Control Panel . . . . . . . . . . . . . . . . . . . . . . . . . . . . . . . . . . . . . . . . . . . . . . . . . . . 16
Buttons for Adjusting the Temperature . . . . . . . . . . . . . . . . . . . . . . . . . . . . . 16
Temperature Display . . . . . . . . . . . . . . . . . . . . . . . . . . . . . . . . . . . . . . . . . . . . . 17
Prior to Initial Start-Up . . . . . . . . . . . . . . . . . . . . . . . . . . . . . . . . . . . . . . . . . 17
Initial Start-Up . . . . . . . . . . . . . . . . . . . . . . . . . . . . . . . . . . . . . . . . . . . . . . . . . 18
Temperature Adjustment . . . . . . . . . . . . . . . . . . . . . . . . . . . . . . . . . . . . . . . . 18
FAST CHILL . . . . . . . . . . . . . . . . . . . . . . . . . . . . . . . . . . . . . . . . . . . . . . . . . . . . 19
Switching the Appliance Off . . . . . . . . . . . . . . . . . . . . . . . . . . . . . . . . . . . . . 19
Interior Accessories . . . . . . . . . . . . . . . . . . . . . . . . . . . . . . . . . . . . . . . . . . . . . 20
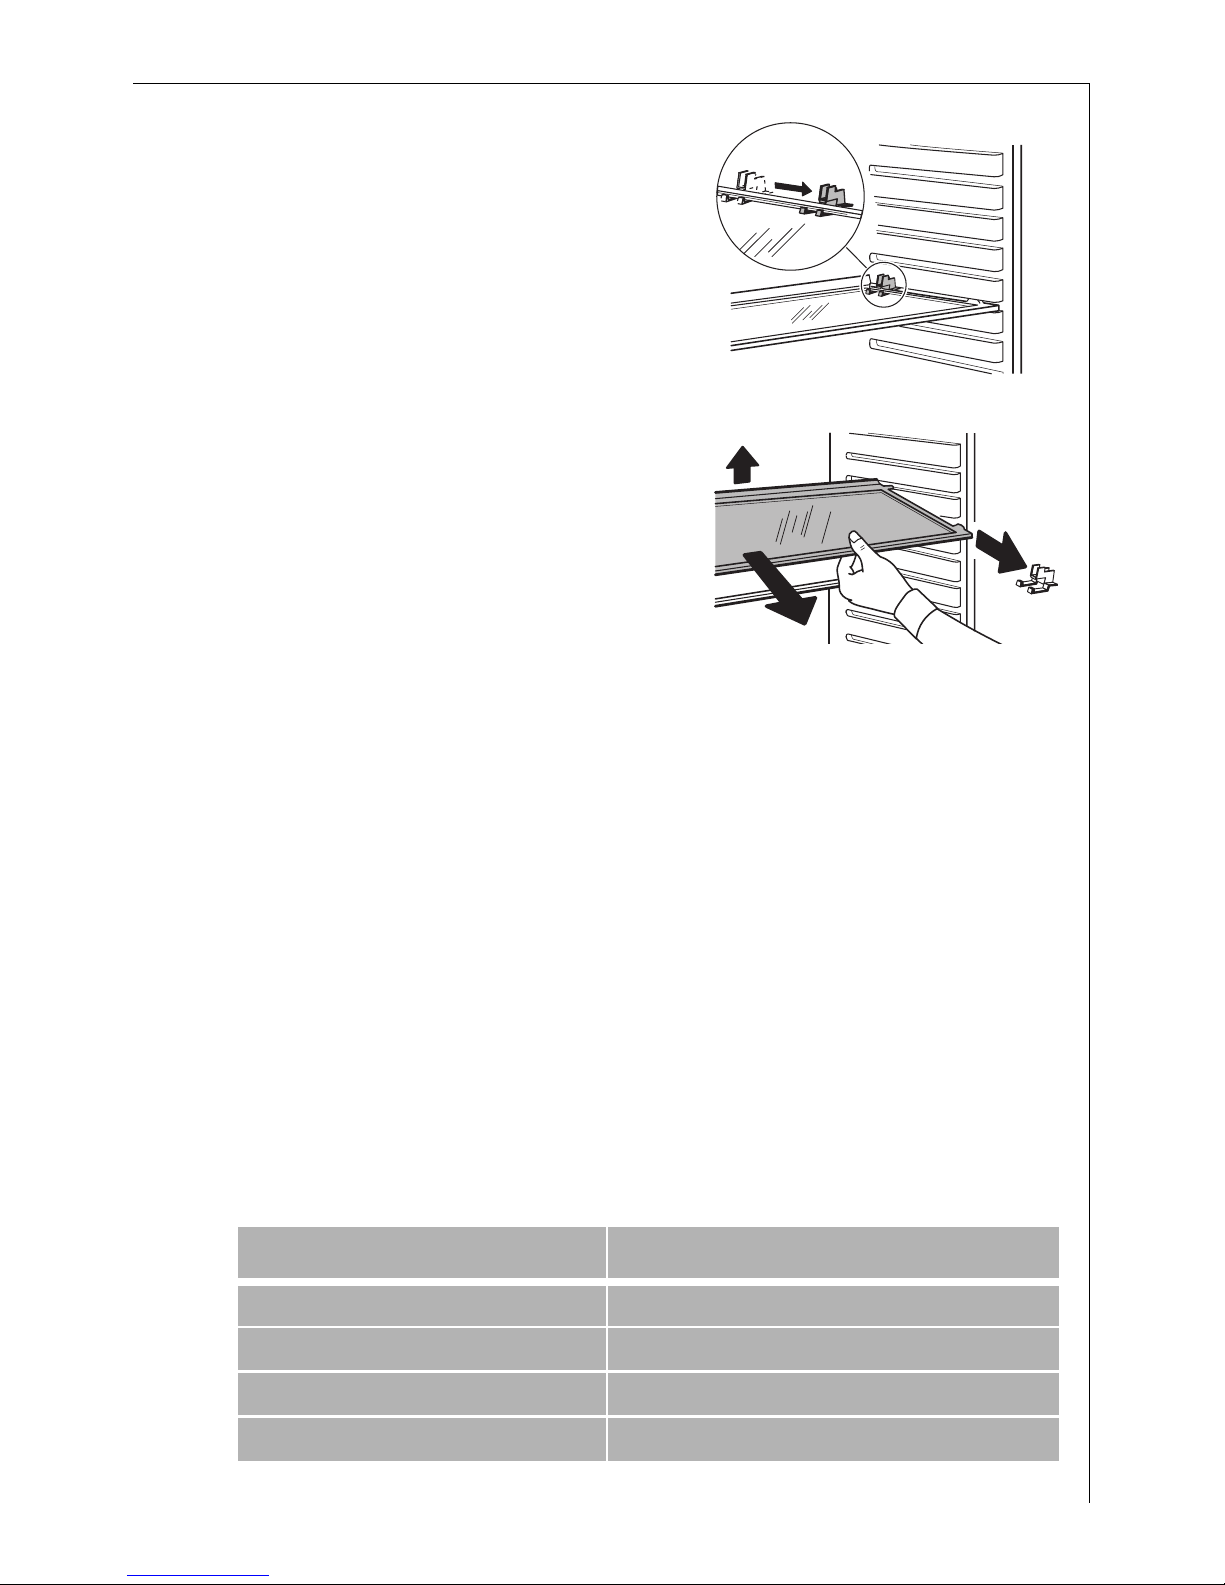
Storage Shelves . . . . . . . . . . . . . . . . . . . . . . . . . . . . . . . . . . . . . . . . . . . . . . . . . 20
Bottle rack . . . . . . . . . . . . . . . . . . . . . . . . . . . . . . . . . . . . . . . . . . . . . . . . . . . . . 20
Variable Inner Door . . . . . . . . . . . . . . . . . . . . . . . . . . . . . . . . . . . . . . . . . . . . . . 21
Bottle Holder . . . . . . . . . . . . . . . . . . . . . . . . . . . . . . . . . . . . . . . . . . . . . . . . . . . 21

Contents
4818 1701-00/7
Correct storage . . . . . . . . . . . . . . . . . . . . . . . . . . . . . . . . . . . . . . . . . . . . . . . . . 22
Defrosting . . . . . . . . . . . . . . . . . . . . . . . . . . . . . . . . . . . . . . . . . . . . . . . . . . . . . 23
The refrigerator is defrosted automatically . . . . . . . . . . . . . . . . . . . . . . . . . . 23
Hints and Tips . . . . . . . . . . . . . . . . . . . . . . . . . . . . . . . . . . . . . . . . . . . . . . . . . . 23
Normal Operating Sounds . . . . . . . . . . . . . . . . . . . . . . . . . . . . . . . . . . . . . . . . 23
Food Storage . . . . . . . . . . . . . . . . . . . . . . . . . . . . . . . . . . . . . . . . . . . . . . . . . . . 23
Energy Saving Advice . . . . . . . . . . . . . . . . . . . . . . . . . . . . . . . . . . . . . . . . . . . . 24
Maintenance and Cleaning . . . . . . . . . . . . . . . . . . . . . . . . . . . . . . . . . . . . . . 24
Internal Cleaning . . . . . . . . . . . . . . . . . . . . . . . . . . . . . . . . . . . . . . . . . . . . . 24
External Cleaning . . . . . . . . . . . . . . . . . . . . . . . . . . . . . . . . . . . . . . . . . . . . . 24
Replace light bulb . . . . . . . . . . . . . . . . . . . . . . . . . . . . . . . . . . . . . . . . . . . . . . . 25
Something not Working . . . . . . . . . . . . . . . . . . . . . . . . . . . . . . . . . . . . . . . . . 26
Technical Terminology . . . . . . . . . . . . . . . . . . . . . . . . . . . . . . . . . . . . . . . . . . 28
Regulations, Standards, Guidelines . . . . . . . . . . . . . . . . . . . . . . . . . . . . . . . 28
Guarantee Conditions . . . . . . . . . . . . . . . . . . . . . . . . . . . . . . . . . . . . . . . . . . . 29
European Guarantee . . . . . . . . . . . . . . . . . . . . . . . . . . . . . . . . . . . . . . . . . . . . . 29
Service & Spare Parts . . . . . . . . . . . . . . . . . . . . . . . . . . . . . . . . . . . . . . . . . . . 31

818 1701-00/7 5
1Important Safety Instructions
These warnings are provided in the interests of your safety. Ensure
that you understand them all before installing or using this
appliance. Your safety is of paramount importance. If you are unsure
about any of the meanings of these warnings contact the Customer
Care Department.
Prior to Installation
• Check the refrigerator for transport damage. Under no circumstances
should a damaged appliance be installed! In the event of damage, please
contact your retailer.
Installation
• This appliance is heavy. Care should be taken when moving it.
• It is dangerous to alter the specifications or attempt to modify this pro-
duct in any way.
• Ensure that the appliance does not stand on the electrical supply cable. If
the supply cable is damaged, it must be replaced by a cable available
from your local Service Force Centre.
• Any electrical work required to install this appliance should be carried
out by a qualified electrician or competent person.
• Parts which heat up should not be exposed. Whenever possible, the back
of the appliance should be close to a wall, but leaving the required
distance for ventilation, as stated in the installation instructions.
• The appliance should be left for 4 hours after installation before it is tur-
ned on, in order to allow the refrigerant to settle.
Refrigerant
The refrigerant isobutane (R600a) is contained within the refrigerant
circuit of the appliance, a natural gas with a high level of environmen-
tal compatibility, which is nevertheless flammable.
• During transportation and installation of the appliance, be certain that
none of the components of the refrigerant circuit become damaged.
• If the refrigerant circuit should become damaged:
– avoid open flames and sources of ignition;
– thoroughly ventilate the room in which the appliance is situated.

Important Safety Instructions
6818 1701-00/7
Child Safety
•Do not allow children to tamper with the controls or play with the pro-
duct.
•Keep packaging material away from children! (There is a risk of suffoca-
tion!)
During Use
•This appliance is designed for domestic use only, specifically for the
storage of edible foodstuffs only. It is not intended for commercial or
industrial use
•Containers with flammable gases or liquids can leak at low temperatures.
Do not store any containers with flammable materials such as, spray cans,
fire extinguisher refill cartridges etc in the refrigerator.
•Manufacturers´recommended storage times should be adhered to. Refer
to relevant instructions.
Maintenance and Cleaning
•Before cleaning, always switch off the appliance and disconnect from the
electrical supply.
•When unplugging always pull the plug from the mains socket, do not pull
on the cable.
Servicing
•This product should be serviced by an authorised engineer and only
genuine spare parts should be used.
•Under no circumstances should you attempt to repair the appliance
yourself. Repairs carried out by inexperienced persons may cause injury or
serious malfunctioning.
Contact your local AEG Service Force Centre.

818 1701-00/7 7
Environmental Information
Packaging
All transit packaging materials are environmentally compatible and can
be reused. Wood is un-treated. The plastics can be recycled and are
identified as follows:
>PE< for polyethylene, e.g. the outer covering and the bags in the inte-
rior.
>PS< for polystyrene foam, e.g. the pads, which are pure hydrocarbon
compounds and can be recycled.
The carton parts are made from recycled paper. Please dispose of the
packaging with due care for the environment.
Old Appliances
When disposing of your old appliance:
Make the appliance unusable by cutting off the cable and remove any
door catches to ensure small children cannot be trapped inside.
Help to keep your country tidy - use an authorised disposal site.
Appliance Transport
Two persons are required for transport of the appliance. There are two
recessed handles at the front of the base and at the back of the appli-
ance at the top for improved gripping.
0Grip the appliance with the recessed handles positioned as in the dra-
wing, and transport the appliance.

8818 1701-00/7
0In order to push the appliance into its final position, press carefully at
the top of the door and tip the appliance back slightly. The weight is
thus transferred to the back casters and the appliance can be easily
pushed.
Before Use
Packaging
0Remove all adhesive tape and packaging from the interior of the
appliance.
3Any remnants of adhesive can be removed with white spirit.
0Remove the transport protection pieces and pull off the adhesive tape.
0Wash the inside of the appliance with lukewarm water with a little
bicarbonate of soda added (5 ml to 0.5 litre of water). Do not use soap
or detergent as the smell may linger. Dry the appliance thoroughly.

818 1701-00/7 9
Remove the transport fittings from
the storage shelves:
0Slide the fittings securing the shelf
forward to the thicker section on
the edge of the storage shelf.
0Slide the storage shelf far enough
forward so that it can be hinged
downwards and the fittings can be
removed from the guides.
Installation
Installation Location
The appliance should be installed in a well ventilated, dry room.
Energy use and efficient performance of the appliance is affected by
the ambient temperature.
The appliance should therefore
–not be exposed to direct sunlight;
–not be installed next to radiators, cookers or other sources of heat;
–only be installed at a location whose ambient temperature corre-
sponds to the climate classification, for which the appliance is desi-
gned.
The climate classification can be found on the rating plate, which is
located at the left on the inside of the appliance.
The following table shows which ambient temperature is correct for
each climate classification:
Climate classification for an ambient temperature of
SN +10 to +32 °C
N+16 to +32 °C
ST +18 to +38 °C
T+18 to +43 °C

Installation
10 818 1701-00/7
The refrigerator needs ventilation
Air is fed under the door through the
vent slots in the base and is
exhausted upwards along the back
wall. To ensure proper air circulation
never cover or alter the vent open-
ings.
Important! If the appliance is instal-
led under a hanging cabinet, a clea-
rance of at least 10 cm between the
top of the appliance and the cabinet
above it must be maintained.
Please check whether, after installing
your appliance and especially after
rehingeing the door, the door seal
seals right round. An untight door seal may lead to heavy frosting and a
higher power consumption (see also "Something not working“).
Appliance Alignment
0The appliance level please compensate for unevenness in the floor by
turning the two adjustable feet at the front.

Installation
818 1701-00/7 11
Electrical Connection
Any electrical work required to install this appliance should be carried
out by a qualified electrician or competent person.
1WARNING – THIS APPLIANCE MUST BE EARTHED
The manufacturer declines any liability should these safety measures
not be observed.
Before switching on, make sure the electricity supply voltage is the
same as that indicated on the appliance rating plate. The rating plate is
inside, on the left.
The appliance is supplied with a 13 amp plug fitted. In the event of
having to change the fuse in the plug supplied, a 13 amp ASTA appro-
ved (BS 1362) fuse must be used.
Important
The wires in the mains lead are coloured in accordance with the follow-
ing code:
Green and Yellow Earth
Blue Neutral
Brown Live
As the colours of the wires in the
mains lead of this appliance may
not correspond with the coloured
markings indentifying the termi-
nals in your plug, proceed as fol-
lows:
1. The wire coloured green and
yellow must be connected to
the terminal marked with the
letter "E“or by the earth sym-
bol or coloured green and yellow.
2. The wire coloured blue must be connected to the terminal "N“or
coloured black.
3. The wire coloured brown must be connected to the terminal marked
"L“or coloured red.
4. Upon completion there must be not cut, or stray strands of wire
present and the cord clamp must be secure over the outer sheat.
1Warning! A cut-off plug inserted into a 13 amp socket is a serious
safety (shock) hazard. Ensure that the cut-off plug is disposed of safely.
Blue
Green
& Yellow
Brown
Cord Clamp

12 818 1701-00/7
Changing Over The Door Hinges
The door hinges can be changed from right (as supplied) to left if requi-
red to suit the location where the appliance is installed.
1Warning! Unplug from the mains, before reversing the door.
0Open the door and remove the
plinth to the front. Move the
door bearing cover on the plinth
from the left to the right.
Close the door
0With the door closed, remove
the cross-head screws from the
lower door bearing and remove
the door bearing downwards.
0Türbeschlag vom Türlager abneh-
men (1, 2). Lagerzapfen von der
rechten in die linke Bohrung
umsetzen (3). Mitgelieferten Tür-
beschlag auf Lagerzapfen aufset-
zen (4, 5).

Changing Over The Door Hinges
818 1701-00/7 13
0Türbeschlag unten rechts aus der
Tür herausnehmen (1). Türlagerab-
deckung von links nach rechts
umsetzen (2). Mitgelieferten Tür-
beschlag unten links in die Tür
einsetzen (3).
Tür vorsichtig nach vorne abneh-
men und beiseite stellen.
0Move the upper bearing pivot to
the left.
0Carefully slide the door onto the
top bearing pivot and close.
0Place the lower door bearing with
the bearing pivot in the lower left
of the door and fasten.

14 818 1701-00/7
0Move the door handle from the
left to the right and cover the
remaining holes with the hole
cover pins.
0Open the door and fit the plinth.
Opening the door
If the door is closed when the appliance is in operation, it cannot be
immediately opened again, because a vacuum occurs which holds the
door closed until pressure has been equalised. The door can be opened
again after several minutes.
If your appliance is equipped with a
QUICK door opener - an opening
mechanism integrated into the door
handle - the door can be opened
easily at any time.

818 1701-00/7 15
Appliance Description
View of Appliance
(various models)
Control panel
Butter and cheese compartment with lid
Door storage compartments
Variable storage box
Bottle compartment
Fruit and vegetable drawers
Shelves
Bottle rack
General purpose box
Rating plate

Appliance Description
16 818 1701-00/7
Control Panel
1 ON/OFF indicator light (green)
2 ON/OFF button
3 Temperature display
4 Buttons for adjusting the temperature
5 FAST CHILL indicator light (yellow)
•FAST CHILL for intensive cooling in the refrigerator
6 FAST CHILL button
Buttons for Adjusting the Temperature
The temperature is adjusted using the
„+“(WARMER) and „-“(COLDER) buttons.
These buttons are connected to the temperature display.
•The temperature display is switched over from the display of the
ACTUAL temperature (one light illuminated) to the display of the
DESIRED temperature (one light flashing) by pressing one of the two
buttons, „+“(WARMER) or „-“(COLDER).
•With each further press of one of the two buttons, the DESIRED tem-
perature is adjusted by one display field.
•If neither button is pressed, the temperature display automatically
switches back after a short period (approx. 5 sec.) to the display of
the ACTUAL temperature.
DESIRED temperature means:
The temperature that is required in the freezer compartment, this can
be adjusted to the temperatures shown in the display. The DESIRED
temperature is indicated by a flashing light.
ACTUAL temperature means:
The temperature display indicates the temperature that is currently
present in the freezer compartment. The ACTUAL temperature is indica-
ted by a continuously illuminated light.

818 1701-00/7 17
Temperature Display
The temperature display can indicate several pieces of information.
•During normal operation, the temperature currently present in the
refrigerator (ACTUAL temperature) is displayed, the corresponding
light illuminates.
•If the temperature in the refrigerator is warmer than the display
range of the temperature display, all the lights in the temperature
display are extinguished.
•If the temperature in the refrigerator is colder than the display range
of the temperature display, then the light for the lowest temperature
(+2) continues to illuminate.
•When the temperature is being adjusted, the temperature currently
set flashes (DESIRED temperature).
•If there is a malfunction in the appliance that prevents the tempera-
ture from being further measured, all the lights on the temperature
display flash.
Prior to Initial Start-Up
1Before connecting the appliance to the mains and putting it into ope-
ration for the first time, leave the appliance to stand for 30 minutes if
was transported upright. After transport on its side, the appliance must
be left to stand for 4 hours before putting it into operation. This is
necessary to allow the oil to flow back into the compressor. Otherwise
the compressor may be damaged.
0Please clean the appliance interior and all accessories prior to initial
start-up (see section: "Maintenance and Cleaning").

18 818 1701-00/7
Initial Start-Up
0Insert plug into mains socket.
0Press ON/OFF button.
The green power indicator lights up.
0Set the refrigerator to the desired temperature (see section: "Tempera-
ture Adjustment").
3Goods to be refrigerated can be loaded immediately after switching on,
because the storage temperature in the refrigerator is quickly reached.
Temperature Adjustment
With the buttons for temperature adjustment the desired temperatures
in the refrigerator can be adjusted.
0Press either the „+“(WARMER) or „-“(COLDER) button.
The temperature display switches over and the DESIRED temperature
currently set flashes on the temperature display.
0To adjust to a warmer temperature, press the „+“button. To adjust to a
colder temperature, press the „-“button. The changed setting is imme-
diately displayed on the temperature display.
The temperature is adjusted by one display field with each press of a
button.
Note: From a food science point of view, +5 °C for the refrigerator
compartment should be considered cold enough as a storage tempera-
ture.
3When the buttons are not further pressed after an adjustment has been
made, after a short period (approx. 5 sec.) the temperature display swit-
ches over and again displays the ACTUAL temperature in the refrigera-
tor. The display changes from flashing to continuous illumination.

818 1701-00/7 19
FAST CHILL
The FAST CHILL function is suited for quick cooling of large
quantities of goods in the refrigerator, e.g. drinks and
salads for a party.
0The FAST CHILL function is switched on by pressing the FAST CHILL but-
ton. The yellow light illuminates.
The FAST CHILL function now provides for intensive cooling. A DESIRED
temperature of +2¯C is automatically selected. The FAST CHILL function
is ended automatically after a period of 6 hours. The originally selected
DESIRED temperature is again valid. The temperature display shows the
ACTUAL refrigerator temperature.
0The FAST CHILL function can be ended manually at any time by pressing
the FAST CHILL button again. The yellow light goes out.
Switching the Appliance Off
0To switch off, press the ON/OFF button until the mains power light
extinguishes.
Note:
The appliance cannot be switched on or off if unplugged, or if there is
no power being supplied to it.
Following connection to the mains power supply, the appliance returns
to the same operating state as before the interruption of main power.
If the appliance is to be removed from service for a lengthy period:
0Switch off the appliance, to do this press the ON/OFF button until the
mains power light extinguishes.
0Remove the mains plug or switch off.
0Clean the appliance thoroughly (see section: "Maintenance and Cle-
aning").
0Leave door open to avoid accumulation of odours.

20 818 1701-00/7
Interior Accessories
Storage Shelves
0A storage shelf must be inserted into the lower guide track above the
fruit and vegetable trays. It must always remain in this position, so that
fruits and vegetables remain fresh longer.
The remaining storage shelves can
be adjusted to various heights:
0Pull the storage shelf forward until
it can be tipped up or down and
removed.
0To insert at a different height use
the same procedure in reverse.
Adjustment for tall items:
0Remove the front half of the two-
part vario glass storage shelf and
insert it at a different level. Space is
then gained for storage of tall items
on the storage shelf below.
Bottle rack
Place bottles in the rack with the
bottleneck to the front.
Important: Only store unopened
bottles horizontally.
The bottle rack can be tilted for
storing opened bottles.
Other manuals for OKO_SANTO SUPER
2
Table of contents
Other AEG Refrigerator manuals

AEG
AEG AC3801 User manual

AEG
AEG SANTO K 9 10 00-6i User manual

AEG
AEG SKE818E1DS User manual

AEG
AEG S94400CTM0 User manual

AEG
AEG SKS58800S1 User manual

AEG
AEG SKS58200F0 User manual

AEG
AEG SANTO Z 9 12 03-6i User manual

AEG
AEG SKE81811DC User manual

AEG
AEG SFE6881VAS User manual

AEG
AEG 210621236-11052010 User manual

AEG
AEG NSF6I82EF User manual

AEG
AEG S33400CSS0 User manual

AEG
AEG S76010CMX2 User manual

AEG
AEG S43300KDW0 User manual

AEG
AEG SANTO 70398-DT User manual

AEG
AEG SANTO User manual

AEG
AEG SCN91800C1 User manual

AEG
AEG SANTO SU96040-5I User manual

AEG
AEG S63800KMW0 User manual

AEG
AEG OKO SANTO 1544-4 User manual