AEI Security & Communications DG180-S User manual

LR150-S
160109-1
xSender
MODEL: DG180-S
Wireless Video Sender System
PLEASE KEEP THIS I STRUCTIO MA UAL FOR FUTURE REFERA CE

DG180-S - Wireless Video Sender System
Please read this instruction manual carefully prior to installationPa e 02
TABLE OF CO TE TS
1. Introduction 3
2. Unpack Your xSender™ 4
3. Install The xSender™ Transmitter 5
4. Install The xSender™ Receiver 7
5. Using the xSender™ 8
6. AV Channel Settings 9
7. Troubleshooting: Picture Problems 10
8. Troubleshooting: Audio Problems 12
9. Troubleshooting: Remote Relay Problems 13
10. Technical Support 14
11. Upgrades & Accessories 15
12. Rear Panel Descriptions 16
INTERFERENCE WARNING
This device is liable to receive interference signals generated by Spread
Spectrum LA and stray microwave emissions from some Microwave
Ovens. Such interference will cease after the interfering equipment has
been switched off.
WAR I G
To prevent damage do not
expose this unit to rain or
moisture.

Please read this instruction manual carefully prior to installation Pa e 03
DG180-S - Wireless Video Sender System
I TRODUCTIO
Congratulations on purchasing the xSender™. This product represents state of the art wireless video
technology and exceptional value for money.
You can now enjoy crisp video and hi-fi stereo sound from your Satellite, Freeview, DVD or VCR in
another room in your home.
The xSender™ is designed to work with virtually any video source and is an ideal solution for trans-
mitting channels from a typical home entertainment environment.
DG180-S - Wireless Video Sender System
Please read this instruction manual carefully prior to installationPa e 04
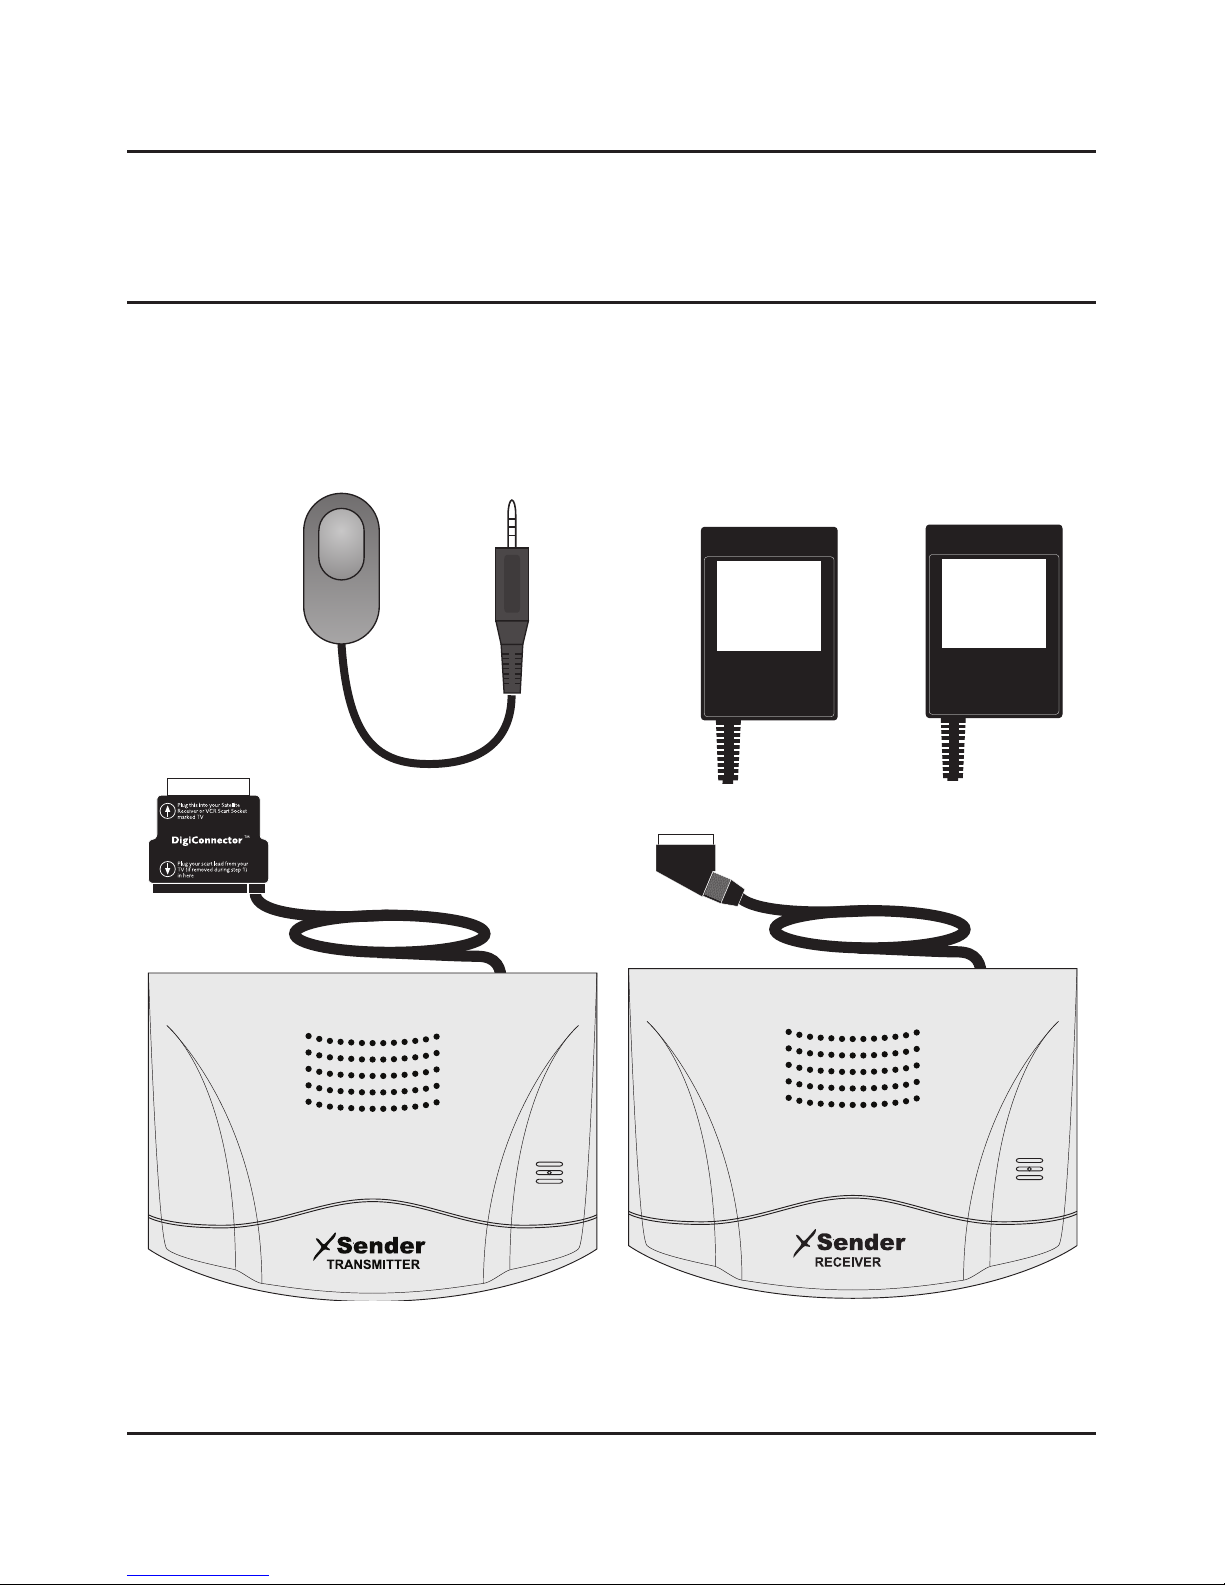
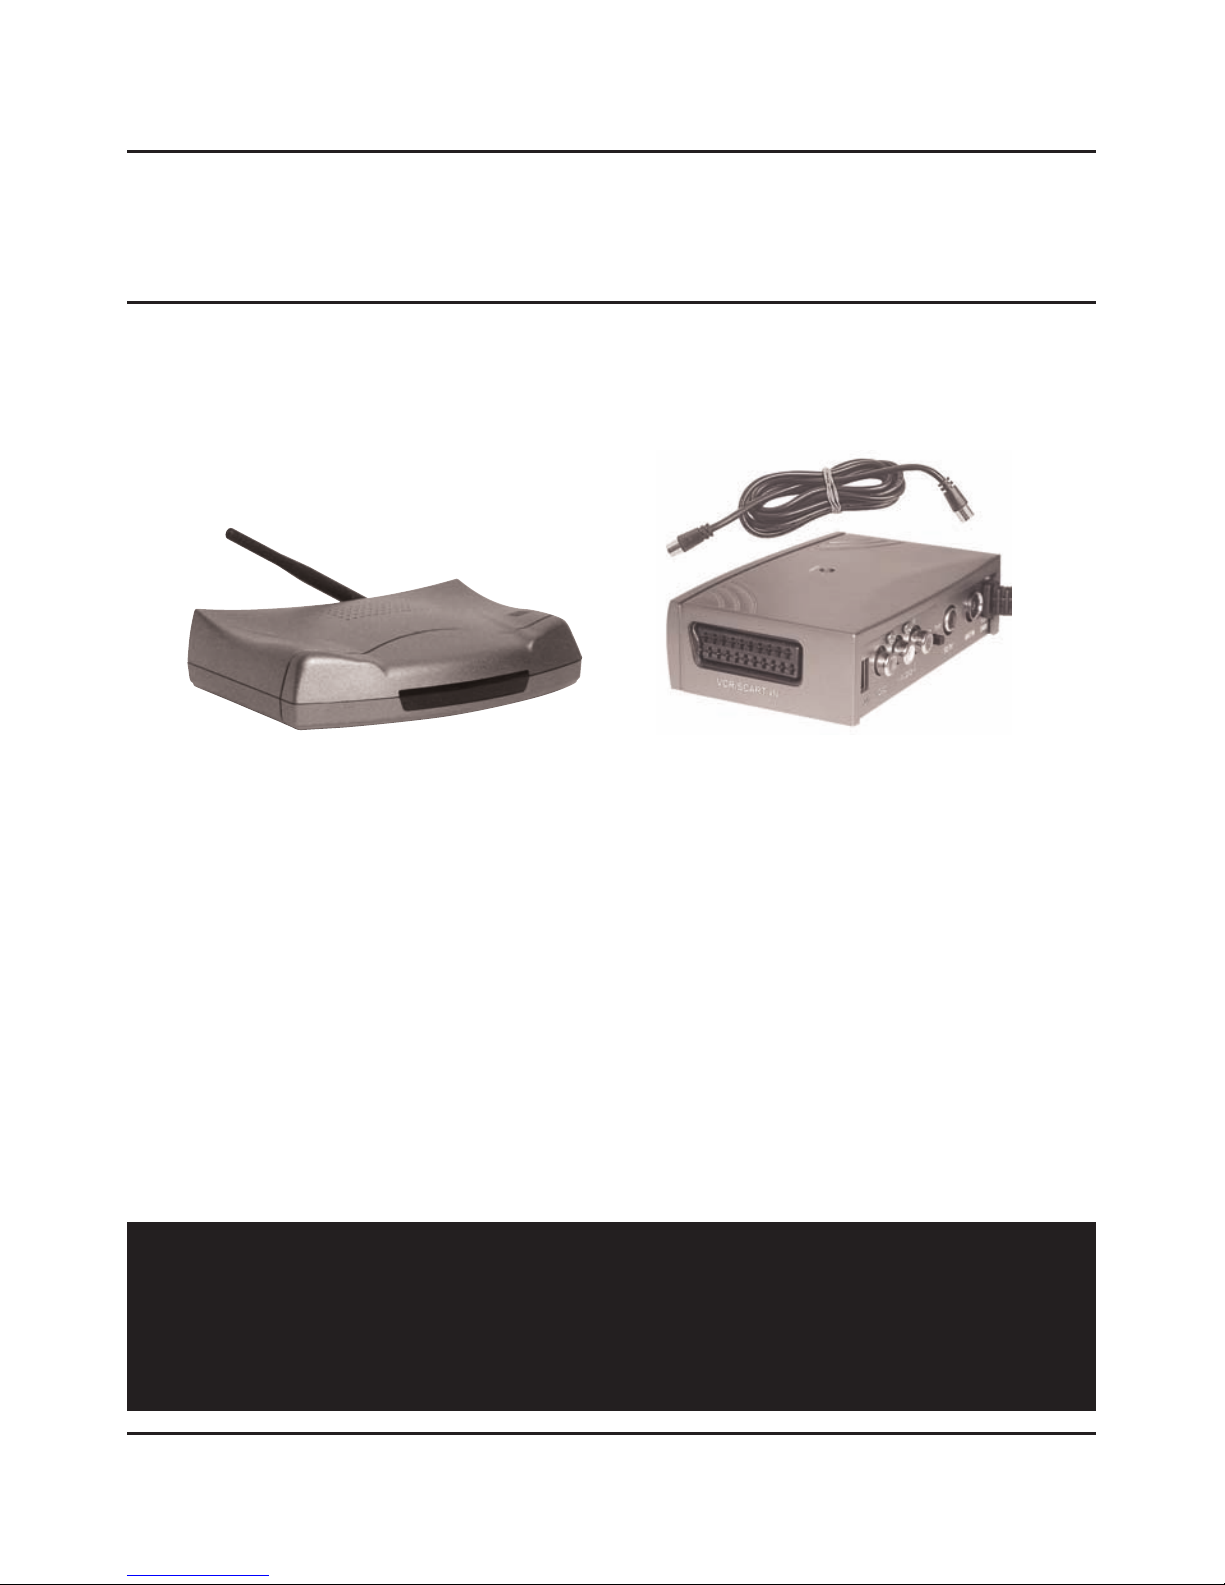
STEP 1
Unpack your xSender™
All packs are computer weigh checked when packed. However, it is a good idea to check all kit con-
tents are present before proceeding with the installation.
Receiver
Transmitter
agic Eye 2 x Power Supply
Please read this instruction manual carefully prior to installation Pa e 05
DG180-S - Wireless Video Sender System
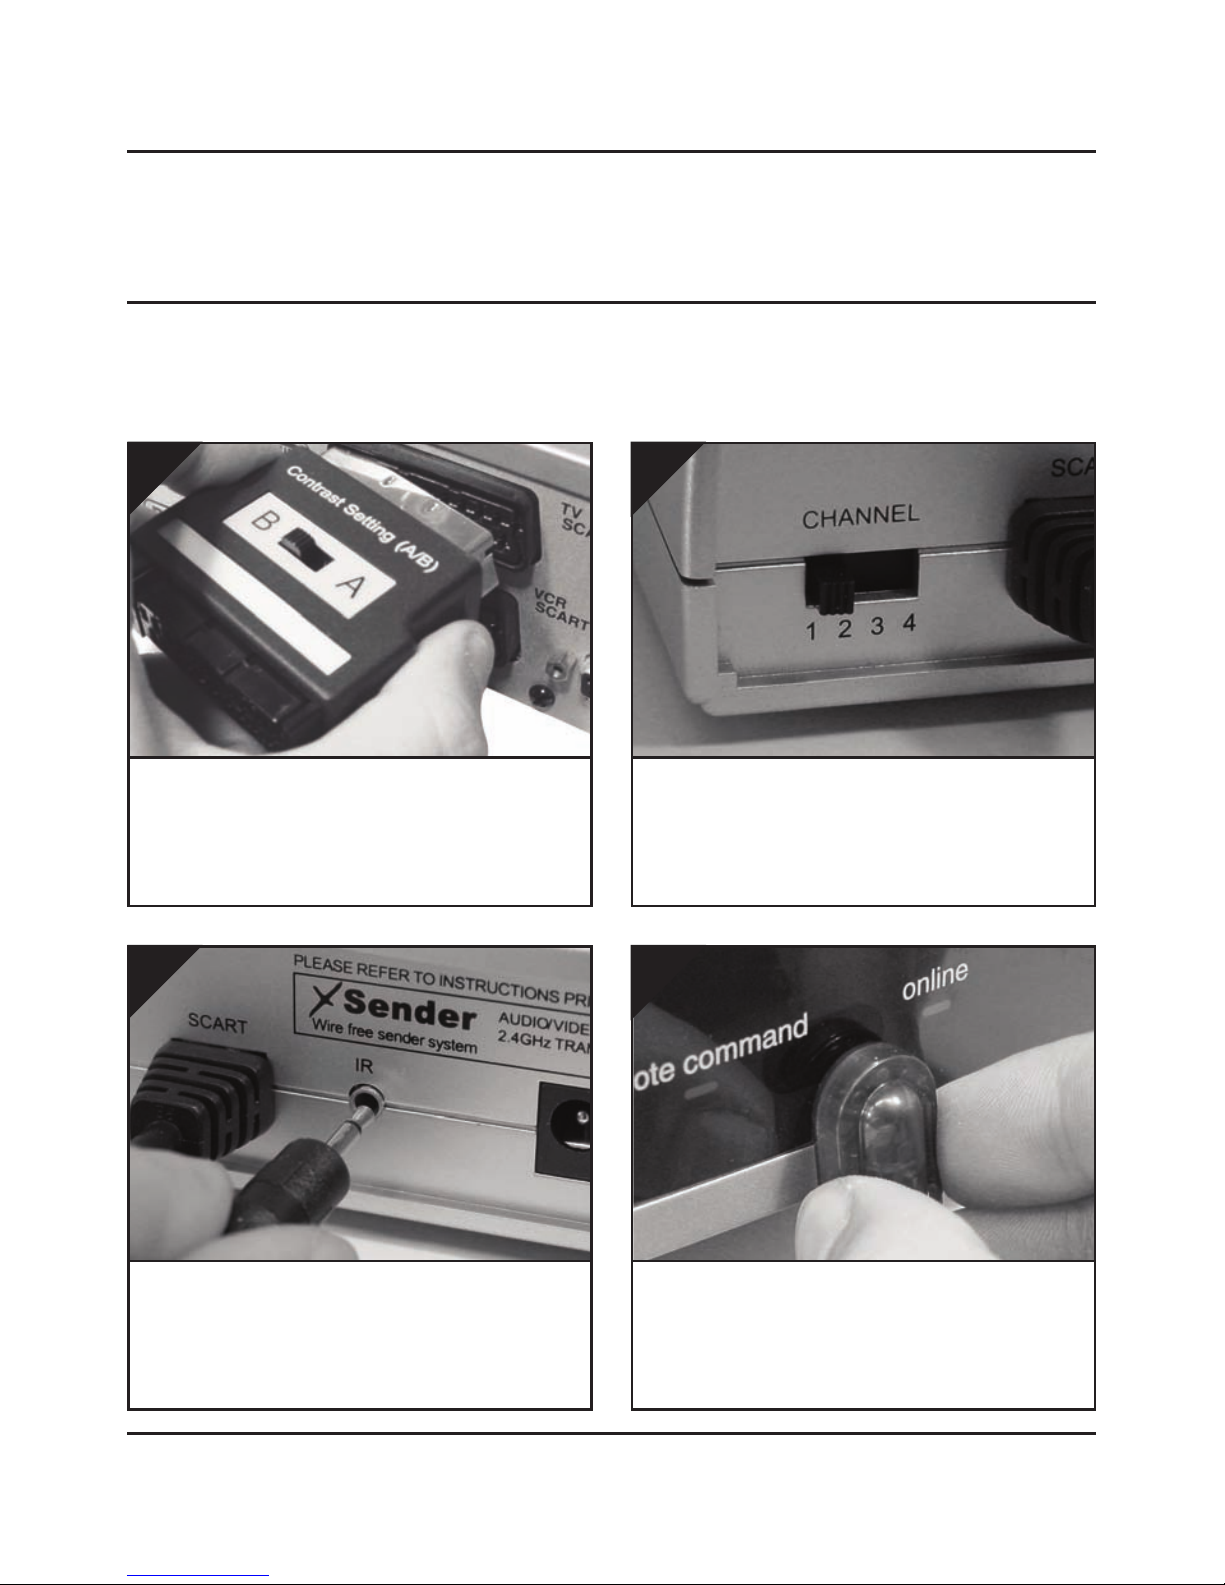
STEP 2
Install the xSender™ Transmitter
Connect the IR Emitter to the socket labelled IR
on the back of the DG180-S Transmitter.
3.
Insert the DigiConnector™ into the SCART socket
labelled ‘TV’ or ‘OUT’ on your source equipment
(Satellite, Freeview, DVD, VCR, etc.) and plug the
SCART cable leading to your TV into the back of it.
1.
Ensure that the A/V Channel switch on the back
of the DG180-S Transmitter is set to 1.
2.
The DG180-S Transmitter will send the sound and video from a connected source (Satellite, Freeview,
DVD, VCR, etc.) to the DG180-S Receiver, located in another room in your home.
Position the IR emitter on or in front of your
source equipment (Satellite, Freeview, DVD, VCR,
etc.) with the LED facing toward the equipments
remote control pick up point.
4.

DG180-S - Wireless Video Sender System
Please read this instruction manual carefully prior to installationPa e 06
continued...
Connect the Power Supply Unit (PSU) to the sock-
et labelled ‘PSU’ on the DG180-S Transmitter.
5.
Connect the Power Supply Unit (PSU) to an avail-
able mains socket.
6.
What’s the A/B switch for??
The Contrast (A/B) switch is present to compen-
sate for differences in equipment set-ups.
Once installation is
complete, if you
experience a poor
picture try
adjusting the
A/B setting.
Important Note: Avoid positioning the DG180-S ransmitter near to other wireless devices operating on
2.4GHz. hese can include Wireless Routers, Laptops, Games Consoles, DEC Phones or Bluetooth devices.

Please read this instruction manual carefully prior to installation Pa e 07
DG180-S - Wireless Video Sender System
STEP 3
Install the xSender™ Receiver
The xSender™ Receiver will pick up the signals being sent by your xSender™ Transmitter and out-
put them to a connected TV.
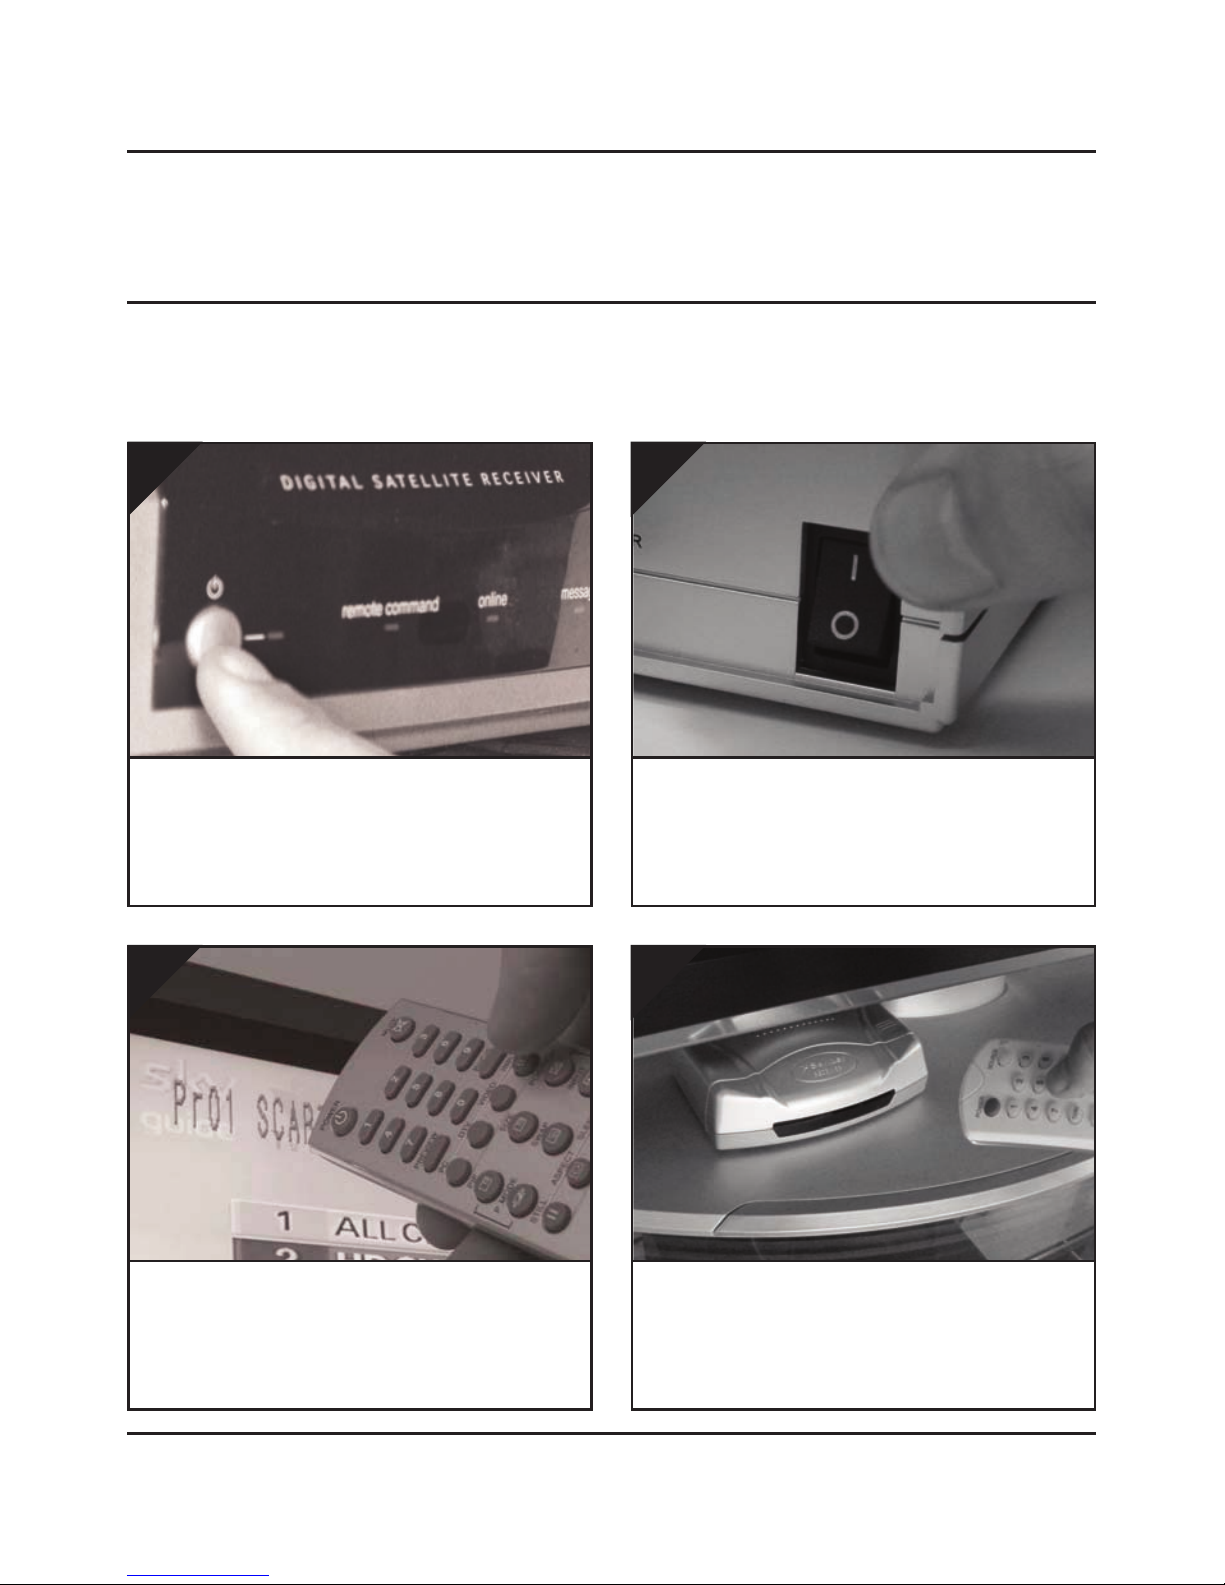
Connect the Power Supply Unit (PSU) to the sock-
et labelled ‘PSU’ on the DG180-S Receiver.
3.
Locate a vacant SCART socket on the back of your
receiving TV and insert the DigiSender® SCART
cable.
1.
Ensure that the A/V Channel switch on the back
of the DG180-S Receiver is set to 1.
2.
Connect the Power Supply Unit (PSU) to an avail-
able mains socket.
4.
DG180-S - Wireless Video Sender System
Please read this instruction manual carefully prior to installationPa e 08
STEP 4
Using the xSender™
To control your source equipment, use its origi-
nal remote control i.e. your Satellite remote,
Freeview remote, DVD remote, VCR remote, etc.,
while pointing it at the xSender™ Receiver.
4.
Switch on the source equipment (Satellite,
Freeview, DVD, VCR, etc.).
1.
Switch on the xSender™ Transmitter and
Receiver at the rear of the units.
2.
On the receiving TV, select the SCART channel
assigned to the SCART socket that you plugged
the DG180-S Receiver in to. This may be labelled
as SCART, AUX, AV, VIDEO, VCR or .
3.

Please read this instruction manual carefully prior to installation Pa e 09
DG180-S - Wireless Video Sender System
A/V Channel Settings
The xSender™ features 4 Audio/Video Channels. Each of these A/V Channels changes the frequen-
cy on which the xSender™ operates and is useful for when other wireless devices are present in your
home. Because the A/V Channel switch allows you to ‘fine tune’ the frequency on which your
xSender™ operates, it is possible to overcome most interference and reception troubles that may
occur.
For your xSender™ to function correctly it is very important that the A/V Channel is set the same on
both the Transmitter and Receiver.

DG180-S - Wireless Video Sender System
Please read this instruction manual carefully prior to installationPa e 10
TROUBLESHOOTI G
Picture Problems
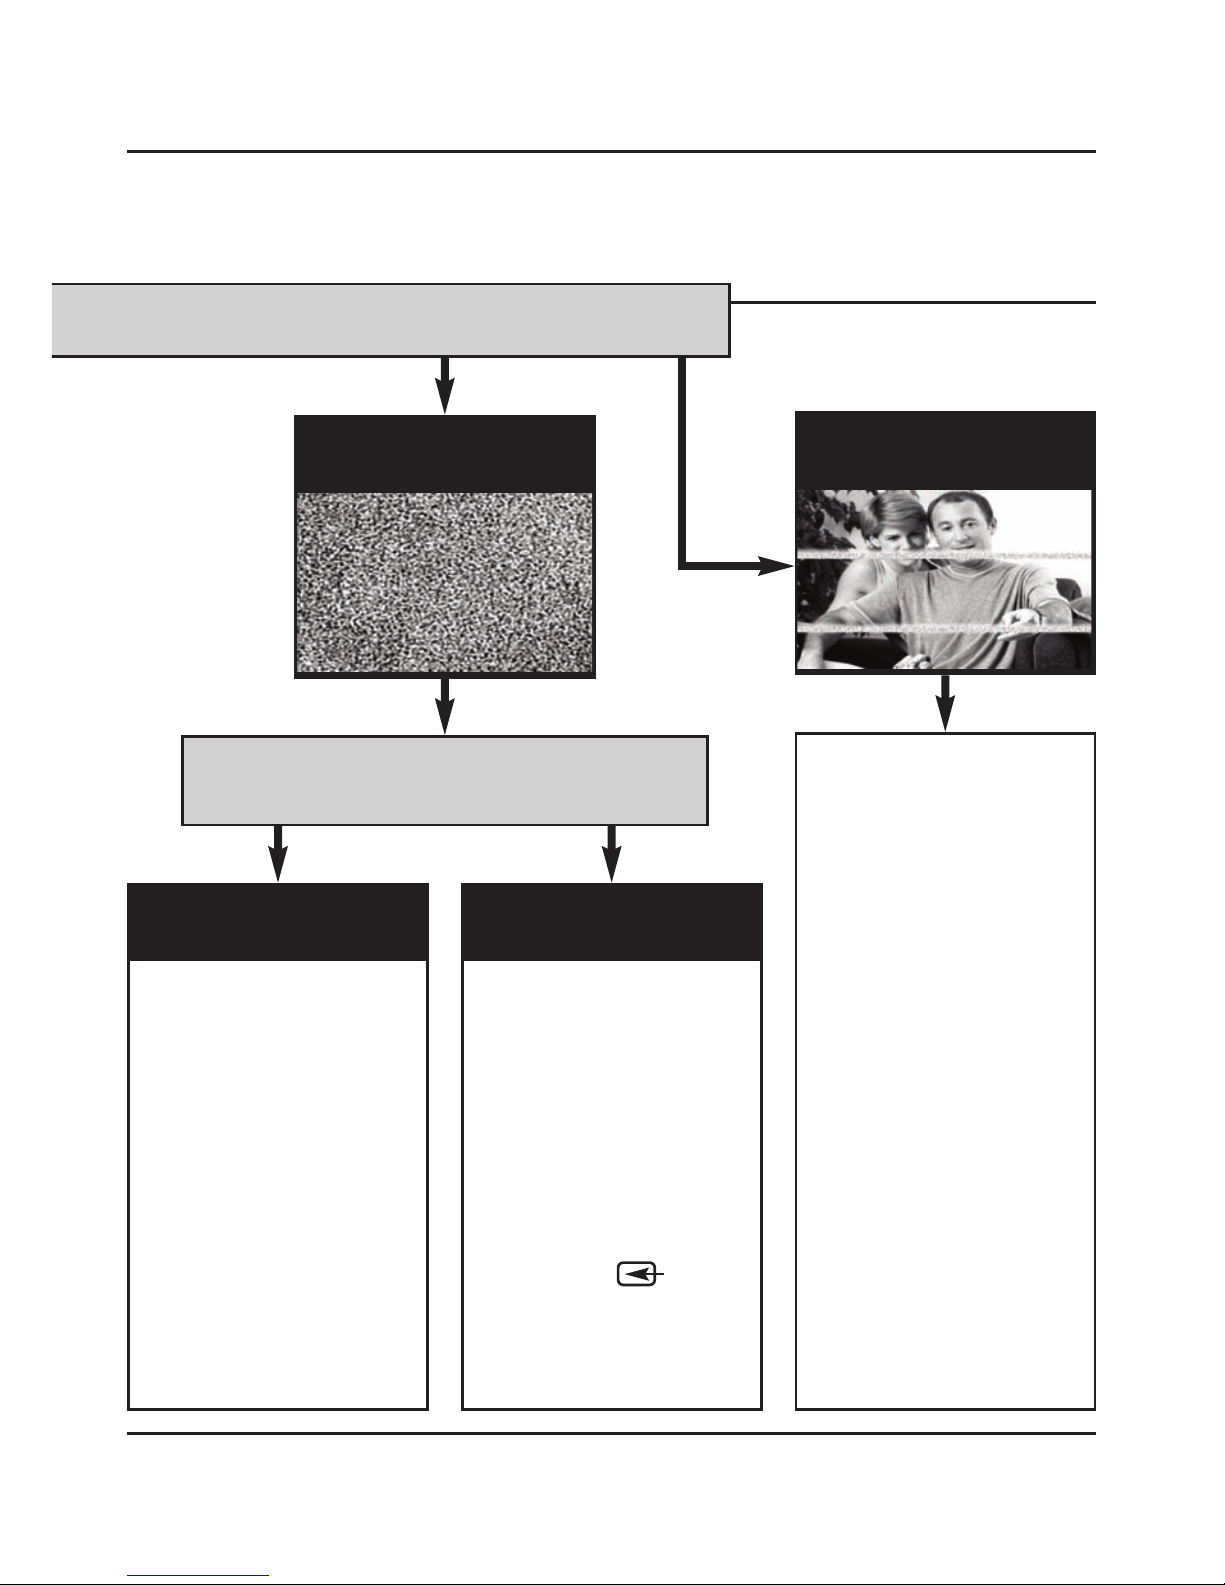
Q: What do you see on your second telev s on?
he picture is present but
poor quality
I still see a Black Screen...
WRONG AV CHAN-
NEL SELECTED
1. Switch the transmitter back
on.
2. Ensure the correct SCAR
channel is selected on your sec-
ond television. Some televisions
feature multiple AV channels for
one or more SCAR , phono and
S-Video inputs.
3. If available try another SCAR
socket on the remote television
POOR RANGE
1. he picture & sound quality is
affected by the transmitter and
receiver’s location. ry position-
ing them in different locations.
he transmitter and receiver
must be connected to a mains
extension lead that can be
moved.
2. ry the 3 other available chan-
nels ensuring that the
audio/video channel is set to the
same on both the transmitter
and receiver
3. Ensure the units are within
the usable range, normally this
would be 40m when passing
through 2 average internal
walls. hicker or stone/granite
walls may lower the usable
range of this device.
RECEIVING BLANK
SIGNAL
1. Switch the transmitter on.
2. Ensure the transmitter is con-
nected to your source device.
3. Ensure that the source equip-
ment is switched on (such as
your satellite or freeview box)
I now see a snowstorm or
blue screen...
I see black or blank screen
Switch OFF your DigiSender® TRANSMITTER
What do you now see at the second TV?
Please read this instruction manual carefully prior to installation Pa e 11
DG180-S - Wireless Video Sender System
cont...
I see a snowstorm effect or
plain blue screen
Switch OFF your DigiSender® RECEIVER.
Q: What do you now see at the second TV?
I see lines over the picture
NOT RECEIVING
SIGNAL
1. Switch the DigiSender®
Receiver back on
2. Ensure the DigiSender®
ransmitter is switched on
3. Select a different audio/video
channel ensuring an identical
channel is chosen on both the
transmitter and receiver
4. Switch off any wireless cam-
eras and/or networks in your
household.
I now see a Black screen
WRONG TV
CHANNEL SELECTED
his indicates the SCAR
Channel has NO been selected
on the second television. Look
for buttons on this televisions
remote control which could
select the AV Channel such as
EX , AV, VIDEO, VCR, AUX,
Channel 0 AND .
I still see a snowstorm or
blue picture
INTERFERENCE
his indicates one or more elec-
trical devices are interfering
with the DigiSender®. o ascer-
tain the source of the interfer-
ence, switch OFF any wireless
networking equipment, laptops,
2.4GHz DEC phones, games
consoles or bluetooth devices.
ry all 4 audio/video channels as
one or more may still be avail-
able. Visit digisender.net or con-
tact our helpline for information
on configuring your equipment
to work together.

DG180-S - Wireless Video Sender System
Please read this instruction manual carefully prior to installationPa e 12
TROUBLESHOOTI G
Audio Problems
Q: What seems to
be the problem
w th the sound?
I can see the picture but
can’t hear anything.
he sound is distorted.
here is a buzzing sound
present. It seems to get
worse during on-screen
menus or bright pictures.
1. Disconnect both the transmitter
AND receiver SCAR ’s. Reconnect
the leads ensuring they are pushed
into the sockets firmly.
2. If you are using a home cinema
DVD player with surround sound,
please ensure the analogue audio
output on SCAR is switched on.
urn down the volume on the source
device such as your satellite/cable
receiver or DVD player.
Change the Contrast A/B setting on
the transmitter DigiConnector™ con-
nected to the offending equipment.
here is a hissing sound
and the volume must be
turned up high on the
second V to hear any-
thing.
1. urn the output volume UP (if
possible) on the source equipment,
such as your satellite/cable receiver
or DVD player.
2. Ensure the transmitter and receiv-
er are within the usable range (40m
avg)
3. Switch off your microwave oven if
present.
Please read this instruction manual carefully prior to installation Pa e 13
DG180-S - Wireless Video Sender System
TROUBLESHOOTI G
Problems Controlling the Source Equipment
If you have any d ff culty operat ng your source equ pment remote control n your second room
please follow the adv ce below below:
1) Ensure the IR Emitter is connected to the socket labelled ‘IR’ on the xSender™ Transmitter.
2) Ensure you are using the correct remote control in the second room. For instance, if you are try-
ing to control your Satellite Receiver you will need to use the Satellite remote control.
3) Ensure the IR Emitter is facing the Infra Red remote control pick up point on your source equip-
ment.
4) ove the IR Emitter further away from the source equipment.
5) ove the xSender™ Transmitter AND xSender™ Receiver further away from other electrical
devices.
6) Try operating your source remote control closer to the xSender™ Receiver.
7) Replace the batteries in your source remote control.

DG180-S - Wireless Video Sender System
Please read this instruction manual carefully prior to installationPa e 14
Technical Support
AEI Security & Communications Ltd is dedicated to providing our customers with first class customer
care and technical support.
We have provided you with 2 methods of obtaining technical advice on this product.
During busy periods we would suggest using the web option to obtain support.
1. On the web...
Free technical advice is available online 24/7 at our dedicated support web site:
http://www.aei.eu
2. By telephone...
We have a dedicated helpline, onday to Friday, 9A - 5P .
Please note that calls are charged at the local rate and your call may be recorded for training pur-
poses.
UK Customers only:
0845 166 7940
Overseas Customers:
+44 (0) 1797 226123
Please read this instruction manual carefully prior to installation Pa e 15
DG180-S - Wireless Video Sender System
Upgrades & Accessories
Add t onal Rece ver - Part DG20RX
• Get your Satellite channels to additional
TV’s in your home!
• Add as many Receivers as you require to
your DigiSender® system
• Connect to any SCART enabled TV or use
with the OD01PIS Aerial Converter
• Supplied with Power Supply Unit
• Requires DigiSender® Transmitter
Aer al Convertor - Part MOD01PIS
• Connect a DigiSender® Receiver to an
aerial socket on your TV
• Shares the power supply with your
DigiSender®
• Test Card signal for easy set up
• Compatible with every UK television
• Adds the DigiSender® signal to your
existing aerial signal
http://www.digisender.net
for the latest info, upgrades and technical support
DG180-S - Wireless Video Sender System
Please read this instruction manual carefully prior to installationPa e 16
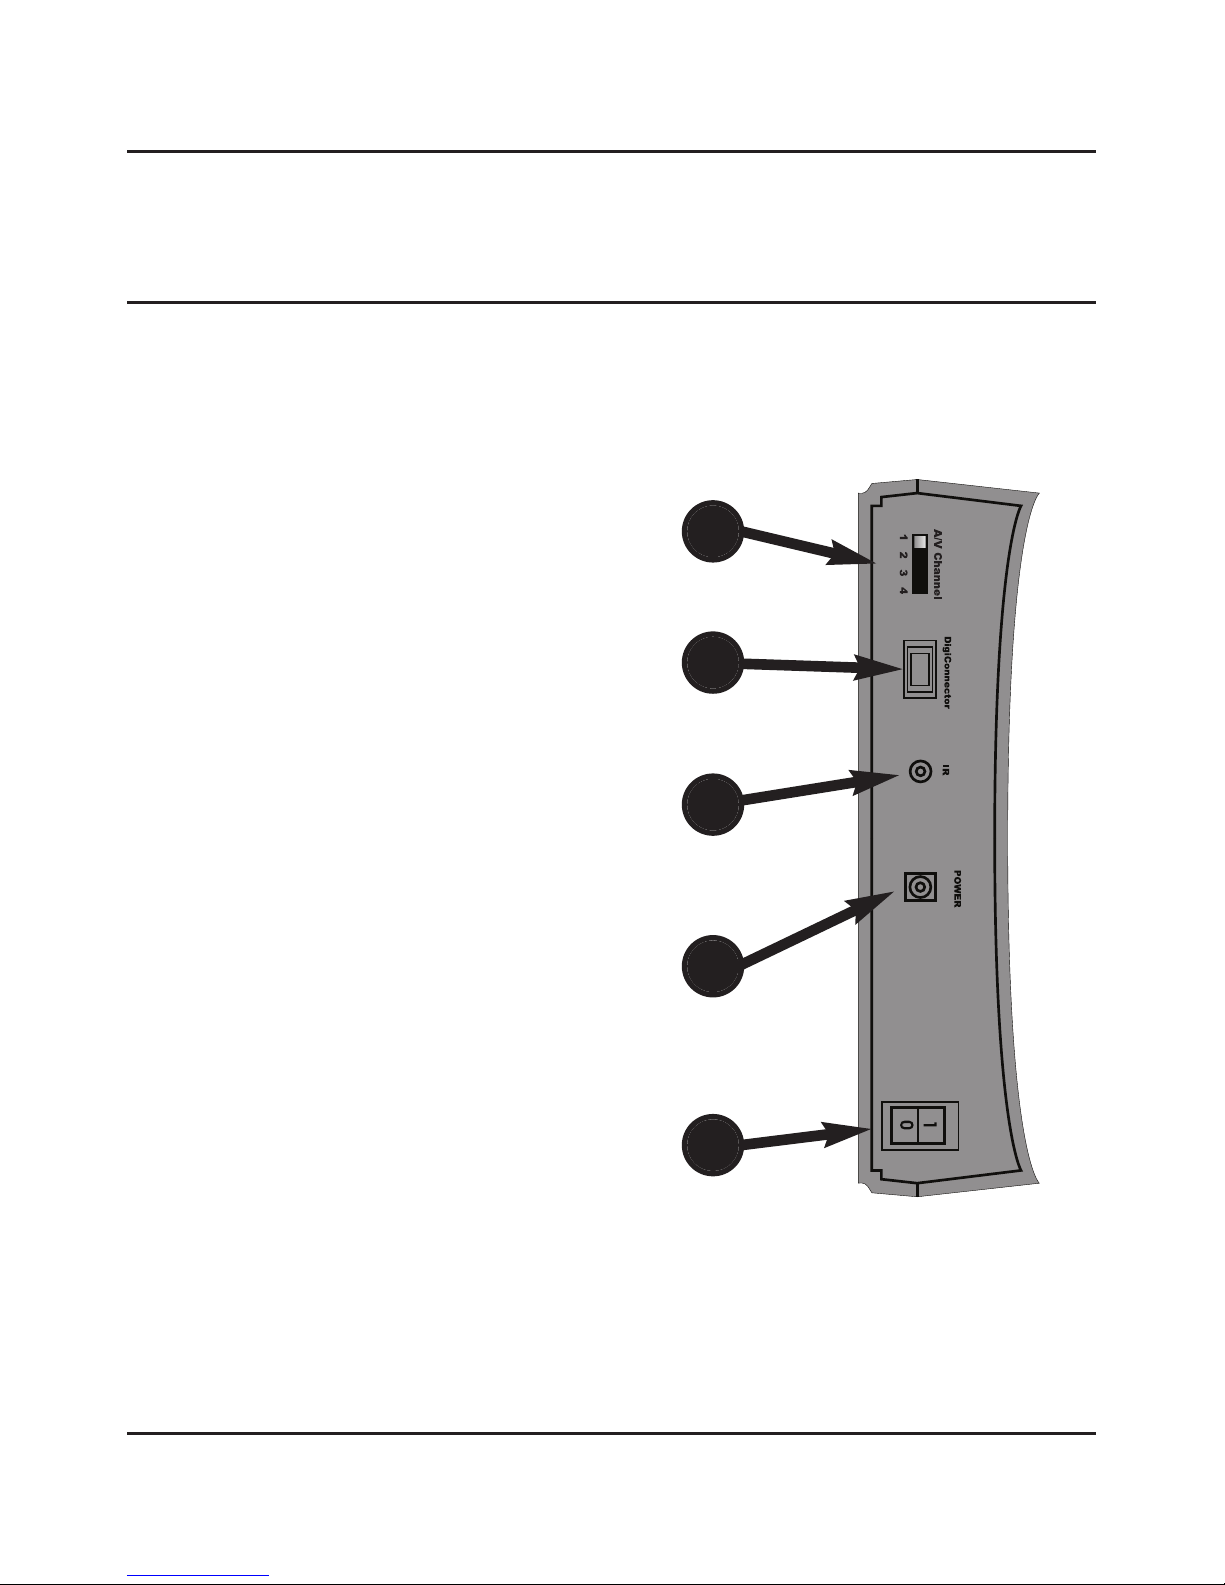
REAR PA EL DESCRIPTIO S
xSender™ Transmitter
1. Audio/Video Channel
Default: Channel 1
See Advanced Section for details.
2. DigiConnector
Connect your satellite or cable here.
3. IR Emitter Output
Connect the supplied IR Emitter here.
4. Power Supply
Connect one of the supplied power
Supply Adaptors here
Figure 6.1 xSender DG180-S ransmitter
5. Power Switch (0/1)
Used to switch ON and OFF your
DigiSender transmitter.
1 2 3 4 5

Please read this instruction manual carefully prior to installation Pa e 17
DG180-S - Wireless Video Sender System
REAR PA EL DESCRIPTIO S
xSender™ Receiver
2. SCART Out
Use this lead to connect to an available
SCART input on your remote television.
3. Power Supply
Connect one of the supplied power
supply adaptors here.
1. Audio/Video Channel
Default: Channel 1
See Advanced Section for details.
Figure 7.1 xSender DG180-S Receiver
4. Power Switch (0/1)
Use this to switch your xSender™
receiver ON or OFF.
1 3 4
2

DG180-S - Wireless Video Sender System
Please read this instruction manual carefully prior to installationPa e 18
otes


©2009 AEI Security & Communications Ltd. All rights reserved.
Registered in England: 02831823
AEI Security & Communications Ltd
Weslake Industrial Park
Rye Harbour Road, Rye
East Sussex
TN31 7TE
United Kingdom
xSender and DigiConnector are trademarks of AEI Security & Communications Ltd.
DigiSender is a registered trademark of AEI Security & Communications Ltd.
SPECIFICATIO S
Transmitter :
Remote Relay Receiver 433.92 Hz
Audio/Video Frequency 2.4000GHz ~ 2.4835GHz
Channel Frequency 2.414GHz - 2.468GHz
odulation F
Video Input Level 1V PP/75Ω
Colour Video Input Phase Alternate Line (PAL)
Audio Input Level 1.0v PP ( od 1KHz, Dev 15KHz)
Audio Bandwidth 10Hz - 22KHz (-1dB)
Input Connectors DigiConnector™ SCART
Power Source DC 9V 300mA Typical
Receiver :
Remote Relay Transmitter 433.92 Hz
Audio/Video Frequency 2.4000GHz ~ 2.4835GHz
odulation F
Video Output Level 1V PP/75Ω
Sensitivity -90dBm
Audio Output Level 1.0V PP ( od 1KHz, Dev 15KHz)
Audio Bandwidth 10Hz - 22KHz (-1dB)
Output Connectors Euro SCART
Power Source DC 9V 300mA Typical)
This manual suits for next models
1
Table of contents


