Aeros SX User manual


sx
USER’ SMANUAL
BESITZERSHANDBUCH

1. INTRODUCTION
SX is a rescue parachute system intended for use by paraglider and hang glider pilots. The system
provides additional safety in flight. Nevertheless, there is no guarantee of 100% safety in emergencies.
Although the SX is perfect for low-speed deployment, any emergency system can be misused, and
therefore become unsafe. At all times use the SX at your own risk. To reduce the risk of unsafe operation
carefully view and understand all aspects of this Manual, properly fold and keep your rescue system.
2. SPECIFICATIONS
3. MAINTENANCE
As your parachute is made of nylon, it is sensitive to ultra violet radiation. The container and the
deployment bag protect the canopy from exposure to direct sunlight. However, for maximum protection,
always store your parachute away from sunlight. Heat can also be destructive for nylon. Although nylon
threads are destroyed at temperature exceeding 150°C, any heat has an ageing effect on the parachute.
Height loss depends upon both horizontal and vertical speed at the moment of deployment.
Size M L XL
Area sq. m 29,5 36 42
Paraglider rescue assembly weight kg 1,7 2 2,3
HG rescue assembly weight kg 2 2,3 2,6
Total payload kg 100 120 140
Type
Canopy construction block/bias
Surface
Rigging lines
Parachute Canopy Shape Pulled Apex
18
Gelvenor Nylon F01-PZ
Cousin Polyamide 2 mm (154 daN)/ 3,3 mm (375 daN)
2

If your parachute becomes damp or wet, you have to open it and hung to dry in a shaded place. If
organically based substances or salt water are spilt on the parachute, wash it with the warm water and a
mild liquid soap. Hand rinses thoroughly and hangs to dry in a shaded place. If organic acids or oils are
spilt on the parachute, you have to treat the contaminated area with a neutralizer.
NOTE: outer bag
Unfold the canopy and
leave it for a week to find out whether permanent damage has been caused by such contamination. If
your parachute needs repair, contact your dealer or the manufacturer.
To ensure the continued serviceability to your parachute, it is necessary to repack it every 120 days.
Unlike a personal parachute used in registered aircraft, or a parachute used for intentional parachute
descents, this equipment does not have to be packed by an authorised person, you can do it yourself.
For this reason, please, read carefully maintenance and packing procedures as detailed in this manual.
4. DEPLOYMENT PROCEDURES
The suggested minimum deployment height is 60-70 metres. However, should there be perfect
horizontal and vertical speed of your paraglider/hang glider at the moment of deployment as well as your
throw strength and direction, the minimum height for successful parachute deployment could be as low
as 30 metres A.G.L. Even if you doubt that your parachute could be helpful, you should deploy it.
4.1. DEPLOYMENT WHEN FLYING A HANG GLIDER
Once you have decided to use your parachute, remove it from the container by pulling the handle and
throw in the direction of least resistance, i.e. away from cables, tubes and the sail of hang glider. If
spinning, throw it in the direction of the spin. If tumbling, wait until the ground can be seen before
throwing. To perform the throw more effectively, grab hold of the hang glider frame with your other hand.
Opening time will depend upon the horizontal and vertical speed. As the landing approaches, behave in
the following way: Do not attempt to stand straight for the landing. Brace yourself against the control bar
so that the "A" frame or another part of the frame would be struck by the ground first. Then during the
destruction of the frame your vertical speed will decrease and you will get softer landing.
Check your arm reach in the prone position before sewing the parachute to the
harness.
4

Make sure you can reach the emergency handle before you permanently fix the parachute to the
harness.
Make sure your choice of position will not interfere with the control bar in all possible flight positions.
You may additionally need to raise the harness by shortening the suspension lines, to enable the
parachute to clear the control bar.
4.2. DEPLOYMENT WHEN FLYING A PARAGLIDER
Once you have decided to use your parachute, remove it from the container by pulling the handle and
throw it up at the angle of 45?. If spinning, throw it in the direction of the spin. If failing, try that again after
you have picked the canopy up. .
For the landing, keep your knees slightly bent, land on both feet and use your leg muscles to absorb the
shock. If necessary, roll over one shoulder in the classic parachutist style.
There are innumerable situations where it may be necessary to use your parachute. To achieve correct
parachute deployment, thoroughly practice operation using the simulator extreme mode prior to actual
use. To save your time in flight, carefully train to grab hold of the emergency handle with your hand.
Before grabbing the handle it is necessary to look at it first, to ensure that your hand finds it easily.
This system must not be used as a sport parachute, and users must be aware that it is intended solely
as an emergency system. Although a test for landing on the firm surface has been carried out, we do not
recommend you to be trained in such mode.
At all times operating the emergency system is the extreme case of emergencies being not entirely
predictable.
Try to through your rescue successfully with force attempt
CAUTION
WARNING
6
5. PACKING INSTRUCTIONS
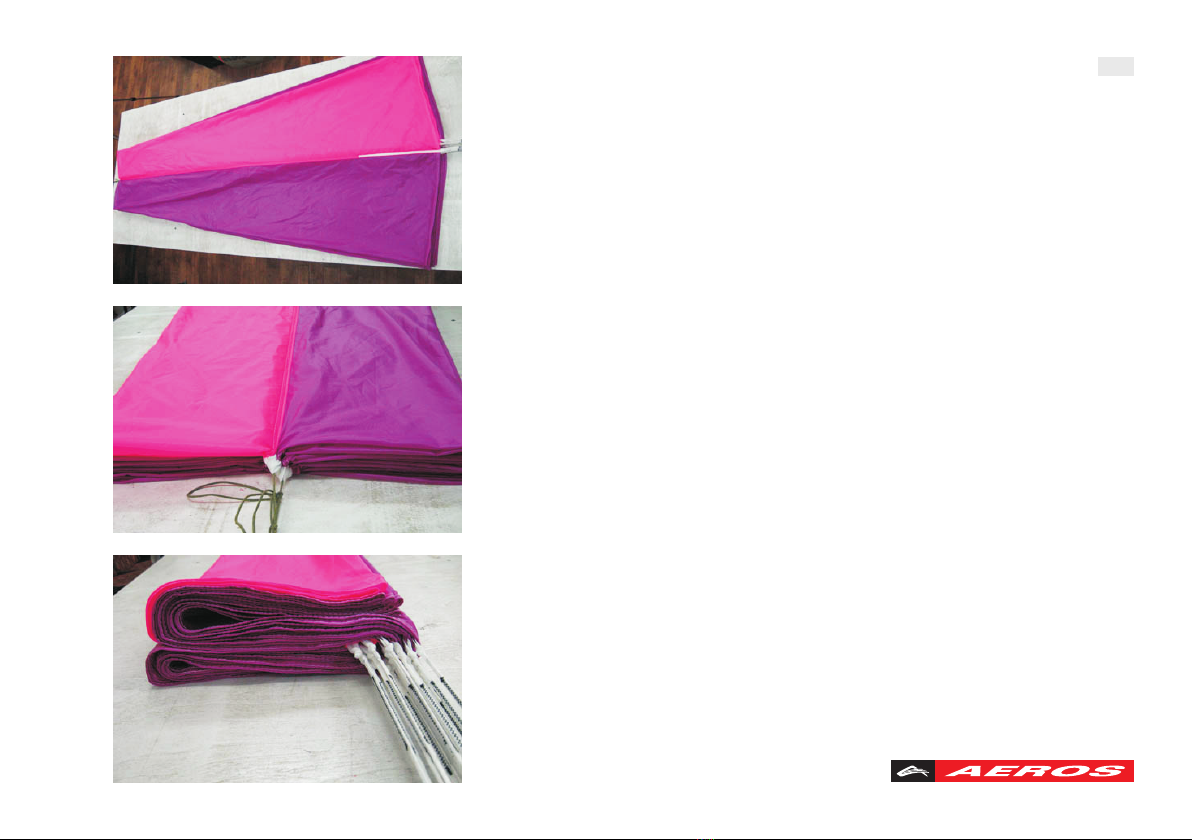
5.1. Lay the canopy on a folding table or another flat and clean surface which is wide and long enough to
unfold the whole canopy and the rigging lines.
5.2. Air out the canopy, make sure that no gores cling to each other. Remove any unwanted material,
grass etc.
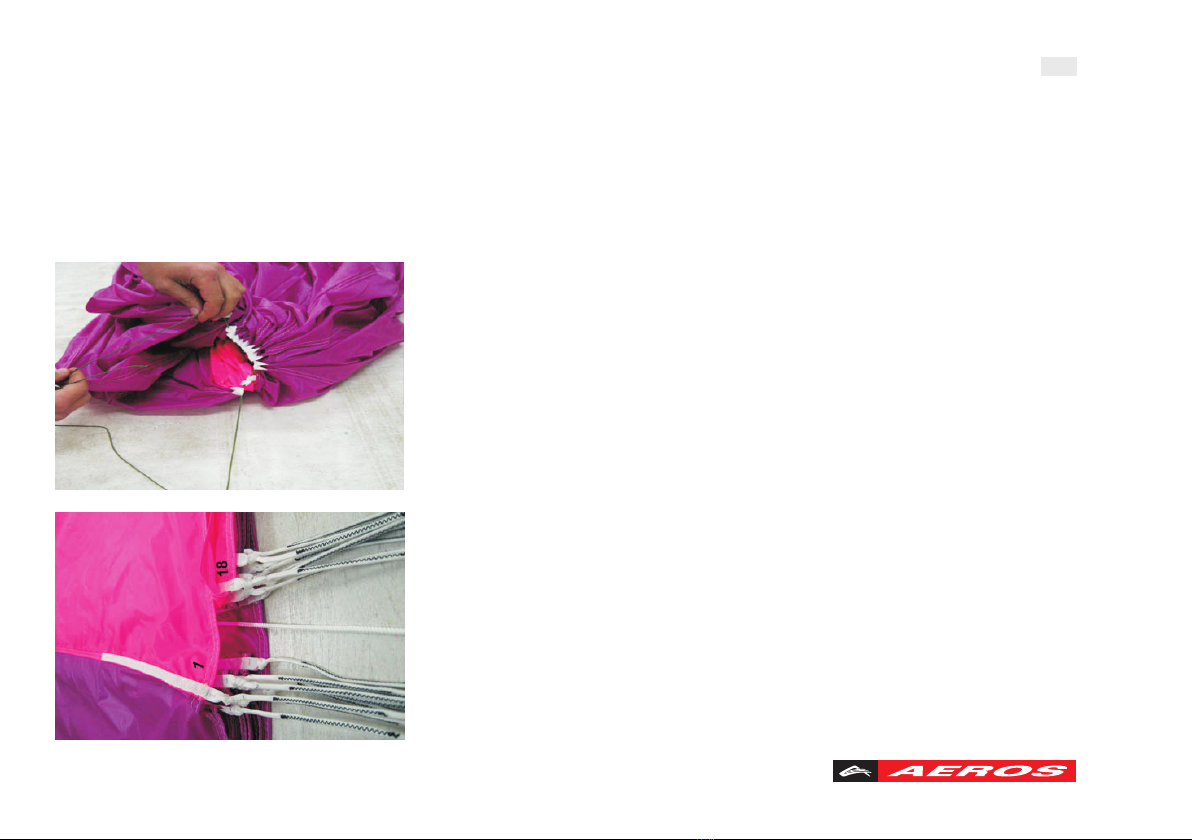
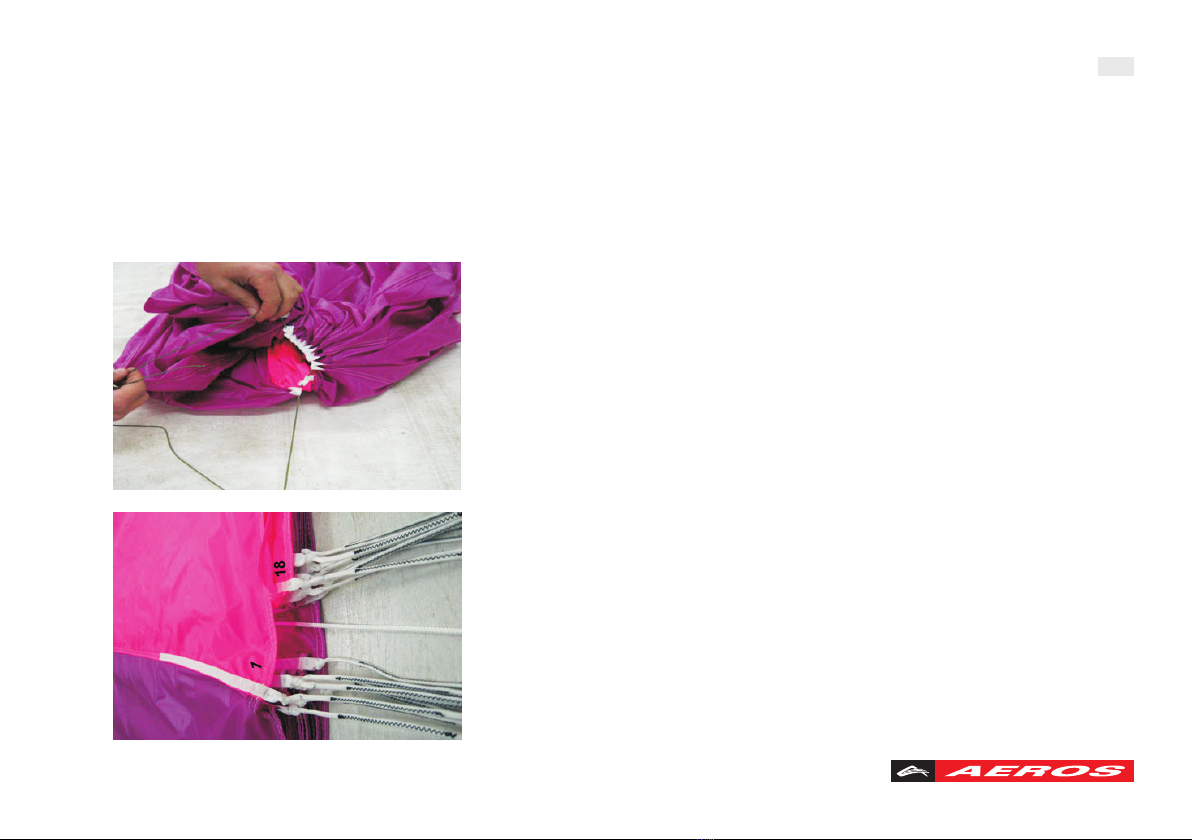
5.3. Insert any spare rope into 18 loops in the middle of the seams
connecting the gores. Attach this rope to any fixed point. Attach
the main bridle to another fixed point, tensioning the rigging lines
until they are straight with a force of approximately 5 kg.
5.4. Place the lines on either side of the pull down line
symmetrically, that is, the lines 1-9 on the left side and the lines
10-18 on the right.
8

5.5. Place the bores identified by the lines 1-2, ... 9 to the left,
and the bores identified by the lines 10, ... 18-1 to the right.
5.6. Make sure that each gore is folded properly and the seams of
each bore are parallel, being straight and slightly tensioned. To
achieve the desired effect you may use little sand bags.
5.7. Join the two groups of lines and the pull down line, making
one group of lines.
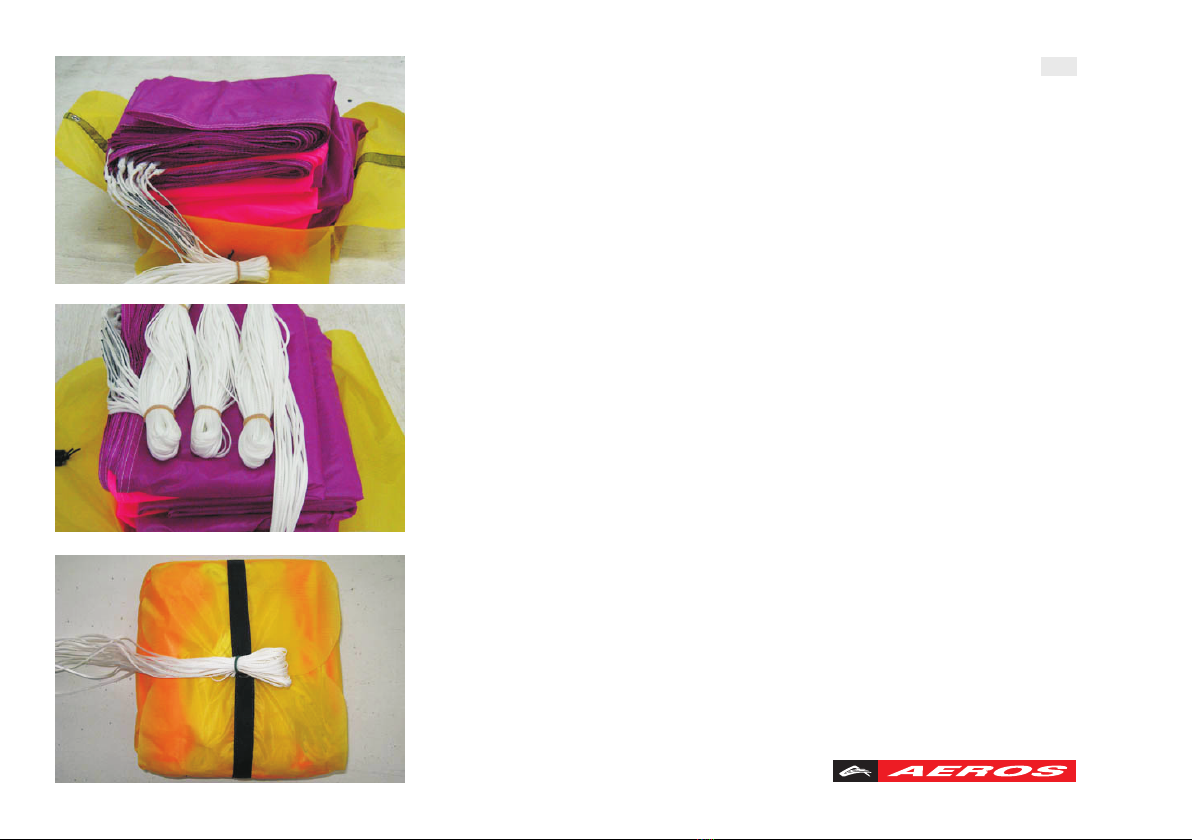
5.8. Fold each gore set as “S”-shape reducing the width of the
gores in this way.
10
5.9.
Reattach the main bridle also.
Reattach the spare rope from the fixed point and
remove it from all loops.
5.10. Group the rigging lines in an S-form along the canopy base.
Fix the lines with six rubber bands.
5.11. S-Fold the beginning from the apex.
12
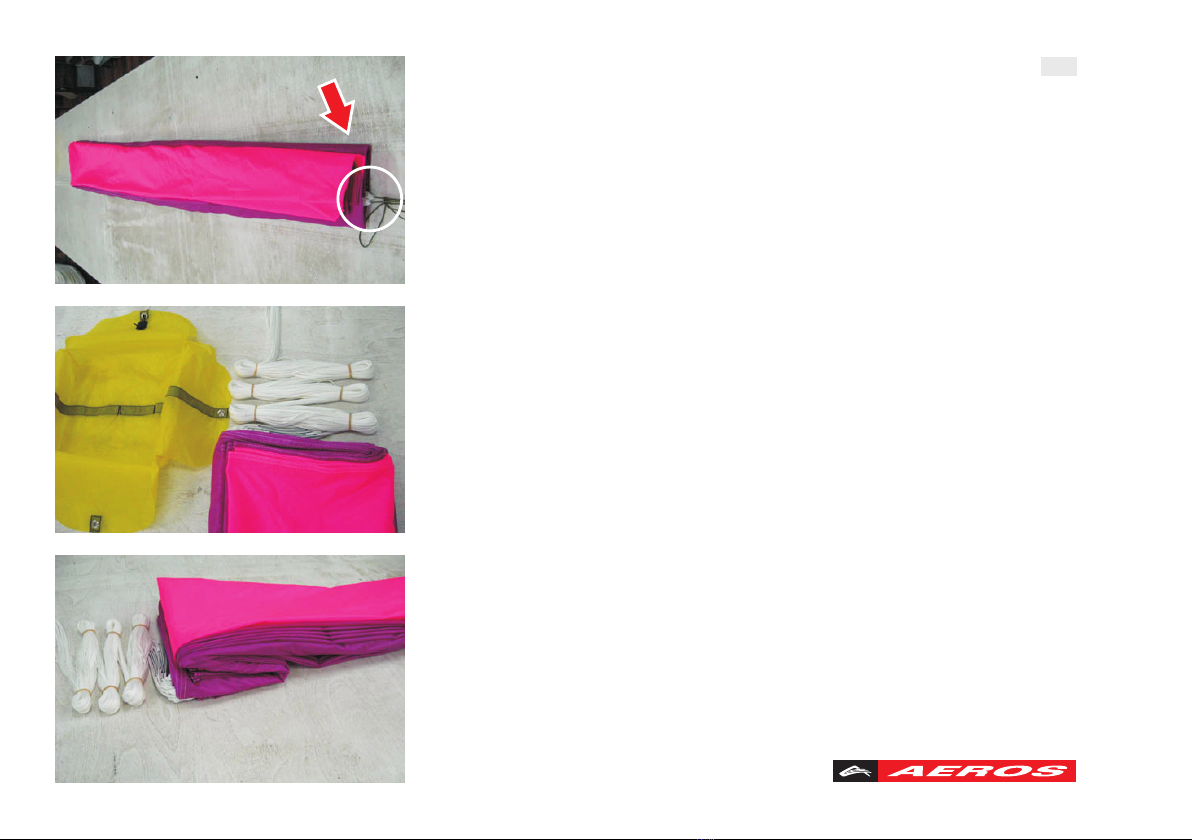
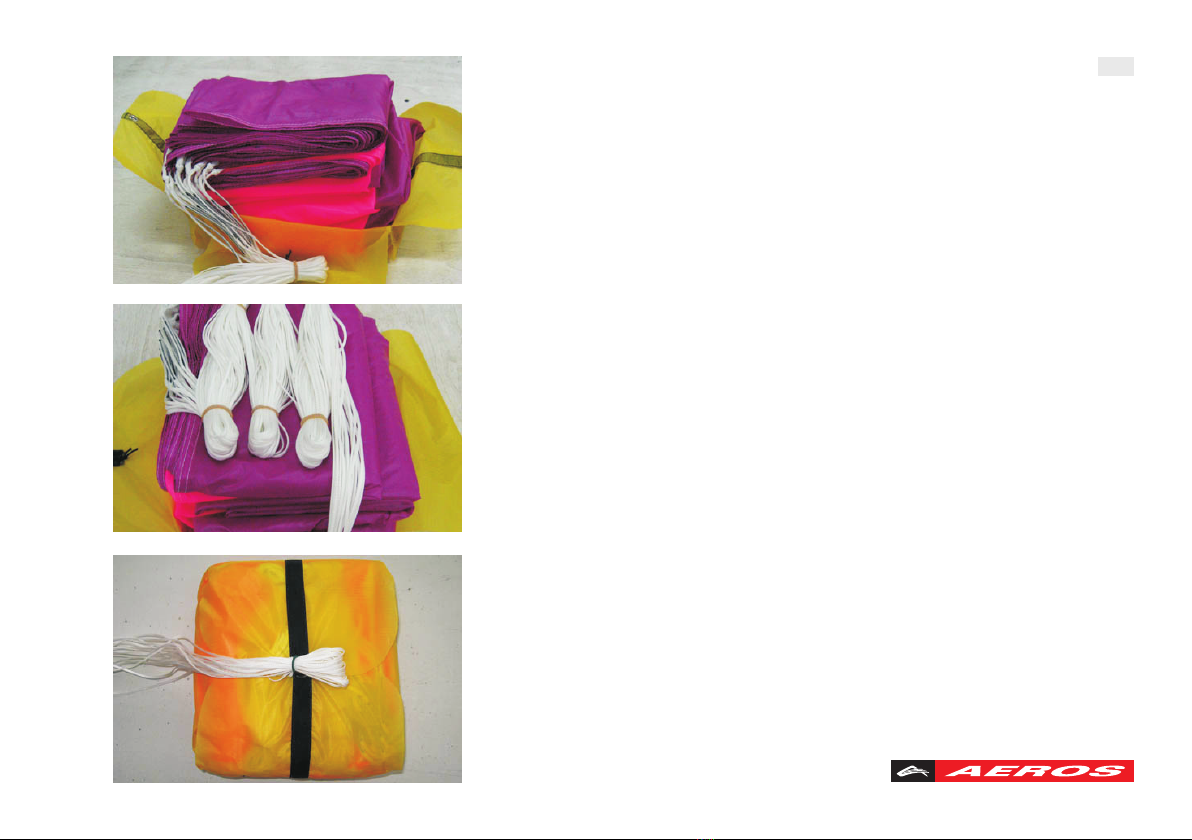
5.12. Put it into the inner bag.
5.13. Put the lines onto the canopy.
5.14. On one of the big flaps there is a rubber loop, attached to it.
Close this flap first. Then close flaps starting from the opposite to
the flap with rubber loop by pulling the rubber loop through the
grommets of flaps, from below. Pull the rigging lines through this
rubber loop, leaving a loop of lines about 3-5 cm.
14

NOTE: Further procedures are different when packing Paragliding (Section 6) and Hang Gliding
(Section 7) versions.
6. PACKING THE PARAGLIDING VERSION
Connect the main bridle to the harness bridle with the running knot.
Put the container with the parachute into the inner bag.
Secure the container of your harness according to harness manual.
7. PACKING THE HANG GLIDING VERSION
The Hang Gliding version differsfrom Paragliding version by longer (6 m) bridle.
To pack rescue into the hanggliding harness use manual for HG harness.
8. DURABILITY
Durability of rescue depends on the different reasons, like maintenance, repacking etc.
We recommend to replace your rescue each 10 years.
16

INSPECTIONS AND REPACKING HISTORY OF THE "SX" RESCUE SYSTEM
(Recommended repacking frequency: once every 3-4 months)
Date Name Signature
18

1. EINFUHRUNG
SX ist ein Rettungsschirm System, entwickelt fur Paragleiter und Hangegleiter Piloten. Durch den
System wird zusatzliche Sicherheit in Flug gewahrleistet. Trotzdem gibt es keine Garantie fur 100%
Sicherheit wenn ein Notfall eintreten sollte. Trotz dem dass die Auslosung der SX bei niedriegen
Geschwindigkeiten perfekt funktioniert, kann wie jeder andeder Notsystem missbraucht werden und
somit unsicher wird. Benutzen Sie den SX ausschlieslich auf eigene Verantwortung. Um die Moglichkeit
von unsicherer Benutzung zu minimieren, lesen Sie sorgfaltig diesen Handbuch.
2. SPECIFIKATIONEN
3. INSTANDHALTUNG
Ihr Rettungsschirm ist gemacht aus Nylon und ist deswegen empfindlich auf UV Strahlung. Der
Rettungskontainer verhindert direkten Kontakt zum Sonnenlicht. Trotzdem lagern Sie ihren Schirm nicht
an direkten Sonnenlicht. Auch die Hitze kann Nylon zerstoren. Die Nylon Nahte gehen kaputt zwar erst
bei Temperaturen uber 150 grad Celsius, aber auch weniger Heise Temperaturen beschleunigen das
Alterungsprozess des Materials.
Hohen Verlust ist von Vertikalen sowie von Horizontalen Geschwindigkeit und den auslose Zeitpunktes
Abhangig.
3
Gro e M L XL
Schirm Flache sq. m 29,5 36 42
Schirm Zubehor PG gewicht kg 1,7 2 2,3
Schirm Zubehor HG gewicht kg 2 2,3 2,6
Max. Zuladung kg 100 120 140
Rettungskuppel form
Block/bias
Surface
Rigging lines
Pulled Apex
18
Gelvenor Nylon F01-PZ
Cousin Polyamide 2 mm (154 daN)/ 3,3 mm (375 daN)
..
..
..
..
?

Sollte Ihr Rettungsschirm feucht oder nass werden, sollte es ausgebreitet und im schattigen Platz
augehangt werden. Wenn organisch basierte Substanzen auf den Schirm geraten sind, sollte
der Schirm mit lauwarmen Wasser und milde Flussige Seife handgewaschen werden, anschliesend gut
mit der Hand ausgespuhlt und im Schatten aufgehangt werden. Wenn organische Sauren oder Ole auf
den Schirm sind, sollte das betroffene Bereich mit neutralisierenden Substanz behandelt werden.
Entfalten Sie die Schirmkuppel und lassen Sie sie fur eine Woche so, damit Sie feststellen konnen, ob
der Schirm Schaden von solche Kontaminierung getragen hat. Wenn ihr Schirm Reparatur braucht,
treten Sie mit Ihren Handler oder Dem Hersteller in Kontakt.
Um eine Fortwahrende Instandhaltungsfahigkeit Ihren Schirms zu gewahrleisten, sollte es alle 120 Tage
neu gepackt werden. Als Unterschied zum personlichen Rettungsgerat, der in Registrierten Flugzeugen
benutzt wird oder zum Schirm, gedacht fur Absichtliche Sprunge aus dem Flugzeug, muss Ihr
Rettungsschirm nicht von einen Fachmann gepackt werden – Sie konnen es selber machen. Zum diesen
Zweck lesen Sie bitte sorgfalltig Instandhaltungs und Pack Verfahren aus diesen Handbuch.
4. AUSLOSEVERFAHREN
Empfohlene minimal Auslosehohe betragt 60-70 Meter. Im Falle von perfekten horizontalen und
vertikalen Geschwindigkeit von ihren Para/Hangegleiter zum Auslosezeitpunkt, kann die minimal Hohe
die noch zum erfolgreichem Auslosen von den Rettungsschirm fuhrt auch nur 30 Meter uber Grund
betragen. Sogar wenn Sie in kritischen Situation Zweifel haben, ob die Auslosung von Rettungsschirm
sinnvolll ware, sollten Sie es auslosen.
4.1. AUSLOSEN IM FLUG MIT DEM HANGEGLEITER
Sobald Sie sich entschieden haben den Rettungsschirm zu benutzen, ziehen sie es mit dem
Rettungsgriff aus dem Kontainer, und werfen Sie es in die Richtung von geringstem Wiederstand, d.h.
weg von Unterverspannungen, Rohren und Segel. Im Trudelfall in die Trudel Richtung, im Uberschlag
Fall warten Sie, bis Boden sichtbar ist und werfen Sie es dann. Um den Wurf effektiver auszufuhren,
halten Sie sich mit der freier hand am Trapez fest.
5

Offnungszeit wird von vertikalen und horizontalen Geschwindigkeit abhangen. Als der Boden
langsam Naher kommt, handeln Sie wie folgt: versuchen Sie nicht stehend zu landen. Sie sollten den
Hangegleiter unter Ihnen Halten, damit die Konstruktion bei Aufschlag ein Teil der Energie aufnimmt. So
werden Sie weichere Landung ihres Korpers ermoglichen.
Uberprufen Sie ihre Arm Reichweite bevor Sie den Schirmkontainer an das Gurtzeug nahen.
Vergewiessern Sie sich, dass Sie den Rettungsgrif Erreichen konnen, bevor sie den Schirm dauerhaft
befestigen. Durch ihre Anbringung sollte der Rettungsschirm in jeder Position frei von Beruhrung mit der
Speedbar bleiben.
4.2. AUSLOSEN IM FLUG MIT DEM PARAGLEITER
Als Sie sich entschieden haben den Rettungsschirm zu benutzen, ziehen Sie es mit dem Rettungsgriff
aus dem Kontainer und werfen Sie es aufwarts in einem 45 grad Winkel. Im Falle von Trudeln werfen Sie
es in die Trudelrichtung. Wenn die Schirmoffnung nicht gelungen ist, ziehen Sie es wieder ein und
versuchen Sie es noch mal. Die Zeit ist knapp, deswegen ist es besser, wenn es gleich gelingt. Bei der
Landung halten Sie ihre Knie in leicht angewinkelt und landen Sie auf beide Fusse gleichzeitig und
benutzen Sie Ihre Beinmuskeln um den Aufprall zu absorbieren. Wenn notig rollen sie ab uber eine
Schulter.
Es sind zahllose Situationen, wo der Rettungschirm gebraucht werden muss. Um die richtige Auslosung
von dem Schirm zu erreichen, uben Sie es in einem Simulator. Um die kostbare Zeit im Real Flug zu
sparen, uben Sie das Greifen von Rettungsgriff. Bevor sie das machen ist es notwendig den Griff
sichtbar zu erfassen,damit die Hand es auch schnell findet.
Dieses Rettungssystem darf nicht als Sportschirm benutzt werden, es ist vorgesehen ausschliesslich als
ein Notfall System. Trotzt dem, dass der Landetest von uns an einer ebenen Flache gemacht worden ist,
empfehlen wir es nicht, auf diese weise zu Uben. Zu jeder Zeit ist das auslosen von einen
Rettungssystem ein extremer Notfall und somit nicht volkommen vorhersehbar.
ACHTUNG:
VORSICHT
WARNUNG
7
5. EINLEITUNG ZUM PACKEN
5.1. Legen Sie die Schirmkuppel auf eine flache und saubere Flache, die gross genug ist um den
ganzen Rettungsschirm mit Aufbauleinen entfalten zu konnen.
5.2. Pressen Sie die Luft aus der Kuppel und versichern Sie sich dass die Leinen nicht zusammen
haften. Entfernen Sie das ungewollte material wie Gras usw.
5.3. Fuhren sie eine Schnur durch die 18 Schlaufen in der Mitte
von Nahten, die die Leinen verbinden, und befestigen Sie diese
schnurr an einen fixen Gegenstand. Befestigen Sie den Hauptgurt
eben so an einen fixen Gegenstand und spannen Sie die Leinen
bis alle gerade sind mit dem Zug von etwa 5 kg.
5.4. Ordnen Sie die Leinen auf jeder Seite von zentralen Zug
Leine, die Leinen 1-9 links und die Leinen 10-18 rechts davon.
9
5.5. Ordnen Sie die Zellen, wo die Leinen 1-2...9 befestigt
sind links, und die Zellen mit den Leinen 10...16-1 rechts.
5.6. Vergewiesseren Sie sich, dass jede Zelle richtig zusammen
gefaltet ist und die Nahte von jeder Zelle parallel verlaufen,
sowohl dass sie Gerade und leicht unterm Zug sind. Um den
Gewunschten Effekt zu erzielen ist die Benutzung von kleinen
Sandtaschen zu empfehlen.
5.7. Fuhren sie die zwei Gruppen von Leinen mit der zentralen
Leine zusammen, so, dass nur eine Leinengruppe entsteht.
5.8. Falten sie jede Zellengruppe um so die Breite der Zellen zu
reduzieren.
11

5.9. Losen sie die Verbindungen von Fixierungsstellen am
Hauptgurt und an der Kuppel, entfernen sie die
Verbindungsschnur.
5.10. Legen Sie die Leinen in S-Form an der Basis von der
Kuppel. Fixieren sie die Leinen mit 6 Gummibandern.
5.11. Legen sie die Leinen zusammen in S-Form, von der Kuppel
beginnend.
13
5.12. Legen sie die Leinen auf die Kuppel.
5.13. Auf einem von den Innenkontainer-Klappen befindet sich
eine Gummischlaufe, die zu dieser Klappe befestigt ist. Schlie?en
sie die Klappen beginnend von der gegenuberstehenden Klappe
zur Klappe mit der befestigten Gummischlaufe. Die
Gummischlaufe wird durch die Osen an den restlichen Klappen
gefuhrt, von unten aufwarts. Am Ende werden die Aufbauleinen
durch die Gummischlaufe gefuhrt, formend eine Leinen Schlaufe
von 3-5 cm.
15

ACHTUNG: Die folgenden Verfahren sind verschieden fur Paragleiter (Sektion 6) und
Hangegleiter (Sektion 7) Version.
6. EINPACKEN DES RETTUNGSSCHIRMES
Einschlaufen der Hauptleinenschlinge vom Rettungsschirm mit der Hauptleine (V-Leine) vom Gurtzeug
(fest zuziehen). Auf eine sichere Verbindung achten.
Den Rettungsschirm in den vorgesehenen Container des Gurtzeuges sauber einlegen.
Den RS - Au?encontainer (bzw. Frontcontainer) in der richtigen Reihenfolge (nach Betriebshandbuch)
verschlie?en.
7. VERPACKUNG DER HANGEGLEITER VERSION
Die Hangegleiterversion unterscheidet sich von der Paragleiterversion durch:
eine langere Hauptleine um 5 m.
Den Rettungsschirm in den Hangegleitergurt laut Bedienungshandbuch des HG-Gurtzeuges einbauen.
8. HALTBARKEIT
Die Haltbarkeit eines Rettungsschirmes hangt von verschiedenen Grunden, wie Lagerung, Wartung,
Umpacken, Handhabung, usw.
Wir empfehlenden den Rettungsschirm nach 10 Jahren zu ersetzen.
17
INSPECTION UND PACKINTERVALE VON DEM "SX" RETTUNGSSYSTEM
(empfohlener Packinterval: alle 3-4 Monate)
Datum Name Unterschrift
19
Table of contents
Languages:
Other Aeros Accessories manuals

Popular Accessories manuals by other brands


Johnson Controls
Johnson Controls NS Series installation instructions

ROSE DISPLAYS
ROSE DISPLAYS ANOFRAME SQUARE WITH CABLE AND SAUCER manual

Focusrite
Focusrite Saffire LE Getting started guide

Pittway
Pittway System Sensor 1251 Installation and maintenance instructions

Leuze electronic
Leuze electronic BPS 34 Technical description

Cornilleau
Cornilleau COMPETITION 640 Assembly and operating instructions