Aerpro AP477E User manual

aerpro.com
USER GUIDE
5W UHF CB
RADIO
ULTRA COMPACT
AP477E

2
CONTENTS
WELCOME ...................................................................................... PAGE: 4
FEATURES...................................................................................... PAGE: 4
BOX CONTENTS........................................................................... PAGE: 4
TECHNICAL SPECIFICATIONS................................................. PAGE: 4
SAFETY INFORMATION AND WARNINGS.............................PAGE: 5
RADIO CONTROLS ...................................................................... PAGE: 7
LCD DISPLAY................................................................................. PAGE: 8
RADIO OPERATIONS
- Power ON/OFF............................................................. PAGE: 9
- Volume control.............................................................. PAGE: 9
- Channel selection......................................................... PAGE: 9
- Mute out ....................................................................... PAGE: 9
- Call button .................................................................... PAGE: 9
- Inst button..................................................................... PAGE: 9
- S button-Scanning...................................................... PAGE: 10
- F button-Menu mode.................................................. PAGE: 10
- Up & Down arrow buttons .......................................... PAGE: 10
- Resetting .................................................................... PAGE: 10
- Receiving/Transmitting............................................... PAGE: 10
MENU SETTINGS
- SQL-Setting the squelch level......................................PAGE:11
- CTC-CTCSS/DCS Selcall ............................................PAGE:11
- DUP-Duplex option.......................................................PAGE:11
- SCN-Scan ................................................................... PAGE:12
- BCL-Busy channel lockout .......................................... PAGE:12
- CAL-Call ring tone....................................................... PAGE:12
- RBP-Roger beep......................................................... PAGE:12
- BEP-Button beep......................................................... PAGE:12

3
CONTENTS (continued)
DUPLEX/REPEATER INFORMATION..................................... PAGE:13
UHF CB CHANNEL GUIDELINES............................................ PAGE:14
UHF CB CHANNELS AND FREQUENCIES
- UHF channel frequency table...................................... PAGE:15
- CTCSS tone table ....................................................... PAGE:16
- DCS code table ........................................................... PAGE:17
TECHNICAL ASSISTANCE........................................................ PAGE:19

4
INTRODUCTION
WELCOME
Thank you for purchasing the Aerpro AP477E 5 Watt UHF CB Radio. Please ensure
that you have read the product manual and instructions in full, prior to installation
and use. Failure to do so may result in product failure/damage or incorrect operation
and therefore impact the product performance.
FEATURES
BOX CONTENTS
TECHNICAL SPECIFICATIONS
Frequency 476.425 - 477.4125 Mhz
Channel number 80 channels
Sub-code CTCSS 38 and DCS 99 sub-codes
Transmission Power 5 Watts
•UHF CB Radio (x1)
•Microphone (x1)
•Mounting bracket (x1)
•5 Watt transmission power
•80 Narrow-band channels
•Aluminium die cast chassis
•12/24 Volts
•Squelch control
•CTCSS & DCS codes
•Duplex range extender
•Fixed Cord Handpiece/ Microphone
Microphone
•Channel scan function
•Volume control
•Call tone alter
•Button beep
•White backlit display
•External Speaker Port
•Mute out (capable of muting car stereo)

5
INFORMATION ON SAFE OPERATION
Please read this information before installing or using your UHF radio.
The operation of your UHF radio in Australia is subject to conditions in the
following Licence: In Australia the ACMA Radio communications (Citizen Band
Radio Stations) and in New Zealand by MED the General User Radio Licence for
Citizen Band Radio.
SAFETY AND GENERAL USE WHILST IN A VEHICLE
Check the State and Federal laws and regulations regarding the use of two way
radios in the area where you drive, and always obey them.
FOR VEHICLES FITTED WITH AIRBAGS
When using the radio in a vehicle, do not place your radio in the area over an
airbag, or in the airbag deployment area. Airbags inate with great force, if a
radio is placed in the airbag deployment area and the air bag inates, it may be
propelled with great force and cause serious injury to the occupants of the vehicle.
POTENTIALLY EXPLOSIVE ATMOSPHERES
Turn your radio OFF when in any area with a potentially explosive atmosphere.
Sparks in such areas could cause an explosion or re resulting in injury or even
death. NOTE: Areas with potentially explosive atmospheres are often, but not
always clearly marked. They include fueling areas such as below deck on boats;
fuel or chemical transfer or storage facilities; areas where the air contains chemi-
cals or particles, such as grain, dust, or metal powders; and any other area where
you would normally be advised to turn of your vehicle engine.
BLASTING CAPS AND AREAS
To avoid possible interference with blasting operations; turn your radio OFF near
electrical blasting caps, or in a “blasting area”, or in areas posted: “Turn off the two
way radio.” Obey all signs and instructions.
EXPOSURE TO RADIO FREQUENCY ENERGY
Your two-way radio complies with Australian Communications Authority Radio
Communications (Electromagnetic Radiation-Human Exposure) Standard, 2003.
To assure optimal radio performance and make sure human exposure to radio
frequency electromagnetic energy is within the guidelines set out in the above
standards always adhere to the following radio operating procedures.
RADIO OPERATION AND EME EXPOSURE
Unauthorised antennas, modications, or attachments could damage the radio
and violate compliance. DO NOT hold the antenna when the radio is “IN USE.”
Holding the antenna reduces the effective range. DO NOT use the radio if the
antenna is damaged. If a damaged antenna makes contact with a persons skin,
a minor burn may result.
SAFETY INFORMATION AND WARNINGS

6
ELECTROMAGNETIC INTERFERENCE/COMPATIBILITY
Nearly every electronic device is susceptible to electromagnetic interference (EMI).
To avoid the possibility of electromagnetic interference and/or compatibility conicts,
turn off the radio in any location where posted notices instruct you to do so such as
health care facilities.
SAFETY INFORMATION AND WARNINGS (continued)
AIRCRAFT
When instructed to do so, turn off your radio when on-board an aircraft. Any use of a
radio must be in accordance with applicable regulations per airline crew instructions.
MEDICAL DEVICES – PACEMAKERS
The Advanced Medical Technology Association recommends a minimum separation
of 15cm be maintained between a radio and pacemaker. These recommendations
are consistent with the independent research by, and recommendations of, the U.S.
Food and Drug Administration. People with pacemakers should:
•ALWAYS keep the radio more than 15cm away from the pacemaker when the radio
is powered on.
•NOT carry the radio in the breast pocket (handheld models).
•Use the ear opposite the pacemaker to minimise the potential for interference.
•Turn the radio OFF immediately there is any reason to suspect that interference is
taking place.
MEDICAL DEVICES – HEARING AIDS
Some radios may interfere with some hearing aids. In the event of such
interference, you may want to consult your hearing aid manufacturer to discuss
alternatives.
MEDICAL DEVICES – OTHER
If you use any other personal medical device, consult the manufacturer of your
device to determine if it is adequately shielded from RF energy. You physician may
be able to assist you in obtaining this information.
GENERAL WARNINGS
Some radios may interfere with some hearing aids. In the event of such
interference, you may want to consult your hearing aid manufacturer to discuss
alternatives.

7
RADIO CONTROLS
RADIO LAYOUT
FIG. 1
RB SC
BP
Push To Talk Button
Microphone
Fixed
Microphone cord
(Non removable)
Memory/
Function
Scan Channel
DOWN
Channel
UP
LCD Display
Power
ON/OFF
Volume
Control
Green Receive
Light
Red Transmit
Light
Selcall Button Instant Channel Button
Antenna
Connection
External
Speaker
Input
8
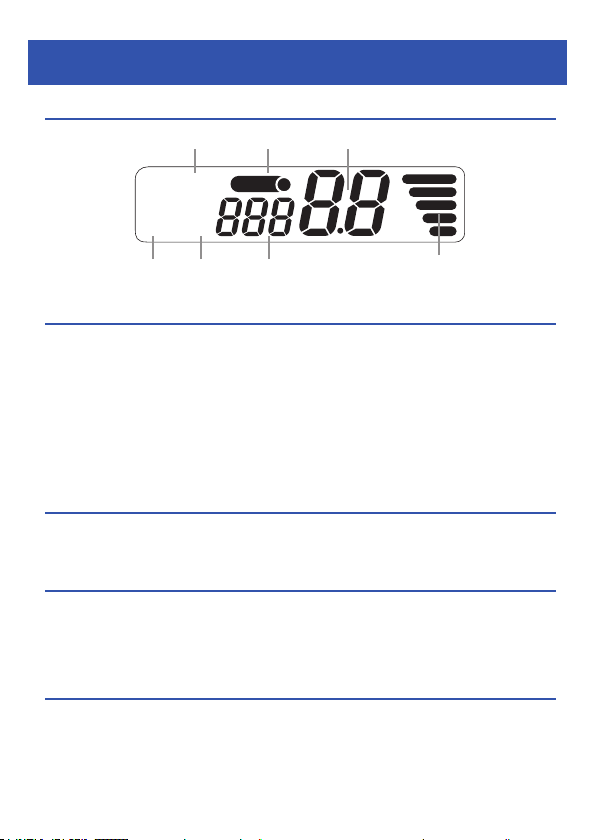
LCD DISPLAY
LCD DISPLAY
DC POWER CONNECTION
The CB radio is designed for 12/24 Volt DC. 13.8 VDC nominal voltage.
ONLY Replace Fuse with 2 Amp 3AG glass fuse.
ANTENNA INFORMATION
The antenna (not supplied) is of critical importance, to maximize your output
power and receiver sensitivity. A poorly installed, inferior quality antenna or one not
designed for the correct frequency band will give poor performance. You should only
purchase an antenna designed for the 477MHz frequency band.
ANTENNA INSTALLATION
1. Connect the antenna to the rear antenna socket using a PL259 coaxial connector
(not supplied).
2. To obtain maximum performance from the radio, select a high quality antenna and
mount it in a good location.
NOTE: Never press the PTT or CALL button before connecting the antenna to
the radio.
RB SC
BP INST
Scan Transmit & Receive
Signal Meter
Channel Number 01-80Button Beep
Roger Beep CTCSS/DCS
Code
CAUTION
When installing your radio in your vehicle, check that during installation you do not
damage any wiring or vehicle components that may be hidden around the mounting
position. For optimum performance your radio needs to be installed correctly. If
you are unsure about how to install your radio, we suggest you have your radio
professionally installed by a UHF specialist or Auto electrician. When installing the
radio, avoid mounting it close to heaters or air conditioners.
Never press the PTT or CALL button before connecting the antenna to the
radio. Screw the mounting bracket and microphone bracket to rm surfaces.
To install the radio: 1. Fix the radio bracket in a suitable location.
2. Then x the radio in the bracket using the thumb screws.
Instant channel

9
RADIO OPERATIONS
POWER ON/OFF
To turn the AP477E ON, turn the “ROTARY KNOB” clockwise until there is a click.
The LCD display will light up, indicating the unit is now ON.
To turn the AP477E OFF, turn the “ROTARY KNOB” anti-clockwise until there is a
click. The LCD display will black out, indicating the unit is now OFF.
VOLUME CONTROL
To adjust the volume, use the “ROTARY KNOB”. Turn the “ROTARY KNOB”
clockwise to increase the volume and turn the “ROTARY KNOB” anticlockwise to
decrease the volume.
CHANNEL SELECTION
Press the Up▲/Down▼buttons to scroll through the desired channel. For
your reference a list of the available channels, corresponding frequencies and
guidelines for their use and selection can be found on page 15 of this instruction
manual.
NOTE: Channels 05 and 35 are reserved for emergency use only.
MUTE OUT
This radio is capable of muting the car stereo when you receive incoming trafc on
the transceiver. Mute out wires present a Zero Ohm Short circuit when Squelch is
OPENED - Black wire MUST go to Ground/ Earth side of mute circuit.
CALL BUTTON (On Microphone)
Short press of CALL button transmits Selcall CTCSS / DCS tones (If enabled in
menu settings).
INST BUTTON (On Microphone)
Short press of INST button switches radio to preset INSTant channel.
DEFAULT INST channel is 09. This can easily be changed by selecting another
channel and then pressing INST for 2 seconds.
Example : To select Channel 40 as INST channel
• Use the ▲ & ▼ Arrow buttons on the faceplate to select channel 40
• Press and Hold INST button for 2 seconds
Instant Channel is now Channel 40.

10
RADIO OPERATION
S BUTTON - SCANNING
SCAN mode (If enabled in menu settings). Press the (S) button and the radio
will scan through all 80 channels until it hears a transmission (Busy Channel). The
radio will stop on the busy channel until transmissions stop – the radio will then
commence scanning again.
To turn Scan OFF Short press (S) button again.
F BUTTON - MENU MODE
A SHORT press of the (F) button places the radio Into Menu / Program mode
A LONG press (2 Seconds) of the (F) button takes the radio Out of Menu /
Program mode.
When the radio is NOT in Menu / Program mode a LONG press of (F) button
turns SQUELCH OFF. A LONG press of (F) button again turns SQUELCH ON.
RECEIVING / TRANSMITTING
The devices are in “Standby” mode when it is turned ON and not transmitting.
When a signal is received on the current channel, the LCD display lights are
green. When you press the PTT (push to talk) button, the devices switches to
“Transmission” mode and the LCD display lights are red and a signal strength
icon displays on screen. Hold the device in a vertical position with the Mic
(microphone) 3-5cm away from your mouth. While holding the PTT button, speak
into the microphone in a normal tone of voice. Release the PTT button when you
have nished transmitting. For others to receive your transmission, they must be
on the same channel with you.
NOTE: The talking range will depend on your surroundings and
environment. It will be affected by obstructions such as hills or buildings.
Don’t try to use two devices which are less than 1.5m (5 feet) apart.
Otherwise, you may experience interference.
UP▲ & DOWN▼ BUTTONS
Pressing the Up▲/Down▼ arrow buttons changes channels in normal mode &
option settings in MENU mode
Long Press (2 Seconds) of Up▲/Down▼ arrow buttons in normal mode FAST
STEPS radio through channels.
RESETTING - FACTORY RESET
To reset the system, Press and Hold the (F) button while turning the CB radio ON.

11
SQL - SETTING THE SQUELCH LEVEL (Global setting)
SHORT press on the (F) button once.
There are 10 squelch level settings (0 → 9) Zero is off, 1 is the lowest Squelch
level and 9 is the highest level. Squelch removes the background noise and
weaker signals from your receiver. To hear only signals from nearby CB users,
increase the Squelch level. To hear signals from CB users further away, decrease
the Squelch level.
DEFAULT SQL Setting is 3
Use the Up▲/Down▼ arrow buttons on the faceplate to change the squelch level
settings.
SHORT press on the (F) button to step onto the next Menu Feature
MENU SETTINGS
SHORT press on the (F) button once.
This allows you to enter the menu and change settings as per your requirements.
Pressing the (F) button again will step you through the Menu options
Some settings are (GLOBAL SETTINGS) affecting ALL Channels when changed
Some settings are (PER CHANNEL SETTINGS) affecting only the channel they
are set on. Some of the options available to you include:
CTC - CTCSS / DCS Selcall (Per channel setting)
SHORT press on the (F) button twice.
There are 38 CTCSS codes & amp; 104 DCS user selectable coded tones, 1 Only
CTCSS or DCS code can be selected.
DEFAULT CTC Setting is OFF.
NOTE : When CTC is turned ON you can ONLY communicate with other CB’s that
have the identical CTCSS or DCS code set on their units.
• Use the Up▲/Down▼ arrow buttons on the faceplate to select the required
CTCSS or DCS code.
• Long Press the (F) button to set the changes & exit programming for this
channel.
This needs to be FULLY repeated for EACH Channel 01 → 80 that you wish
to turn ON the CTC function for – Different CTCSS / DCS Codes can be set
on different channels if required.
SHORT press on the (F) button to step onto the next Menu Feature
DUP - DUPLEX Option (Per channel setting)
SHORT press on the (F) button three times
NOTE: Duplex – Repeater option can only be enabled for Channels 01 → 08 &
Channels 41 → 48. This option NEEDS to be turned ON individually for each of
the 16 channels that you wish to use for repeater operation.
Example to turn ON DUP Duplex – Repeater option for Channel 01
• Use the ▲ & ▼ Arrow buttons on the faceplate select Channel 01

12
MENU SETTINGS
BDL - BUSY CHANNEL LOCKOUT (Per channel setting)
This function disables transmission while there is trafc on a channel. You cannot
send a transmission. ie your PTT is disabled until there is no trafc on your current
channel. Press the Up▲/Down▼ arrow buttons to turn on or off.
SCN - SCAN (Global setting)
This feature will allow you to scan through all 80 channels continuously. When
you enter the SCN setting, press the Up▲/Down▼ arrow buttons to turn scanning
on (0S) or scanning off (GS). When in scan mode press the Up▲/Down▼ arrow
buttons and the unit will scan from 1 to 80 or from 80 to 1.
CAL - CALL RING TONE (Global setting)
This feature allows you to change your call ring tone. You can select from 5 different
call tones. It will only send your set tone when you press the PTT/CALL button on
the hand piece. Press the Up▲/Down▼ arrow buttons to choose from C1 to C5 or
turn off.
RBP - ROGER BEEP (Global setting)
After the PTT button us released, the device will send out a roger beep to conrm
that have stopped talking.
Press the Up▲/Down▼ arrow buttons turn the roger beep ON/OFF. “RB” text icon
will be displayed on screen when turned ON.
BEP - BUTTON BEEP (Global setting)
This feature allows you to turn off the beeps when pressing buttons on the face of
the radio and also disables BEEPS when scrolling through the menus. Press the
Up▲/Down▼ arrow buttons turn the roger beep ON/OFF. “BP” text icon will be
displayed on screen when turned ON.
• SHORT press (F) button 3 times until DUP appears in the display
• Use the Up▲/Down▼ arrow buttons on the faceplate to select R1
• Long Press (F) button to set the changes & exit programming for this channel.
This needs to be FULLY repeated for EACH Channel 01 → 08 & Channel 41
→ 48 that you wish to turn ON the Repeater function for.
DEFAULT DUP Setting is OFF for all channels
SHORT press on the (F) button to step onto the next Menu Feature

13
*Channel 5/35 is emergency channel only
REPEATER
CHANNEL 2 / 32
OBSTRUCTION (HILL / MOUNTAIN)
VEHICLE 1
RADIO IN DUPLEX MODE ON CHANNEL 2
TRANSMISSION FROM VEHICLE 1 (CHANNEL 32)
TRANSMISSION FROM VEHICLE 1 (CHANNEL 2)
TRANSMISSION FROM VEHICLE 2 (CHANNEL 32)
TRANSMISSION FROM VEHICLE 2 (CHANNEL 2)
VEHICLE 2
RADIO IN DUPLEX MODE ON CHANNEL 2
DUPLEX / REPEATER INFORMATION
DUPLEX RECEIVE / TRANSMIT CHANNEL GUIDE
The following table displays the receive and transmit channels when using repeater
stations:
VISUAL REPRESENTATION OF DUPLEX

14
UHF CB CHANNEL GUIDELINES
RADIO COMMUNICATIONS (CITIZEN BAND RADIO STATIONS)
CLASS Licence 2002
NOTE: The operation of your UHF radio in Australia and New Zealand is
subject to conditions in the following Licences: In Australia, the ACMA Radio
Communications (Citizen Band Radio Stations) and in New Zealand by MED the
General User Radio Licence for Citizen Band Radio.
No Licence is required to own or operate this radio in Australia or New Zealand.
The Radio Communications (Citizen Band Radio Stations) Class Licence 2002
contains the technical parameters, operating requirements, conditions of Licence
and relevant standards for Citizen Band (CB) radios. CB radios must comply with
the class Licence for their use to be authorised under the class Licence.
Licences for Repeater Channels 44 & 45 will not be Licenced for an additional 6
to 12 months to allow extra time for owners of Channel 5 Emergency repeaters to
upgrade equipment to meet new standards.
Channels 1 to 8 and 41 to 48 – Repeater Channels. Enable duplex mode on your
radio to use any available repeaters.
Channels 5 & 35 – Emergency use only. Monitored by volunteers, no general
conversations are to take place on these channels.
Channels 22 & 23 – Data transmissions only (excluding packet).
Channels 31 to 38 and 71 to 78 – Repeater inputs. Do not use these channels for
simplex transmissions as you will interfere with conversations on channels 1 to 8
and 41 to 48.
The Australian Government legislated that channels 5 & 35 on the UHF CB Band
are reserved for emergency use only.
If you do nd you are interfering with another persons conversation, just select
another channel.
IMPORTANT CHANNEL INFORMATION
A list of currently authorised channels can be obtained from the ACMA website in
Australia and the MED website in New Zealand.
Please note the following channel guidelines:
• Channels 01-08 (and 31-38), and Channels 41-48 (and 71-78) are repeater
channels.
• Channels 05 and 35 are emergency channels, do not use these unless it is an
emergency.
• Channel 11 is a calling channel.
• Channels 22 and 23 are for telemetry and telecommand applications (Data Only).
• Channel 40 - road channel (Australia).
• Channels 61, 62 and 63 are reserved for future use and TX is inhibited on these
channels.
15
Data Only
Data Only
Reserved
Reserved
Reserved
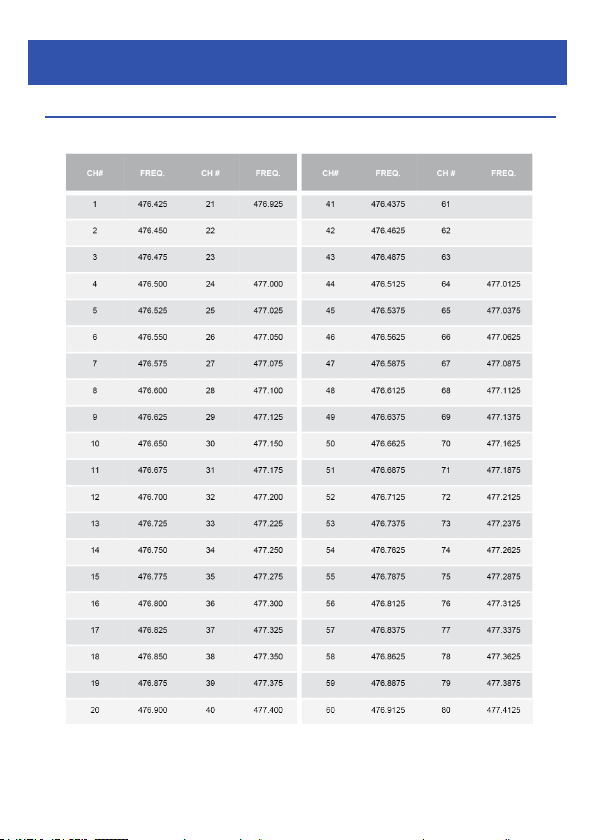
UHF CB CHANNELS AND FREQUENCIES
UHF CHANNEL FREQUENCY TABLE
16
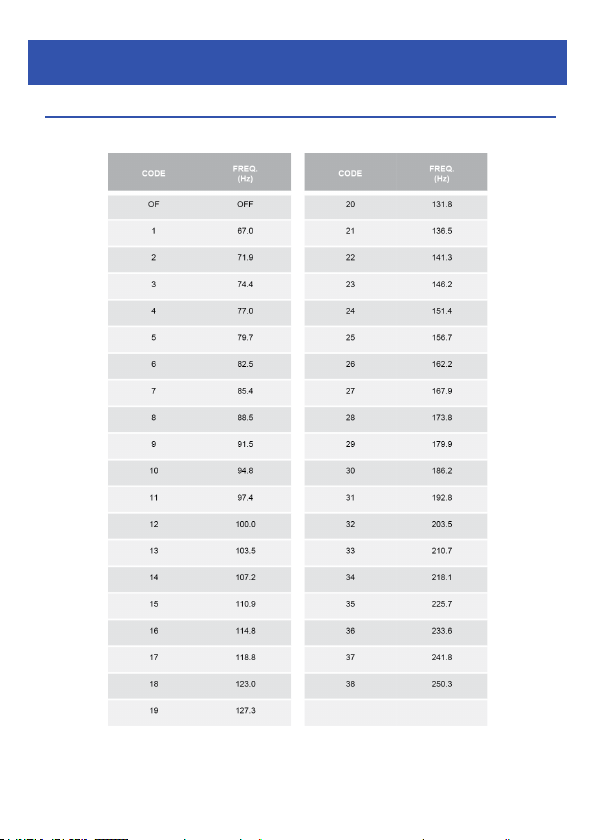
UHF CB CHANNELS AND FREQUENCIES (continued)
CTCSS TONE TABLE (Codes 01 -> 38)

17
UHF CB CHANNELS AND FREQUENCIES (continued)
UHF CB CHANNELS AND FREQUENCIES (continued)
DCS CODE TABLE

18
UHF CB CHANNELS AND FREQUENCIES (continued)
UHF CB CHANNELS AND FREQUENCIES (continued)
DCS CODE TABLE (continued)

19
If you need assistance setting up or using your AERPRO product now or in the future,
call Aerpro Support. Australia.
TEL: 03 – 8587 8898
FAX: 03 – 8587 8866
Mon-Fri 9am – 5pm AEST
Email: [email protected]
Please retain this user guide for future reference.
If you would like to download a digital copy of this manual, or other Aerpro manuals/
software, please visit the Aerpro.com website and click on ‘Firmware & Manuals” or
search for the product model number for more information, accessories and products.
This manual is considered correct at time of printing but is subject to change.
For latest manuals and updates refer to the website.
Copyright © 2023 by TDJ Australia
All rights reserved. No part of this publication may be reproduced, distributed, or
transmitted in any form or by any means, including photocopying, recording, copying
or other electronic or mechanical methods, without the prior written permission of the
author.
TECHNICAL ASSISTANCE
www.aerpro.com

Table of contents
Other Aerpro Radio manuals


