AEG BRFMB18 User manual

BRFM18
BRFMB18
Original instructions

2
2
Important!
This appliance is not intended for use by persons (including children) with
reduced physical, sensory or mental capabilities, or lack of experience
and knowledge, unless they have been given supervision or instruction
concerning use of the appliance by a person responsible for their safety.
Children should be supervised to ensure that they do not play with the
appliance.
1. Mode selection
2. Custom equaliser
3. Clock display setting
4. Mute sound (BRFM18 only)
5. FM mode indicator
6. AM mode indicator
7. AUX1 mode indicator
8. AUX2 mode indicator
9. Battery pack indicator
10. Radio tuning or song select
11. Preset selection
12. Connect via Bluetooth®
(BRFMB18 only)
13. Bluetooth® mode indicator
(BRFMB18 only)
14. AC power adapter indicator
(BRFMB18 only)
15. Battery pack indicator
16. Antenna
17. Battery cover latch
18. Handle
19. Volume/tuning control
20. Power on/off
21. Aux 1 input jack
22. USB charging port
(BRFMB18 only)
23. 18V DC input jack
(BRFMB18 only)
24. Bottle opener
25. AAA battery cover
26. Aux 2 input jack
27. Battery port
28. Device storage
29. Aux cable
30. AC power adapter
(BRFMB18 only)
31. AAA battery
31
1
20
21
22
23
30
19
16 17 18
28
25
26
27
BRFM18 BRFMB18
2
3
12
1
15
2
3
4
10
11
10
11
14
98765 8 13
765
24
29

33
1
1
2
3
4
click
1
1
2
2
3
2
3

4
4
1
2
1
click
2

55
78-100 %
33-54 %
55-77 %
10-32 %
<10 %

6
6
2
1
1
1
2
BRFM18
BRFMB18
2
BRFM18
BRFMB18
1
2
3
AUX1 mode
For BRFMB18

77
AUX2 mode
click
3
4
1
1
2
23
1
1
2
2
3
click
AUX2 mode

8
8
1. Mode selection
2. Custom equaliser
3. Clock display setting
4. Mute sound
5. Preset selection
6. Radio tuning or song select
7. AC adapter indicator
8. Battery pack indicator
9. Volume/tuning control
10. Power on/off
11. Bluetooth® indicator
12. Bluetooth® button
When using radio, adjust the antenna for best signal reception.
BRFM18
5
6
FM mode
AM mode
AUX1 mode
AUX2 mode
BLUETOOTH mode(for BRFMB18)
BRFMB18
8
1
2
3
4
10
9
10
9
5
6
7
8
1
11
2
3
12

99
BATTERY AND CHARGER
Compatible battery pack
(not included)
Compatible charger
(not included)
L1815R
L1815G
L1820R
L1825R
L1830R
L1840R
L1850R
L1860R
L1890R
L1830R-X5
L1860R-X5
AL18G
AL1218G
BL1218
BLK1218
BL18DP-X5
BL18DP2-X5
BL18DPS
Use AEG 18V battery and charger only.
WARNING! Read all safety warnings, instructions, illustrations
and specifications provided with this power tool. Failure to follow
all instructions listed below may result in electric shock, fire and/
or serious injury. Save all warnings and instructions for future
reference.
RADIO SAFETY WARNINGS
Never disassemble or modify this apparatus in any way.
Do not use this apparatus near water.
Clean only with dry cloth. Certain cleaning agents and solvents are
harmful to plastics and other insulated parts.
Keep the apparatus handle clean, dry and free of oil or grease.
Refer all servicing to qualified service personnel.
Do not install near any heat sources.
To prevent injury, do not put hands between the battery pack cover
and radio when closing the battery pack cover.
To prevent injury, keep the top surface clear when folding down the
handle.
Do not touch the metal part of the antenna in order to avoid a drop in
signal reception caused by electrostatic discharge.
Do not dispose of used battery packs in the household refuse or
by burning them. AEG Distributors oer to retrieve old batteries to
protect our environment.
Do not store the battery pack together with metal objects (short
circuit risk).
Use only the provided charger for charging the battery pack. Do not
use battery packs from other systems.
No metal parts must be allowed to enter the battery section of the
charger (short circuit risk).
Never break open battery packs and chargers and store only in dry
rooms. Keep dry at all times.
When damaged and under extreme usage and temperature
conditions, batteries may start to leak. If chemicals from the batteries
come in contact with skin, wash quickly with soap and water. If
chemicals from the batteries get into the eyes, flush eyes with clean
water for a minimum of 10 minutes and seek immediate medical
attention.
Always remove the battery pack from the product when you are
assembling parts, cleaning, or when not in use. Removing these
energy sources will prevent accidental starting that could cause
serious personal injury.
The product shall not be exposed to dripping or splashing and that
no objects filled with liquids, such as vases, shall be placed on the
product.
Batteries (battery pack or batteries installed) shall not be exposed to
excessive heat such as sunshine, fire or the like.
Use only power supplies listed in the user instructions.
ADAPTER SAFETY WARNINGS
The outlet should be close to the device and be slightly accessible.
Do not use the device with a damaged connecting cable or case.
Follow the technical data given by the manufacturer if you use the
device.
Pull out the plug from the outlet if the device is not used.
The device is used for oice/data processing devices and similar
electrical devices and is only for indoor use.
Maximum ambient temperature is 45 °C.
The mains connection components of this device cannot be
substituted. If the power cable is damaged, the device has to be
disposed of.
The device must not be exposed to splashing water, rain or humid
environments.
Objects with liquids, e.g. vases, should not be placed on the device.
TECHNICAL DATA RADIO BRFM18 BRFMB18
Rated voltage 18V DC 18V DC
Tuning range FM 87.50 - 108.00 MHz 87.50 - 108.00 MHz
Tuning range AM 522 - 1620 KHz 522 - 1620 KHz
USB output -- 5V/1A max
Weight - not including AUX cable, AC adapter, AAA batteries and battery pack 4.2 kg 4.3 kg
Clock backup 1.5V AAA (LR03) 1.5V AAA (LR03)
Sound output wattage (RMS) 4.5 W x 2 4.5 W x 2
Bluetooth® range -- Max. 40 m
AUX jack input size 3.5 mm 3.5 mm
Speaker size 3.5 in 3.5 in
Adapter input -- 100 - 240VAC 50/60 Hz
Adapter output -- 18V DC, 2 A

10
10
ADDITIONAL BATTERY SAFETY WARNINGS
WARNING! To reduce the risk of fire, personal injury, and product
damage due to a short circuit, never immerse your tool, battery pack
or charger in fluid or allow a fluid to flow inside them. Corrosive or
conductive fluids, such as seawater, certain industrial chemicals, and
bleach or bleach containing products, etc., can cause a short circuit.
CAUTION! Risk of explosion if the battery is replaced by an
incorrect type.
Ambient temperature range for battery during use is between 0°C
and 40°C.
Ambient temperature range for battery storage is between 0°C and
20°C.
Replacement of a battery with an incorrect type can defeat a
safeguard.
Disposal of a battery into fire or a hot oven, or mechanically crushing
or cutting of a battery, can result in an explosion.
Leaving a battery in an extremely high temperature surrounding
environment can result in an explosion or the leakage of flammable
liquid or gas.
Do not use the product at high altitude due to low air pressure. A
battery subjected to extremely low air pressure may result in an
explosion or the leakage of flammable liquid or gas.
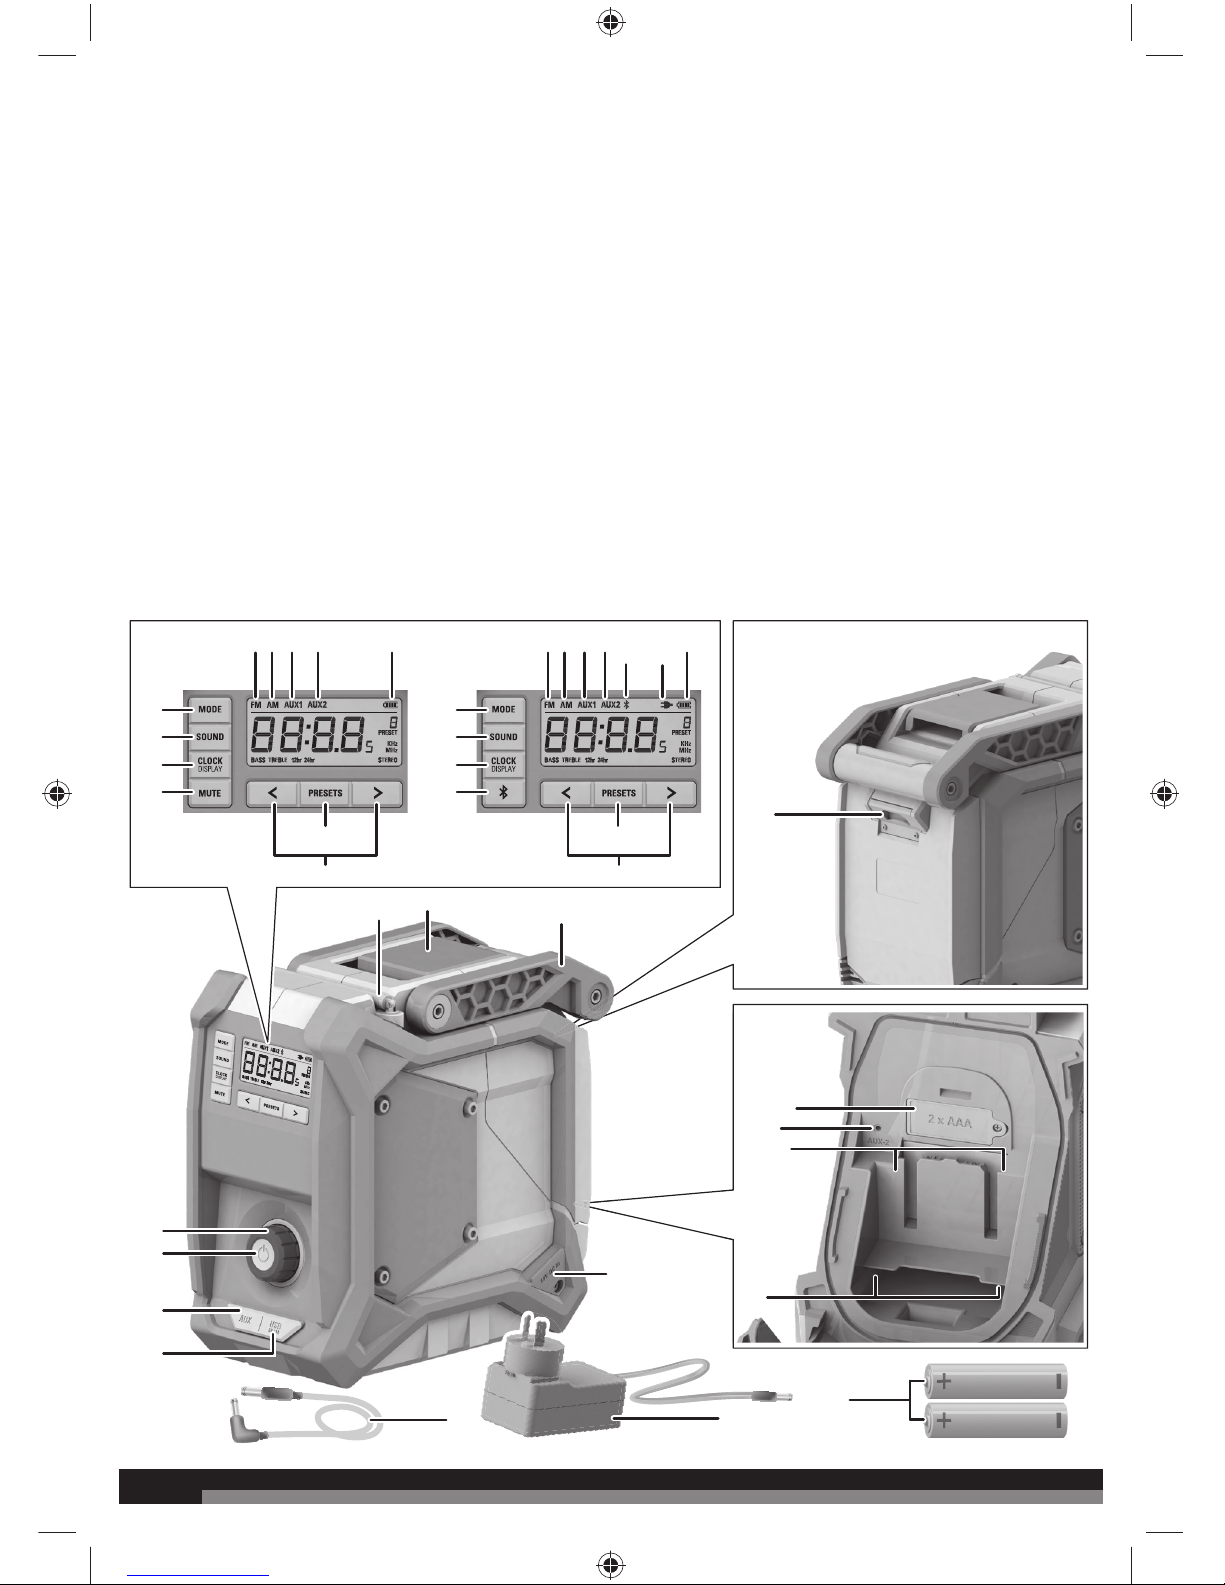
SPECIFIED CONDITIONS OF USE
The radio is suitable for reception of broadcasting and to playback
audio sound of an externally connected CD player, MP3 player or
cassette tape deck.
Do not use this product in any other way as stated for normal use.
CAUTION
Danger of explosion if battery is incorrectly replaced. Replace only
with the same or equivalent type.
OPERATION
WARNING
The product is not waterproof. Do not submerge in liquid. Failure
to heed this warning could result in serious personal injury.
WARNING
Always refer to the manual for any device recommended for use
as an attachment or accessory. Proper use of any device, when
attached to the product, is the sole responsibility of the operator.
Improper use may damage the device or the product.
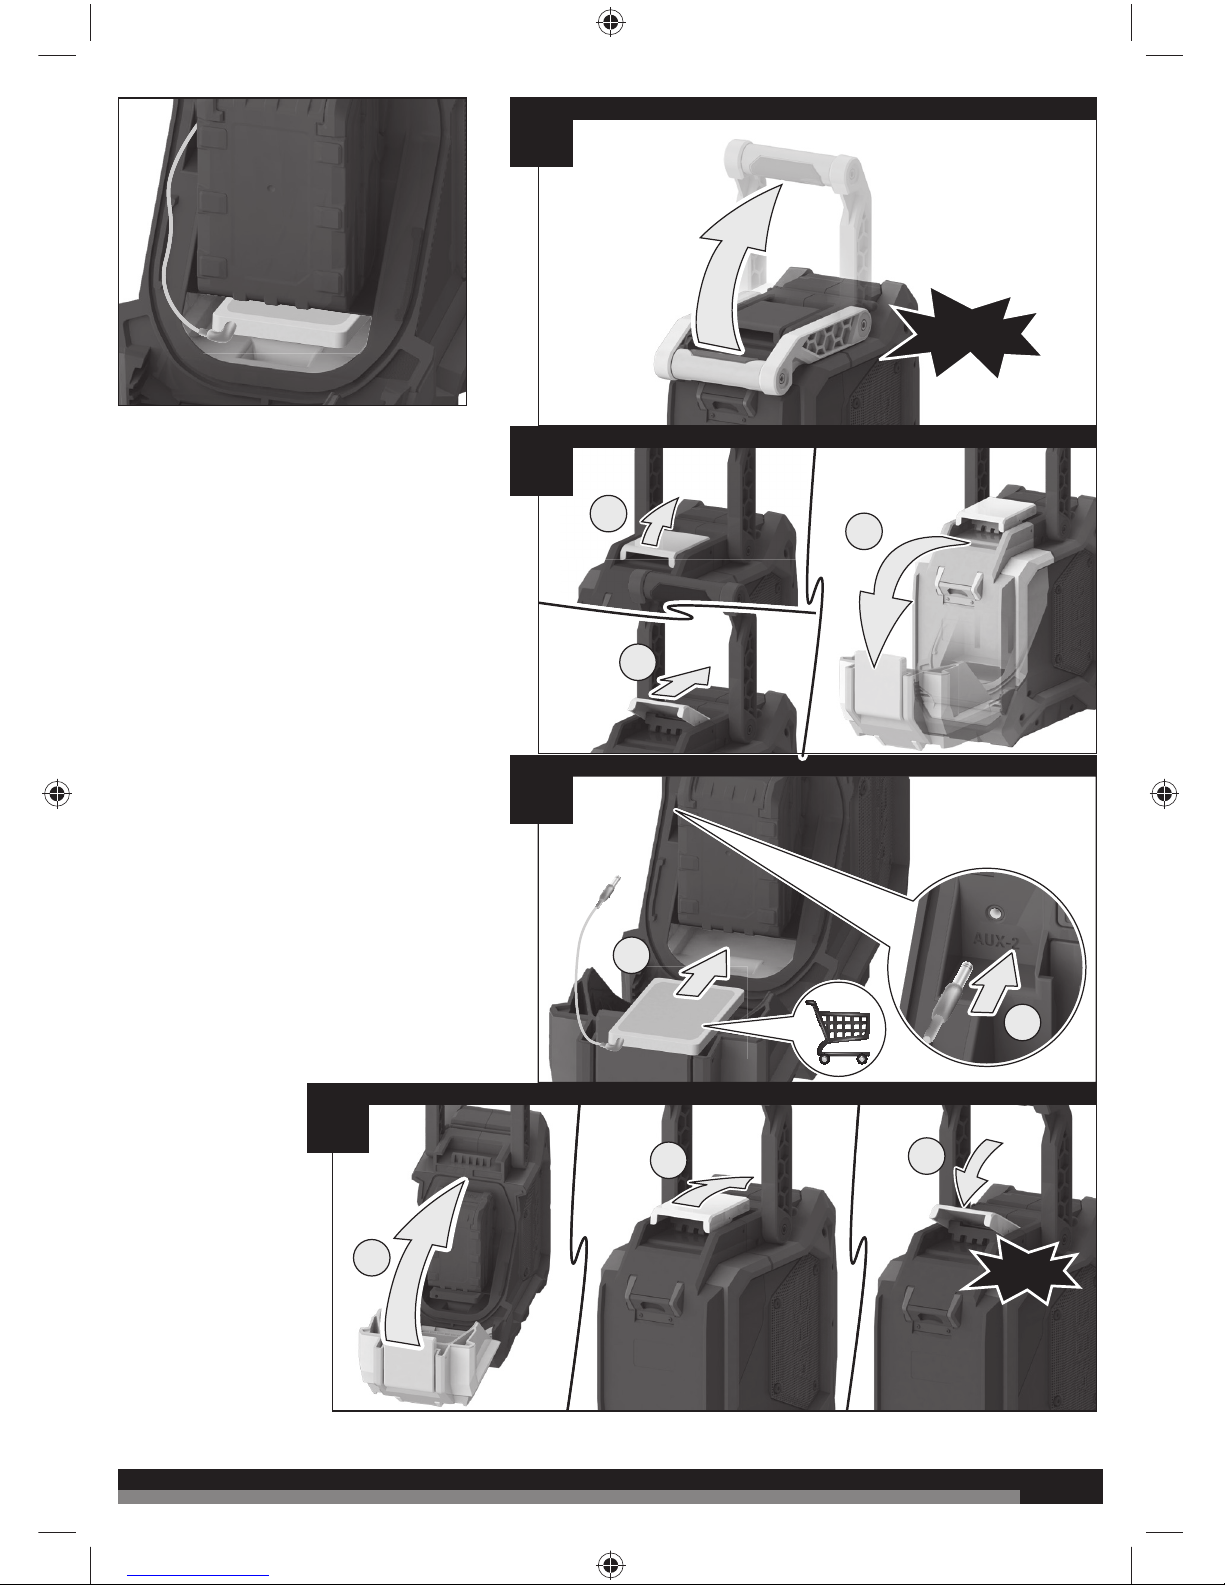
INSTALLINGREMOVING AAA BATTERIES
See page 3.
It is advisable to write down saved channels before replacing the AAA
batteries.
There is a 15-second time frame for replacing the AAA batteries. If
the batteries are not replaced within 15 seconds, the product will
lose all settings previously stored in memory, and they will require
reprogramming.
Always use new alkaline batteries for replacement.
1. Turn off the radio.
2. Lift the handle to make clearance for opening the battery pack
cover.
3. Disengage the latch and open the battery pack cover.
4. Remove the battery pack, if installed.
5. Loosen the screw in the AAA battery cover. Remove the cover
and set aside.
NOTE: AAA batteries are factory-installed for first-time use.
Remove the pull tab at the battery cover to enable electrical
connection. No installation is required.
6. Install two new AAA batteries according to polarity indicators
inside the battery compartment.
NOTE: Do not mix old and new batteries. Do not mix alkaline,
standard (carbon-zinc), or rechargeable (nickel-cadmium)
batteries.
7. Replace the AAA battery cover and tighten screw to secure.
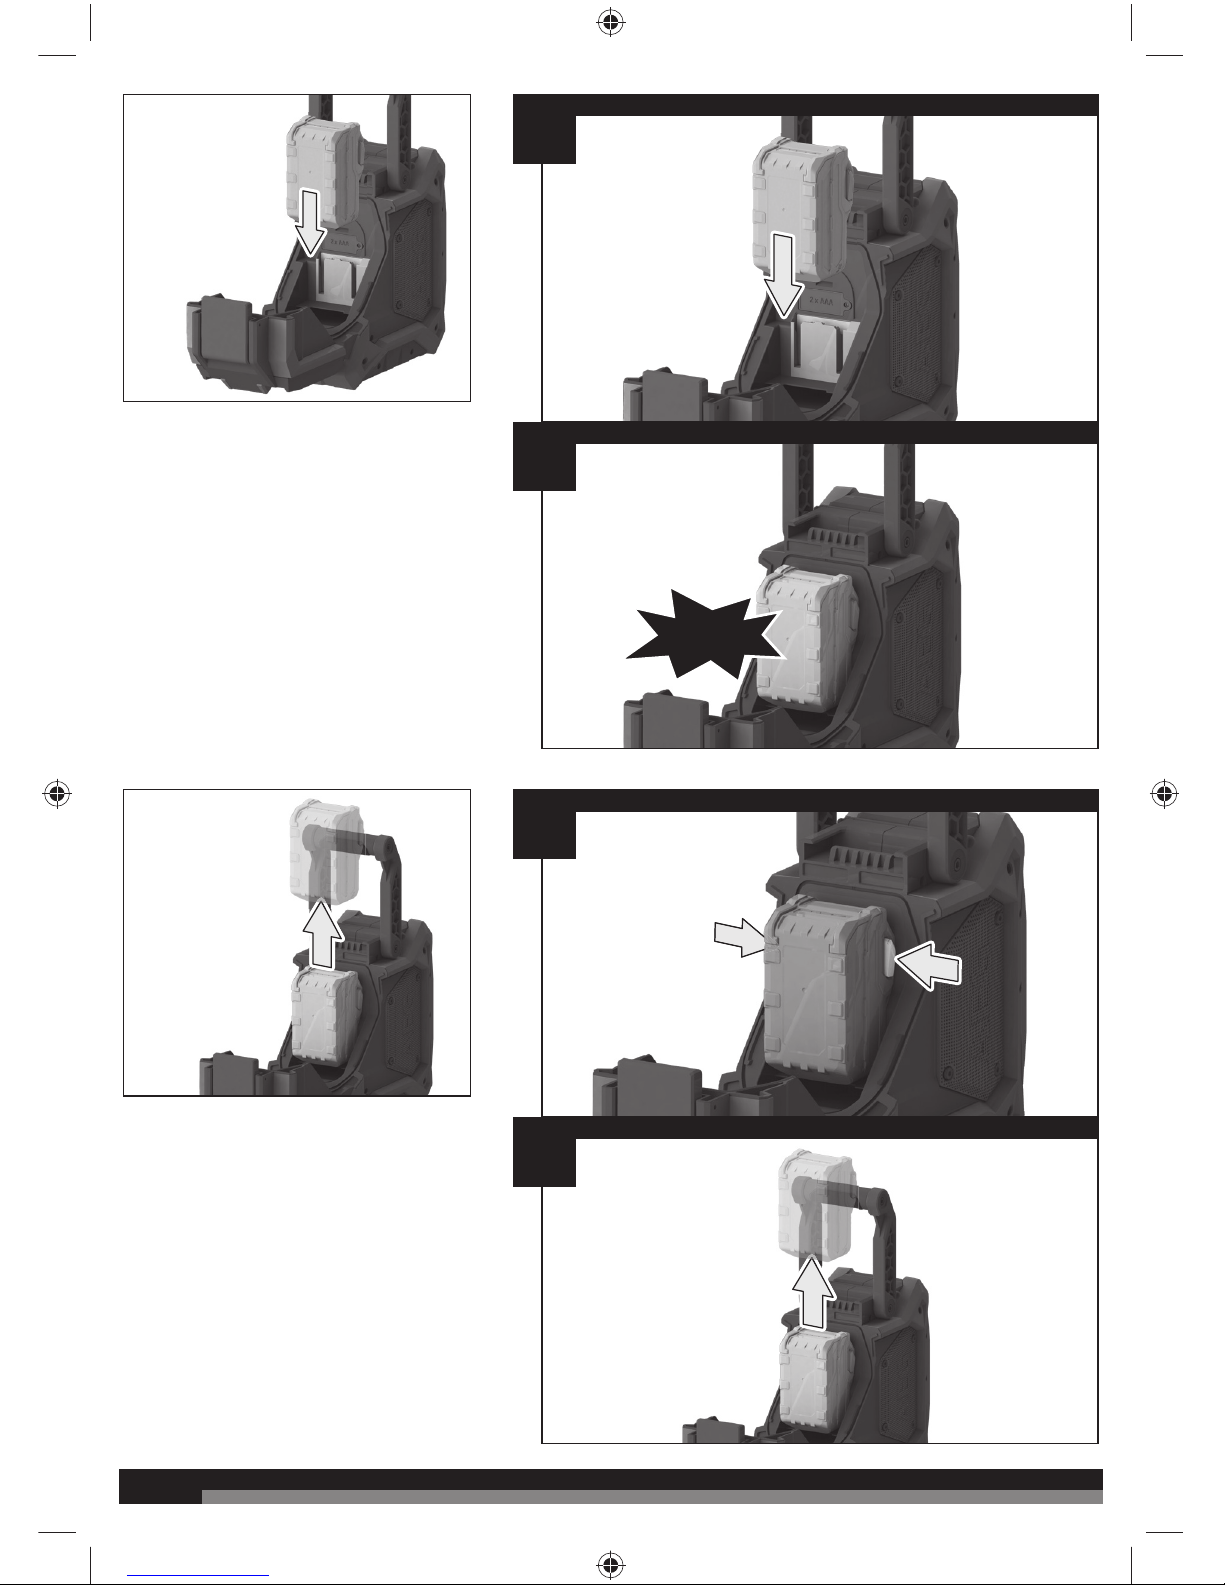
INSTALLINGREMOVING BATTERY PACK
See page 4.
The product can be operated by either an AEG 18V battery pack or
AC adapter.
1. Turn off the radio.
2. Lift the handle to make clearance for opening the battery pack
cover.
3. Disengage the latch and open the battery pack cover.
4. Remove the battery pack, if installed.
5. Place the battery pack in the product, aligning the ribs on the
battery pack with the grooves in the battery port.
6. Make sure the latches on the battery pack snap into place and
the battery pack is secured to the product before beginning
operation.
7. Close the battery pack cover and secure with the latch.
Depress the latches on both sides of the battery pack and pull to
remove.
NOTE: Always remove the battery pack from radio when not in use.
Leaving the battery pack connected for long periods of time may
drain the battery pack.
CONNECTING TO AC ADAPTER
See page 6.
1. Open the DC input jack cover.
2. Insert the plug of AC adapter into the input jack.
3. Plug the AC adapter into a wall socket.
WARNING
Use an authorised AC adapter. An unauthorised adapter may
damage the unit.
LCD DISPLAY
See page 8.
When a battery pack is installed and the product is in the ON position,
the LCD display will show the channel or time. When the battery pack
is removed while AAA batteries are installed, the LCD display will
show the time.

11 11
The backlight of the LCD display will dim after 15 seconds of no user
operation.
NOTE: The illustrations of the LCD display shown in the manual are
only examples of the frequencies you may see on your radio and are
not the exact frequencies that you may choose to listen to.
MENU NAVIGATION BUTTONS
See page 8.
Use the menu navigation buttons to turn the product on and o,
control the volume, change frequencies, toggle between modes and
set the time.
Buttons and LCD display backlight will turn o after 15 seconds of
no operation.
SWITCHING THE PRODUCT ON AND OFF
Press the on/o button to switch the product on and o.
NOTE: You may need to keep the button pressed for up to 3 seconds
before the product will turn on or o.
NOTE: When the product is on and a battery pack is installed,
will be shown in the LCD display. If the battery charge is low, will
be shown.
To help preserve battery power, the product will automatically enter
sleep mode approximately 1 hour after it is turned o. To exit sleep
mode and restart the product, you must press the on/o button.
MODE SELECTION
ŶPress to cycle through available modes.
There are four (BRFM18)/five (BRFMB18) modes to choose from:
ŶFM mode
ŶAM mode
ŶAUX mode 1
ŶAUX mode 2
ŶBLUETOOH mode (BRFMB18 only)
ADJUSTING THE VOLUME
When the product is switched on, the product will return to the last
volume setting.
ŶTo increase the volume, turn the volume/tuning control clockwise.
Maximum volume value is 25.
ŶTo decrease the volume, turn the volume/tuning control
counterclockwise.
ŶTo mute the sound, press . (BRFM18 only)
CAUTION
Do not use the product at maximum volume for an extended
period of time with the bass and treble at maximum levels. It could
cause damage to the speakers and/or amplifiers in the product.
FM TUNING
Use and , or the volume/tuning control to tune to the desired radio
frequency. The selected frequency is displayed on the LCD display.
To tune frequency automatically:
1. Briefly press
. The radio will seek station to lower frequencies
automatically.
2. Briefly press . The radio will seek station to higher frequencies
automatically.
To tune frequency manually:
1. Briefly press the on/off button to enter frequency tuning. FM
indicator will flash.
2. Turn the volume/frequency control knob clockwise to increase
the frequency.
3. Turn the volume/frequency control knob counterclockwise to
decrease the frequency.
4. Briefly press the on/off button to exit frequency tuning. FM
indicator will stop flashing.
The radio will exit manual tuning after 5 seconds of no operation.
To decrease interference or electrical noise, adjust the position of the
antenna or move the product to a higher elevation.
NOTE: Signal reception may drop due to electronic discharge. Tune
the radio or restart to improve signal reception.
AM TUNING
Use and , or the volume/frequency control knob to tune to the
desired radio frequency. The selected frequency is displayed on the
LCD display.
To tune frequency automatically:
1. Briefly press
. The radio will seek station to lower frequencies
automatically.
2. Briefly press . The radio will seek station to higher frequencies
automatically.
To tune frequency manually:
1. Briefly press the on/off button to enter frequency tuning. AM
indicator will flash.
2. Turn the volume/frequency control knob clockwise to increase
the frequency.
3. Turn the volume/frequency control knob counterclockwise to
decrease the frequency.
4. Briefly press the on/off button to exit frequency tuning. AM
indicator will stop flashing.
The radio will exit manual tuning after 5 seconds of no operation.
To decrease interference or electrical noise, adjust the position of the
antenna or move the product to a higher elevation.
NOTE: Signal reception may drop due to electronic discharge. Tune
the radio or restart to improve signal reception.
STORING A PRESET IN MEMORY
The memory feature saves up to 10 frequencies as presets in the
product’s memory. You can save up to 5 frequencies each for FM and
AM modes.
To store a frequency in memory:
1. Tune to the desired FM or AM frequency.
2. Press and hold until the preset position number flashes
on the screen.
3. Press
or to choose a preset position number.
NOTE: There are 5 preset positions for FM and 5 for AM. Only one
station can be saved in each preset position.
4. Press again to store the frequency.
To tune to presets (FM or AM):
ŶPress and release to cycle through each preset position
number and its associated frequency.

12
12
EQUALISER FUNCTION
To adjust the bass and/or treble settings:
1. Press to enter Equaliser setting.
2. Press
or to adjust the Bass level. (Adjustment range: 0 - 5)
3. Press to enter the Treble setting.
4. Press or to adjust the Treble level. (Adjustment range: 0 - 5)
5. Press to exit Equaliser setting.
SETTING THE CLOCK
To set the clock:
1. Press and hold to enter clock setting.
2. The hour time blinks. Press or , or rotate volume/tuning
control to adjust the hour.
3. Briefly press or on/off button. The minute time blinks. Press
or , or rotate volume/tuning control to adjust the minute.
4. Briefly press or on/off button again to confirm the time. The
clock is now set.
NOTE: If AAA batteries are removed or lose charge for more than 15
seconds, clock settings will be lost. Settings are not aected by the
removal of the 18V battery.
AUXILIARY MODE
The product can be used as an amplifier for MP3 players, CD players,
smartphones, tablets, and other music devices. There are two auxiliary
modes, AUX 1 and AUX 2.
To use AUX 1:
See page 6.
1. Press until is displayed.
2. Connect auxiliary cable to the device.
3. Open the AUX 1 input jack cover. Connect the other end of the
auxiliary cable to the AUX 1 input jack.
NOTE:
–The external device must be on and in play mode for sound
to be heard through the speakers.
–All external device controls can be used normally while
connected to radio.
–Volume for any device connected through the auxiliary cable
can be adjusted using the volume control for that device or by
using volume/frequency control knob of the product.
–Switching the product off will not switch the external device
off.
–The auxiliary cable does not provide charging function.
4. For complete operating instructions for the connected device,
always refer to the manual that was included with your device.
To use AUX 2:
See page 7.
1. Press until is displayed.
2. Connect auxiliary cable to the device.
3. Open the battery pack cover. Connect the other end of the
auxiliary cable to the AUX 2 input jack.
NOTE:
–The external device must be on and in play mode for sound
to be heard through the speakers.
–All external device controls can be used normally while
connected to radio.
–Volume for any device connected through the auxiliary cable
can be adjusted using the volume control for that device or by
using volume/frequency control knob of the product.
–Switching the product off will not switch the external device
off.
–The auxiliary cable does not provide charging function.
4. For complete operating instructions for the connected device,
always refer to the manual that was included with your device.
The device storage may be used to store your external device.
NOTE: In AUX1 and AUX2 modes, if there is no audio input for 10
minutes, the radio will turn o automatically to save power.
USING A BLUETOOTH® ENABLED DEVICE WITH THE PRODUCT
BRFMB18 ONLY
1. Press until is displayed. Alternatively, press to enter
Bluetooth® mode directly.
NOTE:
–When the product is switched to Bluetooth® mode, the
product will attempt to pair to a Bluetooth® enabled device.
The volume/tuning control ring light and in the LCD display
will flash.
–The product will automatically attempt to connect to the last
device it was paired to. If a connection cannot be established
within five seconds, the product will make itself available to
other Bluetooth® enabled devices.
–Bluetooth® enabled devices must be within 10 m (30 ft) of
the product and set to search/scan in order to pair with the
product.
–If the radio is not paired with any device, or is paired
without playing songs for 10 minutes, the radio will turn off
automatically.
2. Select “AEG JOBSITE BT5 RADIO” from your device’s list of
available Bluetooth® signals to pair the device and the product.
No password or PIN is required for connection.
NOTE:
–When the device has successfully paired with the radio, the
volume/tuning control ring light and in the LCD display will
stop flashing. A beep sound will play.
–When a device is paired to the product, information for
connecting to the device is saved in the radio’s memory.
–If the radio does not pair with your device, turn off the radio .
Wait 5 seconds, then turn the power on and start the pairing
process again.
3. Press
and to go to the previous or next track when streaming
audio from a Bluetooth® enabled device.
4. Press and release to cycle between pausing and
playing the audio.
NOTE:
–These controls may not be supported by the Bluetooth®
device and application.
–All Bluetooth® enabled device controls can be used normally
while paired to the product.
–Volume for any device paired to the product can be adjusted
using the volume control for that device or by using volume/
frequency control knob of the product.
5. Press and hold for about 2 seconds to disconnect all Bluetooth®
enabled device.
NOTE: When the device is disconnected, the volume/tuning
control ring light and in the LCD display will begin flashing and
the product will begin searching for another device.

13 13
USING THE USB DEDICATED CHARGING PORT BRFMB18 ONLY
The USB dedicated charging port provides charging power of up to
1 Amp for your cell phone, MP3 player, tablet, or other USB devices.
CAUTION
Attempting to charge devices rated more than 1 Amp could
damage the USB dedicated charging port and/or the device.
1. Connect one end of a USB cable (not provided) to your USB
device.
2. Open the USB charging port cover.
3. Connect the other end of the USB cable (not provided) to the USB
dedicated charging port to begin charging the device.
NOTE: The USB dedicated charging port provides power only; it
does not provide any data communication capabilities.
When the product is operating on battery power, the USB dedicated
charging port will continue to function for approximately 1 hour after
switching the product o. If the product remains inactive after this
time, charging will stop. Turn the product on to resume operation.
FOLDDOWN FLEXIBLE ANTENNA
To decrease interference or electrical noise, extend the antenna or
move the product to a higher elevation. The antenna folds down and
out of the way when not in use.
BOTTLE OPENER
Use the bottle opener located at the back of the product to remove
bottle caps. You may need to move the handle to the upright position
and rock the radio slightly forward.
BATTERIES
Battery packs which have not been used for some time should be
recharged before use.
Temperatures in excess of 50°C (122°F) reduce the performance of
the battery pack. Avoid extended exposure to heat or sunshine (risk
of overheating).
The contacts of chargers and battery packs must be kept clean.
For an optimum life-time, the battery packs have to be fully charged,
after used.
To obtain the longest possible battery life remove the battery pack
from the charger once it is fully charged.
For battery pack storage longer than 30 days:
Store the battery pack where the temperature is below 27°C and away
from moisture.
Store the battery packs in a 30% - 50% charged condition.
Every six months of storage, charge the pack as normal.
TRANSPORTING LITHIUM BATTERIES
Lithium-ion batteries are subject to the Dangerous Goods Legislation
requirements.
Transportation of those batteries has to be done in accordance with
local, national and international provisions and regulations.
ŶThe user can transport the batteries by road without further
requirements.
ŶCommercial transport of Lithium-Ion batteries by third parties is
subject to Dangerous Goods regulations. Transport preparation
and transport are exclusively to be carried out by appropriately
trained persons and the process has to be accompanied by
corresponding experts.
When transporting batteries:
ŶEnsure that battery contact terminals are protected and insulated
to prevent short circuit.
ŶEnsure that battery pack is secured against movement within
packaging.
ŶDo not transport batteries that are cracked or leaking.
Check with forwarding company for further advice.
RESIDUAL RISKS
Even when the product is used as prescribed, it is still impossible
to completely eliminate certain residual risk factors. The following
hazards may arise and the operator should pay special attention to
avoid the following:
ŶUse the product only for its intended use. Do not alter or modify
the product from the original design or function.
ŶAlways be aware that misuse and improper handling of the
product can cause injury to yourself and others.
BATTERY PACK PROTECTION
The battery pack has overload protection that protects it from being
overloaded and helps to ensure long life. Under extreme stress the
battery electronics switch o the machine automatically. To restart,
switch the machine o and then on again. If the machine does not
start up again, the battery pack may have discharged completely. In
this case it must be recharged in the battery charger.
MAINTENANCE
The ventilation slots of the machine must be kept clear at all times.
Use only AEG accessories and AEG spare parts. Should components
need to be replaced which have not been described, please contact
one of our AEG service agents (see our list of guarantee/service
addresses).
If needed, an exploded view of the tool can be ordered. Please state
the Article No. as well as the machine type printed on the label and
order the drawing at your local service agents or directly at:
Techtronic Industries Australia Pty Ltd
PO Box 1065
Mount Waverley VIC 3149
Tel. no. 1300 234 797
Australia
Techtronic Industries N.Z. Limited
PO Box 12-806
Penrose AUCKLAND 1642
Tel. no. 0800 234 797
New Zealand
SYMBOLS
Safety alert
Regulatory Compliance Mark (RCM). Product meets
applicable regulatory requirements.

14
14
Please read the instructions carefully before starting
the machine.
For indoor use only.
Class II equipment
Do not touch the metal part of the antenna in
order to avoid a drop in signal reception caused by
electrostatic discharge.
®
Bluetooth®
Do not dispose of electric tools together with
household waste material. Electric tools and
electronic equipment that have reached the end of
their life must be collected separately and returned
to an environmentally compatible recycling facility.

15 15
BLUETOOTH® LICENSE STATEMENT
The Bluetooth® word mark and logos are registered trademarks owned by Bluetooth SIG, Inc., and any use of such marks by Techtronic
Industries Australia Pty Ltd and Techtronic Industries N.Z. Limited are under license. Other trademarks and trade names are those of their
respective owners.

Techtronic Industries Australia Pty Ltd
31 Gilby Road, Mount Waverley, VIC 3149
Australia
Techtronic Industries N.Z. Limited
2 Landing Drive, Mangere
Auckland, 2022, New Zealand
www.aegpowertools.com.au
www.aegpowertools.co.nz
AEG is a registered trademark used under
license from AB Electrolux (publ).
20181116v2
This manual suits for next models
1
Table of contents
Other AEG Radio manuals

AEG
AEG SR 4362 CD/MP3 User manual

AEG
AEG SR 4329 CD User manual

AEG
AEG KRC 4361 BT User manual

AEG
AEG SR 4367 BT User manual

AEG
AEG KRC 4323 CD User manual

AEG
AEG IR 4430 User manual

AEG
AEG DAB+ 4158 User manual

AEG
AEG MR 4104 Technical specifications

AEG
AEG SR 4346 CD MP3 User manual

AEG
AEG MR 4139 BT User manual