aevit DIGIPAD II User manual


Power Headrest Actuator
Accessory Kit
Fab-Lok (4)
Setscrew (7)
5/64 Allen Wrench
Installation Manual
Owner’s Manual
Power Headrest-0 Power Headrest-1 Power Headrest-6
Headpad Single Button Headpad Six Button Headpad
Power Headrest Packing List

The EMC line of Power headrests gives individuals head support along with a variety of switching options when the
OEM headrest is removed. EMC oers three (3) types of headrests. The six-button power headrest allows the driver
to access up to six (6) dierent, low-eort switches positioned on the headrest. This is typically used in conjunction
with EMC’s two (2) button control modules to activate functions such as turn signals, horn, dimmer, wiper low, wiper
wash, cruise on, cruise set or any number of auxiliary operations. The single-button power headrest has one (1) switch
mounted to the side and is typically used to access either Digitone or Digivoice. The third power headrest option has
no switching capability, and is used simply to provide support and comfort to the driver.
Digitone
VIC
HBR-KIT
Power Headrest-1
Power Headrest
Power Headrest-6
Overview

Begin by tting the driver to the driving compartment which includes installing all tiedown restraint systems.
When complete, remove all plastic or metal mouldings around the upper door opening and rearward of the
“B” pillar on the side wall header panel. You may have to remove the shoulder strap retaining bolt in order to
remove the molding. Do Not mount the Power Headrest Base on top of mouldings for any reason!
Always remove the plastic header panel molding and mount the Power Base directly to the header sheet
metal. NEVER mount the Power Base to plastic moldings or use self-tapping screws.
When installing the Power Base Unit, position it such that it is behind the driver’s head and does not interfere
with the seat belt system. Remove the ABS plastic protective cover from the Power Base by removing the
#8-32 machine screw as depicted in the diagrams. Once the position is determined, temporarily screw the
unit to the header panel with two (2) self-tapping screws. Drill the remaining two (2) mounting hole positions
through the header panel using a 5/16” drill. Insert the expanding bolts provided. While holding the bolt with
a 5/8” box wrench, tighten the 5/16” bolt head while applying inward pressure against the wall header panel
until tight. Remove the temporary self-tapping screws and drill and replace with expanding bolts. All four (4)
expanding bolts need to be used when mounting the Power Base to the vehicle!! Replace the protective ABS
plastic cover over the Power Base unit and secure with the #8-32 machine screw.
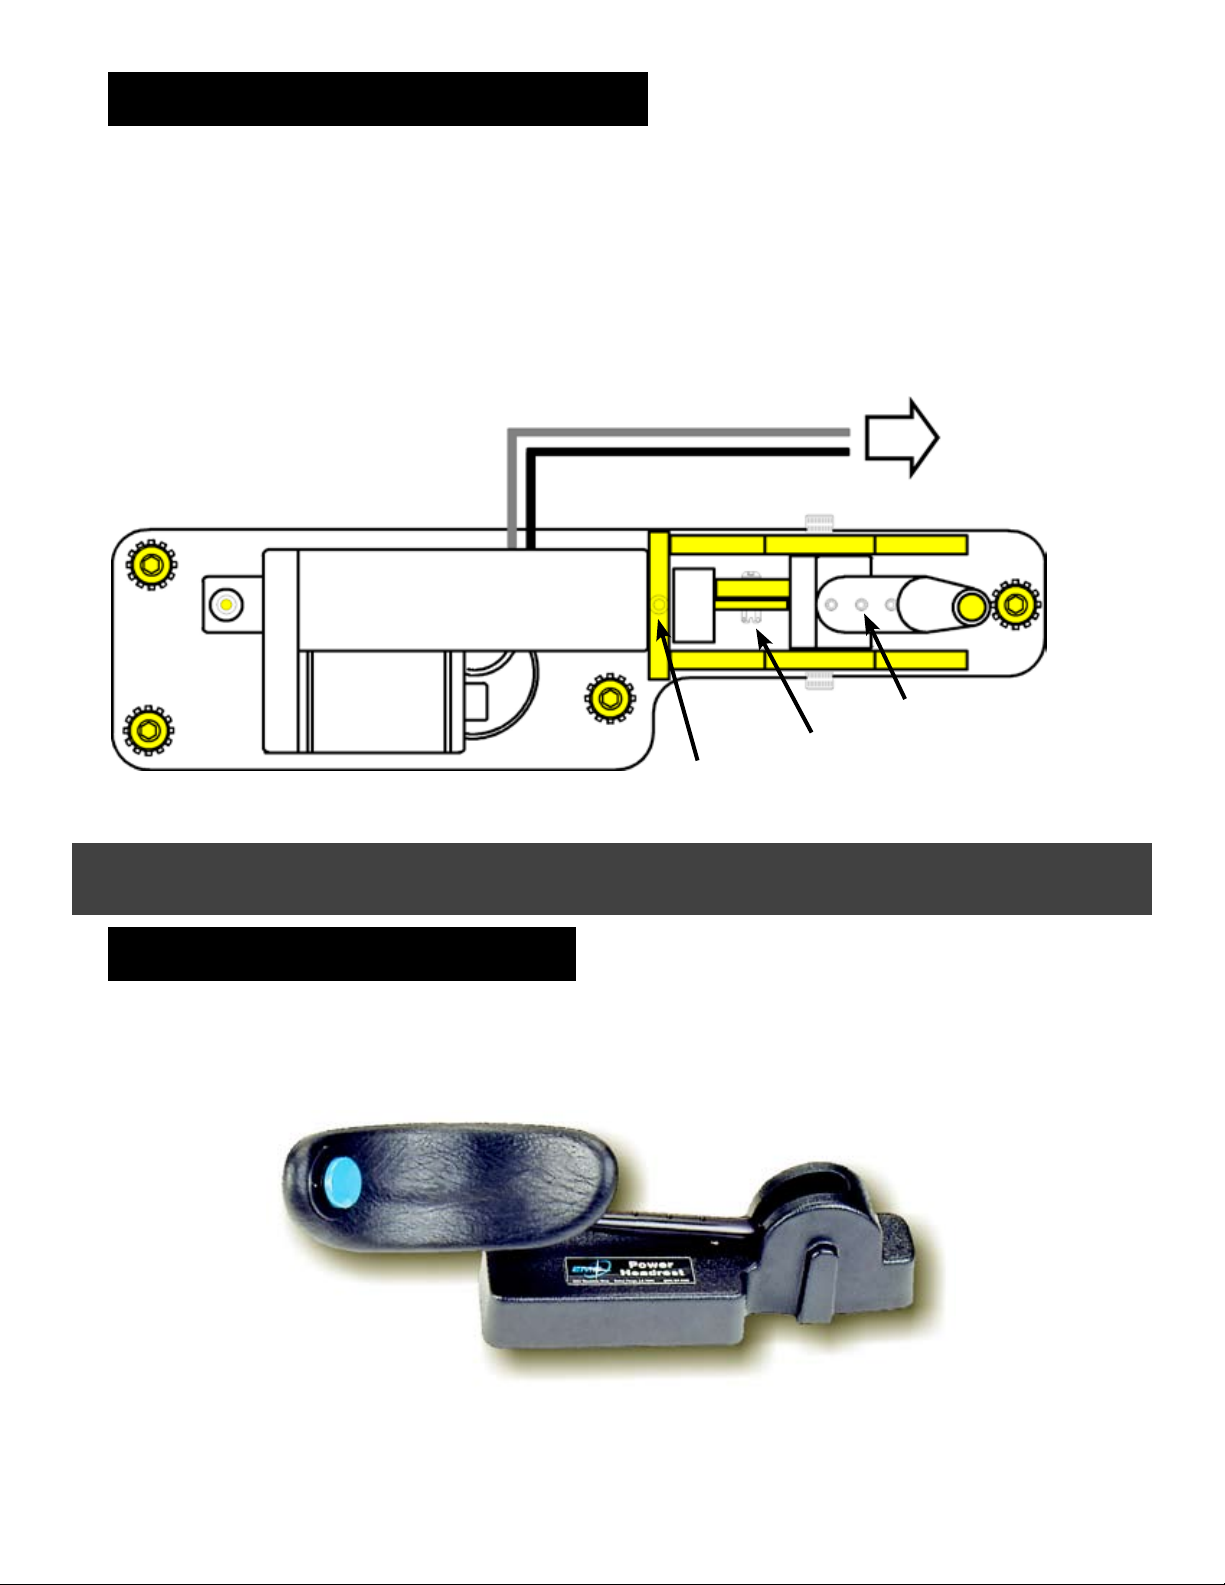
Safety Shear Bolt
Expanding Bolt (4)
ABS Plastic Power Base Cover & Screw
Ball Bearing
Floating Hinge
Setscrews (6)
Adjustment
Arm
The Power Base contains a 1-piece Adjustment Arm that receives the ball shaft of the molded headrest pad.
The length of the ball shaft is such that it allows for linear and rotational adjustment to t most drivers. Make
certain that all six (6) setscrews lock against the shaft to prevent unwanted movement.
This headrest rotates 90 degrees but requires no lubrication. When installing the pad on a Power Headrest-1 or
-6, make sure that the telco cable does not interfere with the rotational motion of the adjustment arm.
To install the headrest, slide the Headrest stainless steel Ball Shaft into the adjustment arm receiver of the
Power Base and tighten the six (6) setscrews to lock in position. Rotate the Headrest pad to the desired angle
and securely tighten the three (3) socket head attachment bolts to lock into position. Do not remove the
molded plastic shell on the back of the Headrest Pad! Once nal positioning is determined, go back and check
all setscrews and securement bolts for tightness. This unit will only perform well if installed properly. Make
sure there is no binding!
Preparing the Vehicle
Power Base Fitting & Mounting
Headrest Fitting & Mounting
Installation
The actuator is a DPDT (polarity reversing) type and will require that it be connected to a DPDT circuit or to a
DPDT toggle switch which will reverse the polarity to the Power Base actuator. If a toggle switch is used, locate
it in a place that will not be accidentally activated while driving.
If you use this unit in conjunction with a Digipad II Gold Series or Econo Series, the Power Headrest can be
operated from one (1) of the auxiliary function. Refer to the auxiliary wiring section of your Digipad II console
installation manual for details.
Safety Shear Bolt
Setscrews
ABS Cover Bolt
DPDT Power
Reversing Switch
Power Base
White
Black
The Power Headrest-1 comes with a six (6) conductor telco plug. The telco plug is used to access Digivoice or a
Stand-alone Digitone system.
Power Base Electrical Wiring
Power Headrest-1
Operation

Before you wire the headrest, rst follow the instructions included with the ELB Control Modules to install the
harnesses directly to the vehicle. Then, simply plug the telco cables from the Power Headrest into the appro-
priate ELB Control Module. The switches on the Power Headrest-6 are not labeled, therefore, you can connect
to any control module. This allows some exibility as to which switches will activate each function.
If the Power Headrest-6 is being installed in conjunction with the Digipad-II Econo Series console it can be used
to remotely operate the Wipers and Cruise functions without the need for a ELB Control Module. All you need
to do is connect the telco cable from the Power Headrest into the Econo Series WC port on the CPU. Now the
Function A & B buttons will operate all of the Wipers and Cruise functions.
The diagram shows which secondary con-
trol will be activated when the switch is
depressed with your head. A gentle touch is
all that is required to operate the low-eort,
momentary switches.
Power Headrest-6
Power Headrest-6 Operation

LIMITED WARRANTY
071408
Electronic Mobility Controls, LLC
26 Gabriel Drive
Augusta, ME 04330
Phone (207) 512-8009
Fax (207) 512-8049
www.aevit.com
ELECTRONIC MOBILITY CONTROLS, LLC (“EMC”) warrants the product
against defects in materials or workmanship only as set forth below.
WARRANTY PERIOD
AEVIT 2.0
For a period of 5 years, 2,500 hours of operation or 60,000 vehicle
miles (whichever comes rst) from the date of delivery to the original
consumer, as veried by the NMEDA/RADCO Label, EMC will repair or
replace, at its option, any of the following components found to be
defective in materials or workmanship:
- Servomotor(s), Display, Input Device(s), Vehicle Interface Module,
Drive Module(s), Control Module, Chassis, Transmission Actuator and
External Modules.
SERVICE LIFE
EMC has dened that the service life for this equipment is 12 years/6000
hours of operation/150,000 vehicle miles (whichever comes rst).
After that date, EMC will no longer service the equipment. EMC will
inspect the system and provide a quote on the cost (paid by the con-
sumer) to replace certain components. Once those components are
replaced, the service life will be extended by 2 years/1000 hours of
operation/24,000 vehicle miles (whichever comes rst).
WHAT IS NOT COVERED
EMC is responsible ONLY for repair or replacement of the covered
product, at EMC’s option, by EMC, and is NOT responsible for any inci-
dental costs or expenses incurred as a result of any defect in any EMC
product. Items not covered by this warranty:
-
-
-
-
Cost (including parts and labor) of: transporting your vehicle to an
EMC Certied Dealer or Service Center, removing the product from
your vehicle, shipping the product to EMC or reinstallation of the
product in your vehicle.
Cost (including parts and labor) of: roadside assistance, towing, re-
placement vehicles, and/or alternate transportation.
Malfunction or damage caused by re, accident, misuse, abuse, lack
of proper maintenance, neglect, improper installation, improper
adjustment, unauthorized modications or alterations, repairs or
attempted repairs by unauthorized persons, maintenance by un-
authorized persons, the mechanical condition of your vehicle, road
hazards, failure to follow operating instructions, and/or act of God or
Nature (i.e., weather, lightning, oods, etc.).
Normal wear and tear, including deterioration of trim and other ap-
pearance items from use or exposure to sunlight.
PURCHASER DUTIES
Purchaser must maintain and service the product and comply with all
cautions, precautions and warnings as set forth in the AEVIT Owner’s
Manuals. This warranty is void if the service schedule, cautions, pre-
cautions or warnings are not followed.
HOW TO OBTAIN WARRANTY PERFORMANCE
Transport the vehicle in which the product is installed to the near-
est EMC Certied Dealer or Service Center. To nd the location of
the nearest EMC Certied Dealer or Service Center, please contact
EMC’s Customer Service Department at (207) 512-8009. The EMC
Certied Dealer or Service Center must then contact EMC to obtain
Return Authorization before removing the product or component
from your vehicle. Once EMC has issued Return Authorization, an
EMC Certied Technician must remove the product or component
from your vehicle and ship it to EMC at your expense. EMC will not
accept the return of any product or component unless EMC has
issued prior Return Authorization.
To be eective, EMC or an authorized dealer must receive notice
of any claimed defect within the applicable warranty period.
EXCLUSION OF CERTAIN DAMAGES
EMC’S LIABILITY FOR ANY DEFECTIVE PRODUCT OR COMPONENT
IS LIMITED TO THE REPAIR OR REPLACEMENT OF SAID PRODUCT
OR COMPONENT, AT OUR OPTION, AND SHALL NOT INCLUDE
DAMAGES OF ANY KIND, WHETHER INCIDENTAL, CONSEQUEN-
TIAL OR OTHERWISE. SOME STATES DO NOT ALLOW THE EXCLU-
SION OR LIMITATION OF INCIDENTAL OR CONSEQUENTIAL DAM-
AGES, SO THE ABOVE LIMITATION OR EXCLUSION MAY NOT APPLY
TO YOU.
This warranty extends only to the original retail purchaser from
the date of the initial retail purchase and is not transferable.
No EMC dealer or any other person is authorized to make any war-
ranties other than those set forth in this limited warranty or to
extend the duration of any warranties beyond the time periods
set forth in this limited warranty on behalf of EMC.
This warranty gives you specic legal rights, and you may also
have other rights which vary from state to state.
Table of contents


