AFG 3.3AT User manual
3.3AT
Read the TREADMILL GUIDE before using this OWNER’S MANUAL.
Lisez le guide du TAPIS ROULANT avant de vous référer au MANUEL DU PROPRIÉTAIRE.
Lea la GUÍA DE LA CAMINADORA antes de utilizar este MANUAL DEL PROPIETARIO.
TREADMILL OWNER’S MANUAL
MANUEL DU PROPRIÉTAIRE DU TAPIS ROULANT
MANUAL DEL PROPIETARIO DE LA CAMINADORA
AFG14_OM_3.3AT_Rev1_2.indd 1 7/31/14 4:41 PM

32
3 ENGLISH
32 FRANÇAIS
62 ESPAÑOL IMPORTANT PRECAUTIONS
SAVE THESE INSTRUCTIONS
When using an electrical product, basic precautions should always be followed, including the following: Read all instructions
before using this treadmill. It is the responsibility of the owner to ensure that all users of this treadmill are adequately
informed of all warnings and precautions. If you have any questions after reading this guide, contact Customer Tech Support
at the number listed on the back cover of the OWNER’S MANUAL.
This treadmill is intended for in-home use only. Do not use this treadmill in any commercial, rental, school or institutional
setting. Failure to comply will void the warranty.
AFG14_OM_3.3AT_Rev1_2.indd 2-3 7/31/14 4:41 PM

54
TO REDUCE THE RISK OF BURNS, FIRE, ELECTRICAL SHOCK OR INJURY TO PERSONS:
• Never use the treadmill before securing the safety tether clip to your clothing.
• If you experience any kind of pain, including but not limited to chest pains, nausea, dizziness, or shortness of breath, stop
exercising immediately and consult your physician before continuing.
• When exercising, always maintain a comfortable pace.
• Do not wear clothes that might catch on any part of the treadmill.
• Always wear athletic shoes while using this equipment.
• Do not jump on the treadmill.
• At no time should more than one person be on treadmill while in operation.
• This treadmill should not be used by persons weighing more than specified in the OWNER’S MANUAL WARRANTY
SECTION. Failure to comply will void the warranty.
• When lowering the treadmill deck, wait until rear feet are firmly on the floor before stepping on the deck.
• Disconnect all power before servicing or moving the equipment. To clean, wipe surfaces down with soap and slightly damp
cloth only; never use solvents. (See MAINTENANCE)
• The treadmill should never be left unattended when plugged in. Unplug from outlet when not in use, and before putting on
or taking off parts.
• Do not operate under blanket or pillow. Excessive heating can occur and cause fire, electric shock, or injury to persons.
• Connect this exercise product to a properly grounded outlet only.
WARNING
TO REDUCE THE RISK OF ELECTRICAL SHOCK:
Always unplug the treadmill from the electrical outlet immediately after using, before cleaning, performing maintenance and putting on or
taking off parts.
DANGER
TO REDUCE THE RISK OF BURNS, FIRE, ELECTRICAL SHOCK OR INJURY TO PERSONS:
• At NO time should children under the age of 13 or pets be within 10 feet of the machine.
• At NO time should children under the age of 13 use the treadmill.
• Children over the age of 13 or disabled persons should not use the treadmill without adult supervision.
• Use the treadmill only for its intended use as described in the treadmill guide and owner’s manual.
• Do not use other attachments that are not recommended by the manufacturer. Attachments may cause injury.
• Never operate the treadmill if it has a damaged cord or plug, if it is not working properly, if it has been dropped or damaged,
or immersed in water. Contact Customer Tech Support at the number on the back cover to schedule service.
• Keep power cord away from heated surfaces. Do not carry this unit by its supply cord or use the cord as a handle.
• Never operate the treadmill with the air opening blocked. Keep the air opening clean, free of lint, hair, and the like.
• To prevent electrical shock, never drop or insert any object into any opening.
• Do not operate where aerosol (spray) products are being used or when oxygen is being administered.
• To disconnect, turn all controls to the off position, then remove plug from outlet.
• Do not use treadmill in any location that is not temperature controlled, such as but not limited to garages, porches, pool
rooms, bathrooms, car ports or outdoors. Failure to comply may void the warranty.
• This treadmill is intended for in-home use only. Do not use this treadmill in any commercial, rental, school or institutional
setting. Failure to comply will void the warranty.
• Do not remove the console covers unless instructed by Customer Tech Support. Service should only be done by an
authorized service technician
It is essential that your treadmill is used only indoors, in a climate controlled room. If your treadmill has been exposed
to colder temperatures or high moisture climates, it is strongly recommended that the treadmill is warmed up to room
temperature before first time use. Failure to do so may cause premature electronic failure.
WARNING
WARNING
This product contains chemicals known to the State of California to cause cancer and birth defects or other reproductive harm.
AFG14_OM_3.3AT_Rev1_2.indd 4-5 7/31/14 4:41 PM
76
ASSEMBLY
There are several areas during the assembly process that special attention must be paid. It is very important to follow the
assembly instructions correctly and to make sure all parts are firmly tightened. If the assembly instructions are not followed
correctly, the treadmill could have parts that are not tightened and will seem loose and may cause irritating noises. To
prevent damage to the treadmill, the assembly instructions must be reviewed and corrective actions should be taken.
Before proceeding, find your treadmill’s serial number located on a white barcode
sticker on the base frame as shown in this image.
ENTER YOUR SERIAL NUMBER AND MODEL NAME IN THE BOXES BELOW:
» Refer to the SERIAL NUMBER and MODEL NAME when calling for service.
SERIAL NUMBER:
TM
MODEL NAME: AFG TREADMILL
WARNING
SERIAL NUMBER LOCATION
GROUNDING INSTRUCTIONS
This product must be grounded. If a treadmill should malfunction or breakdown, grounding provides a path of least resistance
for electrical current to reduce the risk of electrical shock. This product is equipped with a cord having an equipment-grounding
conductor and a grounding plug. The plug must be plugged into an appropriate outlet that is properly installed and grounded in
accordance with local codes and ordinances.
Connect this exercise product to a properly grounded outlet only.
Never operate product with a damaged cord or plug even if it is working
properly. Never operate any product if it appears damaged, or has been
immersed in water. Contact Customer Tech Support for replacement or repair.
3-POLE
GROUNDED
OUTLET
GROUNDED
POWER
CORD
WARNING
DANGER
Improper connection of the equipment-grounding conductor can result in a risk of electric shock. Check with a qualified
electrician or serviceman if you are in doubt as to whether the product is properly grounded. Do not modify the plug
provided with the product. If it will not fit the outlet, have a proper outlet installed by a qualified electrician.
This product is for use on a nominal 110-120 Volt circuit and has a grounding plug that looks like the plug in the illustration.
Make sure that the product is connected to an outlet having the same configuration as the plug. No adapter should be used with
this product.
This product must be used on a dedicated circuit. To determine if you are on a dedicated circuit, shut off the power to that circuit
and observe if any other devices lose power. If so, move devices to a different circuit. Note: There are usually multiple outlets
on one circuit. This treadmill should be used with a minimum 20-amp circuit.
AFG14_OM_3.3AT_Rev1_2.indd 6-7 7/31/14 4:41 PM

98
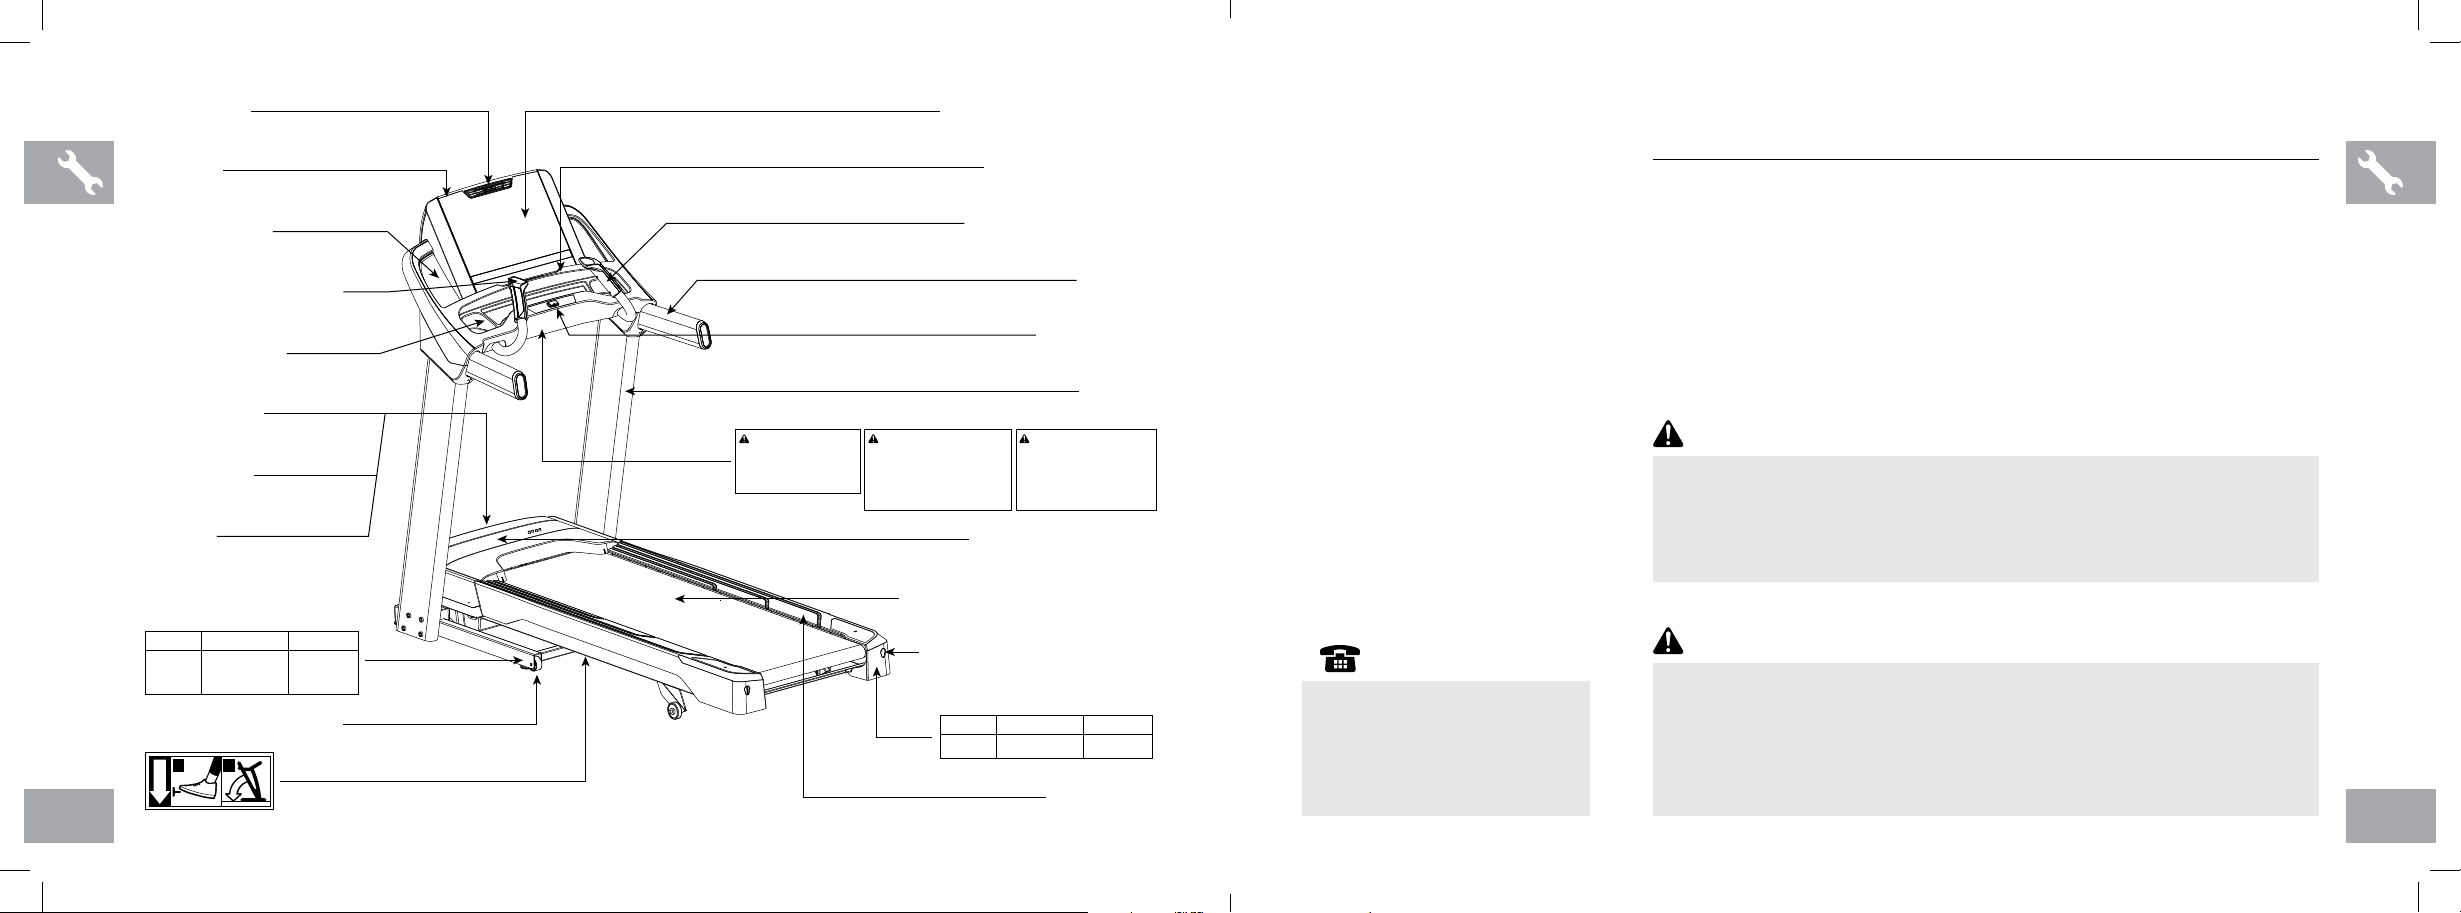
SPEAKERS
WATER BOTTLE HOLDER
HEART RATE GRIP BARS
HANDLEBARS
SPEED/INCLINE TOGGLES
CONSOLE
ON/OFF SWITCH
CIRCUIT BREAKER
TRANSPORT WHEEL
POWER CORD
CAUTION
KEEP HANDS AND FEET
AWAY FROM THIS AREA.
HIGH-PRESSURE
SHOCKS COULD CAUSE
BODILY INJURY.
READING RACK
CONSOLE FAN
CONSOLE DISPLAY AND CONTROLS
SAFETY KEY PLACEMENT
MOTOR COVER
SIDE RAIL
REAR ROLLER
TENSION/ADJUSTMENT BOLTS
CONSOLE MAST
FOOT LOCK LATCH
RUNNING BELT / RUNNING DECK
ATTACH SAFETY KEY CLIP TO CLOTHING BEFORE STARTING. TO AVOID
INJURY, STAND ON THE SIDE RAILS BEFORE STARTING TREADMILL. READ
AND FOLLOW ALL INSTRUCTIONS BEFORE OPERATING. KEEP CHILDREN
AWAY FROM THIS EQUIPMENT. REMOVE SAFETY KEY WHEN NOT IN USE
AND STORE OUT OF REACH OF CHILDREN. CONSULT A PHYSICIAN
BEFORE USING THIS EQUIPMENT. STOP EXERCISING IF YOU FEEL PAIN,
FAINT, DIZZY OR SHORT OF BREATH. KEEP BODY AND CLOTHING FREE
AND CLEAR OF ALL MOVING PARTS. FOR CONSUMER USE ONLY.
CAUTION
RISK OF INJURIES TO PERSONS:
CAUTION
KEEP HANDS AND FEET
AWAY FROM THIS AREA.
12
(UNDERNEATH DECK)
MISE EN GARDE
GARDEZ VOS MAIN ET VOS PIEDS À
L'ÉCART DE CET ENDROIT.
DES COUPS À HAUTE PRESSION
PEUVENT CAUSER DES BLESSURES
CORPORELLES.
FIXEZ L'ATTACHE DE LA CLÉ DE SÉCURITÉ À VOS VÊTEMENTS AVANT DE
COMMENCER. POUR ÉVITER LES BLESSURES, TENEZ-VOUS SUR LES RAILS
LATÉRAUX DU TAPIS ROULANT. LIRE ET SUIVRE TOUTES LES INSTRUCTIONS AVANT
D'OPÉRER. GARDEZ LES ENFANTS LOIN DE CET ÉQUIPEMENT. ENLEVEZ LA CLÉ DE
SÉCURITÉ LORSQUE LA MACHINE N'EST PAS UTILISÉE ET ENTREPOSEZ-LA HORS DE
LA PORTÉE DES ENFANTS. CONSULTEZ UN MÉDECIN AVANT D'UTILISER CET
ÉQUIPEMENT. ARRÊTEZ VOS EXERCICES SI VOUS RESSENTEZ DE LA DOULEUR, DES
FAIBLESSES, DES VERTIGES OU DE L'ESSOUFFLEMENT. GARDEZ VOTRE CORPS ET
VOS VÊTEMENTS LIBRE ET LOIN DES PIÈCES AMOVIBLES. POUR USAGE PAR LES
CONSOMMATEURS SEULEMENT.
MISE EN GARDE RISQUE DE
GARDEZ VOS MAINS ET VOS PIEDS
À L'ÉCART DE CET ENDROIT.
BLESSURES À LA PERSONNE : LESIONES PARA LAS PERSONAS:
ASEGURE EL BROCHE DE LA LLAVE DE SEGURIDAD A SU ROPA ANTES DE
COMENZAR. PARA EVITAR LESIONES, COLÓQUESE SOBRE LOS RIELES LATERALES
ANTES DE ACTIVAR LA CAMINADORA. LEA Y SIGA TODAS LAS INSTRUCCIONES
ANTES DE PONER EN FUNCIONAMIENTO LA UNIDAD. MANTENGA A LOS NIÑOS
ALEJADOS DE ESTE EQUIPO. QUITE LA LLAVE DE SEGURIDAD CUANDO NO UTILICE
EL EQUIPO Y GUÁRDELA FUERA DEL ALCANCE DE LOS NIÑOS. CONSULTE CON UN
MÉDICO ANTES DE UTILIZAR ESTE EQUIPO. DEJE DE HACER EJERCICIO SI SIENTE
DOLOR, SENSACIÓN DE DESMAYO, MAREOS O SI SIENTE FALTA DE AIRE.
MANTENGA EL CUERPO Y LA ROPA LIBRES Y ALEJADOS DE TODAS LAS PIEZAS
MÓVILES. PARA USO POR PARTE DEL CONSUMIDOR ÚNICAMENTE.
PRECAUCIÓN RIESGO DE
PRECAUCIÓN
MANTENGA LAS MANOS Y LOS
PIES ALEJADOS DE ESTA ÁREA.
PRECAUCIÓN
MANTENGA LAS MANOS Y LOS
PIES ALEJADOS DE ESTA ÁREA.
DESCARGAS DE ALTA PRESIÓN
PODRÍAN OCASIONAR LESIONES
FÍSICAS.
MISE EN GARDE
TOOLS REQUIRED:
FT-Wrench
FL-Wrench
FScrewdriver (not included)
PARTS INCLUDED:
F2 Console Masts
F1 Console Assembly
F2 Sets Console Mast Covers
F2 Heart Rate Grip Bars
F1 Hardware Kit
F1 Safety Key
F1 Power Cord
F1 USB Cover
F1 Rubber Pad For Media Players
F1 Audio Adapter Cable
F1 Bottle of Silicone Lubricant
(for 2 applications)
• DO NOT ATTEMPT TO LIFT THE TREADMILL! Do not move or lift treadmill
from packaging until specified to do so in the assembly instructions. You may
remove the plastic wrap from console masts.
• FAILURE TO FOLLOW THESE INSTRUCTIONS COULD RESULT IN INJURY!
WARNING
UNPACKING
Place the treadmill carton on a level flat surface. It is recommended that you place
a protective covering on your floor. Take CAUTION when handling and transporting
this unit. Never open box when it is on its side. Once the banding straps have been
removed, do not lift or transport this unit unless it is fully assembled and in the upright
folded position, with the lock latch secure. Unpack and assemble the unit where it
will be used. The enclosed treadmill is equipped with high-pressure shocks and may
spring open if mishandled. Never grab hold of any portion of the incline frame and
attempt to lift or move the treadmill.
PRE ASSEMBLY
• During each assembly step, ensure that ALL nuts and bolts are in place and
partially threaded. It is recommended you complete the full assembly of your
unit before completely tightening any ONE bolt.
• Several parts have been pre-lubricated to aid in assembly and usage. Please
do not wipe this off. If you have difficulty, a light application of lithium bike
grease is recommended.
IMPORTANT NOTES
If you have questions or if there
are any missing parts, contact
Customer Tech Support. Contact
information is located on the
back cover of this manual.
NEED HELP?
AFG14_OM_3.3AT_Rev1_2.indd 8-9 7/31/14 4:41 PM
1110
A
1
2
1
D
C
B
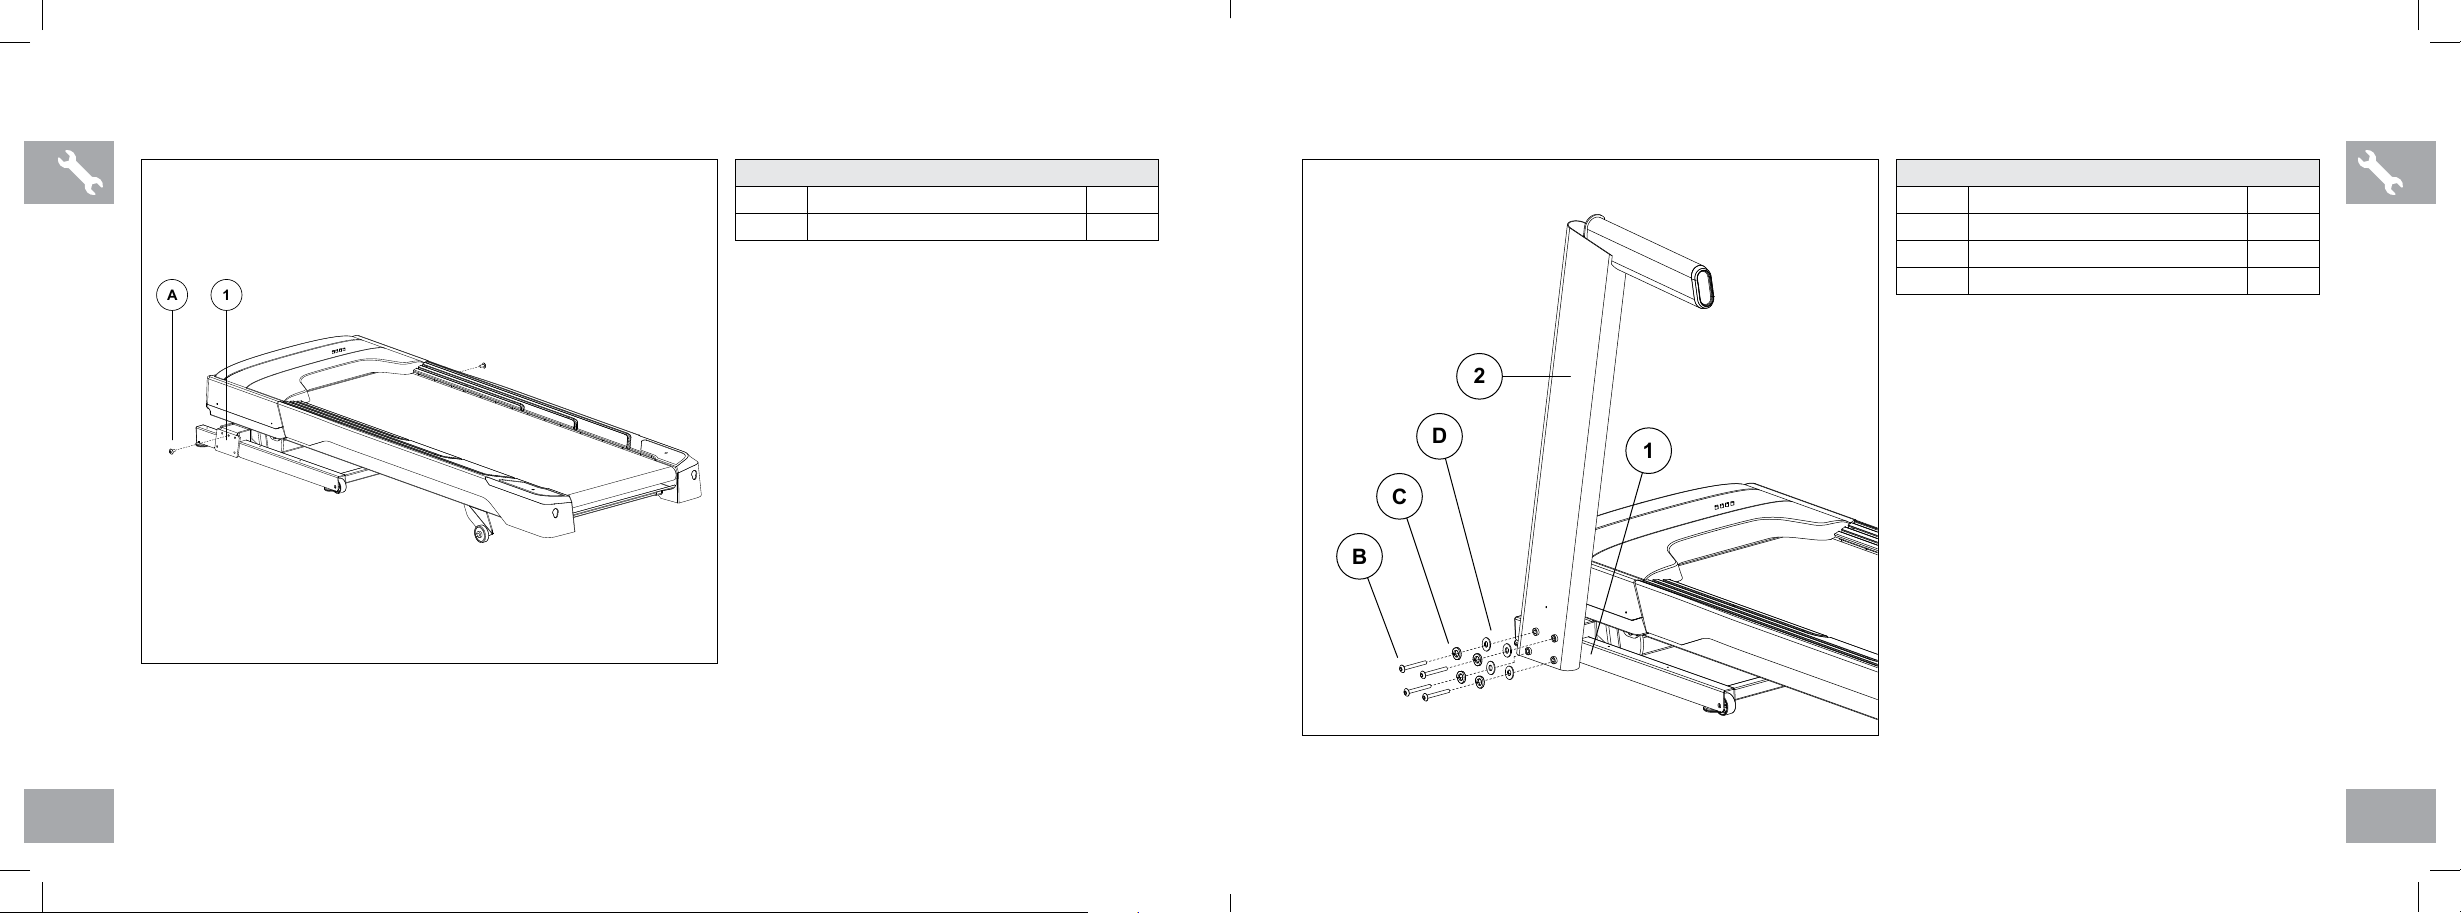
ASSEMBLY STEP 1
A Cut the yellow banding straps and lift the
running deck upward to remove all contents
from underneath the running deck.
B Open HARDWARE FOR STEP 1.
C Insert 2 BOLTS (A) into MAIN FRAME
BRACKETS (1).
HARDWARE FOR STEP 1
PART TYPE QTY
ABOLT 2
ASSEMBLY STEP 2
A Open HARDWARE FOR STEP 2.
B Attach LEFT CONSOLE MAST (2) so that
BOLT (A) sits on the NOTCHED HOLE in the
bottom of the CONSOLE MAST.
C Attach LEFT CONSOLE MAST (2) to MAIN
FRAME BRACKET (1) using 4 BOLTS (B),
4 SPRING WASHERS (C), and 4FLAT
WASHERS (D).
HARDWARE FOR STEP 2
PART TYPE QTY
B BUTTON HEAD BOLT 8
CSPRING WASHER 8
DFLAT WASHER 8
AFG14_OM_3.3AT_Rev1_2.indd 10-11 7/31/14 4:41 PM

1312
4
E
2
C
D
6
7
5
4
3
B
1
C
D
A Pull the CONSOLE CABLE (3) out of the
treadmill base frame using the LEAD WIRE.
Attach CONSOLE CABLE to the CONSOLE
CABLE in the bottom of the mast. The other
end of the CONSOLE CABLE should be
located at the top of the mast. Detach and
discard LEAD WIRES.
B Align the RIGHT CONSOLE MAST (4) so that
BOLT (A) sits in the NOTCHED HOLE in the
bottom of the CONSOLE MAST.
C Attach CONSOLE MAST (4) to MAIN FRAME
BRACKET (1) using 4 BOLTS (B), 4 SPRING
WASHERS (C), and 4FLAT WASHERS (D).
ASSEMBLY STEP 2 (continued)
HARDWARE FOR STEP 2
PART TYPE QTY
B BUTTON HEAD BOLT 8
CSPRING WASHER 8
DFLAT WASHER 8
NOTE: Do not fully tighten bolts until step 6.
NOTE: Be careful not to pinch the console
cable while attaching the right console mast.
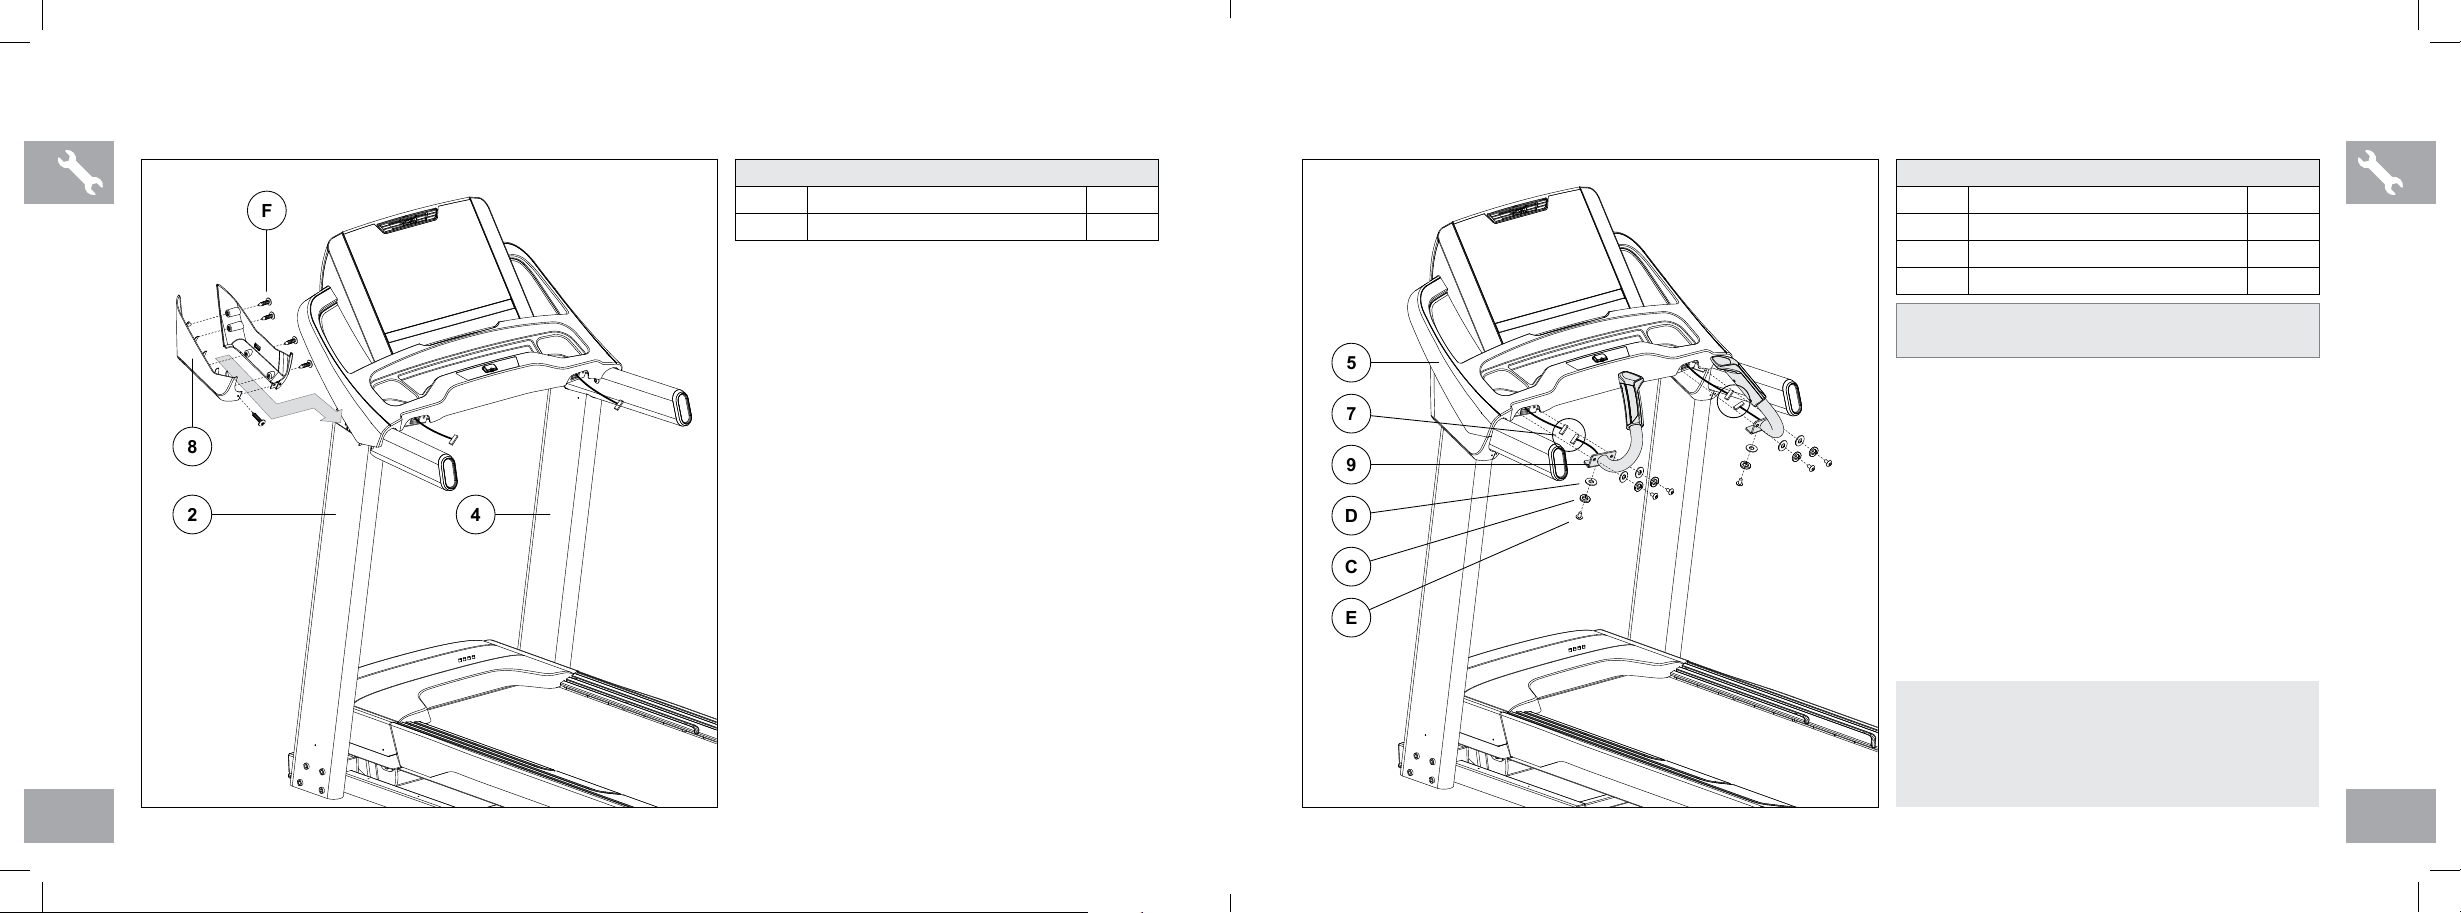
ASSEMBLY STEP 4
A Open HARDWARE FOR STEP 4.
B Gently place CONSOLE (5) on top of
CONSOLE MASTS (2 & 4).
C Connect the CONSOLE CABLES (6) and tuck
them inside the right CONSOLE MAST (4). Do
not connect the HEART RATE CABLES (7)
until STEP 5.
D Connect the CONSOLE (5) to the right
CONSOLE MAST (4) using 2 BOLTS (E),
2 SPRING WASHERS (C) and 2 FLAT
WASHERS (D).
E Repeat STEP D on other side.
HARDWARE FOR STEP 4
PART TYPE QTY
E BUTTON HEAD BOLT 4
CSPRING WASHER 4
DFLAT WASHER 4
NOTE: Be careful not to pinch the console
cables while attaching the console.
AFG14_OM_3.3AT_Rev1_2.indd 12-13 7/31/14 4:41 PM
1514
ASSEMBLY STEP 6
A Open HARDWARE FOR STEP 6.
B Connect the HEART RATE CABLES
(7) and carefully tuck them inside the
CONSOLE (5).
C Attach HEART RATE BAR (9) to the
CONSOLE (5) using using 3 BOLTS (E),
3 SPRING WASHERS (C) and 3 FLAT
WASHERS (D).
D Repeat on other side.
HARDWARE FOR STEP 6
PART TYPE QTY
E BUTTON HEAD BOLT 6
CSPRING WASHER 6
DFLAT WASHER 6
NOTE: Be careful not to pinch the console
cables while attaching the console.
2
4
8
F
5
7
9
D
C
E
ASSEMBLY STEP 5
A Open HARDWARE FOR STEP 5.
B Slide both CONSOLE MAST COVERS (8)
under the console around CONSOLE MAST
(2).
C Attach CONSOLE MAST COVERS (8) using 4
SCREWS (F) from the inside and 1 SCREW (F)
from the front.
D Repeat on other side (4).
HARDWARE FOR STEP 5
PART TYPE QTY
FSCREW 10
ASSEMBLY COMPLETE!
Before the first use, lubricate the treadmill deck by
following the instructions in the MAINTENANCE
section in the TREADMILL GUIDE.
AFG14_OM_3.3AT_Rev1_2.indd 14-15 7/31/14 4:41 PM

1716
TREADMILL OPERATION
This section explains how to use your treadmill’s console and programming. The BASIC OPERATION section in the
TREADMILL GUIDE has instructions for the following:
• LOCATION OF THE TREADMILL
• USING THE SAFETY KEY
• FOLDING THE TREADMILL
• MOVING THE TREADMILL
• LEVELING THE TREADMILL
• TENSIONING THE RUNNING BELT
• CENTERING THE RUNNING BELT
• USING THE HEART RATE FUNCTION
AFG14_OM_3.3AT_Rev1_2.indd 16-17 7/31/14 4:41 PM

1918
CONSOLE OPERATION
Note: There is a thin protective sheet of clear plastic on the overlay of the console that should be removed before use.
A) LCD DISPLAY WINDOW: time, incline, distance, LIVETRACK, speed, laps, calories, and heart rate.
B) PROGRAMMING – / + KEYS: Used to cycle through programs and LIVETRACK workout statistics.
C) ENTER: used to confirm a selection. Press to change display feedback during workout.
D) AUDIO IN JACK: plug your media player into the console using the included audio adaptor cable.
E) VOLUME: used to adjust volume up or down.
F) LIVETRACK FITNESS JOURNAL SYSTEM: see page 26 for more information.
G) USB PORT: insert USB stick for any software updates.
H) ENERGY SAVER LIGHT: indicates if machine is in Energy Saver mode.
I) PROGRAM KEYS: press to select workout.
J) INCLINE QUICK KEYS: used to reach desired incline quickly.
K) SPEED QUICK KEYS: used to reach desired speed quickly.
L) INCLINE – / + KEYS: used to adjust incline level.
M) SPEED – / + KEYS: used to adjust speed level.
N) GO / PAUSE: used to start workout, pause workout, and restart after pause.
O) STOP / HOLD TO RESET: used to stop machine and also will reset machine when held down.
P) FAN:personal workout fan
Q) FAN KEY: press to turn fan on and off.
R) SPEAKERS: plays music through speakers when connected to your media player.
S) READING RACK: holds reading material.
T) STORAGE POCKETS: holds personal items, i.e. water bottle, brought with you.
U) SAFETY KEY: enables treadmill when safety key is inserted.
V) RUBBER PAD: place rubber pad above reading rack to help secure your media player.
P
NF U
S
O I
D
E
A
B
C
J
H
V
L M
T T
G
Q
K
R R
AFG14_OM_3.3AT_Rev1_2.indd 18-19 7/31/14 4:41 PM

2120
GETTING STARTED
1) Check to make sure no objects are placed on the belt that
will hinder the movement of the treadmill.
2) Plug in the power cord and turn the treadmill ON.
3) Stand on the side rails of the treadmill.
4) Attach the safety key clip to part of your clothing making
sure that it is secure and will not become detached during
operation.
5) Insert the safety key into the safety keyhole in the console.
6) Select User 1, User 2, or Guest using –/+and press
ENTER.
7) You have two options to start your workout:
A) QUICK START UP
Simply press the GO key to begin working out.
Time, distance, and calories will all count up from zero. OR...
B) SELECT A PROGRAM
8) Press desired PROGRAM BUTTON to select workout.
9) Set workout time using –/+and press ENTER.
10) Set workout level using –/+and press ENTER.
11) Press GO to begin workout.
NOTE: You can adjust the speed and incline during your
workout.
FINISHING YOUR WORKOUT
When your workout is complete, the console
will display “workout complete” and beep. Your
workout information will stay displayed on the
console for 30 seconds and then reset.
TO RESET THE CONSOLE
Hold STOP key for 3 seconds.
TO CLEAR CURRENT SELECTION
To clear the current program selection or screen,
hold the stop button for 3 seconds.
DISPLAY WINDOWS
• TIME: Shown as minutes : seconds. View the time remaining or the time elapsed in your workout.
• DISTANCE: Shown as miles. Indicates distance traveled or distance remaining during your workout.
• SPEED: Shown as MPH. Indicates how fast the belt is moving.
• CALORIES: Total calories burned during your workout.
• HEART RATE (HR): Shown as BPM (beats per minute). Used to monitor your heart rate (displayed when
contact is made with both pulse grips).
• INCLINE: Shown as percent. Indicates the incline level of the running surface.
• TRACK: Follows progress around a simulated track. Segments light up with every 50 meters completed.
• LAPS: Shows how many 400 meter (¼ mile) laps have been completed.
• LIVETRACK: When LIVETRACK is activated, the LIVETRACK information is displayed. See page 26.
AFG14_OM_3.3AT_Rev1_2.indd 20-21 7/31/14 4:41 PM
2322
PROGRAM INFORMATION
1) MANUAL: Adjust your speed and incline manually during your workout.
2) WEIGHT LOSS: Promotes weight loss by
increasing and decreasing the speed and
incline, while keeping you in your fat burning
zone. Speed and Incline changes, segments
repeat every 30 seconds.
3) MUSCLE TONER: Tones muscles by
adjusting incline gradually while keeping you
in your fat burning zone. Segments change
every 30 seconds. Time based goal with
10 difficulty levels to choose from.
4) STRENGTH BUILDER: Time segments vary
from 30 to 90 segments long to challenge
your stamina and strength. Time based goal
with 10 difficulty levels to choose from.
5) SPEED INTERVALS:
Improves your strength,
speed and endurance by
increasing and decreasing
the speed throughout your
workout to involve your heart
and other muscles. Speed
changes and segments
repeat 90 seconds and
30 seconds.
6) PEAK INTERVALS: Improves your strength, speed and endurance
by increasing and decreasing the speed and incline throughout your
workout to involve your heart and other muscles. Speed and Incline
changes, segments repeat 90 seconds and 30 seconds.
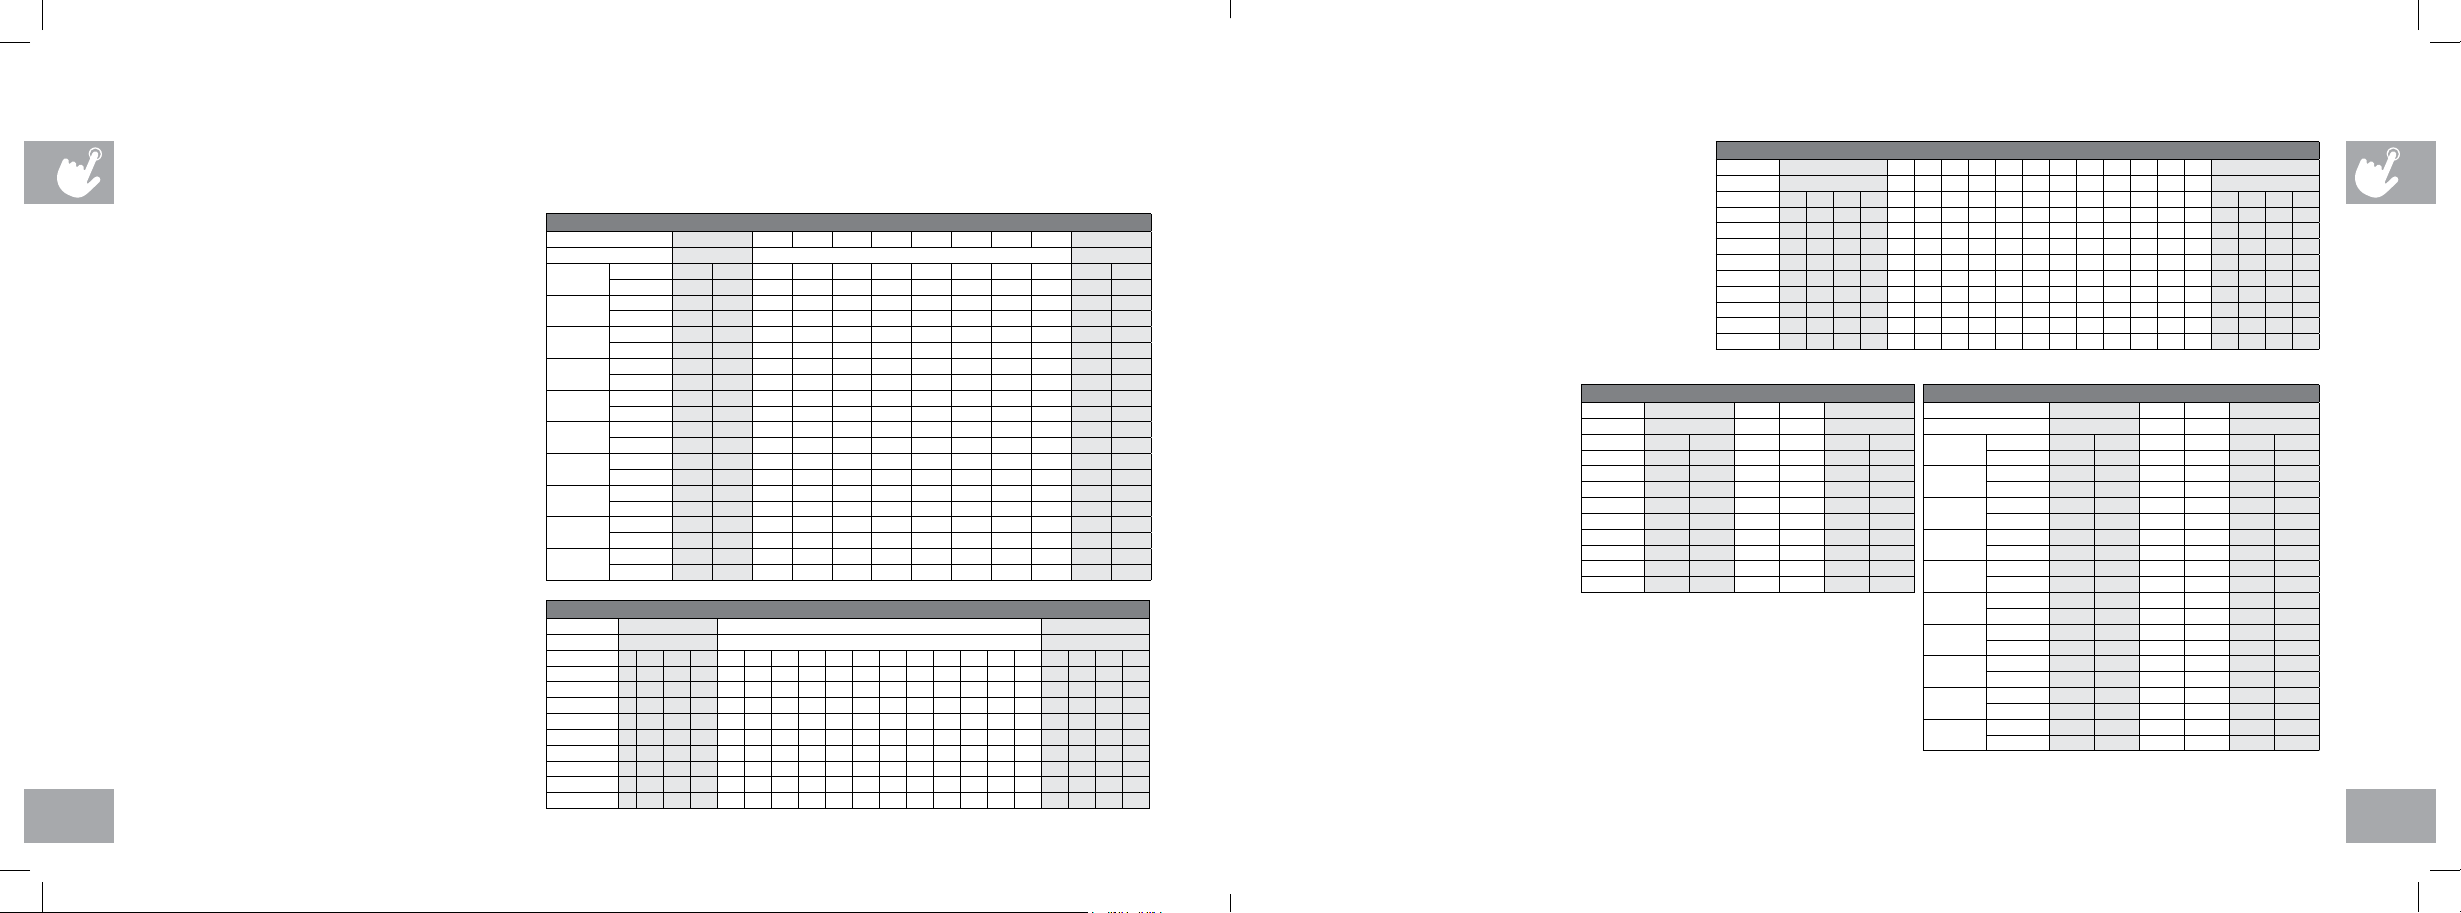
WEIGHT LOSS
Segment Warm Up 1 2 3 4 5 6 7 8 Cool Down
Time 4:00
min
Each segment is 30 seconds 4:00
min
Level 1 Incline 0.0 0.5 1.5 1.5 1.0 0.5 0.5 0.5 1.0 1.5 0.5 0.0
Speed 1.0 1.5 2.0 2.5 3.0 3.5 4.0 3.5 3.0 2.5 2.3 1.5
Level 2 Incline 0.0 0.5 1.5 1.5 1.0 0.5 1.0 0.5 1.0 1.5 0.5 0.0
Speed 1.3 1.9 2.5 3.0 3.5 4.0 4.5 4.0 3.5 3.0 2.6 1.8
Level 3 Incline 0.5 1.0 2.0 2.0 1.5 1.0 1.0 1.0 1.5 2.0 1.0 0.5
Speed 1.5 2.3 3.0 3.5 4.0 4.5 5.0 4.5 4.0 3.5 3.0 2.0
Level 4 Incline 0.5 1.0 2.0 2.0 1.5 1.0 1.0 1.0 1.5 2.0 1.0 0.5
Speed 1.8 2.6 3.5 4.0 4.5 5.0 5.5 5.0 4.5 4.0 3.4 2.3
Level 5 Incline 1.0 1.5 2.5 2.5 2.0 1.5 1.5 1.5 2.0 2.5 1.5 1.0
Speed 2.0 3.0 4.0 4.5 5.0 5.5 6.0 5.5 5.0 4.5 3.8 2.5
Level 6 Incline 1.0 1.5 2.5 2.5 2.0 1.5 1.5 1.5 2.0 2.5 1.5 1.0
Speed 2.3 3.4 4.5 5.0 5.5 6.0 6.5 6.0 5.5 5.0 4.1 2.8
Level 7 Incline 1.5 2.0 3.0 3.0 2.5 2.0 2.0 2.0 2.5 3.0 2.0 1.5
Speed 2.5 3.8 5.0 5.5 6.0 6.5 7.0 6.5 6.0 5.5 4.5 3.0
Level 8 Incline 1.5 2.0 3.0 3.0 2.5 2.0 2.0 2.0 2.5 3.0 2.0 1.5
Speed 2.8 4.1 5.5 6.0 6.5 7.0 7.5 7.0 6.5 6.0 4.9 3.3
Level 9 Incline 2.0 2.5 3.5 3.5 3.0 2.5 2.5 2.5 3.0 3.5 2.5 2.0
Speed 3.0 4.5 6.0 6.5 7.0 7.5 8.0 7.5 7.0 6.5 5.3 3.5
Level 10 Incline 2.0 2.5 3.5 3.5 3.0 2.5 2.5 2.5 3.0 3.5 2.5 2.0
Speed 3.3 4.9 6.5 7.0 7.5 8.0 8.5 8.0 7.5 7.0 5.6 3.8
STRENGTH BUILDER - INCLINE ONLY
Segment Warm Up 12345678910 11 12 Cool Down
Seconds 4:00
min
30 60 90 60 90 45 60 45 90 90 30 30 4:00
min
Level111122221221221222111
Level211123232232232232111
Level311124342342342342111
Level411125453453453452111
Level512225554554554552221
Level612236565565565563221
Level712237675675675673221
Level811129898898898892111
Level 9 2 2 2 3 11 10 11 910 11 910 11 910 11 2111
Level 10 2 3 4 5 12 12 12 11 12 12 11 12 12 11 12 12 3221
MUSCLE TONER - INCLINE ONLY
Segments Warm Up Program Segments - Repeat Cool Down
Time 4:00
min
Each segment is 30 seconds 4:00
min
Level100011122112211221000
Level200121223122312232100
Level301122233223322332110
Level411122334233423342111
Level522223344334433442222
Level622233445344534453222
Level733335566556655663333
Level833346677667766774333
Level 9 3 3 4 4 7 7 8 9 7 7 8 10 7 7 10 10 4 4 3 3
Level 10 3 4 4 5 8 10 10 10 8 8 11 11 8 8 12 12 5 4 4 3
SPEED INTERVALS
Segment Warm Up 1 2 Cool Down
Time 4:00
min
90
sec
30
sec
4:00
min
Level 1 1.0 1.5 2.0 4.0 1.5 1.0
Level 2 1.0 1.5 2.0 4.5 1.5 1.0
Level 3 1.3 1.9 2.5 5.0 1.9 1.3
Level 4 1.3 1.9 2.5 5.5 1.9 1.3
Level 5 1.5 2.3 3.0 6.0 2.3 1.5
Level 6 1.5 2.3 3.0 6.5 2.3 1.5
Level 7 1.8 2.6 3.5 7.0 2.6 1.8
Level 8 1.8 2.6 3.5 7.5 2.6 1.8
Level 9 2.0 3.0 4.0 8.0 3.0 2.0
Level 10 2.0 3.0 4.0 8.5 3.0 2.0
PEAK INTERVALS
Segment Warm Up 1 2 Cool Down
Time 4:00
min
90
sec
30
sec
4:00
min
Level 1 Speed 1.0 1.5 2.0 4.0 1.5 1.0
Incline 1.0 1.5 0.5 1.5 1.5 0.0
Level 2 Speed 1.0 1.5 2.0 4.5 1.5 1.0
Incline 1.5 2.5 3.0 6.5 2.5 1.5
Level 3 Speed 1.3 1.9 2.5 5.0 1.9 1.3
Incline 2.0 3.0 4.0 7.5 3.0 2.0
Level 4 Speed 1.3 1.9 2.5 5.5 1.9 1.3
Incline 2.0 3.0 4.0 8.0 3.0 2.0
Level 5 Speed 1.5 2.3 3.0 6.0 2.3 1.5
Incline 2.5 3.5 4.5 8.5 3.5 2.5
Level 6 Speed 1.5 2.3 3.0 6.5 2.3 1.5
Incline 2.5 3.5 4.5 9.0 3.5 2.5
Level 7 Speed 1.8 2.6 3.5 7.0 2.6 1.8
Incline 2.5 4.0 5.5 9.5 4.0 3.0
Level 8 Speed 1.8 2.6 3.5 7.5 2.6 1.8
Incline 3.0 4.0 5.5 9.5 4.0 3.0
Level 9 Speed 2.0 3.0 4.0 8.0 3.0 2.0
Incline 3.0 4.5 6.0 10.0 5.0 3.0
Level 10 Speed 2.0 3.0 4.0 8.5 3.0 2.0
Incline 3.0 4.5 6.0 10.0 5.0 3.0
AFG14_OM_3.3AT_Rev1_2.indd 22-23 7/31/14 4:41 PM

2524
7-8) 5K/10K: Programs that allow
you to set and work toward
a distance goal. Treadmill
automatically adjusts incline to
simulate running on an actual
course. Incline changes and all
segments are 0.16 Km.
9) TRAIL RUN: Simulates climbing
mountains by increasing and decreasing
the incline. Time-based goal with 10
difficulty levels to choose from.
10)TRAIL CLIMB: This high-intensity
ascending cardio program gives you a
solid and varied workout with 10 different
challenge levels.
5K / 10K - INCLINE ONLY
Segment Warm Up 1 2 3 4 5 6 7 8 9 10 11 12 13 14 15 Cool Down
Incline 4:00
min
Each segment is 0.16 Km 4:00
min
Level 1 0.0 0.5 1.0 3.0 1.0 3.0 2.0 3.0 2.0 3.5 2.0 3.0 2.0 3.0 1.0 3.0 1.0 0.5 0.0
Level 2 0.0 0.5 1.0 3.0 2.0 3.0 2.0 3.0 2.5 3.5 2.5 3.0 2.0 3.0 2.0 3.0 1.0 0.5 0.0
Level 3 0.5 1.0 1.5 3.5 1.5 3.5 2.5 3.5 2.5 4.0 2.5 3.5 2.5 3.5 1.5 3.5 1.5 1.0 0.5
Level 4 0.5 1.0 1.5 3.5 2.5 3.5 2.5 3.5 3.0 4.0 3.0 3.5 2.5 3.5 2.5 3.5 1.5 1.0 0.5
Level 5 1.0 1.5 2.0 4.0 2.0 4.0 3.0 4.0 3.0 4.5 3.0 4.0 3.0 4.0 2.0 4.0 2.0 1.5 1.0
Level 6 1.0 1.5 2.0 4.0 3.0 4.0 3.0 4.0 3.5 4.5 3.5 4.0 3.0 4.0 3.0 4.0 2.0 1.5 1.0
Level 7 1.5 2.0 2.5 4.5 2.5 4.5 3.5 4.5 3.5 5.0 3.5 4.5 3.5 4.5 2.5 4.5 2.5 2.0 1.5
Level 8 1.5 2.0 2.5 4.5 3.5 4.5 3.5 4.5 4.0 5.0 4.0 4.5 3.5 4.5 3.5 4.5 2.5 2.0 1.5
Level 9 2.0 2.5 3.0 5.0 3.0 5.0 4.0 5.0 4.0 5.5 4.0 5.0 4.0 5.0 3.0 5.0 3.0 2.5 2.0
Level 10 2.0 2.5 3.0 5.0 4.0 5.0 4.0 5.0 4.5 5.5 4.5 5.0 4.0 5.0 4.0 5.0 3.0 2.5 2.0
TRAIL RUN - INCLINE CHANGES
Segment Warm Up Program Segments - Repeat Cool Down
Seconds 4:00
min
30 60 60 30 30 60 30 60 60 30 30 60 4:00
min
Level 1 11113113313113311111
Level 2 11123113313113312111
Level 3 11124224424224422111
Level 4 11134224424224423111
Level 5 12335335535335533321
Level 6 12345335535335534321
Level 7 12346446646446644321
Level 8 12356446646446645321
Level 9 22357557757557755322
Level 10 22467557757557756422
PROGRAM INFORMATION
TRAIL CLIMB - INCLINE ONLY
Segment Warm Up Program Segments - Repeat Cool Down
Seconds 4:00
min
30 60 60 30 30 60 30 60 60 30 30 60 4:00
min
Level111235566666667773211
Level211245666667778884211
Level311116667888788781111
Level411116666788999991111
Level51112566678999910101221
Level 6 2 2 2 3 5 6 6 6 7 8 9 9 10 10 10 10 2 1 1 1
Level723346666778991011 11 2211
Level823446667788991011 11 3211
Level92445777889991011 12 12 3 2 1 1
Level 10 3 4 5 6 7 7 8 8 9 9 9 10 11 11 12 12 4 2 1 1
CUSTOM PROGRAM INFORMATION
Lets you create and reuse a perfect workout for you with specific speed, incline and time combination. The ultimate in
personal programming. Time-based goal.
1) Press the CUSTOM program button and press ENTER.
2) Set the workout time using the –/+and press ENTER.
3) Use –/+to set the speed for each segment. Press ENTER to confirm the speed setting for each segment of the
workout.
4) Use –/+to set the incline for each segment. Press ENTER to confirm the incline setting for each segment of the
workout.
5) Press GO to begin workout.
DATE AND CLOCK SETUP
1) Enter setup mode: Press and hold 1 & 2 SPEED QUICK KEYS for 3-5 seconds.
2) Use –/+to change settings and press ENTER to confirm settings.
3) Settings include: MONTH, DAY, YEAR, HOUR, MINUTE, and AM/PM.
4) Review settings: You can review your settings at any time while in setup mode.
Use the ENTER button to scroll through settings.
5) Exit setup mode: To confirm the DATE and TIME, press and hold ENTER for 3 seconds.
6) To reset simply reenter setup mode and adjust DATE and TIME to the correct setting.
AFG14_OM_3.3AT_Rev1_2.indd 24-25 7/31/14 4:41 PM

2726
1) PERSONAL BEST: allows user to scroll through and view 5
personal bests for all previous workouts. They are:
• Best Mile – fastest time in which the user has completed a
mile
• Best 5K – fastest time in which the user has completed a 5K
• Longest Workout – (time)
• Longest Workout – (distance)
• Calories Burned – most calories user has burned in one
workout
2) LAST 5 WORKOUTS: allows you to view data from your
previous 5 workouts. The following data from these 5
workouts can be scrolled through and viewed by pressing the
WORKOUT STATS key:
• Time – total time of selected workout
• Distance – total distance of selected workout
LIVETRACK™ FITNESS JOURNAL SYSTEM
The integrated LIVETRACK software allows you to track your fitness progress over time without the need for paper journals or
logs. With LIVETRACK, you can easily compare your current workout to your last, average or lifetime workout totals. With quick
access to feedback like duration of workout or calories burned during previous workouts, you’ll be able to see the progress
you’ve made.
SETUP
To activate LIVETRACK fitness journal system a user MUST
be chosen before the program begins. To select a USER 1 or
2, use –/+and press ENTER to confirm. All workout data will
accumulate only for the user that is chosen. NOTE: If no user is
selected data will not be tracked.
RESET
Reset all recorded information for User 1 or User
2 by selecting the user and then holding down the
WORKOUT STATS/HOLD TO RESET key for 10
seconds. NOTE: This step is permanent and will
delete ALL previously accumulated data for the
chosen user.
• Calories – total calories burned during selected
workout
• Pace – average pace during selected workout
• Elevation Gain (feet) – total elevation climbed, in
feet, during selected workout
3) WORKOUT TOTALS: allows you to view the
total accumulated workout data. Pressing the
WORKOUT TOTALS key will allow you to scroll
through the following totals:
• Total Workouts
• Total Distance
• Total Calories
• Total Time
• Elevation Gain – total elevation climbed in feet
ACCUMULATED DATA
Once LIVETRACK is activated, you can scroll through your accumulated data in multiple formats by pressing the LIVETRACK
buttons. A workout is saved when: the program ends, the console is paused and not resumed within 5 minutes, or the STOP
button is held to reset the console.
USING YOUR MEDIA PLAYER
1) Connect the included AUDIO ADAPTOR CABLE to the AUDIO IN JACK on the left of the console and the
headphone jack on your media player.
2) Use your media player buttons to adjust song settings.
3) Remove the AUDIO ADAPTOR CABLE when not in use.
ENERGY SAVER (STANDBY MODE)
This machine has a special feature called Energy Saver™ mode. This mode is NOT automatically activated.
When Energy Saver mode is activated, the display will automatically enter standby mode (Energy Saver mode) after
15 minutes of inactivity. This feature saves energy by disabling most power to the machine until a key is pressed on
the console. This feature can be turned on or off in the engineering menu.
To enter the engineering menu, press and hold the + INCLINE key and – SPEED key for 3-5 seconds. Use the –/+
keys to navigate through the menu to ENG3. Press ENTER to select. Use –/+keys to select ENRGY SVE ON or
OFF. Press and hold STOP for 3-5 seconds to exit ENG3. Press and hold STOP again for 3-5 seconds to exit the
engineering menu.
AFG14_OM_3.3AT_Rev1_2.indd 26-27 7/31/14 4:41 PM

292828
LIMITED HOME-USE WARRANTY
AFG14_OM_3.3AT_Rev1_2.indd 28-29 7/31/14 4:41 PM

3130
WEIGHT CAPACITY = 325 lbs (147 kilograms)
FRAME = LIFETIME
Warranty on the frame against defects in workmanship and
materials for a lifetime period of the buyer from the date of
purchase, so long as the device remains in the possession of the
original owner. (The frame is defined as the welded metal base of
the unit and does not included any parts that can be removed.)
DRIVE MOTOR/ELEVATION MOTOR = LIFETIME
Warranty on the drive/elevation motors against defects in
workmanship and materials for a lifetime period of the buyer
from the date of purchase, so long as the device remains in the
possession of the original owner. Labor or installation of motor is
not covered under the motor warranty.
ELECTRONICS & PARTS = 3 YEARS
Warranty on the electronic components, finish and all original
parts for the period specified above from the date of original
purchase, so long as the device remains in the possession of the
original owner.
LABOR = 1 YEAR
Warranty shall cover the labor cost for the repair of the device for
the period specified above from the date of the original purchase,
so long as the device remains in the possession of the original
owner.
EXCLUSIONS AND LIMITATIONS
Who IS covered:
• The original owner and is not transferable.
What IS covered:
• Repair or replacement of a defective motor,
electronic component, or defective part and is the
sole remedy of the warranty.
What IS NOT covered:
• Normal wear and tear, improper assembly or
maintenance, or installation of parts or accessories
not originally intended or compatible with the
equipment as sold.
• Damage or failure due to accident, abuse,
corrosion, discoloration of paint or plastic, neglect,
theft, vandalism, fire, flood, wind, lightning, freezing,
or other natural disasters of any kind, power
reduction, fluctuation or failure from whatever
cause, unusual atmospheric conditions, collision,
introduction of foreign objects into the covered
unit, or modifications that are unauthorized or not
recommended by the manufacturer.
• Incidental or consequential damages. The
manufacturer is not responsible or liable for indirect,
special or consequential damages, economic loss,
loss of property, or profits, loss of enjoyment or use,
or other consequential damages of whatsoever
nature in connection with the purchase, use, repair
SERVICE/RETURNS
• In-home service is available within 150 miles of the
nearest authorized Service Provider (Mileage beyond
150 miles from an authorized service center is the
responsibility of the consumer).
• All returns must be pre-authorized by the manufacturer.
• The manufacturer’s obligation under this warranty is
limited to replacing or repairing, at the manufacturer’s
option, the same or comparable model.
• The manufacturer may request defective components
be returned to the manufacturer upon completion of
warranty service using a prepaid return shipping label.
If you have been advised to return parts and did not
receive a label, please contact Customer Tech Support.
• Replacement units, parts and electronic components
reconditioned to as-new condition by the manufacturer
or its vendors may sometimes be supplied as warranty
replacement and constitute fulfillment of warranty terms.
• This warranty gives you specific legal rights, and your
rights may vary from state to state.
or maintenance of the equipment. The manufacturer
does not provide monetary or other compensation for
any such repairs or replacement parts costs, including
but not limited to gym membership fees, work time lost,
diagnostic visits, maintenance visits or transportation.
• Equipment used for commercial purposes or any use
other than a single family or Household, unless endorsed
by the manufacturer for coverage.
• Equipment owned or operated outside the US and
Canada.
• Delivery, assembly, installation, setup for original or
replacement units or labor or other costs associated with
removal or replacement of the covered unit.
• Any attempt to repair this equipment creates a risk of
injury. The manufacturer is not responsible or liable for
any damage, loss or liability arising from any personal
injury incurred during the course of, or as a result of
any repair or attempted repair of your fitness equipment
by other than an authorized service technician. All
repairs attempted by you on your fitness equipment are
undertaken AT YOUR OWN RISK and the manufacturer
shall have no liability for any injury to the person or
property arising from such repairs.
• If you are out of the manufacturer’s warranty but have
an extended warranty, refer to your extended warranty
contract for contact information regarding requests for
extended warranty service or repair.
AFG14_OM_3.3AT_Rev1_2.indd 30-31 7/31/14 4:41 PM

3332
FRANÇAIS PRÉCAUTIONS IMPORTANTES
CONSERVEZ CES DIRECTIVES
Lorsque vous utilisez un produit électrique, des précautions de base doivent toujours être respectées, y compris les suivantes : Lisez
toutes les directives avant d’utiliser ce tapis roulant. Il incombe au propriétaire de veiller à ce que tous les utilisateurs de tapis roulant soient
adéquatement informés de tous les avertissements et précautions. Pour toute question après la lecture de ce guide, communiquez avec le
service de soutien technique à la clientèle au numéro indiqué sur l’endos du MANUEL DU PROPRIÉTAIRE.
Ce tapis roulant est prévu uniquement pour un usage à la maison. N’utilisez pas ce tapis roulant dans un milieu commercial, locatif, scolaire
ou institutionnel. Ne pas se conformer à cette directive annulera la garantie.
AFG14_OM_3.3AT_Rev1_2.indd 32-33 7/31/14 4:41 PM
3534
POUR RÉDUIRE LE RISQUE DE BRÛLURES, D’INCENDIE, DE CHOC ÉLECTRIQUE OU DE BLESSURES :
• N’utilisez jamais le tapis roulant avant d’avoir fixer la pince d’attache de sécurité à votre vêtement.
• Si vous éprouvez une douleur quelconque, notamment une douleur à la poitrine, de la nausée, des étourdissement ou un essoufflement,
cessez immédiatement l’exercice et consultez un médecin avant de continuer à utiliser le tapis roulant.
• Durant l’exercice, adoptez toujours un rythme confortable.
• Ne portez pas de vêtements pouvant se prendre dans toute pièce du tapis roulant.
• Portez toujours des chaussures athlétiques lorsque vous utilisez cet équipement.
• Ne sautez pas sur le tapis roulant.
• En aucun temps, plus d’une personne ne doit se trouver sur le tapis roulant lorsqu’il fonctionne.
• Ce tapis roulant ne doit pas être utilisé par des personnes pesant plus que la capacité indiquée dans la SECTION de la GARANTIE DU
MANUEL DU PROPRIÉTAIRE. Ne pas se conformer à cette directive annulera la garantie.
• Au moment de descendre le pont du tapis roulant, attendez que les pieds arrière reposent fermement sur le sol avant de monter sur le
pont.
• Mettez l’équipement hors tension avant d’effectuer un entretien ou de le déplacer. Pour nettoyer, essuyez les surfaces avec du savon et un
chiffon légèrement humide : n’utilsez jamais de solvants. (Reportez-vous à la section ENTRETIEN)
• Le tapis roulant ne doit pas être laissé sans surveillance lorsqu’il est branché. Débranchez le tapis roulant de la prise lorsqu’il n’est pas
utilisé, et avant d’installer ou d’enlever des pièces.
• N’utilisez pas le tapis roulant sous une couverture ou un oreiller. Une chaleur excessive peut alors se produire et causer un incendie, un
choc électrique ou des blessures.
• Branchez cet exerciseur uniquement à une prise appropriée de mise à la terre.
AVERTISSEMENT
POUR RÉDUIRE LE RISQUE DE CHOC ÉLECTRIQUE :
Débranchez toujours le tapis roulant de la prise électrique immédiatement après l’avoir utilisé, avant de le nettoyer et d’effectuer un entretien ainsi
qu’avant d’ajouter ou d’enlever des pièces.
DANGER
POUR RÉDUIRE LE RISQUE DE BRÛLURES, D’INCENDIE, DE CHOC ÉLECTRIQUE OU DE BLESSURES :
• En AUCUN temps, les enfants de moins de 13 ans et les animaux de compagnie ne devraient se tenir à moins de 3 m (10 pi) du tapis
roulant.
• En AUCUN temps, les enfants de moins de 13 ans ne devraient utiliser le tapis roulant.
• Les enfants de plus de 13 ans ou les personnes souffrant d’un handicap ne doivent pas utiliser le tapis roulant sans la supervision d’un
adulte.
• Utilisez le tapis roulant uniquement aux fins prévues comme il est décrit dans le guide du tapis roulant et le manuel du propriétaire.
• N’utilisez pas d’autres accessoires qui ne sont pas recommandés par le fabricant. Les accessoires peuvent causer des blessures.
• N’utilisez jamais le tapis roulant si le cordon ou la fiche est endommagé, s’il ne fonctionne pas correctement, s’il a été échappé ou
endommagé ou encore s’il a été immergé dans l’eau. Communiquez avec le soutien technique à la clientèle au numéro indiqué au verso du
manuel pour prendre un rendez-vous pour le service.
• Tenez le cordon d’alimentation loin des surfaces chauffées. Ne transportez pas cet appareil par son cordon d’alimentation et n’utilisez pas
le cordon comme poignée.
• N’utilisez jamais le tapis roulant si l’ouverture d’air est bloquée. Tenez l’ouverture d’air propre et exempte de peluche, de cheveux, etc.
• Pour éviter tout choc électrique, n’échappez ni n’insérez jamais un objet dans toute ouverture de l’équipement.
• N’utilisez pas le tapis roulant dans un endroit où des produits (pulvérisation) aérosols sont utilisés ou si de l’oxygène est administré.
• Pour débrancher l’équipement, réglez toutes les commandes à la position « OFF » (arrêt), puis retirez la fiche de la prise.
• N’utilisez pas le tapis roulant dans un endroit où la température n’est pas régulée, notamment les garages, les vérandas, les salles de
billard, les salles de bain, les abris d’auto ou à l’extérieur. Ne pas se conformer à cette directive peut annuler la garantie.
• Ce tapis roulant est prévu uniquement pour un usage à la maison. N’utilisez pas ce tapis roulant dans un milieu commercial, locatif, scolaire
ou institutionnel. Ne pas se conformer à cette directive annulera la garantie.
• N’enlevez pas les garnitures de console à moins d’en avoir reçu les directives du Soutien technique à la clientèle. L’entretien et les
réparations ne doivent être effectués que par un technicien en entretien et en réparation autorisé.
Il est essentiel de n’utiliser le tapis roulant qu’à l’intérieur, dans une pièce climatisée. Si votre tapis roulant a été exposé à des
températures basses ou à un climat très humide, il est fortement recommandé de le laisser réchauffer à la température ambiante avant
la première utilisation. Ne pas se conformer à cette directive peut causer une défaillance électronique prématurée.
AVERTISSEMENT
AVERTISSEMENT
Ce produit contient des produits chimiques reconnus par l’État de Californie pour causer le cancer et des malformations congénitales ou
autres problèmes de reproduction.
AFG14_OM_3.3AT_Rev1_2.indd 34-35 7/31/14 4:41 PM

3736
INSTRUCTIONS DE MISE À LA TERRE
Cet appareil doit être mis à la terre. Si le tapis roulant fait défaut ou tombe en panne, la mise à la terre fournit une voie de moindre résistance
pour le courant électrique en vue de réduire le risque de choc électrique. Ce tapis roulant est muni d’un cordon avec un conducteur de terre
d’équipement et d’une fiche de terre. La fiche doit être branchée dans une prise appropriée qui est correctement installée et mise à la terre
conformément à tous les codes et ordonnances locaux.
Branchez cet exerciseur uniquement à une prise appropriée de mise à la terre.
Ne faites jamais fonctionner l’appareil dont l’un des cordons ou l’une des prises est
endommagé(e), même s’ils fonctionnent correctement. Ne faites jamais fonctionner un
produit qui semble endommagé ou qui a été plongé dans l’eau. Communiquez avec le
soutien technique à la clientèle pour des pièces de remplacement ou une réparation.
PRISE MISE
À LA TERRE À
TROIS BROCHES
CORDON
D’ALIMENTATION
MIS À LA TERRE
DANGER
Une mauvaise connexion du conducteur de protection peut causer un risque de choc électrique. Vérifiez auprès d’un électricien ou d’un
préposé à l’entretien qualifié si vous avez des doutes quant à la mise à la terre adéquate du produit. Ne modifiez pas la fiche fournie avec
le produit. Si elle n’est pas compatible avec la prise, faites poser une prise adéquate par un électricien qualifié.
Ce produit doit être utilisé sur un circuit nominal de 110-120 V et comporte une fiche de mise à la terre qui ressemble à la fiche de l’illustration.
Assurez-vous que le produit est branché à une prise dont la configuration est identique à la fiche. Aucun adaptateur doit être utilisé avec ce
produit.
Ce produit doit être utilisé sur un circuit spécialisé. Pour déterminer si vous êtes sur un circuit spécialisé, coupez l’alimentation de ce circuit et
voyez si les autres appareils sont encore alimentés. Si c’est le cas, utilisez un autre circuit pour ces appareils. Remarque : Un circuit comprend
généralement plusieurs prises. Ce tapis roulant doit être utilisé avec un circuit d’au moins 20 A.
AVERTISSEMENT
ASSEMBLAGE
Le processus d’assemblage comporte certaines étapes au cours desquelles il faut faire particulièrement attention. Il importe de suivre les
instructions d’assemblage à la lettre et de s’assurer que toutes les pièces sont bien serrées. Si on ne suit pas correctement les instructions
d’assemblage, certaines parties du tapis roulant pourraient être mal serrées et bouger et elles pourraient causer des bruits irritants. Pour
éviter les dommages au tapis roulant, relisez les instructions d’assemblage et prenez les mesures correctives qui s’imposent.
Avant de continuer, recherchez le numéro de série et le nom du modèle du tapis roulant qui
figurent sur un autocollant de code à barres blanc, sur le cadre tel que montré dans cette figure.
INSCRIVEZ LE NUMÉRO DE SÉRIE ET LE NOM DU MODÈLE DANS L’ESPACE CI-DESSOUS:
Référez-vous au NUMÉRO DE SÉRIE et au NOM DU MODÈLE lorsque vous appelez pour le service.
NUMÉRO DE SÉRIE :
TM
NOM DU MODÈLE : TAPIS ROULANT AFG
AVERTISSEMENT
EMPLACEMENT DU NUMÉRO DE SÉRIE
AFG14_OM_3.3AT_Rev1_2.indd 36-37 7/31/14 4:41 PM
3938
HAUT-PARLEURS
PORTE-BOUTEILLE
POIGNÉES À FRÉQUENCE
CARDIAQUE
GUIDONS
BASCULES VITESSE/PENTE
CONSOLE
INTERRUPTEUR
ON/OFF (MARCHE/ARRÊT)
DISJONCTEUR
ROULETTE DE TRANSPORT
CORDON
D’ALIMENTATION
MISE EN GARDE
GARDEZ VOS MAIN ET VOS PIEDS À
L'ÉCART DE CET ENDROIT.
DES COUPS À HAUTE PRESSION
PEUVENT CAUSER DES BLESSURES
CORPORELLES.
SUPPORT DE LECTURE
VENTILATEUR
DE CONSOLE
AFFICHAGE ET COMMANDES
DE LA CONSOLE
PLACEMENT DE
LA CLÉ DE SÉCURITÉ
COUVERCLE DU MOTEUR
RAIL LATÉRAL
TENSION DU ROULEAU ARRIÈRE
ET BOULONS D’AJUSTEMENT
GUIDONS
DE LA CONSOLE
PÉDALE DE VERROUILLAGE
BANDE/PLATE-FORME DE COURSE
FIXEZ L'ATTACHE DE LA CLÉ DE SÉCURITÉ À VOS VÊTEMENTS AVANT DE
COMMENCER. POUR ÉVITER LES BLESSURES, TENEZ-VOUS SUR LES RAILS
LATÉRAUX DU TAPIS ROULANT. LIRE ET SUIVRE TOUTES LES INSTRUCTIONS AVANT
D'OPÉRER. GARDEZ LES ENFANTS LOIN DE CET ÉQUIPEMENT. ENLEVEZ LA CLÉ DE
SÉCURITÉ LORSQUE LA MACHINE N'EST PAS UTILISÉE ET ENTREPOSEZ-LA HORS DE
LA PORTÉE DES ENFANTS. CONSULTEZ UN MÉDECIN AVANT D'UTILISER CET
ÉQUIPEMENT. ARRÊTEZ VOS EXERCICES SI VOUS RESSENTEZ DE LA DOULEUR, DES
FAIBLESSES, DES VERTIGES OU DE L'ESSOUFFLEMENT. GARDEZ VOTRE CORPS ET
VOS VÊTEMENTS LIBRE ET LOIN DES PIÈCES AMOVIBLES. POUR USAGE PAR LES
CONSOMMATEURS SEULEMENT.
MISE EN GARDE RISQUE DE
MISE EN GARDE
GARDEZ VOS MAINS ET VOS PIEDS
À L'ÉCART DE CET ENDROIT.
12
(SOUS LA PLATEFORME)
CAUTION
KEEP HANDS AND FEET
AWAY FROM THIS AREA.
HIGH-PRESSURE
SHOCKS COULD CAUSE
BODILY INJURY.
ATTACH SAFETY KEY CLIP TO CLOTHING BEFORE STARTING. TO AVOID
INJURY, STAND ON THE SIDE RAILS BEFORE STARTING TREADMILL. READ
AND FOLLOW ALL INSTRUCTIONS BEFORE OPERATING. KEEP CHILDREN
AWAY FROM THIS EQUIPMENT. REMOVE SAFETY KEY WHEN NOT IN USE
AND STORE OUT OF REACH OF CHILDREN. CONSULT A PHYSICIAN
BEFORE USING THIS EQUIPMENT. STOP EXERCISING IF YOU FEEL PAIN,
FAINT, DIZZY OR SHORT OF BREATH. KEEP BODY AND CLOTHING FREE
AND CLEAR OF ALL MOVING PARTS. FOR CONSUMER USE ONLY.
CAUTION
RISK OF INJURIES TO PERSONS:
CAUTION
KEEP HANDS AND FEET
AWAY FROM THIS AREA.
BLESSURES À LA PERSONNE : LESIONES PARA LAS PERSONAS:
ASEGURE EL BROCHE DE LA LLAVE DE SEGURIDAD A SU ROPA ANTES DE
COMENZAR. PARA EVITAR LESIONES, COLÓQUESE SOBRE LOS RIELES LATERALES
ANTES DE ACTIVAR LA CAMINADORA. LEA Y SIGA TODAS LAS INSTRUCCIONES
ANTES DE PONER EN FUNCIONAMIENTO LA UNIDAD. MANTENGA A LOS NIÑOS
ALEJADOS DE ESTE EQUIPO. QUITE LA LLAVE DE SEGURIDAD CUANDO NO UTILICE
EL EQUIPO Y GUÁRDELA FUERA DEL ALCANCE DE LOS NIÑOS. CONSULTE CON UN
MÉDICO ANTES DE UTILIZAR ESTE EQUIPO. DEJE DE HACER EJERCICIO SI SIENTE
DOLOR, SENSACIÓN DE DESMAYO, MAREOS O SI SIENTE FALTA DE AIRE.
MANTENGA EL CUERPO Y LA ROPA LIBRES Y ALEJADOS DE TODAS LAS PIEZAS
MÓVILES. PARA USO POR PARTE DEL CONSUMIDOR ÚNICAMENTE.
PRECAUCIÓN RIESGO DE
PRECAUCIÓN
MANTENGA LAS MANOS Y LOS
PIES ALEJADOS DE ESTA ÁREA.
PRECAUCIÓN
MANTENGA LAS MANOS Y LOS
PIES ALEJADOS DE ESTA ÁREA.
DESCARGAS DE ALTA PRESIÓN
PODRÍAN OCASIONAR LESIONES
FÍSICAS.
OUTILS REQUIS :
FClé à manche en T
FClé à manche en T
FTournevis (non inclus)
PIÈCES COMPRISES :
F2 guidons du mât
F1 ensemble de console
F2 ensembles de couvercles de mâts
de console
F2 poignées à fréquence cardiaque
F1 trousse de quincaillerie
F1 clé de sécurité
F1 cordon d’alimentation
F1 couvercle USB
F1 tapis en caoutchouc pour lecteurs
de média
F1 câble adaptateur audio
F1 bouteille de lubrifiant au silicone
(suffisant pour 2 applications)
DÉBALLAGE
Placez l’emballage du tapis roulant sur une surface plane. Il est conseillé de placer une toile
de protection sur le sol. Prenez des PRÉCAUTIONS pour le maniement et le transport de la
machine. N’ouvrez jamais la boîte lorsqu’elle se trouve sur le côté. Après avoir retiré les bandes
d’emballage, ne tentez pas de transporter la machine tant qu’elle n’a pas été complètement
assemblée et placée dans sa position verticale pliée et que la goupille de verrouillage n’a
pas été bien sécurisée. Déballez et assemblez l’appareil là ou il sera utilisé. Ce tapis roulant
est équipé d’amortisseurs à haute pression qui peuvent se déployer soudainement en cas de
manipulation incorrecte. Ne saisissez jamais une partie quelconque du cadre d’inclinaison et
ne tentez pas de soulever ou de déplacer le tapis roulant.
PRÉ ASSEMBLAGE
Si vous avez des questions
ou s’il manque des pièces,
communiquez avec le soutien
technique à la clientèle.
Les coordonnées figurent au
verso de ce manuel.
BESOIN D’AIDE?
• NE TENTEZ PAS DE SOULEVER LE TAPIS ROULANT! Ne déplacez pas le tapis
roulant ou ne le sortez pas de son emballage avant que ce ne soit spécifié dans les
instructions d’assemblage. Vous pouvez enlever l’emballage plastique des mâts de
console.
• LE NON-RESPECT DE CES DIRECTIVES PEUT CAUSER DES BLESSURES!
AVERTISSEMENT
• À chaque étape de l’assemblage, assurez-vous que TOUS les boulons et les
vis sont en place et partiellement vissés. Il est recommandé de compléter
l’assemblage avant de serrer N’IMPORTE des boulons.
• Beaucoup de pièces sont légèrement pré-graissées pour faciliter l’assemblage
et l’usage. Ne les essuyez-pas. Si vous rencontrez de difficultés, une légère
application de la graisse de lithium pour vélos est recommandée.
REMARQUES IMPORTANTES
AFG14_OM_3.3AT_Rev1_2.indd 38-39 7/31/14 4:41 PM
Other manuals for 3.3AT
1
Table of contents
Languages:
Other AFG Treadmill manuals


