AGK 10859 User manual

www.ssb-repair.com/agk
WIFI INTERNET RADIO
with USB/FM/AUX/UPNP/LAN function
WIFI INTERNETRADIO
met USB/FM/AUX/UPNP/LAN functie
WIFI RADIO INTERNET
avec des fonctions USB/FM/AUX/UPNP/LAN
WIFI-INTERNETRADIO
mit USB/FM/AUX/UPNP/LAN-Funktion
Model no. 10859
{
s
N
Manual size: 148x210mm
封面封底157g铜版纸,内页80g的双胶纸

www.ssb-repair.com/agk
2 3
Thank you very much for buying the FM radio. In order to let you freely operate the product and fully enjoy the
overbalancing happiness it brings you, we have introduced each function of the player in detail in this user manual.
Please carefully read this user manual before use and keep for future reference.
Note: Particular specifications are subjected to change without prior notice.
1. Appearance and Key Descriptions
Front View
No. Description Functions
1 POWER Power on/standby control
2 MODE Press to change among iRadio-FM-Aux-UPnP-USB
3 ALARM Set up Alarm
4 S1 Preset station No. 1, press and hold to store, press to recall
5 S2 Preset station No. 2, press and hold to store, press to recall
6FAV Press and hold “FAV” key to save preset, press “FAV” to recall the preset station
7Back; Press “” key to search previous station in “FM” mode,
8VOL Rotate the “VOL” key to the right to increase the volume or to the left to decrease the
volume
9 USB USB port
10 S3 Preset station No. 3, press and hold to store, press to recall
11 S4 Preset station No. 4, press and hold to store, press to recall
12 Forward; Press “” to search next station in “FM” mode
13 MENU The “MAIN MENU” allows you to enter different operating modes(“Internet Radio
“mode; “Media Center” mode; “FM” mode; “Information Center” mode; “AUX” mode;
“Configuration” mode)
The “MODE MENU” show the function available within the context of each of the operating
mode.
Press the “MENU” key at anytime will take you to the mode menu of the operating mode
your radio is currently in. Each mode menu includes an option “MAIN MENU”-selecting this
option will return you to the main menu.
Press to back to the playing screen.
14 ENTER Rotate the “ENTER” key to scroll up/down through menu options. Press the “ENTER” key to
confirm your selection of a menu option. In “FM” mode, rotate “ENTER” key to auto search
the stations.
Remote control
Insert 2PCS “AAA” batteries
NOTE:”AAA” Included on packing
1.1. About Music streaming
AirMusic is the default device name for DLNA, and you may rename it as you like.
The information below is the introduction of how to setup up media streaming from PC or other media server.
Study the own instruction of the software or apps you use to enjoy music streaming if necessary.
Make sure the music files are in the format of MP3, WMA, WAV or AAC for music streaming to 10859.
Refer to section 7 for the details of the control on 10859 for music streaming playback.
1.2. Get UPnP Ready
To enjoy the streaming music from PC, the following steps are to be done on the PC:
- Connect the PC to the network.
- Ensure the 10859 is powered on and connected to the same network.
- Open the UPnP platform Windows Media Player (10 or later). Alternatively, other platforms or server such as
Windows Media Connection may be used.
Allow to share your media to AirMusic (10859).
- Add the audio files and folders you want to share with 10859 to the media library.
You may also enjoy the streaming music from other music server, such as smart phone (Android platform):
- Connect the mobile to the network
- Search and install media sharing apps from Android market.
- Add the audio files from your mobile you want to share.
After setup the shared server, choose the music and control playback on the 10859.

www.ssb-repair.com/agk
4 5
1.3. For Wired Network
Check if wired network whether is useful.
Connect LAN on the back of radio.
If connect Succeed will display icon in the upper left corner.
1.4. About Airmusic APP Control
Direct download Airmusic APP on mobile phone.
Connect the same router.
After that can operation from the mobile phone
2. Functions
Overview
Power = Standby
Internet Radio
Radio Station/Music
My Favorite
Local Radio
History
Service
Media Center
USB
UPnP
My Play List
Clear My Play List
FM
Information Center
Weather Information
Financial Information
System Information
AUX
Configuration
Reset to Default
Sleep Timer
Date & Time
Alarm
Language
Dimmer
Buffer
Weather
FM Set Up
Local Radio Set Up
Playback Set Up
Equaliser
Software Update
Power Management
DLAN Setup
Resume when power on
Network
Manage My Media U
3. Configuration
3.1 Network setting
Wired Network configuration
Enable /disable wired network just connect LAN on the back of Radio
Wireless Network Configuration
Enable/ disable WiFi network. When you enable the WiFi network, the system will automatically search the
available AP.
Wireless Network (WPS PBC)
Manual Configuration
You can choose DHPC (which IP assigned automatically) or manually input IP address for wired/wireless network
connection.
Check Network when Power On
Enable / disable network.
3.2. Date & Time setting
Setup the date and time; set time format display as 12 Hour or 24 Hour; set date format in the positions of YY
(year), MM (month) and DD (day) - YY/MM/DD, DD/MM/YY or MM/DD/YY.
Turn on/off the Daylight Saving Time (DST). If your country is under summer time that please set Daylight Saving
Time (DST) in ON.
With a wireless network connected, GMT (+01:00) time is a time reference of time setting.
Add or deduce the hour according to your time zone when you set the time.

www.ssb-repair.com/agk
6 7
3.3. Alarm setting
There are three independent alarms - 2 alarms of absolute time setting (Alarm 1 and Alarm 2) and 1 alarm for
relative time setting (Alarm NAP). Press Alarm on the remote control to enter this menu directly.
After Alarm NAP is set, it alarms once in 5/10/20/30/60/90/120 minutes depending on which one you have
set.
When the alarm(s) is/are set, there will be a clock icon at the top of the display. The clock icon with alarm time
will also clearly display on the standby mode screen.
During alarm, press POWER to stop the alarm.
3.4. Language setting
SELECT the OSD language: English, German, French, Nederland, Russian, Swedish, Norwegian or Danish.
3.5. Dimmer setting
Configure the brightness of backlight on the display.
3.6. Power management setting
Turn off or set the power off on 5/15/30 minutes
3.7. Sleep setting
Turn off or set the sleep time of 15/30/60/90/120/150/180 minutes. Once the time is set, there will be a bed
icon with remaining minutes at the top right corner and 10859 will turn to standby then.
Press Sleep on the remote control for the shortcut of this function.
3.8. Buffer setting
Configure the buffer time of the music playback, 2/4/8 seconds.
3.9. Weather setting
10859 is able to display current weather information under standby mode.
Turn on Standby Display and set Temperature Unit (C° or F°) to get the weather displayed at the standby mode.
Set Location is to choose which city you want to show during standby.
When it is turned on, the current time and the current weather will display in alternative 10 seconds.
3.10. FM Setup
Choose Mono/Stereo and ENTER the FM broadcast band (Japan: 76 - 108.0 MHz; Other Area: 87.5 -108.0
MHz).
3.11. Local Radio Set Up
Default is Auto Detect.
3.12. Playback Set up
To set the playback mode of UPnP - Repeat all, Repeat one, Shuffle, or Off (play once only).
3.13. DLAN set up
3.14. Equaliser
Default equalizer is Normal, you may change to Flat, Jazz, Rock, Movie, Classical, Pop, or News.
3.15. Resume when power on
3.16. Software Update
Update software. If there is an updated software version on the server, the system will notify you when you return
to the main menu.
3.17. Reset to Default
Restore the default settings. All stored WiFi access information, Internet Radio user login and FM presets will be
deleted. Be aware of this before reset.
After 10859 is reset, the system will move to Language setting menu. And it will automatically turn to Network
setting menu once the OSD language is selected.

www.ssb-repair.com/agk
8 9
4. Internet Radio
Display and playback your own Internet Radio station list on the Internet Radio server.
To activate your own station list, follow the steps below:
1. Access http://www.mediayou.net/
2. Click Login and register;
3. Login to the website;
4. Enter your user name, password, email address and zip-code(if any);
5. If it is successfully registered, you will receive an email from the support team. You may input the login to
10859 then. You may also login the website to manage your station list.
6. My mediaU Device
To use ‘my mediaU’ function on internet radios that support mediaU, you don’t need to enter your mediaU user-
name/password on them. Simply register on mediaU and it will sync your ‘my mediaU’ setting (favorite stations,
manually add …) to the device.
1) Input Radio MAC address to PC in order to sync
By Pressing MENU-> information Center->System Information->Wireless Information->MAC address N0 to find
MAC
2) Press MENU->Configuration -> Manage my mediaU -> Enable
7. Favorite Station
Save you favorite stations here, and you can also create different directories for easy management.
8. Favorite Location / Genre
Save you favorite Location/Genre (can be combination) here.
9. My Local Station
Setup the city you live and it will list the stations of that city.
10. Manually Add
Here you can manually add AOD, Podcast or personal stations that are not listed in mediaU.
Tips: If you go back to the menu when playing a station, volume cannot be adjusted by the reel, use the volume
keys on the remote control instead. Otherwise, you may stop controlling the system, it counts 10 seconds and
return to playback display automatically, then you are able to adjust the volume.

www.ssb-repair.com/agk
10 11
4.1. Browse Preset (FAV)
Press and hold button “FAV” to store favorite stations. You can store 250 favorite internet radio stations. Press
“FAV” or figures on the remote control to recall FAV stations.
Noted: Press and hold S1-S4 to store top 4 favourite station, press S1-S4 to recall.
4.2. Browse Stations
View the station list by the following categories: My Favorite, Radio Station/Music, Local Radio, History.
For each station, press ENTER to play directly. You may press to enter its submenu (configuration).
4.3.Search Radio Station
Enter your keyword to search radio station from the list.
4.4. Add New Radio Station
Input radio URL
Notes:
The radio will come to standby mode in 15 minutes when network is weakness.
The radio will come to standby mode in 15 minutes when mute
4.5. History
A list of last listened stations.
For each station, press ENTER to play directly. You may press to enter its submenu - you can Add to Preset,
Auto Scan, Play or Use as Alarm Sound (if you chose internet as alarm sound in alarm configuration).
5. Media Center
5.1. UPnP
If you have set up shared media, you should see the shared media from UPnP. If you have more than one
computer sharing media, the alternatives are listed. SELECT the shared media you want to play.
Rotate “ENTER” button to songs list, press “ENTER” key to play selected song
Press and on the remote control to play previous/next music track, press to Pause or play. Press ¾ to
stop the music.
Tips: The radio can only read the track with the file name less than 40 characters. And the characters should be
in European language. If you encounter failure of reading the track under UPnP mode, you may try to rename the
file.
However, if the track is still unable to play, you can try converting the file to different formats.
Tips: If you go back to the menu when playing s station, volume cannot be adjusted by the reel, use the volume
keys on the remote control instead. Otherwise, you may stop controlling the system, it counts 10 seconds and
return to playback display automatically, then you are able to adjust the volume.
5.2. USB Mode
USB mode plays audio from USB
Rotate “ENTER” button to songs list, press “ENTER” key to play selected song
Press and on the remote control to play previous/next music track, press to Pause or play. Press ¾ to
stop the music.
Notes: When connect USB before play the music must appear on the right corner. The radio will come
to standby mode in 15 minutes when mute
6. FM
FM radio mode receives analogue radio from the FM band.
Press / to search FM station. The frequency display starts to run up as 10859 scans the FM band. It stops
when it has received a station.
You may press ENTER to find a station manually. Each press moves 0.05MHz.
Press and hold the FAV to save the station.

www.ssb-repair.com/agk
12 13
You can save up to 20 stations. Short press FAV and rotate ENTER to check and choose the preset station; You
may press the number on the remote control to choose the saved station.
Alternatively, you can let the system scan ALL stations for you by pressing ENTER, The searched stations will
automatically be stored in preset station list.
Tips: If you go back to the menu when playing station, volume cannot be adjusted by the reel, use the volume keys
on the remote control instead. Otherwise, you may stop controlling the system, it counts 10 seconds and return to
playback display automatically, then you are able to adjust the volume.
Notes: The radio will come to standby mode in 15 minutes when mute
7. AUX IN
Aux in mode plays audio from an external source such as an MP3 player.
8. Information Center
8.1. Weather Information
There are weather information and forecasts for 2000 cities. SELECT the country and then the city for the weather
detail.
It is able to display the weather information on the standby mode. On the weather information page, press ENTER
to set the city to displaying on the standby mode.
8.2. Financial Service
View the stock index from around the world.
8.3. System Information
Check out the version of the 10859 system, and the details of connected network.
9. Troubleshooting
Error Remedy
The device does not
switch on. Check it the power adaptor is connected properly.
No sound. 1. Turn on the sound as it may be muted
2. Increase the volume.
No network con-
nection can be
established.
1. Check the WLAN function.
2. Try to set an IP address at the device.
3. Activate the DHCP function on the router and make the connection again at the device.
4. A firewall is activated on the network - set the respective program in such a way that
access is possible.
WLAN connection
cannot be established.
1. Check the availability of WLAN network on the access point.
2. Place the device closer to the router.
3. Make sure the WEP/WPA password is correct.
No station is found.
1. Check the network as well as the access point and firewall.
2. The station may not be available currently, try it again later or SELECT another station.
3. The link of the station is changed or the station no longer transmits - ask the provider for
information.
4. The link of manual added station is not correct, make sure it is correct and re-enter.a
Hiss in FM mode. 1. Check/move the FM antenna.
2. Move the radio.
Alarm does not work.
1. Switch on the alarm.
2. Due to the volume setting, refer to the solutions of “No sound”.
3. The source of alarm was set to be station but there is no network connection. Change the
source of alarm or reconfigure the connection.
System freezes
suddenly. The radio is overloaded, reboot the unit.
10. Specifications
Model number 10859
Description Internet Radio
Display 128 x 64 dot matrix
Network supported 802.11b/g (WLAN)
WLAN key WEP, WPA, WPA2 (PSK)
Streaming Protocol
NTP Network Time Protocol
RTSP Real Time Streaming Protocol
MMS Microsoft Media Streaming Protocol
HTTP Hyper Text Transfer Protocol
Supported playback
formats
WMA Windows Media Audio
MP3 MPEG Layer 3 Audio
WAV Waveform Audio
AAC Advanced Audio Coding
Power adaptor 12V 1.5A

www.ssb-repair.com/agk
N
1514
Connections 3.5mm jack socket
DC IN power supply socket
Dimensions 250mm(L) x 135mm(H) x 130mm(D)
Weight 2 kg (approx.)
ENVIRONMENTAL RECOMMENDATION
An electrical/electronic product should be disposed of in a manner that minimises environmental impact as much as
possible. The device should be disposed of according to local guidelines. The device can usually be disposed of at the
local recycling station.
Environmental consideration and battery disposal
It is important to consider the environment in terms of battery disposal. Never dispose used batteries with
household waste. Used batteries must be handed in at one of the special indicated authorised collection points
in your municipality. Remove batteries before disposing the device. Further, make sure that the batteries are not too old
or used, since they may start to leak acid. Check the expiry date on the batteries.
Device disposal
The law requires that electric and electronic devices are collected, and that the devices are partially recycled. Electric
and electronic devices, marked with the waste management symbol, must be handed in at a municipal recycling centre.
Complaints
You have the right to complain according to applicable law. In case of complaints, please enclose a machine marked
receipt/purchase receipt with purchase date. Further, please hand in the device at the retailer in question.
The RoHS Directive
On July 1, 2006, the RoHS Directive (www.thiim.com/pdf/rohs.pdf) (2002/95/EC) came into effect. The
aim of this Directive is to limit the use af hazardous substances in electrical and electronic equipment and
to contribute to human health protection as well as environmentally sound utilization and disposal of electrical and
electronic waste.
The guarantee is invalid
If the above is not observed.
If the device has been abused, exposed to force or other type of damage.
Agk Nordic A/S is not liable for loses or damages of any kind, neither indirectly nor directly, as a consequence of
wrong use or unauthorized operation of the unit.
Importer:
AGK Nordic A/S
www.agknordic.com
Copyright 2014. All rights reserved
Printed and published by Agk Nordic A/S. 15.09.2014
Hereby, Agk Nordic A/S, declares that this 10859 is in compliance with the essential requirements and other relevant
provisions of Directive 1999/5/EC. The declaration of conformity for 10859 can be obtained at the following address:
AGK Nordic A/S
Randersvej 88B
Stevnstrup
8870 Langaa
Denmark
Hartelijk dank voor uw aankoop van de FM-radio. Iedere functie van de speler wordt gedetailleerd in deze
gebruikershandleiding besproken zodat u het product vrij kunt bedienen en volledig kunt genieten van
uitgebalanceerde geluid. Lees deze gebruikershandleiding voor gebruik goed door en bewaar deze voor
toekomstige naslag.
Opmerking: Bepaalde specificaties zijn onderhevig aan wijziging zonder mededeling.
1. Uiterlijk en toetsbeschrijvingen
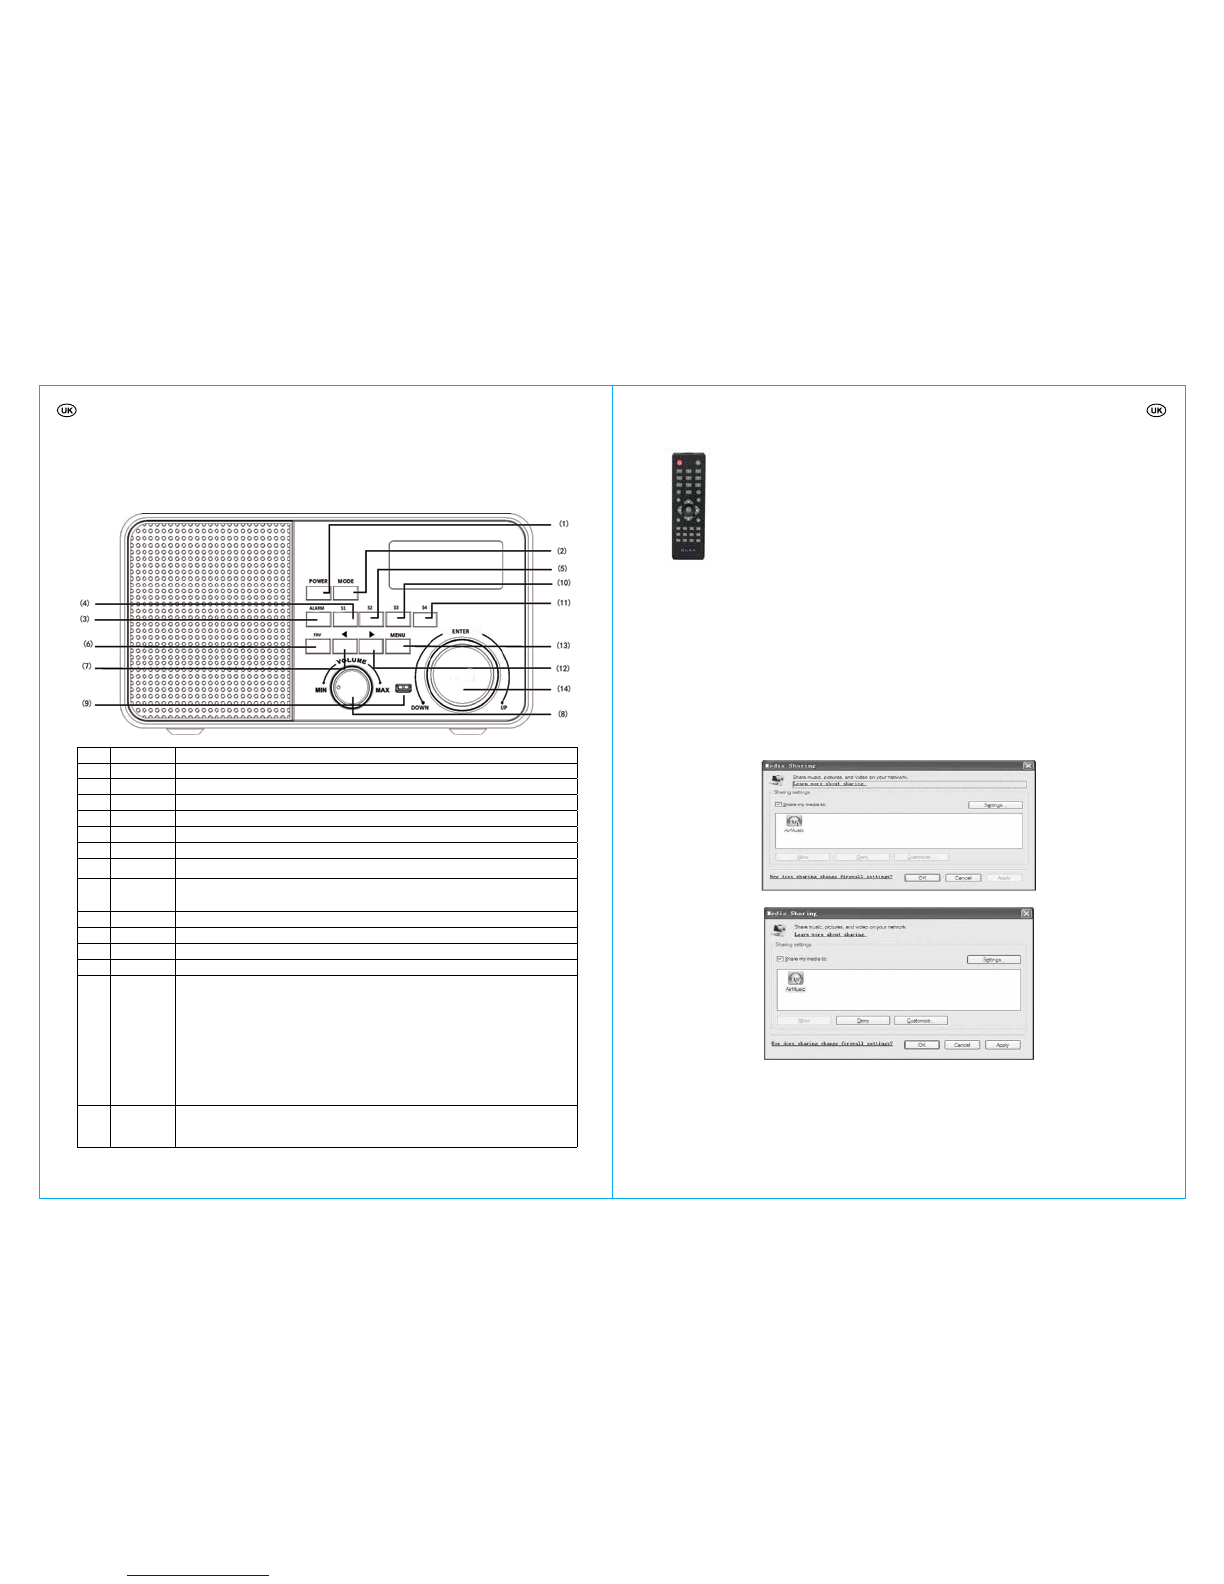
Voorkant
Nr. Beschrijving Functies
1 POWER Inschakelen/stand-by controle
2 MODE Indrukken om te wisselen tussen iRadio-FM-Aux-UPnP-USB
3 ALARM Instellen van het alarm
4 S1 Geprogrammeerd station Nr. 1, ingedrukt houden om op te slaan, indrukken om op te roepen
5 S2 Geprogrammeerd station Nr. 2, ingedrukt houden om op te slaan, indrukken om op te roepen
6FAV ngedrukt houden van de “FAV” toets voor het opslaan van het programma, druk op “FAV”
voor het oproepen van het geprogrammeerde station.
7Terug; Druk op de “ ” toets om het vorige statoin in de “FM” modus te zoeken.
8VOL Draai de “VOL” toets naar echts om het volume te verhogen of naar links om het volume te
verlagen.
9 USB USB poort
10 S3 Geprogrammeerd station Nr. 3, ingedrukt houden om op te slaan, indrukken om op te roepen
11 S4 Geprogrammeerd station Nr. 4, ingedrukt houden om op te slaan, indrukken om op te roepen
12 Vooruit; Druk op de “” toets om het volgende statoin in de “FM” modus te zoeken.
13 MENU “modus; “Media Center” modus; “FM” modus; “Information Center” modus; “AUX” modus;
“Configuration” modus)
Het “MODE MENU” toont de beschikbare functie in de context van elke gebruiksmodus.
Druk op de “MENU” toets om terug te gaan naar het mode menu van de gebruiksmodus
waar uw radio momenteel in staat. Elk mode menu bevat een optie “MAIN MENU” - door deze
optie te selecteren, zult u terugkeren naar het main menu.
Druk om terug te keren naar het afspeelscherm.
14 ENTER Draai de “ENTER” toets om omhoog/omlaag te bladeren door de menu-opties. Druk op de
“ENTER” toets om uw selectie van een menu-optie te bevestigen. Draai, in de “FM” modus, de
“ENTER” toets om automatisch naar stations te zoeken.

www.ssb-repair.com/agk
NN
16 17
Afstandsbediening
Plaats 2 “AAA” batterijen.
LET OP: “AAA” bijgesloten op verpakking.
1.1. Over muziekstreaming
AirMusic is de standaard toestelnaam voor DLNA, en u kunt deze naam wijzigen indien gewenst.
Onderstaande informatie is een inleiding in het instellen van media streaming van PC of andere media server. Lees
de instructies van de software of apps die u gebruikt voor het streamen van muziek.
Zorg dat de muziekbestanden het formaat MP3, WMA, WAV of AAC hebben voor streamen naar de 10859
Kijk in sectie 7 voor meer informatie over de bediening op 10859 voor het afspelen van muziek streaming.
1.2. UPnP voorbereiden
De volgende stappen moeten op de PC uitgevoerd worden om muziek vanaf de PC te kunnen streamen.
- Sluit de PC aan op het netwerk.
- Zorg dat de 10859 is ingeschakeld en aangesloten is op hetzelfde netwerk.
- Open het UPnP platform Windows Media Player (10 of recenter). Of andere platforms of servers zoals
Windows Media Connection kunnen gebruikt worden.
Maakt het mogelijk om uw media te delen in AirMusic (10859).
Voeg de audiobestanden en mappen die u wilt delen met de 10859 toe aan de mediabibliotheek.
U kunt tevens genieten van het streamen van muziek van een andere muziekserver, zoals een smart phone
(Android platform):
Sluit de telefoon aan op het netwerk.
Zoeken en installeren van media gedeelde apps voor Android.
Toevoegen van audiobestanden van uw telefoon die u wilt delen.
Kies, na het instellen van de gedeelde server, de muziek en regel het afspelen op de 10859.
1.3. Voor bekabelde netwerken
Controleer of het bekabelde netwerk te gebruiken is.
Sluit LAN aan op de achterkant van de radio.
Na een succesvolle verbinding zal het pictogram in de linker bovenhoek getoond worden.
1.4. Over Airmusic APP Controle
Direct downloaden van Airmusic APP op uw mobiele telefoon.
Sluit aan op dezelfde router.
Daarna kunt u dit vanaf de mobiele telefoon gebruiken.
2. Functies
Overzicht
Voeding = stand-by
Internetradio
Radiostation/muziek
Mijn favoriet
Lokale radio
Geschiedenis
Service
Media Center
USB
UPnP
Mijn afspeellijst
Mijn afspeellijst wissen
FM
Informatiecenter
Weerinformatie
Financiële informatie
Systeeminformatie
AUX
Configuratie
Reset naar standaard
Slaaptimer
Datum & Tijd
Alarm
Taal
Dimmer
Buffer
Weer
FM instellen
Lokale radio instellen
Afspelen instellen
Equaliser
Software-update
Energiebeheer
DLAN-instellingen
Hervatten na inschakeling Netwerk
Network
Beheren van Mijn Media U

www.ssb-repair.com/agk
NN
18 19
3. Configuratie
3.1 Netwerk instellen
Bekabelde netwerkconfiguratie
Inschakelen/uitschakelen van bekabeld netwerk door LAN aan te sluiten op de achterkant van de radio.
Draadloze netwerkconfiguratie
Inschakelen/uitschakelen van WiFi netwerk. Het systeem zal na inschakelen van het WiFi netwerk automatisch
zoeken naar de beschikbare AP.
Draadloze netwerk (WPS, PBC)
Manuele configuratie
U kunt kiezen uit DHPC (waarbij automatisch een IP wordt toegewezen) of manueel het IP-adres invoeren voor
bekabelde/draadloze netwerkverbinding.
Controleer het Netwerk indien ingeschakeld
Inschakelen/uitschakelen van netwerk.
3.2. Instellen van datum & tijd
Instellen van datum en tijd; instellen weergave tijdformaat als 12 uur of 24 uur, instellen van datumformaat in de
posities van JJ (jaar), MM (maand), en DD (dag) - JJ/MM/DD, DD/MM/JJ of MM/DD/JJ.
Schakel zomer-/wintertijd in. Indien in uw land gebruik wordt gemaakt van zomertijd, stel dan Daylight Saving
Time (DST) in op AAN.
Indien een draadloos netwerk aangesloten is, dan is GMT (+01:00) tijd een tijdferentie van de tijdinstelling.
Tijdens het instellen van de tijd verhogen of verlagen van het uur volgens uw tijdzone.
3.3. Alarminstelling
Er zijn drie onafhankelijke alarminstellingen ; 2 alarmen van absolute tijdinstelling (Alarm 1 en Alarm 2) en 1
alarm voor relatieve tijdinstelling (Alarm NAP). Druk op ALARM op de afstandsbediening om dit menu direct te
openen.
Nadat het Alarm NAP ingesteld is, gaat deze één keer af na 5/10/20/30/60/90/120 minuten, afhankelijk van
de door u gekozen instelling.
Er is een klokpictogram te zien bovenin het scherm indien het alarm ingesteld is. Het klokpictogram met alarmtijd
zal tevens duidelijk te zien zijn in het stand-by modusscherm.
Druk tijdens het alarm op POWER om het alarm te stoppen..
3.4. Taalinstelling
Selecteren van de OSD-taal: Engels, Duits, Frans, Nederlands, Russisch, Zweeds, Noors of Deens.
3.5. Dimmerinstelling
-Configureren van de helderheid of het achtergrondlicht van het scherm.
3.6. Instelling energiebeheer
Uitschakelen of instellen van de voeding na 5/15/30 minuten.
3.7. Slaapinstelling
Uitschakelen of instellen van de slaaptijd van 15/30/60/90/120/150/180 minuten. Er zal nadat de tijd is
ingesteld een bedpictogram met resterende minuten getoond worden in de rechterbovenhoek en de 10859 zal
daarna in stand-by gaan.
Druk op Slaap op de afstandsbediening voor een snelkoppeling naar deze functie.
3.8. Bufferinstelling
Configureren van de buffertijd van het afspelen van de muziek, 2/4/8 seconden.
3.9. Weerinstelling
10859 kan de huidige weerinformatie in stand-by modus weergeven.
Inschakelen van het stand-by scherm en de temperatuureenheid (C° of F°) voor het weergeven van het weer in de
stand-by modus. Stel de Locatie in om te kiezen welke stad u in de stand-by wilt tonen.
Na inschakeling zal de huidige tijd en het huidige weer afwisselend na 10 seconden getoond worden.
3.10. FM-instellingen
Kies Mono/Stereo en OPEN de FM uitzendband (Japan: 76 - 108.0 MHz; Andere gebieden: 87.5 -108.0 MHz).
3.11. Lokale radio instellen
Standaard is Auto Detecteren

www.ssb-repair.com/agk
NN
20 21
3.12. Afspelen instellen
Om de afspeelmodus in te stellen op UPnP - Herhaal alles, Herhaal één, Shuffle of Uit (één keer afspelen).
3.13. DLAN instellen
3.14. Equaliser = Equaliser
Standaard equalizer is Normaal, u kunt deze wijzigen naar Flat, Jazz, Rock, Film, Klassiek, Pop of Nieuws.
3.15. Hervatten na inschakeling
3.16. Software Update = Software-update
Software update Het systeem zal u op de hoogte stellen van bijgewerkte softwareversies op de server zodra u
terugkeert naar het hoofdmenu.
3.17. Reset naar standaard
De standaard instellingen herstellen. Alle opgeslagen WiFi toegangsinformatie, Internetradio gebruikerslogin en
FM programma’s zullen verwijderd worden. Denk hier aan voordat u de reset uitvoert.
Na de reset van de 10859 zal het systeem het menu Taalinstellingen openen. En vervolgens wordt automatisch
het instelmenu Netwerk geopend worden na het selecteren van de schermtaal.
4. Internetradio
Weergeven en afspelen van uw eigen lijst met internetradiostations op de internetradioserver.
Volg onderstaande stappen op om uw eigen stationslijst te activeren:
1. Open http://www.mediayou.net/
2. Klik op Login en registreer:
3. Login op de website:
4. Voer uw gebruikersnaam, wachtwoord, e-mailadres en postcode in (indien noodzakelijk);
5. U zult een e-mail ontvangen van het support team indien u succesvol geregistreerd bent. U kunt vervolgens de
login invoeren in de 10859. U kunt nu bij de website inloggen om uw stationslijst te beheren
6. Mijn mediaU toestel
Om de functie “my mediaU” te gebruiken bij internetradio’s die mediaU ondersteunen, hoeft u geen mediaU
gebruikersnaam / wachtwoord in te voeren. Registreer gewoon bij mediaU en dit zal gesynchroniseerd worden
met “mijn mediaU” instelling (favoriete stations, manueel toevoegen...) in het toestel.
1) Vul het Radio MAC adres in de PC in om synchronisaie uit te voeren
Door te drukken op MENU -> Information Center -> System Information -> Wireless Information -> MAC address
N0 om de MAC te vinden
2) Druk op MENU->Configuration -> Manage my mediaU -> Enable
7. Favoriet station
Sla je favoriete stations hier op, en u kunt tevens verschillende directories aanmaken zodat het beheer eenvoudig
is.

www.ssb-repair.com/agk
NN
22 23
8. Favoriete locatie / Genre
Sla je favoriete locatie/genre op (dit kan een combinatie zijn).
9. Mijn lokale station
Stel de stad waar u woont in en er verschijnt een lijst met stations in die stad.
10. Manueel toevoegen
Hier kunt u manueel AOD, Podcast of persoonlijke stations die niet in mediaU staan, toevoegen.
Tips: Als u tijdens het afspelen van een station terug gaat naar een menu, dan kunt u het volume niet met het de
draaiknop aanpassen, gebruik hiervoor dan de volumetoetsen op de afstandsbediening. U kunt ook stoppen met
het besturen van het systeem, 10 seconden wachten, en het zal automatisch terugkeren naar het afspeelscherm,
u kunt dan het volume weer aanpassen.
4.1. Door programma’s bladeren (FAV)
Houd de “FAV” knop ingedrukt om uw favoriete stations op te slaan. U kunt maximaal 250 favoriete
internetradiostation opslaan. Druk “FAV” of nummers op de afstandsbediening om de FAV-stations op te roepen.
Opmerking: Houd S1-S4 ingedrukt om de top 4 favoriete stations op te slaan, druk op S1-S4 om deze op te
roepen.
4.2. Door stations bladeren
Bekijk de stationlijst in de volgende categorieën: Mijn favoriet, Radiostation/Muziek, Lokale Radio,
Geschiedenis.
Druk voor elk station op ENTER om het direct af te spelen. U kunt op drukken om het submenu (configuratie) te
openen.
4.3 Radiostation zoeken
Voer uw sleutelwoord in om een radiostation in de lijst te zoeken.
4.4. Nieuw radiostation toevoegen
Vul de URL van het radiostation in.
Opmerkingen:
De radio zal na 15 minuten zwakte van het netwerksignaal de stand-by modus ingaan.
De radio zal na 15 minuten gedempt geluid de stand-by modus ingaan.
4.5. Geschiedenis
Een lijst met de meest recent beluisterde stations.
- Druk voor elk station op ENTER om het direct af te spelen. U kunt op drukken om het submenu te openen - u
kunt Toevoegen aan programma’s, Auto Scan, Afspelen of Gebruiken als Alarmgeluid (indien u kiest voor
internet als alarmgeluid in alarmconfiguratie).
5. Media Center = Media Center
5.1. UPnP

www.ssb-repair.com/agk
NN
24 25
Indien u gedeelde media heeft ingesteld, ziet u de gedeelde media van UPnP. Indien u media deelt vanaf meer
dan één computer, dan worden de alternatieven vermeld. SELECTEER de gedeelde media die u wilt afspelen.
Draai de “ENTER” knop in de lijst met liedjes, druk op “ENTER” om het geselecteerd lied af te spelen.
Druk op en op de afstandsbediening om het vorige/volgende lied af te spelen, druk op om te pauzeren
of af te spelen. Druk op ¾ om het afspelen te stoppen.
Tips: De radio kan alleen de track lezen met een bestandsnaam van minder dan 40 tekens. En de tekens moeten
in Europese talen voorkomen. Indien er een fout optreedt bij het lezen van de track in de UPnP modus, dan kunt u
proberen om het bestand te hernoemen.
Echter, als u de track nog steeds niet kunt afspelen, probeer dan het bestand om te zetten naar een ander
formaat.
Tips: Als u tijdens het afspelen van een station terug gaat naar een menu, dan kunt u het volume niet met het de
draaiknop aanpassen, gebruik hiervoor dan de volumetoetsen op de afstandsbediening. U kunt ook stoppen met
het besturen van het systeem, 10 seconden wachten, en het zal automatisch terugkeren naar het afspeelscherm, u
kunt dan het volume weer aanpassen.
5,2. USB Modus
USB Modus speelt audio vanaf een USB af.
Draai de “ENTER” knop in de lijst met liedjes, druk op “ENTER” om het geselecteerd lied af te spelen.
Druk op en op de afstandsbediening om het vorige/volgende lied af te spelen, druk op om te pauzeren
of af te spelen. Druk op ¾ om de muziek te stoppen.
Opmerkingen: Indien u een USB aansluit om muziek af te spelen, moet in de rechterhoek verschijnen. De
radio zal na 15 minuten gedempt geluid de stand-by modus ingaan.
6. FM
FM radiomodus ontvangt analoge radio van de FM band.
Druk op / om het FM station te zoeken. De getoonde frequentie begint omhoog te lopen als de 10859 de
FM band scant. Het stopt zodra een station ontvangen wordt.
U kunt op ENTER drukken om manueel naar een station te zoeken. Door elke druk wordt met 0,05MHz
verschoven.
Houd FAV ingedrukt om het station op te slaan.
U kunt maximaal 20 stations opslaan. Druk kot op FAV en draai aan ENTER om het geprogrammeerde station te
controleren; U kunt op het nummer op de afstandsbediening drukken om het opgeslagen station te kiezen.
Of u kunt het systeem ALLE stations laten scannen door op ENTER te drukken. De gezochte stations zullen
automatisch in de geprogrammeerde stationlijst opgeslagen worden.
Tips: Als u tijdens het afspelen van een station terug gaat naar een menu, dan kunt u het volume niet met het de
draaiknop aanpassen, gebruik hiervoor dan de volumetoetsen op de afstandsbediening. U kunt ook stoppen met
het besturen van het systeem, 10 seconden wachten, en het zal automatisch terugkeren naar het afspeelscherm, u
kunt dan het volume weer aanpassen.
Opmerkingen: De radio zal na 15 minuten gedempt geluid de stand-by modus ingaan.
7. AUX IN
Met de Aux in modus kunt u muziek van een externe bron, zoals een MP3-speler, afspelen.
8. Informatiecenter
8.1. Weerinformatie
Weerinformatie en voorspellingen voor 2000 steden. SELECTEER het land en vervolgens de stad voor de
weerinformatie.
De huidige weerinformatie kan in stand-by modus worden weergegeven. Druk in de pagina weerinformatie op
ENTER om de stad weer te geven in de stand-by modus.
8.2. Financiële diensten
Bekijk de aandelenindex van beurzen wereldwijd.
8.3. Systeeminformatie
Controleer de versie van het 10859 systeem, en de informatie van het aangesloten netwerk.
9. Problemen Oplossen
Fout Oplossing
Het toestel schakelt
niet in. Controleer of de voedingsadapter goed aangesloten is.
Geen geluid. 1. Schakel het geluid in, misschien is het gedempt.
2. Verhoog het volume.

www.ssb-repair.com/agk
NN
26 27
Geen netwerkverbind-
ing is mogelijk.
1. Controleer de WLAN functie.
2. Probeer een IP-adres in het toestel in te stellen.
3. Activeer de DHCP functie op de router en probeer opnieuw verbinding te maken.
4. Het netwerk is uitgerust met een firewall - stel deze zo in dat toegang mogelijk is.
WLAN verbinding
niet mogelijk.
1. Controleer de beschikbaarheid van het WLAN netwerk op het access point.
2. Plaats het toestel dichterbij de router.
3. Zorg dat het WEP/WPA wachtwoord correct is.
Er is geen station
gevonden.
1. Controleer het netwerk en het access point en de firewall.
2. Het station is misschien momenteel niet beschikbaar, probeer het later opnieuw of
SELECTEER een ander station.
3. De link van het station is gewijzigd of het station zendt niet meer uit - vraag de provider
voor meer informatie.
4. De link van het manueel toegevoegde station is niet correct, controleer dit en voer het
opnieuw in.
Een sissend geluid in
FM modus.
1. Controleer/verplaats de FM antenne.
2. Verplaats de radio.
Alarm werkt
niet.
1. Schakel het alarm in.
2. Kijk vanwege de volume-instelling bij de oplossingen voor “geen geluid”.
3. De bron van het alarm is ingesteld op station, maar er is geen verbinding met het
netwerk. Wijzig de bron van het alarm of configureer de verbinding opnieuw.
Systeem bevriest
plotseling. De radio is overbelast, start het toestel opnieuw op.
10. Specificaties
Modelnummer 10859
Beschrijving Internetradio
Scherm 128 x 64 dot matrix
Ondersteund netwerk 802.11b/g (WLAN)
WLAN sleutel WEP, WPA, WPA2 (PSK)
Streaming Protocol
NTP Network Time Protocol
RTSP Real Time Streaming Protocol
MMS Microsoft Media Streaming Protocol
HTTP Hyper Text Transfer Protocol
Ondersteund afspelen
Formaten
WMA Windows Media Audio
MP3 MPEG Layer 3 Audio
WAV Waveform Audio
AAC Advanced Audio Coding
Voedingsadapter 12V 1.5A
Aansluitingen 3.5mm ingang
DC IN voedingsingang
Afmetingen 250mm(L) x 135mm(H) x 130mm(D)
Gewicht 2 kg (bij benadering)
MILIEUAANBEVELINGEN
Een elektrisch/elektronisch product moet verwijderd worden op een manier dat het milieu zo min mogelijk belast wordt.
Het toestel moet verwijderd worden volgens lokale verordeningen. Het toestel kan ingeleverd worden bij een lokaal
milieupark.
Milieuoverwegingen en batterijverwijdering
Het is belangrijk dat bij het verwijderen van batterijen het milieu in overweging gehouden wordt. Gooi
gebruikte batterijen nooit bij het huishoudelijk afval. De gebruikte batterijen moeten ingeleverd worden
bij een van de speciaal aangewezen vezamelpunten in uw gemeente. Verwijder de batterijen voordat u het toestel
weggooit. Zorg er verder voor dat de batterijen niet oud of gebruikt zijn, aangezien deze kunnen lekken. Controleer
de vervaldatum van de batterijen.
Verwijdering van het toestel
De wet schrijft voor dat elektrische en elektronische toestellen verzameld worden, en dat de toestellen gedeeltelijk
hergebruikt worden. Elektrische en elektronische toestellen, gemarkeerd met het afvalmanagement symbool, moeten
bij gemeentelijke milieuparken ingeleverd worden.
Klachten
U heeft volgens de van kracht zijnde wetgeving het recht om een klacht in te dienen. Sluit in geval van klachten een
machinale kassabon/aankoopbewijs met aankoopdatum bij. Lever het toestel in bij uw winkelier.
De RoHS Verordening
Op 1 juli 2006 werd de RoHS Verordening (www.thiim.com/pdf/rohs.pdf) (2002/95/EC) van kracht. Het
doel van deze verordening is het beperken van het gebruik van gevaarlijke substanties in elektrische en
elektronische apparatuur en het bijdragen aan bescherming van mensen en milieu door afval van elektrische en
elektronische apparatuur goed te verwerken.
De garantie is ongeldig
als het bovenstaande niet opgevolgd wordt.
als het toestel verkeerd gebruik is, blootgesteld is aan impact of andere beschadigingen aanwezign zijn.
Agk Nordic A/S is niet aansprakelijk voor verlies of schade, indirect of direct, als gevolg van verkeerd of
onbevoegd gebruik van het toestel.
Importeur:
AGK Nordic A/S
www.agknordic.com
Copyright 2014. Alle rechten voorbehouden
Gedrukt en gepubliceerd door Agk Nordic A/S. 15.09.2014
Hierbij verklaart Agk Noric A/S dat deze 10859 voldoet aan de essentiële voorwaarden en andere relevante
bepalingen van Verordening 1999/5/EC. De conformiteitsverklaring voor 10859 is verkrijgbaar op het volgende
adres:
AGK Nordic A/S
Randersvej 88B
Stevnstrup
8870 Langaa
Denemarken

www.ssb-repair.com/agk
ss
28 29
Nous vous remercions d’avoir acheté la radio FM. Pour vous permettre d’utiliser ce produit et profiter du bien-être
qu’il vous donnera, nous avons présenté chaque fonction de la radio de façon détaillée dans ce manuel d’utilisation.
Veuillez lire le manuel d’utilisation avant d’utiliser le produit et le conserver pour des besoins futurs.
Attention: Certaines spécifications sont sous réserve de modifications sans notification préalable.
1. Apparence et description des touches
Vue de face
No. Description Fonctions
1 POWER Commande pour allumer et mettre en veille
2 MODE Appuyer sur MODE pour changer entre iRadio-FM-Aux-UPnP-USB
3 ALARM Régler l’alarme
4 S1 Prérégler station No. 1, appuyer et tenir pour enregistrer, rappuyer pour sauvegarder
5 S2 Prérégler station No. 2, appuyer et tenir pour enregistrer, rappuyer pour sauvegarder
6FAV Appuyer et tenir la touche “FAV” pour enregistrer le préréglage, rappuyer sur “FAV” pour
sauvegarder le préréglage.
7En arrière. Appuyer sur la touche “” pour rechercher la station précédente en mode “FM”.
8VOL Tourner le bouton “VOL” à droite pour monter ou baisser le volume.
9 USB Entrée USB
10 S3 Prérégler station No. 3, appuyer et tenir pour enregistrer, rappuyer pour sauvegarder
11 S4 Prérégler station No. 4, appuyer et tenir pour enregistrer, rappuyer pour sauvegarder
12 Vers l’avant. Appuyer sur “” pour rechercher la prochaine station en mode “FM”.
13 MENU Le menu principal (“MAIN MENU”) vous permet d’entrer différents modes opératoires
(mode « Internet radio ; mode “Media Center”; mode “FM”; mode “Information Center”;
mode “AUX”; mode “Configuration”).
Le menu des modes (“MODE MENU”) montre les fonctions dans le contexte de chaque
mode opératoire.
Appuyer sur la touche “MENU” pour obtenir le menu du mode opératoire actuel de votre
radio. Le menu de chaque mode contient une option “MAIN MENU”- sélectionner cette op-
tion pour retourner au menu principal.
Appuyer pour retourner à l’écran permettant d’écouter de la musique.
14 ENTER Tourner le bouton “ENTER” pour parcourir les options dans le menu. Appuyer sur la touche
“ENTER” pour confirmer votre sélection d’une option dans le menu. En mode “FM”, tourner
le bouton “ENTER” pour effectuer une recherche automatique des stations.
Télécommande
Insérer 2 piles “AAA”.
VEUILLEZ NOTER: Les piles ”AAA” sont inclues dans l’emballage.
1.1. Streaming musical
AirMusic est le nom par default du DLNA: Vous pouvez le renommer si vous le souhaitez.
Vous trouverez ci-dessous une introduction à la configuration du streaming media du PC ou d’un autre serveur
media. Etudiez les notices du software et des applications que vous utilisez pour écouter le streaming musical si
nécessaire.
Vérifiez que les fichiers musicaux sont bien en format MP3, WMA, WAV ou AAC pour le streaming musical du
modèle 10859.
Se référer à la section 7 pour plus de détailles concernant le contrôle sur le modèle 10859 pour le playback du
streaming musical.
1.2. Get UPnP Ready
Pour écouter le streaming musical du PC, suivez les étapes suivantes sur le PC:
- -Relier le PC au réseau.
- Vérifier que le modèle 10859 est branché et connecté au même réseau.
- Ouvrir la plate-forme UPnP Windows Media Player (version 10 ou plus récente). Vous pouvez également
vous servir de plate-formes ou de serveurs alternatifs tels que Windows Media Connection.
Accepter de partager vos fichiers media avec AirMusic (10859).
- Ajouter les fichiers et les dossiers audio que vous souhaitez partager avec le modèle 10859 pour les
archives media. Vous pouvez également écouter le streaming musical d’autres serveurs musicaux, tels que
le smart phone (plate-forme Android):
- Chercher et installer les applications de partage media du marché Android.

www.ssb-repair.com/agk
ss
30 31
- Ajouter les fichiers audio de votre téléphone portable que vous souhaitez partager.
Suite à l’installation et la configuration du serveur partagé, sélectionner la musique et le contrôle playback sur le
modèle 10859.
1.3. Pour les réseaux câblés
Vérifier le bon fonctionnement du réseau câblé.
Etablir la connexion LAN sur le dos du radio.
Quand la connexion est établie, une icone Réussite apparaîtra en haut à gauche.r.
1.4. Contrôle Airmusic APP
Charger l’application Airmusic APP sur votre téléphone portable.
Relier au même routeur.
Maintenant vous pouvez utiliser l’application sur votre téléphone portable.
2. Fonctions
Liste des fonctions:
En veille
Radio Internet
Station de radio/musique
Mon favori
Radio locale
Histoire
Service
Centre de média
USB
UPnP
Ma playlist
Effacer ma playlist
FM
Centre d’information
Informations météo
Informations financières
Informations de système
AUX
Configuration
Réinitialisation au réglage par défaut
Reveil
Date & heure
Alarme
Langue
Variateur d’éclairage
Amortisseur
Météo
Configuration de FM
Configuration de radio locale
Playback Set Up
Egalisation
Mise à jour du software
Gestion d’alimentation
Configuration de DLAN
Reprise quand la radio s’allume
Réseau
Gérer mes média U
3. Configuration
3.1 Configuration du réseau
Configuration du réseau câblé
Pour activer/désactiver le réseau câblé, relier LAN sur le dos du radio
Configuration du réseau sans fil
Activer/désactiver le réseau WiFi. Quand vous activez le réseau WiFi, le système cherche automatiquement le AP
disponible..
Réseau sans fil (WPS PBC)
Configuration manuelle
Vous pouvez sélectionner le DHPC (attribution automatique d’adresse IP) ou entrer l’adresse IP manuellement pour
les connexions des réseaux câblés/sans fil.
Vérifier la connexion au réseau quand la radio est allumée
Activer / désactiver le réseau.
3.2. Réglage de la date & de l’heure
Réglage de la date et de l’heure; Régler l’affichage du format du temps de 12 heures ou 24 heures; régler le
format de la date dans les champs YY(year=année), MM (month=mois) et DD (day = journée) - YY/MM/DD,
DD/MM/YY ou MM/DD/YY.
Activer/désactiver l’heure d’été. Si votre pays utilise l’heure d’été, sélectionner ON et régler Daylight Saving Time
(DST).
Avec un réseau sans fil connecté, GMT (+01:00) est la référence pour le réglage du temps.
Quand vous réglez l’heure, ajoutez ou déduisez les heures selon votre zone horaire.

www.ssb-repair.com/agk
ss
32 33
3.3. Réglage de l’alarme
Il y a trois alarmes indépendantes - 2 alarmes avec un réglage du temps absolu (Alarme 1 et Alarme 2) et 1
alarme pour un réglage du temps relatif (Alarme NAP). Appuyer sur “Alarm” sur la télécommande pour entrer
directement dans le menu.
Selon le réglage NAP Alarm, l’alarme sonnera toutes les 5/10/20/30/60/90/120 minutes dépendant de votre
sélection.
Quand l’alarme/les alarmes est/sont réglé(s), une icône d’une montre apparaîtra en haut de l’écran. L’icône de la
montre avec l’heure de l’alarme sera aussi clairement affichée sur l’écran en mode veille.
Quand l’alarme sonne, appuyer sur POWER pour l’arrêter.
3.4. Réglage des langues
SELECTIONNER la langue OSD: Anglais, allemand, français, hollandais, russe, suédois, norvégien ou danois.
3.5. Réglage du variateur d’éclairage
Configurer la luminosité de l’illumination arrière sur l’écran.
3.6. Réglage de la gestion de l’alimentation
Eteindre ou régler « power off » sur 5/15/30 minutes.
3.7. Réglage du réveil
Eteindre ou régler la durée du sommeil sur 15/30/60/90/120/150/180 minutes. Quand la durée est réglée,
une icône d’un lit apparaîtra avec les minutes restantes en haut à droite, et le modèle 10859 se mettra en veille.
Appuyer sur “Sleep” sur la télécommande pour utiliser le raccourci de cette fonction.
3.8. Réglage de l’amortisseur
Régler la durée de l’amortisseur pour le playback musical, 2/4/8 secondes.
3.9. Réglage de la météo
Le modèle 10859 peut afficher les informations actualisées de la météo en mode veille.
Configurer l’unité température (C° ou F°) pour afficher la météo en mode veille.
Configurer le lieu avec “Set Location” pour sélectionner la ville à afficher en mode veille.
Quand la radio est allumée, le temps actuel et la météo actuelle seront affichés en alternance pendant 10
secondes.
3.10. Configuration FM
Sélectionner Mono/Stéréo et ENTRER la bande de diffusion FM (Japan: 76 - 108.0 MHz; Autres destinations:
87.5 -108.0 MHz).
3.11. Réglage de la Radio Locale
Le réglage par défaut est « Auto Detect » (détection automatique)
3.12. Configuration playback
Pour configurer le mode playback du UPnP – “Repeat all” (tout répéter), “Repeat one” (répéter une piste),
“Shuffle” (sélection au hasard), ou “Off” (écouter une fois uniquement).
3.13. Configuration DLAN
3.14. Egaliseur
L’égaliseur par défaut est Normal. Vous pouvez changer de mode: Flat, Jazz, Rock, Movie, Classical, Pop, ou
News.
3.15. Reprise quand la radio s’allume
3.16. Mise à jour du software
Mise à jour du software. S’il y a une mise à jour du software sur le serveur, le système vous avertira quand
vous retournez au menu principal.
3.17. Restaurer les réglages par défaut
Avant de restaurer les réglages par défaut, sachez que toutes informations d’accès au WiFi et les préréglages des
mots de passe Radio Internet et FM seront effacés.

www.ssb-repair.com/agk
ss
34 35
Après la réinitialisation du modèle 10859, le système passera au menu Réglage des langues. Et après la sélection
de la langue OSD, le système passera automatiquement au menu Réglage du réseau.
4. Radio Internet
Activer votre propre liste de stations de radio Internet sur le serveur Radio Internet et son playback.
Pour activer votre propre liste de stations, suivez les étapes ci-dessous:
1. Accès http://www.mediayou.net/
2. Cliquer sur Login pour effectuer l’enregistrement;
3. Login du site web;
4. Entrer votre nom d’utilisateur, mot de passe, adresse email et code postal (le cas échéant);
5. Suite à la réussite de l’enregistrement, vous recevriez un email de l’équipe support. Entrez votre mot de passe
pour le modèle 10859. Vous pouvez également vous connecter sur le site web pour gérer votre liste de stations
radio.
6. My mediaU Device
Pour utiliser la fonction ‘My mediaU’ sur les radios Internet qui supporte mediaU, vous ne devez pas entrer votre
nom d’utilisateur et mot de passe mediaU. Il faut simplement vous enregister sur mediaU, et les réglages ‘my
mediaU’ (stations favorites, ajouts manuels…) seront synchronisés avec l’appareil.
1) Entrer l’adresse MAC de la radio dans le PC pour synchroniser les informations. Appuyer sur MENU-> Infor-
mation Center->System Information->Wireless Information->MAC address N0 pour trouver l’adresse MAC
2) Sélectionner MENU->Configuration -> Manage my mediaU -> Enable
7. Station favorite
Ici vous pouvez sauvegarder vos stations de radio favorites. Vous pouvez également créer différents répertoires
pour faciliter la gestion.
8. Piste favorite/ Genre favori
Sauvegarder votre position favorite/genre favori (ou une combinaison).
9. Ma station locale
Configurer la ville où vous habitez, et la liste des stations dans la ville sera affichée.
10. Ajouts manuels
Ici vous pouvez ajouter manuellement les AOD, les Podcast et les stations personnelles qui ne sont pas sur la liste
du mediaU.
Astuce: Si vous retournez au menu quand vous écoutez une station radio, vous ne pouvez plus régler le volume.
En revanche vous pouvez utiliser les boutons de volume sur la télécommande. Sinon vous pouvez arrêter de
contrôler le système pour revenir automatiquement à l’écran playback au bout de 10 secondes. Ici vous pouvez
régler le volume.

www.ssb-repair.com/agk
ss
36 37
4.1. Parcourir les préréglages (FAV)
Appuyer et tenir le bouton “FAV” pour enregistrer les stations favorites. Vous pouvez stocker 250 stations de radio
Internet. Appuyer sur “FAV” ou sur les numéros sur la télécommande pour retrouver les stations FAV.
Appuyer et tenir S1-S4 pour enregistrer les 4 stations favorites. Rappuyer S1-S4 pour sauvegarder.
4.2. Browse Stations
Voir la liste de stations selon les catégories suivantes: Mon favori, Station radio/Musique, Radio locale,
Histoire.
Appuyer sur ENTER pour écouter chaque station. Vous pouvez appuyer sur XX pour entrer son sous-menu
(configuration).
4.3. Recherche Station radio
Entrer votre mot clé pour rechercher une station radio de la liste.
4.4. Ajouter une nouvelle station radio
Entrer radio URL
Veuillez noter:
La radio se met en veille au bout de 15 minutes, quand le réseau est faible.
La radio se met en veille au bout de 15 minutes sur silencieux
4.5. Historique
Une liste des stations écoutées dernièrement.
Appuyer sur ENTER pour écouter chaque station directement. Vous pouvez appuyer sur pour entrer le
sous-menu – vous pouvez sélectionner Add to Preset, Auto Scan, Play ou Use as Alarm Sound (si vous
sélectionnez Internet comme sonnerie d’alarme et configuration d’alarme).
5. Centre Media
5.1. UPnP
Si vous avez configuré les media partagés, les média partagés de UPnP apparaîtront. Si vous n’avez plus qu’un
médium de partage entre ordinateurs, les alternatifs sont listés. SELECTIONNER les media partagés que vous
voulez écouter.
Tourner le bouton “ENTER”, sélectionner la liste de chansons et appuyer sur la touche “ENTER” pour écouter la
chanson sélectionnée.
Appuyer sur et sur la télécommande pour écouter la prochaine piste de musique ou la piste précédente,
appuyer sur « pause » ou « play ». Appuyer sur ¾ pour arrêter la musique.
Astuce: La radio peut seulement lire les pistes avec des noms de fichier de moins de 40 caractères. Les caractères
doivent être européens.
Si vous n’arrivez pas à lire la piste en mode UPnP, vous pouvez essayer de renommer le fichier.
Si la piste est encore difficile à lire, vous pouvez essayez de convertir le fichier en différent formats.
Astuce: Si vous retournez au menu, vous ne pouvez plus régler le volume, quand vous écoutez une station. En
revanche vous pouvez utiliser les boutons sur la télécommande. Sinon vous pouvez cesser de contrôler le système :
après 10 secondes l’affichage du playback réapparaît et vous pouvez de nouveau régler le volume.
5.2. Mode USB
En mode USB vous pouvez écouter les pistes audio sur la clé USB
Tourner le bouton “ENTER”, sélectionner la liste de chansons, et appuyer sur la touche “ENTER” pour écouter la
chanson sélectionnée.
Appuyer sur et sur la pour écouter la prochaine piste de musique ou la piste précédente, appuyer ¾ sur «
pause » ou « play ». Appuyer sur pour arrêter la musique.
Veuillez noter: Quand vous reliez la clé USB avant d’écouter la musique, elle doit apparaître à droit. La
radio se met en veille après 15 minutes sur silencieux.
6. FM
Le mode radio FM reçoit les fréquences analogues de la bande de fréquence FM.
Appuyer sur / pour rechercher une station FM. La fréquence affichée augmente pendant le scan de la bande
de fréquence FM. Le scan s’arrête à chaque station identifiée.
Pour trouver une station de radio manuellement, appuyer sur ENTER. Chaque fois que vous appuyez, la fréquence
change de 0.05MHz.
Appuyer sur et tenir FAV pour enregistrer la station.

www.ssb-repair.com/agk
ss
38 39
Vous pouvez enregistrer jusqu’à 20 stations. Appuyer rapidement sur FAV et tourner ENTER pour vérifier ou
sélectionner la station présélectionnée. Vous pouvez également appuyer sur le numéro sur la télécommande pour
sélectionner la station enregistrée.
Solution alternative: Appuyer sur ENTER pour permettre au système de scanner TOUTES les stations de radio. Les
stations identifiées seront automatiquement sauvegardées dans la liste de station préréglée.
Astuce: Si vous retournez au menu, vous ne pouvez plus régler le volume quand vous écoutez une station. En
revanche vous pouvez utiliser les boutons sur la télécommande. Sinon vous pouvez cesser de contrôler le système,
et après 10 secondes l’affichage du playback réapparaît et vous pouvez de nouveau régler le volume.
Veuillez noter: La radio se met en veille après 15 minutes sur silencieux.
7. AUX IN
En mode Aux vous pouvez écouter des enregistrements audio d’une source externe telle qu’un enregistreur MP3.
8. Centre d’information
8.1. La météo
Vous trouvez la météo et d’autres informations météorologiques sur 2000 ville. SELECTIONNER le pays et la ville
pour obtenir des informations détaillées.
La radio peut afficher les informations météorologiques en veille. Sur la page météo, appuyer sur ENTER pour
enregistrer la ville à afficher en mode veille.
8.2. Services financières
Voir l’indice boursier des actions pour le monde entier.
8.3. Informations système
Examiner la version du système 10859 et les détails du réseau relié.
9. Solutions de problèmes
Erreur Solution
L’appareil ne s’allume
pas. Vérifier que l’adaptateur est branché correctement.
Pas de son. 1. Activer le son, car l’appareil peut être sur silencieux
2. Monter le volume.
Pas de connexion de
réseau.
1. Vérifier la fonction WLAN.
2. Enregistrer une adresse IP dans l’appareil.
3. Activer la fonction DHCP sur le routeur et rétablir la connexion avec l’appareil.
4. Un pare-feu est activé sur le réseau – configurer le logiciel pour permettre l’accès
Pas de connexion
WLAN.
1. Vérifier la disponibilité du réseau WLAN sur le point d’accès.
2. Placer l’appareil plus près du routeur.
3. Vérifier que le mot de passe WEP/WPA est correct.
Le recherche de
stations ne donne
aucun résultat.
1. Vérifier le réseau ainsi que le point d’accès et le pare-feu. ne donne aucun résultat.
2. Si la station n’est pas disponible, réessayer ultérieurement ou SELECTIONNER une autre
station.
3. Il est possible que le lien de la station de radio a changé, ou que la station ne transmet
plus – demander au fournisseur.
4. Réenregistrer le lien de station ajouté manuellement, s’il n’est pas correct.
Souffle en mode FM. 1. Vérifier/déplacer l’antenne FM.
2. Déplacer la radio.
L’alarme ne marche
pas.
1. Activer l’alarme.
2. En ce qui concerne le réglage de volume, se référer aux solutions susmentionnées pour
activer le son.
3. Si la source de l’alarme enregistrée est la station radio, vérifier la connexion au réseau.
S’il n’y a pas de connexion, changer la source de l’alarme ou reconfigurer la connexion.
Le système est bloqué. The radio est surchargée. Réinitialiser le système.
10. Spécifications
Numéro du modèle 10859
Description Radio Internet
Ecran 128 x 64 dot matrix
Réseau supporté 802.11b/g (WLAN)
Clé WLAN WEP, WPA, WPA2 (PSK)
Protocole Streaming
NTP Network Time Protocol
RTSP Real Time Streaming Protocol
MMS Microsoft Media Streaming Protocol
HTTP Hyper Text Transfer Protocol
Playback supporté
Formats
WMA Windows Media Audio
MP3 MPEG Layer 3 Audio
WAV Waveform Audio
AAC Advanced Audio Coding
Adaptateur électrique 12V 1.5A
Connexions 3.5mm connecteurs jack
DC IN prise électrique
Dimensions 250mm(L) x 135mm(H) x 130mm(P)
Poids 2 kg (environ)
Table of contents
Languages:
Other AGK Radio manuals