Agria 5100 Rabbit User manual

Before commissioning the machine, read operating
instructions and observe warnings and safety instructions.
Operating Instructions No.
998 746-A 10.10
4342A
&
Type 5100 321
with reverse speed
with Honda engine
Grassland MowerGrassland Mower
Grassland Mower
5100 Rabbit5100 Rabbit
5100 Rabbit
OriginalOriginal
OriginalOriginal
Original
OperatingOperating
OperatingOperating
Operating
InstructionsInstructions
Instructions

2agria Grassland Mower 5100
Symbols, Name Plate
Please complete:
Machine Type No........................
Identification No.
....................................................
Engine Type: ...............................
Engine No....................................
Date of Purchase: .......................
For name plate, refer to p3/fig. A/1.
For Engine type and number, refer to
p46/fig. C/7.
Please state these data when order-
ing spare parts to avoid wrong deliv-
eries.
Only use original agria spare parts!
Specifications, figures and dimen-
sions stated in these instructions are
notbinding.Noclaimscanbederived
from them. We reserve the right for
improvements without changing
these instructions.
This delivery comprises:
l
Operating instructions
l
Grassland mower – base machine
l
Steering handle with attachment
bolts
l
Linch pin for cutter bar attachment
l
Tool kit
Symbols
Warning – Danger
Important information
Choke
Fuel
Oil
Engine Start
Engine Stop
Mowing drive
Wheel drive
Wheel drive engaged
Wheel drive disengaged
Open (unlocked)
Closed (locked)
è- Serviceç= contact
Your agria workshop

agria Grassland Mower 5100 3
Fig. A
Designation of Parts
Fig. B

4agria Grassland Mower 5100
Designation of Parts
Figure A
1Machine type plate (Identification No.)
(on engine support plate to the right)
2Hex head bolt for steering handle height adjustment
3Steering bar
4Mowing drive hood
5Crop deflector
6Cutter bar
7Knife driver
8Knife driver hole
9Rocker arm
10 Running bases
11 Mowing drive
12 Worm gear (transmission)
13 Tool box
14 Steering handle
15 Engine
16 Engine support plate
17 Belt drive housing
18 Belt housing cover
19 Drive wheel
20 Wheel dog switchable
Figure B
1Safety circuit lever
2 Transmission clutch lever
3 Pawl for transmission clutch lever
4Mowing drive clutch lever
5Speed control lever and engine shut-off lever
7Lever for steering handle side-adjustment

agria Grassland Mower 5100 5
Index
1
3
5
6
4
2
Amount of Delivery.......................2
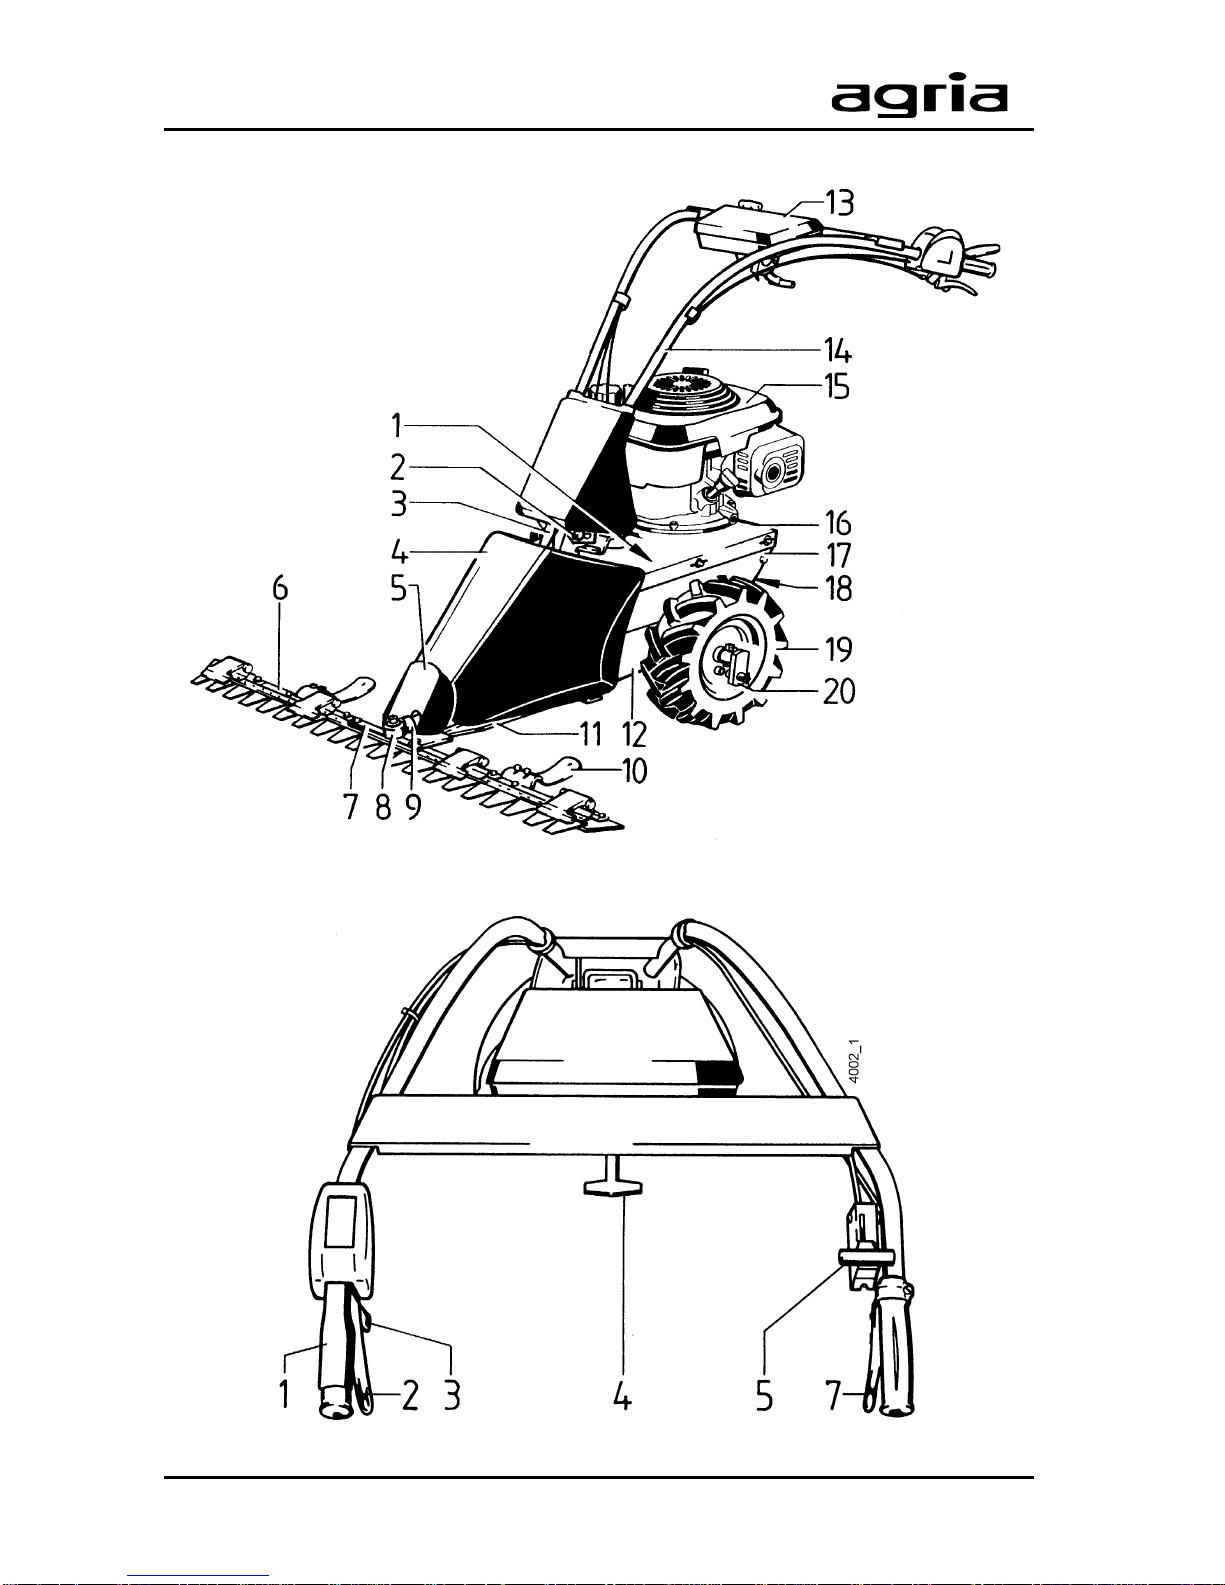
Designation of Parts................3, 46
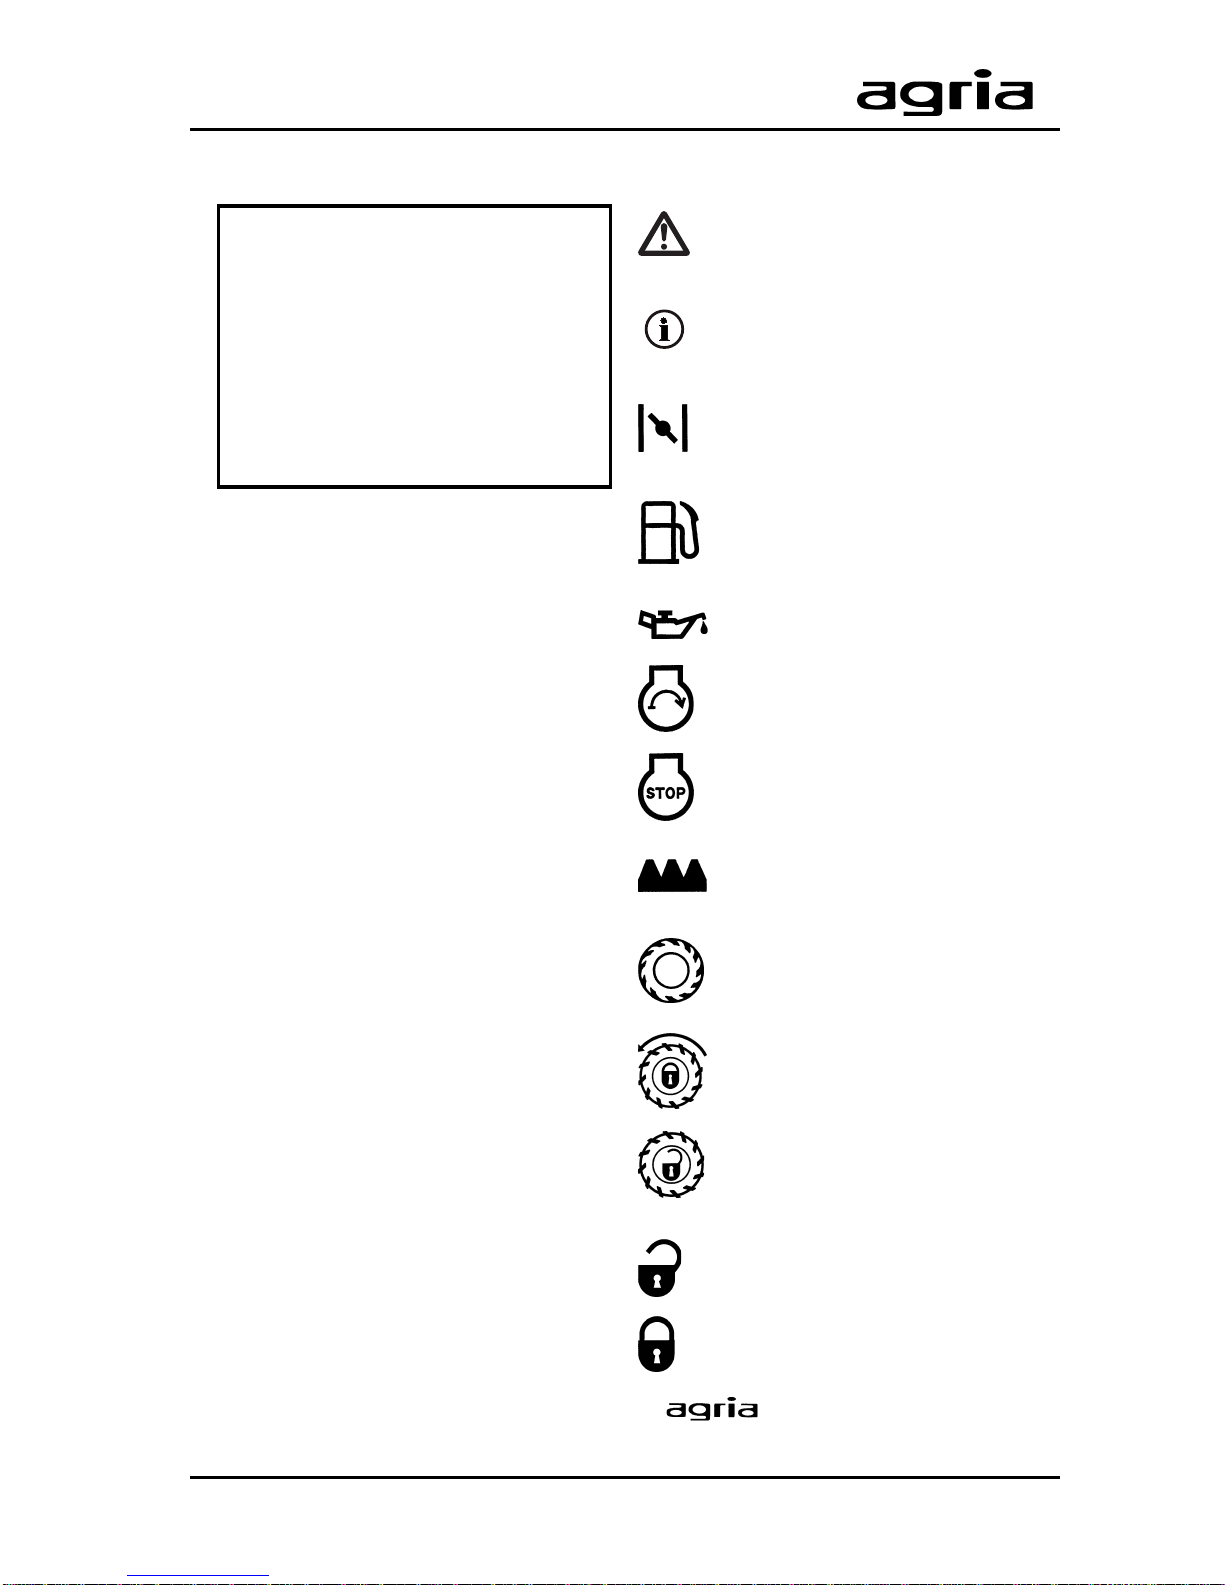
Recommendations
Lubricants, Anti-Corrosive Agents ..6
Fuel ..................................................6
Maintenance and Repair .................6
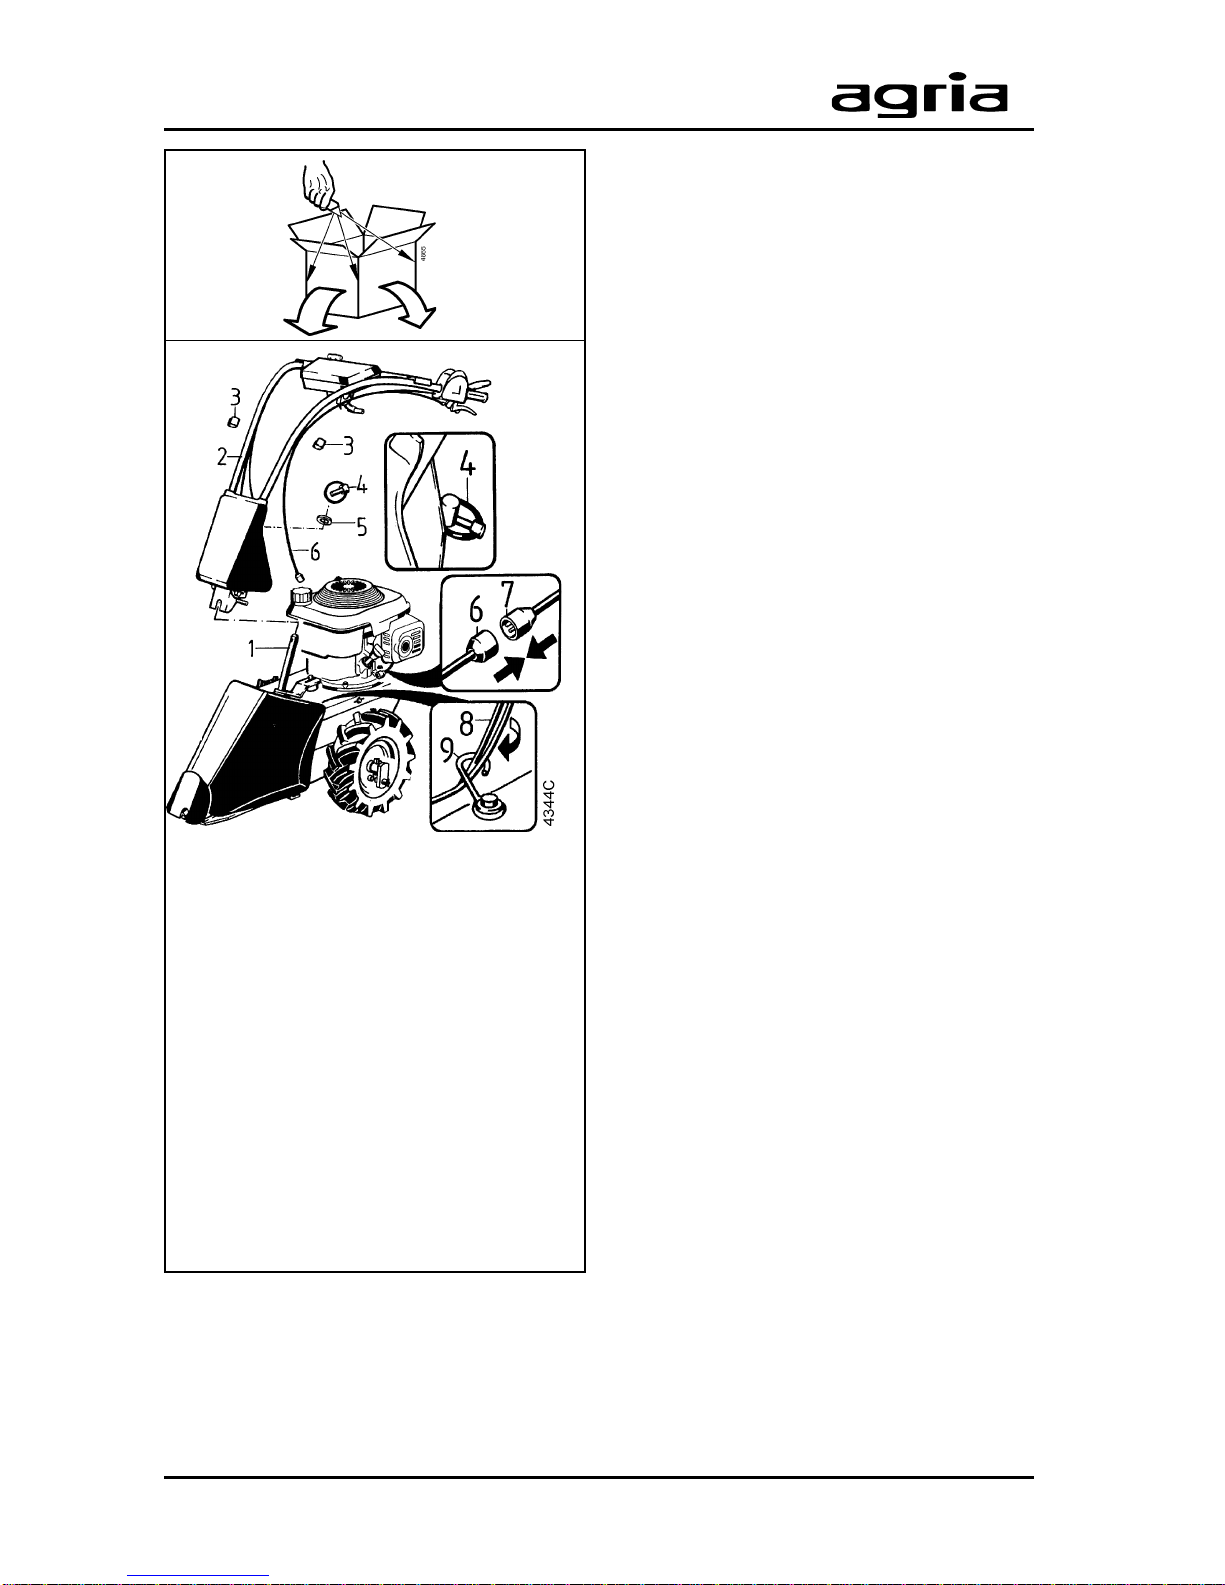
Unpacking and Assembly.............7
1. Safety Instructions ..............8–12
2. Specifications
Dimensions ....................................13
Grassland Mower...........................13
Mowing Drive.................................13
Noise Level ....................................13
Vibration Acceleration Value..........13
Engine............................................14
Operation on Slopes......................14
3. Devices and Operating Elements
Engine............................................15
Safety circuit ..................................16
Clutch.............................................16
Transmission..................................17
Mowing Drive.................................17
Steering Handle .............................18
Drive-Wheels .................................19
Cutter Bar ......................................20
Replacing the Mowing Knife..........21
4. Commissioning and Operation
Commissioning the Machine .........23
Starting the Engine........................24
Shutting off the Engine ..................25
Mowing...........................................26
5. Maintenance
Machine .........................................27
Clutch play.....................................27
Drive-wheels ..................................28
Mowing Attachment .......................28
Universal-S Cutter Bar ..................29
Grinding the Knives .......................30
Engine............................................31
Air Filter .........................................32
Fuel System...................................33
Spark Plug .....................................34
Cooling System .............................34
Governor ........................................35
Exhaust..........................................35
Speed Actuating Devices ..............35
Carburetor Settings .......................35
Safety circuit ..................................36
General ..........................................36
Cleaning.........................................36
Storage ..........................................37
Electrical Wiring...........................38
Varnishes,Wear Parts .................39
6. Troubleshooting .................40–41
Lubrication Chart.........................42
Inspection and
Maintenance Chart......................43
Conformity Declaration ...............47
Note fold-out pages!
Fig. A and B ....................................3
Fig. C .............................................46

6agria Grassland Mower 5100
Recommendations
Lubricants and
Anti-Corrosive Agents:
Use the lubricants specified for engine
and gearbox (see “Specifications”).
We recommend using Bio-lubricating
oil orBio-lubricating grease for“open”
lubrication points or nipples (as speci-
fied in the operating instructions).
WerecommendusingBio-slushing oil
to preserve machines and attachments
(do not apply on painted covers). You
can brush or spray the oil.
Anti-corrosive agents are environmen-
tally friendly and degrade fast.
Using ecologically safe Bio-lubricants
and Bio-anti-corrosives, you contribute
to environmental protection and to the
wellbeing of humans, animals and
plants.
Fuel
This engine runs smoothly on conven-
tional unleaded regular and super-
grade petrol as well as on leaded
supergrade petrol.
Do not add oil to petrol.
If, for environmental reasons, you use
unleaded petrol, make sure the fuel is
drainedcompletelywhenshuttingdown
the engine for more than 30 days.This
is to prevent resin residue from depos-
iting in the carburetor, fuel filter, and
tank.Or add a fuel stabilizer to the fuel.
For further instructions see “Engine
Preservation”.
Maintenance and Repair:
The trained mechanics of your agria
workshop expertly carry out any main-
tenance and repair work.
You should only carry out major main-
tenance work and repairs on your own,
if you have the proper tools and knowl-
edge of machines and internal combus-
tion engines.
Donothammer againsttheflywheel with
a hard object or metal tools as it might
crack and shatter in operation, causing
injuries and damage.Only use suitable
tools to pull off the flywheel.

agria Grassland Mower 5100 7
Unpacking and Assembly
1Steering column pin
2Steering handle
3Clips
4Linch pin
5Washer
6Electric cable with connector
(on steering handle)
7Electric connector on engine
8Bowden cables
9Guide hook for Bowden cables
Unpacking
l
Open the top of the cardboard box.
l
Cut the box open on all four corners
and fold down the sides.
Assembly of steering handle
l
Push the steering handle location
holes (2) onto the steering column pin
(1).
l
Fit the washer (5) onto the steering
column pin (1).
l
Lockthe steering handle byfitting the
linch pin (4) through the horizontal hole
in the steering column.
l
Notch the steering handle into the
middle position of the side adjustment
mechanism (see page 18).
l
Adjust the steering handle to the de-
sired working height (see page 18).
l
Connect the electric cable (7) to
socket(6) (enginesafetycircuitsystem).
l
Fit the Bowden cables (8) into the
guide hook (9).
l
Inspect again all cable guides to en-
sure the cables are not twisted or
jammed and to avoid clutch problems.
l
Attach Bowden and electric cables
with clips (3) to the steering handle.
Attaching the cutter bar
See instructions on page 20
Starting up
See instructions on page 23

8agria Grassland Mower 5100
1. Safety Instructions
1
Before starting the engine, read the op-
erating instructions and note:
Warning
Thissymbolmarksallparagraphswhich
affectyoursafety.Passall safetyinstruc-
tions to other users and operators.
Due Use
The grassland mower is constructed
solely for the cutting of grass and simi-
lar plants as well as thin non-wooded
scrub in land & forest management,
greenspaces,andother such areasand
may also be used as a snow-clearing
machine after it has been fitted with a
suitable rake blade (due use).
Any other type of operation is consid-
ered undue.The manufacturer is not li-
able for any damages resulting from
undue use, for which the risk lies with
the user alone.
When the grassland mower is used on
publicroads,the local national road traf-
fic rules must be observed, e.g. reflec-
tors, lights.
Thegrasslandmoweris not intended for
use with a trailer on public roads or as
as a tractive machine.
Due use includes compliance with
manufacturer’s instructions on opera-
tion, maintenance and repair.
Anyunauthorizedchangestothemower
render manufacturer liability null and
void.
General Instructions on
Safety and Accident
Prevention
Basic Rule:
The standard accident prevention regu-
lations must be adhered to, as well as
all other generally accepted rules gov-
erning operational safety, occupational
health and road traffic regulations.
For drives on public roads, the national
traffic code applies.
Accordingly, checkthe grasslandmower
for road and operational safety each
time you take up operation.
Only persons familiar with the mower
and instructed on the hazards of opera-
tion are allowed to use, maintain and
repair the mower.
Teenagers of 16 years or younger may
not operate the grassland mower!
Only work in good light and visibility.
Operator’s clothes should fit tight.Avoid
wearing loose fitting clothes.Wear solid
shoes.
Note the warning and instruction signs
on the mower for safe operation. Com-
pliance is for your own safety.
When transporting the mower on vehi-
cles or trailers outside the area to be
mowed,ensure thattheengineisturned
off.
Careful with rotating tools – keep at a
safe distance!

agria Grassland Mower 5100 9
1. Safety Instructions
1
Beware of coasting tools.Before you
start anymaintenanceorrepaironthem,
waituntiltoolshavecome to acomplete
stop.
Foreignpoweredparts shear and crush!
Riding on the attachment during opera-
tion is not permitted.
Implements and their weight affect the
driving, steering, braking, and tip-over
characteristics of the mower.Therefore,
ensure steering and braking functions
are sufficient.Match operating speed to
conditions.
Donotchangesettingsofgovernor.High
engine speed increases risk of acci-
dents.
Working Area and Danger
Zone
The user is liable to third parties work-
ing within the mower’s working range.
Staying in the danger zone is not per-
mitted.
Check the immediate surroundings of
the mower before you start it.Watch out
for children and animals.
Before you start work, clear the area
from any foreign object. During opera-
tion,always watchout forfurtherobjects
and remove them in time.
Foroperationinenclosed areas,ensure
that a safety distance is kept to enclo-
sures to prevent damage to tools.
Operation and Safety
Devices
Before you start the engine
Become familiar with the devices and
operating elements and their functions.
Above all, learn how to turn the engine
off quickly and safely in an emergency.
Ensure that all protective devices are
mounted and positioned to provide pro-
tection.
Withnoimplementmounted,makesure
PTO-shaft is covered with the protec-
tive cap.
Starting the engine
Donotstart engineinclosedrooms.The
carbon monoxide contained in the ex-
haust fume is extremely toxic when in-
haled.
Before you start the engine set all oper-
ating elements to neutral or idling posi-
tion.
For starting the engine, do not step in
front of the mower and the implement.
Do not use assist-starting liquids when
using electrical assist-starting devices
(jumper cable). Danger of explosion.
Operation
Never leave the operator’s position at
the steering handle while mower is at
work.
Never adjust the operating handles dur-
ing work – danger!

10 agria Grassland Mower 5100
1. Safety Instructions
1
Duringoperationthe operatormustkeep
at a distance as defined by the steering
handle, especially when turning the
machine.
Riding on the implement during opera-
tion or in transport is not permitted.
Ifcloggingoccursintheimplement,turn
off the engine and clean the implement
with an appropriate tool.
In case of damage to the grassland
moweror to the implement, immediately
turn off the engine and have it repaired.
If steering causes problems, immedi-
ately bring the mower to a halt and turn
it off.Have the malfunction removed
without delay.
To prevent the mower from sliding on
slopes, make sure it is secured by an-
other person using a bar or a rope.This
person must be located at a higher po-
sition than the vehicle and at a safe dis-
tance from the attachment at work.
If possible, always work horizontally on
the slope.
End of Operation
Never leave the mower unattended with
the engine running.
Before you leave the grassland mower,
turn off the engine.
Secure grassland mower against unau-
thorized use.If mower is equipped with
ignitionkey,removethekey.Forallother
versions, remove spark plug connector.
Implements
Only mount implements with the engine
and PTO switched off.
Always use appropriate tools and wear
gloves when changing implements and
parts thereof.
For mounting and dismounting imple-
ments bring stands into proper position
and ensure stability.
Secure mower and implements against
rollingoff(parking brake,wheel chocks).
Beware of injuries while coupling imple-
ments.
Mountimplementsasspecified and only
couple at specified points.
Secure mower and implement against
unauthorized use and rolling off when
you leave the machine.If necessary, in-
stall transport or security devices and
secure.
Mowing Attachment
Handle with care! Sharp blades of the
cutter bar may cause injuries! Remove
knife guards only for mowing and refit
immediately after work has finished.
Fortransportandstoragealways mount
the knife guards.Secure finger bars
additionally with tension springs.
Do not transport the dismounted cutter
bar without knife guards.

agria Grassland Mower 5100 11
1. Safety Instructions
1
Before mounting and dismounting the
cutter bar, make sure all blades are pro-
tected by the knife guards.
To exchange the mowing knife and to
mount/dismount the knife driver, make
sure that you turn bolts away from cut-
ting edges.
For grinding the mowing knives, always
wear safety goggles and gloves.
Weights
Always fit weights onto appropriate
weight mounting devices.
Snow Clearing
Ensure snow dozer is mounted cor-
rectly! Wear slip-proof shoes.
Whenpivotingthe snowdozerwatchout
for crush and shear points.Adjust work-
ing speed to conditions.Operator may
be injured when the mache comes in
contact with solid objects.
Maintenance and Cleaning
Never carry out any maintenance or
cleaning with the engine running.
Before you work on the engine, always
remove spark plug connector (petrol
engine only).
Check regularly and, if necessary, re-
place all guards and tools subject to
wear and tear.
Replace damaged cutting tools.
Always wear safety gloves and use
proper tools when exchanging cutting
tools.
Do not carry out repairs like welding,
grinding, drilling, etc. on structural and
safety-relevant parts (e.g.steering han-
dle, coupling devices)!
Keep mower and implement clean to
avoid risk of fire.
Check nuts and bolts regularly for tight
fit and re-tighten, if necessary.
Aftermaintenanceandcleaning, ensure
that you re-install all safety devices and
guards and adjust them properly.
Only use original agria spare parts.All
other commercial spare parts must cor-
respondtoqualityand technical require-
ments specified by agria.
Storage
It is not allowed to store the mower in
rooms with open heating.
Never park the mower in closed rooms
with fuel left in tank. Fuel vapours are
hazardous.
Engine,Fuel, and Oil
Never lettheengine run inclosedrooms.
Extreme danger of intoxication! For the
same reason, also replace damaged
exhaust pipe immediately.
Becarefulwhendealingwithfuel.Great
danger of fire! Never refill fuel close to
open fire, inflammable sparks or hot
engine parts.Do not refill fuel in closed
rooms.Do not smoke when refilling!
Refill only with the engine switched off
and cooled down.
Do not spill any fuel, use a proper filling
device.
In case of fuel spillage, pull the grass-
land mower away from the spillage be-
fore you start the engine.
Make sure fuel is of specified quality.
Store fuel in approved cans only.

12 agria Grassland Mower 5100
1. Safety Instructions
1
Store anti-corrosive agents and stabi-
lizing liquids out of reach of children. If
sicknessand vomitingoccur,seeadoc-
tor.If fuel has contacted eyes, rinse
them thoroughly, avoid inhaling of va-
pours.
Read and observe enclosed instruc-
tions.
Before you dispose of opened and
seemingly empty pressurised tins (e.g.
ofassist-starting liquids) makesurethey
are completely empty.Empty them in
ventilated places safe from spark for-
mation or flames.If necessary, dispose
of tins in hazardous waste deposits.
Be careful when draining hot oil, dan-
ger of burns.
Makesureoilis of specifiedquality.Stor-
age is in approved cans only.
Dispose of oil, greases, and filters
seperately and properly.
Tyres and
Tyre Air Pressure
When working on tyres, make sure
grasslandmowerisparkedproperlyand
secured against rolling off.
Any repairs are to be carried out by
trained mechanics only and with the
appropriate tools.
Regularly check tyre air pressure.Ex-
cessive pressure may cause bursts.
Use appropriate tyre air pressure when
mounting weights or implements.
Re-tighten attachment bolts of drive-
wheels or check tightness when doing
maintenance work.
Electrical System and
Battery
Persons having a pacemaker must not
touch live parts of ignition system when
the engine is running.
Explanation of
Warning Signs
Before any cleaning, maintenance, and
repair work switch off the engine and
pull spark plug connector.
With engine running, keep at a safe dis-
tance from cutting tools.
Signs
When working with the ma-
chine,wearindividual protec-
tive ear plugs.
Wear protective gloves.
Wear solid shoes.

agria Grassland Mower 5100 13
2. Specifications
2
Tyres:.....................3.50-6 (field tyres)
Tyre pressure: ......................... 0.8bar
Clutch:
2 V-belt clutches, separate engage-
ment, pulleys between engine and
transmission or mowing drive.
Friction clutch for reverse speed
Only use genuine agria V-belts
(see spare parts, p39)
Transmission:.................. Worm gear
Ground speeds:
forward .................................. 2.8km/hr
reverse .................................. 1.8km/hr
Mowing drive:
Central rocker arm drive, knife driver
fitted with rubber bearing bush
Reciprocating shaft speed.....920 rpm
Stroke......................... approx. 60 mm
Steering handle:
vibration dampened, side-adjustable,
height-adjustable without tools
Weight:...........................approx. 65 kg
(without cutter bar)
Noise level:
In accordance with EN 12733
Noise level at operator’s ear .80.7 dBA
Acoustic power level ............... 99 dBA
Vibration acceleration value:
on handlebar grip:......... ahw = 7.4 m/s2
in accordance with ISO 5349 standard
at 85% of rated engine speed with tools
at work.
Grassland Mower
Machine dimensions:
a........................................ 630 mm
b........................................ 560 mm
e........................................ 180 mm
h................................. 740-980 mm
l........................................ 1260 mm
m............................710 or 910 mm
..(depending on cutter bar version)
s......................................... 430 mm
A........................................ 525 mm

14 agria Grassland Mower 5100
2. Specifications
2
2
Engine
Manufacturer: ..........................Honda
Type: ............................ GCV 160 N2E
Version: ....................... Fan-air-cooled
1 cylinder-4-stroke
OHC engine (petrol)
Bore: ........................................ 64 mm
Stroke: ..................................... 50 mm
Piston displacement: ......... 160 ccm
Output: .................................... 4.1 kW
at 3,000 rpm
Torque: ..........................max 11.4 Nm
at 2,500 rpm
Spark plug: ...... NGK BPR6ES Bosch
Spark plug gap: ............... 0.7–0.8 mm
Ignition:
Transistor trip coil, contactless;
ignition point: 20° before dead centre,
radio remote screened according to
VDE 0879
Valve lash (engine cold)
Intake: ........................0.15 ± 0.04 mm
Outlet: ........................0.20 ± 0.04 mm
Starter:..........................Recoil starter
Fuel tank capacity: .................... 1.1 l
Fuel:..................... Conventional petrol
Octane number min. 85 RON
(refer to fuel recommendations
in this manual)
Air filter: ................. Dry element filter
Carburetor:............... Float carburetor
Throttle valve type
Mixture control screw: .....opened by
approx. 1 turn in base setting
Top no-load speed: ...........3,250 rpm
Idling speed:...........1,550–1,850 rpm
Engine oil:
Filling quantity................approx. 0.55 l
Multi-grade oil SAE 10 W-40
SG, SF or higher quality grade
Operability on Slopes:
Engine is suited for use on slopes
(with oil level at „max“ = upper level
mark)
Continuous operation possible up to
20° inclination (37%)

agria Grassland Mower 5100 15
3. Devices and Operating Elements
3
The grassland mower agria 5100 is
suited for agricultural and forestal op-
erations, green spaces and for winter
service operation. The following cutter
bars are available:
l
Universal-S cutter bar
91 cm (agria Item no.4347 641)
105 cm (agria Item no.4347 651)
Available attachment for winter service
operation:
l
Snow dozer
100 cm (agria Item no.5396 012)
Engine
The four-stroke petrol engine runs on
commercial petrol (refer to fuel recom-
mendations p6).
During the first 20 operating hours
(break-in period) do not operate the en-
gine at maximum speed.
Even after the break-in period never
operatethe engine at higher speed than
is necessary for the work in hand.
IHigh engine speed is harm-
ful to any engine and consid-
erably affects its longevity. This ap-
plies especiallyfor no load operation.
Any overspeed (have the engine roar)
can result in immediate damage.
Cooling System
The engine is fan-cooled. Therefore
keep the grille on the recoil starter and
thecoolingfins onthecylinderclean and
free from sucked-in plant trash.
Idling Speed
Always ensure that idling-speed is ad-
justed correctly.At low speeds and with
the speed control lever set to idle, the
engineissupposedtorun smoothly and
without run-out.
Air Filter
The air filter purifies the air intake. A
clogged filter reduces engine output.
Ignition System
The engine is equipped with a mainte-
nance-free, contactless electronic igni-
tion system. We recommend to have
necessarycheck-upsdone byanexpert
only.
Speed Control Lever
(Engine-shut-off switch)
The speed control lever (B/5) on the
steering handle sets the engine speed
steplesslyandactuates the CHOKEand
the engine-shut-off switch. For the ap-
propriate positions in the shift gate see
the illustration.
IThe speed control lever also
serves as engine safety circuit.
In an emergency move the lever to po-
sition "STOP" to shut off the engine in-
stantly.

16 agria Grassland Mower 5100
3. Devices and Operating Elements
STOP position
Operating position
Start position
3
Safety circuit
The grassland mower is equipped with
a safety circuit lever.
l
Stop position: Upon release of the
lever – with transmission and mowing
drive engaged – the ignition system is
switched off (engine is shut off).
Caution – engine keeps running due to
centrifugal mass.
l
Start position: Pull the clutch lever
(B/2) to start the machine and to inter-
rupt work.Lock the lever with pawl (B/3)
and move the mowing drive lever (B/4)
to position ”0”.
l
Operatingposition:Pressthesafety
lever (B/1) down to start operation.
WDo not tie down the safety
lever.
IThesafetycircuit leveralso serves
to shut off the engine in an
emergency situation.Upon release,
the lever will automatically go to STOP
position.
Clutch
The machine is equipped with a V-belt
clutch. Clutch engagement is via clutch
lever(B/2) fortransmissionengagement
and via lever (B/4) for mowing drive en-
gagement.
It is possible to engage each clutch in-
dependently.
The transmission clutch is combined
with reverse speed selection.

agria Grassland Mower 5100 17
3. Devices and Operating Elements
3
Transmission
The grassland mower has one forward
and one reverse speed.
The forward/reverse speed is engaged/
disengaged via clutch lever B/2.
l
Forward speed is engaged when the
clutch lever is released (B/2) and the
pawl is not locked.
l
No gear is engaged when the clutch
lever is pulled half way (B/2, pawl is
locked).
l
Reverse speed is engaged when the
the clutch lever (B/2) is pulled all the
way.
It is possible to lock the clutch lever in
position ”0” with pawl (B/3).
WDuring slope operation al-
ways turn machine towards
the slope.
The levers are factory-set to a play of
2–3 mm to prevent the clutch from slip-
ping during work.
Check the clutch play after the first op-
eratinghour and readjust the playifnec-
essary (see maintenance instructions).
Mowing drive
The knives are driven by a rubber-
mounted rocker drive.
The mowing drive is engaged/disen-
gaged via the mowing drive clutch lever
(B/4).
l
Pull the lever up to engage the
drive;theengineisnowdriving themow-
ing drive.
l
Move the lever down (B/4) to dis-
engage the mowing drive.
INote: Park the mower only
when all drives are disengaged
(see Storage, page 37) to avoid clutch
problems.

18 agria Grassland Mower 5100
3. Devices and Operating Elements
3
3
Steering Handle
Steering Handle Height
Adjustment
l
Loosenbothhexheadbolts (A/2)with
a socket spanner until notches are ex-
posed.
l
Adjust the steering handle (A/14) to
the desired height and fit it into the ap-
propriate notch.
l
Tighten the bolts on both ends.
Steering Handle Side
Adjustment
l
Pull lever (B/7) up to unlock it. Pivot
thesteering handle(A/14)tothedesired
side.
l
Release the lever again and ensure
that the locking bolt locks in place (if
necessary, pivot the steering handle
slightly to both sides)
There is one notch on either side and in
the middle.

agria Grassland Mower 5100 19
3. Devices and Operating Elements
3
Drive-wheels
Thedrive-wheels(3)areattachedtothe
wheel shaft with linch pins (2). This al-
lowsattachingand removingthewheels
without tools.
Spacers(4)arefittedbetweenthegear-
box and drive wheels.
Anti-winding tubes (5) are fitted on both
ends of the wheel shaft.These prevent
grass from winding around the wheel
shaft. Removing grass that has wound
around the shaft is easy:simply remove
the drive-wheels without tools and slide
off the tubes.
Wheel Dogs
Wheel dogs are fitted to engage/disen-
gage the wheels independently of the
gearbox.
Pushing the Machine
Disengage the dogs to push the ma-
chine when the engine is shut off.
Turning Aid
Engage the dog on one wheel only for
easier turning.
Engaging the Wheel Dogs
l
Align the dog pins (2) with the appro-
priate holes (3) on the drive wheels.
l
Turn the pins on their ends (1) by 90
degrees until the ends mesh into the
slot. Turn each dog to either side until
the pin locks completely into the hole.
Disengaging the Wheel Dogs
l
Grab the end (1) of each dog pin to
pull it out and rotate it by 90 degrees.
1Wheel dog
2Linch pin
3Drive-wheel
4Spacer
5Anti-winding tube
1Grip end
2Dog pin
3Hole on drive wheel

20 agria Grassland Mower 5100
3. Devices and Operating Elements
3
3
Attaching the Cutter Bar
The following cutter bars are available
for attachment to the base machine:
l
Universal-S cutter bar
91 cm (agria Item no.4347 641)
105 cm (agria Item no.4347 651)
WWhen attaching/removing the
cutter bar to/from the ma-
chine fit the knife guard (13) and wear
safety gloves!
l
Ensure the o-ring (3) is on the knife
driver pin (2)
l
The knifedriverpin(2)
must be positioned at a
90° angle to the cutter
bar.If this is not the
case, align it accord-
ingly.For this purpose,
undo the locking nut
(12), pivot the driver pin
to the proper position
and tighten the locking
nut.
l
Brush bio-lubricating
grease on the driver pin
(2) and the carrier pin
(5).
l
Insert the driver pin (2) in the rocker
hole (4) and insert the carrier pin (5) in
the hole (6) on the cutter bar carrier (if
necessary,movethe knifeuntil both pins
align with the holes).
l
Lock the carrier pin with linch pin (8)
(this is in the tool kit during shipment).
l
Lubricate the driver pin (2) on nipple
(7) with bio-lubrication grease.
Reverse the above order to remove the
cutter bar from the base machine.
1Cutter bar
2Knife driver pin
3O-ring
4Carrier pin
5Hole on rocker arm
6Hole to accommodate the cutter
bar
7Lubrication nipple
8Linch pin
9Running bases
height-adjustable(optional)
10 Attachment bolt for knife driver
11 Knife driver
12 Attachment bolt for knife driver
pin
13 Knife guard
This manual suits for next models
1
Table of contents
Other Agria Lawn Mower manuals

Agria
Agria 9500 Basic User manual

Agria
Agria 3400 User manual

Agria
Agria 3600 BM Unihamster compact User manual

Agria
Agria 5000 User manual

Agria
Agria 5400 KL User manual

Agria
Agria 9200 371 User manual

Agria
Agria 3600 User manual

Agria
Agria 8000 Quick guide

Agria
Agria 3600 User manual

Agria
Agria 2500 Hydro User manual