AIGOSTAR 8433325186487 User manual

INSTRUCTION MANUAL
PANINI MAKER
MODEL: 8433325186487
PLEASE READ THE MANUAL CAREFULLY BEFORE OPERATING YOUR
PRODUCT AND RETAIN IT FOR FUTURE USE


CONTENT
--------------------------------------------- 06-10
ES
--------------------------------------------- 21-26
DE
--------------------------------------------- 27-31
NL
--------------------------------------------- 32-36
FR
--------------------------------------------- 37-41
PT
--------------------------------------------- 16-20
IT
--------------------------------------------- 11-15
PL
--------------------------------------------- 01-05
GB

1
IMPORTANT SAFEGUARDS
READ ALL INSTRUCTIONS
•Use only on AC 220-240 Voltage, 50/60 Hz. Use only for
household.
•Do not touch hot surfaces. Use handles and knob.
•To protect against risk of electric shock, do not immerse the
cord, plug or cooking unit in water or any other liquid.
•Close supervision is necessary when any appliance is used by
or near children.
•Unplug from outlet when not in use and before cleaning. Allow
to cool before putting on or taking off parts, and before cleaning
appliance.
•Do not operate any appliance with a damaged has
malfunctioned or has been damaged in any manner. In order to
avoid the risk of an electric shock, never try to repair the Press
Grill yourself. Take it to an authorized service station for
examination and repair. An incorrect reassembly could present a
risk of electric shock when the Press Grill is used.
•The use of accessory attachments not recommended by the
manufacturer may result in fire, electrical shock, or risk of injury
to persons.
• Do not use outdoors or for commercial purposes.
•Do not let power cord hang over the edge of the table or
counter, or touch hot surfaces.
•Do not place on or near a hot gas or electric burner or heated
oven.
•Unplug the unit when finished using.
•Extreme caution must be exercised when moving an
appliance.
GB

2
PARTS IDENTIFICATION
BEFORE FIRST USE
•Read all instructions carefully and keep them for future reference.
•Remove all packaging
•Clean the Cooking Plates by wiping a sponge or cloth dampened in
warm water.
DO NOT IMMERSE THE UNIT AND DO NOT RUN WATER
DIRECTLY ONT THE COOKING SURFACES.
•Dry with a cloth or paper towel.
•For best results, lightly coat the cooking plates with a little cooking oil or
cooking spray.
Notice: When your Grill Toaster is heated for the first time, it
may emit slight smoke or odor. This is normal with many
heating appliances. This does not affect the safety of your
appliance.
6
7
1
2
4
1. Handle
2. Upper Housing
3. Hinge Release Lever
4. Upper Non-stick Plate
5. Bottom Non-stick Plate
6. Ready Light (Green)
7. Power Light (Red)
8. Thermostat Knob
9. Bottom Housing
10. Oil Tray
11. Lift rod
5
8
9
10
3
11
GB

3
USE AS PRESS GRILL
•Set the Grill Toaster Temperature Control to your desired setting. At first,
try a setting in the max. You may later adjust it lower or higher
according to your preference.
•Close the Grill Toaster and plug it into the wall outlet, you will notice that
the power and ready light will come on, indicating that the Grill Toaster
has begun preheating.
•It will take approximately 5 minutes to reach baking temperature, the
ready light will goes off.
•Open the Grill Toaster, put the sandwich,
meat or other foods on the bottom cooking
plate.
•Close the Grill Toaster. The ready light will
go on again.
•Cook for about 3 to 8 minutes, the ready
light goes off again, or until golden brown, adjusting the time to
suit your own individual taste.
•When the foods is cooked use the handle to open the lid. Remove the
foods with the help of a plastic spatula. Never use metal tongs or a
knife as these can cause damage to the non-stick coating of the cook
plates.
•Once you are finished cooking, disconnect the plug from the wall outlet
and leave unit open to cool.
USE AS OPEN GRILL
•Place Grill Toaster on a clean flat surface where you intend to cook. The
Grill Toaster can be positioned in flat position.
•Upper plate/cover is level with lower plate/base. The upper and lower
plates line up to create one large cooking surface. The Grill Toaster to this
GB

4
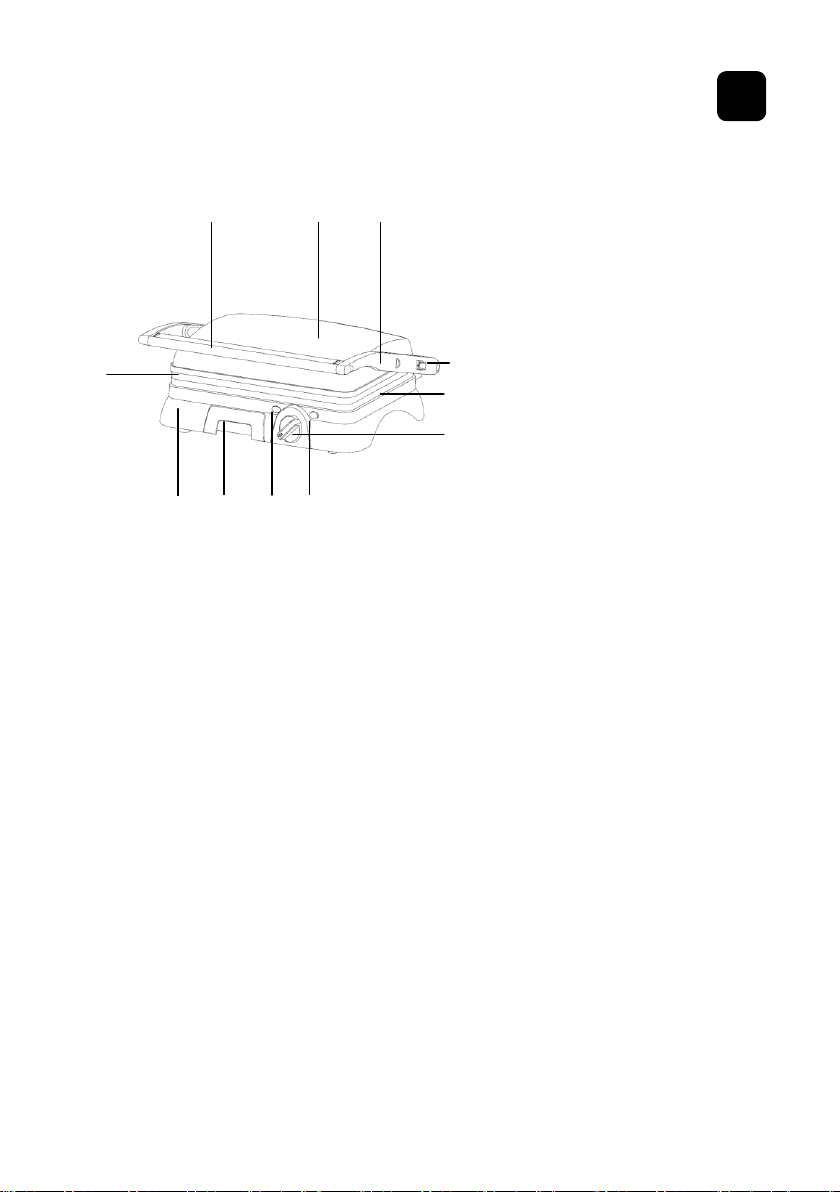
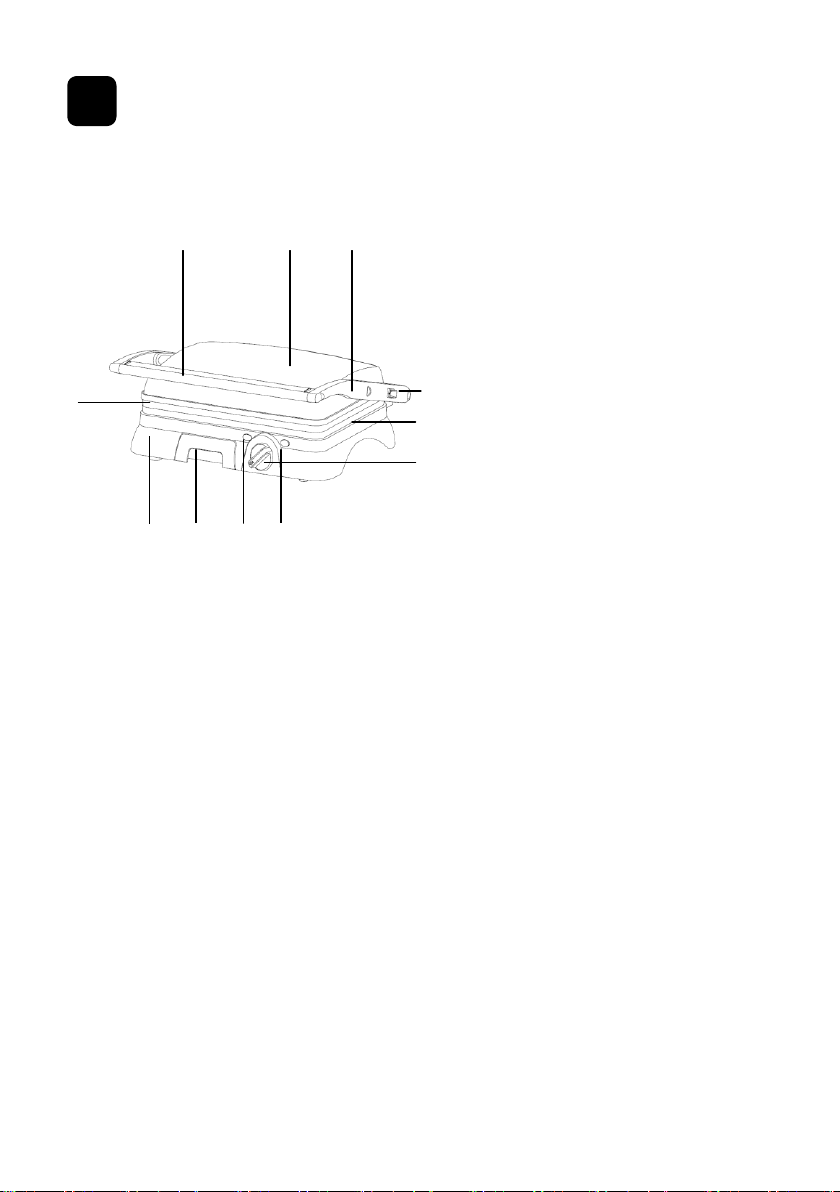
position, locate the hinge release lever on the right arm.
•With you left hand on the handle, use your
right hand to slide the lever toward you. Push
the handle back until the cover rests flat on the
counter. The unit will stay in this position until
you lift the handle and cover to return it to the
closed position.
•Use the Grill Toaster as an open grill to cook burgers, steak, poultry (we
do not recommend cooking bone-in chicken,
since it does not cook evenly on an open
grill), fish and vegetables.
•Cooking on the open grill is the most
versatile method of using the Grill Toaster.
In the open position, you have double the
surface area for grill.
•You have the option of cooking different types of foods on separates
without combining their flavors, or cooking large amounts of the same
type of food. The open position also accommodates different cuts of meat
with varying thicknesses, allowing you to cook each piece to you liking.
CLEANING AND CARE
•Always unplug the Grill Toaster and allow it to cool before cleaning. The
unit is easier to clean when slightly warm. There is no need to
disassemble Grill Toaster for cleaning. Never immerse the Grill Toaster in
water or place in dishwasher.
•Wipe cooking plates with a soft to remove food residue. For baked on
food residue squeeze some warm water mixed with detergent over the
food residue then clean with a non abrasive plastic scouring pad or place
wet kitchen paper over the grill to moisten the food residue.
•Do not use anything abrasive that can scratch or damage the non-stick
Hinge
release
lever
GB

5
coating.
•Do not use metal utensils to remove your foods, they can damage the
non-stick surface.
•Wipe the outside of the grill toaster with a damp cloth only. Do not clean
the outside with any abrasive scouring pad or steel wool, as this will
damage the finish. Do not immerse in water or any other liquid.
•Do not place in the dishwasher.
•Remove and empty the drip tray after each use and wash the tray in
warm, soapy water. Avoid the use of scouring pads or harsh detergents as
they may damage the surface.
Rinse and dry thoroughly with a clean, soft cloth and replace.
STORAGE
•Always unplug the Grill Toaster before storage.
•Always make sure the Grill Toaster is cool and dry before string.
• The power cord can be wrapped around the bottom of base for storing.
Data:
•AC 220-240V, 50/60Hz,2000W
WARRANTY: 2 YEARS
GB

6
INSTRUCCIONES DE SEGURIDAD
LEA TODAS LAS INSTRUCCIONES
•Use el producto únicamente con una tensión de CA de 220-240
V, 50/60 Hz. Ú nicamente para uso doméstico.
•No toque las superficies calientes. Use las agarraderas.
•Para evitar riesgos de descargas eléctricas, nunca sumerja el
cable, enchufe o la unidad en agua u otros líquidos.
•Extreme la precaución cuando use la plancha cerca de los
niños.
•Desenchufe el aparato cuando no vaya a usarlo y antes de
lavarlo. Deje que se enfríe antes de montar o desmontar las
piezas y antes de lavarlo.
• No use el aparato si está dañado o no funciona correctamente.
Para evitar riesgos de descargas eléctricas, no intente reparar la
Plancha Grill usted mismo. Llévela a un centro autorizado para
que la examinen y reparen. Un montaje incorrecto podría causar
una descarga eléctrica al usar la Plancha Grill.
•El uso de accesorios no recomendados por el fabricante podría
causar un incendio, descarga eléctrica o causar lesiones al
usuario.
• No lo use al aire libre ni con fines comerciales.
•No deje que el cable eléctrico cuelgue del borde de la mesa ni
toque superficies calientes.
•No coloque la plancha cerca de un quemador de gas o eléctrico
ni de un horno.
•Desenchufe la unidad cuando haya terminado de usarla.
•Extreme la precaución cuando mueva el aparato.
ES

7
IDENTIFICACIÓ N DE LAS PARTES
ANTES DEL PRIMER USO
•Lea todas las instrucciones con atención y consérvelas para futuras
referencias.
•Retire el embalaje
•Lave las placas grill con una esponja o trapo humedecido con agua
templada.
NO SUMERJA LA UNIDAD NI ECHE AGUA DIRECTAMENTE SOBRE
LAS SUPERFICIES DE COCCIÓ N.
•Seque el aparato con un trapo o con papel de cocina.
•Para un mejor resultado, cubra las superficies ligeramente con aceite de
cocina o spray para cocinar.
A tener en cuenta: Cuando la Plancha Grill se calienta por la
primera vez, puede despedir una pequeña cantidad de humo o
un olor extraño. Es totalmente normal y sucede con la mayoría
de aparatos calefactores. Esto no pone en riesgo la seguridad
del aparato.
6
7
1
2
4
1. Mango
2. Cubierta superior
3. Palanca de desbloqueo
4. Placa de Grill
antiadherente superior
5. Placa de Grill
antiadherente inferior
6. Luz verde (listo para
cocinar)
7. Luz roja (encendido)
8. Regulador de temperatura
9. Cubierta inferior
10. Bandeja de aceite
11. Brazo elevador
5
8
9
10
3
11
ES

8
CÓ MO USAR LA PLANCHA CERRADA
•Ajuste la temperatura de la Plancha Grill a su gusto. Comience
ajustando la temperatura al nivel max. Más tarde podrá regularlo a mayor
o menor temperatura, según su gusto personal.
•Cierre la Plancha Grill y enchúfela a la corriente eléctrica. La luz de
encendido y de listo para cocinar se encenderá para indicarle que la
plancha ha comenzado el precalentamiento
• Tardará 5 minutos aproximadamente en alcanzar la temperatura de
cocción, la luz de preparado se apagará.
•Abra la Plancha Grill, y coloque el panini, la carne u otros alimentos
sobre la placa de cocción.
•Cierre la Plancha Grill. Se encenderá de nuevo la
luz de listo para cocinar.
•Cocine durante entre 3 y 8 minutos cuando la luz
de listo para cocinar se haya apagado, o hasta que
los alimentos estén dorados ajustando el tiempo a
su gusto personal.
•Cuando haya terminado de cocinar los alimentos,
use el mango para abrir la tapa. Retire los alimentos con la ayuda de una
espátula de plástico. Nunca use tenazas o cuchillos de metal que podrían
dañar la capa antiadherente de la placa de cocción.
•Cuando haya terminado de cocinar, desenchufe el aparato de la
corriente eléctrica y abra la plancha para que se enfríe.
CÓ MO USAR LA PLANCHA ABIERTA
•Coloque la Plancha Grill sobre una superficie
plana y limpia. Coloque la Plancha Grill en
posición horizontal.
•La placa superior debe coincidir con la placa
inferior. Se alinean las placas para crear una
Palanca de
desbloqueo
ES

9
única superficie de cocción. En esta posición, la palanca de desbloqueo
estará en el lado derecho.
•Con su mano izquierda en el mango, deslice la palanca de desbloqueo
hacia usted con la mano derecha. Empuje el mango hacia atrás hasta que
la placa forme una superficie plana. La unidad quedará en esta posición
hasta que levante el mango para que la cubierta vuelva a la posición de
cerrado.
•Use la Plancha Grill Toaster como una plancha abierta para cocinar
hamburguesas, filetes, otros tipos de carne
(no se recomienda cocinar piezas de pollo
con hueso, ya que no se cocinarán de
manera uniforme en la plancha grill),
pescado, verduras.
•Cocinar en la plancha grill abierta es el
modo más versátil de utilizar la Plancha Grill. En la posición abierta,
tendrá el doble de espacio para cocinar.
•Puede cocinar diferentes tipos de alimentos si los coloca separados, sin
mezclar los sabores, o puede cocinar grandes cantidades de los mismos
alimentos. La posición abierta también le permite cocinar diferentes
piezas de carne de diferente grosor, pudiendo cocinar cada pieza a su
gusto.
LIMPIEZA Y MANTENIMIENTO
• Desenchufe siempre la Plancha Grill y deje que se enfrìe antes de lavarla.
Es más fácil lavar la unidad cuando aún conserva un poco de calor. No es
necesario desarmar la Plancha Grill para lavarla. Nunca la
sumerja en agua ni la lave en el lavavajillas.
• Pase un trapo suave por la placa de cocción para retirar los restos de
comida. Si los restos de comida se han adherido a la superficie, rocíelos
con agua templada y detergente y retírelos con un estropajo no abrasivo,
ES

10
o coloque papel de cocina húmedo sobre la plancha para humedecer los
restos de comida.
• No use ningún abrasivo que pueda rayar o dañar la capa antiadherente.
• No retire los alimentos con utensilios metálicos que podrìan dañar la
superficie antiadherente.
• Pase un trapo húmedo por la parte exterior de la Plancha Grill. No lave la
parte exterior con un estropajo abrasivo o metálico pues podría dañar el
acabado. No lo sumerja en agua u otros líquidos.
• No lo lave en el lavavajillas.
• Retire y vacìe la bandeja de aceite tras cada uso y lávela en agua
templada con jabón. Evite el uso de estropajos y detergentes que podrían
dañar la superficie
• Aclárela y séquela minuciosamente con un trapo limpio y suave y vuelva
a colocarla.
ALMACENAMIENTO
• Desenchufe siempre la Plancha Grill antes de guardarla.
• Asegúrese siempre de que la Plancha Grill está fría y seca antes de
guardarla.
• Puede enrollar el cable eléctrico alrededor de la base de la Plancha Grill.
Especificaciones:
•AC 220-240V, 50/60Hz,2000W
GARANTÍA: 2 AÑ OS
ES

11
WAŻNE ZABEZPIECZENIA
PRZECZYTAJ CAŁĄ INSTRUKCJĘ
•Używaj tylko przy napięciu AC 220-240, 50/60 Hz. Tylko do
użytku domowego.
•Nie dotykaj gorących powierzchni. Użyj uchwytów i pokrętła.
•Aby zabezpieczyć się przed porażeniem prądem, nie zanurzaj
przewodu, wtyczki ani urządzenia w wodzie lub innym płynie.
•Konieczny jest ścisły nadzór, gdy urządzenie jest używane
przez dzieci lub w ich pobliżu.
•Zawsze odłączaj urządzenie od gniazdka przed czyszczeniem,
przenoszeniem lub gdy nie jest używane. Pozostawić do
schłodzenia przed założeniem lub zdjęciem części oraz przed
czyszczeniem urządzenia.
•Nie należy obsługiwać urządzenia, które zostało w jakikolwiek
sposób uszkodzone. Aby uniknąć ryzyka porażenia prądem,
nigdy nie próbuj samodzielnie naprawiać przycisku. Zabierz
urządzenie do autoryzowanego punktu serwisowego w celu
przeprowadzenia przeglądu i naprawy. Nieprawidłowy ponowny
montaż może stwarzać ryzyko porażenia prądem, gdy
urządzenie będzie w trakcie działania.
•Korzystanie z akcesoriów dodatkowych niezalecanych przez
producenta może spowodować pożar, porażenie prądem lub
obrażenia osób
•Nie używaj na zewnątrz lub w celach komercyjnych
•Nie pozwól, aby przewód zasilający zwisał poza krawędź stołu
lub blatu, lub dotykał gorących powierzchni.
•Nie umieszczaj na gorącym gazie lub palniku elektrycznym, ani
na gorącym piekarniku
•Odłącz urządzenie po zakończeniu użytkowania.
•Podczas przenoszenia urządzenia należy zachować szczególną
ostrożność.
PL

12
OPIS CZĘŚCI
PRZED PIERWSZYM UŻYCIEM
Przeczytaj uważnie wszystkie instrukcje i zachowaj je na przyszłość.
• Usuń wszystkie opakowania
• Wyczyść płyty kuchenne wycierając gąbką lub ściereczką zwilżoną w
ciepłej wodzie.
NIE WOLNO ZANURZAĆ URZĄDZENIA I URUCHOMAĆ
URZĄDZEŃ Z WODĄ BEZPOŚREDNIO NA POWIERZCHNIACH
GOTOWANIA.
• Wysuszyć szmatką lub ręcznikiem papierowym.
• Aby uzyskać najlepsze wyniki, posmaruj płyty grzewcze niewielką ilością
oleju.
Uwaga: Gdy opiekacz zostanie podgrzany po raz pierwszy, może
wydzielać lekki dym lub zapach. Jest to normalne w przypadku
wielu urządzeń grzewczych. Nie wpływa to na bezpieczeństwo
twojego urządzenia.
6
7
1
2
4
1. Uchwyt
2. Obudowa górna
3. Dźwignia zwalniająca
zawias
4. Górna płyta
5. Dolna płyta
6. Światło gotowości
(zielone)
7. Wskaźnik zasilania
(czerwony)
8. Pokrętło termostatu
9. Obudowa dolna
10. Taca na olej
11. Zawias
5
8
9
10
3
11
PL

13
UŻYWANIE NA ZAMKNIĘTYM GRILLU
•Ustaw kontrolę temperatury opiekacza na pożądane ustawienie.
Najpierw spróbuj ustawienia w maks. Możesz później dostosować go w
zależności od preferencji.
• Zamknij opiekacz i podłącz go do gniazdka ściennego, zauważysz, że
lampka zasilania i gotowości zaświeci się, co oznacza, że opiekacz
zaczął podgrzewanie.
• Osiągnięcie temperatury pieczenia zajmie
około 5 minut, lampka gotowości zgaśnie.
• Otwórz opiekacz, ułóż kanapkę,
mięso lub inną żywność na dolnej płycie.
• Zamknij opiekacz. Lampka gotowości nadal
będzie świeciła. Kontynuuj.
• Gotuj przez około 3 do 8 minut, do momentu, gdy światło gotowości
zgaśnie
lub do zarumienienia, dostosowuj czas do indywidualnego gustu.
• Po przygotowaniu potraw użyj uchwytu, aby otworzyć pokrywkę. Usuń
żywność za pomocą plastikowej szpatułki. Nigdy nie używaj
metalowych szczypiec lub noża, ponieważ mogą one spowodować
uszkodzenie nieprzywierającej powłoki.
• Po zakończeniu gotowania odłącz wtyczkę od gniazdka ściennego i
zostaw urządzenie otwarte, aby ostygło.
UŻYWANIE PRZY OTWARTYM GRILLU
•Umieść opiekacz na czystej płaskiej powierzchni, gdzie zamierzasz
gotować. Opiekacz można ustawić w pozycji
płaskiej.
•Górna płyta / pokrywa jest równa dolnej
płycie / podstawie. Górna i dolna płyta
ustawiają się w jednej linii, tworząc jedną
Dźwignia
zwalniają
ca zawias
PL

14
dużą powierzchnię do gotowania. Zlokalizuj dźwignię zwalniającą zawias
na prawym ramieniu.
•Trzymając lewą rękę na uchwycie, prawą ręką przesuń dźwignię w swoją
stronę. Popchnij uchwyt do tyłu, aż pokrywa będzie spoczywała płasko
na blacie. Urządzenie pozostanie w tej pozycji do momentu podniesienia
uchwytu i pokrywy, aby powrócić do pozycji zamkniętej.
•Używaj opiekacza do grillowania jako otwartego grilla do przyrządzania
hamburgerów, steków, drobiu (nie zalecamy gotowania kurczaka z kością,
ponieważ nie gotuje się równomiernie na otwartym grillu), ryb i warzyw.
•Gotowanie na otwartym grillu jest najbardziej wszechstronną metodą
korzystania z opiekacza do grillowania. W
pozycji otwartej masz podwójną
powierzchnię do grillowania.
•Masz możliwość gotowania różnych
rodzajów żywności bez łączenia ich
smaków lub gotowania dużych ilości tego samego rodzaju żywności. W
pozycji otwartej znajdują się również różne kawałki mięsa o różnej
grubości, dzięki czemu można ugotować każdy kawałek.
CZYSZCZENIE I PIELĘGNACJA
•Zawsze odłączaj opiekacz po użyciu i pozostaw go do ostygnięcia przed
czyszczeniem. Urządzenie jest łatwiejsze do czyszczenia, gdy jest lekko
rozgrzane. Nie ma potrzeby demontażu opiekacza do czyszczenia. Nigdy
nie zanurzaj tostera w wodzie lub nie wkładaj go do zmywarki.
•Przetrzyj płytki do gotowania miękką szmatką, aby usunąć resztki
jedzenia. W przypadku upieczonych resztek jedzenia wycisnąć trochę
ciepłej wody zmieszanej z detergentem nad pozostałościami żywności, a
następnie wyczyścić nieścieralnym plastikowym podkładem do
PL

15
szorowania lub umieścić mokry papier kuchenny na ruszcie, aby zwilżyć
resztki jedzenia.
•Nie należy używać żadnych materiałów ściernych, które mogłyby
porysować lub uszkodzić nieprzywierającą powłokę.
•Nie używaj metalowych przyrządów do usuwania żywności, ponieważ
mogą one uszkodzić nieprzywierającą powierzchnię.
•Wytrzyj zewnętrzną część opiekacza tylko wilgotną szmatką. Nie należy
czyścić powierzchni zewnętrznej za pomocą ściernych ściereczek lub
wełny stalowej, ponieważ spowoduje to uszkodzenie wykończenia. Nie
zanurzać w wodzie ani żadnym innym płynie.
•Nie wkładaj do zmywarki.
•Po każdym użyciu wyjmij i opróżnij tacę ociekową i umyj ją w ciepłej
wodzie z mydłem. Unikaj używania szorujących lub silnych detergentów,
ponieważ mogą one uszkodzić powierzchnię.
Opłukać i osuszyć dokładnie czystą, miękką ściereczką.
PRZECHOWYWANIE
• Zawsze odłączaj opiekacz przed przechowywaniem.
• Zawsze upewnij się, że opiekacz jest zimny i suchy.
• Przewód zasilający można owinąć wokół podstawy w celu
przechowywania.
Dane:
•AC 220-240V, 50 / 60Hz, 2000W
GWARANCJA: 2 LATA
PL

16
MISURE DI SICUREZZA IMPORTANTI
LEGGI TUTTE LE ISTRUZIONI
•Usa solo con voltaggi AC 220-240, 50/60 Hz. Per l’uso
domestico esclusivamente.
•Non toccare le superfici calde. Usa le maniglie.
•Per proteggerti contro il rischio di shock elettrico, non
immergere la corda, la spina o l’unitá di cottura nell’acqua né
dentro qualsiasi altro liquido.
•É necessaria la stretta supervisione quando qualsiasi
apparecchio sia usato da o vicino ai bambini.
•Scollegala dalla presa quando non sia in uso e prima di pulirla.
Lasciala raffreddarsi prima di mettere o togliere i pezzi, e prima
della pulizia.
•Non operare nessun apparecchio danneggiato o che non
funzioni bene o che abbia subito qualsiasi genere di danno. Per
evitare il rischio di shock elettrico, mai tentare di riparare la
Press Grill per conto tuo. Portala da un agente di servizio
autorizzato per il controllo e la riparazione. Un rimontaggio
inadeguato potrebbe portare ad un rischio di shock elettrico
quando la griglia sia usata.
•L’utilizzo di accessori aggiuntivi non consigliati dal produttore
potrebbe causare incendi, shock elettrico, o rischio di lesioni alle
persone.
• Non usare all’aperto né per scopi commerciali.
•Non lasciare che il cavo elettrico cada dal bordo di un tavolo o
una mensola, o che tocchi superfici calde.
•Non posizionarla su o vicino una stufa a gas o elettrica o su un
forno caldo.
•Scollegare l’unitá una volta finito di usarla.
•Si deve avere estrema cautela quando si muove l’apparecchio.
IT

17
IDENTIFICAZIONE DELLE PARTI
PRIMA DEL PRIMO USO
•Leggi attentamente tutte le istruzioni e conservale per referenze nel
futuro.
•Rimuovi tutti gli imballaggi.
•Pulisci le Piastre di Cottura strofinando con una spugna o un panno
bagnato con acqua tiepida.
NON IMMERGERE L’UNITÁ E NON LASCIAR SCORRERE ACQUA
DIRETTAMENTE SULLE SUPERFICI DI COTTURA.
•Asciuga con un panno o un tovagliolo.
•Per migliori risultati, ricopri leggermente le piastre di cottura con un po’
di olio di cucina o spray per cucinare.
Nota: Quando la tua Griglia si riscaldi per la prima volta,
potrebbe emettere un po’ di fumo o di odore. Questo é normale
per molti apparecchi che riscaldano. Non ha nessun impatto
sulla tua sicurezza o sull’apparecchio.
6
7
1
2
4
1. Maniglia
2. Camera superiore
3. Leva per lo sblocco
4. Piastra antiaderente
superiore
5. Piastra antiaderente
inferiore
6. Luce di Pronto (Verde)
7. Luce di Energia (Rosso)
8. Manopola Termostato
9. Camera inferiore
10. Vassoio dell’olio
11. Asta di sollevamento
5
8
9
10
3
11
IT
Table of contents
Languages:
Other AIGOSTAR Grill manuals
Popular Grill manuals by other brands

Brinkmann
Brinkmann Pitmaster deluxe owner's manual

Nexgrill
Nexgrill XH-300A-3310 Assembly and operating instructions

CTC Union
CTC Union CLATRONIC RG 3228 Instruction manual & guarantee

Lincat
Lincat Lynx 400 GG1R Installation, operating and servicing instructions

PERMASTEEL
PERMASTEEL PG-50404SOL user manual

Suwanee Grill
Suwanee Grill The Sports Grille UGG-1 owner's manual