Aimmer technology AIP-311 User manual

AIP-311 VOIP PHONE
User manual
AIMMER TECHNOLOGY CO.,LIMITED
www.aimmertech.com
FAX:+0086-755-83464309
TEL:+0086-755-23934589

- 2 -
Table of Content
1. INTRODUCING AIP-311 VOIP PHONE........................................................................................4
1.1. THANK YOU FOR YOUR PURCHASING AIP-311............................................................................4
1.2. DELIVERY CONTENT.....................................................................................................................4
1.3. KEYPAD.........................................................................................................................................4
1.4. PORT FOR CONNECTING ...............................................................................................................6
2. INITIAL CONNECTING AND SETTING......................................................................................7
2.1. CONNECT THE PHONE...................................................................................................................7
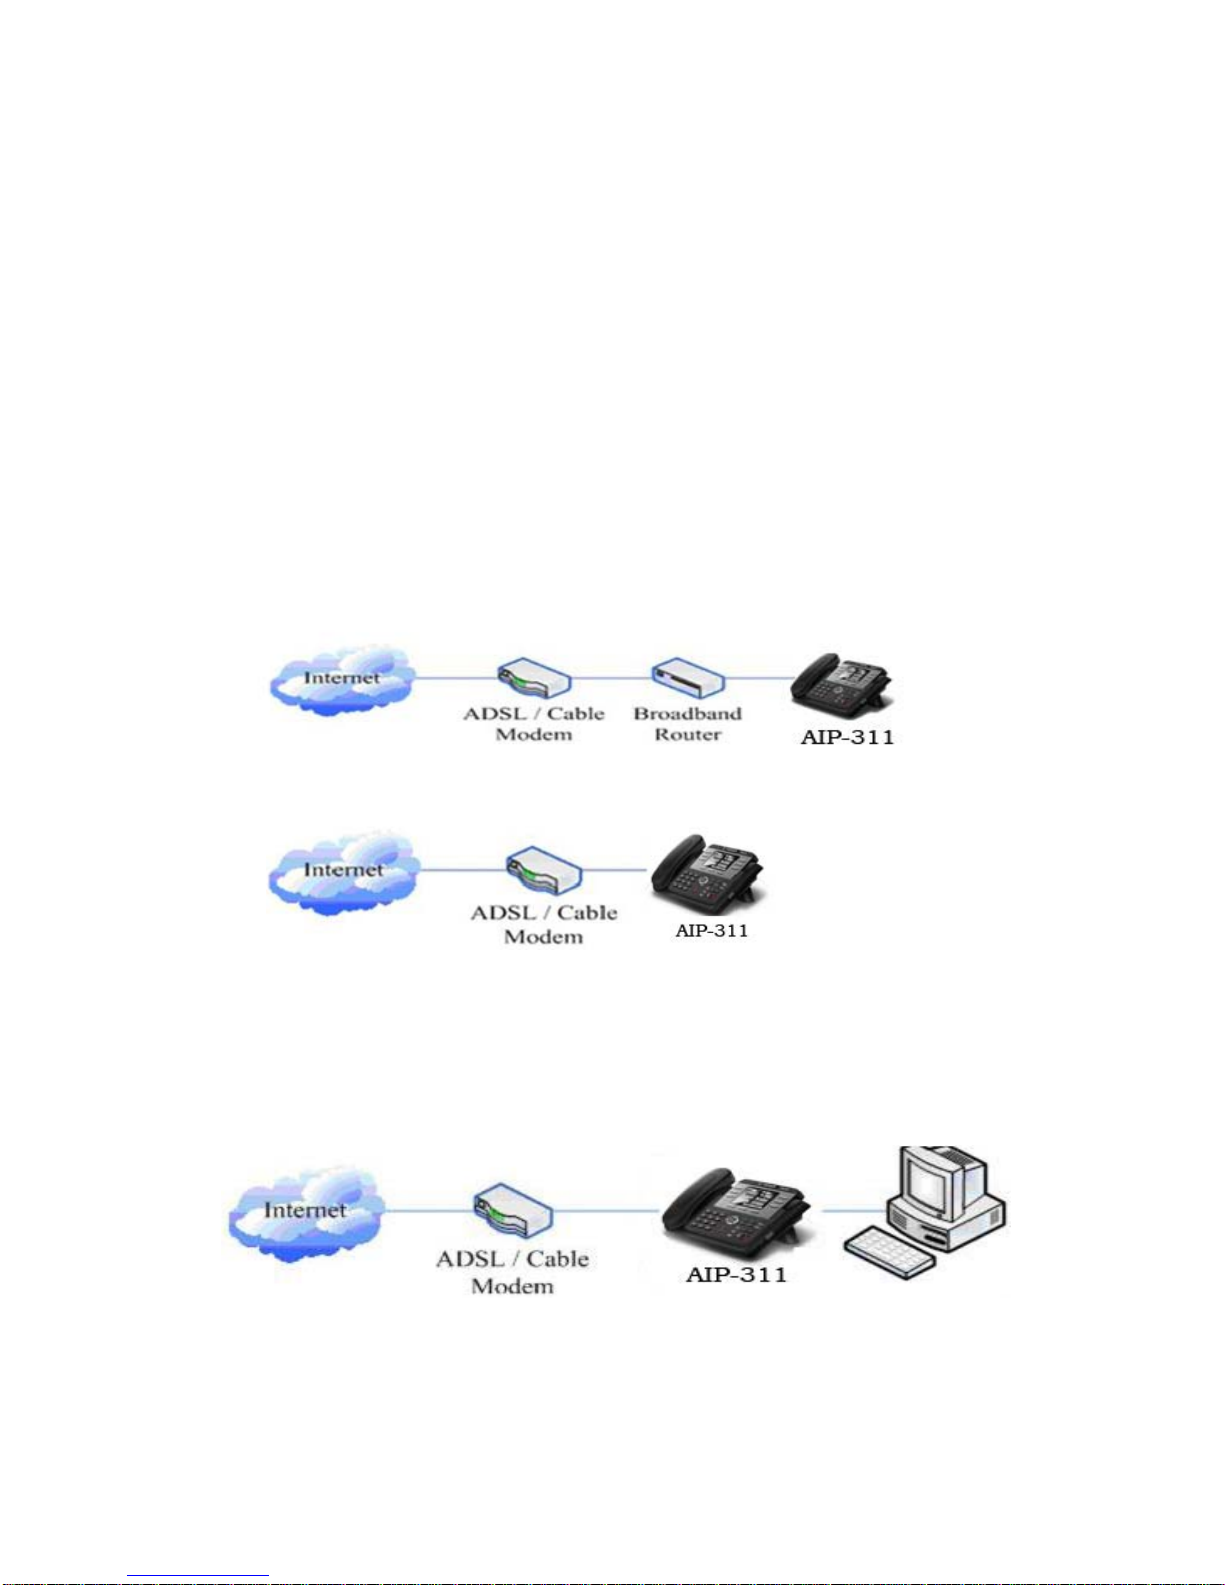
2.1.1. Connect to network..............................................................................................................7
2.1.2. Power adaptor connection...................................................................................................8
2.2. BASIC INITIALIZATION .................................................................................................................8
2.2.1. Network settings...................................................................................................................8
3. AIP-311’S BASIC OPERATION....................................................................................................11
3.1. ANSWER CALLS...........................................................................................................................11
3.2. PLACE CALLS ..............................................................................................................................11
3.3. END CALLS ..................................................................................................................................12
3.4. CALL TRANSFER..........................................................................................................................12
3.5. CALL HOLD .................................................................................................................................13
3.6. 3-WAY CONFERENCE CALL .........................................................................................................13
3.7. CALL RECORDS ...........................................................................................................................13
3.8. SPECIAL KEYS .............................................................................................................................14
3.9. CALL PICKUP...............................................................................................................................15
3.10. JOIN CALL .................................................................................................................................15
3.11. REDIAL/UNREDIAL.....................................................................................................................16
3.12. CLICK TO DIAL..........................................................................................................................16
4. WEB CONFIGURATION...............................................................................................................17
4.1. INTRODUCTION OF CONFIGURATION..........................................................................................17
4.1.1. Ways to configure...............................................................................................................17
4.1.2. Password Configuration....................................................................................................17
4.2. SETTING VIA WEB BROWSER.......................................................................................................17
4.3. CONFIGURATION VIA WEB........................................................................................................17
4.3.1. BASIC .................................................................................................................................17
4.3.1.1. Status............................................................................................................................................17
4.3.1.2. Wizard..........................................................................................................................................18
4.3.1.3. Call Log........................................................................................................................................20
4.3.1.4. MMI SET.....................................................................................................................................20
4.3.2. Network...............................................................................................................................21
4.3.2.1. WAN Config ................................................................................................................................21
4.3.2.2. LAN Config..................................................................................................................................23
4.3.2.3. Qos Config ...................................................................................................................................23

- 3 -
4.3.2.4. Service Port..................................................................................................................................25
4.3.2.5. DHCP SERVER ..........................................................................................................................26
4.3.2.6. SNTP ............................................................................................................................................28
4.3.3. VOIP....................................................................................................................................29
4.3.3.1. SIP Config....................................................................................................................................29
4.3.3.2. IAX2 Config.................................................................................................................................32
4.3.3.3. Stun Config..................................................................................................................................33
4.3.3.4. DIAL PEER setting.....................................................................................................................34
4.3.4. Phone...................................................................................................................................37
4.3.4.1. DSP Config...................................................................................................................................37
4.3.4.2. Call Service..................................................................................................................................38
4.3.4.3. Digital Map Configuration.........................................................................................................40
4.3.4.4. Phone Book..................................................................................................................................42
4.3.4.5. Function Key................................................................................................................................42
4.3.5. Maintenance........................................................................................................................44
4.3.5.1. Auto Provision.............................................................................................................................44
4.3.5.2. Syslog Config ...............................................................................................................................44
4.3.5.3. Config Setting..............................................................................................................................45
4.3.5.4. Update..........................................................................................................................................46
4.3.5.5. Account Config............................................................................................................................47
4.3.5.6. Reboot ..........................................................................................................................................47
4.3.6. Security ...............................................................................................................................48
4.3.6.1. MMI Filter...................................................................................................................................48
4.3.6.2. Firewall ........................................................................................................................................48
4.3.6.3. NAT Config..................................................................................................................................50
4.3.6.4. VPN Config..................................................................................................................................52
4.3.7. Logout .................................................................................................................................54
5. CONFIGURATION VIA KEYPAD ......................................................................................................55
5.1. Keypad introduction.............................................................................................................55
5.2. Menu Tree..............................................................................................................................55
6. APPENDIX .......................................................................................................................................56
6.1. SPECIFICATION ...........................................................................................................................56
6.1.1. Hardware............................................................................................................................56
6.1.2. Voice features .....................................................................................................................56
6.1.3. Network features................................................................................................................57
6.1.4. Maintenance and management .........................................................................................57
6.1.5. Special features...................................................................................................................57
6.2. DIGIT-CHARACTER MAP TABLE..................................................................................................58

1. Introducing AIP-311 VoIP Phone
1.1. Thank you for your purchasing AIP-311
Thank you for your purchasing AIP-311, AIP-311 is a full-feature telephone that provides voice
communication over the same data network that your computer uses. This phone functions not
only much like a traditional phone, allowing to place and receive calls, and enjoy other features
that traditional phone has, but also it own many data services features which you could not expect
from a traditional telephone.
This guide will help you easily use the various features and services available on your phone.
1.2. Delivery Content
Please check whether the delivery contains the following parts:
The base unit with display and keypad
The handset
The handset cable
The power supply
The Ethernet cable
The User Manual (you may download from our website)
IP Phone are designed to look like conventional phones, the following photo shows a broad
overview of the IP Phone.
1.3. Keypad
Key Key name Function Description
Navigation
Navigation key assist users for operating...
In idle state they have special function
Left: Checking Incoming call
Up: Checking Missed Call
Right: Checking line status
Down: Checking IP info
OK: Enter into the phone's menu
Release key
Press RLS, the phone will skip to stand-by mode.
Note: DO NOT Press RLS during the configuration process, or
else phone will not save the configuration modified and return
to stand-by status.
mute
Press this key in calling mode, you can hear the other side, and
the other side can not hear you
Envelope LED inside, if blinks remind user have new voicemail.
Hold
Temporarily hold the active call during the talking; press the
key again might release the call. (Please refer to 3.5. - call hold

- 5 -
for more details). In idle mode, press this key, LCD will show
“Do Not Disturb”, and this phone is set to be No disturbing
mode. Press this key again to cancel this function.
Transfer
Use the key to realize blind transfer or attended transfer please
refers to 3.4.-call transfer for more details). In the idle mode,
press this key, LCD will show call forward”. After this
indication disappears, User can configure the forward phone
no. of SIP1 or SIP2. Press Soft2(ON) to enabled call forward
function and set it to always mode; Press Soft1(OFF) to close
the function of forward
HeadSet Place and receive calls through an optionally connected headset
Line1/2/3 Here is Three SIP lines, user could select any one to make the
call ,if it has been registered,
Volume -/+ Turn down or turn up the volume by pressing these two keys
Redial
1,In the hook off /hands-free mode, use the key to dial the last
call number;
2,In stand-by mode, it has a function to check the OUTGOING
CALL
Hands-free Make the phone into hands-free mode.
Indicator light If the light blinking, indicate the phone has missed call
Memory key
(1-6)
Users could store their commonly used number in these keys,
and call for them as speed dial.
Soft key 1/2/3
Keys combination, include functions such as SMS / SDial
/PBook /Answer /Conf /Enter /Save /Quit /Edit /Redial and so
on.

- 6 -
1.4. Port for connecting
Port Port name description
Power switch Input: 5V AC, 1A
WAN 10/100M Connect it to Network
LAN 10/100M Connect it to PC
Handset Port type: RJ-9 connector
Headset Port type: RJ-9 connector
Headset Port type: 3.5mm jack
AIP-311 provide two Ethernet ports and a power adaptor. Also has two headset interfaces with
RJ-9 port and 3.5mm jack. Please refer to safety notes of this manual carefully before power
adaptor is connected.

2. Initial connecting and Setting
2.1. Connect the phone
2.1.1. Connect to network
Step 1: Connect the IP Phone to the corporate IP telephony network. Before you connect the
phone to the network, please check if your network can work normally.
You can do this in one of two ways, depending on how your workspace is set up.
Direct network connection—by this method, you need at least one available Ethernet port in your
workspace. Use the Ethernet cable in the package to connect WAN port on the back of your phone
to the Ethernet port in your workspace. Since this VoIP Phone has router functionality, whether
you have a broadband router or not, you can make direct network connect. The following two
figures are for your reference.
Shared network connection—Use this method if you have a single Ethernet port in your
workspace with your desktop computer already connected to it. First, disconnect the Ethernet
cable from the computer and attach it to the WAN port on the back of your phone. Next, use the
Ethernet cable in the package to connect LAN port on the back of your phone to your desktop
computer. Your IP Phone now shares a network connection with your computer. The following
figure is for your reference.
Step 2: Connect the handset to the handset port by the handset cable in the package.
Step 3: connect the power supply plug to the AC 5V adapter port on the back of the phone. Use
the power cable to connect the power supply to a standard power outlet in your workspace.
Step 4: push the on/off switch on the back of the phone to the on side, then the phone’s LCD

- 8 -
screen displays “Initializing wait logon”. Later, a ready screen typically displays the date, time.
If your LCD screen displays different information from the above, you need refer to the next
section “Initial setting” to set your network online mode.
If your VoIP phone registers into corporate IP telephony Server, your phone is ready to use.
2.1.2. Power adaptor connection
Make sure that the power you use is comply with the parameters of power adaptor.
1. Plug power adaptor to power socket.
2. Plug power adaptor’s AC output to the AC5V port of AIP-311 to start up.
3. There will be displayed black line and “initializing... wait logon...” on the screen. After
finishing startup, phone will show greeting, current date and time and so forth.
4. If phone has registered to the server, you can place or answer calls.
2.2. Basic Initialization
AIP-311 is provided with a plenty of functions and parameters for configuration. User needs some
network and VoIP knowledge so that user could understand the meanings of parameters. In order
to make user use the phone more easily and convenient, there are basic configurations introduced
which is mandatory to ensure phone calls.
2.2.1. Network settings
Make sure that network is connected already before setting network of phone.AIP-311 uses DHCP
to get WAN IP configurations, so phone could access to network as long as there is DHCP server
in it. If there is no DHCP server available, phone has to be changed WAN network setting to
Static IP or PPPoE.
Note: during setting network parameter in menu, Please don’t press the key, or else
the phone will not save the configuration and will return to standby interface.
Setting PPPoE mode (forADSL connection)
1. Get PPPoE account and password first.
2. Press , and press twice, screen will show “Network”. Then press Soft2 (Enter)
or "OK", the LCD screen will display “WAN”.
3. Press Soft2 (Enter), then press , choose PPPoE.
4. Press Soft1 (Edit), the screen will display “Account”. The screen will show the current account
information. Press Soft1 (Del) to delete it, then input your PPPoE account and press Soft2 (Save).
With “saved” displayed, screen will jump to password settings,
5. Press Soft2 (Edit) again, then input your PPPoE password and press Soft2 (OK), With “Saved”

- 9 -
displayed, screen will display the current password: ******, and confirm: you need input the
password again, after confirm, press soft2 (OK) to save the Account and password.
6. Press Soft3 (Quit) once return to “Net Mode”. Press Soft2 (Save) the screen will show “Saved”
and then jump to show the current net mode.
7. Press or Soft3 (Quit) thrice return to standby, at this time the phone is trying to
change to PPPoE mode. Press for checking the status. If the screen shows
“Negotiating…” it shows that the phone is trying to access to the PPPoE Server; if it shows an IP
address, then the phone has already get IP with PPPoE.
Setting Static IP mode (static ADSL/Cable, or no PPPoE / DHCP network)
1. Prepare the network’s parameters first, such as IP Address, Net mask, Default Gateway and
DNS server IP address. If you don’t know this information, please contact the service provider
or technician of network.
2. Press , then press twice, chooses “Network”. Press "OK" or Soft2 (Enter),
LCD screen will display “WAN”.
3. Press "OK" or Soft2 (Enter), then choose “Static”.
4. Press Soft1Edit) and screen will show “IP”, then press Soft1 (Del) to delete. Input your IP
address and press Soft2 (Save) to save what you input. After “Saved” shown, the screen will
jump to show the Net mask information.
5. Press Soft1 (Del) to delete. Input your Net mask and press Soft2 (Save). After “Saved” shown,
the screen will jump to show the Gateway information
6. Press Soft1 (Del) to delete, Input your gateway and press Soft2 (Save). After “Saved” shown,
the screen will jump to show the DNS information.
7. Press Soft1 (Del) to delete. Input your DNS server address and press Soft2 (Save). After
“Saved” shown, the screen will return to show IP information.
8. Press Soft3 (Quit) once, the screen shows” Net Mode”. the cursor stay at“<>Static”; with
Soft2(Save) pressed,the screen shows “Saved” and then shows the current net mode.
9. Press or Soft3 (Quit) thrice, return to main interface and at this time the
phone is trying to change to Static mode. Press button, the screen shows
“Static” .the screen shows the IP address and gateway which were set just now, if the phone
could display the right time, it shows that Static IP mode takes effect.
Setting DHCP mode
1. Press , then press twice, chooses “Network”. Then press "OK" or Soft2 (Enter),
the screen will show “WAN”.
2. Press "OK" or Soft2 (Enter) to show “Net Mode”. Select “DHCP”. Press Soft2 (Save), with

- 10 -
“saved” shown, screen will jump to show the current net mode.
3. Press or Soft3 (Quit) thrice back to main interface and at this time phone is
trying to change to DHCP mode. Press until the phone shows “DHCP”,If the
screen shows the IP address and gateway which were set just now, it shows that DHCP mode
takes effect.

3. AIP-311’s basic operation
3.1. Answer calls
AIP-311 will ring to indicate you when there is call incoming,below is ways to answer call:
Answer with hook off
Take handset, you can talk directly. You can just hang up to finish talk。
Answer with hands-free
Press [Speaker] to begin talking. Press [Speaker] again to finish talk
Answer with headset
Press [Headset] to answer the call, ,press [Headset]again to finish talk.
Using hands-free instead of handset during a talk
Press [Speaker] and hook on the handset when you use handset to speak and want to change to
use hands-free to speak. Press [Speaker] again to finish talk.
Using handset instead of hands-free during a talk
Hook off the handset when you use hands-free and want to change to use handset. Just hook on to
finish talk.
Using headset instead of hands-free during a talk
In the hands-free calls, press [Headset] key, you can use the headset to call. After the
call, press [headset] to hang up the call.
Using hands-free instead of headset during a talk
In the headset call, press [Speaker] key to enter the hands-free calls, press [Speaker]
key again to end the call.
Using headset instead of handset during a talk
In the handset call, press [Headset] key, hang up the handset to continue using the
headset call. After the call, press the [Headset] key to cut off the call.
Using handset instead of headset during a talk
In the headset call, hook off the handset after the call, just hook on to finish talk.
3.2. Place calls
Using handset
Hook off (screen will show the current using line, or you could press key L1-L3 to select), after
getting dialing tone, you could begin to dial number. After finishing it, press # and AIP-311 will
send the number and call the number. When you hear a ring-back tone and screen shows the
callee’s number, it shows that the person you called is ringing. If callee answers the call, you can
begin to talk and your phone will keep showing callee’s number and counting time. Just hang up
to finish talk.
Using headset
Standby, press the [Headset] key (On screen display “Enter Number Pls”) and hear
the dialing tone, you can start dialing. After finishing it, press # or press the
softkey2-Send.
AIP-311 can immediately begin connecting with each other. When you hear a ring-back
tone and screen shows the callee’s number, it shows that the person you called is ringing. If callee
answers the call, you can begin to talk and your phone will keep showing callee’s number and

- 12 -
counting time. Just press [Headset] key to finish talk.
Using hands-free
Press [Speaker] key(screen will show the current using line, or you could press key L1-L3 to
select), after getting dialing tone, you could begin to dial number. After finishing it, press # and
AIP-311 will send the number and call the number. When you hear the ringback tone and screen
shows the callee’s number, it shows that the person you called is ringing. If callee answers the call,
you can begin to talk and your phone will keep showing callee’s number and counting time. Press
[Speaker] key again to finish talk.
Using directory
Press Soft3 (PBook) in stand-by mode, you will access to phonebook. If there are many persons
records stored in the directory, you can use &to select number or press the first
character of the name for searching the person which you want to contact. Press to
forward,and press to backward. Press Soft2 (Dial) to dial the current number shown on
the screen.
Speed dial
Speed dial means user can make calls directly without hook off or using hands-free. User can dial
number in stand-by mode, but first, user need to add and edit SDial no. By pressing Soft2 (SDial)
to edit and save the number to be a SDial number. In this way, user could make a call only press
the number and Soft3 (Dial).
Multiple-way call
If user has 2 line calls and wants to invite the third party during the call, they can press Soft1
(Conf) or Soft2(Transf) “New CALL”, press Soft1(OK),enter the number ,then press Soft2(Send)
and wait for the other party to answer. When the multiple-way calls, you can press the arrow keys
to select a call.
3.3. End calls
Hang up with handset hook on
Hook on to finish talking.
Hang up with hands-free
Press [Speaker] key to finish talk when phone is in hands-free status.
Hang up with headset
If you are in the headset call, press [Headset] key to end the call.
Hang up an active call with 2 calls
When there are two calls,user might use Soft1(Switch)to switch to the call you want to hang up
first. Then press Soft3 (Close) to finish talk, and phone will switch to the other call automatically.
3.4. Call transfer
Blind Transfer

- 13 -
During talk, press or Soft2 (Transf), and then dial the number that you want to transfer
to, and finished by "#". Phone will transfer the current call to the third party. After finishing
transfer, the call you talk to will be hanged up.
Attended Transfer
During talk, press or Soft2 (Transf), then input the number that you want to transfer to
and press Soft2 (Send). After that third party answers, then press to complete the transfer.
(You need enable call waiting and call transfer first). If there are two calls, you can just talk to one,
and keep hold to the other one. The one who is keep hold can not speak to you or hear from you.
Alert Transfer
During the talk, press or Soft2 (Transf) firstly, then press Soft2 (Send) after inputting the
number that you want to transfer. You are waiting for connection, now, press or Soft2
(Transf) and the transfer will be done. (To use this feature, you need enable call waiting and call
transfer first)
3.5. Call hold
During talking, user could press to hold the current call. Press again to return
the call or switch the call active.
3.6. 3-way conference call
User can press Soft1 (Conf) to dial the line2 (press Soft1 (Answer) to answer the call directly if
this call is from line2) during talking with line1. After line2 connect, user can press Soft2 (Conf)
select another way into the three-way calling number, then press softkey1-OK to enter into
conference mode. To back to line1 from conference, please press Soft1 (Split); to end the call,
please press Soft3 (Close) or press .
3.7. Call records
AIP-311 supports 100 items of missed call, 100 items of incoming call, and 100 items of dialed
call. If the records are full, the newest will replace the oldest. If phone’s power cut or reboot, call
records will be discarded.
Missed call
Press and screen displays “Missed Call” with the number and time of missed call. User
can also use &to browse the missed call records, or press Soft1 (Option) to

- 14 -
check the details of this record, then press Soft2 (EDial) again to change the current number.
Pressing Soft2 (Dial) will call this number directly if user don’t modify the number. If there is no
missed call, screen will show “List Is Empty”.
Incoming call
Press and screen displays “Incoming Call”, by pressing &to browse the
records; or press Soft1 (Option) to check the details of this record, then press Soft2 (EDial) again
to change the current number. Pressing Soft2 (Dial) will call this number directly if user don’t
modify the number. If there is no incoming call,screen will show “List Is Empty”.
Dialed call
Press , and use &to browse the dialed call records; or press Soft1 (Option)
to check the details of this record, then press Soft2 (EDial) again to change the current number.
Pressing Soft2 (Dial) will call this number directly if user don’t modify the number. If there is no
dialed call, screen will show “List Is Empty”.
3.8. Special keys
SMS function
In the standby press Softkey1-SMS, then press Soft1 (new) key. After inputting SMS content,
press Soft2 (send) key to input callee’s number, next, press Soft2 (OK) again to send SMS.
When user has new message, the phone will ring, there is a coin on the screen. Press
softkey1-SMS, select inbox use up/down key, and then press softkey2-OK. When a number of text
messages, users can use up/down key and press softkey2-Enter to select one to view. Press
softkey2-Reply and input message content, finally, press Soft2(Send) again to reply this message.
The phone can also send messages by phonebook.
Note: while user browses the message numbers, new messages will be marked by “new”; when
user edits message, press # key that to switch input method, e.g. ABC (uppercase English input),
abc (lowercase English input), 123(digit input), Korean (Korean input(if your phone’s firmware
version supports Korean). PY,( if your phone’s firmware version supports Chinese)
SpeedDial function
User can pre-define numbers in these keys (numeric key 0-9). Hook off, press the defined
numeric key, and then input “#”. Your pre-defined numbers will send out.
Press softkey2-SDial to set speed dial in standby, a total of 12 numbers, users can select by
memory key. Users can delete and press # key that to switch input method.
Note: 1. First 9 numbers corresponding digit key 1-9, 10th number corresponding digit key 0
2.The first 10 set of numbers in standby mode press the corresponding number key and then
press softkey3-Dial or 【Speaker】key to exhale, but the first 11 groups and 12 group numbers

- 15 -
without the corresponding number key is required to enter SDial menu to find the set of numbers
by Corresponds memory key or softkey3-Dial button to exhaled.
Realize Secondary Dial by Dialing for only one time
When you make secondary dial in off-hook/hands-free or standby pre-input mode, press [hold]
button to postpone input, and screen display will show ^. One stands for 2 seconds. For example,
you input 123^45, the phone will send DTMF (45) 2 seconds after the phone call 123. 123^^^45
will make phone send DTMF (45) at 6 seconds interval
Message waiting indication
After you set it, you can pick up or hands-free, then press to listen to record in server
when you have new voice message.
Phone book search function
In the Chinese version, users can be retrieved by the corresponding initials Chinese name,
which simplifies the steps in the phone book to find contacts.
For example, contact name is Zhang San, contact number is 123. When you enter the
phonebook, you can press 9 key to select letter z, all the numbers of beginning with z will display
on the phone, you can select the one you want to search by press up/down key.
3.9. Call pickup
Call pickup is implemented by simulating pickup function of PBX. it’s that, when A calls B, B
rings but no answer, at this moment, C can hook off and input an appointed prefix plus B’s
number, pick up A’s call and talk with A.
The following chart shows how to configure an appointed prefix in dial peer to have call pick up
function.
*1* means appointed prefix code. After making the above configuration, C can dial *1* plus B’s
phone number to pick up A’s call. User can set prefix in random, in the case of no affecting
current dialing rules.
3.10. Join call
When B is calling C, A can join in the existing call by inputting an appointed prefix numbers plus
B or C number, if B or C also supports join call
The following chart shows how to configure an appointed prefix in dial peer to have join call
function.

- 16 -
*2* means appointed prefix code. After making the above configuration, A can dial *2* plus B or
C number to join B and C’s call. User can set prefix in random, in the case of no affecting current
dialing rules.
3.11. redial/unredial
If B is in busy line when A calls B, A will get notice: busy, please hang up. If A want to connect B
as soon as B is in idle, he can use redial function at the moment and he can dials an appointed
prefix number plus B’s number to realize redial function.
What is redial function? A can’t not build a call with B when B is in busy, then A will subscribe
B’s calling mode at 60 second intervals. Once B is available, A will get reminder of rings to hook
off, while A hooks off, A will call B automatically. If at this time A is occupied temporarily and
unwilling to contact B, A also can cancel the redial function by dialing an appointed prefix plus
B’s number before making the redial function.
*3* is appointed prefix code. After making the above configuration, A can dial
*3* plus B’s phone number to make the redial function.
*4* is appointed prefix code. After configuration, A can dial *4* to cancel redial function.
User can set prefix in random, in the case of no affecting current dialing rules.
3.12. Click to dial
When user A browses in an appointed Web page, user A can click to call user B via a link (this
link to user B), then user A’s phone will ring, after A hooks off, the phone will dial to B.

4. Web configuration
4.1. Introduction of configuration
4.1.1. Ways to configure
AIP-311 has three different ways to different users.
Use phone keypad.
Use web browser(recommendatory way).
Use telnet with CLI command.
4.1.2. Password Configuration
There are two levels to access to phone: root level and general level. User with root level can
browse and set all configuration parameters, while user with general level can set all configuration
parameters except SIP (1-2) or IAX2’s that some parameters can not be changed, such as server
address and port. User will has different access level with different username and password.
Default user with general level:
username:guest
password:guest
Default user with root level:
username:admin
password:admin
The default password of phone screen menu is 123.
4.2. Setting via web browser
When this phone and PC are connected to network, enter the IP address of the wan port in this
phone as the URL (e.g. http://xxx.xxx.xxx.xxx/ or http://xxx.xxx.xxx.xxx:xxxx/).
If you do not know the IP address, you can look it up on the phone’s display by pressing
button.
The login page is as below picture
4.3. Configuration via WEB
4.3.1. BASIC
4.3.1.1. Status

- 18 -
Status
Field name Explanation
Network
Shows the configuration information on WAN and LAN port,
including the connect mode of WAN port (Static, DHCP, PPPoE),
MAC address, the IP address of WAN port and LAN port, ON or
OFF of DHCP mode of LAN port.
Phone Number Shows the phone numbers provided by the SIP LINE 1-3 servers
and IAX2.
The last line shows the version number and issued date.
4.3.1.2. Wizard
Wizard
Field Name Explanation
Please select the proper network mode according to the network condition. AIP-311 provide
three different network settings:
Static: If your ISP server provides you the static IP address, please select this mode, then
finish Static Mode setting. If you don’t know about parameters of Static Mode setting,
please ask your ISP for them.

- 19 -
DHCP: In this mode, you will get the information from the DHCP server automatically;
need not to input this information artificially.
PPPoE: In this mode, your must input your ADSL account and password.
You can also refer to 3.2.1 Network setting to speed setting your network.
Choose Static IP MODE,click【NEXT】can config the network and SIP(default SIP1)simply,
also can browse too. Click【BACK】can return to the last page.
Static IP Address Input the IP address distributed to you.
Netmask Input the Netmask distributed to you.
Gateway Input the Gateway address distributed to you.
DNS Domain Set DNS domain postfix. When the domain which you input can
not be parsed, phone will automatically add this domain to the end
of the domain which you input before and parse it again.
Primary DNS Input your primary DNS server address.
Alter DNS Input your standby DNS server address.
Display Name Set the display name.
Server Address Input your SIP server address.
Server Port Set your SIP server port.
User Name Input your SIP register account name.
Password Input your SIP register password.
Phone Number Input the phone number assigned by your VOIP service provider.
Enable Register Start to register or not by selecting it or not.

- 20 -
Display detailed information that you manual config.
Choose DHCP MODE,click【NEXT】can config SIP(default SIP1)simply, also can browse too.
Click【BACK】can return to the last page. Like Static IP MODE。
Choose PPPoE MODE,click【NEXT】can config the PPPoE account/password and SIP(default
SIP1)simply, also can browse too. Click【BACK】can return to the last page. Like Static IP
MODE。
PPPoE Server It will be provided by ISP.
Username Input your ADSL account.
Password Input your ADSL password.
Notice: Click【Finish】button after finished your setting, IP Phone will save the setting
automatically and reboot, After reboot, you can dial by the SIP account.
4.3.1.3. Call Log
You can query all the outgoing through this page.
Call Lo
g
Field name explanation
Start Time Display the start time of the outgoing record.
Last Time Display the conversation time of the outgoing record.
Called Number Display the account/protocol/line of the outgoing record.
4.3.1.4. MMI SET
Table of contents