manuals.online logo
Brands
  1. Home
  2. •
  3. Brands
  4. •
  5. Escene
  6. •
  7. IP Phone
  8. •
  9. Escene SayHi CC800v2 User manual

Escene SayHi CC800v2 User manual

Other manuals for SayHi CC800v2

1

Other Escene IP Phone manuals

Escene ES206 User manual

Escene

Escene ES206 User manual

Escene Sayhi ES210 User manual

Escene

Escene Sayhi ES210 User manual

Escene 102 Series User manual

Escene

Escene 102 Series User manual

Escene SayHi ES280 User manual

Escene

Escene SayHi ES280 User manual

Escene ES282 User manual

Escene

Escene ES282 User manual

Escene ES410-PEN User manual

Escene

Escene ES410-PEN User manual

Escene ES410PE User manual

Escene

Escene ES410PE User manual

Escene ES/DS/410 User manual

Escene

Escene ES/DS/410 User manual

Escene SayHi GS620 User manual

Escene

Escene SayHi GS620 User manual

Escene ES620 User manual

Escene

Escene ES620 User manual

Escene ES292 User manual

Escene

Escene ES292 User manual

Escene ES330-PEG User manual

Escene

Escene ES330-PEG User manual

Escene ES620 User manual

Escene

Escene ES620 User manual

Escene 620 Series User manual

Escene

Escene 620 Series User manual

Escene SayHi PS760-P User manual

Escene

Escene SayHi PS760-P User manual

Escene SayHi 320 Series User manual

Escene

Escene SayHi 320 Series User manual

Escene ES205 User manual

Escene

Escene ES205 User manual

Escene Sayhi HS108 User manual

Escene

Escene Sayhi HS108 User manual

Escene ES282-PC User guide

Escene

Escene ES282-PC User guide

Escene ES320 User manual

Escene

Escene ES320 User manual

Escene Sayhi ES220 User manual

Escene

Escene Sayhi ES220 User manual

Escene ES270-C User manual

Escene

Escene ES270-C User manual

Escene ES380 User manual

Escene

Escene ES380 User manual

Escene WS320 User manual

Escene

Escene WS320 User manual

Popular IP Phone manuals by other brands

Cortelco C62 VoIP Phone user guide

Cortelco

Cortelco C62 VoIP Phone user guide

VanillaIP Polycom IP300 user manual

VanillaIP

VanillaIP Polycom IP300 user manual

Yealink Yealink SIP-T22P Quick installation guide

Yealink

Yealink Yealink SIP-T22P Quick installation guide

Viking SR-IP product manual

Viking

Viking SR-IP product manual

Yealink VP59 Teams user guide

Yealink

Yealink VP59 Teams user guide

Panasonic KX-UT133-B Administrator's guide

Panasonic

Panasonic KX-UT133-B Administrator's guide

Avaya one-X 9600 Series overview

Avaya

Avaya one-X 9600 Series overview

AVA Enterprises B179 Installation and administration guide

AVA Enterprises

AVA Enterprises B179 Installation and administration guide

Cisco Unified 7900 Series System guide

Cisco

Cisco Unified 7900 Series System guide

Polycom SoundPoint IP 450 datasheet

Polycom

Polycom SoundPoint IP 450 datasheet

Cisco SPA-500 Series user guide

Cisco

Cisco SPA-500 Series user guide

IPitomy IP290 user manual

IPitomy

IPitomy IP290 user manual

Polycom SoundPoint IP 650 user guide

Polycom

Polycom SoundPoint IP 650 user guide

Proximus Maestro 3016 IP quick start guide

Proximus

Proximus Maestro 3016 IP quick start guide

Polycom IP 450 user guide

Polycom

Polycom IP 450 user guide

Fanvil X4 user manual

Fanvil

Fanvil X4 user manual

Snom 320 quick start guide

Snom

Snom 320 quick start guide

Avaya Integral 5 R3.0 user guide

Avaya

Avaya Integral 5 R3.0 user guide

manuals.online logo
manuals.online logoBrands
  • About & Mission
  • Contact us
  • Privacy Policy
  • Terms and Conditions

Copyright 2025 Manuals.Online. All Rights Reserved.

CC800v2
IP 话务盒快速操作指南

表1
线路键灯
LED 灯状态
描述
红色闪烁 对应线路有来电正在呼入
红色常亮 对应线路摘机且正在进入正常通话状态

表2
状态灯
LED 灯状态
描述
红色闪烁 某线路有来电正在呼入及线路被保持
红色常亮 某线路摘机且正在进入正常通话状态

表3
免提键
LED 灯状态
描述
红色常亮 摘机或通话状态

表3
其他
LED 灯状态
描述
红色常亮 对应功能正启用
安装耳机架,如图 1和图 2所示:
图1:话务盒翻转,背部卡槽为耳机支架安装孔,对准后向里轻轻一推
即可拴紧耳机支架。
图2:耳机支架可放置耳机,方便使用。
1-1
图1图2
注:耳机和耳机架非标准配件。
话机接口功能,如图 3和图 4所示:
图3:耳机 RJ11 接口;SUPERVISOR 监听接口。
图4:PC 口接电脑,LAN 口接外网,电源口接电源(DC5V),USB 电源
口接 USB,3.5mm 耳机口接耳机。
图3图4
按话机 LCD 界面上的“
菜单”
软键(按
向下
软按键或者数字
2\4\6\8
键操作)
=> 系统设置=> 高级设置=>
输入
高级设置密码
(默认为空)
=> 网络=>本地网口设置=>网络类型=>按“进入”键进入修改后“保
存”。
网络选项:静态 IP、拨号 PPPOE、DHCP 自动获取
选择
静态 IP
后按导航键下,看到 IP 地址设置,可对 IP 及网关等网
络信息进行设置,其中“.”请用键“*”输入,修改完后“保存”。
选择
PPPoE
输入账号和密码后按保存。
选择
DHCP
不用设置 IP。
注:修改了网络参数,需要重启才能使其生效,请选择重启;数字
2\4\6\8
键复用为导航键上\左\右\下。
登陆话机网页
话机设置>高级>功能键
,可 对
L1\L2\AUTO ANS\HOLD\RD
键
进行可编程功能修改,根据功能所需可从新定义为
快速拨号\快速
拨号前缀\DTMF 二次拨号\Paging\Call Park\Intercom\Pick
up\BLA
。
1-2
按话机 LCD 界面上的菜单软键(
按“向下”软按键或者数字“8”键)
=> 系统设置=> 高级设置=>
输入
高级设置密码
(默认为空
=> Sip=>
账号 SIP 设置 =>账号 1
,之后分别配置以下参数:启用、账号类型、
账号、密码、主 SIP 域名

主SIP 域名:
输入 SIP 服务器 IP(“.”请用键*输入,注意 IP 话机
与SIP 服务器间网络必须可达),之后按
“确定”
,再按下
“保存”
软键,即可完成 SIP 账户的添加。
您可以按下
耳麦键
来进行一个呼叫。

IP 直呼:
摘机或者待机状态下,直接拨 IP 地址呼叫另一台 IP 话机

直接呼叫:
直接拨打号码,然后按
#键
或按
发出
软键;

重拨:
按
RD 功能
按键以拨打最近一个拨出的号码;

从呼叫记录进行呼叫:
按
菜单键
,选择“
呼叫记录
”,再选择“
未
接来电
” 、“
已接来电
”或“
已拨电话
”列表来选择一个号码,按
“进
入”
软键再按
“呼叫”
菜单进行呼叫。
列表
数量
话机 1
网线 1
USB 线1
快速操作指南 1
*更多的详细内容以及话机配置信息请参考本话机的用户手册。您也可以
通过访问话机的 Web 页面来进行更详细的参数配置,在浏览器中输入 IP
话机的地址,输入话机的用户名、密码(默认均为 root),即可进入了
IP 话机的网页配置界面。
广州市亿景通信技术有限公司
地址:广州市天河区东圃镇黄村路 51 号粤安工业园 C栋4楼
网址:http://www.escene.cn
客户服务:400 090 5818
1-3
CC800v2
IP Phone Quick Guide
Table 1 Line 1\2
LED Status
Description
Red, flashing There is an incoming call.
Red, steady Pick up and enter normal call.
Table 2Light-strip
LED Status Description
Red, flashing There is an incoming call or be Hold.
Red, steady Hook-off. or enter a usual conversation
Table 2 Headset
LED Status Description
Red, steady Pick up and enter normal call.
Table 3 Others
LED Status Description
Red, steady The corresponding function is enabled.
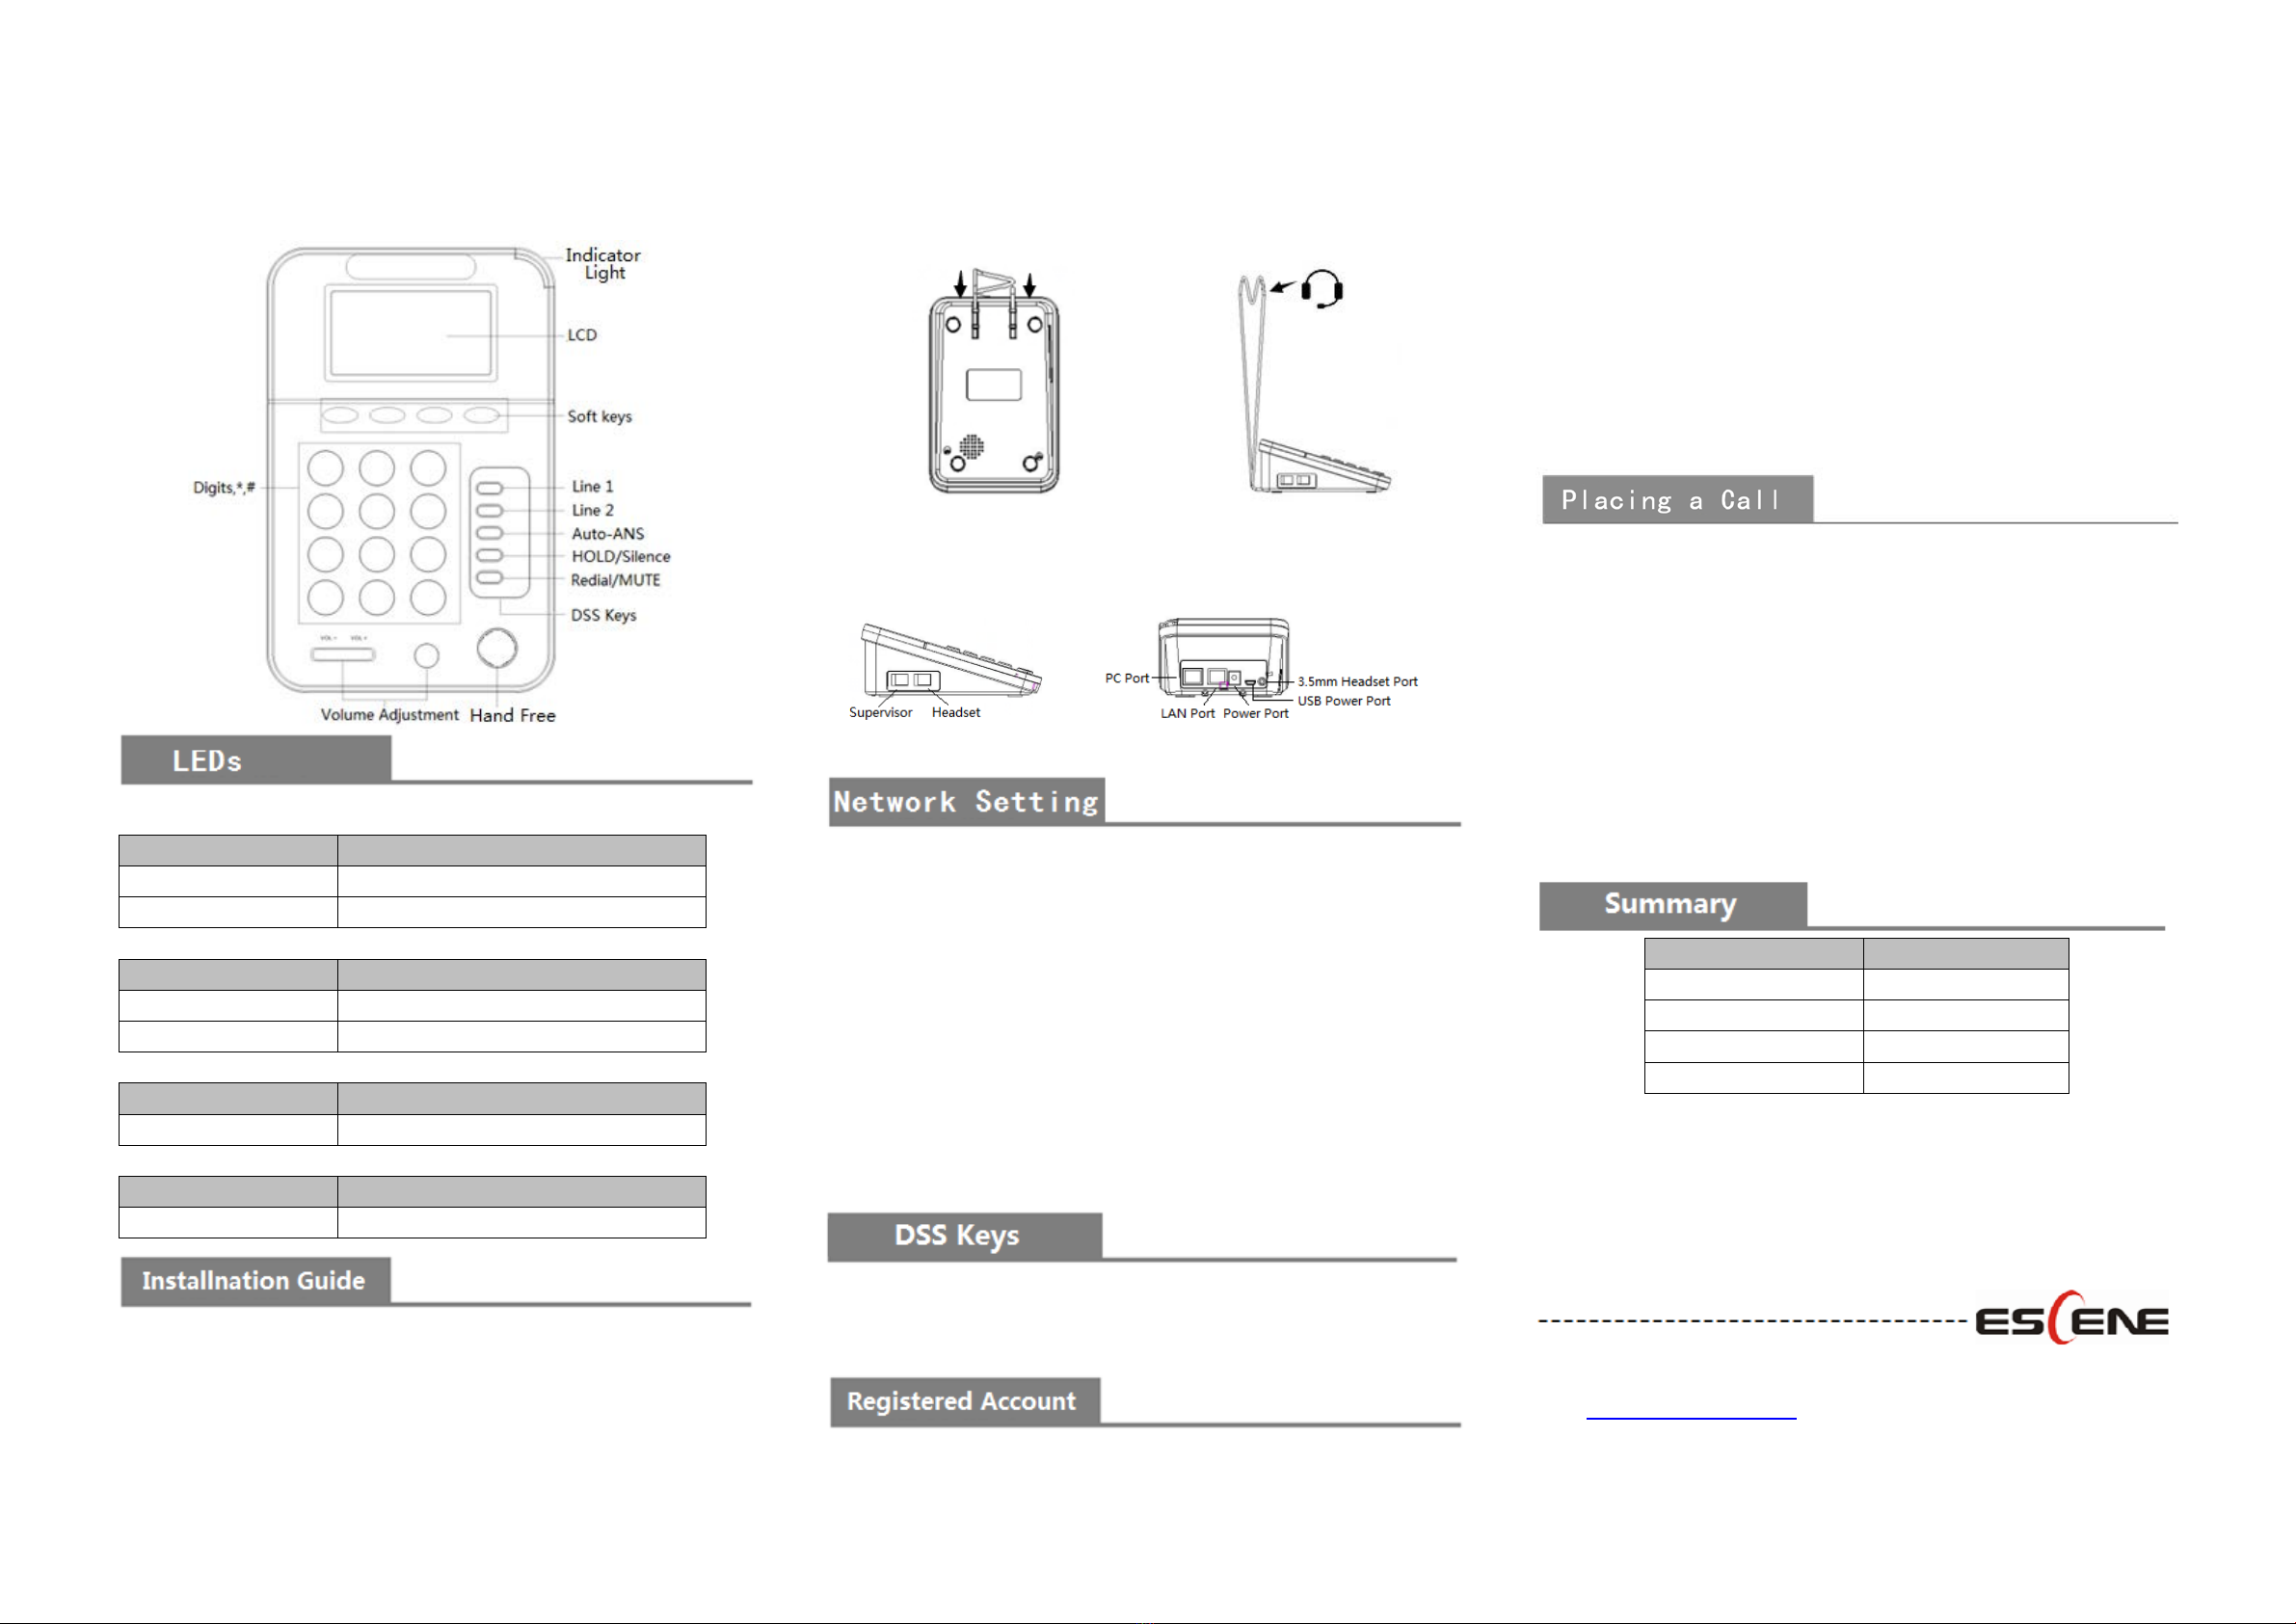
Bracket installation and usage are as following pictures:
Figure 1: Push the bracket down and it can match the bottom card slot.
Figure 2: It’s convenient to hang headset onto the bracket.
Figure 3~4: Some of the interfaces, e.g: Supervisor interface\Headset
interface\3.5mm headset interface\PC port\ Internet port\Power
port\USB power supply.
2-1
Figure 1 Figure2
Note: The bracket and headset are non-standard parts.
Figure3Figure4
Press the menu soft key on the phone MENU=> System setting=>
Advanced setting=>Enter Advanced Password (Empty by default) =>
Network =>LAN Port click ENTER
Type has the following options : STATIC\PPPoE\DHCP
Choose STATIC press Navigation key - to the next, see the IP address
settings, the IP and gateway settings and other related network
information, including "." Use the key "*" entry.
Select PPPoE username and password to register.
Select DHCP needn’t to setting IP.
NOTE: when network configuration has been changed, must reboot to
take effect, please select reboot.; 2\4\6\8 are navigation keys when
operating menu.
Login the phone website>Phone Settings> Advanced>Function(DSS) keys,
you can set the Function(DSS) Keys as Speed Dial\
Speed Dial
Prefix\DTMF\Paging\Call Park\Intercom\Pickup\BLA.
On the idle status, you can start to configure account by pressing MENU
soft key
=> System Setting => Advanced Setting=>type Advanced
password (it is idle by default) => SIP Account, the main parameters for
2 SIP accounts are needed to be set as follow:
2-2
Enable Account: Select Enable
Account: Type your SIP account
Authen User: The authentication with the account
User Pwd
:
Type your SIP password
SIP Server
:
Type the SIP server IP address (you can type “.” by “*” key,
you must confirm the connection between the phone and SIP server),
And then select Submit changes and press OK to submit the changes.
You can press Headset/Speaker button to place a call.
Dial directly: Dial number directly, then press # button or Send soft-key (it
will call from the first available line);
Redial: Press Redial button/soft-key to dial the latest number;
Dial from Call history: Press Menu button, select “Call history” and select
one of “Missed calls”, “Received calls” and “Dialed numbers” lists to dial
by pressing Dial soft-key.
You can quickly use these functions by pressing corresponding
Navigation-buttons [2\4\6\8]. For example, Left button : “Received Calls” list ;
Right button : “Dialed Numbers” list ; Down button : “Missed Calls” list . UP
button :"tone volume" ;
List Quantity
Phone 1
Ethernet Cable 1
USB Cable 1
Quick Operator Guide 1
*This document introduces normal function operation of IP phones only. For
details (operation and configuration), refer to User Manual. And set details on
the web page of phone. In the browser, enter the IP phone's address, enter the
phone's user name and password (the default are root), enter the IP phone's
web configuration interface.
ESCENE COMMUNICATION CO.,LTD.
Web: http://www.escene.cn/en
Address: Floor 4 Building C YueAn Industrial Park No.51 Huangcun Road
Tianhe District Guangzhou China
2-3