manuals.online logo
Brands
  1. Home
  2. •
  3. Brands
  4. •
  5. AIRLESSCO
  6. •
  7. Paint Sprayer
  8. •
  9. AIRLESSCO SL User manual

AIRLESSCO SL User manual

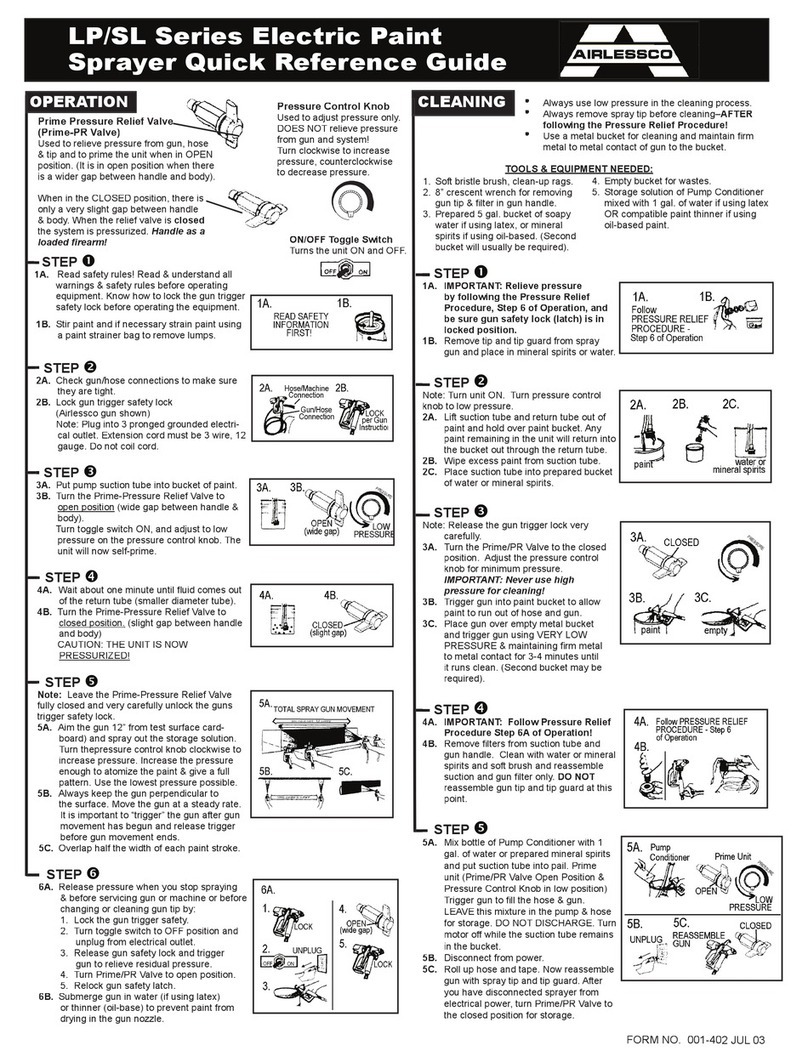
STEP

1A.
Read safety rules on reverse. Read & understand all warnings
& safety rules before operating equipment. Know how to lock
the gun trigger saftey lock before operating the equipment.
1B.
Stir paint and if necessary strain paint using a paint strainer bag
to remove lumps.
STEP

2A.
Check gun/hose connections to make sure they are tight.
2B.
Lock gun trigger safety lock (Airlessco gun shown)
Note: Plug into 3 pronged grounded electrical outlet. Extension
cord must be 3 wire, 12 gauge. Do not coil cord.
STEP

3A.
Put pump suction tube into bucket of paint.
3B.
Turn the Prime-Pressure Relief Valve to
open position
open position
(wide
gap between handle & body).
Turn ON and adjust low pressure on the pressure control knob.
The unit will now self-prime.
STEP

4A.
Wait about one minute until  uid comes out of the return tube
(smaller diameter tube).
4B.
Turn the Prime-Pressure Relief Valve to
closed position.
closed position.
(slight
gap between handle and body)
CAUTION: THE UNIT IS NOW
PRESSURIZED!
STEP

Note:
Leave the Prime-Pressure Relief Valve fully closed and very
carefully unlock the guns trigger safety lock.
5A.
Aim the gun 12” from test surface (cardboard) and spray out
the storage solution. Turn the pressure control knob clockwise
to increase pressure. Increase the pressure enough to atomize
the paint & give a full pattern. Use the lowest pressure possible.
5B.
Always keep the gun perpendicular to the surface. Move the
gun at a steady rate. It is important to “trigger” the gun after
gun movement has begun and release trigger before gun
movement ends.
5C.
Overlap half the width of each paint stroke.
STEP

6A.
Release pressure when you stop spraying & before servicing
gun or machine or before changing or cleaning gun tip by:
1.
Lockin the gun trigger safety.
2.
Turn toggle switch to OFF position and unplug from
electrical outlet.
3.
Release gun safety lock and trigger gun to relieve residual
pressure.
4.
Turn Prime/PR Valve to open position.
5.
Relock gun saftey latch.
6B.
Submerge gun in water (if using latex) or thinner (oil-base) to
prevent drying gun nozzle.
•
Always use low pressure in the cleaning process.
•
Always remove spray tip before cleaning–
AFTER following the Pressure
Relief Procedure!
•
Use a metal bucket for cleaning and maintain  rm metal to metal contact
of gun to the bucket.
READ AND UNDERSTAND ALL SAFETY WARNINGS ON REVERSE SIDE OF THIS USERS GUIDE!
TOOLS & EQUIPMENT NEEDED:
1.
Soft bristle brush, clean-up rags.
2.
8” crescent wrench for removing gun tip &
 lter in gun handle.
3.
Prepared 5 gal. bucket of soapy water if using
latex, or mineral spirits if using oil-based.
(Second bucket will usually be required).
STEP

1A.
IMPORTANT: Relieve pressure by following the Pressure
Relief Procedure, Step 6 of Operation, and be sure gun
safety lock (latch) is in locked position.
1B.
Remove tip and tip guard from spray gun and place in mineral
spirits or water.
STEP

Note: Turn unit ON. Turn pressure control knob to low pressure.
2A.
Lift suction tube and return tube out of paint and hold over paint
bucket. Any paint remaining in the unit will return into the bucket
out through the return tube.
2B.
Wipe excess paint from suction tube.
2C.
Place suction tube into prepared bucket of water or mineral
spirits.
STEP

Note: Release the gun trigger lock very carefully.
3A.
Turn the Prime/PR Valve to the closed position. Adjust the
pressure control knob for minimum pressure.
IMPORTANT: Never use high pressure for cleaning!
3B.
Trigger gun into paint bucket to allow paint to run out of hose and
gun.
3C.
Place gun over empty metal bucket and trigger gun using VERY
LOW PRESSURE & maintaining  rm metal to metal contact for
3-4 minutes until it runs clean. (Second bucket may be required).
STEP

4A.
IMPORTANT: Follow Pressure Relief Procedure Step 6A of
Operation!
4B.
Remove  lters from suction tube and gun handle. Clean with
water or mineral spirits and soft brush and reassemble suction
and gun  lter only.
DO NOT
reassemble gun tip and tip guard at
this point.
STEP

5A.
Mix 1 oz. bottle of
Pump Conditioner
with 1 gal. of water or
Pump Conditioner with 1 gal. of water or Pump Conditioner
prepared mineral spirits and put suction tube into pail. Prime unit
(Prime/PR Valve Open Position & Pressure Control Knob in low
position) Trigger gun to  ll the hose & gun. LEAVE this mixture in
the pump & hose for storage. DO NOT DIS CHARGE. Turn motor
off while the suction tube remains in the bucket.
5B.
Disconnect from power.
5C.
Roll up hose and tape. Now reassemble gun with spray tip and tip
guard. NOTE: After you have disconnected sprayer from electri-
cal power, turn Prime/PR Valve to closed position for storage.
Prime Pressure Relief Valve (Prime-PR Valve)
Used to relieve pressure from gun, hose & tip and to prime the
unit when in OPEN position. (It is in open position when there
is a wider gap between handle and body).
When in the CLOSED position, there is only a very slight
gap between handle & body. When closed the system is
pressurized.
Handle as if it was a loaded  rearm!
ON/OFF Toggle Switch-
turns the unit ON and OFF.
OPERATION CLEAN ING
FORM NO. 001-402 JUL ‘03
SL & LP Electric Paint Sprayer Users Guide
STEP
STEP
STEP
STEP
STEP
Pressure Control Knob
- used
- used
to adjust pressure only. DOES
NOT relieve pressure from gun
and system! Turn clockwise to
increase pressure & counter-
clockwise to decrease pressure.
STEP
STEP
STEP
STEP
STEP
STEP
4.
Empty bucket for wastes.
5.
Storage solution of Pump Conditioner mixed with
1 gal. of water if using latex OR compatible paint
thinner if using oil-based paint.
INJECTION HAZARD
SPRAYING VAPORS + STATIC SPARKING CREATE FIRE/EX PLO SION
Always be sure all equipment, paint bucket and object being sprayed
are properly grounded. Always ground sprayer, gun, paint bucket,
and object being sprayed. Be sure gun is grounded through hose
con nec tion. Con nect grounding wire to a true earth ground.
NEVER spray in closed area Ventilation must be adequate to remove
vapors.
NEVER keep  ammable materials in spray area.
NEVER spray highly  ammable liquids.
Use only high pressure conductive airless hoses with static wire ap-
proved for 3000psi.
NEVER SMOKE IN SPRAYING AREAS.
ALWAYS ensure properly maintained  re extinquishing equipment is
available.
FLUSHING & CLEANING CAN CREATE STATIC SPARKING IF DONE IMPROPERLY!!!!
NEVER spray solvents under pressure through spray tip.
FOLLOW PRESSURE RELIEF PROCEDURE and remove spray tip
for cleaning.
USE LOWEST POSSIBLE PRESSURE when  ushing and cleaning.
FLUSHING & CLEANING CAN CREATE STATIC SPARKING IF DONE IMPROPERLY!!!!
Fluids under high pressure from spray or leaks can penetrate the skin
and cause serious injury and the need for amputation.
NEVER
point the spray gun at anyone or any part of the body.
NEVER
put hand or  ngers over the spray tip. Do not use rag over your
NEVER put hand or  ngers over the spray tip. Do not use rag over your
NEVER
 ngers. Paint will penetrate through material and into the  ngers.
NEVER
try to stop leaks with your hand or body.
NEVER try to stop leaks with your hand or body.
NEVER
NEVER wipe off build up around spray tip. ALWAYS remove the tip from
the gun to clean it after following Pressure Relief Procedure!!
MEDICAL TREATMENT
If any  uid appears to penetrate your skin, get
EMERGENCY CARE AT
ONCE. DO NOT TREAT AS A SIMPLE CUT.
Tell the doctor exactly what
 uid was injected and have him read the following Note.
NOTE TO PHYSICIAN: Injection in the skin is a trau mat ic in ju ry.
It is
important to treat the injury sur gi cal ly as soon as possible. DO NOT
DELAY treat ment to re
search tox ic i ty.
Toxicity is a concern with some
exotic coatings in ject ed directly into the blood stream. Con sul ta tion with a
plastic surgeon or re con struc tive hand surgeon may be ad vis able.
SPRAY GUN SAFETY
ALWAYS set safety lock on the gun in "LOCKED" po si tion when not in use
and before servicing or cleaning.
DO NOT remove or modify any part of gun.
Check operation of gun safety devices before each use
.
HIGH PRESSURE SPRAY CAN CAUSE EXTREMELY SERIOUS INJURY. Handle as you would a loaded  rearm.
Learn and follow the PRESSURE RELIEF PROCEDURE. Read and understand all instruction manuals, tags, warnings, user’s guides
and labels on machine before operating equipment. Order new labels if unreadable.
NEVER spray in vicinity of open  ame or other source of ignitions such
as water heaters and furnaces.
ALWAYS locate the sprayer and electrical outlets in use at least 25
feet away from spray area in well ventilated area. Do not plug in any
electrical cores in spray area.
Follow the coating and solvent manufacturer’s safety precautions and
warnings.
HALOGENATED HYDRO CARBON WARNING: NEVER use
halogenated hydrocarbon (HHC) solvents or paints that contain them
in this system. Some of the most common of these solvents are: Car-
bontetrachloride, Chlorobenzene, Dichloroethane, Dichloroethyl Ether,
Ethylbromide, Ethylchloride, Tetrachloethane.
Consult your supplier to be sure.
Hold gun  rmly against a metal waste container to reduce spark pos si bil i ty.
NEVER use cleaning solvents with  ash points below 140 degrees F.
Some of these are: acetone, benzene, either, gasoline, naptha. Consult your
supplier to be sure.
FORM NO. 001-402 JUL 03
AIRLESSCO SL&LP SAFETY GUIDE
SPRAY TIP SAFETY
Use extreme caution when cleaning or chang ing spray tips. If the spray tip clogs
while spray ing, engage the gun safety latch and ALWAYS follow the
PRES
SURE
RELIEF PRO CE DURE
before removing the spray tip to clean it.
NEVER wipe off build up around the spray tip.
TIP GUARD
NEVER operate gun without tip guard attached
.
GENERAL PRECAUTIONS
ALWAYS ensure switch is in “OFF” position before plug ging unit in.
ALWAYS ensure unit is in prime position and spray gun locked before starting
unit.
NEVER alter equip ment in any manner.
NEVER spray highly  ammable materials.
NEVER use around children or let children use sprayer.
NEVER allow another person to use sprayer.
ALWAYS wear a face mask while spraying.
NEVER leave sprayer unattended with pressure in system.
HOSES
NEVER use weak or damaged nonconductive paint hose. Do not allow
kinking, crushing, or allow it to vibrate against rough, sharp or hot surfaces.
Check hoses for damage or wear before each use.
REPLACE DAMAGED HOSE - DO NOT mend with tape or any other device.
USE ONLY conductive or grounded  uid hoses for airless ap pli ca tions.
TIGHTEN all  uid con nec tions before each use.
AIRLESSCO SL&LP SAFETY GUIDE
PRESSURE RELIEF PROCEDURE
Learn this procedure before operating unit. Never attempt to change or clean spray tip or service unit
and gun without  rst releasing the pressure by:
1.
Lock gun trigger safety lock.
2.
Turn engine OFF.
3.
Release gun trigger safety lock & trigger gun into pail.
4.
Relock gun.
5.
Turn Prime/Pressure Relief Valve open to relieve residual  uid pressure.
NOTE:
If spray tip or hose is clogged, follow steps 1-5 & expect paint splashing into the bucket during Step 5.

This manual suits for next models

1

Other AIRLESSCO Paint Sprayer manuals

AIRLESSCO Spray & Stripe 3600 User manual

AIRLESSCO

AIRLESSCO Spray & Stripe 3600 User manual

AIRLESSCO SL User manual

AIRLESSCO

AIRLESSCO SL User manual

AIRLESSCO MP18 Instruction Manual

AIRLESSCO

AIRLESSCO MP18 Instruction Manual

AIRLESSCO SL6500 User manual

AIRLESSCO

AIRLESSCO SL6500 User manual

AIRLESSCO 450 User manual

AIRLESSCO

AIRLESSCO 450 User manual

AIRLESSCO LP540 Hi Boy B Series Use and care manual

AIRLESSCO

AIRLESSCO LP540 Hi Boy B Series Use and care manual

AIRLESSCO 3A1186F User manual

AIRLESSCO

AIRLESSCO 3A1186F User manual

AIRLESSCO 3A1885A User manual

AIRLESSCO

AIRLESSCO 3A1885A User manual

AIRLESSCO LP Series User manual

AIRLESSCO

AIRLESSCO LP Series User manual

AIRLESSCO SL1250 Use and care manual

AIRLESSCO

AIRLESSCO SL1250 Use and care manual

AIRLESSCO Spay & Stripe 3000 User manual

AIRLESSCO

AIRLESSCO Spay & Stripe 3000 User manual

AIRLESSCO LP460 User manual

AIRLESSCO

AIRLESSCO LP460 User manual

AIRLESSCO Prolight Contractor Series User manual

AIRLESSCO

AIRLESSCO Prolight Contractor Series User manual

AIRLESSCO 910E User manual

AIRLESSCO

AIRLESSCO 910E User manual

AIRLESSCO slow stroker II 4100SL User manual

AIRLESSCO

AIRLESSCO slow stroker II 4100SL User manual

AIRLESSCO TS900 Instruction Manual

AIRLESSCO

AIRLESSCO TS900 Instruction Manual

AIRLESSCO SL810 User manual

AIRLESSCO

AIRLESSCO SL810 User manual

AIRLESSCO SL 6250 User manual

AIRLESSCO

AIRLESSCO SL 6250 User manual

AIRLESSCO LP 955 Use and care manual

AIRLESSCO

AIRLESSCO LP 955 Use and care manual

AIRLESSCO HSS 9000 User manual

AIRLESSCO

AIRLESSCO HSS 9000 User manual

AIRLESSCO SL1500 User manual

AIRLESSCO

AIRLESSCO SL1500 User manual

AIRLESSCO HSS 9000 User manual

AIRLESSCO

AIRLESSCO HSS 9000 User manual

AIRLESSCO MP 400 Operating instructions

AIRLESSCO

AIRLESSCO MP 400 Operating instructions

AIRLESSCO LP 400 Use and care manual

AIRLESSCO

AIRLESSCO LP 400 Use and care manual

Popular Paint Sprayer manuals by other brands

Graco 310802D Operation manual

Graco

Graco 310802D Operation manual

Hardi Ranger Series Instruction book

Hardi

Hardi Ranger Series Instruction book

Nordson A7A Customer product manual

Nordson

Nordson A7A Customer product manual

Graco GM 3500 Instructions-parts list

Graco

Graco GM 3500 Instructions-parts list

PMC PH-2 manual

PMC

PMC PH-2 manual

C.A. Technologies Lynx 100CM Product information

C.A. Technologies

C.A. Technologies Lynx 100CM Product information

Grizzly G5357 instruction sheet

Grizzly

Grizzly G5357 instruction sheet

Seiwa S 101E instruction manual

Seiwa

Seiwa S 101E instruction manual

Graco FinishPro 290 manual

Graco

Graco FinishPro 290 manual

Lube Shuttle mato LubeJet-eco operating instructions

Lube Shuttle

Lube Shuttle mato LubeJet-eco operating instructions

Solo 460 Li Original instructions

Solo

Solo 460 Li Original instructions

Hyper Tough HT19-401-003-22 Operator's manual

Hyper Tough

Hyper Tough HT19-401-003-22 Operator's manual

Gloria classic 1200 manual

Gloria

Gloria classic 1200 manual

Birchmeier Vario-Matic 1 P operating manual

Birchmeier

Birchmeier Vario-Matic 1 P operating manual

Gardena 884 operating instructions

Gardena

Gardena 884 operating instructions

Amazone UX 3200 Super operating manual

Amazone

Amazone UX 3200 Super operating manual

EINHELL BG-PS 5 operating instructions

EINHELL

EINHELL BG-PS 5 operating instructions

Parkside PFSPS150 Operation and safety notes

Parkside

Parkside PFSPS150 Operation and safety notes

manuals.online logo
manuals.online logoBrands
  • About & Mission
  • Contact us
  • Privacy Policy
  • Terms and Conditions

Copyright 2025 Manuals.Online. All Rights Reserved.