Airlinkplus AME001 User manual

External Modem
User’s Manual

External Modem
User’s Manual
No part of this publication may be reproduced in any form by any means without the prior written permission.
Other trademarks or brand names mentioned herein are trademarks or registered trademarks of their respective
companies.
May 2003

I
Contents
CHAPTER 1 BEFORE YOU BEGIN....................................................................................1
1.1 Features.......................................................................................................................................... 1
1.2 Package Contents........................................................................................................................... 1
1.3 Minimum System Requirements ................................................................................................... 1
CHAPTER 2 HARDWARE INSTALLATION ....................................................................3
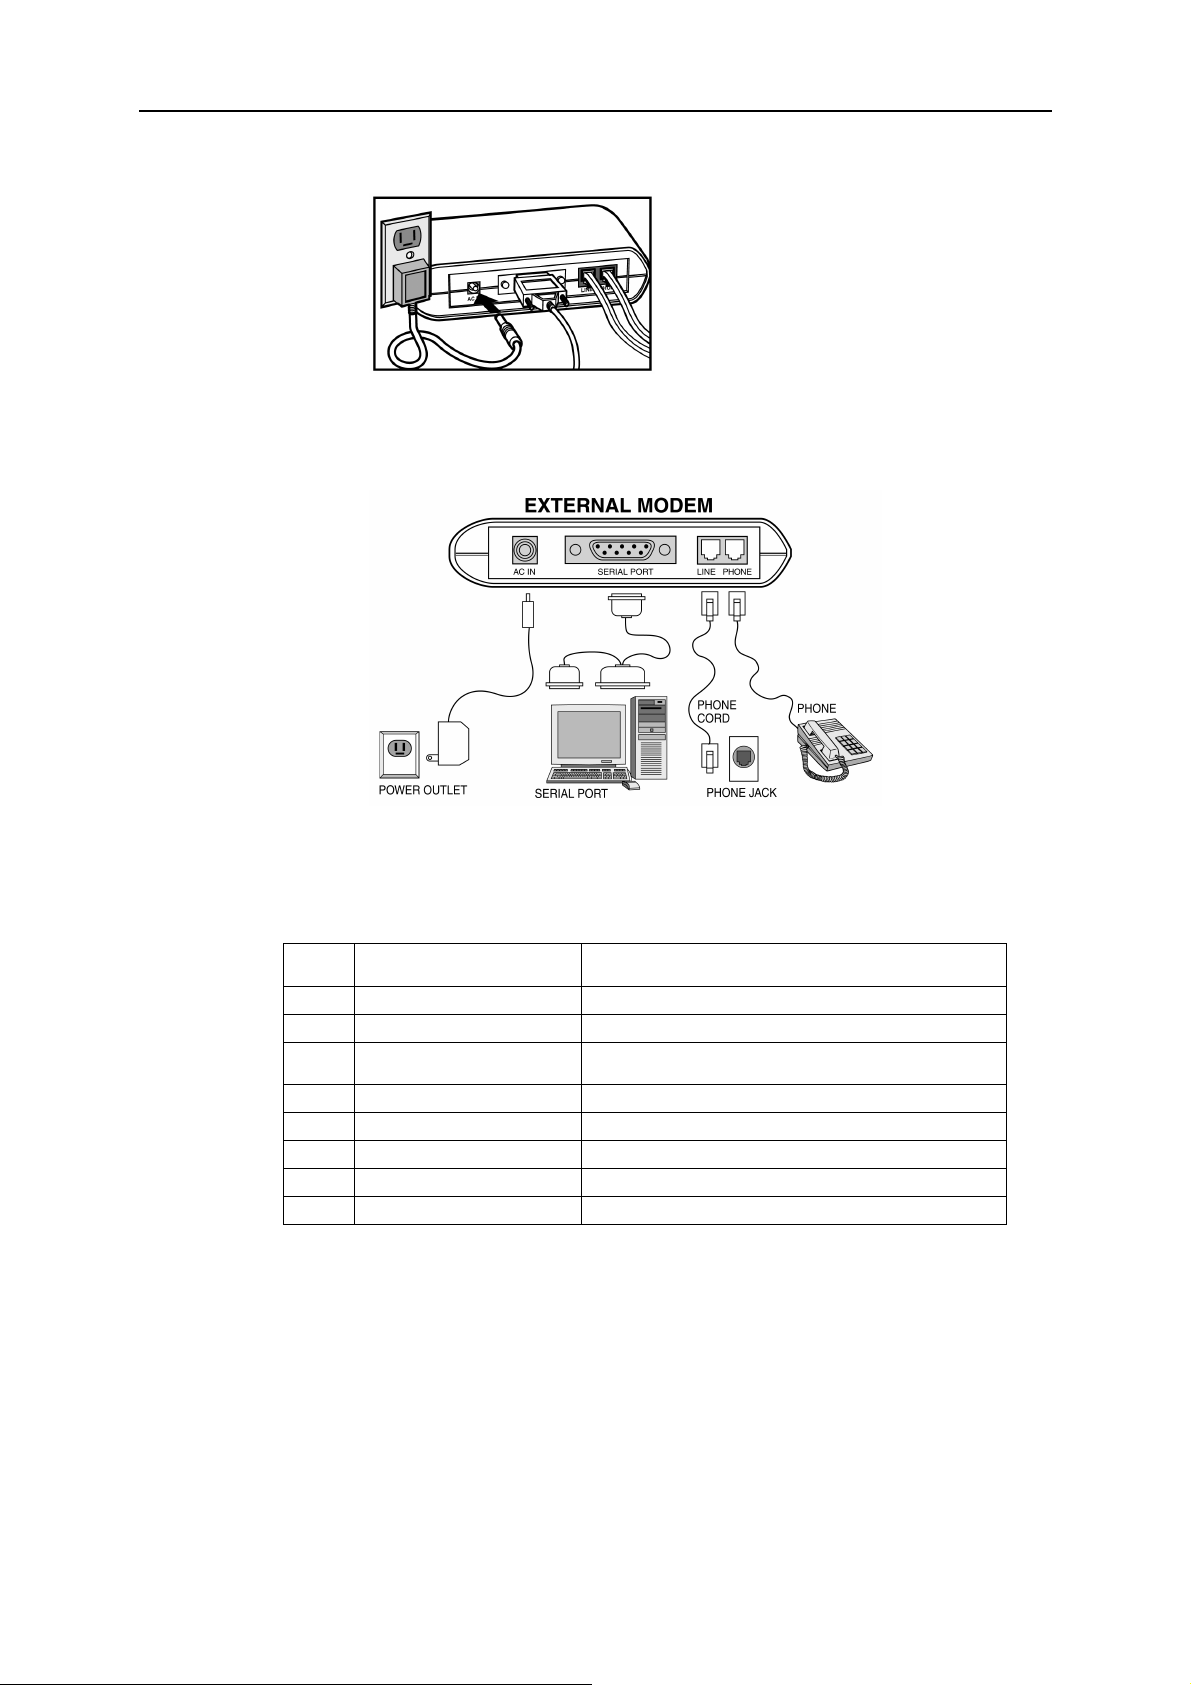
2.1 Connecting Your Modem.............................................................................................................. 3
2.2 LED Indicators............................................................................................................................... 4
CHAPTER 3 DRIVER INSTALLATION.............................................................................5
3.1 Driver Installation for Windows 95............................................................................................... 5
3.2 Driver Installation for Windows 98............................................................................................... 7
3.3 Driver Installation for Windows Me.............................................................................................. 9
3.4 Driver Installation for Windows 2000......................................................................................... 11
3.5 Driver Installation For Windows XP........................................................................................... 13
3.6 Country Selection ........................................................................................................................ 15
3.7 Verify that Your Modem is Properly Installed............................................................................ 16
3.7.1 For Windows 95/98/Me.................................................................................................................... 16
3.7.2 For Windows 2000/XP ..................................................................................................................... 18
CHAPTER 4 DRIVER UNINSTALLATION.....................................................................21
4.1 Uninstallation from Windows 95/98/Me..................................................................................... 21
4.2 Uninstallation from Windows 2000............................................................................................. 22
4.3 Uninstallation from Windows XP................................................................................................ 24
CHAPTER 5 COMMAND REFERENCE ..........................................................................25
5.1 AT Commands............................................................................................................................. 25
5.1.1 Basic Command Set.......................................................................................................................... 25
5.1.2 Commands Preceded by &................................................................................................................ 28
5.1.3 Commands Preceded by *................................................................................................................. 29
5.1.4 Commands Preceded by \................................................................................................................. 30
5.1.5 Commands Preceded by % .............................................................................................................. 31
5.2 Dial Modifiers............................................................................................................................. 31
5.3 Commands Not Preceded By AT................................................................................................32
5.4 S Register Reference.................................................................................................................... 33
5.4.1 Register Summary............................................................................................................................. 33
5.4.2 Glossary of the S Registers............................................................................................................... 33
CHAPTER 6 MODEM REFERENCE ................................................................................39
6.1 Troubleshooting........................................................................................................................... 39
6.2 Result Codes................................................................................................................................ 39
6.3 Application Examples.................................................................................................................. 40
6.3.1 Dialing a Remote Modem................................................................................................................. 40
6.3.2 Dialing a Stored Number.................................................................................................................. 40
6.3.3 Manual Answer an Incoming Call.................................................................................................... 41
6.3.4 Auto Answer an Incoming Call ........................................................................................................ 41
6.3.5 Voice to Data Switch........................................................................................................................ 41
APPENDICES ........................................................................................................................43

External Modem User's Manual
II
Appendix A: Caller ID Commands (Optional).................................................................................. 43
Appendix B: Technical Specifications .............................................................................................. 45
Appendix C: Quick Reference........................................................................................................... 46
Appendix D: Glossary ....................................................................................................................... 47
Appendix E: ASCII CODE TABLE.................................................................................................. 49

1
CHAPTER 1
BEFORE YOU BEGIN
1.1 Features
These Fax/Data/TAM Modems combine the features of a 56000(receive
only)/33600/28800/14400/9600 bps data modem and a 14400/9600 bps FAX modem. Your
new Fax/Data/TAM Modem gives your personal computer the ability to send and receive FAX
messages over the telephone line like a standard FAX machine. Your Fax/Data/TAM Modem
also allows your PC to communicate with other personal computers, terminals or BBS's
(Bulletin Board Systems) through the data modem functions.
When used as a data modem your Fax/Data/TAM Modem uses the standard AT command set
and is fully compatible with ITU-T V.42, V.42bis, V.34, V.32bis, V.32, V.22bis, V.23, V.22,
V.21, MNP 2-5, Bell 103, 212A and V.90. When used as a Fax/Data/TAM Modem it
communicates with all ITU-T Group 3 FAX machines and is compatible with ITU-T V.27ter,
V.29 and V.17. Switching between DATA mode operation and FAX mode operation of your
Fax/Data/TAM Modem is done through its firmware, no hardware settings are required.
The communication software, which should be used, depends on the kind of machine that you
are going to communicate with. If you are going to call a FAX machine then you must use the
Fax software. If the machine that you are going to communicate with is a modem then you
must use a data modem communications software.
Note: This manual is written to be used for several models of Fax/Data/TAM Modems.
Some of the information in this manual may not apply to your Fax/Data/TAM Modem.
All the description in this manual about Caller ID, V.90 and Fax class 1 applies only to
the models which support these functions.
1.2 Package Contents
Before installation, please check the items of your package. The package should include the
following items:
! The External Modem
! Quick Installation
! Installation CD
If any of the above items are missing, please contact your supplier.
1.3 Minimum System Requirements
Before installation, please check that your computer complies with the following requirements:
! Pentium MMX CPU 166 or above (Recommended CPU: Intel Pentium MMX , AMD K6
MMX, Cyrix 6x86 MMX )
! 16MB RAM
! Operating System: Windows 95/ 98/Me/2000/XP
! CD-ROM drive

3
CHAPTER 2
HARDWARE INSTALLATION
2.1 Connecting Your Modem
Note: For safety, before installing and uninstalling your modem, please make sure the
telephone line is UNPLUGGED from your modem.
Step 1: Power off your computer.
Step 2: Connect one end of the RS-232 serial cable to the modem and the other to your
computer’s serial port.
Note: Connect the male end of the RS-232 cable to the modem’s serial port and the
female end to your computer. Choose suitable 9-pin or 25-pin female connector
according to your computer’s serial port.
Step 3: Plug one end of the RJ-11 phone cord into the LINE jack on the modem, and plug
the other end into your phone jack.
Step 4: For model with PHONE port only. If you want to use a telephone on the modem’s
phone line while the modem is not used , plug the telephone’s cord into the
modem’s PHONE jack.

External Modem User's Manual
4
Step 5: Plug the AC adapter into the modem’s AC IN jack, and plug the other end into an
electrical outlet.
Step 6: When connection is finished, power on your modem before you power on your PC.
The diagram below illustrates the typical external modem connection:
2.2 LED Indicators
After hardware installation, turn on the modem and then your computer. The PWR, HS, and
MR LEDs should illuminate. The description of the LED indicators on the front panel are
listed below (from left to right) :
MR Modem Ready/ Self-testing On: Power on
Flash: Self-testing/ In diagnostic mode
HS High Speed Speeds On: Operating speed at 24000bps or higher
CD Carrier Detect On: Receiving a data carrier signal from remote modem
OH Off Hook On: Modem off hook
Off: Modem on hook
SD Send Data Flash: Transferring data from the modem
RD Receive Data Flash: Receiving data to the modem
TR Terminal Ready On: Modem is on (unless setup by AT commands)
AA Auto-answer On: Set up to answer incoming calls
PWR Power On: power on

5
CHAPTER 3
DRIVER INSTALLATION
After hardware installation, turn on your modem and then power on your PC. Follow the
instructions below to install the drivers for the modem.
3.1 Driver Installation for Windows 95
Step 1: Start Windows 95. The Update Device Driver Wizard appears. Insert the provided
Installation CD into your CD-ROM drive. Click Next.
Step 2: Windows will be unable to locate a driver. Click Other Locations.
Step 3: Click Browse to locate the path of the driver: x:\Driver\Win9x (where x is your
CD-ROM drive) and click OK.
Step 4: Windows will find the location of driver; click Finish.
Step 5: If Copying Files window appears, click Browse to locate the path of the driver:
x:\Driver\Win9x (where x is your CD-ROM drive) and click OK.
Step 6: Windows will continue to detect another device. Click Next and then repeat steps 2-
4 to complete driver installation.

Chapter 3 Driver Installation
7
3.2 Driver Installation for Windows 98
Step 1: Start Windows 98. The Add New Hardware Wizard appears announcing the
detecting of a new hardware. Click Next. Insert the provided Installation CD into
your CD-ROM drive.
Step 2: Select Search for the best driver for your device and click Next.
Step 3: Check Specify a location. Click Browse to locate the path of the driver:
x:\Driver\Win9x (where x is your CD-ROM drive) and click OK. Click Next.
Step 4: When Windows finds the driver file for the device, click Next.
Step 5: If Copying Files window appears, click Browse to locate the driver file and click
OK.
Step 6: Click Finish.

External Modem User's Manual
8
Step 7: Windows will continue to detect another device. Click Next.
Step 8: With Search for the best driver for your device checkbox selected, click Next.
Step 9: Again, select Specify a location checkbox and the location should be:
x:\Driver\Win9x where x is your CD-ROM drive. Otherwise, repeat step 3 to
specify the location. Click Next.
Step 10: When Windows finds the driver file, click Next.
Step 11: If Insert Disk window appears, click Browse to locate the driver file and click OK.
Step 12: Click Finish to complete the installation.
When you are done with driver installation, you will need to specify the country where you
locate upon different telecommunication regulations/ laws. Please proceed to “3.6 Country
Selection” on page 15 for instructions.

Chapter 3 Driver Installation
9
3.3 Driver Installation for Windows Me
Step 1: Start Windows Me. The Add New Hardware Wizard appears. Insert the
Installation CD into your CD-ROM drive. Select Specify the location of the driver
(Advanced) and then click Next.
Step 2: With Search for the best driver for your device selected, uncheck the Removable
Media checkbox and then check only the Specify a location checkbox. Click
Browse to locate the path of the driver: x:\Driver\WinME (where x is your CD-
ROM drive) and click OK. Click Next.
Step 3: Windows will find the driver for the device. Click Next to continue.
Step 4: Click Finish.
Step 5: Windows will continue to detect another device. Select Specify the location of the
driver (Advanced) and then click Next.

External Modem User's Manual
10
Step 6: Again, select Search for the best driver for your device and check only the
Specify a location checkbox. The location should be: x:\Driver\WinME where x is
your CD-ROM drive. Otherwise, repeat step 2 to specify the location. Click Next.
Step 7: Windows will find the driver for the device. Click Next to continue.
Step 8: When installation is complete, click Finish.
When you are done with driver installation, you will need to specify the country where you
locate upon different telecommunication regulations/ laws. Please proceed to “3.6 Country
Selection” on page 15 for instructions.

Chapter 3 Driver Installation
11
3.4 Driver Installation for Windows 2000
Step 1: Start Windows 2000. Windows will detect a new hardware device, click Next to
continue.
Step 2: Select Search for a suitable driver… and click Next.
Step 3: Insert the Installation CD into your CD-ROM drive. Check ONLY Specify a
location and click Next.
Step 4: Click Browse to locate the path of the driver: x:\Driver\W2K (where x is your CD-
ROM drive) and click OK.
Step 5: When Windows finds the location of the driver, click Next.

External Modem User's Manual
12
Step 6: If Digital Signature Not Found window appears, click Yes to continue.
Step 7: Click Finish. When Found New Hardware screen appears, wait for completing the
installation.
When you are done with driver installation, you will need to specify the country where you
locate upon different telecommunication regulations/laws. Please proceed to “3.6 Country
Selection” on page 15 for instructions.

Chapter 3 Driver Installation
13
3.5 Driver Installation For Windows XP
Start Windows XP and insert the provided CD into your CD-ROM drive to start driver
installation.
Step 1 When Found New Hardware Wizard screen appears, select Install from a list or
specific location (Advanced) and click Next.
Step 2 With Search for the best driver in these locations selected, select ONLY Include
this location in the search. Click Browse to specify the path to X:\Driver\WinXP
where X is your CD-ROM drive letter and click Next.
Step 3 If compatibility prompt message appears, click Continue Anyway.

External Modem User's Manual
14
Step 4 Click Finish. When Found New Hardware screen appears, wait for completing the
installation.
When you are done with driver installation, you will need to specify the country where you
locate upon different telecommunication regulations/ laws. Please proceed to “3.6 Country
Selection” on page 15 for instructions.

Chapter 3 Driver Installation
15
3.6 Country Selection
Before starting the modem, you may need to specify the country where you locate upon
different telecommunication regulations/ laws.
Step 1: Click Start, point to Settings and then click on Control Panel. Double-click the
Modem Regional Settings icon.
Step 2: The utility will start detecting automatically. You may click on the drop down arrow
to reset your country and then click OK.
Step 3: Wait for resetting. When resetting is finished, the following window will appear.
Click OK to finish your country selection.

External Modem User's Manual
16
3.7 Verify that Your Modem is Properly Installed
3.7.1 For Windows 95/98/Me
Step 1: Click Start, point to Settings and then click on Control Panel. Double-click the
Modems icon.
Note: If you are prompted with Location Information screen, enter your area code
and then exit the screen.
Step 2: Highlight the IC+ 56k External Data Fax Voice Modem and then click on
Diagnostics tab.

Chapter 3 Driver Installation
17
Step 3: Highlight the COM port used by your modem and click on More Info….
Step 4: Wait for communication with your modem.
Step 5: If your modem is properly installed, the command response should appear in the box
as the following.
Congratulations! You have successfully installed the modem hardware and its driver.
Note: If your modem fails to respond, you will see an error message. Make sure your modem
is properly installed and turned on. If your modem still fails to respond, you may need to
remove the driver and reinstall again.
Other manuals for AME001
1
Table of contents
Other Airlinkplus Modem manuals