AirLive P-201 User manual

Quick Setup Guide
Wired/Wireless Printer Server
P-201 / P-201U / P-203N/
WP-201G / WP-203G
English ●●●
Español ●●●
Deutsch ●●●
Česky ●●●
Русский ●●●
Português ●●●
日本語 ●●●
Slovensky ●●●
Romania ●●●
25
31
19
1
7
13
37
43
49

1
1
Wired / Wireless Printer Server English
This print server supports TCP/IP, NetBEUI, IPX/SPX, and
AppleTalk protocols. It is the best network printing solutions for
various common network operating systems such as:
Important Information
With the help of Installation Wizard, you can easily and instantly complete
the settings for the printing environment, and start enjoying the fantastic
features provided by this print server.
This guide is used for quick installation on Windows peer-to-peer printing
environments. If you find any problem, please refer to the User’s Manual
on the CD-ROM for more detail information.
English
Windows Peer-to-Peer Printing
(Windows 95/98/Me/NT/2000/XP/2003)
Microsoft Windows NT/2000/2003 Server-Based Printing
Novell NetWare 3.x/4.x/5.x
Unix/Linux
MAC OS

2
2
Wired / Wireless Printer Server English
English
4. Connect the power adapter to the print server. The print server will
perform the Power-On-Self-Test (POST) after it is powered on.
During the POST, the Printer Port LEDs will be on. When the LEDs
are unlighted, the print server is ready.
Note: You must use the power adapter shipped along with the print
server, do NOT use any other power adapter from other sources..
Hardware Installation
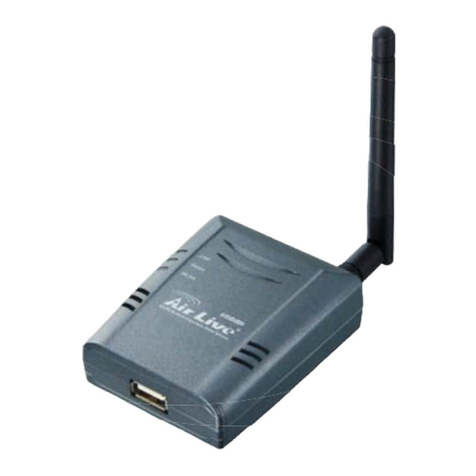
This package contains the following components:
One Print Server
One Antenna (Only for Wireless Print Server)
One Power Adapter
One Quick Installation Guide
One CD-ROM (Including all the software utilities, drivers and
User’s Manual)
1. Unpack the print server package and verify that all the items listed in
the previous section are provided
2. Connect the print server to the printer you want to share on the
network.
3. Connect the print server to your network by attached the network
cable to the UTP port of the print server
Driver and Utility installation
The Driver and Utility Program executes a wizard-driven
procedure that performs the following tasks:
Install all necessary Printer Server Network Driver and utilities
Automatically add all Network Ports to your PC.

3
3
Wired / Wireless Printer Server English
1. insert the print server’s Installation CD into the CD-ROM drive.
2. Click “Driver and Utility” from the Auto-Run menu screen.
3. Once executed, the Setup program will extract files to launch the
InstallShield Wizard;after choose the destination location of install
Printer Server utilities,. follow it step by step to complete the
installation process
When the installation procedure is completed, you are ready to set up the
client’s computer. All network ports of the Print Servers detected on the
network will be added to your PC automatically, click “Continue”
English

4
4
Wired / Wireless Printer Server English
Note : if there are no print servers detected in the network currently,
please click “Continue” to finish the installation.
Following the Start->Program files -> AirLive PrintServer Utilities;
you can click the “Network Port Quick Setup” for automatically search the
print server, or you can click “Remove Ports” for add / remove Network
port manually .
If you want to setup the Print Server , please click the
Start ÆProgram files ÆAirLive PrintServer UtiiltiesÆPrint Server
Configuration
Print Server Configuration
English

5
5
Wired / Wireless Printer Server English
When execute this program, that will searching the print servers on the
local network and list on the Server Group, you can click one of this
p
rint server to view the status
,
English
Click “Setup” icon on the tool bar, the setup items of the
current selected print server will be showed on the right side of the window
Setup

6
6
Wired / Wireless Printer Server English
English
Double click one of the icons to set up the selected print server. A screen will
pop up to verify “User Name” and “Password” of the print server. The default
values are as follows:
User Name: admin Password: airlive
For more Print Server configuration details, please refer to User’s
Manual.

7
7
Wired / Wireless Printer Server Español
Instalación de Controlador y Software
Español
Este Servidor de Impresión soporta los protocolos TCP/IP,
NetBEUI, IPX/SPX y AppleTalk. Es la mejor solución de impresión
en red para varias plataformas de sistemas operativos tales como:
Windows Peer-to-Peer Printing (Windows
95/98/Me/NT/2000/XP/2003)
Microsoft Windows NT/2000/2003 Server-Based Printing
Novell NetWare 3.x/4.x/5.x
Unix/Linux
MAC OS
Con la ayuda del Menú Inteligente de instalación puedes fácil e
instantáneamente completar la configuración del ambiente de
impresión y comenzar a disfrutar las fantásticas facilidades que
ofrece este servidor de impresión.
La presente guía puede ser utilizada para una instalación rápida
sobre plataforma Windows peer-to-peer printing. Si encuentras
alguna dificultad por favor ver el manual de Usuario en el CD-ROM
para información más detallada.

8
8
Wired / Wireless Printer Server Español
Instalación de Hardware
Instalación de Controlador y Software
El programa de instalación del controlador y utilitario ejecuta procedimiento
guiado por un menú wizard con las siguientes tareas::
Instala todos los Controladores y Utilitarios del Servidor de
Impresión necesarios.
Automáticamente agrega todos los puertos de red a tu PC.
Español
El paquete contiene los siguientes elementos:
Un Servidor de Impresión
Una Antena (solo en servidores inalámbricos)
Un adaptador de Corriente
Una Guía Rápida de Instalación
Un CD-ROM (que incluye software utilitario, controladores y
Manual de Usuario)
1. Destape los envoltorios del servidor de impresión y verifica que todos los
elementos indicados anteriormente se encuentren allí contenidos.
2. Conecte el Servidor de Impresión a la impresora que deseas compartir en
red.
3. Conecte el Servidor de Impresión a la red colocando el cable de red en el
Puerto UTP del servidor de impresión y el Puerto del switch/hub de la red.
4. Enchufe y conecte el adaptador de corriente al Servidor de Impresión. El
Servidor de Impresión realizará el test de inicio Power-On-Self-Test
(POST) luego de ser encendido. Durante este test los LEDs del Servidor
de Impresión estarán encendidos. Cuando estos se apaguen el Servidor de
Impresión estará listo para operar.
Nota: Debes utilizar el adaptador de corriente incluido con el Servidor de
Impresión. NO utilice cualquier otro adaptador de otra índole.
9
9
Wired / Wireless Printer Server Español
1. Inserte el CD de Instalación del Servidor de Impresión en el
drive de CD-ROM..
2. Haga Click en “Driver and Utility” en la ventana del menú
Auto-ejecutable.
3. Una vez ejecutado, el programa extraerá los archivos para lanzar
el InstallShield Wizard. Luego selecciona la ruta de destino de
instalación de los utilitarios del Servidor de Impresión. Siga paso
por paso para completar el proceso de instalacióninstallation
process
Cuando el procedimiento de instalación haya sido completado, ya esta
slisto para configurar el computador cliente. Todos los puertos de los
Servidores de Impresión que son detectados en la red son agregados a tu
PC automáticamente. Haga click en “Continue”.
Español

1
10
0
Wired / Wireless Printer Server Español
Nota : Si no hay Servidores de Impresión detectados en la red, por
favor hacer click en “Continue” para terminar la instalación.
Siguiendo la opción Start->Program files -> AirLive PrintServer
Utilities; puedes hacer click en “Network Port Quick Setup” para buscar
el Servidor de Impresión automáticamente o puedes hacer click en
“Remove Ports” para agregar/ remover puertos manualmente .
Si deseas configurar el Servidor de Impresión, por favor haga click en
Start ÆProgram files ÆAirLive PrintServer UtiiltiesÆPrint Server
Configuration
Configuración del Servidor del Impresión
Español

1
11
1
Wired / Wireless Printer Server Español
Cuando se ejecute este programa se buscarán los Servidores de
Impresión en la red local y se lista los Grupos de Servidores. Puedes
hacer click sobre cualquiera de estos para ver su estado
Haga Click en el ícono “Setup” de la barra de herramientas. En la parte
derecha de la ventana se mostrarán los detalles de configuración del
servidor de impresión seleccionado
Setup
Español

1
12
2
Wired / Wireless Printer Server Español
Haga doble clicken uno de los íconos para configurar el Servidor de
Impresión seleccionado. Una ventana se abrirá para verificar el nombre de
Usuario y palabra clave del Servidor de Impresión. Los valores por defecto
son los siguientes:
Nombre de Usuario: admin Palabra Clave: airlive
Para más detalles de configuración del Servidor de Impresión, por
favor ver el Manual de Usuario.
Español

1
13
3
Wired / Wireless Printer Server Deutsch
Wichtige Informationen
Deutsch
Dieser Printserver unterstützt die Protokolle TCP/IP, NetBEUI,
IPX/SPX und AppleTalk. Bei den meisten verbreiteten
Netzwerk-Betriebssystemen ist das die optimale Lösung für den
Netzwerkdruck. Unterstützt werden:
Windows Peer-to-Peer Printing (Windows
95/98/Me/NT/2000/XP/2003)
Microsoft Windows NT/2000/2003 serverbasiertes Drucken
Novell NetWare 3.x/4.x/5.x
Unix/Linux
MAC OS
Mit der Hilfe des Installations-Wizards können Sie die Einstellungen für
die Druckerumgebung schnell und einfach komplettieren und damit
beginnen, die fantastischen Möglicheiten dieses Printservers zu
erkunden.
Diese Anleitung ist für die schnelle Installation in
Peer-to-Peer-Umgebungen unter Windows gedacht. Sollten Sie auf
Probleme stoßen, so finden Sie im Benutzerhandbuch auf der CD-ROM
detailliertere Informationen.

1
14
4
Wired / Wireless Printer Server Deutsch
Installation der Hardware
Installation von Treibern und Utilities
Das Programm zur Installation der Treiber und Utilities führt auf Ihrem PC
führt im Rahmen einer assistentenbasierten Prozedur die folgenden
Schritte aus
Installation aller notwendigen Netzwerktreiber und Utilities für den
Druckerserver.
Automatisches Hinzufügen der betreffenden Netzwerkports auf ihrem
PC.
Deutsch
Die Packung beinhaltet die folgenden Komponenten:
Ein Printserver
Eine Antenne (Nur für Wireless-Printserver)
Ein Netzteil
Eine Kurzanleitung
Eine CD-ROM (Beinhaltet die Software-Utilities, Treiber und das
Benutzerhandbuch)
1. Entnehmen Sie den Printserver der Verpackung und überprüfen Sie bitte, ob
alle im vorherigen Abschnitt aufgeführten Komponenten enthalten sind.
2. Verbinden Sie den Printserver mit dem Drucker, den Sie übers Netzwerk zur
Verfügung stellen möchten.
3. Verbinden Sie den Printserver mit Ihrem Netzwerk indem Sie das
Netzwerkkabel am UTP-Port des Printservers anschließen.
4. Verbinden Sie das Netzteil mit dem Printserver. Nachdem der Printserver
mit Strom versorgt wurde wird er einen Power-On-Selbsttest
(POST)durchführen. Während diesem POST werden die
Druckerport-LEDs leuchten. Nachdem sie erloschen sind ist der
Printserver betriebsbereit.
Anmerkung: Benutzen Sie das Netzteil, das mit dem Printserver
mitgeliefert wurde. Verwenden Sie NICHT ein Netzteil anderer Herkunft.

1
15
5
Wired / Wireless Printer Server Deutsch
1. Legen Sie die Installations-CD des Drucker-Servers in das
CD-ROM-Laufwerk Ihres PCs.
2. Klicken Sie im Fenster des Autorun-Menüs auf “Driver and
Utility”.
3. Nach seinem Start extrahiert das Setup-Programm ein paar
Dateien, um den InstallShield-Wizard aufzurufen. Nachdem Sie
das Zielverzeichnis zur Installation der Utilities für den
Druckerserver ausgewählt haben, folgen Sie bitte der
Intallations
p
rozedur Schritt für Schritt bis diese ab
g
eschlossen ist.
Nachdem die Installation durchgeführt wurde können Sie die
Client-Computer einrichten. Sämtliche Netzwerkports der Drucker-Server,
die im Netzwerk erkannt werden, werden automatisch Ihrem PC
hinzugefügt. Klicken Sie danach auf “weiter”
Deutsch

1
16
6
Wired / Wireless Printer Server Deutsch
Anmerkung: Falls derzeit keine Drucker-Server im Netzwerk erkannt
werden schließen Sie die Installation bitte mit einem Klick auf “weiter” ab
Unter Start->Programme -> AirLive PrintServer Utilities können Sie das
Netzwerk durch einen Klick auf “Network Port Quick Setup” automatisch
nach dem Drucker-Server durchsuchen. Mit einem Klick auf “Remove
Ports” lassen sich Netzwerkports auch manuell hinzufügen oder
entfernen..
Zur Konfiguration des Druckerservers klicken Sie bitte auf Start Æ
Programme ÆAirLive PrintServer UtiiltiesÆPrint Server
Configuration
Konfiguration des Druckerservers
Deutsch

1
17
7
Wired / Wireless Printer Server Deutsch
Dieses Programm durchsucht beim Start das lokale Netzwerk nach
Druckerservern, und führt diese in einer Servergruppe auf. Mit einem
Klick auf einen dieser Server können sie dessen Status einsehen,
Klicken Sie auf das “Setup”-Symbol in der Werkzeugleiste. Die
Einstellungsmöglicheiten des derzeit ausgewählten Druckerservers
werden nun auf der rechten Seite des Fensters angezeigt
Setup
Deutsch

1
18
8
Wired / Wireless Printer Server Deutsch
Mit einem Doppelklick auf eines der Symbole gelangen Sie zur Konfiguration
des betreffenden Druckerservers. In einem Pop-Up-Fenster werden Sie
zunächst nach Benutzernamen und Passwort dieses Gerätes gefragt. Die
werkseitige Vorgabe lautet dabei wie folgt:
Benutzername: admin Passwort: airlive
Weitere Details zur Konfiguration des Druckerservers entnehmen
Sie bitte dem Benutzerhandbuch.
Deutsch

1
19
9
Wired / Wireless Printer Server Czech
Tento print server podporuje TCP/IP, NetBEUI, IPX/SP a AppleTalk
protokoly. Je tou nejlepší volbou pro různé typy sítí a operační
systémy
Důleřité informace
S pomocí instalačního průvodce nainstalujete jednoduše zařízení do
vašeho síťového prostředí a můžete začít využívat skvělé možnosti
tohoto tiskového serveru.
Tato příručku popisuje rychlé nastavení v prostředí Windows
Peer-to-peer..
Windows Peer-to-Peer Printing
(Windows 95/98/Me/NT/2000/XP/2003)
Microsoft Windows NT/2000/2003 Server-Based Printing
Novell NetWare 3.x/4.x/5.x
Unix/Linux
MAC OS
Česky
Other manuals for P-201
1
This manual suits for next models
4
Table of contents
Languages:
Other AirLive Print Server manuals

AirLive
AirLive P-201 User manual

AirLive
AirLive WFP-101U v2 User manual

AirLive
AirLive WFP-101U User manual

AirLive
AirLive WP-201G V2 User manual

AirLive
AirLive P-203N User manual

AirLive
AirLive MFP-101U User manual

AirLive
AirLive WFP-151U User manual

AirLive
AirLive WFP-101UV2 User manual

AirLive
AirLive MFP-101U User manual