manuals.online logo
Brands
  1. Home
  2. •
  3. Brands
  4. •
  5. AirTech
  6. •
  7. Radio
  8. •
  9. AirTech 70-112B User manual

AirTech 70-112B User manual

0CONTENTS
GENERAL FEATURES.................................................1
UNPACKING..................................................................2
OPTIONAL ACCESSORIES.........................................2
GETTING READY..........................................................3
DESCRIPTION...............................................................4
OPERATION ..................................................................6
CHARGER AND BATTERY..........................................8
SPECIFICATIONS .........................................................9
General Features
1. Ultra compact design & size
(102 x 50 x 43.2mm, 335g with high capable battery)
2. Heavy durable construction
3. 16 channels
4. 38 CTCSS/ 83 CDCSS
5. PC Programmable, transferable by cloning
6. Time-out timer (TOT)
7. Busy channel lock-out (BCLO)
8. Battery saving mode
9. Low battery alert
10. DTMF PTT-ID
11. Button lockable
12. Talking range to 5 miles
13. Transmit output power High/Low
14. DC7.5V Ni-MHbattery
1
α
Unpacking
Unpack and check that all items have been enclosed.
Packing contents:radioαantennaβbatterypack (1,350mA)
χbelt cilpδhand strapεchargerφuser`s manual
Optional Accessories
1.External earphone & MIC. (APE–10)
2.Additional battery pack (720 mAH, HM–720)
Getting Ready
1. Installation, Removal Belt Clip
Installation: align the belt clip with the
plastic slots of the battery pack. Slide
the belt clip onto the battery pack,
pushing firmly until a click heard.
Removal: hold up the belt clip release
tab with a fingernail or a coin (or like
instrument). While holding up the
release tab, slide the belt clip out and away from the
battery pack.
2. Installation, Removal Battery Pack
Installation: turn off the transceiver. Hold the transceiver
with the back of the unit facing up. Place the battery
pack against the back of the transceiver so that the tabs
on the transceiver engage the four openings in the
battery pack. Slide the battery pack towardthe top of the
transceiver until a click heard.
Removal: turn off the transceiver. Hold the radio with the
back of the unit facing up. With the thumbnail of your
other hand slide the latch lever down. While holding the
latch lever down, slide the battery pack down toward the
bottom of the transceiver. Separate the battery pack
from the transceiver.
3. Installation Antenna
Rotate the antenna clockwise until it
is seated firmly.
*. Before your starting operation, make
sure the battery is fully charged.
23
α βα χ
δεφ
Description
∠Power on / off and Volume Control Switch
Turn the transceiver on by rotating power on / off and
volume control switch clockwise and control the volume.
∇ Channel Select knob
Rotate the Channel Selector as you desire channel
number.
Speaker .
Helical Antenna.
Tx / Rx Indicate LED (3 colors)
On Transmitting
Red Blinking Low battery
On Receiving, monitoring
Green Blinking Different sub-tone when receiving
Orange On Initializing, programming and
cloning
∏External Earphone/MIC and Programming Jack Socket
√Hand Strap
⋅Antenna Connector
¬PTT(Push To Talk) Button
Hold down to transmit, release to receive.
∧Function Button
Refer to “OPERATION” page 7.
∨Monitor Button
Press to monitor. Holding down over 2 seconds keeps
monitoring function on, and press shortly again or PTT
Button to stop.
⇔Belt Clip
⇐ Battery Pack
4
∠
∇



∏
√⋅
¬
∧
∨
⇔
⇐
5
Operation
1. Power Turn on / off and Volume Control
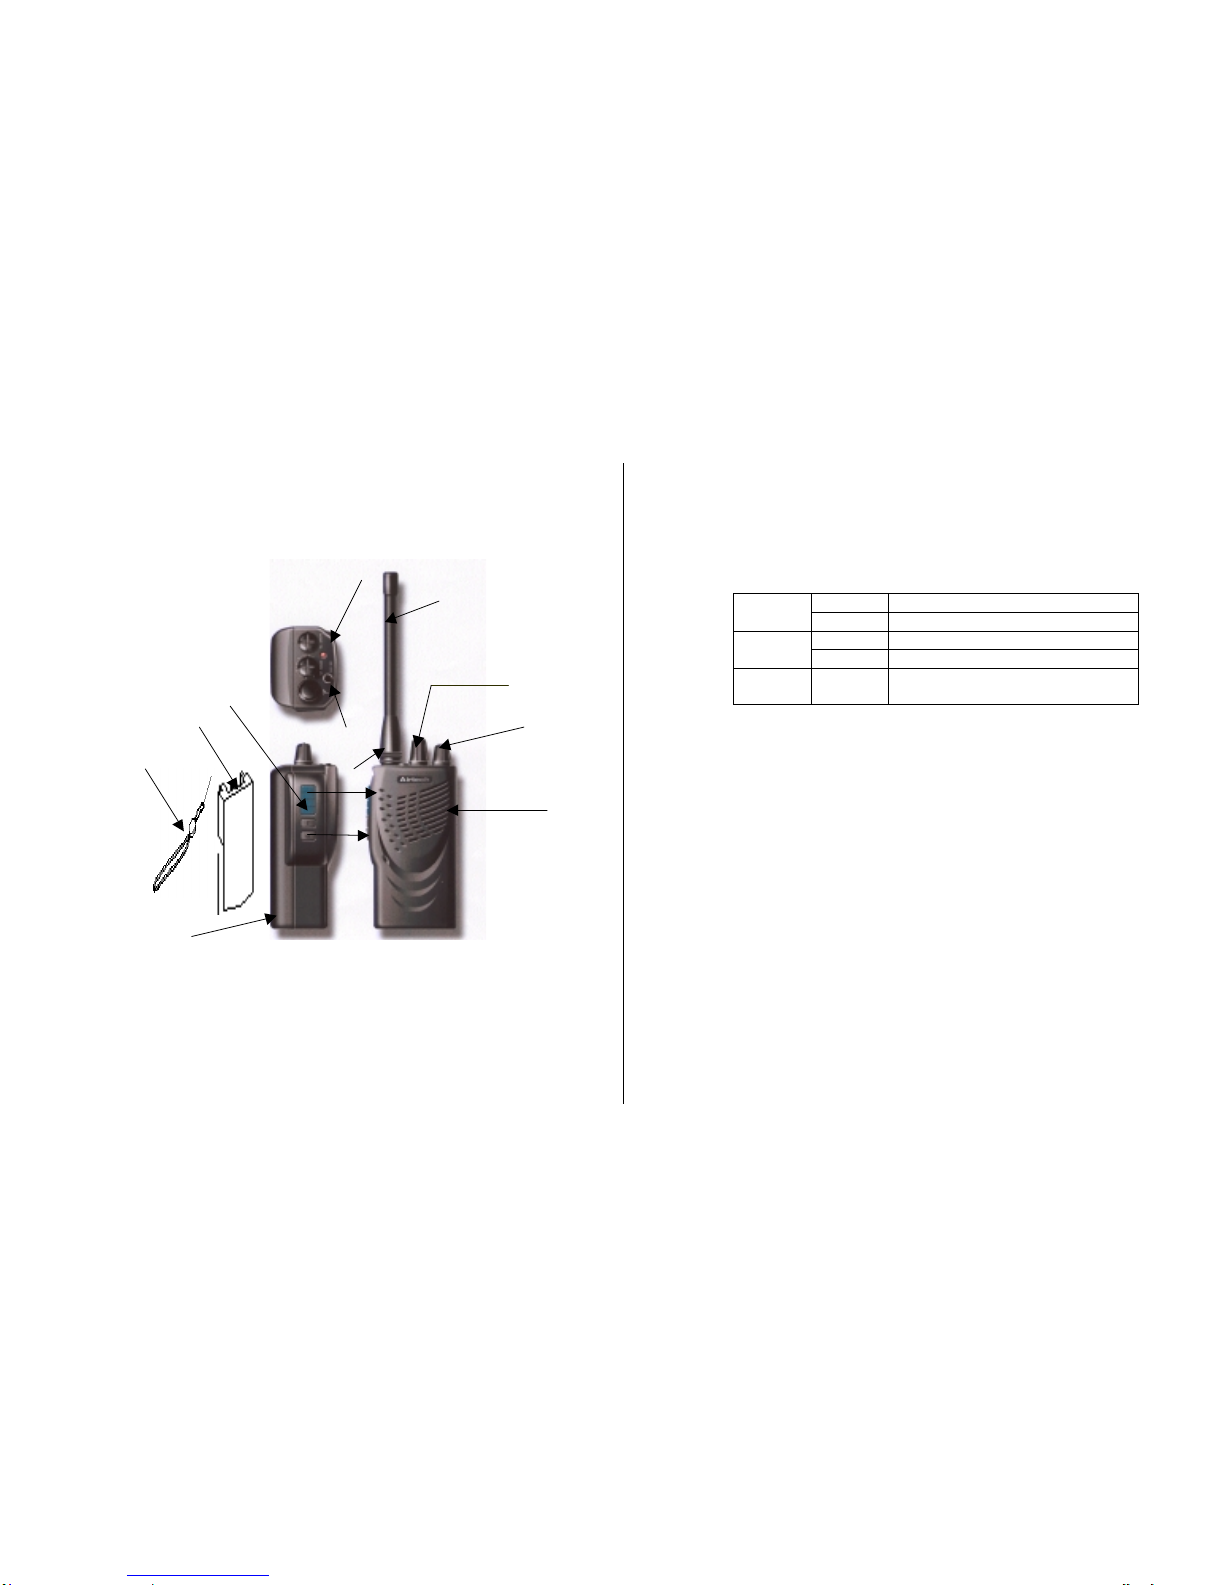
Rotate the Power on/off and Volume Control Switch∠
clockwise to turn power on, then the LED√lights orange
and power–up tone is generated after about on second,
indicating the transceiver has passed the self–diagnostic.
When you turn on the transceiver, it comes same
channel and function with your last using. Rotate this
switch∠ clockwise to increase the volume or
counterclockwise to reduce the volume. Rotate it∠
counterclockwise fully to turn power off.
2. Channel Selecting
Rotate the Channel Select knob as you desire a channel
number.
3. Transmit
Hold down the PTT Button¬and talk to MIC in 5~7Cm
distance. The LEDlights red on transmitting. Release
the PTT button¬ to stop transmitting.
4. Receive
Choose the channel by pressing Channel Select Button∇
as you desire. The LEDlights green on receiving. In
case the signal doesn’t match in using sub–tone, green
light blinks.
5. Monitor
Press the Monitor Button∨to monitor. Holding down
Monitor Button∨over 2 seconds keeps monitoring
function on, and press Monitor Button∨shortly or press
PTT Button¬ to stop.
6. Scan
1). Scan will be started by press and hold the function
button more than 1 second.
In case Priority Scan not settled down
1) mem 1ch > mem 2ch > mem 3ch > …..
In case 1 cannel of Priority Scan is settled down
2) mem 1ch > pri ch > mem 2ch > pri ch > …..
In case 2 cannels of Priority Scan are settled down
3) mem 1ch > pri 1ch > pri 2ch > mem 2ch > …..
2). Tx channel of scanning
a). Priority type : priority channel(the channel that is set
by the channel selector)
b). Nonpriority type : last busy channel
3). While in scanning mode, function button is pressed 2
times rapidly the radio will return to the last busy channel
The priority channel remained the channel that is
indicated by channel selector.
4). While the radio is stopped scanning on a busy
channel, pressing the monitor button will cause scan to
resume and temporarily bypass the busy channel. If the
channel become busy again scan will stop.
5). While the radio is stopped scanning on a busy
channel, press and hold the monitor button more than 1
second will cause this channel to be deleted from scan
list until scan list is reset.
7. Selcall function : will be added….
576
On ChargingRed Blinking Abnormal
battery
Green On Fully
charged
On Stand-by
for
charging
(rear cup)
Orange
Blinking dischargi
ng
Charger and Battery
1. Battery (Ni-MH)
Voltage DC 7.5V
HM-1350 Over 8 hrsDuty time
(5-5-90) HM-720 Over 4 hrs
2. Charger
Input power Free voltage (AC90~250V)
Charging time HM-1350 Appr. 100min
HM-720 Appr. 60min
Operating temperature 0ºC~55ºC
Connect the charger to electric power supply (free voltage
AC 90~240 V). Turn the transceiver power off and put into
front socket of the charger. The red light turns on during
charging and the green light turns on when finished. When
you put two batteries together, the front one charges first
then the rear one starts
charging.
!When you put the
battery on rear cup of
the charger for
charging, the charger
checks voltage. If
voltage is under 7.4V,
the charger starts
discharging for 4
minutes then checks
again. If voltage is still
fewer than 7V, it
discharges until voltage is 6V then starts charging.
Specifications
Model 70-112B
Dimension
(HxWxD) 102x50x39.2mm (720mAH Battery),
102x50x43.2mm (1,350mAH Battery)
Weight (With
Battery) 150g (243g/310g)
Operating Voltage DC 7.5V
Operating Temp. -30 ~ 60
Battery Life (H/L)
720mAH Battery
1,350mAH Battery
(based on 5% Tx: 5% Rx: 90% STBY)
6hrs/8hrs
10hrs/15hrs
Channels 16
Privacy Codes 38 CTCSS, 83 CDCSS
Band Width 12.5KHz/25kHz switch able
Frequency Range Tx 150~174MHz
Rx 150~174MHz
FM Hum & Noise Tx -40 dB
Rx -40 dB
Rx Sensitivity -119 dBm (0.25uV)
Rx Spurious
Response -60dB/-70dB
Rx Selectivity -60dB/-70dB
Rx Intermodulation -65dB
Tx Power (H/L) 4.8W/2W
Tx Spurious Rejection
-60 dBc
Audio Power (8Ω)500mW (Max.)
Frequency stability +/- 2.5ppm
Accessories
Desk Rapid/Trickle Charger
with Adapter ACR-130/1.5 hrs
720 mAH Ni-MH Battery HM-720
1,350 mAH Ni-MH Battery HM-1350
8 9
User’s Manual
Land Mobile Radio (LMR)
Model: 70-112B
Airtech Information & Communication Co., Ltd.
11

Other AirTech Radio manuals

AirTech ATS-100 User manual

AirTech

AirTech ATS-100 User manual

AirTech ATP-400B User manual

AirTech

AirTech ATP-400B User manual

AirTech AT-100 A User manual

AirTech

AirTech AT-100 A User manual

Popular Radio manuals by other brands

NAVICOM PACK RT311 Installation and operation guide

NAVICOM

NAVICOM PACK RT311 Installation and operation guide

nedis RDFM5000BN manual

nedis

nedis RDFM5000BN manual

Sirius Satellite Radio Radio Getting started

Sirius Satellite Radio

Sirius Satellite Radio Radio Getting started

Midland ALAN 48 EXCEL D80 user manual

Midland

Midland ALAN 48 EXCEL D80 user manual

Goodmans GDPRDABS2ST user manual

Goodmans

Goodmans GDPRDABS2ST user manual

Blaupunkt RX+ 10 instruction manual

Blaupunkt

Blaupunkt RX+ 10 instruction manual

Hytera PTC760 user manual

Hytera

Hytera PTC760 user manual

Adler Europe AD 1155 user manual

Adler Europe

Adler Europe AD 1155 user manual

Sangean dpr-39 user manual

Sangean

Sangean dpr-39 user manual

Medion MD 85651 instruction manual

Medion

Medion MD 85651 instruction manual

Somogyi home RPR 7B instruction manual

Somogyi

Somogyi home RPR 7B instruction manual

Sony ICF-703 Service manual

Sony

Sony ICF-703 Service manual

SOUNDMASTER UR270RO manual

SOUNDMASTER

SOUNDMASTER UR270RO manual

BC BC-BC-800WF user manual

BC

BC BC-BC-800WF user manual

PRESIDENT HENRY classic ASC 12/24 Service manual

PRESIDENT

PRESIDENT HENRY classic ASC 12/24 Service manual

MAJORITY CB1A-DAB-BLK Petersfield user guide

MAJORITY

MAJORITY CB1A-DAB-BLK Petersfield user guide

SAGEMCOM RM50 quick start guide

SAGEMCOM

SAGEMCOM RM50 quick start guide

Honeywell EchoView user guide

Honeywell

Honeywell EchoView user guide

manuals.online logo
manuals.online logoBrands
  • About & Mission
  • Contact us
  • Privacy Policy
  • Terms and Conditions

Copyright 2025 Manuals.Online. All Rights Reserved.