Medion MD 85651 User manual

Cover QSG W-LAN-Radio MD 85651 ML.FH11 Fri Jun 15 11:53:21 2007 Seite 1
Probedruck
C M Y CM MY CY CMY K
INTERNET RADIO
www.medion.com
07/07
Schnellstartanleitung
Quick Start Guide
Instructions de démarrage rapide
Guida rapida
Manual de inicio r pido
Snelstarthandleiding
Lynstartvejledning
Wireless LAN
MEDION Service Center
Franz-Fritsch-Str. 11
AT - 4600 We s
Hot ine: 0810 - 001048
Fax: 07242 - 93967592
www.medion.de/service
AT
MEDION Service Center
John F. Kennedy aan 16a
NL - 5981 XC Panningen
Hot ine 022006198
Fax 022006199
www.medion.com/n
BE
MEDION Service Center Visonic S.A.
A ejandro Sanchez 95-97
E - 28019 Madrid
Hot ine 90251448
Fax 914604772
E
MEDION France
CS 90180
F - 72207 La F eche Cedex
Indigo no. 0825 81 1000
pc-suppor[email protected]
F
MEDION Service Center
Service on site S.P.A.
Via Kennedy 21
I - 20023 Cerro Maggiore (MI)
Hot ine: 199 309077
service-ita [email protected]
I
MEDION Service Center
Antwoordnummer 4015
NL - 5980 ZX Panningen
Hot ine: 0900 - 633 4660
Fax 0900 - 654 6540
www.medion.com/n
NL
MEDION Service Center
Rütistraße 28
CH - 8952 Sch ieren
Hot ine 0848 - 33 33 32
service-switzer [email protected]
CH
MEDION E ectronics Ltd.
120 Faraday Park, Faraday Road, Dorcan
UK - Swindon SN3 5JF, Wi ts
Hot ine 0870 7270370
Fax 01793 715716
www.medion.co.uk
UK
MTC - MEDION Techno ogie Center
D - 45467 Mü heim / Ruhr
Hot ine: 01805 - 633 466
Fax: 01805 - 654 654
(0,14 Euro/Minute innerha b des deutschen Festnetzes)
www.medion.de/service
D
MD 85651
DK
Service Provider
Naver and 31
DK- 2600 G ostrup
Hot ine: (+45) 70212024
Fax: (+45) 70212029

INSTRUCTION MANUAL
INTERNET RADIO
07/07
Wireless LAN
MD 85651

MD 85651 EN-1
EN
TABLE OF CONTENTS
Safety instructions . . . . . . . . . . . . . . . . . . . . . . . . . . . . . . . . . . . . . . . . . . . . . . . . . . . .2
Preparation . . . . . . . . . . . . . . . . . . . . . . . . . . . . . . . . . . . . . . . . . . . . . . . . . . . . . . . . . . .4
Unpacking the device . . . . . . . . . . . . . . . . . . . . . . . . . . . . . . . . . . . . . . . . . . . . . . . . . . . . . . . . . . . . . . . .4
Inserting the batteries into the remote control . . . . . . . . . . . . . . . . . . . . . . . . . . . . . . . . . . . . . . . . . . . . .4
Connections . . . . . . . . . . . . . . . . . . . . . . . . . . . . . . . . . . . . . . . . . . . . . . . . . . . . . . . . . . . . . . . . . . . . . . .4
Overview . . . . . . . . . . . . . . . . . . . . . . . . . . . . . . . . . . . . . . . . . . . . . . . . . . . . . . . . . . . . . 5
W-LAN Radio . . . . . . . . . . . . . . . . . . . . . . . . . . . . . . . . . . . . . . . . . . . . . . . . . . . . . . . . . . . . . . . . . . . . . . .5
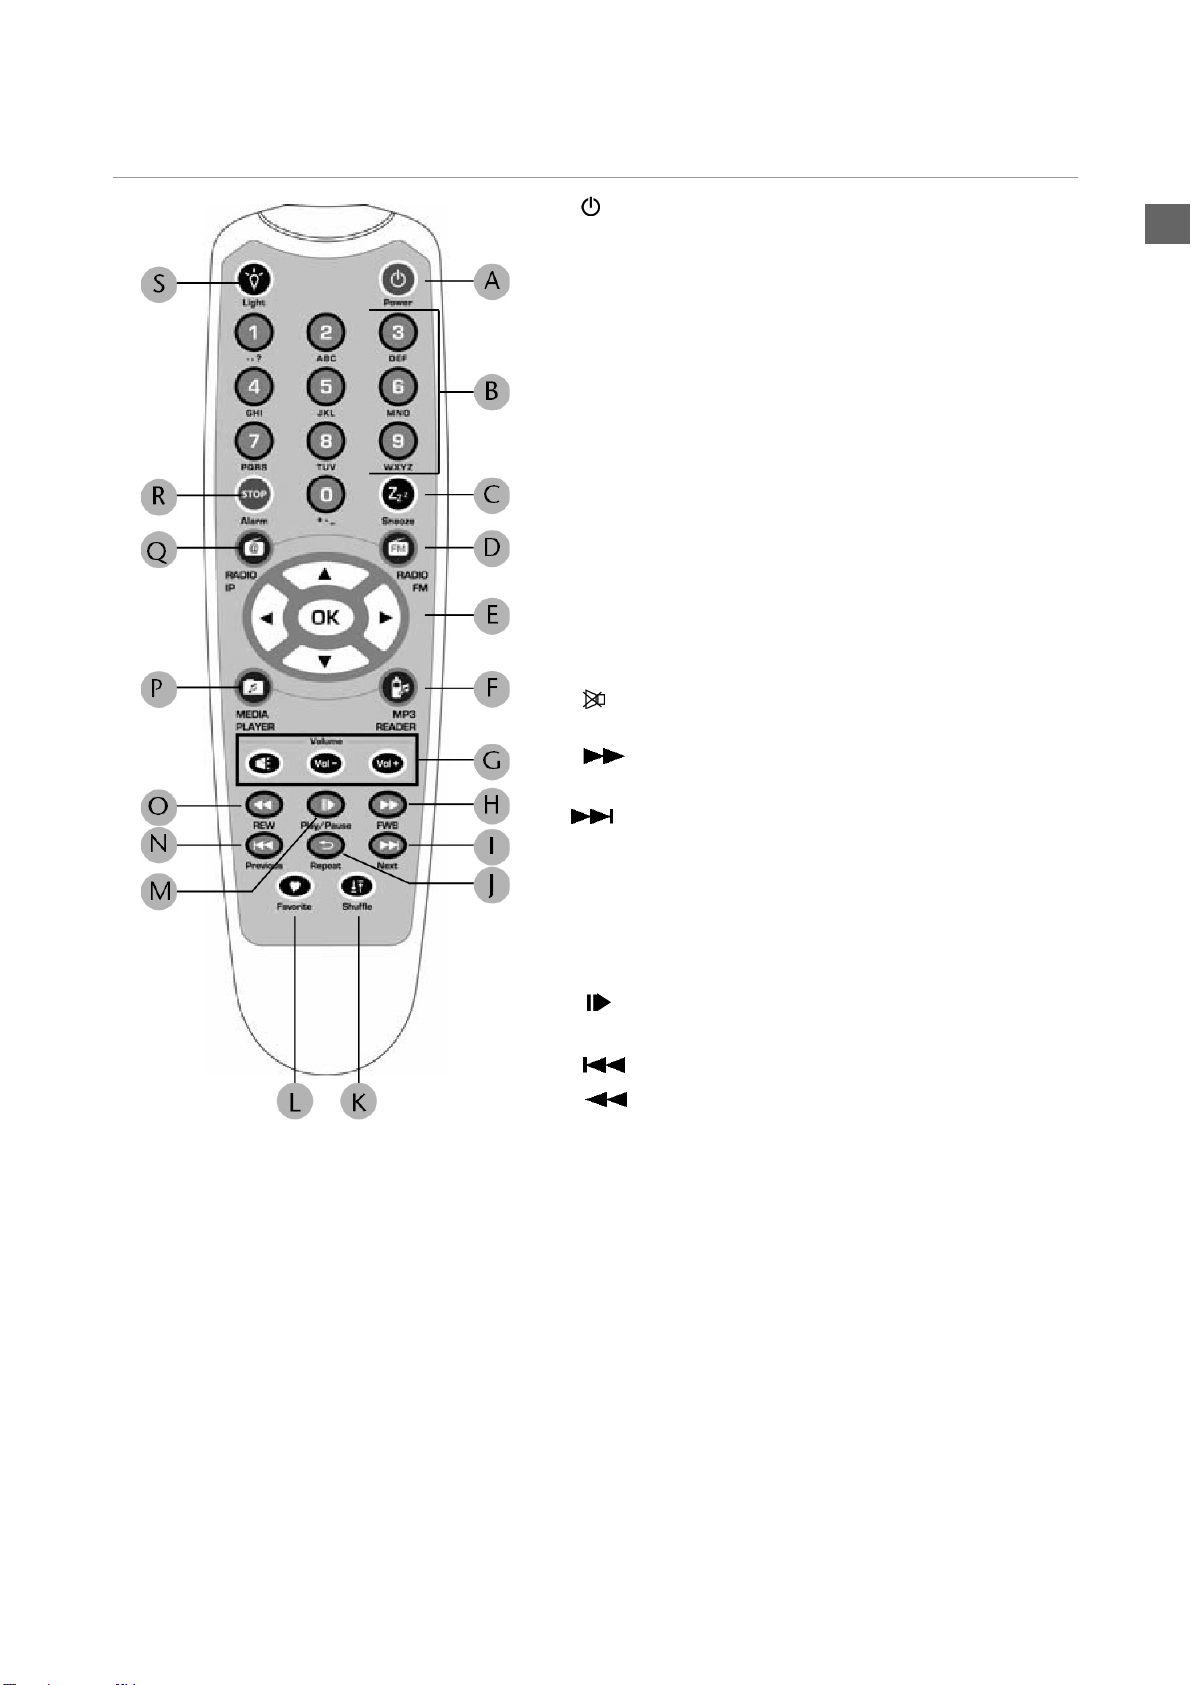
Remote Control . . . . . . . . . . . . . . . . . . . . . . . . . . . . . . . . . . . . . . . . . . . . . . . . . . . . . . . . . . . . . . . . . . . . .6
Menüstruktur . . . . . . . . . . . . . . . . . . . . . . . . . . . . . . . . . . . . . . . . . . . . . . . . . . . . . . . . .9
Installation . . . . . . . . . . . . . . . . . . . . . . . . . . . . . . . . . . . . . . . . . . . . . . . . . . . . . . . . . . 11
Network Setup . . . . . . . . . . . . . . . . . . . . . . . . . . . . . . . . . . . . . . . . . . . . . . . . . . . . . . . . . . . . . . . . . . . .11
Configuration as a Wireless Client . . . . . . . . . . . . . . . . . . . . . . . . . . . . . . . . . . . . . . . . . . . . . . . . . . . . .12
Configuration as a Wired Client . . . . . . . . . . . . . . . . . . . . . . . . . . . . . . . . . . . . . . . . . . . . . . . . . . . . . . .14
Configuration as a Wireless Access Point (AP) . . . . . . . . . . . . . . . . . . . . . . . . . . . . . . . . . . . . . . . . . . . .16
Using the IP Radio as a Media Client . . . . . . . . . . . . . . . . . . . . . . . . . . . . . . . . . . . . . . . . . . . . . . . . . . . .18
Listening to Music . . . . . . . . . . . . . . . . . . . . . . . . . . . . . . . . . . . . . . . . . . . . . . . . . . . . 19
Listening to Internet Radio . . . . . . . . . . . . . . . . . . . . . . . . . . . . . . . . . . . . . . . . . . . . . . . . . . . . . . . . . . .19
Listening to FM Radio . . . . . . . . . . . . . . . . . . . . . . . . . . . . . . . . . . . . . . . . . . . . . . . . . . . . . . . . . . . . . . .21
Listening to the music in your computer . . . . . . . . . . . . . . . . . . . . . . . . . . . . . . . . . . . . . . . . . . . . . . . 23
Listening to the Music on your USB drive . . . . . . . . . . . . . . . . . . . . . . . . . . . . . . . . . . . . . . . . . . . . . . . 25
The Playback Screen . . . . . . . . . . . . . . . . . . . . . . . . . . . . . . . . . . . . . . . . . . . . . . . . . . . . . . . . . . . . . . . 26
Alarm . . . . . . . . . . . . . . . . . . . . . . . . . . . . . . . . . . . . . . . . . . . . . . . . . . . . . . . . . . . . . . . 27
Clock . . . . . . . . . . . . . . . . . . . . . . . . . . . . . . . . . . . . . . . . . . . . . . . . . . . . . . . . . . . . . . . . . . . . . . . . . . . 27
Alarm settings . . . . . . . . . . . . . . . . . . . . . . . . . . . . . . . . . . . . . . . . . . . . . . . . . . . . . . . . . . . . . . . . . . . . 28
Snooze . . . . . . . . . . . . . . . . . . . . . . . . . . . . . . . . . . . . . . . . . . . . . . . . . . . . . . . . . . . . . . . . . . . . . . . . . . 30
Miscellaneous Setup Functions . . . . . . . . . . . . . . . . . . . . . . . . . . . . . . . . . . . . . . . . . 31
Backlight Settings . . . . . . . . . . . . . . . . . . . . . . . . . . . . . . . . . . . . . . . . . . . . . . . . . . . . . . . . . . . . . . . . . .31
Language Choice . . . . . . . . . . . . . . . . . . . . . . . . . . . . . . . . . . . . . . . . . . . . . . . . . . . . . . . . . . . . . . . . . . .31
Equalizer Settings . . . . . . . . . . . . . . . . . . . . . . . . . . . . . . . . . . . . . . . . . . . . . . . . . . . . . . . . . . . . . . . . . .31
Reset to Factory Default Settings . . . . . . . . . . . . . . . . . . . . . . . . . . . . . . . . . . . . . . . . . . . . . . . . . . . . . . 32
Clear Favorites . . . . . . . . . . . . . . . . . . . . . . . . . . . . . . . . . . . . . . . . . . . . . . . . . . . . . . . . . . . . . . . . . . . . 32
Check Firmware Version . . . . . . . . . . . . . . . . . . . . . . . . . . . . . . . . . . . . . . . . . . . . . . . . . . . . . . . . . . . . 32
Software Update . . . . . . . . . . . . . . . . . . . . . . . . . . . . . . . . . . . . . . . . . . . . . . . . . . . . . . . . . . . . . . . . . . 32
Appendix . . . . . . . . . . . . . . . . . . . . . . . . . . . . . . . . . . . . . . . . . . . . . . . . . . . . . . . . . . . . . 33
Care and Maintenance . . . . . . . . . . . . . . . . . . . . . . . . . . . . . . . . . . . . . . . . . . . . . . . . . . . . . . . . . . . . . 33
Problems . . . . . . . . . . . . . . . . . . . . . . . . . . . . . . . . . . . . . . . . . . . . . . . . . . . . . . . . . . . . . . . . . . . . . . . . 33
Technical Data . . . . . . . . . . . . . . . . . . . . . . . . . . . . . . . . . . . . . . . . . . . . . . . . . . . . . . . 35
Disposal . . . . . . . . . . . . . . . . . . . . . . . . . . . . . . . . . . . . . . . . . . . . . . . . . . . . . . . . . . . . .36
Restricted Warranty . . . . . . . . . . . . . . . . . . . . . . . . . . . . . . . . . . . . . . . . . . . . . . . . . . 37

MD 85651 EN-2
EN
SAFETY INSTRUCTIONS
Keep electrical equipment out of reach of children
Children can be injured by electrical devices. Never allow children to use electrical appliances unattended.
Keep plastic packaging out of the reach of children. There is a risk of suffocation.
Setting the appliance up safely
Place the device on a sturdy, level surface. It is not designed for use in rooms that are very humid (e.g.
bathrooms).
Please observe the following installation conditions:
Ensure that ventilation is adequate. The ventilation unit should not be obstructed by placing objects such
as newspapers, table cloths, curtains, etc. on the vents.
Do not place the device near heat sources (e.g. heaters) that could affect the unit.
Do not place the unit in direct sunlight.
Avoid contact with water droplets or spray and do not place
vases or anything containing water on the unit.
Never set up the appliance near magnet fields.
(e.g. television sets or speakers).
Naked flames, such as lit candles, must not be placed on or near the device.
Power connection
Only connect the appliance to a power socket (230 V ~ 50 Hz) that is easy to reach and is close to the place
where you have set up the appliance. The power socket must be freely accessible so that you can unplug the
appliance quickly, if necessary.
Do not use the device if the mains plug, cable or device itself has been dropped. If the plug, cable or appliance
is damaged, immediately remove the plug from the power supply.
Ensure the mains cable is out of harms way and will not trip people up. There should be no kinks or folds in
the power cable.
Do not connect the device immediately to the mains if the unit has been moved from a cold to a warm room.
Any condensation which forms could damage the unit. The device can be operated as soon as the unit has
reached room temperature.
Thunder storms
Unplug the device if you are away for a long period of time or there is a storm.
About these instructions
Please read these instructions carefully before using the device. Note the warnings on the device
and in the operating instructions
Always keep the operating instructions close to hand. If you sell
or give the unit away, please
ensure that you also pass on these instructions.

MD 85651 EN-3
EN
Never undertake your own repairs
Never try to open and/or repair the device yourself. There is a risk of electric shock! Do not interfere
with the unit’s power cable.
If there is a fault contact our Service Centre or other suitable specialist workshop.
Headphones
Listening to the unit at a high volume with headphones or ear phones can damage your hearing.
Lower the volume before putting on head/earphones. Your hearing can be damaged if you listen at high
volumes over a long period or if the volume is increased too suddenly.
Safe handling of batteries
The remote control is battery operated. Please note the following:
Keep the batteries out of reach of children. They can be fatal if swallowed. If a battery is swallowed, please
obtain immediate medical assistance.
Do not throw batteries into a fire, do not short-circuit them and do not dismantle them.
If necessary clean the battery and device contacts before insertion.
Always change all batteries at the same time.
Only use batteries of the same type. Do not use different types of batteries; do not use a mix of used and
new batteries.
Please take note of the polarity (+/-) when inserting the batteries.
Remove the batteries if the unit is not going to be used for long periods.
Remove the empty batteries immediately from the unit! There is an increased risk of leakage.
Do not expose batteries to extreme conditions; for example, do not place the unit on top of radiators. There
is an increased risk of leakage.
Never try to recharge non-rechargeable batteries. There is a risk of an explosion!
Remove leaking batteries from the device immediately. Clean the contacts before inserting new batteries.
There is a risk of skin irritations from battery acid!
If battery acid leaks out it is essential to avoid contact with the skin, eyes and mucous membranes! If the
acid does come into contact with skin, immediately rinse the affected areas with plenty of clear water and
contact a doctor immediately.

MD 85651 EN-4
EN
PREPARATION
Unpacking the device
Remove all packaging materials including the film on the front of the unit..
WARNING!
Do not let children play with the plastic wrapping. There is a risk of suffocation!
Inserting the batteries into the remote control
Insert tow 1.5 V batterie (AAA size ) in the supplied remote
control. Observe the polarity (+/–) as shown in the illustra-
tion: the negative end is placed next to the springs
Close the battery compartment before using the remote
control.
Connections
Before connecting any devices, switch off the IP Radio (ON/OFF switch (5) at the back of the device).
W-LAN-mode operation or Access Point-Mode: Schrauben Sie die mitgelieferte WiFi-Antenne in die
Buchse LAN auf der Rückseite des Geräts (1).
Betrieb im LAN-Modus: Schließen Sie ein Ethernet-Kabel an den RJ 45-Port an (3).
Betrieb des UKW-Radios: Stecken Sie die mitgelieferte UKW-Antenne in die Buchse FM-ANT (2).
Netzadapter: Verbinden Sie den Gerätestecker des mitgelieferten Netzadapters mit dem Anschluss PO-
WER und den Netzstecker mit einer Steckdose 230 V ~ 50 Hz.
Package contents
IP radio device
WiFi antenna (2 dBi)
FM antenna (cable with 2.5 mm plug)
Power adapter (CD 5V/3A)
Remote control
2 x batteries 1,5 V (size AAA/R03)
CD-ROM with the Media Server application Twonky Vision and the user manual
Quick Start Guide
Back of the device

MD 85651 EN-5
EN
OVERVIEW
W-LAN Radio
Front
1.WiFi antenna (if connected)
2.Display
3.Infrared sensor for the remote control
4.USB port
5.Speaker
Buttons on the top
6. STOP/ALARM:
Open main menu / stop playback /
switch off the alarm
7. POWER / LIGHT:
press briefly: switch background light on and off;
press and hold: switch device to standby mode
8. Arrow buttons
W: back to the previous selection
X: to the next selection
S: during playback: volume up /
in a menu: selection upwards
T: during playback: volume down /
in a menu: selection downward
9.OK: confirm selection
10.SNOOZE: in the alarm mode: repeat alarm after 10
minutes /
iduring playback: set the switch off timer
Rear
11.ON/OFF: switch on/off
12.POWER: socket for DC adapter
13.RESET: press the area with a pointed object in order to
reset the device
14.FM ANT.: socket for FM antenna
15. Socket for headphone (3.5 mm)
16. LINE OUT: audio out for the connection to an external
audio device (suche as a stereo system or loudspeakers)
17.STATUS: status LED (flashes when no cable is connec-
ted; lights up permanently when an Ethernet cable is con-
nected)
18.Socket for Ethernet cable (RJ45)
19.Socket for W-LAN antenna

MD 85651 EN-6
EN
Remote Control
A POWER:
switch device into standby mode and on again
B Numberic buttons; to enter numbers and charactes,
press repeatedly until the desired character appears.
C SNOOZE:
during alarm mode: repeat alarm every 10 minutes;
during playback: set switch off timer
D FM RADIO: select FM radio operation
E Arrow buttons:
W: back to the previous selection
X: to the next selection
S: during playback: volume up /
in a menu: selection downward
T: during playback: volume down /
in a menu: selection downward;
OK: confirm selection
F MP3 READER: Select device connected to the USB port
G mute:
VOL–: volume down; VOL+: volume up
H FWB: during playback of audio titles:
fast forward
I Next: select next radio station or title
J Repeat: during playback of audio titles:
repeat function
KShuffle: during playback of audio titles:
shuffle function (random playback)
LFavorite: select radio station for the list of Favorites
MPlay/Pause: during playback of audio titles:
start and interrrupt playback
N Previous: select previous station or title
O REW: during playback of audio titles:
fast backward
P MEDIA PLAYER: select Media Player operation
Q RADIO IP: select IP Radio operation
R STOP: open main menu;
during playback of audio titles: stop playback
S Light: switch display light on and off

MD 85651 EN-7
EN
Function of the remote control in detail
A) For the Selection Screen & Playback screen
(B) For the Idle screen (clock screen)
Select Screen
(Screen with menu list)
Playback Screen
(Screen with name of station / song)
SNOOZE No function Launches the timer for 15, 30, 45, or 60 min
(stops the current music source after time
selected) - Information screen displayed for
3s. - Goes back to standby screen with timer
icon ON.
STOP STOP MUSIC.
Go back to main menu.
Identical.
POWER Put the device in Standby
mode.
Identical.
OK Select the function. Goes to option screen.
UP Move to previous item. Volume up.
After 2s goes back to playback screen.
DOWN Move to next item. Volume down.
After 2s goes back to playback screen.
LEFT Radio IP Goes back to the previous
menu.
Goes back to radio list.
Radio FM If radio FM (direct access) :
Goes back to the menu list.
Otherwise: Goes back to radio list.
Media Server Goes back to the song list.
MP3 Player Goes back to song list.
RIGHT Radio IP Goes back to the next
menu.
Goes back to radio list.
Radio FM If radio FM (direct access) :
Goes back to the menu list.
Otherwise: Goes back to radio list.
Media Server Goes back to the song list.
MP3 Player Goes back to song list.
Standby screen
& Music Playing
Standby Screen
& Alarm Music
Standby
Screen &
No Music
SNOOZE Launches 15, 30, 45, or 60 min
timer to stop current music source
(Goes back to clock screen with
timer icon ON).
STOPS the
music (Goes back
to clock screen &
reactivates alarm
after 10 min.).
No function

MD 85651 EN-8
EN
STOP STOPS MUSIC and goes back to
main menu.
STOPS the music &
Goes back to
standby screen (No
reactivation of
alarm).
Alarm menu
displayed.
POWER Put the device in Standby mode. Identical. Identical.
OK Displays playback screen. Identical. Main menu
displayed.
UP Volume up (after 2s goes back to
playback screen).
Identical. Main menu
displayed.
DOWN Volume down (after 2s goes back to
playback Screen).
Identical. Main menu
displayed.
LEFT Radio IP First press:
Goes back to Station radio screen.
Second press:
Goes back to radio list.
Identical. Main menu
displayed.
Radio FM First press:
Goes back to Station radio screen.
Second press:
If radio FM (direct access) : Goes
back to the menu list.
Otherwise: Goes back to radio list
Goes back to radio
list.
Media
Server
First press:
Goes back to song playing screnn.
Second press:
Goes back to songs list.
Identical
MP3 Player
RIGHT Radio IP Goes back to Station radio screen. Identical. Main menu
displayed.
Radio FM First press:
Goes back to Station radio screen.
Second press:
If radio FM (direct access) : Goes
back to the menu list.
Otherwise: Goes back to radio list.
Goes back to radio
list.
Media
Server
First press:
Goes back to song playing screnn.
Second press:
Goes back to songs list.
Identical.
MP3 Player

MD 85651 EN-9
EN
MENÜSTRUKTUR
Das Radio hat folgende Menüstruktur:
Internet Radio Station List Location
Genres
New Stations
Popular Stations
Favorite Stations All
Genre
Location
FM Radio FM Sensitivy High
Low
Station List
Favorite Stations
Update List
Direct Access
Media Server
MP 3 Player
Alarm Alarm 1 OFF
ON
Alarm 2 OFF
ON

MD 85651 EN-10
EN
Setup Clock Current Time
Set Manually
Auto-Sync (NTP)
Language Main Language
vTuner Language
Backlight Always ON
1 Minute
3 Minutes
10 Minutes
30 Minutes
Equalizer Normal
Classic
Rock
Jazz
Pop
Advanced Setup Network Setup
Configure Network
Reset to Default
Clear Favorites
Device MAC Address
Firmware Version
F/W Upgrade (thru. USB).

MD 85651 EN-11
EN
INSTALLATION
Network Setup
Basic Requirements
For the Wi-Fi IP Radio device to work properly under your existing network environment, your network must
feature the following:
You must have a router device with an enabled DHCP server function, so that it can automatically assign the
IP address to your computer or another network device.
If you already have a router device in your home, it will be easy to setup the Wi-Fi IP Radio device with your
existing network environment. If you don't know what you have on your home network, the following FAQ
will help you to troubleshoot before operating your Wi-Fi IP Radio device.
The minimum streams to receive Radio IP are :
192 kB/s for a normal quality,
640 kB/s for an upper quality.
How does your computer or Notebook PC access the Internet?
The answer might be one of the following:
Case I
I have to plug an Ethernet cable to the computer, and ...
... 1. I have to execute a dial-up program from my computer to link to the ISP service, and I can then access
the Internet.
`You need to purchase a (wireless) broadband router.
... 2. No extra dial-up program is executed in my computer, but I set a fixed IP address in my computer.
... 3. No extra dial-up program is executed in my computer, and I set a dynamic IP address in my computer.
`There is a router device in your home. You can configure the Wi-Fi IP Radio device in wired client mode to
operate it with your home network.
Case II
I use wireless connection, and ...
... 1. I have to execute a dial-up program from my computer to link to the ISP service, and I can then access
the Internet.
`There is no router device in your home. You need to purchase a new router device to upgrade your home
network.
... 2. No extra dial-up program is executed in my computer, but I set a fixed IP address in my computer.
`If the IP address is provided by your ISP supplier, there is probably no DHCP service in your home network.
You need to buy a new router device.
`If the IP address is a virtual IP, such as 192.168.xxx.xxx, you should have a router device. Therefore, the Wi-
Fi IP Radio device will function with your home network.
... 3. No extra dial-up program is executed in my computer, and I set the dynamic IP address in my computer.
`... 3. There is a wireless router device in your home, the Wi-Fi IP Radio device will be able to operate with
your home network.
Moreover, the Wi-Fi IP Radio allows to play the music loaded in your PC, this one being connected to the same
router.

MD 85651 EN-12
EN
Configuration as a Wireless Client
There are three network configuration modes available for the Wi-Fi IP Radio device: simple wireless client,
wired client, or wireless access point (AP).
The factory default mode is the client mode. If an Ethernet cable is available, the device will automatically
select a suitable client mode to operate. Users can also manually change the network configuration settings
via the Setup menu "Setup/Advanced Setup/Configure Network".
If you have a 802.11b/g wireless network in your home, this mode is the most straightforward means of
connecting the Wi-Fi IP Radio device to the existing network.
Simply power the device, without connecting an Ethernet cable, and the device will automatically switch to
the wireless client mode and detect all available wireless APs (Access Points). The first time the device is set to
the wireless client mode, you need to determine which AP to connect to and enter the encryption key. Once
the settings have been established, the device will remember the settings and attempt to connect to the
designated AP when it is switched on. However, if you encounter any difficulty in connecting to the
designated AP, the device will display the AP list for you to configure the device once again.
(A) Using the device for the first time, without an Ethernet cable connection:
Screen on the
right
Screen Next screen Comment
1 Initial screen
2 Device run as a Wireless Client.
3 "OK" button Select the MMI language.
4 "OK" button Select the Internet radio menu
language.
5 Scanning for available APs.
6"" button
(once)
"" button
or "OK" button
Select the AP that you can
connect to your router device.
7Numerickey
pads
"OK" button Enter the encryption key if
the AP is encrypted.

MD 85651 EN-13
EN
(B) Manually set to the Wireless Client Mode:
8 "OK" button Confirm the settings above.
9 Apply new settings.
10 The device is now in wireless
client mode.
11 The device is already connected
to your network.
Screen on the
right
Screen shot Next screen Comment
1 "OK" button Initial screen
2"" button
(4 times)
"" button
or "OK" button
3"" button
(once)
"" button
or "OK" button
4"" button
or "OK" button
Manually select the wireless client
mode.
5 Scanning for available APs.

MD 85651 EN-14
EN
Configuration as a Wired Client
If there is no 802.11b/g wireless network in your home, and only a wired 802.3 network is available, the Wi-
Fi IP Radio device can connect to the wired network via an Ethernet cable.
In this case, before powering the device, you need to plug the Ethernet cable into the RJ45 connector. The
device will automatically switch to the wired client mode when it detects a link status via the Ethernet
connection.
(A) Using the device for the first time, without an Ethernet cable connection:
If the radio is switched on after a reset, wireless client mode will be chosen, even if Ethernet cable has already
been plugged in.
6"" button
(once)
"" button
or "OK" button
Select the AP that you can
connect to your router device.
7 Numeric key pad "OK" button Enter the encryption key if
the AP is encrypted.
8 "OK" button Confirm the settings above.
9 Apply new settings.
10 The device is now in wireless
client mode.
11 The device is already connected
to your network.
Screen on the
right
Screen shot Next screen Comment
1 Initial screen

MD 85651 EN-15
EN
(B) Manually set to the Wired Client Mode:
2 Device run as a Wired Client.
3"" button
or "OK"
button
Select the MMI language.
4"" button
or "OK"
button
Select the Internet radio menu
language.
5 The device is now in wired client
mode.
It is already connected to your
network.
Screen on the
right
Screen Next screen Comment
1 "OK" button Initial screen
2"" button
(4 times)
"" button
or "OK"
button
3"" button
(once)
"" button
or "OK"
button
4"" button
(once)
"" button
or "OK"
button
Manually select the wired client
mode.
5"" button
(once)
"" button
or "OK"
button
Select the DHCP for auto
configured IP address.

MD 85651 EN-16
EN
Configuration as a Wireless Access Point (AP)
If you wish to extend your wireless network coverage range, you need to add new access points to specific
locations in your home. This will enable other wireless notebook PCs and network devices to access the
extended wireless network. The Wi-Fi IP Radio device can also be configured as a wireless AP. With this feature,
you can easily extend your wireless coverage without having to purchase another AP.
To configure the Wi-Fi IP Radio device as an AP, you need to setup the device manually via the MMI menu
"Setup/Advanced Setup/Configure Network/AP mode". You then need to enter the IP address, the SSID, the
channel number and the AP encryption. Once these settings have been established, the device will
automatically reboot and function as an AP.
Manually set to the Wireless AP Mode:
6 "OK" button Confirm the settings above.
7 Apply new settings.
8 The device is now in wired client
mode.
9 The device is already connected to
your network
Screen on the
right
Screen Next screen Comment
1 "OK" button Initial screen
2"" button
(4 times)
"" button
or "OK" button
3"" button
(once)
"" button
or "OK" button

MD 85651 EN-17
EN
4"" button (2
times)
"" button
or "OK" button
Manually select the AP mode.
5"" button
(once)
"" button
or "OK" button
Select the DHCP for auto
configured IP address.
6 Numeric key pad "OK" button Enter the Identifier (name) for this
AP.
7 Numeric key pad "OK" button Select the wireless channel to be
allocated to this AP.
8"" button
(once)
"OK" button Select one of the security
functions.
9 Numeric key pad "OK" button Enter the encryption key if
the AP is encrypted.
10 "OK" button Confirm the settings above.
11 Apply new settings.
12 The device is in wireless AP mode
now.
13 The device is already connected
to your network and can now
operate.

MD 85651 EN-18
EN
Using the IP Radio as a Media Client
The IP Radio is compliant with the UPnP protocol, and the IP Radio works with any UPnP-based server software
installed on your computer.
Installing Twonky Vision
The supplied CD-ROM contains the Media Server Software Twonky Vision. Select the software for installation.
In the first step, you select the language.
This selections applies both to the language for installation and for the
installed software.
Follow the futher steps in the installation wizard.
Connection between Wi-Fi IP Radio and Media Server
Establish the connection between the Wi-Fi IP Radio device and the media server.
On the Wi-Fi IP Radio device, select the "Media Server" function in the main menu (or press the "Media Player"
hot key on the remote controller). The Wi-Fi IP Radio device will then initiate the server detection process. After
a few seconds, it will detect a server and display "PC_Hostname: Server Name"
This is the Media Server that you installed.
Press the 'OK' button to try to connect to the server.
The Wi-Fi IP Radio screen will read "Connecting…." and will then display the following list:
You can browse the "Music" list and play the music of your choice.
Other manuals for MD 85651
1
Table of contents
Other Medion Radio manuals

Medion
Medion MD 44100 User manual

Medion
Medion LIFE P85035 User manual

Medion
Medion E66381 User manual

Medion
Medion LIFE P85023 User manual

Medion
Medion LIFE E66314 User manual

Medion
Medion P85096 User manual

Medion
Medion MD 2773 User manual

Medion
Medion LIFE User manual

Medion
Medion LIFE E66566 User manual

Medion
Medion LIFE E66172 User manual

Medion
Medion P85295 User manual

Medion
Medion E66452 User manual

Medion
Medion LIFE P66096 User manual

Medion
Medion P85333 User manual

Medion
Medion MD 87466 User manual

Medion
Medion LIFE P66096 User manual

Medion
Medion LIFE P66550 User manual

Medion
Medion MD87090 User manual

Medion
Medion LIFE P66098 User manual

Medion
Medion LIFE P66007 User manual