Akai AM-M77 User manual

SSh:*tar'-us{t e
ATTENTION
Pour
6viter
tout
risque
d'incendie
ouded6chargeelectrique,
ne
pas
exposercet
appareilauxintemp6ries
oudI'humidit6.
Operator'sManual
Manuel
de
I'utilisateur
..
Ggbruiksaanwijzingen .,, Biz21-4o
Bruksanvisnin$.
..,,,,,,
Bedienungsanleitung
...
Page
1-20
Page
1
-20
sid.21-40
Seite4l
-60
Pagina4l
-60
WARNING
To
prevent
f
ire
orshockhazard,donotexposethisappliance
to
rain
or
moisture. e
Manual
delusuario....

,wt G
ffifuWarning
Miseengarde
&
Power
requirements
Powerrequirements
forelectrical
equipmentdiffer from areatoarea.
Pleas ensurethatyourmachinemeetsthepower
requirements
in yourarea.
If indoubt,consult
aqualified
electrician.
120V.
60Hzfor USA and
Canada
220V,50Hzfor Europe
exceptUK
240V,50Hzfor UK andAustralia
ll0V /120Vn20V lzrt0V, 50/60H2switchablefor orhercountries.
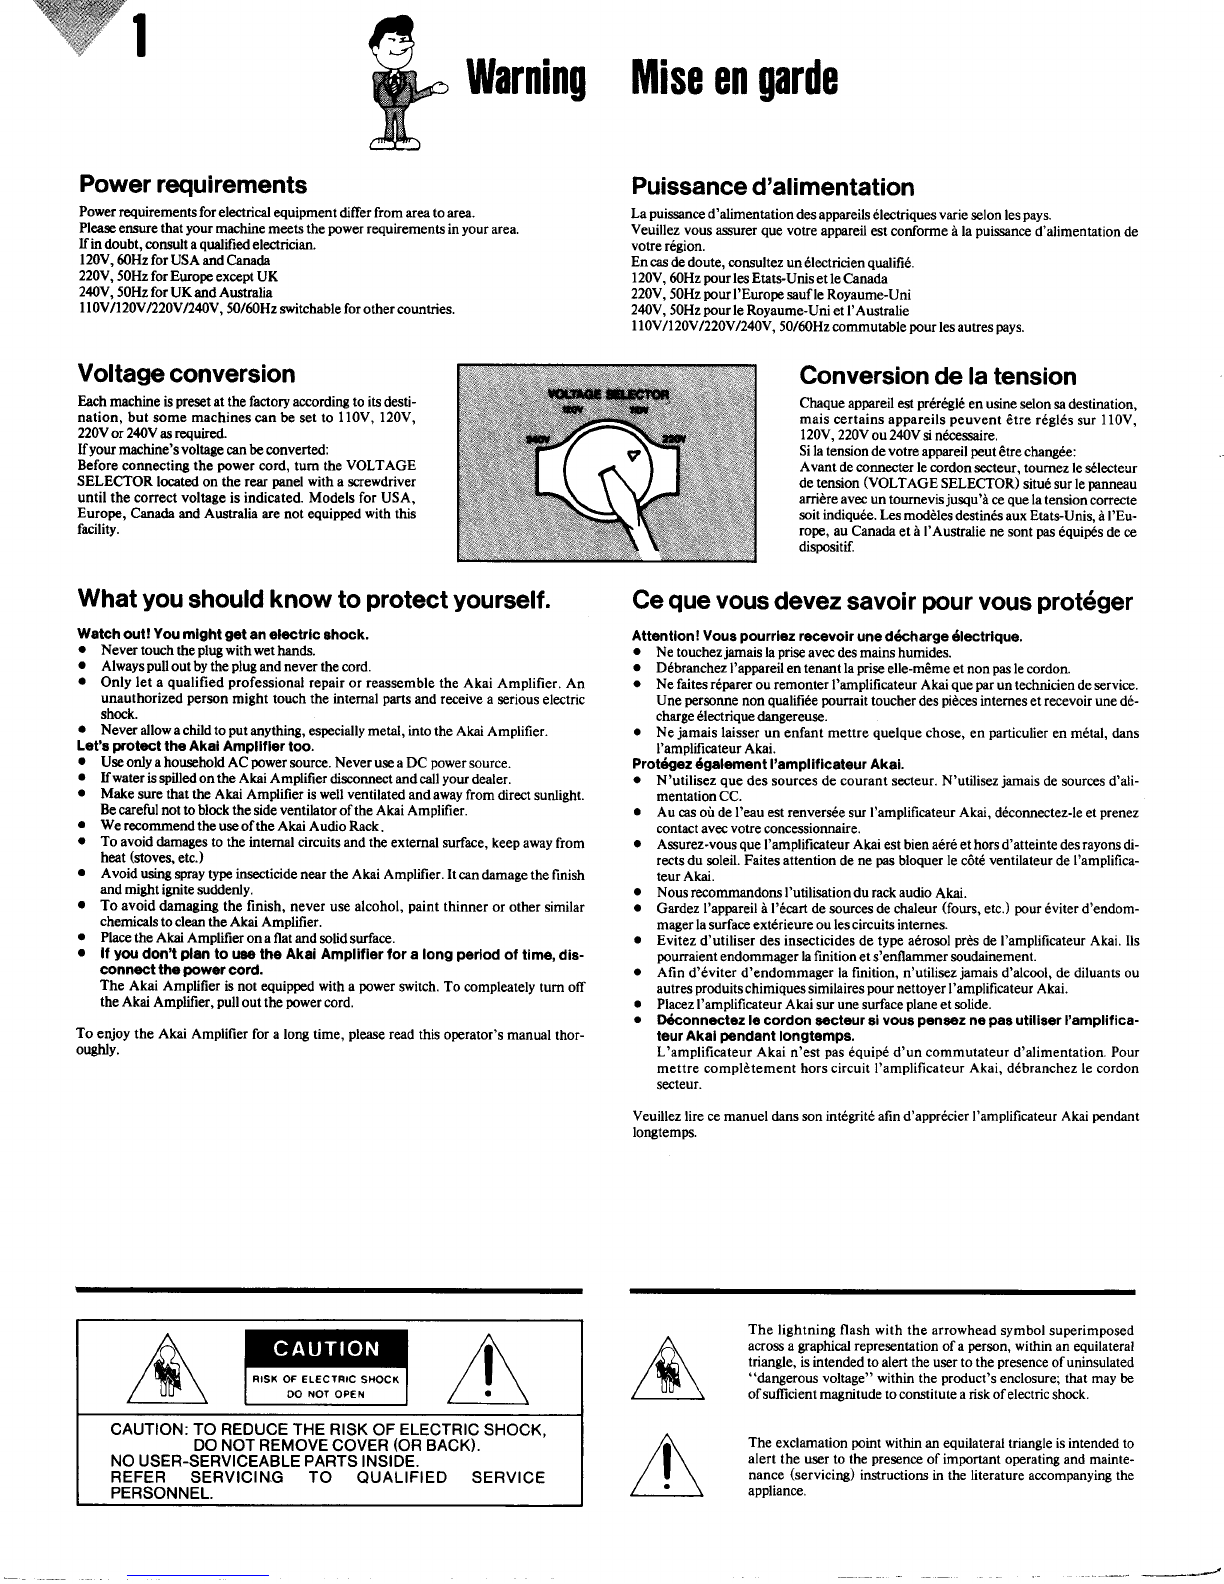
Voltage
conversion
Each
machineispreset
etthefactoryaccordingto itsdesti-
nation,but some
machines
canbesetto 110V,120V,
220Vor 2ll{)V
as
required.
lfyour machine'svoltage
canbeconverted:
Before
connectingthe power
cord,tum theVOLTAGE
SELECTOR locatedon the rear panelwith ascrewdriver
until the correctvoltage
isindicated.Modelsfor USA,
Europe, Canada
andAustralia arenot equipp€d
with this
facility.
What
you
should
knowtoprotectyourself.
Watch oul! Youmlght got an oloctrlc shock.
r Nevertouchtheplug
with wethands.
. Alwayspul outbytheplugandneverthecord.
o Onlylet a qualified
professional
repairor reassemble
theAkai Amplifier.An
unauthorized
person
might touchtheintemalparts
andreceiveaseriouselectric
shock.
. Neverallowachild to putanything,especiallymetal,into theAkai Amplifier.
Lot's p.otoct th€ Akai Amplltler too.
. UseonlyahouseholdAC power
source.
NeveruseaDC power
source.
. Ifwater isspilledontheAkai Amplifier disconnectand
callyourdealer.
. Makesurethatthe Akai Amplifier iswell ventilatedandawayfrom directsunlight.
Becarefulnot1oblocktheside
ventilatorofthe Akai Amplifier.
o Werecommendtheuseof theAkai Audio Rack.
. To avoiddamages
to the internal circuitsandthe extemalsurface,keep
awayfrom
heat(stoves.
etc.)
. Avoid using
spray
typeinsecticide
neartheAkai Amplifier. It candamagethefinish
andmight ignitesuddenly.
. To avoiddamagingthe finish, neverusealcohol,paintthinner or other
similar
chemicals
tocleantheAkai Amplifier.
. Place
theAkai Amplifier onaflatandsolidsurface.
. lf you don't plan to uso the Akai Amplilior tor a long porlod ot time, dis-
connect tho poYver
cord.
The Akai Amplifier isnotequippedwithapower
switch.To compleatelytum off
theAkai Amplifier, pulloutthe power
cord.
To enjoythe Akai Amplifier foralongtime,please
read
thisoperator's
manualthor-
oughly.
Puissance
d'alimentation
La
puissance
d'alimentation
desappareils6lectriquesvarie
selonles
pays.
Veuillez
vousassurer
que
votre
appareil
estconformei lapuissance
d'alimentationde
votre
region.
Encasdedoute,mnsultezun6lectricien
qualifi6.
120V,
60Hz
pour
lesEtats-Unis
etleCanada
220V,50Hz
pour
I'Europe
saufle
Royaume-Uni
2tl0V,
50Hz
pour
leRoyaume-Uni
etl'Australie
ll0V /120V1220V/240V, 50/50H2commutable
pourlesautres
pays.
Conversion
delatension
Chaque
appareilestpr6r6gl6
enusine
s€lonsadestfuration,
mais
certainsappareils
peuvent
6tre16916s
sur
Il0V,
120Y,
220Y
ou240V
sin6cessaire.
Silatension
devotreappareil
peut6trechang6e:
Avant deconnect€rlecordonsecteur,toumezleselecteur
detension(VOLTAGE SELECTOR)situ6surlepanneau
arridreavec
untoumevisjusqu'i ceque
latension
correcte
soit
indiqu6e.
Lesmoddles
destin6sauxEtats-Unis,
d
I'Eu-
rope,
auCanada
eteI'Australie
nesont
pas
6quip6sdece
dispositif.
Ce
que
vous
devez
savoir
pour
vous
prot6ger
Attentlon! Vous pourul€zrecevoir uned6charge 6lectrlqu€.
. Ne touchez
jamais
laprise
avecdesmainshumides.
o D6branchez
I'appareilentenantlaprise
elle-m€meetnon
pas
lecordon.
. Nefaitesr6parer
ouremonterI'amplificateurAkaiquepar
untechniciendeservice.
Une personne
nonqualifi6epounait toucherdes
pieces
intemesetrecevoiruned6-
charge6lectriquedangereuse.
o Nejamais laisserun enfantmettrequelque
chose,
enparticulier
enm6tal,dans
I'amplificateurAkai.
Prot6gez6galem€nt I'amplificat6ur Akai.
. N'utilisez quedessourcesdecourantsecteur.N'utilisezjamais
desourcesd'ali-
mentationCC.
. Au casoirdeI'eauestrenversee
sur
I'amplificateurAkai,d6connectez-leetprenez
contactavec
voue
concessionnaire.
o Assurez-vous
que
I'amplificateur
Akaiestbiena6r6ethorsd'atteintedesrayons
di-
rectsdusoleil.
Faitesattention
denepas
bloquer
lec6te
ventilateur
de
I'amplifica-
teurAkai.
o NousrecommandonsI'utilisation durackaudioAkai.
. Gardez
I'appareil
irl'6cartdesourcesdechaleur
(fours,
etc.)
pour
6viterd'endom-
magerlasurfaceext6rieureoulescircuitsintemes.
. Evitezd'utiliser desinsecticidesdetypeaerosol
prds
deI'amplificateurAkai.Ils
pourraient
endommager
lafinition ets'enllammer soudainement.
. AIin d'6viter d'endommagerlafinition,n'utilisez
jamais
d'alcool,dediluantsou
autres
produits
chimiquessimilaires
pour
nettoyerI'amplificateurAkai.
o PlacezI'amplificateurAkaisur
une
suface
plane
et
solide.
o El6connectezl€ cordon socteur aivous penaozno pas utiliser I'amplifica-
teur Akal p€ndant longtomps.
L'amplificateurAkai n'est
pas
6quip6d'uncommutateurd'alimentation.Pour
mettrecompldtementhorscircuitI'amplificateur
Akai,d6branchezlecordon
secteur.
Veuillez
lirecemanueldanssonint6griteafind'appr6cierI'amplificateurAkaipendant
longtemps.
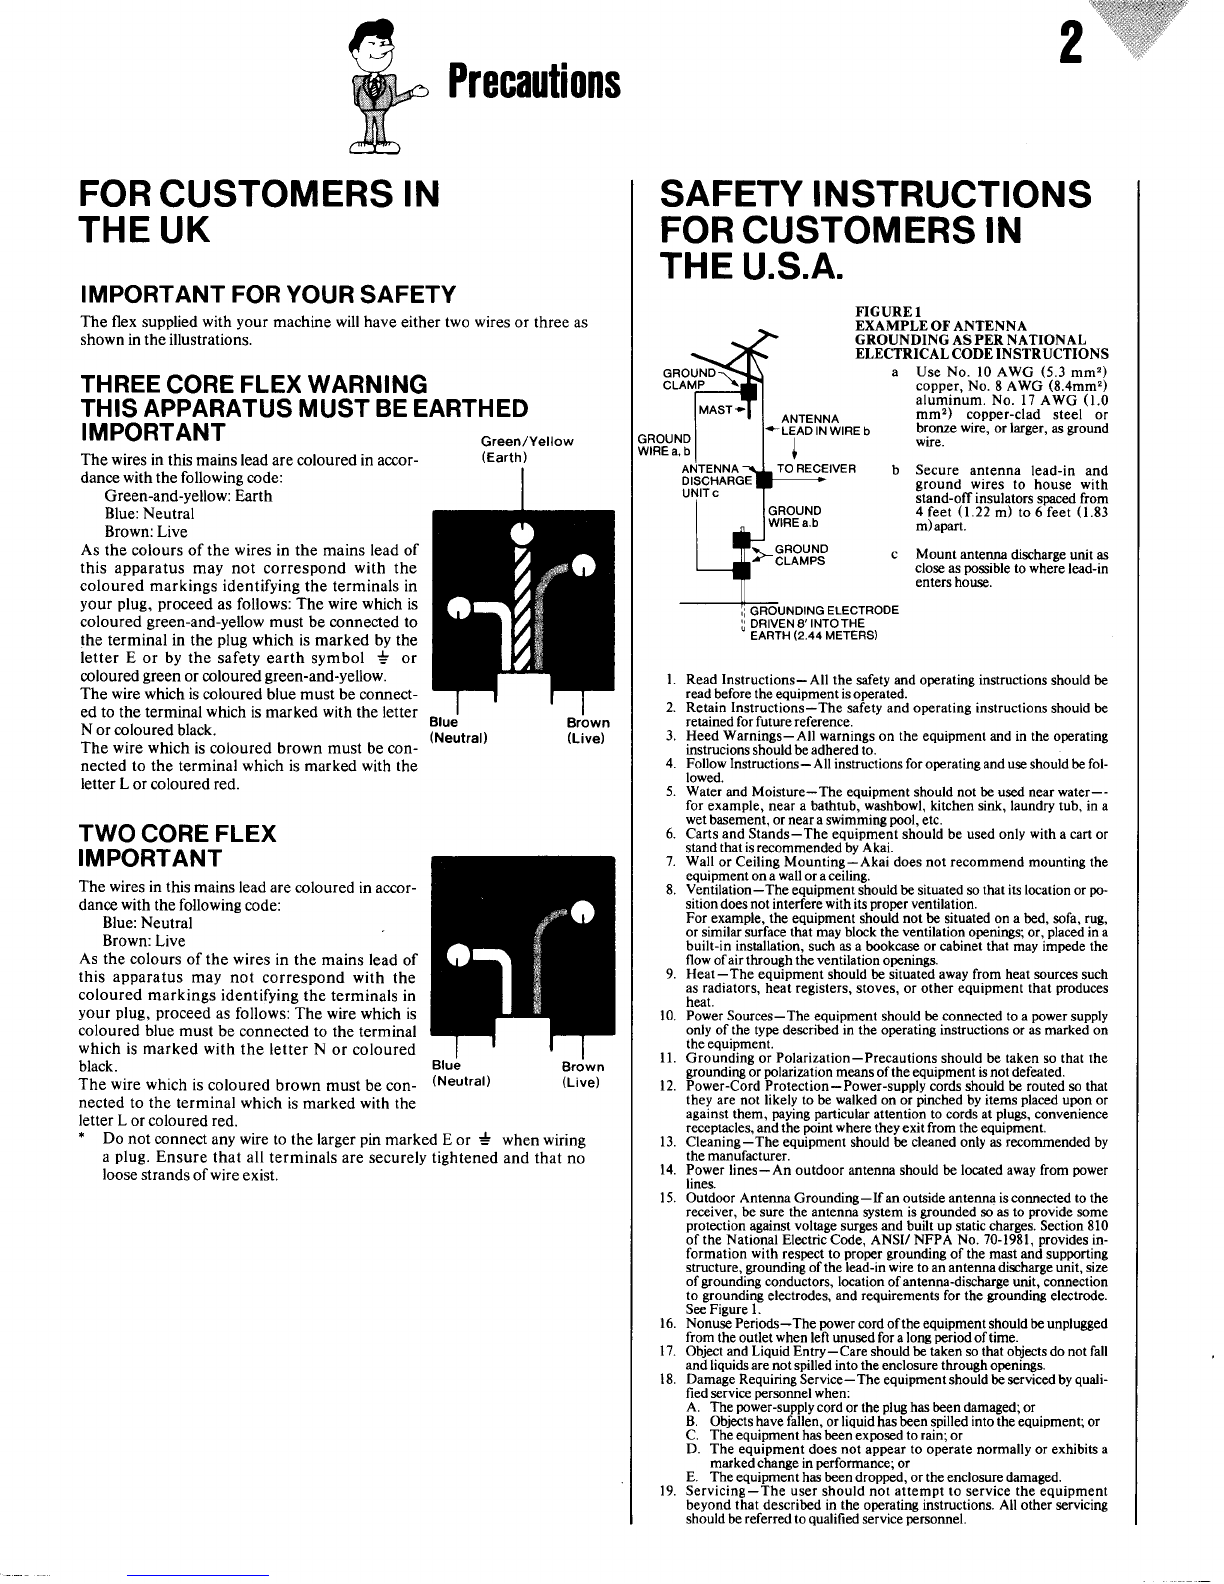
Thelightningflashwith thearrowheadsymbol
superimposed
across
agraphical
representation
ofa person,
withinanequilateral
triangle,
isintendedtoalertthe
user
tothe
presence
ofuninsulated
"dangerousvoltage"withintheproduct's
enclosure;thatmaybe
ofsullicientmagnitudetoconstituteariskofelectric
shock.
Theexclamation
point
withinanequilateraltriangleisintendedto
alertthe userto thepresence
of importantoperatingandmainte-
nance
(servicing)
instructions
in theliteratureaccompanyingthe
appliance.
A
/\
RISX OF ELECTRICSHOCK
OO NOT OPEN
CAUTION:TOREDUCETHERISK
OF
ELECTRIC
SHOCK,
DONOTREMOVE
COVER
(OR
BACK).
NO
USER-SERVICEABLE
PARTS
INSIDE.
REFER SERVICIN.G TO QUALIFIED SERVICE
PERSONNEL.
-_, _-*J

G
W Precautions
JL
Elue
(Neutral)
(Neutral)
FOR
CUSTOMERS
IN
THE
UK
IMPORTANTFORYOUR
SAFETY
Theflex supplied
with your machinewill have
eithertwowires
or threeas
shownintheillustrations.
THREE
CORE
FLEXWARNING
THISAPPARATUSMUSTBEEARTHED
IMPORTANT creen/Yeilow
Thewires
inthismainsleadarecolouredinaccor- (Earth)
dance
withthefollowingmde:
Green-and-yellow:Earth
Blue:
Neutral
Brown:Live
As thecoloursof thewires
in themainsleadof
this apparatusmay not correspond
with the
colouredmarkingsidentifying
theterminalsin
yourplug,proceed
asfollows:
Thewirewhich
is
coloured
green-and-yellow
mustbeconnected
to
theterminalin the
plug
which
ismarkedbythe
letterE or by the safetyearthsymbol * or
coloured
green
orcoloured
green-and-yellow.
Thewirewhichis
colouredbluemustbeconnect-
edto theterminal
which
ismarked
withtheletter
N orcoloured
black.
Thewirewhich
iscolouredbrownmust
be
con-
nectedto theterminalwhichis
marked
withthe
letterL orcolouredred.
TWO
CORE
FLEX
IMPORTANT
Thewires
in this
mainsleadare
colouredin accor-
dance
withthefollowing
code:
Blue:Neutral
Brown:
Live
As thecolours
of thewires
in themainslead
of
this apparatus
may not correspondwith the
coloured
markingsidentifying
theterminalsin
yourplug,
proceed
asfollows:Thewirewhichis
coloured
bluemust
beconnectedto theterminal
which
ismarkedwiththeletterN or coloured
black.
Thewirewhich
iscoloured
brownmustbecon-
nected
to theterminalwhich
ismarkedwiththe
letterL orcolouredred.
* Do notmnnectanywireto thelarger
pinmarkedEor * whenwiring
aplug.
Ensure
thatall terminalsaresecurelytightened
andthatno
loose
strands
of
wire
exist.
(Live)
z*r
UseNo. l0 AWG (5.3
mm,)
copper,No. 8AWG (8.4mm,)
aluminum.No. 17AWG (1.0
mm2) copper-cladsteel or
bronzewire,orlarger,
as
ground
wlre.
Secure antenna lead-in and
ground wires to house with
stand-offinsulators
soacedfrom
4 feet
(1.22
m) to6'feet
(1.83
m)apart.
Mount antenna
dischargeunit as
closeaspossible
to wherelead-in
entershouse.
I
2.
3.
5.
6
7
8
13.
14.
15.
16.
11.
18.
9.
10.
ll.
12.
SAFETY
INSTRUCTIONS
FOR
CUSTOMERS
IN
THE
U.S.A.
FIGURE
1
EXAMPLE OtrANTENNA
GROUNDING
ASPERNATIONAL
ELECTRICAL CODf,,INSTRUCTIONS
MAST+ ANTENNA
+LEAD INWIRE
b
I
TORECEIVEF
GROUNO
WIREa.b
GFOUND
CLAMPS
::DRIVENS'INTOTHE
- EARTH
(2.44
METERS)
ReadInstructions-All thesafety
andoperatinginstructions
shouldbe
read
beforetheequipmentisoperated.
RetainInstructions-The safety
andoperatinginstructions
shouldbe
retainedforfuturereference.
Heed
Warnings-All warnings
on theequipmentandin theoperating
instrucions
shouldbe
adhered
to.
FollowInstructions-All instructionsforoperatinganduse
shouldbe
fol-
lowed.
Water
andMoisture-The equipment
should
notbeusednearwater--
for example,neara bathtub,
washbowl,
kitchensink,laundrytub, in a
wet
basement,orneara
swimming
pool,
etc.
CartsandStands-The
equipmentshouldbeusedonly
with
acartor
stand
thatisrecommended
by
Akai.
Wall
orCeilingMounting-Akai doesnotrecommendmounting
the
equipmentona
wall
oraceiling.
Ventilation-The equipmentshouldb€situatedso
thatitslocation
orpo-
sitiondoes
notinterfere
withits
proper
ventilation.
Forexample,theequipmentshould
notbesituatedonabed,sofa,
rug,
orsimilarsurfacethatmayblocktheventilation
openingsior,placed
ina
built-in installation,
suchasabookcaseor cabinetthatmayimpedethe
flow
ofairthroughthe
ventilation
openings.
Heat-The equipmentshouldbesituatedawayfromheatsources
such
as
radiators,
heatregisters,stoves,or otherequipmentthat produces
heat.
PowerSources-Theequipment
should
beconnectedtoapower
supply
onlyof the typedescribedin the operatinginstructionsorasmarked
on
theequipment.
GroundingorPolarization-Precautions
shouldbetakensothatthe
grounding
orpolarization
meansoftheequipmentisnotdefeated.
Power-CordProtection-Power-supply
cordsshouldberouted
so
that
theyarenot likely to bewalkedonor pinched
byitems
placed
uponor
againstthem,payingparticular
attentiontocordsatplugs,
convenience
receptacles,andthe
point
where
theyexitfromthe
equipment.
Cleaning-The equipmentshouldbecleanedonlyas
recommended
by
themanufacturer.
Power
lines-An outdoorantennashouldbelocatedawayfrom power
lines.
OutdoorAntenna
Grounding-Ifan outsideantennaisconnectedtothe
receiver,besuretheantenna
system
isgrounded
soasto provide
some
protection
againstvoltagesurgesandbuiltupstatic
charges.Section810
of theNationalElectricCode,ANSI/ NFPA No. 70-1981,
provides
in-
formationwith respectto propergrounding
of themastand
supporting
structure,
grounding
ofthelead-in
wire
toanantennadischargeunit,size
ofgrounding
conductors,location
ofantenna-discharge
unit,connection
to grounding
electrodes,
andrequirementslor thegrounding
eleatrode.
SeeFigure1.
NonusePeriods-Thepower
cordoftheequipmentshouldbeunplugged
fromtheoutlet
when
leftunusedforalong
period
oftime.
ObjectandLiquidEntry-Care shouldbetakensothatobjectsdonotfall
and
liquidsarenotspilledintotheenclosurethroughopenings.
Damage
RequiringService-Theequipmentshouldbeservicedby
quali-
fiedservice
personnel
when:
A. The
power-supply
cord
orthe
plug
hasbeendamaged;
or
B. Objectshave
fallen,
orliquidhasbeenspilled
into
theequipment;or
C. Theequipment
hasbeenexposed
torain;
or
D. The equipment
does
not appear
to operatenormallyorexhibits
a
markedchangeinperformance;
or
E. The
equipmenthasbeendropped,ortheenclosuedamaged.
Servicing-The user
shouldnot attemptto servicetheequipment
beyond
thatdescribedin theoperatinginstructions.
All otherservicing
shouldbe
referred
toqualified
service
personnel.
l9

This
is
the
AkaiUoici
I'amplificateur
stdrfo
AM-M77
$tereointdgrfAM-M77
ftkai
lntegrated
l,mplifier
TheAkai AM-M77 isa stereo
integrated
amplifier.Use
the
AM-M77 in combinationwith theothercomponents
in the
ClaritySeries
and
youwill havean
excellenthi-fisystem.
AkaioriginalZero
drivecircuit.
Drastically
reduces
dynamic
(TIM, IIM) and
static
(Harmonic)
distortions
to"0".
Dual pole DC servo circuitfor clear
anddynamic
sound
reproduction.
Exclusive
lownoise
attenuatorICand
strain
gauge
sensorcom-
bination
electronically
changesthevolume
and
balancecontrol.
Interface
Autofunction
control
system.
Automatically
changes
theinput
source
selectoraccording
to
playback
sourceengaged.
DirectSynchroRecording
system.
Synchronises
the Akai HX-M77 andaselectedcomponent
for
automaticrecording
ofthedesiredmusic
source.
2 tone control
settingcan
bememorized
by theAcoustic
memory.
Microcomputer
controlled
tonecontrol
systemwithanexclu-
siveIC.
Lastmemory.
Memorizes
the position
of the various
controls
just before
the
power
isturned
off
Electronic
protection
circuit.
Large2-colored
FL display
showsmode
of theAkai AM-M77
ingraphic
form.
Microphone
mixingin playback
andrecording.
Direct
connectionfor simpleandconvenient
connection
to
othercomponents
oftheClaritySeries.
ThisistheAkaiAM-MTTStereolntegratedAmplifier
....... .. 3
Controls ...... 4
Makingtherightconnections ........ 5-8
Let'senjoythemusic .......9-10
Onthebalancecontrols. .......... l0
Tomemorizethesafetyvolume .......... l0
Tonecontroladjustment ..1l-12
How
tousetheacousticmemory. ......II- 12
Let'senjoymicrophonemixing ...... 13
Let'srecord ......14-15
Tapedubbing ..... 16
Onthespeakersystem ....... l1
Using
the
AkaiAM-M77
withoutthedirectconnection
plug
... l8
Problem?
Let'scheck. ....... l9
Specifrcations .. ... ... 20
iilffi.rr'',
Akai
Akai Le AM-M77 Akaiestun amplificateur
st6r6o
int6gr6.
Utilisez
le
AM-M77Akai
encombinaison
avecles
autreselements
delas6rie
ClarityAkai
et
vous
aurez
uneexcellentechaine
hautefid6lit6.
Caractiristiques
o Circuitd'entrainementz6ro
originalAkai.
R6duit
lesdistorsions
dynamique
(TIM,llM) etstatique
(har-
monique)d"0".
Servo-circuit
CC doublep6le
pour
unereproduction
sonore
claireetdynamique.
Combinaisond'un CI d'att6nuateurAfaible
bruitexclusif
et
d'un senseur
de
jauge
decontrainte
pourchanger
6lectronique-
ment
etdirectementlacommande
devolume
etd'6quilibre.
Systdme
decommande
defonction
automatique
interfacecom-
mand6
par
micro-ordinateur.
Changeautomatiquement
les6lecteurdesourced'entr6een
fonction
dessources
de
reproduction
engag6es.
Systdme
d'enregistrement
synchronise
directcommand6
par
micro-ordinateur.
Synchronise
leHX-M77Akai
etun6lementselectionn6
pour
un
enregistrementautomatique
dela
source
musicale
desiree.
2r6glages
decaract6ristiques
decommandedetonalit6
peuvent
6trememoris6s
par
lamemoire
acoustique.
Systeme
decommande
detonalit6
par
micro-ordinateur
avec
unCIexclusif.
Dernidre
mdmoire
M6morise
laposition
desdiversescommandes
juste
avantla
mise
horscircuit.
Circuit
de
protection
electronique
Grandallichage
fluorescent
bicoloreindiquant
graphiquement
lemodeduAM-M77Akai.
Mixage
aumicrophone
dlareproduction
et
dl'enregistrement.
Prise
deconnexion
directe
pouruneconnexion
simpleetpra-
tiqueaux
autres
6lementsdelas6rieClarity.
Voicil'amplificateurst6r6ointdgreAM-M77Akai
............ 3
Commandes ........ . 4
Etablissementdesconnexionscorrectes .... 5-8
Appr6cionslamusique .... 9-10
Surlescommandesd'equilibre... ........ 10
Pour
m6moriserle
volume
desecurite. .... 10
Reglagedelacommandedetonalite. ..... 11*12
Commentutiliserlam6moireacoustique..... 1l-12
Mixageaumicrophone...... ........ 13
Enregistrement..... .... 14-15
Doublagedebande ....... 16
Surlesystdmed'enceintes. .-..... -.. 11
Utilisationdu
AM-M77Akai
sanslaorise
deconnexiondirecte.
Des
problemes?
V6riflez
Specifications
Features
a
a
a
oo
a
o
a
Table
ofcontents
Table
desmatibres
18
l9
20

G
WW
&Gontrols
Commandes 4
How
toturn
onand
offtheAkai
AM-M77.
TheAkaiClarity
systcm
isturnedonandofl
with
the
AkaiAT-M77/L's
"SYSTEM
ON/OFF" switch.
Therefore.theAkai
AM-M77
isnotequipped
with
anexclusive
oowerswitch.
Commentmettresous
tensionet
hors
circuit
leAM-M77Akai
LesystemeClarity
Akaiestmissoustension
et hors circuit avec le commutateur
"SYSTEM ON/OFF" du AT-M77/L Akai.
Le AM-M77 Akai n'est
donc
pas
equipe
d'un commutateur
d'alimentation
exclusif.
VOL/BALbutton
Toselect
themodeoftheDirectaccess
volume
panel
whenvolumeorbalance
control.
Touche
devolume/
(VOL/BAL)
Pour
s6lectionner
lemode
du
panneau
de
volume
daccdsdirectlorsdureglage
duvolume
oude
l'6quilibre.
SAFETY
button
Tomemorize
maximumvolumelevelfor
safetyvolume
systemortoconfirmthe
memorized
safetyvolumelevel.
Touche
des6curit6
(SAFETY)
Pourm6moriserleniveau
maximumde
volume
pour
le
systdmede
s6curitedu
volumeou
pour
v6rifierleniveaude
volume
des6curite
m6moris6.
Direct
accessvolume
panel
Toadjustthevolumelevel
and
left
orright
channellevel.
Panneau
de
volumed direct
DIRECT
SYNCHRORECORDING
SYSTEM
buttons
To
automatically
set
theAkai
HX-M77R
recording
mode
accordingto
play
backthe
pressed
music
source.
Attention
These
buttons
arenotinput
sourceselector.
Touches
desystdme
d'enregistrement
synchronis6
direct
(Dl
RECT
SYNCHRO
RECORDINGSYSTEM)
Pourreglerautomatiquement
le
HX-M77R
Akai
surlemoded'enregistrement
en
fonctiondela
sourcede
musique
reproduite.
Attention
Cestouchesnesont
pas
uns6lecteur
desource
d'entr6e.
PHONES
jack
Forlisteningthroughheadphones.
Jackdecasque
(PHONES)
Pourun
ecoute
par
uncasque.
INPUT
SELECTOR
button
To manuallyselectasource
you wantto
listento.
Touche
dus6lecteur
d'entr6e
(INPUT
SELECTOR)
Pour
selectionner
manuellementla
source
que
vousvoules
6couter.
Tone
controls
Toadjust
thebassandtrebleresponses,and
tomemorizethe
tonecontrolcharacteristics.
Commandesde
Pourrdglerlesr6ponses
des
graves
etdesaiguds,
et
pour
m6moriser
lescaracteristiquesdela
commandedetonalit6.
MICMIXING
control
To
adjustthemicrophone
level
when
microphonemixing.
Commandedemixagemicrophone
(MIC
MIXING)
Pourr6glerleniveau
du
microphonelorsd'un
mixageaumicrophone.
MIC
jack
Tomicrophone
mixing.
Jackdemicro (MlC)
Pour
unmixageaumicrophone.
AUXjack
Toplay
back
withthe
cassette
player,
cassettedeckorradiocassette.Connect
jack
with
thestereoMini-plugcord.
JacK
AUX
Pour
une
reproduction
avecunlecteur
de
cassettes,
unmagn6tocassette
ou
une
radio-cassette.Connectez
lecordonst6r6o it
mini
-prise
dce
jack.
SPEAKERS
(A
and
B)
switch
Toturnonandoffthespeakersystem.
When
usingtheheadphones,set
these
switches
tothe
OFF
(r ) position.
Commutateur
haut-parleurs
(SPEAKERS)(A
et
B)
Pour
mettresous
tensionethors
circuitle
systdmed'enceintes.
Reglez
cecommutateursurarrCt
(OFF f )
lorsdeI'utilisationd'uncasque.
Pourr6glerleniveaudevolumeel
canaux
gauche
et
droit.
Centralized
FL
display
Affichage
fluorescent
centralis6.
leniveaudes
Shows
theeffect
ofthe tonecontrol and
acoustic
memory.
lndique I'effetde lammmande detonalit6etla
m6moire acoustique.
Showswhich
SPEAKERS
switch
is
engaged.
Indique
quel
commutateurhaut-parleurs
(SPEAKERS) estengage.
Shows
thattheACOUSTICMEMORY
buttonisengaged.
Indiquequelatouchede memoire acoustique
(ACOUSTIC MEMORY) estensasee.
Shows
the
VOLUME levelindBorleftand
risht channelbalance.
Indique
endBleniveaude
VOLUME ou
l'6quilibre
des
canaux
gauche
etdroit.
Showswhich
oneoftheACOUSTIC
MEMORY
buttonsis
engaged.
Showswhich
componentcanbe
played
back.
lndiquequelle
touchedememoire acoustique
(ACOUSTIC MEMORY) estengag6e.
lndiquequel
6lementpeut
61re
reproduit.
ShOWSthc
DIRECT
SYNCHRO
RECORDINGSYSTEMisengaged.
Indique
que
le
systdme
d'enregislrement
synchronisedirect
(Dl
RECTSYNCHRO
RECORDINGSYSTEM)estengag6.
Shows
the
SAFETY
VOLUMELEVEL
memorized.
lndique
que
leniveaudcvolume
des6curite
est
memoris6.

.,., g
G
wMaking
theright
connections
Etablissement
des
connexions
correctes
Checkfirst
o Turn off all the components
beforecon-
necting.
. Connect
the
power
cordlast.
DIRECT
CONNECTION
When usingtheAkai AM-M77 with other
components
of theClaritySeries,
theDirect
Connection
Plugmakes
assembling
your
system
quick
andeasy.
Assurez-vous
tout
d'abord
. De mettre
tous
les
elementshors
circuit
avant
d'effectuer
lesconnexions.
o De connecter
le cordon
secteurender-
nierlieu.
CONNEXIONDIRECTE
Lors d'uneutilisation
du AM-M77 Akai
avec
d'autres
6l6ments
delas6rieClarity,
la
prise
deconnexion
directerend
I'assemblage
delachaine
simple
etfacile.
I
@
Raise
the directconnection
pluglocated
on
top
oftheAkaiAM-M77.
Oncein the
verti-
calposition,pushdown lightly andit will
lock in.position.(Use
thesame
procedure
for all componentswith thedirectconnec-
tion
plug.
Connect
yourAM-M77only
intheorder
il-
lustrated
by first aligningthe front panel
with that
of thecomponent
below.Then
carefully
setit downsothatthesocketon
the bottom of theAkai AM-M77 fitsover
the
extended
plug
oftheAkai
HX-M77R.
Place
theAkaiAT-M77/L or AkaiEA-M77
abovethe Akai AM-M77 in the
same
manner.
The
Akai AM-M77can
be
directlyconnect-
edto thefollowing
components
oftheClari-
tySeries:
Soulevez
la prise
deconnexion
directe
situ6esurlepanneau
sup6rieur
duAM-M77
Akai.Unefois
qu'elle
estenposition
verti-
cale,
poussez-la
l6gdrement
etelle
seblo-
quera
en position.
(Utilisez
lamdmeme-
thode
pour
tousles
elements6quipes
d'une
prise
deconnexion
directe).
Ne connectezvotreAM-M77 Akai que
dans
I'ordre
illustre,enalignant
tout
d'abord
son
panneau
frontal
avecceluidel'6lement
situe
dessous.Puisd6posez-le
soigneusement,
de
sorte
que
ladouillesitueesurlepanneau
in-
fdrieur du AM-M77 Akai s'insdre
surla
prise
faisant
saillieduHX-M77RAkai.
Placez
le AT-M77
lL ouleEA-M77Akai au-
dessus
du AM-M77 Akai delamdme
ma-
nidre.
Le AM-M77 Akaipeut
6treconnect6
direc-
tementaux6lementssuivants
dela
s6rie
Claritv.

-"w
Before
connecting
o Make
surethat
youconnect
thewhitePIN-plug
to theleft
(while)
jack
andthered
PIN-plug
tothe
right
(red)jack.
o Connect
everything
securely.
Loose
connectionscan
lead
to
distortion.
o Make sure thatthe power
cordsandthe connectioncordsdo
notget
tangledwitheachother.
This
canleadtodistortion.
. To prevent
damageto the cords,connectanddisconnectby
holdingthe
plug
andnotthecord.
PHONOiacks
Connectthe outputcordsof the Akai
AP-M77
(left
andright)to thePHONO
jacks
of
the
AkaiAM-M77(left
and
right).
CONTROLjack
Connect the black Mini-plug to the
CONTROL
jack
ofthe
AkaiAM-M77.
Avant
d'effectuer
les
connexions
o Assurez-vous
deconnecter
laprise
PIN blanche
aujack
gauche
(blanc)
etla
prise
Pl
Nrougeau
jack
droit
(rouge)
.
. Connectez
tout fermement.Des
connexionslAches
peuvent
provoquer
desdistorsions.
o Assurez-vous
quelescordons
secteur
et lescordonsdecon-
nexionne s'embrouillent
pas.
Cela
peutprovoquer
des
distorsions.
. Pour
6vitertout dommageauxcordons,effectuezles
con-
nexionset d6connexionsen tenantlaprise
elle-m€me
et non
pas
le
cordon.
Jacks
PHONO
Connectez
lescordonsde sortie
dela
AP-M77 Akai (gauche
et droit) aux
jacks
PHONO (gauche
etdroit)
duAM-M77
Akai.
Jack de commande (CONTROL)
Connectezla mini-prisenoiredujack
CONTROLduAM-M77
Akai.
CD
jacks
ConnecttheOUTPUT
jacks
(left
andright)
of the Akai Compact
Disc
player
or other
component,to theCDjacks
(left
andright)
of
theAkaiAM-M77.
CONTROLiack
If your compact disc player has
"CONTROL" jack. Connect the
CONTROL
jack
of theCompact
disc
player
andthe Akai AM-M77 with theMini-plug
cord.
Jacks
CD
Connectezles
jacks
desortie
(OUTPUT)
(gauche
etdroit) du lecteurdecompacts
discs
Akaioud'un autre6lement,aux
jacks
CD (gauche
etdroit)du
AM-M77
Akai.
Jack de commande (CONTROL)
Sivotrelecteur
decompactsdiscsest6quipe
d'un jack"CONTROL", connectezce
jack
auAM-M77 Akai aveclecordonirmini-
prise.
I
ffil t i.l-):-
l:, (
iilr o t
.t'
.j
r6x
3
.tJ
a

7
SPEAKER
terminals
Be
suretoconnect
the:
* wires
tothe* terminals
(red)
I
- wires
tothe
- terminals
(black);
Left speaker
to theLeft (L) terminals;
and
Right
speakertotheRight
(R)
terminals.
How
toconnect
the
speakers
I Stripoff I cm lengthof vinylcovering
from
theend
ofthespeakerwire.
2 Withthe
speakertab
inthe
open
(down)
position,
insert
thespeakerwirefully
into
theterminal.
Press
up
onthespeaker
tab
until
the
grip
onthewire
is
firm.Pull
thespeakerwiregently
to make
surethat
it issecure.
On
speakerimpedance
o USA,
Canada,
Europe,
UKand
Australia
When
usingtheA orB SPEAKERtermi-
nals:
usespeakers
of6
tol6 ohmsimpedance.
When
usingthe
A and
B SPEAKER
termi-
nals:
usespeakers
ofI2
to16ohmsimpedance.
o Others
Whenusingthe
A or B SPEAKER
termi-
nals:
usespeakersof4
to16
ohmsimpedance.
When
usingthe
A andB SPEAKER
termi-
nals:
usespeakers
of
8
tol6ohmsimpedance.
* Refer
tothemarkings
ontherear
panel.
After
you
have
connected
everything
Connect
the power cord to the Akai
AT-M77's
the
"AMP"OUTLET.
Connected
thepower
cordof the
Akai
AT-M77
lL toahouseholed
ACoutlet.
'1
Iffi
,iW \
U\
approx..l
cm
Bornes
haut-parleurs
(SPEAKERS)
Assurez-vous
deconnecter:
Les
fils* aux
bornes
* (rouges)
Lesfils
- aux
bornes
- (noires)
Lehaut-parleur
gauche
auxbornes
gauches
(L) etlehaut-parleur
droitauxbornes
droites
(R).
Comment
connecter
les
haut-parleurs
1 Denudez
I cm du boutdu fil de
haut-
parleur.
2 La languette
haut-parleur
6tantenposi-
tionouverte
(vers
lebas),ins6rezdfond
lebout
denudedufilhaut-parleur
dansle
borne.Appuyez
surlalanguette
haut-
parleur
jusqu'd
ce
que
lefil soitbien
coinc6.Tirez
doucement
surle fil haut-
parleurpourvous
assurer
qu'il estbien
connect6.
Sur
l'imp6dance
des
haut-parleurs
o Etats-Unis,
Canada,Europe,
Royaume-Uni
etAustralie
Lors
de
I'utilisation
de
la
bornehaut-parleur
A
ou
B
(A
ouB
SPEAKER):
Utilisezdes
haut-parleursde6 d 16
ohms
d'impedance.
Lors
deI'utilisation
desborneshaut-parleur
A
et
B(A
et
B
SPEAKER):
Utilisezdeshaut-parleurs
de
l2 d l6 ohms
d'impedance.
o Autres
Lors
deI'utilisation
de
la
bornehaut-parleur
A
ouB
(A
ou
B
SPEAKER):
Utilisez
deshaut-parleursde
4 d 16
ohms
d'imp6dance.
Lors
de
I'utilisation
des
bornes
haut-parleur
A
et
B
(A
etB
SPEAKER):
Utilisez
des
haut-parleursde8d 16
ohms
d'impedance.
* Reportez-vous
auxrepdres
dupanneau
arridre.
Aprds
avoirtoutconnect6
Connectez
lecordonsecteur
Ala
sortie
"AMP" duAT-M77/LAkai.
Connectezlecordonsecteur
duAT-M77/L
Akai
d
unesortiesecteurmurale.

I
Onthe
RESET
button
On the rear panel
of theAkai AM-M77
thereis
aRESET
button
which
setsthe
mi-
crocomputerinsidetheAM-M77 toafactory
set
'initial
mode'
when
it isdepressed.
Dep-
ress
this button
when
problems
relating.to
insufficientback-up
powerproduce
symp-
toms
similartothefollowing.
o The Akai AM-M77 will not function
whena
buttonisdepressed.
If it is difficult
to depressthe RESET
button,usea
pointed
objectlikethe
point
of
a
pen.
When
theRESET
button
isdepressed
with
theAkai AM-M77 turnedon, it will revert
tothefollowing
initialmode:
o Thetonecontrolwill
besettoflat.
o The
input
selector
will beset
toTUNER
(@ ).
o The direct access
volumewill besetto
-42dB.
o The safetyvolumeandacousticmemory
will be
cancelled.
Protection
circuit
When
theAkaiAM-M77isturned
on,nosignalwill beoutputto
thespeakers
for afewseconds.Thisisdue
totheprotection
circuit
which
prevents
outputof noise
when
theAkai AM-M77isturned
on.
The
protection
circuitalso
functions
during
playback
toprotect
the
speakersfrom overloading
andto protect
theamplifierfrom dam-
ages.
When
speakers
withlessthantheratedimpedance
areused,
theprotection
circuitwill short-circuitthe
g,h, speaker
cords.
Therefore,
should
the
soundbecutduring
playback:
L Turn
offthe
AkaiAM-M77.
2. Checkforandcorrect
thecause.
3. Turn
onthe
AkaiAM-M77.
Surla
touchede
16initialisation
(RESET)
Une touche
dereinitialisation
(RESET)se
trouve sur lepanneau
arridredu AM-M77
Akai. lorsqu'elleestenfonc6e,elle
reglele
micro-ordinateur
quisetrouve
i I'int6rieur
duAM-M77Akai
surun"modeinitial"d6-
termine
enusine.
Appuyez
sur
cettetouche
lorsque
desproblemes
ayanttrait i une ali
mentation
desoutien
insuffisante
produisent
des
sympt6mes
commele
suivant.
. LeAM-M77Akai
nefonctionne
pas
lors-
qu'une
touche
estenclenchee.
S'ilestdifliciled'enfoncerlatoucheder6ini-
tialisation
(RESET),
utilisezunobjet
pointu
comme
unstylo.
Lorsquelatouche
dereinitialisation
esten-
fonc6e,le
AM-M77Akai
6tant
sous
tension,
ilseracommut6sur
lemodeinitial
suivant:
o Lacommandedetonalitd
sera
rdglee
sur
"plate".
Le selecteurd'entreeserareglesur
TUNER
( @ ).
Le volume d accdsdirect
sera
regle
sur
-42d8.
Touslesr6glages
de volume de securit6
etdem6moireacoustiqueserontannul6s.
Circuitde
protection
Lorsquele AM-M77 Akai est
missoustension,aucun
signalne
serasortiauxhaut-parleurs
pendantquelques
secondes.Celaest
d0 aucircuitdeprotectionquieviteunesortiedeparasites
lorsque
leAM-M77
Akai
estmissoustension.
Lecircuitde
protection
fonctionne
egalement
pendant
lareproduc-
tionafin
de
prot6ger
les
haut-parleursd'une
surchargeetde
prote-
ger I'amplificateur
detoutdommage.
Lorsque
deshaut-parleurs
ayantuneimpedance
inf6rieuredI'impedance
nominale
sontuti-
lises,lecircuit
deprotection
court-circuiteralescordons
dehaut-
parleurs
+ et-. Au casofile
sonestcoupe
pendant
unereproduc-
tion:
l. Mettez
leAM-M77Akai
hors
circuit.
2. D6,celez
lacause
duprobldme
etremediez-y.
3. Mettez
leAM-M77Akai
soustension.

9 G Let's
enioythe
music
W APPrdcionslamusique
dt
Prepairfor
playback
Pr6parez-vous
dlareproduction
Tostartrecord
playback
Place
the recordyou want to play
backon
theturntable.
Pour
d6marrerlareproduction
d'undisque
Installezsur le plateau
le disque
quevous
voulez
reproduire.
Listening
toanFM
orAMradio
station
Memorize
theAkaiAT-M77
lL with
asta-
tion.
I YUNTNe l/SH|FT
FIEV Fvvtr'
Ecoute
d'unestationderadioFM
ou
AM
M6morisezle AT-MT7lL Akaiavecune sta-
tion.
To playback
acassettetape
Load
the
AkaiHX-M77Rwithapre-
recorded
cassettetape.
Pourreproduire
une
bande
cassette
Chargez
unebandecassette
pr6-enregistr6e
dans
le
HX-M77R.
Toplayback
acompactdisc
Load the Akai compact discplayer
with a
compactdisc.
Pour
reproduire
un
compact
disc
Chargezun compactdiscdans
le lecteur
de
compactsdiscs
Akai.
Step
2
Etape
2
Play
backthe
component
Press
theSTART/CUT
({+) buttonofthe
AkaiAP-M77.
Reproduisez l'616ment
Appuyez
surlatouche
d6marrage/arr€,t
(START/CUT{=)
de
laAP-M77Akai.
Pressthedesired
preset
channelbuttonof
theAkaiAT-M77
/L.
Appyez
surlatouche
destation
prereglee
desireedu AT-M77/L
Akai.
Presstheforward
( ) ) or reverse
( { ) PLAY
buttonto
play
back
a
tape.
Appuyezsur
la
touche
de
reproductionen
avance
( > ) ou
en
retour
( { ) pour
reproduireune
bande.
Pressthe
INPUTSELECTOR
until
theCD ( @ )is
displayed.
Pressthe
PLAY( > ) button
to
play
back
acompactdisc.
Appuyez
surleselecteur
d'entrde
(INPUT
SELECTOR)
jusqu'd
ce
que
CD ( EI ) soit
affich6.
Appuyez
sur
latouchede
reproduction
( ) ) pour
reproduire
un
compactdisc.

t0
Checkfirst
V6rifiez
toutd'abord I AkaiClarity
system
is
turnedON. I Lesysteme
ClarityAkaiestsoustension.
2 The volume levelis
setaround -48dB. 2 Le
niveaude
VOLUME
est
r6gleautour
de
-48 dB.
Mettez
sous
tension
(-.^) le commutateur
haut-
parleurs
(SPEAKERS).
Lors
d'uneecoute
au
casque,
mettezhorscircuit
(- '-) cecommutateur.
-
1Turn on ( t-^ ) the
Whenlisteningthrough
(
^-l )the
bothswitch.
SPEAKERS
switch.
headphones,
turnoff
To
adjustthe
volume
Usethedirectaccess
volume pamel.
To increase
thevolume
Touch thedirect accessvolume panel
towardsthe right.
To decreasethe volume
Touch thedirect access
volume panel
towardsthe left.
Note:
The directaccess
panel
andVOL/BAL displays
will change
backto
volume about 5seconds
after the balanceisadjusted.
Pour
r6gler
le
volume
Utilisez le panneau
devolume daccds
direct.
Pour augmenter levolume
Touchez lepanneau
devolume dacces
direct vers ladroite.
Pour diminuer levolume
Tuchez lepanneau
devolume daccdsdirect vers lagauche.
Remarque:
Le panneau
de volume aaccds
directet les
affichages
volume/6quilibre re-
viendrontdvolume environ 5secondes
apres
queI'equilibreestajuste.
To
memorizethe
safety
volume
How to memorize
1 DepresstheSAFETYbutton
more
than
I seconduntiltheSAFETYdisplay
will
startflashingonandoff.
Within 1 mlnute
2 Touch
theareaof thedirectaccess
volumepanelyouwant
to memorize
as
themaximum
volume
level.
3 To memorize
thesafety
volumelevel,
press
the SAFETY button. The
SAFETYdisplay
will
light.
If you
want
tochange
thememorized
safety
volume
level
please
followtheabove
proce-
dure.
The left andright level
balancecannot
be
memorized.
To
confirmthe
memorized
Safety
volume
level
Onthe
BALANCE
control
When you feelthat there isadeficiencyin the left andright speaker
balancedueto the speaker
placement.
I Tune in anAM stationto receiveamonaural signal.
2 Touch the direct access
volume panel to the normal listening
level.
3 Pressthe VOL/BAL button. The FL display
will changethe bal-
ance
display.
4 Touch the directaccess
volume panel
towardsleft (L) or right
(R) until thesoundseems
centeredonyour usual
listeningarea.
Sur
la
commande
d'6quilibre
(BALANCE)
Utilisez
cettecommandelorsquevous sentez
qu'il y aun mauvaisequilibre
deshaut-parleurs
droit et
gauche
du faitdeleuremplacement.
l. Syntonisez
une stationMA pour recevoir un signalmonaural.
2. Touchez le panneaude volume d accdsdirect pour obtenir le niveau
normal d'6coute.
3. Appuyezsur la toucheVOL/BAL. L'affichage
fluorescent
indiquera
I'aflichage
d'6quilibre.
4. Touchez le panneau
de volume d accesdirect
versla
GAUCHE ou la
DROITE jusqu'a ce
que le son semble
centr6sur votre position
d'e-
coutehabituelle.
Pour
m6moriserle
volume
de
s6curit6
Commentm6moriser
I Appuyez
sur
latouchede
s6curit6
(SAFETY)
pendant
plus
d'uneseconde
jusqu'd
ce
que
I'aflichageSAFETYcommenc€d
clignoter.
Avant
qu'une
minute
sesoit
icoul6e
2 Touchez la zone du panneau
de volume d
acces
direct
pour
obtenir
leniveaumaximum
de
volume
que
vousvoulezm€moriser.
3 Pour m6moriserle niveaude volume desecu-
rite, appuyezsur la touche SAFETY. L'afli-
chageSAFETY s'allumera.
Pour changerle niveau de volume de securite
me-
morisd, effectuez
lesoperationsci-dessus.
L'6quilibre des
canaux
gauche
etdroit ne peut
pas
6trem6moris6.
Pour
v6rifier
leniveau
de
volume
des6curit6
m6moris6
Press
the
SAFETY
button.
The
memorized
safety
volume
will
dis-
played
onthe
FL display.
This
operation
willnotalterthelisteningvolume
level.
Appuyezsur latouche
SAFETY. Le volume desecurite
m6moris6sera
af-
fichesur I'affichagefluorescent.
Le niveau de volume d'6coute ne sera
pas
modifie parcetteoperation.

riil:1
| |
G
ff Tone
control
adiustment
tfglage
dela
commandede
tonalitf
To
adjust
BASSresponse
To increase
bass
response
Press
the* sideoftheBASS button.
Todecrease
bass
response
Press
the- sideoftheBASS button.
Pourr6glerla
r6ponse
des
graves
(BASS)
Pouraugmenterla
r6ponse
des
graves
Appuyezsur le c6t6 * de la touche
BASS.
Pour
diminuer
lar6ponsedes
graves
Appuyez
sur le c6t6 - de latouche
BASS.
To
cancelthetonecontrol
effect
Press
the DEFEATbutton.
TheACOUS-
TIC displays
willdisappear.
Pour
annuler
I'effet
de
commandedetonalit6
Appuyez sur la touche annulation
(DEFEAT).
L'afiichage
ACOUSTICdispa-
raitra.
To
adjust
TREBLEresponse
Toincrease
trebleresponse
Press
the
* sideof
the
TREBLEbutton.
Todecreasetreble
response
Press
the
- sideof
the
TREBLE
button.
Pourr6gler
la
r6ponse
des
aiguds
ffREBLE)
Pour
augmenter
lar6ponsedesaiguds
Appuyez
surle c6te * delatouche
TREBLE.
Pour
diminuer
lar6ponse
des
aigu€s
Appuyez
sur le c6t6 - de latouche
TREBLE.
F+H\
+Da /Frd ,-H
I
[r$il
How
tousetheacoustic
memory
TheAkai AM-M77 canmemorize
uptotwo
sets
of bassandtreble
responses
for instant
recall.
How
tomemorize
Adjust thebass
andtrebleresponse
you
want
tomemorize.
Press
theMEMORY
button.TheACOUS-
TIC andM displaywill lightandA1 and
,{2
displaywill flash
onand
off.
Comment
utiliser
lam6moire
acoustique
Le AM-M77 Akai
peut
m6moriser
jusqu'i
jeux der6ponses
graves
etaigu€s
pour
un
rappelinstantan6.
Comment
m6moriser
Reglezla rdponsedes
graves
etdes
aiguEs
que
vousvoulezm6moriser.
Appuyez
sur
latouche
MEMORY.
L'affi-
chage
ACOUSTIGetM s'allumera
etI'affi-
chage
Alet
,{2
clignotera.
lrlI
2E-fr
tElElEt

Within
5seconds
Press
the IN/CALL I or 2 button of the
memory (Al or A2) you want to use.The
appropriate
displaywill light.
To changethe memorized tone control char-
acteristics:
Please
follow aboveprocedure.
To recall the memorized tone control char-
acteristics
Press
theIN/CALL I or 2 button.
The memorized characteristicswill appear
on the FL display.
Notefor tonecontrol
. Loudnesscompensation
* Thehuman
ear
isless
sensitiveto thelowand
highfrequencies
atlowvolumelevels.If thesefrequencieswere
notboostedor
compensated,
thesound
will seemunnatural.
Morenatural
soundcanbeobtained
by boostingthebassand
treblere-
sponses.
Thisiscalledloudness
compensation.Play
back
a
sourceatlowvolume
level,adjustthebassand
treble
responses
andmemorize
theminto oneof theacousticmemoriesfor in-
stant
loudness
compensation.
* Set
theBASS response
toapproximetly
*5 and
the
TREBLE
responseto approximately*3 andmemorize
thesecharacteris-
ticsforinstantloudness
compensation.
o Onthevolumelevel
Do notsetthevolumelevel
toohigh.Thespeaker'stweeters
and
woofers
might
becomeoverloaded.
o When
usingtheAkaigrahpicequalizer
EA-M77
Press
the DEFEAT button.Engaging
theacoustic
memoryor
BASSandTREBLE
controls
willhave
anadverse
effect
on
the
signals.
l2
Avant
que
5secondesse
soient6coul6es
Appuyez sur la touche entree/rappel
(IN/CALL) I ou 2 de lamemoire (A1 ou
A2) sur laquellevous voulez utiliser.
L'affi-
chagecorrespondant
d la toucheenclench6e
s'allumera.
Pour changer les caract6ristiquesmdmori-
seesdelacommande de tonalite.
Effectuezles
operations
ci-dessus.
Pour rappeler les caract6ristiquesm6mori-
seesdelacommande detonalite.
Appuyez sur la touche entrde/rappel
(IN/CALL) I ou
2.
Les caracteristiquesm6moris6es seront afli-
chees
surI'aflichagefluorescent.
Remarques sur lacommande de tonalit6
o Compensationphysiologique
* L'oreillehumaine
estmoinssensibleauxbasses
ethautesfre-
quences
auxfaiblesniveaux
de
volume.Si
cesfr6quences
n'6-
taient
pas
amplifi6es
oucompens6es,lesonsembleraitartificiel.
Un son
plus
naturel
peut
6treobtenuenamplifiantlesr6ponses
graves
et aiguEs.Ceciestappelecompensation
physiologique.
Reproduire
une
source
dfaibleniveaude
volume
et,reglez
les
r6ponses
graves
etaiguEset lesmettre
enmemoire
dans
I'une
desm6moires
acoustiques
pour
unecompensation
physiolo-
gique
instantanee.
* Reglez
lardponse
des
graves
surapproximativement
*5 et la
r6ponse
desaigu€s
sur
aproximativement
*3 etm6morisezces
caractdristiques
pour
une
compensation
physiologique
instantan6e.
o Sur
le
niveaudevolume
Ne rdglez
pas
le niveaudevolume
tropfort.Les
transducteurs
de bassesfr6quenceset dehautesfr6quences
pourraient
€tre
surcharg6s.
o Lors de I'utilisation
de l'6galiseur
graphique
EA-M77
Akai
Appuyez
sur
latouche
d'annulation
(DEFEAT).
Lefait
d'enga-
ger
lam6moire
acoustiqueoulescommandesdes
graves
etdes
aiguds
aurauneffetcontrairesurles
signaux.

t,i,
:]]il]iiji::ii:ii:iil:;i!
i:]i:i:jti:]i:]tiii:tiilijiii
i.r':r:':+"*::'r..
l3 G Lgt's
gni0y
microphone
mixing
@ Mixage
au
microphone
,
Ifil
dqE)
To produce
acontrolled
mix of microphone
andotherinput
sources
for recording
or playback,
theAkai AM-M77 isequipped
withamicrophone
mixingcircuit.This
circuitis
activated
whenev-
eramicrophoneis
plugged
intotheMini (3.5mm)
MIC
jack
locat-
ed
onthe
front
ofthe
Akai
AM-M77.
Connect
themicrophone
tothe
MIC
jack
ofthe
AkaiAM-M77.
For
microphone
use
with
play
back:
Press
theplay
buttonof thecomponent
you
want
toplayback.
Adjust
onlythemicrophonelevel.Usingthe
MICMIXING
control.
Adjust the volumeof the microphoneand
music combination with the Akai
AM-M77's
directaccess
volume
panel.
Pour produire
un mixagecontr6led'un microphone
etd'autres
sources
d'entr6e,
pour
I'enregistrementoulareproduction.Cecir-
cuit estactiv6lorsqu'unmicrophone
estbranch6
surle minijack
(3,5
mm) MICsitu6
sur
le
panneau
frontal
duAM-M77Akai.
Connectezle
microphoneau
jack
MICdu
AM-M77
Akai.
Pour
utiliserunmicrophoneavec
une
reproduction:
Appuyez
surlatouchede
reproductionde
I'el6ment
que
vousvoulezreproduire.
Pourregler
seulementle niveaude mixage
du microphone,
utilisez
lacommande
de
mixage
micro
(MlC MIXING)
du
AM-M77
Akai.
Reglez
seulementle niveau microphone en
utilisant la commande
de mixagemicro
(MlC MIXING). Regler
le
volume
de
la
combinaison musiqueet microphoneavec
le panneau de volume d accdsdirect du
AM-M77 Akai.
PLAY
For
microphone
useinrecording:
First
Load
a
cassettetapetotheAkaiHX-M77R.
Next
Depress
the
DIRECT
SYCHRORECORDING
SYSTEM
buuon
ofthe
source
you
want
torecord.
To adjust
therecording
level
ofthemicrophone
only,usetheMIC
MfXING
control
on
theAkaiAM-M77.
Howling
This typeof feedbackiscommonlycausedby havingthemicro-
phone
located
tocloselytothe
speakersorthevolume
uptoohigh.
Toeliminate
this
problem,
simplykeepthemicrophone
awayfrom
thespeakers,
andadjustthevolumesothatthere
isno danger
of
annoying
feedback.
/7
-_
\\
Pour
utiliser
unmicrophone
i I'enregistrement:
Toutd'abord
Chargez
une
bandecassette
dansle
HX-M77R
Akai.
Puis
Appuyez
sur
latouche
desystemed'enregistrementsynchronise
direct
(DIRECT
SYNCHRO
RECORDING
SYSTEM)de
la
source
que
vousvoulez
enregistrer.
Pour
r6gler
seulementleniveaud'enregistrement
dumicrophone,
utilisezla
commande
demixagemicro
(MlC
MIXING)
du
AM-M77
Akai.
Ronf
lement
Cetype
deprobldme
est
fr6quentlorsquelemicrophone
estsitue
tropprds
des
haut-parleurs
ouquelevolume
esttrop6leve.Pour
eliminerceprobleme,
il voussuffitd'6loignerle microphone
des
haut-parleurs
ouder6glerlevolume
desorte
qu'il n'y aitpas
de
dangerde
ronflement.
it
il
a.

G ht'srecord
@ Enregistrement
A
Attention
These
buttonsarenotto beusedasan
input
sourceselector.These
buttonsoperatein
the same
way
astherecording
button of the
cassette
deck.They do not only changethe
input source,
but alsoput the Akai
HX-M77Rintorecordingmode.
First
o If the cassettetape'srecordingdefeat
tabs
arebroken, recordingcannottake
place.
Coverthe cavitieswithadhesive
tape.
PresstheEJECT buttonandloadacassette
tape.
Recording
souce
Froma record
Place
arecord
ontheturntableand
press
the
appropriate
programming
keysif you want
tousetheRPPS.
Sourced'enregistrement
A
partir
d'undisque
Placez
undisquesurlatabledelecture
etap-
puyezsurlestouches
deprogrammation
si
vous
voulez
utiliserle
svstdme
RPP.
l4
Languettes
de
protection
Attention
Ces
touchesnesont
pas
un s6lecteur
de
sourced'entr6e.Ces
touchesfonctionnent
delam6memanidre
que
latouched'enregis-
trementd'un magn6tocassette.Ces
touches
ne changent
pas
seulement
la sourced'en-
tr6e,maismettent6galement
le HX-M77R
sur
lemoded'enregistrement.
Tout
d'abord
. Si leslanguettesdeprotection
contre
I'enregistrementdelacassettesontcas-
s6es,
I'enregistrement
ne
peutpas
s'effec-
tuer.Recouvrez
lescavit6sd'unmorceau
derubanadhdsif.
Appuyez
surlatouched'6jection
(EJECT)
etchargezunebande
cassette.
DIRECT
SYNCHRO
RECORDING
button
Pressthe
PHONO
button
TheAkaiHX-M77Rwillautomatically
start
recording.
Touche
d'en
registrement
synchronis6direct
(Dl
RECT
SYNCHRO
RECORDING)
Appuyez
sur
latouchede
PHONO.
LeHX-M77R
demarrera
automatiquement
I'enregistrement.
Fro I
r16-r
L:-f{+s+
I
Fromaradioprogram.
Pressa PRESET
STATION buttononthe
frontpanel
oftheAkaiAT-M77
/L.
A partird'une
6mission
de radio
Appuyez
unela touchedestation
prereglee
(PRESET
STATION) sur
le
panneau
avant
AT-M77
/L.
Press
the
TUNER
button
TheAkaiHX-M77Rwillautomaticallystart
recording.
Appuyez
sur
latouchede
TUNER.
Le
HX-M77R
demarrera
automatiquementI'enregistrement.
1
IFM.BI
---
4
IFM-EI
. tat

r5
Froma compact disc
Load
theCD
player
with
acompact
disc.
A partird'uncompact disc
Chargez
un compact
discdanslelecteurde
compact
discs.
The AUX jack is not equipped
withthe
DIRECT
SYNCHRO
RECORDING
SYS.
TEM button.
If youwantto recording
from
the
AUX
component.
I Depress
the INPUT SELECTOR
until
the
AUX
is
displayed.
2 Depress
theRECPAUSEbuttonofthe
Akai HX-M77R into recording
standby
mode.
3 Depress
theforward
or reverse
PLAY
button,then
play
back
thecomponent.
* Thelistening
sound
can
be
adjusted
with
theAkaiAM-M77',s
VOLUME
control,
butit willhavenoeffectonthe
recording
sound.
To adjusttherecording
volume,
usethe
cassettedeck's
RECLEVELcon-
trol.
Press
the
CD
button.
The
AkaiHX-M77R
will
automatically
start
recording.
Appuyez
surlatouchede
CD.
Le
HX-M77R
demarreraautomatiquementI'enregistrement.
Lejack
AUX n'est
pas
connect6irlatouche
desystemed'enregistrementsynchronis6
direct
(DIRECT
SYNCHRO
RECORDING
SYSTEM).
Sivousvoulez
enregistrer
d
partir
de
I'el6ment
AUX.
I Appuyez
sur le s6lecteurd'entr6e
(INPUT SELECTOR)
jusqu'd
ce
qu'AUXsoit
affich6.
2 Appuyez
surlatouchedepause
i I'enre-
gistrement (REC PAUSE) du
HX-M77R Akai pourle mettre
surle
mode
d'attented'enregistrement.
3 Appuyez
surla touchedereproduction
enavance
ouenretour,
puis
reproduisez
l'616ment.
* Le son
6coute
peut
Otre
regle
avecla
commandede
VOLUMEdu AM-M77
Akai,mais
celan'aura
aucun
effetsur
le
sonenregistre.
Pourreglerle volume
d'enregistrement,utilisez
lacommande
de niveaud'enregistrement
(REC
LEVEL)
dumagnetocassette.

G Tapedubbing
W l|oublagedebande
Ju
You can make a copy of an original tape by recording from one
tapedeckto another.
Connect the tapedeck to the front or rear panelAUX jacks of the
Akai HX-M77R for playbackonly and use the Akai HX-M77R for
recording only. You cannot record from the Akai HX-M77R to
AUX.
canbe adjusted
with the Akai AM-M77's
but it will have no effect on the recording
r6
Vous
pouvez
faireunecopied'unebandeoriginaleen
enregistrant
d'un magn6tocassettedun autre.Relierle magn6tocassette
con-
nect6
aux
jacks
AUX du panneau
avantouarridre
du HX-M77R
Akai
seulement
pour
lareproduction
etutilisez
leHX-M77RAkai
seulement
pour
lareproduction
etutilisezle
HX-M77RAkai
seule-
ment pour I'enregistrement.
Vous
nepouvezpas
enregistrerdu
HX-M77RAkai
i AUX.
HX-M77R
o Lesonecoute
peut
0tre
regleaveclacommande
de
VOLUME
du AM-M77 AKai. mais
cela
n'auraaucun
effet
surle
son
enregistr6.
o Thelisteningsound
VOLUME
control.
sound.
AM-M77
- i_-J:
r [_-91
L
EE
=-E
dac l-
Ee l-
djr6 [:
=-
nF
u P-q
ii'r: l.
*iliffi7,?
ILoadthe originaltape and prepare
for
playback.
Chargezla
bandeoriginaleet
pr6parez
le magn6tocassette i la reproduction.
INPUT
EELEC?c,FI
Depress
the INPUT
SELCTORbutton
until
AUX
is
displayed.
Appuyez
surlatouchedu s6lecteur
d'entr6e
(INPUT
SELECTOR)
iusqu'i
cequ'AUX
soitaffich6.
FIEC PAUC'E
Loada blanktapeandprepare
for
recording.
largez unebande
vierge
et pr6parez
magn6tocassetteA
I'enregistrement.
2
PLAY
Play
back thetape.
Reproduisez
labande.
PLAY
Startrecording.
D6marrezI'enregistrement

l7
G
ff 0nthespeakersystem
$ur
le
systbme
d'Bnceintes
Wffi
q
Speaker
placement
The playback
characteristics
of thespeakersystem
are
greatly
in-
fluenced
bytheplacement
andtheroominwhich
thespeakers
are
used.
Forexample,if thespeakersystem
is
placed
nearahard
wall,
the bass
will soundbetterbut the treblemightseemtoo strong.
Play
backsomemusic
without using
thetonecontrols
andmove
the speakersystemaroundto find thebest
location.However,
please
keepthefollowinginmind.
Place
thespeakersystem:
o On a flat andsolidsurface
whichdoes
not transmittoo manv
vibrations.
o Ina
wellventilated,
notvery
humid
place.
o Awayfromdirectsunlight
andheat
sources
(stoves,
etc.).
o Awayfromyour
turntableand
TV.
Attention
To prevent damageto the speakersystem.
o Do not raise
the volume too high.
o Turn off the Akai AM-M77 when changing or connecting the
player
system's
cartridge.
o Lower the volume when changing radio stations, or when
cueingor reviewing tapes.
o Do nottouchthespeakers'diaphragms.
Midi-Speaker
series
. Some
speakersofAkai'smid-sizeseriescome
withstandard
ac-
cessoryfelt pads
whichwill helpto reduce
unwanted
vibration
noise
when
attatchedtothebottomofthespeakers.
How
tocleanthespeakersystem
o Cleanthe
speakersystem
witha
soft,
drycloth.
o Ifvery
dirty,usea
milddetergent.
o To protect
thediaphragms
(the
vibrating
parts),
donotspray
liquidcleaner
directly
onthespeakersystem.
Always
spray
it on
aclothfirst.
o Never usealcohol,
paint
thinner,chemicallytreatedclothor
useaspray-type
insecticidenearthespeakersystem,
asthis
will
damagethefinish.
Emplacement
deshaut-parleurs
Lescaracteristiquesdereproductiondu systdmed'enceintessont
influenceesde manidre
importante
parlapidce
dans
laquelleles
haut-parleurssontutiliseset par
leuremplacement.
Par
exemple,
sile systeme
d'enceintesest
plac6prds
d'un mur 6pais,
les
graves
sembleront
meilleuresmais
les
aiguEs
peuvent
semblertrop
fortes.
Reproduisezdelamusique
sans
utiliser
lescommandesdetonalite
et d6placez
les
haut-parleurs
pourtrouverleur meilleur
emplace-
ment.
Pensezcependantaux
points
suivants:
Placez
lesystdmed'enceintes:
o Surune
surface
plate
et solide
qui netransmet
par
trop
de
vibrations.
. Dans
unendroitbien
a6r6,
pas
trophumide.
o Eloigne
des
rayonsdirectsdu soleileldessourcesdechaleur
(fours,
etc.)
o Eloigne
de
la
tablede
lecture
et
d'unteleviseur.
Attention
Pour
6vitertoutdommageausystdme
d'enceintes
o Nereglez
pas
le
volume
tropfort.
o Mettez
leAM-M77 Akaihors
circuit
pour
changerouconnecter
la
cellulede
latabledelecture.
o Diminuezlevolume
pour
changer
destation
radio,
lors
de
I'a-
vance
rapideet
lerembobinage
debandes.
o Netouchez
pas
lesmembranesdeshaut-parleurs.
S6riede
haut-parleurs
Midi
o Certainshaut-parleursde la seriedimensions
moyennes
Akai
sontequipesdepatins
enfeutre
qui
aideront
irreduireles
bruits
de vibration lorsqu'ils
sont
fix6ssur
le panneau
infdrieurdes
haut-parleurs.
Comment
nettoyer
le
systdmed'enceintes
o Nettoyez
le
systemed'enceintes
avecunchiffon
douxetsec.
o S'il
esttrdssale,utilisez
undetergentdoux.
o Afin deprot6ger
lesmembranes
(les
parties
vibrant).
n'appli-
quez
pas
denettoyant
liquideena6rosoldirectementsurlesys-
tdme
d'enceintes.
Mettez-led'abord
toujours
surunchiffon.
o N'utilisez
jamais
d'alcool,dediluant,detissutrait6chimique-
mentsur
les
coffretsdusystdme
d'enceintes,
nin'utilisez
d'in-
secticidesdetype
a6rosol
pres
deceux-ci,carcelaendommage-
raitlafinition.

r8
o
o
TAPE
iacks
Connect
the REC jacks of the Akai
AM-M77 (leftandright) to the
LINE lN
jacks
of
theAkaiHX-M77R
(left
andright).
Connect
the PLAY jacks
of the Akai
AM-M77 (left
and
right)to theLINE OUT
jacks
ofthe
AkaiHX-M77R(left
and
right).
TUNER
jacks
Connectthe
TUNER
jacks
of the
Akai
AM-M77to theOUTPUT
jacks
ofthe
Akai
AT-M77TL
CONTROL jacks
Connectthe CONTROL jack of each
component and the Akai AM-M77
CONTROL
jacks
withMini-plugcords.
CDjacks
ConnecttheOUTPUTjacks
(leftandright)
of the Akai Compact
Disc
player
or other
component,to theCDjacks
(leftand
right)
ofthe
AkaiAM-M77.
EQUALIZER
jacks
Connectthe OUT jacks
(left
and
right)of
theAkai EA-M77to the
EQUALIZER
lN
jacks
ofthe
AkaiAM-M77.
Connectthe lN jacks(leftandright)of the
AkaiEA-M77
to the
EQUALIZER
OUT
jacks
ofthe
AkaiAM-M77.
Attention
lf you
do not intend
to usethe Akai
EA-M77.
Connect
the
AkaiAM-M77'sEQUALIZER
lNandOUT
jacks
with
the
PIN
plug
cords
(available
on
themarket).
If these
jacks
arenotconnected
withPIN
plug
cords,the
Akai
Claritysystem
willnot
function
properly.
ffifffiEi ;
t?rile?Tf;IEtffi$'@
;ffi"tr=**uff*,o,'*.f
I:_- rL
lll Iq-5
t
Jacks bande (TAPE)
Connectez
les
jacks
d'enregistrement
(REC)du AM-M77 Akai(gauche
et droit)
aux
jacks
d'entr6e
deligne
(LINElN) du
HX-M77RAkai (gauche
etdroit).Connec-
tezles
jacks
dereproduction
(PLAY) du
AM-M77 Akai (gauche
etdroit)aux
jacks
de sortiede ligne (LINE OUT) du
HX-M77R
Akai
Qauche
etdroit).
Jacks TUNER
Connectezles
jacks
TUNER
duAM-M77
Akai aux
jacks
sortie (OUTPUT) du
AT-M77
lL Akai.
Jacksdecommande
(CONTROL)
Connectezle
jackdecommande (CON-
TROL) dechaqueelementetles
jacks
de
commande
(CONTROL)
du
AM-M77Akai
aveclescordonsirmini-prise.
Jacks GD
Connectezles
jacks
desortie
(OUTPUT)
(gauche
et droit) du lecteurde compacts
discs
Akai ou d'un autre
6l6ment
aux
jacks
CD (gauche
etdroit)duAM-M77 Akai.
Jacks 6galiseur (EOUALIZER)
Connectez
les
jacks
de sortie(OUT)
(gauche
etdroit)duEA-M77Akaiaux
jacks
entr6e
6galiseur
(EQUALIZER
lN) du
AM-M77Akai.
Connectezles
jacks
d'entr6e
(lN) (gauche
et
droit) duEA-M77Akaiaux
jacks
sortie
6ga-
liseur
(EQUALIZER
OUT) Oe
nU-VtZZ
Akai.
Attention
Si vous n'avez pas I'intention
d'utiliser le EA-M77 Akai
Connectez
les
jacks
entr6eetsortieegaliseur
(EQUALIZER
lN et OUT)duAM-M77
Akaiaveclescordonsi prise
PIN (en
vente
danslecommerce).
Sices
jacks
nesont
pas
connect6savec
des
cordonsd
prise
PlN,lesystdmeClarityAkai
nefonctionnera
pas
correctement.
g Usingthe
frkaiAM-M77withoutthedirectGonnectim
plug
tr Utilisation
du
AM-M77Akaisansla
prise
dcconnexion
directe
Whenplacing
theAkai AM-M77 andanothercomponentside
by
sidefor use
without
thedirectconnection
plug,
followtheinstruc-
tions
below.
Before
connecting:
o Turnoffallthecomponents.
o Use
the
PIN-plug
cordsforPIN-jack
con-
nections
and
Mini-plug
cordsfor CON-
TROL
jacks.(available
onthemarket)
Lors
de
I'installationduAM-M77Akaietunautre
6lement
cdted
cdt6pourutilisationsans
laprise
deconnexion
directe,suivez
la
mdthodeci-dessous.
Avant
d'effectuer
les
connexions
Mettez
tous
les6l6mentshors
circuit.
Utilisezlescordons
dprise
PIN pour
la
connexion
du
jack
PIN et le
cordon
d
mini-prise
pourles
jacks
decommande
(CONTROL).(En
vente
dans
le
com-
merce).

t9
G
ff Problem?
ht'scheck
Bes
problbmes?
Ufrifiez
Ist'hs
AhsiC.tqrity-sy$tsm
turned
g'ri? :, l
Depres.sthe
$YSTEtilOl*lOFF,butroh
ofrhedkai
NI.M?IlL,totryE
on
the
AkaiClaritysvstorn.
Is,the
SpEAKEfi$'switch
tumed,sn,
{.c"}
?'
Turnonths$FEAKEfiSowitch,'.r.l::
,,.: , , ,.,,,
,-',,,
,.,
' ,"'.
, . i ,,,,,
,.,
.,1.
....
Lesy eClaritiAkaiest-ii,sousren$ion?
i''
Appuybzsur,la'touchernarc,lplah0tsyst&nre,
"
{svsTEflt oil/orrl d" *1.il{??llArcCi,poui '
rnettresous,tensionle
$y$t$me,ehfity.
Le
co4rnutateur
heut-parleurs
{$FEAKER$}s$t.il
sousteneion
( .+ )? ' ' '
Mettez
soustension
Iecommutateur
haut-parleurs.
it u
VOLUilEi$
set
too
low.
Adiwt the
VOI"UME
control.
LeVOLUMEest
regl6
trop
bns.
Reglez
la
commnnde
de
VOLUME.
Yqr cannot hear the baeg fully or
tho sotnld doee rpt sgem to be in
stseo.
l-es
gnavee
n'ont
pae
tor.rtc
leur
prieeance qr le Gonns smble
pae 6tre en st6r6o.
Check
thespeakeraonnedions
Makesurethat * wiresaredbnnoctedto *
terminals
and- wires
to ; terminals.
Vdrifiezles
mnnexionsdes
haut-parleurs.
Assurez-vous
quebs fils + sontmnnectesaux
rru*rnes
* etlesfils - ouxbornes
*.
Shouldaproblem
persist,
write
downthemodeland serialnumbers
and
all
pertinentdata
regardingwarrantycoverageas
well as
aclear
description
of
the existing trouble. Then, contact your nearestauthorizedAkai Service
Station or the Service
Department of Akai Electric
Company, Tokyo,
Japan.
En cas
de probldme, notez le nom du moddle, le num6ro de s6rieet toutes lesdonnees
pertinentes
concemant I'etendue delagarantie
ainsi
qu'une descriptionclairedes
defail-
lancestechniques.Puis, prenezcontactavec la Station ServiceAkai la plusprocheou la
SectionApres-ventede lasocieteAkai ElectricCompany, Tokyo, Japan.
Other manuals for AM-M77
1
Table of contents
Other Akai Amplifier manuals
Popular Amplifier manuals by other brands

Crown
Crown XTi 1000 Operation manual

Amplifier Research
Amplifier Research 100A250 series manual

BRAX
BRAX X 2000.2 GRAPHIC EDITIONS instruction manual

Becos
Becos MICRO BOOSTER installation manual

Unison Research
Unison Research Unico Secondo user manual

Audiotec Fischer
Audiotec Fischer Match M 5DSP MK2 micro manual