manuals.online logo
Brands
  1. Home
  2. •
  3. Brands
  4. •
  5. Akai
  6. •
  7. Plasma TV
  8. •
  9. Akai PDP4249G User manual

Akai PDP4249G User manual

Other manuals for PDP4249G

1

Other Akai Plasma TV manuals

Akai LCT32Z4ADP User manual

Akai

Akai LCT32Z4ADP User manual

Akai PDP4206EA Installation instructions

Akai

Akai PDP4206EA Installation instructions

Akai PDP42Z5TAC User manual

Akai

Akai PDP42Z5TAC User manual

Akai PDP4273M1 User manual

Akai

Akai PDP4273M1 User manual

Akai PDP4273M User manual

Akai

Akai PDP4273M User manual

Akai PDP5006H User manual

Akai

Akai PDP5006H User manual

Akai PDP6065TAC User manual

Akai

Akai PDP6065TAC User manual

Akai PDP42Z5TA - 42" Plasma TV User manual

Akai

Akai PDP42Z5TA - 42" Plasma TV User manual

Akai PDP4206EM1 User manual

Akai

Akai PDP4206EM1 User manual

Akai PDP4294LV1 User manual

Akai

Akai PDP4294LV1 User manual

Akai PDP4273M User manual

Akai

Akai PDP4273M User manual

Akai PDP4273M User manual

Akai

Akai PDP4273M User manual

Akai PDP5074HNC User manual

Akai

Akai PDP5074HNC User manual

Akai PDP6065TA User manual

Akai

Akai PDP6065TA User manual

Akai PDP50Z6TA User manual

Akai

Akai PDP50Z6TA User manual

Akai PDP42Z5TA - 42" Plasma TV User manual

Akai

Akai PDP42Z5TA - 42" Plasma TV User manual

Popular Plasma TV manuals by other brands

Sony WEGA KE-P42M1 Service manual

Sony

Sony WEGA KE-P42M1 Service manual

LG 60PA5500 Specifications

LG

LG 60PA5500 Specifications

VisionQuest PVQ-32VGB owner's manual

VisionQuest

VisionQuest PVQ-32VGB owner's manual

LG PJ550N Specifications

LG

LG PJ550N Specifications

Samsung PA43H4000 user manual

Samsung

Samsung PA43H4000 user manual

LG 42LG70ER owner's manual

LG

LG 42LG70ER owner's manual

Samsung 7+ series quick start guide

Samsung

Samsung 7+ series quick start guide

Panasonic Viera TH-37PA60EY operating instructions

Panasonic

Panasonic Viera TH-37PA60EY operating instructions

LG DU-42PZ60H Service manual

LG

LG DU-42PZ60H Service manual

Panasonic Viera TH-42PX80A operating instructions

Panasonic

Panasonic Viera TH-42PX80A operating instructions

Panasonic VIERA TH-P50X30D Service manual

Panasonic

Panasonic VIERA TH-P50X30D Service manual

Samsung PS43F4510AW manual

Samsung

Samsung PS43F4510AW manual

Panasonic TH-50PX20U/P Service manual

Panasonic

Panasonic TH-50PX20U/P Service manual

Panasonic TH-37PW7BX operating instructions

Panasonic

Panasonic TH-37PW7BX operating instructions

Nexus NX422 owner's manual

Nexus

Nexus NX422 owner's manual

Panasonic TX-PR42U10 Service manual

Panasonic

Panasonic TX-PR42U10 Service manual

Panasonic TH42PV500EY operating instructions

Panasonic

Panasonic TH42PV500EY operating instructions

Panasonic Viera TH-50PE8U Service manual

Panasonic

Panasonic Viera TH-50PE8U Service manual

manuals.online logo
manuals.online logoBrands
  • About & Mission
  • Contact us
  • Privacy Policy
  • Terms and Conditions

Copyright 2025 Manuals.Online. All Rights Reserved.

Contents:
1 Important Information ............................................................ 2
2 General Information .............................................................. 3
3 Safety Precautions ................................................................ 4
4 Specification .......................................................................... 5
5 Accessories ........................................................................... 6
6 OSD Functions ...................................................................... 7
7 Peripheral Equipment Connecting ....................................... 19
8 Remote Controller ................................................................ 25
9 Quick Guide for Color Adjustment .......................................... 27
10 Cleaning And Maintenance Handy Tips ............................... 29
11 FAQs ...................................................................................... 30
PAGE1
WARNING
This is a Class A and Class B product. In a domestic environment this
product may cause radio interference in which case the user may be
required to take adequate measures.
TO REDUCE THE RISK OF FIRE AND ELECTRIC SHOCK, DO NOT
EXPOSE THIS PRODUCT TO RAIN OR MOISTURE.
WARNING
This lightning flash with arrowhead symbol, within an equilateral triangle,
is intended to alert the user to the presence of uninsulated "dangerous
voltage" within the product's enclosure that may be of sufficient magnitude
to constitute a risk of electric shock to persons.
2 The exclamation point within an equilateral triangle is intended to alert the
user to the presence of important operating and maintenance (servicing)
instructions in the literature accompanying the appliance.
It is strongly advised NOT to freeze the image or to show still image on the
PDP for a long duration of time. This might cause the screen to have burn
in image. Use "White Pattern" under "Function" Function to fix the burn in
problem if it does happen.
4 All the Glass accessories used in this product have been specially
enhanced in its hardness and duration. However, when the following
situations occur, these glass might break or be damaged,
a. When the glass is hit with hard objects with great forces.
b. Falling or hard contact during transportation and moving.
c. Improper installation of the glass might scratch the surface of the glass.
PAGE 2
IMPORTANT:
When the set is switched on, do not shift or move the set around.
Sometimes it may develop unevenness in color in some parts of the screen.
This can be eliminated by switching off the the main power switch (rear side of
the set ) and wait for 10 minutes before switching on again. If the situation
remains, call for service.
FRONT VIEW
Channel (UP)
Channel (Down)
Volume(+)
Volume(-)
REAR VIEW
Power Switch
AC INPUT P©WER
100V-240V t
50Hz-60Hz
ONJOFF
Connectors
i coM2
©
©
oul
56'5
©0©
-- AUDIO IN
_NTC^_L_ iN
©Rs-_s2k_
PAGE 3
Please read the following directions carefully before using the machine.
Please keep the manual well and retain for future reference.
1 Clean the machine with a slightly damp soft cloth. Do not use spray detergent
and abrasive solvent. It can damage the machine's screen coating layer.
2 Place the machine on a solid base to avoid dropping or danger.
3 For good ventilation of the machine, please do not place the machine on
surfaces such as bed, sofa or rug.
4 Before operating the machine, make sure that the operating voltage of your
machine is identical with that of your local power supply. If there is any
question, please contact with sales dealer.
5 Use only the accessory power cord designed for this product to prevent shock.
6 Do not put anything under the power cord to avoid tramping.
7 If using the same power source with other equipments, please make sure the total
current does not exceed 15A.
8 Never attempt to repair a defection of the machine by yourself. Always consult
a skilled machine service personnel.
When the following situations occur, please contact the qualified engineer:
A. The power cord or the power socket has damaged.
B. If any liquid or solid object fall into the machine through the ventilation holes.
C. Exposing the machine to rain or excessive moisture.
D. The function does not follow the user manual.
E. The function of machine has clear changes.
10 No further notice will be provided if the specification or design subjects have
been changed.
11 Release the battery of remote controller after long-time replacement
(over 1 month) and avoid making destruction of remote controller by liquid.
PAGE 4
ModelName
ModelNumber
Display Ratio
Aspect NativeDisplayPixels
CharacteristicsDisplaysSub-pixeIs
PixeIPitch
Sub-pixelPitch
HorizontalFrequency
VerticalFrequency
ResolutionCapabilities
SupportingsystemInput
Brightness
ContrastRatio
ViewingAngle
Colors
General Weight
Dimension
PowerSupply
Frequency
PowerConsumption
Signal-inputS-VideoInput
CompositeInput
ComponentInput
DVIInput
AnalogVGAInput
AudioInput
Signal-OutputAudioOutput
SoundOutput
Specificationsaresubjecttochange
42-inchPlasmaMonitor
PDP4249G
16:9
852(H)x480(V)Pixel
2556(H)x480(V)PixeI
1.08(H)x1.08(V)(mm)
0.36(H)x1.08(V)(mm)
30kHzto80kHz
59Hzto85Hz
VGA,SVGA,XGA,SXGA,UVGA,UXGA,DTV(480i,480p,720p,1080i)
PAL,PAL-M,PAL-N,NTSC,NTSC4.43,SECAM
7OOcd/m2(Moduleonly)
2000:1(NoambientLight)
Over160degreeshorizontallyandvertically
16.77million
48kg
1210(W)x640(H)x130(D)mm/!210 (W) x 701 (H) x 210 (D)mm w/Stanc
AC110V-240V
50Hz-60Hz
< 280 W
Din 4-pin x 1
BRCA X 1
YPbPr X 3 or YCbCr x 3, RCA-Typ
DVl
D-Sub 15-pin X 1
RCA-pin type(R/L)X4
RCA-pin (L/R) x !
External Speakers Connectable
without notice.
*HDTV READY:
Display Panel that supports up to 720p resolution capability is categorized as Hi-Definition TV
(HDTV). Display Panel that supports up to 480p resolution capability is categorized as SDTV.
Display Panel that supports under 480p is categorized as DTV. This specific model support up
to 1080i resolution capability.
PAGE 5
1
2
3
4
5
REMOTE CONTROLLER
AAA Battery x 2 Pcs
POWER CORD
TABLE STAND
S-VIDEO CORD
Items 1 & 2 Item 3 Item 4
Item 5
WallMount Kit(Non-Adjustable): Optional item for purchase.
f
PAGE 6
Functions To start the OSD Functions on your screen, please press the "Menu" key now!
On the Remote Controller:
use the "Up"or "Down" keyto select OSD and SUBOSD Functions.
Pressthe "ENTER" keyto access the SUB OSDfrom the Main OSD.
Use the "Left" or "Right" key to adjust value in each function.
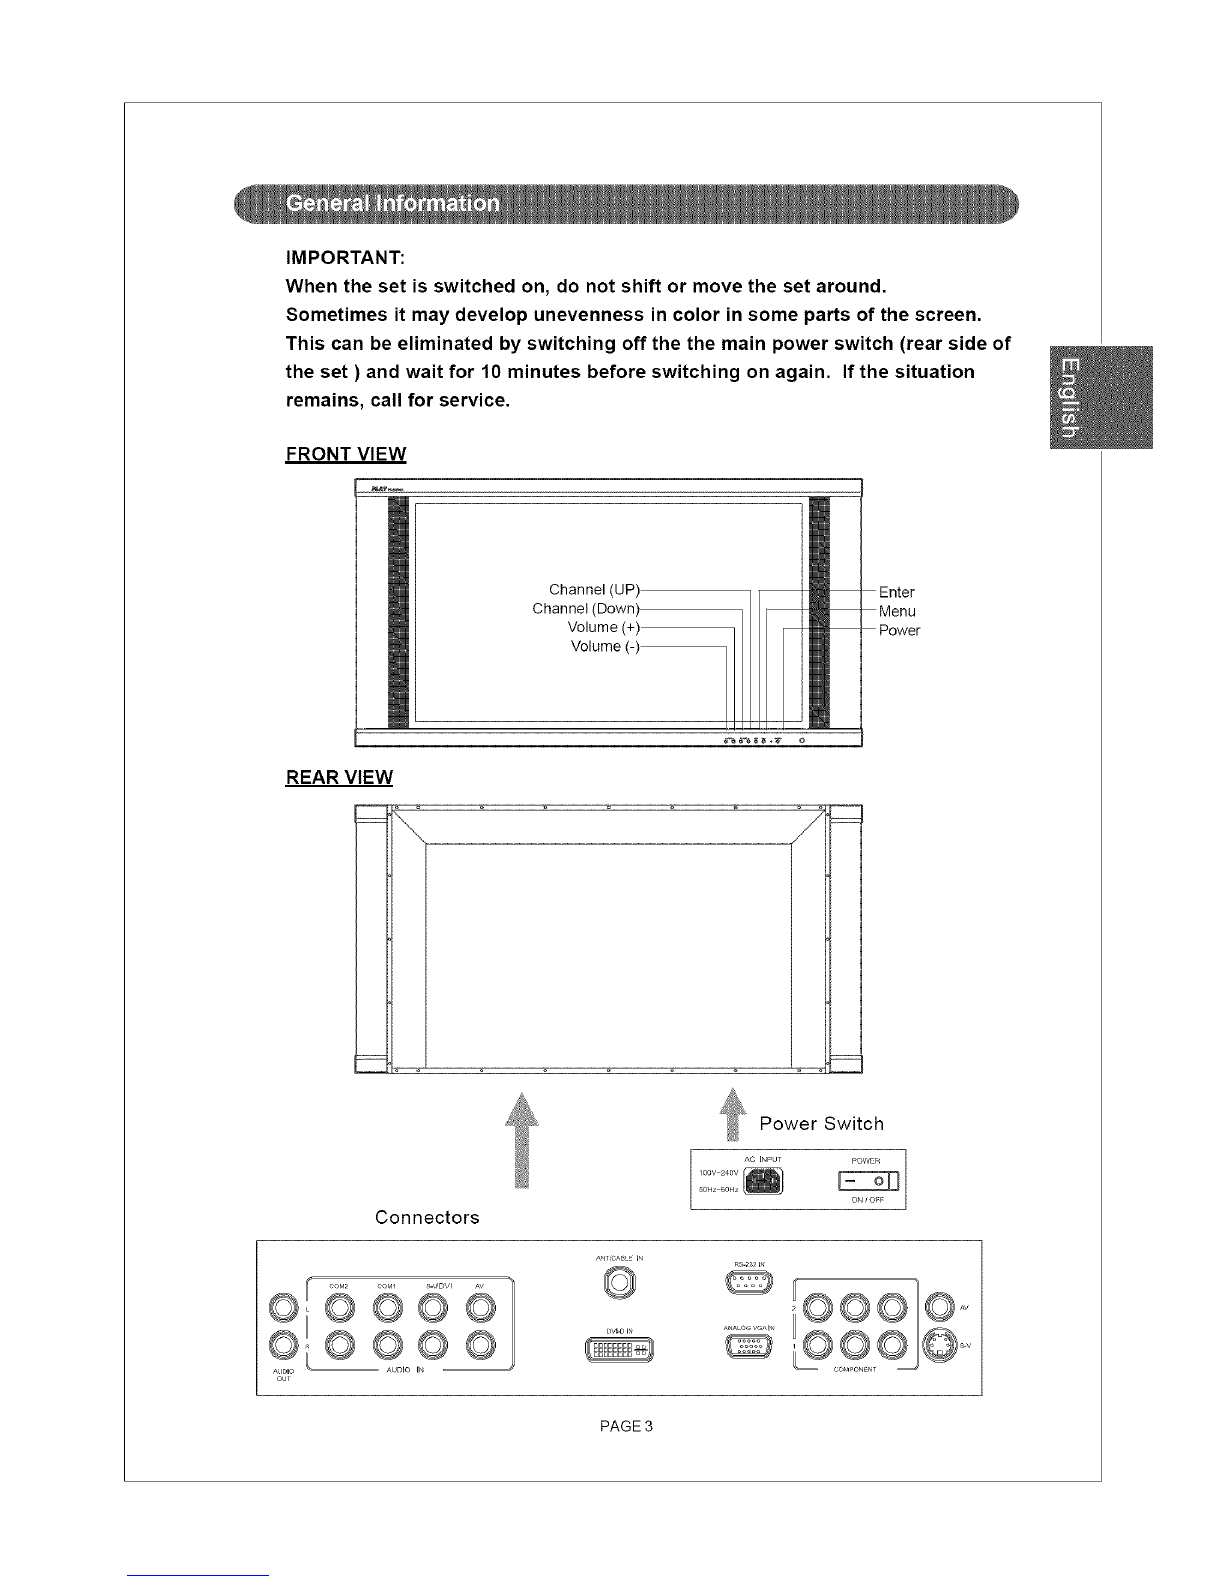
On the Key Pad of the Monitor:
Use the "A Select _'" key to select OSD and SUB OSD Functions.
Press the "ENTER" key to access the SUB OSD from the Main OSD.
Use "u Volume +" key to adjust value in each function.
Please Press the "Menu" key again to exit the OSD Menu or to go back to the prevoius page.
Picture (IN AV, S-Video, Component-YCbCr, & TV MODE):
Toaccess thefunction of Picture (INAV,S-Video, Component-YCbCr,
& TV MODE), press "Menu"and select "Picture".
Picture
contrast
S,arpn ss
ii Tint
Brightness:
1 Under the function of "Picture", please select "Brightness".
2 Use the "Left" or "Right" key to adjust the Brightness.
**Note: The higher the value of Brightness, the brighter the picture will be.
However, inappropriate setting of brightness may cause pictures to have whitish images.
Contrast:
1 Under the function of"Picture", please select "Contrast".
2 Use the "Left" or"Right" key to adjust the Contrast Ratio.
**Note: Contrast ratio may have certain effects on brightness. The higher the value of
Contras, the higher Black/White level the pictures will show.
Sharpness:
1 Under the function of "Picture", please select"Sharpness".
2 Use the "Left" or "Right" key to adjust the Sharpness.
PAGE 7
Picture
Color:
1 Under the function of"Picture", please select "Color".
2 Use the "Left" or "Right" key to adjust the Color.
**Note: Higher value of Color adjustment enable the picture to have fuller color.
Tint:
1 Under the function of"Picture", please select "Tint".
2 Use the "Left" or "Right" key to adjust the Tint.
**Note: The higher the value of Tint, the more Greenish/Bluish the image will display.
The less the value of Tint, the more Redish the image wiii display.
(IN Component-YPbPr MODE):
To access the function of Picture (IN Component-YPbPr Mode), press "Menu" and select
"Picture".
I Picture ] H-Position
Advanced V-Position
Brightness
Contrast
Sharpness
Color
Tint
H-Position:
1 Under the function of "Picture", please select "H-Position".
2 Use the "Left" or "Right" key to adjust the Horizontal Position.
V-Position:
1 Under the function of "Picture", please select "V-Position".
2 Use the "Left" or "Right" key to adjust the Vertical Position.
Brightness:
1 Under the function of"Picture", please select "Brightness".
2 Use the "Left" or "Right" key to adjust the Brightness.
**Note: The higher the value of Brightness, the brighter the picture will be.
However, inappropriate setting of brightness may cause pictures to have whitish images.
Contrast:
1 Under the function of"Picture", please select "Contrast".
2 Use the "Left" or"Right" key to adjust the Contrast Ratio.
**Note: Contrast ratio may have certain effects on brightness. The higher the value of
Contrast, the higher Black/White level the pictures will show.
Sharpness:
1 Under the function of "Picture", please select"Sharpness".
2 Use the "Left" or "Right" key to adjust the Sharpness.
PAGE 8
Color:
1 Underthefunctionof"Picture",pleaseselect"Color".
2 Usethe"Left"or"Right"keytoadjusttheColor.
**Note:HighervalueofColoradjustmentenablethepicturetohavefullercolor.
Tint:
1 Underthefunctionof"Picture",pleaseselect"Tint".
2 Usethe_'Left"or"Right"keytoadjusttheTint.
**Note:ThehigherthevalueofTint,themoreGreenish/Bluishtheimagewilldisplay.
ThelessthevalueofTint,themoreRedishtheimagewilldisplay.
Picture (IN Analog RGB MODE):
To access the function of Picture (IN AnaIog RGBMode), press "Menu" and select
"Picture".
I Picture I H-Positior
V-Position
Brightness
Contrast
Qt lity Sharpness
Frequency
Phase
Auto Image
H-Position:
1 Under the function of"Picture", please select"H-Position".
2 Use the "Left" or "Right" key to adjust the Horizontal Position.
V-Position:
1 Under the function of "Picture", please select "V-Position".
2 Use the "Left" or "Right" key to adjust the Vertical Position.
Brightness:
1 Under the function of"Picture", please select "Brightness".
2 Use the "Left" or "Right" key to adjust the Brightness.
**Note: The higher the value of Brightness, the brighter the picture will be.
However, inappropriate setting of brightness may cause pictures to have whitish images.
Contrast:
1 Under the function of"Picture", please select "Contrast".
2 Use the "Left" or "Right" key to adjust the Contrast Ratio.
**Note: Contrast ratio may have certain effects on brightness. The higher the value of
Contrast, the higher Black/White level the pictures will show.
Sharpness:
1 Under the function of "Picture", please select"Sharpness".
2 Use the "Left" or "Right" key to adjust the Sharpness.
PAGE 9
Picture
Frequency:
1 Under the function of"Picture", please select"Frequency".
2 Use the "Left" or "Right" key to adjust the Frequency.
**Note: It is strongly advised to set the Frequency level as it is when coming out of the
factory.
Inappropriate setting of Frequency may cause the pictures to have uneven lines or noise.
Phase:
1 Under the function of "Picture", please select "Phase".
2 Use the "Left" or"Right" key to adjust the Phase.
**Note: It is strongly advised to set the Frequency level as it is when coming out of the
factory.
Inappropriate setting of Frequency may cause the pictures to have uneven lines or noise.
Auto Image:
1 Under the function of"Picture", please select "Auto Image".
2 When "Auto Image" is selected, "H-Position", "V-Position", "Frequency", and "Phase"
(IN DVI MODE):
To access the function of Picture (IN DVI Mode), press "Menu" and select "Picture".
Picture Brightness
_va Contrast _
Auto Image
Brightness:
1 Under the function of"Picture", please select "Brightness".
2 Use the "Left" or "Right" key to adjust the Brightness.
**Note: The higher the value of Brightness, the brighter the picture will be.
However, inappropriate setting of brightness may cause pictures to have whitish images.
Contrast:
1 Under the function of"Picture", please select "Contrast".
2 Use the "Left" or "Right" key to adjust the Contrast Ratio.
**Note: Contrast ratio may have certain effects on brightness. The higher the value of
Contrast, the higher Black/White level the pictures will show.
Auto Image:
1 Under the function of "Picture", please select "Auto Image".
2 When "Auto Image" is selected, "Brightness" and "Contrast" automatically tuned
to the optimal value.
PAGE 10