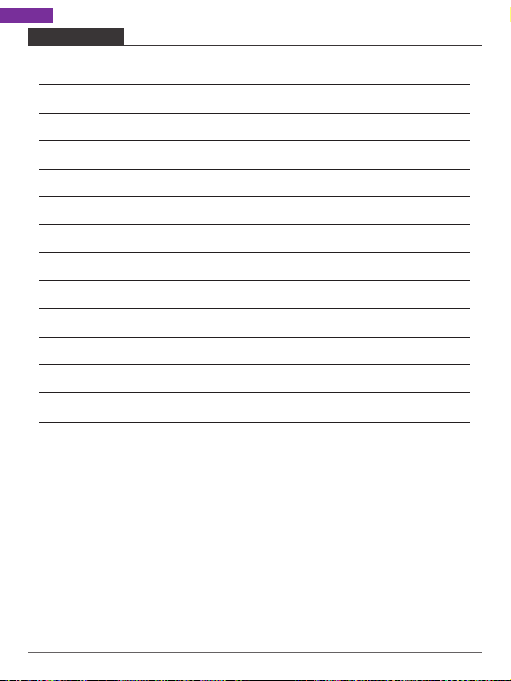
Akaso A300 User manual

USER MANUAL
AKASO A300 Drone

CONTENTS
What's in the Box
The Drone
Transmitter Intructions
Install Battery
Connect Remote Controller to Drone
Flight Control
Problems and Solutions
App Control of Drone and Camera
App Control Interface Guide
The Applicable Mobile Phone Model By App Control
Mode Switch
Charging the Battery
Contact Us
2
2
4
4
5
6
10
11
12
13
18
23
23
1
English

WHAT'S IN THE BOX
THE DRONE 4
1
35
2
Main Body
1
Rotor Blade
2
WiFi Camera
3
Power Switch4
Motor
5
Unfolded
Folded
1 x A300 Drone
1 x USB charging cable
1 x Screwdriver
2 x Spare Screws 1 x 3.7v 500mAh
Li-po battery
4 x Propeller Guards
1 x Remote Control
(battery not included)
1 x Quick Reference Guide
QUICK
REFERENCE
GUIDE
A300DRONE
23

TRANSMITTER INTRUCTIONS
INSTALL BATTERY
4
5
6
7
8
Press 1 Seconds: Headless Mode
Press 3 Seconds: One Button Backing
1
Take Off / Descend (Press 3 second
one button emergency landing )
2
ON / OFF
3
Left Rocker / 3 Different Speed Modes
4
Take Photos
5
Video
6
Fine Tuning
7
Right Rocker / 3D Flips operation
8
1. Install the battery for remote control (3x1.5V AA battery-not included).
AA 1.5V
AA 1.5V
AA 1.5V
2
3
1
Press 3s to
one-button return
Press 3s to
emergency landing
STOP
CONNECT REMOTE CONTROLLER TO DRONE
2. Insert battery into battery compartments.
Make sure the propeller is installed correctly and fasten enough.
1. Press drone power switch long, then turn on the remote controller.
2. Push the left rocker to the top and then to the lowest as below, the indicator light of
drone will be flash, and stop flashing once connected successful.
45

FLIGHT CONTROL
1. Take off
Option 1:
①Put the drone in flat floor, push both rockers to right down at 45° angle.
②Calibration the drone before take off, the indicator light of drone will be flash, and
stop flashing once completed.
③ Push up the left rocker and start to take off.
Option 2:
①Put the drone in flat floor, push both rockers to right down at 45° angle.
②Calibration the drone before take off, the indicator light of drone will be flash, and
stop flashing once completed.
③ Press the “up“ button as below at the top left of the remote controller, automatically lift
the drone.
2
2
1
1
Press 3s to
one-button return
Press 3s to
emergency landing
STOP
Option 2:
Press the “down” button at the left top of the remote, and the drone will descend
automatically.
Option 2
Option 1
3. Emergency Landing
When the drone encountered obstacles or emergency, long press the emergency landing
button at the left top for 3 seconds ,the drone can be emergency landing.
2. Landing Methods
Option 1:
①Slowly push down the left rocker until the drone lands.
②Keep the rocker in the lowest position for 3 seconds.
③ The motor stops and the plane lands successfully.
Press 3s to
one-button return
Press 3s to
emergency landing
STOP
Press 3s to
one-button return
Press 3s to
emergency landing
STOP
67

4. Flying controlled and fine tuning
Ascend/
descend
When the left rocker push
up or pull down, the drone
is ascending or descending.
Turning
left/right
Turning when the left rocker
push left or right, the drone
turns left or right
accordingly.
Forward/
backward
When the right rocker push
up/down, the drone goes
forth/back.
Side Fly
When the right rocker push
left or right, the drone goes
to the left or right.
Side-fly
Fine
tuning
balance
When the drone is
hovering, and the drond
is deviate to left or right
then turn the side-fly fine
tuning to the right or left
unitil the drone keeps
balance.
Note: Please fly the drone to a height 3 meters or more, and then perform the roll control
mode. If the drone can not vertically take off, it can be calibrated.
3 Different Speed Modes
Adjustable Speed Modes: Press the left Rocker to change from low, middle to high speed.
5. Flight Mode
3D FLIPS operation
Press the right rocker, then drone will be ready to 3D flip, and control direction by shift
the right rocker left / right / forward / backward, then drone flips accordingly.
Press 1 Seconds: Headless Mode
The drone is default the camera to the "head” of drone and turn the direction to left /
right / forward / backward accordingly to.
Headless mode is easier to control and fly back when the drone is out of sight, press the
button as below, orients the drone's direction no matter which direction the "head" of the
drone is facing, that is mean: push rocker to left indicates left, and push rocker to right
indicates right, etc.
Press 3 Seconds: One Button Backing
Press the below button, drone fly back to the place start.
Press 1 Seconds: Headless Mode
Press 3 Seconds: One Button Backing
3 Different Speed Modes
(Press the left Rocker)
3D FLIPS operation
(Press the right rocker)
23
1
2
1
3
1
According ToThe
Three Seconds According ToThe
Three Seconds
STOP
Press 3s to
one-button return
Press 3s to
emergency landing
STOP
89

THE DRONE
PRECAUTIONS:
1. Insufficient electricity power will shorter the control distance.
2. Insufficient electricity power will lead to difficulties in taking off and ascending.
3. Fix the quadcopter if there is any damage. Flying a damaged quadcopter could cause
injuries.
4. Remove the transmitter batteries if not in use in case of battery leakage.
5. Please avoid dropping and crashing the drone, other wise it will damage and shorten
the service life.
6. Before flying, always turn on the transmitter switch first, then the drone switch.
7. After flying, always turn off the drone switch first, then the transmitter switch.
Other wise, the drone will be confused with extraneous signal and be out of control.
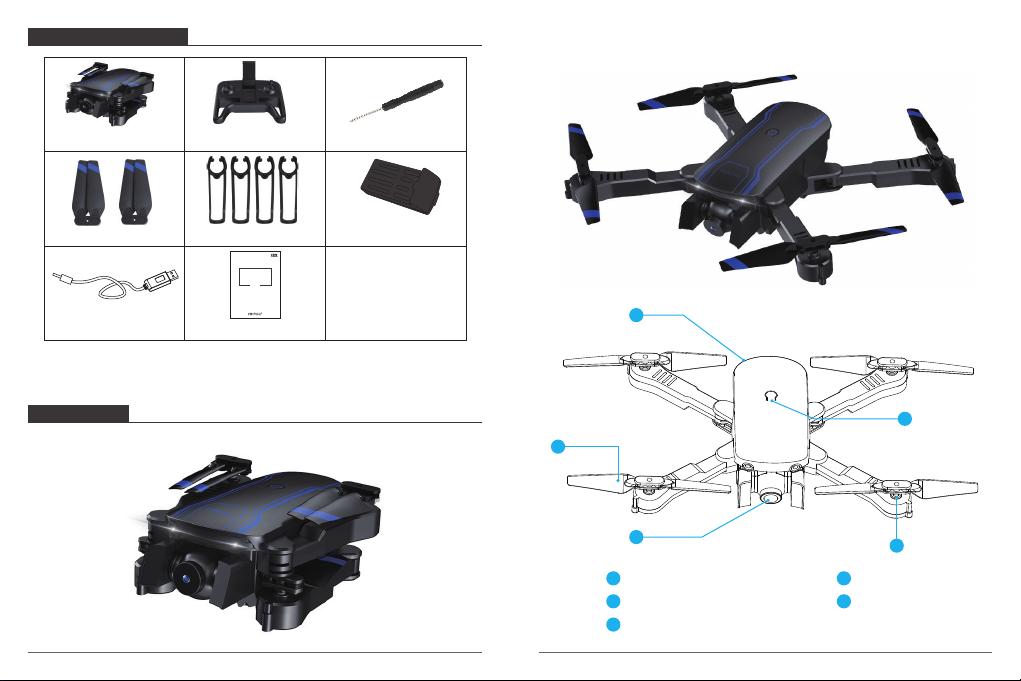
PROBLEMS
Transmitter
not working
Control failure
Ascending
failure
Landing too
soon
CAUSE SOLUTIONS
2. The batteries are
installed improperly.
2. Check with the pole indications
and reinstall the batteries again.
1. The transmitter
switch is on “OFF”.
1. The transmitter
switch is on “OFF”.
2. The fuselage switch
is on “OFF”.
3. The transmitter
indicator is flashing.
1. The rotation of main
blades is too slow.
1. Push up the left lever
(accelerator).
2. The fuselage battery is
well consumed.
The left rocker (accelerator)
is pulled down too fast.
Pull down the left rocker (accelerator)
slowly to perform a smooth landing.
2. Recharge the fuselage battery.
3. Pull down the left rocker
(accelerator) to the end and
replace the batteries.
1. Turn on the transmitter.
1. Turn on the fuselage.
1. Turn on the transmitter.
3. Batteries are
completely consumed. 3. Replace with new batteries.
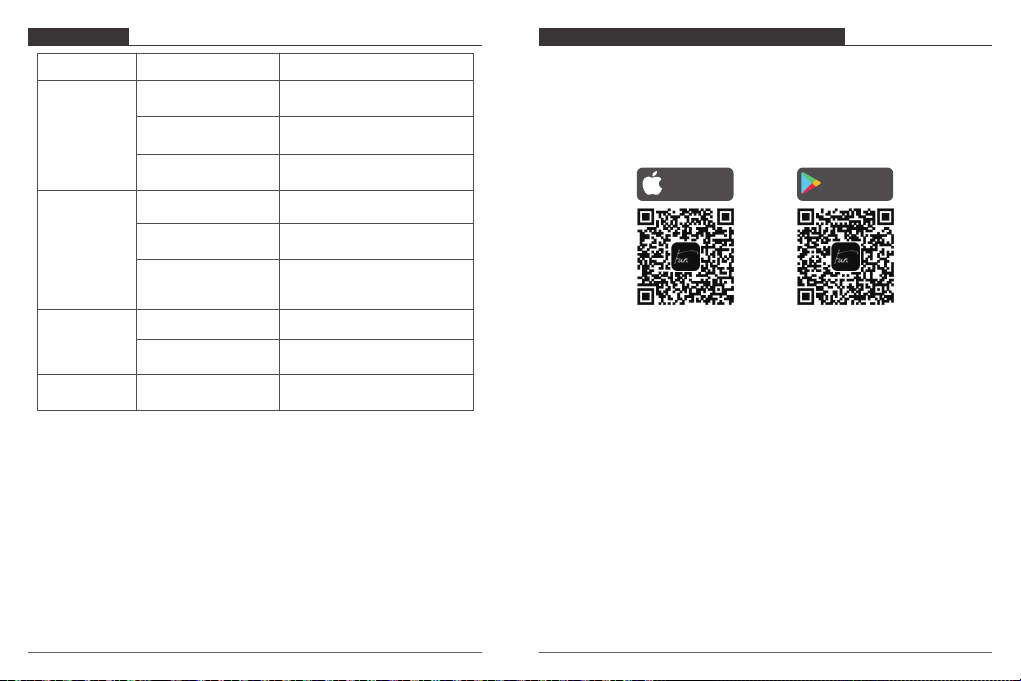
APP CONTROL OF DRONE AND CAMERA
Download the APP
If your mobile phone is operating by IOS system, please download the “HFUN” at APP
store.
You can also scan the QR code provided.
If your mobile phone is operating on Android, please download the “HFUN” at the
Google Play store. You can also scan the QR code provided.
Download on the
App Store
GET IT ON
Google Play
Connecting with Wi-Fi
1. Choose and Connect the Wi-Fi signal of the drone (AKASO-*******).
2. Please switch on the drone, refer to the instruction manual from.
At mobile phone Wi-Fi setting interface, select the Wi-Fi signal sent form the drone
“AKASO-*******”, once connected, you are ready to operate the “HFUN” APP.
10 11

APP CONTROL INTERFACE GUIDE THE APPLICABLE MOBILE PHONE MODEL BY APP CONTROL
Picture 1 Picture 2
Picture 3
1. iOS
2. Android
Picture 4
Go to “HFUN” APP interface, please refer to below screen shot in picture 1.
Tap the button enter into real-time image transmitting, as shown in Picture 2.
Tap the “OFF” switch to “ON” on the operating panel to enter the APP controlled flight
interface as shown in Picture 3.
(If the remote control has been connected to the drone, please turn off the remote control
by transmitter.)
Configuration Recommended Optimal
Mobile Phone
Model
iOS 8.0 and above
iPhone 5S \ iPhone SE \
iPhone 6 and above
System version
The CPU model
Memory size
CPU usage
System version Android 5.0 and above Android 8.0 and above
3G and above
Occupancy rate of 25% and below Occupancy rate of 10% and below
6G and above
Snapdragon 630 and above
Samsung Exynos 7420 and above
Hair aivision Helio X25 and above
Kirin 950 and above
Snapdragon 630 and above
Samsung Exynos 7420 and above
Hair aivision Helio X25 and above
Kirin 950 and above
iOS 8.0 and above
iPhone 6S and above
Configuration Recommended Optimal
* Clean up the background program, which can effectively reduce the CPU usage.
WARM TIPS 1
One drone can only be connected to one mobile APP at the same time.
WARM TIPS 2
How to achieve higher recognition when take photo by Gesture:
1. Make sure the camera lens facing to user
2. Please fly in good lighting environment, it is hard to recognize when weakness of
lighting.
3. Take photo by gesture , hand is better at the distance of 2 meters away form the
drone camera.
4. Make sure the WiFi signal is not disturbed or weak.
12 13

WARM TIPS 3
When the drone in the following environment, the Optical Altitude Hold Performance will
not good.
1 2 3 4 5
① The surface of the water
② At night
③ Huge difference at Vertical height
④ Smooth reflective ground
⑤ Two-color stripe
Emergent landingRocker Mode Mode switch
(Flight mode/master mode)
Shoot Videos
Take Photos
Change Speed
Menu
Headless
Revolve lensTrajectory Flight
Back
Perspective
conversion
(Camera Switch)
Photo album
Take off/land
MV
Introduction to operation interface
APP Setting Interface
Note: Please calibrate the drone before take off, the indicator light of drone will be flash,
and stop flashing once completed.
VR
Palm control
Filter
APP Control Panel options:
At APP setting interface, there are 4 control panels for your choice: Virtual Rocker Control
Panel, Hidden Keyboard Panel, Classic Panel, and Motion Sensing Panel.
Note: Take left hand mode for example, while switch to right hand mode, the Left / Right
panel control command will be exchange.
14 15

Rocker mode(Virtual Rocker Control Panel)
In this mode, the left panel control the upward, downward movement, turn left, turn right
of the drone, and the right one control the forward, backward movement, toward to left,
toward to right.
Rocker mode(Virtual Rocker Control Panel) Classic mode(Classic Panel)
Hidden mode(Hidden Keyboard Panel)
In this mode, the left panel control the upward, downward movement, turn Left / Right,
and the right panel control the forward, backward movement of the drone, and it can also
move the drome towards to left or right.
(When your thumb touch cell phone screen, it display the control panel, when the thumb
take away from the screen, the keyboard is hidden.)
Hidden mode(Hidden Keyboard Panel)
Classic mode(Classic Panel)
In this mode, the left panel control the upward and downward movement, the right panel
control the forward, backward movement, and it can also move the drone towards left or
right, slip your fingers at the top of cellphone screen to the left or right, the drone turn
left or turn right accordingly.
Motion sensing mode(Motion Sensing Panel)
In this mode, the left panel control the upward and downward movement, slip your fingers
at the top of cellphone screen to the left or right, the drone turns to left or right
accordingly.
At the right control panel, press the white dot in the circle for seconds, when cellphone tilt
forward, backward, left or right, the drone also fly forward, backward, toward to left or
right accordingly.
Motion sensing mode(Motion sensing Panel)
16 17

MODE SWITCH
There are 3 modes to switch: Flight Mode, Master Mode, Palm Control Mode.
1. Flight Mode
In flight mode, a number of visual recognition operations can be performed
① Yeah Gestures takes pictures
User hold the Yeah gesture by hand, and 2 meters away from the drone camera.
After the drone recognized the gesture successfully, countdown 3 seconds, then photos
can be taken.
② Video of box gesture
User hold the gesture as picture, at the distance of 2 meter of the drone camera.
After the drone recognized the gesture successfully, countdown 3 seconds, then video can
be taken. When this gesture is captured again by drone camera, end the recording.
(The time difference between two recognition should be more than 3 seconds).
③ Video of palm gesture
User hold the gesture as picture, at the distance of 2 meter of the drone camera.
After the drone recognized the gesture successfully, countdown 3 seconds, then video can
be taken. When this gesture is captured again by drone camera, end the recording.
(The time difference between two recognition should be more than 3 seconds, some
mobile phone do not support this function).
Flight Mode Master Mode Palm Control Mode
2. Master Mode
In the master mode, additional human following function can be implemented, and the
specific operation steps as below:
① Target person appears in the blue “frame” of the lens.
② Select the target character by touch the screen.
③ The blue frame will be turn red after the target person locked.
Make sure the target character is on the middle of the screen.
18 19

④ When the drone is about 2 meters away from the target person, it will follow him.
⑤If the target character is lost, you need to click the target character again. If there is no
alternative character in the screen for 5 seconds, it will change to “flight mode“
automatically.
Note: When human body takes up more than 80% of the red frame , the best effect
can be achieved.
3. Palm Control Mode
Click the top right corner icon , the hidden icons will be listed as below
Click the palm icon , switch to “palm control mode”.
Operate steps
① User facing to the camera of drone, put your hands up ,looks like ‘“give me five”.
② When palm in the red frame at APP, gently move the palm.
③Move palm up and down, the drone will move upward and downward accordingly.
Note: When the distance is between palm and camera is about 1m, it controls at the best.
Instruction for the other functions
Lens Switching
Click the “Lens Switching” button change to follow states.
①Front lens.
②Lens at the bottom.
③PIP (picture in picture, the real-time view will be captured and play on cellphone by
both the front camera and camera at the bottom, some mobile phone do not support
this function).
④Split screen (some mobile phone do not support this function).
Note: Defaulted as “front lens“.
Note: Switch to PIP or split screen status, enter into MV, also can record view captured by
both cameras.
Headless
Revolve lens
VR
Other Functional Icons
Trajectory Flight
Palm control
Filter
20 21

Trajectory Flight
Headless
The front camera defaulted as the “head”of the drone, and control the direction to left /
right / forward / backward accordingly.
When switch to Headless mode , it is easier to control and fly back while the drone fly high
far away and out of your sight.
Orients the drone’s direction no matter which direction the ‘“head'” of the drone is facing,
that is mean, remote control to left indicates left, and remote control to right indicates
right, etc.
With this function, draw a trajectory in the frame on the right of the screen, and the
aircraft will fly according to this trajectory.
Camera
Operating lever
Photo album
Filter
Taking pictures
Rotate the picture
Turn off MV mode
Choose music
Length of
recorded time
Length of music time
Recording progress bar
Introduction to MV interface
The MV interface
MV
For any problem with AKASO products, please feel free to contact us, we will respond
within 24 hours.
E-mail: [email protected]
Tel: (888) 466-9222 (US) Mon-Fri (except holiday) 9am-5pm (EST)
Official website: www.akasotech.com
Note: The red indicator light stays on during charging, and turns off when fully charged.
CHARGING THE BATTERY
CONTACT US
Li-po Battery
Indicator Light
Attention:
• Do not use or leave the battery near a heat source.
• Do not disassemble the battery.
• Never leave the battery unattended during charge.
22 23
Choose music
English

INHALT
Packliste
Die Drohne
Senderanweisungen
Installation der Batterie
Sender Mit Drohne Verbinden
Fliegensteuerung
Die Drohne
Die Drohne Und Kamera Über App Kontrollieren
Anleitung der App-kontrolle
Anwendbare Handymodell der App-kontrolle
Modus - Schalter
Aufladen Der Batterie
Kontaktieren Uns
25
25
27
27
28
29
33
34
35
36
41
46
46
24
Deutsch

PACKLISTE
DIE DROHNE 4
1
35
2
Hauptteil
1
Rotorblatt
2
WiFi-Kamera
3
Netzschalter4
Motor
5
Entfaltet
Gefaltet
1 x A300 Drohne
1 x USB Ladekabel
1 x Schraubendreher
2 x Ersatzschrauben 1 x 3.7v 500mAh
Li-po Batterie
4 x Propellerschutz
1 x Fernbedienung
(Batterie nicht enthalten)
1 x Kurzanleitung
QUICK
REFERENCE
GUIDE
A300DRONE
25 26

SENDERANWEISUNGEN
INSTALLATION DER BATTERIE
4
5
6
7
8
1 Sekunde drücken: Kopflos-Modus
3 Sekunden drücken: Ein-Taste-Zurück
1
Abflug / Landung (3 Sekunden lang
Ein-Taste-Notlandung drücken )
2
EIN / AUS
3
Linke Wippe / 3Geschwindigkeitsmodi
4
Fotos
5
Video
6
Feinabstimmung
7
Rechte Wippe / 3D-Flip-Betrieb
8
1. Legen Sie die Batterie für die Fernbedienung ein (3 x 1,5 V AA-Batterie, nicht im
Lieferumfang).
AA 1.5V
AA 1.5V
AA 1.5V
2
3
1
Press 3s to
one-button return
Press 3s to
emergency landing
STOP
SENDER MIT DROHNE VERBINDEN
2. Batterie in die Batteriefächer einlegen.
Vergewissern Sie sich, dass der Propeller korrekt installiert und fest genug ist.
1. Drücken Sie den Netzschalter der Drohne lange und schalten dann die Fernbedienung
ein.
2. Drücken Sie die linke Wippe nach oben und dann nach unten. Die Kontrollleuchte der
Drohne blinkt und hört auf zu blinken, sobald die Verbindung hergestellt wurde.
27 28

FLIEGENSTEUERUNG
1. Abflug
Option 1:
①Stellen Sie die Drohne auf einen ebenen Boden und drücken Sie beide Wippen im 45°
-Winkel nach rechts unten.
②Kalibrieren Sie die Drohne vor dem Start. Die Kontrollleuchte der Drohne blinkt und
hört auf zu blinken, sobald der Vorgang abgeschlossen ist.
③Drücken Sie die linke Wippe nach oben und starten Sie den Abflug.
Option 2:
①Stellen die Drohne auf einen ebenen Boden und drücken Sie beide Wippen im 45° -
Winkel nach rechts unten.
②Kalibrieren Sie die Drohne vor dem Start. Die Kontrollleuchte der Drohne blinkt und
hört auf zu blinken, sobald der Vorgang abgeschlossen ist.
③Drücken Sie die “Auf”-Taste oben links auf der Fernbedienung und heben Sie die
Drohne automatisch an.
2
2
1
1
Press 3s to
one-button return
Press 3s to
emergency landing
STOP
Option 2:
Drücken Sie die Abwärtstaste links oben auf der Fernbedienung, um die Drohne
automatisch abzusenken.
Option 2
Option 1
3. Notlandung
Wenn die Drohne auf Hindernisse oder einen Notfall stößt, halten Sie die Notlandetaste
oben links 3 Sekunden lang gedrückt. Die Drohne kann eine Notlandung schaffen.
2. Landung
Option 1:
①Drücken Sie die linke Wippe langsam nach unten, bis die
Drohne landet.
②Halten Sie die Wippe 3 Sekunden lang in der niedrigsten
Position.
③Der Motor stoppt und das Flugzeug landet erfolgreich.
Press 3s to
one-button return
Press 3s to
emergency landing
STOP
Press 3s to
one-button return
Press 3s to
emergency landing
STOP
29 30

4. Fluggesteuert und Feinabstimmung
Abflug /
Landung
Wenn die linke Wippe nach
oben oder unten gedrückt
wird, steigt oder sinkt die
Drohne.
Nach
links /
rechts
abbiegen
Wenn die linke Wippe nach
links oder rechts gedrückt
wird, dreht sich die Drohne
entsprechend nach links
oder rechts.
Vorwärts/
Rückwärts
Wenn die rechte Wippe
nach oben / unten gedrückt
wird, fährt die Drohne
vorwärts / rückwärts.
Seitenfliege
Wenn die rechte Wippe nach links oder
rechts drückt, seitenfliegt die Drohne
nach links oder rechts.
Seitenfliege Feineinstellungsbalance
When the drone is hovering, and the
drond is deviate to left or right then
turn the side-fly fine tuning to the right
or left unitil the drone keeps balance.
Hinweis: Bitte fliegen Sie die Drohne bis zu einer Höhe von 3 Metern oder mehr und
führen Sie dann den Rollsteuerungsmodus aus. Wenn die Drohne nicht senkrecht
abgehoben werden kann, kann sie kalibriert werden.
3 Geschwindigkeitsmodi
Einstellbare Geschwindigkeitsmodi: Drücken Sie die linke Wippe, um von niedriger,
mittlerer zu hoher Geschwindigkeit zu wechseln.
5. Flugmodus
D FLIPS-Betrieb
Drücken Sie die rechte Wippe, die Drohne ist dann bereit für das 3D-FLIPS. Sie steuern die
Richtung, indem Sie die rechte Wippe nach links / rechts / vorwärts / rückwärts bewegen.
Die Drohne fliegt entsprechend.
1 Sekunde drücken: Kopflos-Modus
Die Drohne setzt die Kamera standardmäßig auf den "Kopf" der Drohne und dreht die
Richtung nach links / rechts / vorwärts / rückwärts entsprechend um.
Mit Kopflos-Modus ist es einfacher zu steuern und rückwärts zu fliegen, wenn die Drohne
außer Sicht ist. Drücken Sie die Taste wie unten, und richten Sie die Richtung der Drohne
aus, unabhängig davon, in welche Richtung der "Kopf" der Drohne zeigt. Das bedeutet:
Drücken Sie die Wippe nach links bedeutet links und Wippe nach rechts bedeutet rechts
usw.
3 Sekunden drücken: Ein-Taste-Zurück
Drücke den unteren Knopf und die Drohne fliegt zurück zum Startort.
1 Sekunde drücken: Kopflos-Modus
3 Sekunden drücken: Ein-Tasten-Zurück
3 Geschwindigkeitsmodi
(Linke Wippe drücken)
3D FLIPS-Betrieb
(Rechte Wippe drücken)
23
1
2
1
3
1
According ToThe
Three Seconds According ToThe
Three Seconds
STOP
Press 3s to
one-button return
Press 3s to
emergency landing
STOP
31 32

DIE DROHNE
VORSICHTSMASSNAHMEN:
1. Eine unzureichende Stromversorgung verkürzt den Steuerabstand.
2. Unzureichende Stromversorgung führt zu Startschwierigkeiten und Steigschwierigkeiten.
3. Reparieren Sie den Quadcopter, wenn er beschädigt ist. Das Fliegen eines beschädigten
Quadcopters kann zu Verletzungen führen.
4. Nehmen Sie die Senderbatterien heraus, wenn die Drohne nicht verwendet wird, um
Batterieauslauf zu vermeiden.
5. Vermeiden bitte Fallen und Abstürtzen der Drohne, da sie sonst beschädigt und die
Nutzungsdauer verkürzt wird.
6. Schalten Sie vor dem Fliegen immer zuerst den Senderschalter und dann den
Drohnenschalter ein.
PROBLEMEN
Der Sender
funktioniert
nicht
Kontrollfehler
Abflug
Misserfolg
Landung zu
früh
URSACHE LÖSUNGEN
2. Die Batterien sind
falsch eingelegt.
2. Prüfen Sie anhand der Polangaben,
und setzen die Batterien wieder ein.
1. Der Senderschalter
steht auf "AUS".
1. Der Senderschalter
steht auf "AUS".
2. Der Rumpfschalter
steht auf "AUS".
3. Die Senderanzeige
blinkt.
1. Die Rotation der
Hauptblätter ist zu langsam.
1. Drücke den linken Wippe
(Gaspedal) nach oben.
2. Die Rumpfbatterie ist
verbraucht.
Die linke Wippe (Gaspedal)
ist zu schnell gedrückt.
Ziehen Sie die linke Wippe (Gaspedal)
langsam herunter, um eine reibungslose
Landung durchzuführen.
2. Laden Sie den Rumpfakku auf.
3. Ziehen Sie die linke Wippe (Gaspedal)
bis zum Anschlag herunter und tauschen
Sie die Batterien aus.
1. Schalten den Sender ein.
2. Rumpf einschalten.
1. Schalten den Sender ein.
3. Batterien sind
vollständig verbraucht. 3. Ersetzen die Batterien durch neue.
DIE DROHNE UND KAMERA ÜBER APP KONTROLLIEREN
Die APP herunterladen
Wenn Ihr Mobiltelefon mit einem iOS-System betrieben wird, laden Sie bitte die “HFUN“
im APP-Store herunter.
Sie können auch den bereitgestellten QR-Code scannen.
Wenn Ihr Mobiltelefon mit Android betrieben wird, laden Sie die “HFUN” im
Google Play Store herunter. Sie können auch den bereitgestellten QR-Code scannen.
Download on the
App Store
GET IT ON
Google Play
Verbindung mit Wi-Fi
1. Wählen und verbinden das Wi-Fi-Signal der Drohne (AKASO - *******).
2. Wählen Sie auf der WLAN-Einstellungsoberfläche des Mobiltelefons das WLAN-Signal
aus, das von der Drohne “AKASO - *******“ gesendet wird. Sobald die Verbindung
hergestellt ist, können Sie die “HFUN” APP bedienen.
33 34
7. Schalten Sie nach dem Fliegen immer zuerst den Drohnenschalter und dann den
Senderschalter aus. Andernfalls würde die Drohne mit fremden Signalen verwechselt
und außer Kontrolle.
Table of contents
Languages:
Other Akaso Drone manuals