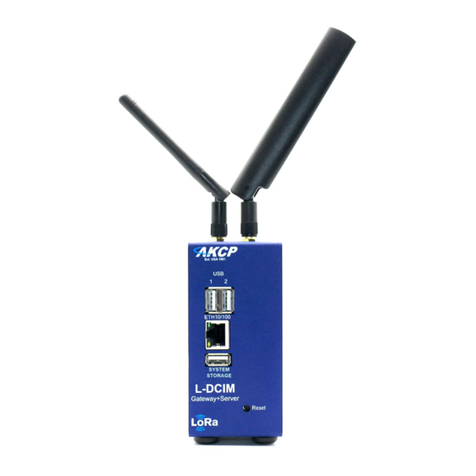
AKCP SEC+ User manual

www.AKCP.com
SEC+ and L-DCIM
Product Manual
Copyright © 2019, AKCP
Provided by https://www.didactum-security.com/
en/

SEC+ and L-DCIM Product Manual
- 2 -
Table of Contents
Introduction ................................................................................................................................................... 4
Connecting to the unit for the first time ..................................................................................................... 10
Initial out-of-box configuration....................................................................................................................12
SEC+ Initial setup steps ..................................................................................................................12
Setting up the unit’s IP address .....................................................................................................19
Recovery information ...................................................................................................................................24
Information about software updates...........................................................................................................25
Backup & Restore .........................................................................................................................................26
Backup ..............................................................................................................................................27
Export backup to external USB ......................................................................................... 32
Restore..............................................................................................................................................36
Server settings .............................................................................................................................................. 44
General..............................................................................................................................................45
Connections ..................................................................................................................................... 46
Local Network...................................................................................................................................47
LoRa Wireless ..................................................................................................................................48
Wi-Fi...................................................................................................................................................50
Station mode .......................................................................................................................51
Access Point mode.............................................................................................................54
Modem...............................................................................................................................................55
SNMP.................................................................................................................................................57
VPN....................................................................................................................................................59
SMTP Email Alert .............................................................................................................................63
Event logs configuration.................................................................................................................65
Notification .......................................................................................................................................66
NTP - Network Time Protocol ......................................................................................................... 67
Language ..........................................................................................................................................69
Maintenance .....................................................................................................................................71
Services ............................................................................................................................................73
Software update ...............................................................................................................................76

SEC+ and L-DCIM Product Manual
- 3 -
Safe Mode ......................................................................................................................................................77
Firmware Upgrade process............................................................................................................. 79
Safe Mode Troubleshooting............................................................................................................ 81
Wireless Sensors ..........................................................................................................................................82
Installation examples.......................................................................................................................84
Adding wireless sensors.................................................................................................................86
Wireless sensor synchronization...................................................................................................91
Sync troubleshooting .........................................................................................................95
Wireless sensor parameter setup .................................................................................................. 97
Overview .............................................................................................................................. 97
Device...................................................................................................................................99
Sensors................................................................................................................................102
Network................................................................................................................................112
Wireless sensor firmware update...................................................................................................114
Firmware Update Over The Air (FOTA).............................................................................114
Firmware update with direct USB connection .................................................................118
Provided by https://www.didactum-security.com/en/

SEC+ and L-DCIM Product Manual
- 4 -
Introduction
In this manual, we’ll only cover the basic configuration of the SEC+ and L-DCIM units and their
unique features, such as the wireless sensor support. Please refer to the APS HTML manual for
configuring the unexplained parts of the system and for the setup of notifications, as they’re identical
with the AKCPro Server WebUI.
In this manual, for simplicity we’ll refer both units as the SEC+ but some of the features won’t work on
L-DCIM units.
Very important note:
All units come with a system USB flash drive plugged in to USB port 3.
DO NOT REMOVE THIS USB DRIVE! It contains the AKCPro Server installation and all your user
settings and data.
If you remove the USB drive, the unit will stop working until you re-insert the same drive. If the drive
gets corrupted and you insert another drive, the unit will perform a factory reset and all your settings
will be lost!
Always perform backups and export your backups to external drive to avoid losing your data (see
below about backup & restore features in this manual). The drive is formatted with Linux Ext4 file
system partitions and is unreadable under Windows OS, you cannot recover data from it this way.
AKCP always highly recommends using
a dedicated 3rd party UPS on the units.
Any damage caused by unstable power
or power outages will void the warranty
on our units.

SEC+ and L-DCIM Product Manual
- 5 -
What is the L-DCIM?
The AKCP L-DCIM is a “DCIM in a box” solution with embedded AKCPro Server. You can monitor all
your network enabled devices such as intelligent PDU’s, UPS’s rectifiers and CRAC units. It supports
SNMP, Ping and Modbus TCP/IP virtual sensors. Add sensors connected to AKCP base units for a
complete end to end data center monitoring solution.
LoRa™ Radio
L-DCIM is equipped with a LoRa™ wireless radio for connecting AKCP wireless sensors. Easily
deploy environmental and security monitoring solutions in hard to reach areas, no cabling, no IP
addresses, no power needed.
Tablet View
The L-DCIM has a dedicated tablet view user interface, allowing you to monitor your data center stats
with drill down mapping from custom desktops over WiFi while roaming your data center. This allows
technicians on the ground to be updated real time and respond to critical alerts immediately.
Provided by https://www.didactum-security.com/en/

SEC+ and L-DCIM Product Manual
- 6 -
What is the SEC+?
The SEC+ unit is based on the L-DCIM and supports all its features (including the embedded AKCPro
Server), with integrated RJ45 sensor ports and sensorProbeX+ modularity with personality cards.
Basically this eliminates the need to install the AKCPro Server software onto a computer or server
machine, yet still allows for CCTV video camera connections, AKCP sensors, dry contacts, external
USB hard drives and modem. Everything is accessible from your laptop, smartphone or tablet through
a web browser.
The SEC+ units are customizable using our online tool just like the SP+ units.
http://www.akcp.com/configuratorTool/
SEC+ Features:
Integrated video security: supports up to 2 USB cameras & 2 ONVIF IP cameras. *
Synchronize video with sensor events.
Manage RFID Swing Handle Cabinet Locks and Door Access.
Connect SEC+ to your network with Ethernet cable or WiFi.
2x USB ports for connecting 2 USB cameras, and for future new features and functions.
The system is expandable with SPX+ modules via the Basic Expansion Bus (BEB) port
Monitor all your devices from a single SEC+
No dedicated PC required
No client software or special apps to install.
Log and graph data from AKCP Intelligent sensors, and Virtual Sensors *
Manage RFID Swing Handle Cabinet Locks and Door Access.
Optional internal cellular modem is supported
The SEC+ APS is installed on and running from a system USB drive.
* Virtual Sensors and 3rd Party IP Cameras require a license, see below in this manual
Provided by https://www.didactum-security.com/en/

SEC+ and L-DCIM Product Manual
- 7 -
Important notes:
Some of the pictures shown in this manual might not represent the actual Web UI of the unit
and may refer to the SP2+ or SPX+ units; this is because the SEC+ is a new family of units
and its Web UI is basically all the same as SP2+. We are constantly working on improving the
firmware; please provide us with feedback if you have any issues configuring your unit.
All units are shipped with DHCP enabled or if there’s no DHCP server on the network, the
default web interface IP address will be 192.168.0.100. We strongly recommend you change
this to avoid problems with duplicate IP addresses on your network. Please see the section in
this manual on how to setup a new IP address on the unit.
The SEC+ unit is designed for smaller installations with a few devices, and APS on a PC
should be used for larger installations (more IP cameras, lot of devices and sensors to monitor
etc.)
You can add any AKCP units to the SEC+ including SP+, SEC & sensorProbe units but you
cannot add a SEC+ to HTML5 APS on a PC. This might be possible in future releases.
You cannot have an AKCP unit connected to a SEC+ and to APS on a PC simultaneously. A
warning popup will be shown if you attempt to do so. IP cameras and other network devices
however could be connected to multiple APS.
All AKCP sensors are supported on SEC+, except probeSwitch. The 5 Dry Contact Sensors
are supported as a licensed feature.
Hardware installation remark: It is recommended to connect the power supply's cable prior to
mounting the unit in the rack; otherwise it might be hard for you to connect it while it’s mounted.
AKCP also always highly recommends using a dedicated 3rd party UPS on the units.
What is the difference between the previous securityProbe (SEC5E, SEC5ES, SEC5ESV etc.)
units and the SEC+ (securityProbe+)?
The main difference is that the SEC+ is running the ported (embedded) AKCPro Server software
instead of the previous securityProbe built in web interface. You can think of it as the AKCPro
software running on the SEC+ unit instead of a separate computer server machine.
This not only frees up resources not having to use expensive server computers, but allows you to
have the power of the server software running in your server cabinet or rack in a 1U unit.
And like the AKCPro Server you can add and monitor all of your other AKCP units into the SEC+
units APS application for centralized monitoring from a single SEC+ unit in your cabinet or server
rack.

SEC+ and L-DCIM Product Manual
- 8 -
Cross Platform Access
SEC+, with it’s embedded AKCPro Server, can be accessed across multiple platforms. Login to the
server from your PC, Laptop, Smartphone or Tablet. Platform independent with nothing to install, just
use your web browser*. Using the latest HTML5 technology your desktops, animated thermal maps,
graphing and video playback are fully functional.
* supported browsers: Chrome and Firefox. IE is not supported.
Provided by https://www.didactum-security.com/en/

SEC+ and L-DCIM Product Manual
- 9 -
AKCPro Server Embedded SEC+
AKCPro Server is our central monitoring and mangement software. Suitable for a wide range of
monitoring applications. Free to use for all AKCP devices. Monitor your infrastructure, whether it be a
single building, or remote sites over a wide geographic area. Integrate third party devices with
Modbus, SNMP and ONVIF compatible IP cameras.
Manage cabinet maps, sensors, access control and other equipment from anywhere in the
world.
Monitor data center maps and drill down to single cabinets.
Automate notifications based on sensor, power or access control sensors status.
Notification Wizards : SNMP traps, Email, Popup Messages, SMS, Remote Unlock (and
more…)
Use custom scripts for complex sensor input or notification outputs.
On SEC+ units you can use IP, USB and wireless cameras to perform on-event or on-time
recordings with pictures - SEC+ does not support full-featured video recording features, but
live camera view is possible.

SEC+ and L-DCIM Product Manual
- 10 -
Connecting to the unit for the first time
Very Important Note: The units require you to enter passwords to access the web interface every
time. Unlike other SP+ units, this cannot be disabled.
The default log in is Username: admin Password: admin
Every unit is shipped with the default IP address of 192.168.0.100 and DHCP client enabled.
In the next section in this manual we will go through the process of changing this IP address to fit
your own network configuration.
Note: In some cases your computer might not be able to connect to this default IP address. In this
situation you either need to:
a) check your DHCP server (or router, if any) for the automatically assigned IP address
b) add the default IP your computers routing table or
c) add a secondary IP address to the LAN card to allow access to the unit.
See below how to setup these.
Ensure the following items are available to you before starting:
- RJ45 CAT5 crossover cable with RJ45 male connection (straight cable might also work, depending
on your LAN card)
- A PC with Ethernet card or LAN socket, logged in with Administrator rights
- Stable power source for the unit (UPS)
1) Connect the unit via the Ethernet port of the unit to your computers LAN or Ethernet port with a
CAT5 crossover cable.
2) Proceed to the next section in this manual: Initial out-of-box configuration
Provided by https://www.didactum-security.com/en/

SEC+ and L-DCIM Product Manual
- 11 -
How to add a manual route to the computer’s routing table?
Open an Administrator Command Prompt (CMD) window and type:
route add 192.168.0.100 10.1.1.20
Where 10.1.1.20 is the IP address of the Ethernet interface on the PC that the unit is plugged into
with the crossover cable.
Note: If you do not receive an 'OK!' message then a parameter was wrong or missing.
The route is not persistent (removed upon rebooting), but you can also delete it with the
route delete 192.168.0.100 command.
How to add a secondary IP address to the computer’s LAN card?
You can do this via the GUI by opening the LAN connection’s properties:
Or open an Administrator Command Prompt (CMD) window and type:
netsh interface ipv4 add address “Local Area Connection”192.168.0.2
255.255.255.0
The above command adds the IP Address 192.168.0.2 (with Subnet Mask 255.255.255.0) to the
connection titled “Local Area Connection”.
You will then be able to connect to the unit with its default IP.
Note: The secondary IP address is permanent for the LAN connection; don’t use it if you only need it
once. Instead use the routing table method above.

SEC+ and L-DCIM Product Manual
- 12 -
Initial out-of-box configuration
SEC+ Initial setup steps
Connect all cables to SEC+, arrange the antennas and power it on. It can take a few minutes before
the system gets ready for the first time.
During startup, SEC+ will check the system USB drive, and format it again if necessary - this will also
add to the boot time, please be patient.
You can already point your browser to the unit’s default IP address, and it will open when the system
is ready.
Note that currently the only supported browsers are Google Chrome and Mozilla Firefox. With other
unsupported browsers, the Web UI might not load correctly.
What is the default IP address of the unit?
1. If there's a DHCP server online on your network, the device will get a DHCP IP automatically.
Check your router / DHCP server for its IP or contact your network administrator for help.
2. If you have the unit directly connected to your PC via a LAN cable:
Open the Web UI with default IP 192.168.0.100 (see below).
Note: The following steps are also required after you perform a factory reset using the Maintenance
menu on the unit.
Provided by https://www.didactum-security.com/en/

SEC+ and L-DCIM Product Manual
- 13 -
In this example we’re using direct cable connection, so we’ll open the default IP:
192.168.0.100
The unit’s login page defaults to HTTPS protocol. It’s using a self-signed certificate and you’ll need to
accept that to continue. This is depending on your browser, Chrome is shown as an example.
Click the Advanced button and then Proceed to 192.168.0.100 (unsafe).
You can replace the SSL certificate later to eliminate the browser warnings, or enable the HTTP port.

SEC+ and L-DCIM Product Manual
- 14 -
The login page will load. It is necessary to log into the system every time the Web UI is accessed.
The default login name and password is:
admin / admin.
Provided by https://www.didactum-security.com/en/

SEC+ and L-DCIM Product Manual
- 15 -
Now the initial setup wizard will load.
Here you can set the basic parameters for the device.
Note: If you skip the setup with the “Skip Setup” button, the default values will be used. These can be
later modified using the system menus.
You can also skip the setup if you plan to restore a backup from USB drive, since the backup will
contain these parameters.
How to run the setup wizard again?
If you wish, you can run the initial setup wizard again by going this URL: /app.html/setup
For example, with the default IP the full link will be: https://192.168.0.100/app.html/setup

SEC+ and L-DCIM Product Manual
- 16 -
The timezone should be auto-detected from the browser. It can slightly differ from the actual zone but
the time should display correctly.
Correct it if necessary.
Provided by https://www.didactum-security.com/en/

SEC+ and L-DCIM Product Manual
- 17 -
Next specify a different password for the default admin user.
A password strength meter helps to choose a strong password, but it’s not enforced - you can use
weak password at your own risk.
As the final step, the unit will ask you to set up the backup options.
As noted earlier, the backups are essential to safeguard against losing your data - don’t forget to also
regularly export the backup files to external media!
You could accept the default quick setup setting or customize the backup options, or skip it altogether
at your own risk.

SEC+ and L-DCIM Product Manual
- 18 -
The default empty Web UI will load, which is very similar to a Windows HTML5 APS desktop.
A tutorial will run to show you the basics of UI navigation. You may either proceed with the tutorial or
skip it. Similar turorials will be shown for various menu options as you navigate the UI.
Demo hosts
You’ll see two hosts for demonstration purposes: a demo host and a demo generator.
You can use them for trying out various features, setting up notifications and actions etc.
They even have dedicated Desktops which serve as additional tutorials.
Important: before adding real devices and sensors to SEC+, after you’ve checked the demo host and
generator, it is recommended to remove them because the system logs will be full of demo events
logged from these hosts.

SEC+ and L-DCIM Product Manual
- 19 -
Setting up the unit’s IP address
To open the menu, click on the three horizontal lines in
the upper left corner:
Important: We’ll only describe the unique SEC+ WebUI
elements in details in this manual. All other menus and
UI elements can be found in our separate APS HTML
manual.
Please refer to that manual if you need help navigating
the menu.
Go to the Settings menu / Server Settings / Local
Network page to configure a different IP address for the
unit.

SEC+ and L-DCIM Product Manual
- 20 -
Settings menu / Server Settings / Local Network page
Here you can configure a different IP address for your unit. The default settings are as follows:
1. If a DHCP server is used on the network, the auto-assigned IP settings should display (see below).
2. If a direct connection to the PC was used, the default IP 192.168.0.100 should display (as on this
screenshot above).
Note that SEC+ currently only supports IPv4 addressing.
Provided by https://www.didactum-security.com/en/
This manual suits for next models
1
Table of contents
Other AKCP Gateway manuals