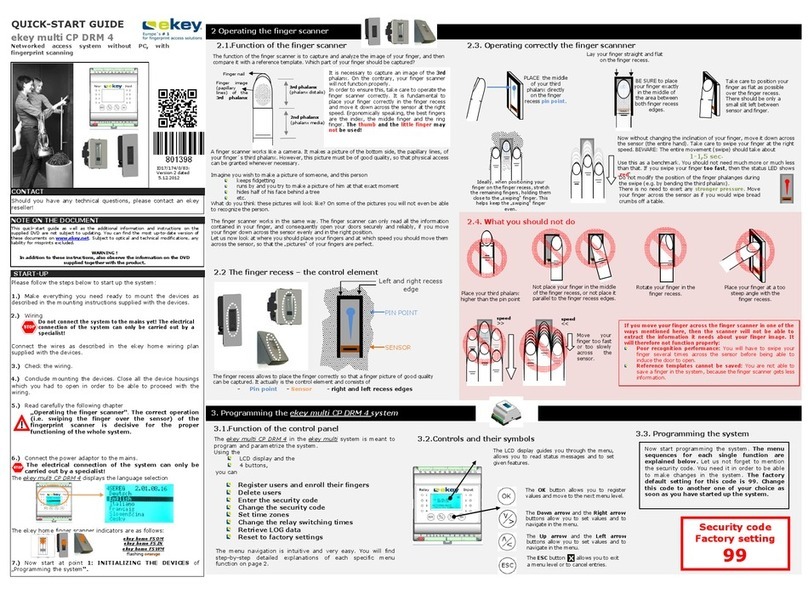
eKey Home User manual

OPERATING INSTRUCTIONS
ekey
home
Fingerscan Access Control System

ENGLISH
EUTSCH
EUTSCH ...................................................................................................................................................... 2
1.
FOREWOR ....................................................................................................................................... 3
2.
MANUFACTURER’S WARRANTY .......................................................................................................... 3
3.
CONTACT ........................................................................................................................................... 3
4.
NOTE ON THE OPERATING INSTRUCTIONS ....................................................................................... 3
5.
PRO UCT OVERVIEW ........................................................................................................................ 4
6.
SCOPE OF ELIVERY ......................................................................................................................... 4
7.
EKEY HOME CONTROL PANELS .......................................................................................................... 5
8.
EKEY HOME FINGER SCANNER ........................................................................................................ 11
9.
TROUBLE SHOOTING ....................................................................................................................... 14
10.
MOUNTING AN INSTALLATION ..................................................................................................... 15
11.
TECHNICAL ATA ............................................................................................................................ 19

1.
Foreword
Congratulations on your purchase of this high quality finger scanner system
ekey
home.
It was manufactured with highest accuracy and guarantees
a maximum amount of recognition performance. Enjoy the
convenience - no more lost keys and no longer memorizing complicated codes.
rom now on your finger is the key!
We hope you will take a lot of delight in your product.
2.
MANUFACTURER’S WARRANTY
ekey bio
metric systems (‘ekey’) guarantees, under conditions which you can view on our website
that the product is free from material or processing defects for
24 months from the date of purchase.
Warranty claims can
only be made in the country where the product was sold. ekey records the production of each
product.
3.
Contact
Visit the website of ekey biometric systems GmbH at:
www.ekey.net
There you can always find the most up to date version of this document, as
well as other additional information about
this and other products by ekey biometric systems.
If you have any further questions, please contact our support team at
Österreich and International: +43 720605013100
Germany: +49 6187 90696 28
Switzerland: +423 235 0880
Our whole team will be happy to provide you with more information.
So that you can have the most important information at hand in case of complaints we request that you
enter the serial number below:
The serial nu
mber has 14 digits and can either be found on the label below the barcode or can be accessed via the
menu on the control panel.
ekey
home finger scanner
ekey
home control panel
4.
Note on the operating instructions
These operating instructions are not subject to updating. You can find the most up to date version of these instructions
at www.ekey.net.
Subject to optical and technical modifications, any liability for misprints excluded.
a maximum amount of recognition performance. Enjoy the
rom now on your finger is the key!
metric systems (‘ekey’) guarantees, under conditions which you can view on our website
www.ekey.net
,
only be made in the country where the product was sold. ekey records the production of each
well as other additional information about
So that you can have the most important information at hand in case of complaints we request that you
mber has 14 digits and can either be found on the label below the barcode or can be accessed via the
These operating instructions are not subject to updating. You can find the most up to date version of these instructions
Subject to optical and technical modifications, any liability for misprints excluded.

ENGLISH
5.
Product overview
ekey home is a biometric access system which is equipped with a finger scanner
. This scanner reads special
your finger lines and uses
them to recognise people with access rights. Each one of your fingers has
recognition features and also varies from the fingers of other people. ekey
home is available in differen
mechanical versions and can therefore be optimally adapted to your application:
Finger scanner
ekey
home finger scanner Standard installation
ekey
home integra finger scanner integrated
Control panels
The ekey
home control panels are intended to directly control an electric motor
lock. This is
wiring for relay 1.
ekey
home control panel Standard installation 1 relay
ekey
home 3 control panel Standard installation 3 relays
ekey
home integra control panel integrated 1 relay
ekey
home 2 integra control panel integrated 2 relays
ekey
home PC control panel Standard installation 3 relays
ekey
home PC integra control panel integrated 2 relays
Essentially any finger scanner may be combined to any control panel.
Based on the scope of delivery
, check precisely which units you have when you start up the systems.
If you have our ekey home PC or ekey home PC integra product
, then please also
corresponding documents on the C
supplied along with these operating instructions.
6.
SCOPE OF ELIVERY
INTEGRA
STANDARD
ekey
home integra finger scanner
ekey
®
TOCAnet
finger scanner
Operating instructions Installation plate for the
finger scanner
Power adaptor
Installation plate for the control panel
Design element Power adaptor
screws-set Screw set
Operating instructions
1
3
4
2
1
1
2
Anzeige
Bedienung
1
. This scanner reads special
features of
them to recognise people with access rights. Each one of your fingers has
specific
home is available in differen
t functional and
lock. This is
usually relay 1 for the door
, check precisely which units you have when you start up the systems.
, then please also
take into account the
supplied along with these operating instructions.
STANDARD
finger scanner
finger scanner
Installation plate for the control panel
3
3
4
3
4
2

ekey
home integra control panel ekey
home control panel
7.
ekey home control panels
7.1 Common functions
7.1.1 OPERATING THE BUTTONS
our buttons are used for the operation:
= OK button: is used to enter the menu and to confirm entries.
< and > buttons: are used to change the values on the display or for navigating in
the programming menu.
(see diagram in section 7.1.4)
ESC button (X): is used to cancel the current entry.
PROGRAM, MENU UNCTIONS AND DISPLAY
Standard mode (blinking dot) .
Enrol user (Enroll user) Eu
Delete user (delete user) du
Set the security code (Security code) Sc
Serial and version number (Information) In
Reset to factory settings rr
Changing the relay switching times (Relay time) rt
(Delete all user settings and data)
7.1.2 OPTICAL SIGNALS
Displays from the menu navigation are not described here.
isplay Info escription
Both dots are lit up
The terminal is new or has been reset to factory settings. The
link with the fingerprint scanner is not active.
Left dot blinking Normal operation, everything is functioning properly.
4
2

ENGLISH
"Nu" - Need Update
This terminal requires a firmware update. This display also
appears during updating.
"E0"- Error code
There is no connection to the finger scanner,
or the energy
supply to the system has been interrupted. The system will be
restarted.
"E1"-Error code
99 fingerprints have already been registered
No more fingerprints can be registered. Where necessary
delete existing fingerprints in order to record new ones.
“E2”-Error code
30min-
lock after the security code has been entered
incorrectly three times. Wait 30 minutes
before entering the
security code again.
"E3"-Error code Devices connected incorrectly. Connect the devices again,
as
one of the devices has been manipulated.
to
isplay of a number
between “1” and “99”
plus the dot on the right
is lit up.
Shows the user number of the recognised fingerprint.
to Control panel
counts
down from "44" to "0"
State when connected to live current, with
no connection
having been created to the finger scanner
. If the control panel
does not switch to normal mode after a few seconds, but
continues to count down, the connection with the
finger
scanner is not intact and has to be checked.
7.1.3 INITIAL START-UP:
CONNECTION BETWEEN THE CONTROL PANEL AN THE FINGER SCANNER
When the devices are connected to the power supply the display starts to count down until a connection has been
created with the finger scanner. Afterwards two red dots appear. During this time the status display on the finger
scanner lights up red. Once the start procedure has been completed the status display begins to flash orange. Now the
initialisation can be started.
Please press the OK button followed by the ESC button. "E " appears on the display, which stands for "Enroll inger".
A pre-recorded finger may now be swiped over the sensor and the initialisation process is started without deleting any
files. If no fingerprints have yet been recorded (new installation) then the initialisation process can be ended by
pressing the ESC button.
The initialisation process runs completely automatically, in the course of which the devices are connected with each
other. This connection is meant to prevent unauthorised people gaining access in case of an improper exchange of a
finger scanner.
After the initialisation the flashing dot on the display of the control panel signalises normal mode. The security code is
preset to the standard value of 99. Please change this as soon as possible to a two-digit security code of your choice.
7.1.4 OVERVIEW OF THE PROGRAMMING MENU OF THE CONTROL PANEL:
You can access lower menu levels by pressing the OK button. You can move back up by pressing the ESC button. You
can navigate or choose an option by pressing the < and > buttons for left and right respectively.

. Flashing dot
Normal mode
. 0..99
Enter safety code
Eu
Record
fingerprint
du
Delete
user
Sc
Set safety
code
In
Information
rr
actory
settings
rt
Settings
relay-
impulse
1..99
Select user
no.
F1..F9,F10
Select
fingerprint
no.
o1…o3
Select relay
o1…o3
Select relay
1..99
Select user
no.
See section
Fehler!
Verweisquelle
0..99
Enter safety
code
See section
Fehler!
Verweisquelle
See section
Fehler!
Ve
rweisquelle
0..99
Enter safety
code
See section
7.1.11
0..99
Change relay
time
See section
Fehler!
Verweisquelle
Sn
Serial no.
US
Version
Cu
Control
panel
FS
ingerprint
scanner
Cu
Control
panel
FS
ingerprint
scanner
See section
Fehler!
Verweisquelle

ENGLISH
7.1.5 ENTERING THE SECURITY CO E
Press the OK button on the control panel.
Use the < and > buttons to enter the left number of the security code (factory setting is 9)
Press the OK button.
Use the < and > buttons to enter the right number of the security code (factory setting is 9)
Press the OK button.
"Eu" is shown in the display (Enroll user)
7.1.6 ENROLING A FINGERPRINT IN THE SYSTEM
A maximum of 99 fingerprints can be enrolled.
irst, enter the security code as per section 7.1.5.
7.1.6.1 ALLOCATING AUTHORISATION
When the display shows "Eu", press the OK button.
Select the user: The display shows the number "1". If this user number is already in use this is signalised
by a dot next to the number. or example: "1". Select the desired user number using the < and > buttons.
Press the OK button.
Select the finger: " 1" is shown in the display to represent fingerprint 1. Please begin counting with the
little finger on the left hand. The little finger on the right hand is number 10 (= setting " 0" on the display).
If a fingerprint number is already allocated, then this is also signalised with a dot next to the number. or
example set the index finger on the right hand as " 7".
Press the OK button.
You can now determine which relay is meant to be controlled by the previously selected fingerprint.
Select the relay: "o1" on the display signalises that at the moment the first relay (the motor lock) is
selected (standard setting). Use the < and > buttons to select the relay to be controlled and then press the
OK button. Now "E " will also appear on the display.
Options: "o1","o2","o3". Whether this selection is available depends of course on the system in
front of you. With the ekey home control panel for example, only "o1" can be selected. With the ekey home
3 control panel "o1", "o2" and "o3" can be selected. or more information see section 4.2.
7.1.6.2 RECORDING A INGERPRINT
Once "E " appears on the display you have 60 seconds to swipe your finger, starting at the top knuckle over the
sensor. The fingerprint should be recorded in the manner described in the section 8.1.Fehler! Verweisquelle
konnte nicht gefunden werden. The finger scanner possesses a (LED) status display, which signalises the
status using three different colours:
Red: The fingerprint was not able to be scanned successfully.
Please repeat the scanning process!
Orange: Enrollment mode. The device is waiting for a finger to record.
Green: Scan successful
7.1.7 ELETING A USER
irst enter the security code as per 7.1.5
7.1.7.1 SELECTING AND DELETING THE USER
Press the > button until "du" (delete user) is displayed.
Press the OK button.
Use the < and > buttons to select the desired user number to be deleted from the system.
Press the OK button.
"OK" is then shown on the display for a short time. The device then returns to normal mode.
The function "DELETE" (du) always relates to the user. It is NOT possible to delete individual fingerprints
of a user.

7.1.8 SETTING A NEW SECURITY CO E
Please be aware that the device cannot be operated further without setting a new security code. After three
incorrect attempts the device is locked for 30 minutes.
irst enter the security code as per section 7.1.5
7.1.8.1 SETTING A NEW CODE
Press the > button until "Sc" is displayed
Press the OK button
Enter the left digit of the new security code using the < and > buttons
Press the OK button
Enter the right digit of the new security code using the < and > buttons
Press the OK button
"OK" is displayed for a short time. The device then returns to normal mode.
7.1.9 ACCESSING SERIAL NUMBER AN VERSION NUMBER
The serial number and version number can also be accessed via the 7-segment display. Two digits of the
number are displayed at a time. This is especially important for Integra models, as their parts are built-in and
the labels are usually no longer visible.
The serial number corresponds to the serial number of the device and therefore allows you to determine the
date of production and the hardware model. The version number corresponds to the update version of the
software.
Enter the first security code as per section 7.1.5
7.1.9.1 ACCESSING THE SERIAL NUMBER
Press the > button until "In" is displayed
Press the OK button
Use the < and > buttons to select the option "Sn" for serial number
Press the OK button
Use the < and > buttons to select which device you wish to view the serial number on:
" S"…. inger scanner
"CU"…. Control panel
Press the OK button
Now you will be able to see the first two digits of the serial number. By pressing the > button you can view
the remaining digits. The serial number is 14 digits long.
By pressing the OK button you return to the first two digits of the serial number. If you press the ESC
button once you have reached the last two digits the display moves up a level in the navigation.
Accessing the version number
After inputting the security code the following steps are necessary
Press the > button until "In" is displayed
Press the OK button
Use the < and > buttons to select the option "US" for the software version.
Press the OK button
Use the < and > buttons to select which device you wish to view the version number on:
" S"…. inger scanner
"CU"…. Control panel
Press the OK button
Now you will be able to see the first two digits of the version number. By pressing the > button you can
view the remaining digits. The version number is 8 digits long.
By pressing the OK button you return to the first two digits of the version number. If you press the ESC
button once you have reached the last two digits the display moves up a level in the navigation.

ENGLISH
7.1.10 CHANGING THE RELAY SWITCHING TIMES
The switching impulse times of the individual relays can be variably adjusted from 1s to 99s. This enables you to
adjust the duration of the opening impulse of the door according to your application.
If the value 0 is assigned to a relay in this menu, then a special function is active. In this case the relay is bi-
stable. This means that when a finger is recognised, the relay changes to its switched state and remains there
until another finger is recognised. That relay thereby works as a switch and does not emit an impulse.
WARNING ! If there is a power cut in this operating mode, then the relay always restarts in idle state
once the power supply has been reconnected. NO contact = open !!
irst enter the safety code as per section 7.1.5
7.1.10.1 ALTERING THE RELAY IMPULSE TIME
Keep pressing the > button until “rt” is displayed.
Press the OK button.
Use the < and > buttons to select “o1”, “o2” or “o3” for the desired relay (NOT on ekey home and ekey
home integra systems, as they only have one relay available!)
Press the OK button.
Use the < and > buttons to set the desired duration of the switching impulse.
o0 = Special function “switch”
o1 = 1 second
o2 = 2 seconds
o.
o.
o99 = 99 seconds
Press the OK button.
"OK" will appear on the display for a short time. The device then returns to normal mode.
The duration of the impulse has been defined for the selected relay.
7.1.11 RESETTING TO FACTORY SETTINGS
If you reset the device to its factory settings all data in the memory are deleted. The security code is reset to
the standard value of 99 and the control panel and the finger scanner are disconnected.
irst of all enter the security code as per section 7.1.5
7.1.11.1 PER ORMING THE RESET
Press the > button until "rr" is displayed
Press the OK button
Enter the left digit of the security code using the < and > buttons (factory setting is 9)
Press the OK button
Enter the right digit of the security code using the < and > buttons (factory setting is 9)
Press the OK button
You will now see two red dots on the display. The orange light on the finger scanner is flashing. The device
is now in its delivered condition.
To start operating the device again, proceed from section Fehler! Verweisquelle konnte nicht
gefunden werden.

7.2 ifferences between ekey
home control panels
The ekey
net control panels differ in 4 ways:
Number of relays
Type of installation
PC connection
Power supply
In the table below the differences are listed. In it you can see the differences in the operation (1/2/3 relays) and the
pin configuration.
Article Art. no Type of
installation
Relays
ekey
®
TOCAhome control panel 100001 Standard 1
ekey
®
TOCAhome 3 control panel 100002 Standard 3
ekey
®
TOCAhome integra control panel 100523 Integrated 1
ekey
®
TOCAhome 2 integra control panel 100503 Integrated 2
ekey
®
TOCAhome PC control panel 100154 Standard 3
ekey
®
TOCAhome PC integra control panel 100512 Integrated 2
*with a ekey
®
CONVERTER USB.
If you have our ekey
home PC or ekey
home PC integra product, then please also tske
the respective documentation on
the supplied CD in consideration in addition to these operating instructions. The
additional
are listed there in details.
8.
ekey home finger scanner
8.1 Operating the finger scanner
Operating the finger scanner correctly is a guarantee that this product will
function
recommendations apply to both versions of the finger scanner, ekey
home finger scanner
and ekey
scanner.
Please use the finger which has the best finger lines
in your opinion. In particular with weakly
you should avoid pressing down too hard on the sensor so that you do not squash the
anyway.The finger scanner is equipped with a fully automatic lear
ning system in order to guarantee recognition
performance over a long period.
To optimise the fingerprint recognition it is best to swipe
each finger over the sensor at least 5 times. If any are
rejected then please repeat this process.
If the scanner is not providing sufficient fingerprint recognition then try the
following:
Reduce the pressure on the finger when you place it on the scanner.
Make sure that your finger scan starts exactly within the finger area visible on
the casing.
Use the surface of the finger starting
the top knuckle. Almost everyone has a strongly pronounced fold at
the knuckle, and this is the start position for scanning.
Usually the middle finger is the best finger for scanning.
The small fing
ers and thumbs are not ideal for ergonomic reasons. Thumbs are very difficult to use.
Try scanning the fingerprint at different speeds in order to find out the best speed for you.
In the table below the differences are listed. In it you can see the differences in the operation (1/2/3 relays) and the
Voltage USB-
Bus
9-12VDC
9-12VAC
-
9-12VDC
9-12VAC
-
8-30VDC
8-24VAC
-
8-30VDC
8-24VAC
-
9-12VDC
9-12VAC
Yes*
8-30VDC
8-24VAC
Yes*
the respective documentation on
additional
options of these products
function
properly. The following
and ekey
home integra finger
in your opinion. In particular with weakly
-pronounced finger lines
you should avoid pressing down too hard on the sensor so that you do not squash the
finger lines which are flat
ning system in order to guarantee recognition
each finger over the sensor at least 5 times. If any are
If the scanner is not providing sufficient fingerprint recognition then try the
the casing.
the top knuckle. Almost everyone has a strongly pronounced fold at
ers and thumbs are not ideal for ergonomic reasons. Thumbs are very difficult to use.
Try scanning the fingerprint at different speeds in order to find out the best speed for you.

ENGLISH
!
Save the same fingerprint at several storage locations if the above information does not help. You have
space to save 99 fingerprints. In extreme cases you should use up to 10 memory spaces for one finger.
Wet fingers show modified finger lines, you can see that with your own eyes. If you often have wet fingers then it is
best to save a wet version of your fingerprint.
Children’s fingerprints are usually recognised, depending on the child´s height, from the age of 5. Please also observe
the points mentioned above.
RECORDING A INGERPRINT USING THE SENSOR (SEE PAGE Fehler!
Textmarke nicht definiert.)
It is important that you swipe the finger correctly over the sensor.
Best results are achieved by using the middle finger and stretching out the index and ring finger at
the same time..
Please swipe the desired finger, starting at the top knuckle over the sensor with full contact. The larger the scanned
surface of the finger, the better your finger will be recognised by the device.
In order to gain as good a recognition as possible please swipe your finger along the sensor in the same way as in the
recording process.
The sensor is placed in the middle of the finger swiping track (between the gray lines, see the diagram in section 5.2.
Swipe the finger carefully, with light pressure and constant, medium speed over the sensor.
People performing manual work should especially take care of possibly worn out finger lines, so right-handed people for
instance should therefore scan a fingerprint from their left hand.
If you notice that the contours of your fingerprints are difficult to see with the naked eye, then use the finger where
the contours are most pronounced.
WARNING:
Please try to swipe as large a surface as possible over the sensor, starting from the top knuckle, with a small
amount of pressure. This gives you the best recognition performance.
8.2 Care of the sensor area
Sensor areas

The sensor area of the finger scanner is the most important element of your ekey
home and needs to be taken care of
accordingly in order to function durably.
The sensor area is self-cleaning and therefore no special maintenance is necessary. If the finger scanner still becomes
dirty, wipe the sensor with a damp (not wet), non-scratch or non-abrasive cloth. Use normal water without any
cleaning agents. Be particularly careful when cleaning the surface of the sensor. Do not rub on the sensor area or exert
pressure on it.
8.3 ekey
home finger scanner and ekey
home integra finger scanner
Signals on the finger scanner
Standard Integra Status
display
Function
display
escription
Orange light
flashing Off
There is no connection to the
ekey
home control panel.
Please check the connection.
Off Left: green
Right: green
The system is online – all
components are
communicating correctly.
Orange light
flashing
Left: green
Right: green
ingerprint recognition:
checking
Green Left: green
Right: green
ingerprint recognition:
positive, the relay is
connected accordingly.
Red Left: green
Right: green
ingerprint recognition:
negative or the recognised
fingerprint is rejected
Orange Left: green
Right: green
ingerprint recording mode.
The finger now has to be
swiped over the sensor.
Red and
green lights
flashing
Left: green
Right: green
irmware update will be
carried out (using the
TOCAUpdate program)
uring the boot procedure:
Red Off
The module is booting, it
takes about 1-2s counting
from the moment when
power supply is available

ENGLISH
Orange light
flashing Off lash error – automatic
repair will be started
Red and
green lights
flashing
Off
Communication with the
sensor was not possible
during start-up. Normal
mode starts after 20
seconds.
9.
TROUBLE SHOOTING
Error Cause Solution
The recording of fingerprints is not
working
1. The finger was not swiped evenly over
the sensor starting at the top knuckle.
2. The finger was swiped too lightly or too
heavily over the sensor.
3. The finger was swiped too
fast or too
slowly over the sensor.
4. The finger is being swiped at an
incorrect angle.
5. The finger does not have enough
features to be detected (due to wear).
1. Swipe the finger over the sensor
evenly without moving it backwards
starting at the top knuckle.
2. Swipe the finger gently, but not too
carefully over the sensor.
3. Swipe the finger at a medium speed
and the correct angle over the s
ensor
(see page
Fehler! Textmarke nicht
definiert.).
4. Use a different finger.
A finger that has already been
recorded is no longer recognised.
1. During the recording,
another surface
of the finger was learnt.
2. The recording of the finger was not
carried out properly.
3. The finger was incorrectly swiped over
the sensor
1.
Enroll the finger n the system again
a
nd always swipe over the sensor
evenly.
2. See “The recording of fingerprints is
not working“ –
perfect recording
guarantees good recognition.
3. See page
Fehler! Textmarke nicht
definiert.
The status dot on the control panel
is not blinking
No power supply
1. Check the power
supply, where
necessary check the fuses
Two dots are lit up on the display of
the control panel
Lack of or defective connection
to the
device
Re-connect the device
(See section
Fehler! Verweisquelle
konnte nicht gefunden werden.
initial start-up)
Error code "E0"
shown on the
display, then the countdown starts
from 45
1. No connection to the fingerprint
scanner
2. The power supply to the system has
been interrupted. The system
will be
restarted.
1. Check the 4-
pin connection cable.
Check the power supply at terminals 3
and 4, it must be at least 8V
2. Wait until the start process has
finished.
Error code "E1" on the display
99 fingerprints have already been
registered
No more fingerprints can be
registered. Where necessary delete
existing
fingerprints in order to record
new ones.
Error code "E2" on the display
30 minutes lock after three incorrect
attempts to enter the security code.
Wait 30 minutes before entering th
e
security code again.
Error code "E3" on the display Device connected incorrectly
Reconnect the devices as one of them
has been manipulated.
The green LED on the
finger
scanner
signalises that the
fingerprint has been positively
recognised, but the relay is not
connected.
Incorrect device allocation.
The recognition is not accepted, as one of
the devices has been exchanged.
Reconnect the devices as one of them
has been manipulated.
Before connection reset the devices to
factory settings (see
Fehler!
V
erweisquelle konnte nicht
gefunden werden.)

273.00
254.00
233.25
30.0
X
< >
OK
Ausfräsung für die Inneneinheit integra
räsbreiten: 18mm, 20mm oder 24mm
Auslass für Kabelzuführung
(von Außeneinheit, Motorschloss und Hauptzuleitung,
die Position der Ausnehmung ist frei wählbar)
Türblatt
Bohrungen f. Befestigungsschrauben
(optional)
min. 8mm
The green and red status lights
blink alternately on the
finger
scanner.
Possible problems or damage to the
sensor
Contact our customer support team.
Have the serial number of the product
(visible below the barcode sticker)
ready (for contact details, see page 2)
10.
Mounting and installation
10.1 ekey
home integra
10.1.1 COUNTERSINKING OF THE EKEY
HOME INTEGRA CONTROL PANEL
Outlet for cable lead X1, X3, X6
(from the fingerprint scanner, motor lock and main
supply cable. You can select any position you choose
for the recess)
min. 15mm
The width of the
countersinking depends on
the model and amounts to:
18mm, 20mm oder 24mm
234.00mm
door
Countersinking for the
internal unit - integra
holes for the mounting screws
(optional)

ENGLISH
10.1.2 COUNTERSINKING OF EKEY
HOME INTEGRA FINGER SCANNER
10.1.3 MOUNTING OF THE EKEY
HOME INTEGRA CONTROL PANEL
10.1.3.1 COUNTERSINKING
To install the ekey
home integra control panel, create a countersinking as per the illustration on page Fehler!
Textmarke nicht definiert..
10.1.3.2 MOUNTING THE CABLES
When laying or inserting cables make sure that enough cable is left over for connection or disconnection, so that you
are able to re-mount the device.
10.1.3.3 ELECTRIC CONNECTION
The control panel is supplied with power via the white and brown X1 conductors of the 8-pin power cable. If you use
direct current voltage (DC), connect the white cable to the +pole and the brown cable to the –pole. If the system uses
alternating current then also connect the brown and white conductors with the AC power adaptor.
* recommended size of countersink
(may vary depending on materials)
Corner or
radius 5mm
(on all 4 Corners)
Cable outlet
Version 1 (assembly
dowels)
Version 2 (screws)

The dimensions of the power supply are to be chosen so that it provides enough power for the operation of the ekey
home Integra (1W) and the connected device on relay 1 (X6).
Example: Motor lock 24VDC 1A plus ekey
home integra at 24VDC approx. 100mA. In this case the power supply should
be at least 27 Watts, i.e. 24VDC 1.1A.
The power supply for any applicable motor lock is taken directly from the control panel (3-pin screw clamp terminal
X6).
10.1.3.4 CONNECTION O A MOTOR LOCK - X6
Use the screw clamp x6 to connect a motor lock. To do so connect the +output of the control panel with the +input of
the motor lock. The same applies to the minus pole and the impulse output.
WARNING:
The electric connection can only be carried out by qualified personnel.
10.1.4 MOUNTING THE EKEY
HOME INTEGRA FINGER SCANNER
The ekey
home integra finger scanner can be mounted in two ways.
10.1.4.1 MOUNTING USING DOWELS:
When mounting in a door, a recess should be created as per the illustration on page Fehler! Textmarke nicht
definiert.. When doing so be careful about the cable outlet, as a through-hole or channel for the cables is to be
created (drilled or countersunk). Install the cable with the pre-made RJ45 plug in the door so that the end protrudes
into the recess for the finger scanner. The other end is passed through the door and laid down to the place where the
control panel is installed. Then connect the finger scanner and insert it into the countersunk opening. Both dowels on
the casing must reach their intended holes so that they can be tightened using the supplied screws. When tightening
the screws you should press the scanner lightly against the door to ensure it sits securely in the door. Only attach the
supplied design element after you have fully completed the installation.
10.1.4.2 MOUNTING WITHOUT DOWELS:
When mounting without dowels (e.g. in a door frame) the dowels attached to the casing have to be cut off.
Countersink a recess as per the diagram on page Fehler! Textmarke nicht definiert. and drill two holes for the
mounting screws (diameter approx. 2mm). Lay the cable from the recess for the sensor to the place where the control
panel is installed. The end of the cable with the RJ45 plug must be in the installation position of the finger scanner.
Connect the RJ45 plug to the scanner and push it into the recess. Then screw in the finger scanner using the screws
supplied. Make sure that you do not tighten the screws too much and thereby cause damage to the casing. Only mount
the supplied design element after you have fully completed the installation.
Switch impulse 3
MS- supply 2
MS+ supply 1
With both mounting options please be aware there
should be about one hand’s width space on either
side of the Integra fingerprint scanner, to ensure
that it functions without problems with all fingers.
X6

ENGLISH
1550m m
ca. 1300m m
Fingerscanner
Steuereinheit
10.1.5 MOUNTING HEIGHT FOR THE INTEGRA EKEY
HOME CONTROL PANEL A
SCANNER
10.1.6 ATTACHING THE ESIGN ELEMENT
In order to mount the design element
, take hold of it by the sides with two fingers
insert it into the lower edge of the casing so that the lower mounting clip
recess intended for it.
Then exert a slight amount of pressure on the upper edge of the
bend it slightly. Then push the mounting clips i
nto the recess on the upper edge by
slowly releasing the design element.
10.1.7 REMOVING THE ESIGN ELEMENT
inger scanner
Control panel
HOME CONTROL PANEL A
N FINGER
, take hold of it by the sides with two fingers
and
insert it into the lower edge of the casing so that the lower mounting clip
s lock into the
Then exert a slight amount of pressure on the upper edge of the
design element, to
nto the recess on the upper edge by

180 CM
135 CM
Use a flat object (such as a flat screwdriver) to remove the design element and lift it carefully out of the frame, by
inserting the flat object into the upper or lower edge of the casing between the design element and the plastic edge.
10.2 ekey
home
10.2.1 WALL MOUNTING OF THE EKEY
HOME FINGER SCANNER
Mount the installation plate (see diagram in section 1) directly onto the
wall. The optimum installation height is around 135 cm or higher. The angle
of the casing is optimal at this height.
It is only possible to mount the device in the wall in connection with the "wall-mounting
set (stainless steel)" accessory. In order to guarantee good operation of outdoor units
with both the right and the left hand, it should be mounted in a place that is easily
accessible. To mount the scanner on a standard flush-mounting box (electronic
installation box) please use the "Cover round (plastic)" accessory. Alternatively you can
attach it directly onto the wall using dowels, wood screws or similar (see the accessories
listed).
The outdoor unit (splash proof) is to be mounted at a location which is sheltered from
heavy rain, snow and bright sunlight.
10.2.2 WALL MOUNTING OF THE EKEY
HOME CONTROL PANEL
irst mount the installation rail (DIN Rail 35mm). The installation rail is a bracket for the casing of the indoor unit. Now
place the indoor unit on the installation plate. Open the unit by pressing the clip of the lock downwards with a flat
screwdriver.
The indoor unit is to be mounted in such a way that unauthorised people are prevented from accessing it.
Danger of manipulation!
11.
TECHNICAL ATA
Technical data
-
ekey
home
finger scanner
Unit
ekey
home
standard
ekey
home integra
Power supply
AC
9
-
12
8
-
24
DC
9
-
12
8
-
30
Power input
W
approx. 2
approx.1
Temperature range
°C
-
40 to +85
-
40 to +85
Memory
ingers
99
99
Security
AR
1x 10
-
6
1x 10
-
6
RR
1.4x 10
-
2
1.4x 10
-
2
Protection class
IP43
IP
54
Speed
s
1
-
4
1
-
4
Life time cycle
inger scans
approx.
4
million
approx.
4
million

ENGLISH
*The electrical life time will be reduced further by switching capacitive or inductive appliances. If you want to switch such appliances place electric spark compression units to
protect the releais-contacts.
*
A maximum of 3.5A can be output via X6. E.g. if 2.8A are consumed via X6PIN1, then only a maximum of 0.7A can be used by X6PIN1.
The control panel and the finger scanner have to be connected with a 4-core cable which has a minimum diameter of
0.5 mm (equals a 0.14 mm² core diameter). or distances of over 50m a cable with a larger core diameter has to be
selected for the live cores (connections 3 and 4). The maximum length of cable between the finger scanner and the
control panel is 500m.
1 relay is available (3 relays in the ekey
home 3 and pc versions) for controlling external devices. Its programming is
carried out via the programming menu. The relay has a change-over contact, which can be used as required - the
maximum switching capacity is 250VAC 5A (with the integra version 30V / 2A). Every single door lock must, without
exception, be connected to a separate power supply (do not use the supplied power adaptor!).
The connecting cable between the control panel and the finger scanner has to be laid separately from the electric
installations of the building, as these signals produce a low-voltage area, which can be impaired by neighbouring live
cables.
The connections are not protected against reverse polarity!
Version 1 : 6.2.09 BRUM
Technical data ekey home
control panel
Unit
ekey home
ekey home 3,
pc
ekey net
Power supply
V A/C
9
-
12
9
-
12
V D/C
9
-
12
9
-
12
Power input
W
approx. 2
approx.2
Relays
Number
1
3
Switching capacity of the relays
230V AC /
5A
230V A
C / 5A
Mechanical life span of the relays
Switching cycles
10 mill.
10 mill.
Electrical life span of the relay
*
Switching cycles
200,000 at
250V/5A
200,000 at 250V/5A
Temperature range
°C
-
20 to +70
-
20 to +70
Protection class
IP
4
0
4
0
Digital inputs
-
-
Technical data ekey home
integra control unit
Unit
ekey home integra
ekey home integra 2,
pc
Power supply
VAC
8
-
24
8
-
24
VDC
8
-
30
8
-
30
Power input
W
approx. 1
approx. 1
Relays
Number
1
2
Switching capacity of the relays
30V D/C / 2A
30V D/C / 2A
RELAIS
Switching power
42
VDC
(AC)
/2A
42
VDC
(AC)
/2A
Load voltage(Peak AC)
V
60
60
ON resistance (max.)
Ω
0,12
0,12
O state leackage current
µA
1
1
Turn On time
ms
1.5
1.5
Turn Off time
ms
0.5
0.5
Temperature range
°C
-
40 to +85
-
40 to +85
Protection class
IP
40 (front)
40(front)
Digital inputs
1
1
Maximum current to X6 PIN 1 (only
with Integra)*
A
3
3
Other manuals for Home
3
Table of contents
Other eKey Gateway manuals
Popular Gateway manuals by other brands
Four-Faith
Four-Faith F8L10GW-L user manual
CHAFFOTEAUX
CHAFFOTEAUX ChaffoLINK Assembly and operation manual

TLS Corporation
TLS Corporation iport user manual

AudioCodes
AudioCodes Mediant 3000 TP-6310 Performance Monitoring and Alarm Guide
Titan Logix
Titan Logix CTX-TDS-100 Configuration utility manual

Avaya
Avaya Media Gateway G250 overview
