Akro-Mils,
1293
South
Main
St.,
Akr
on,
Ohio
44301
•
800-253-2467
•
Fax:
330-761-6348
•
akro-mils.com
•
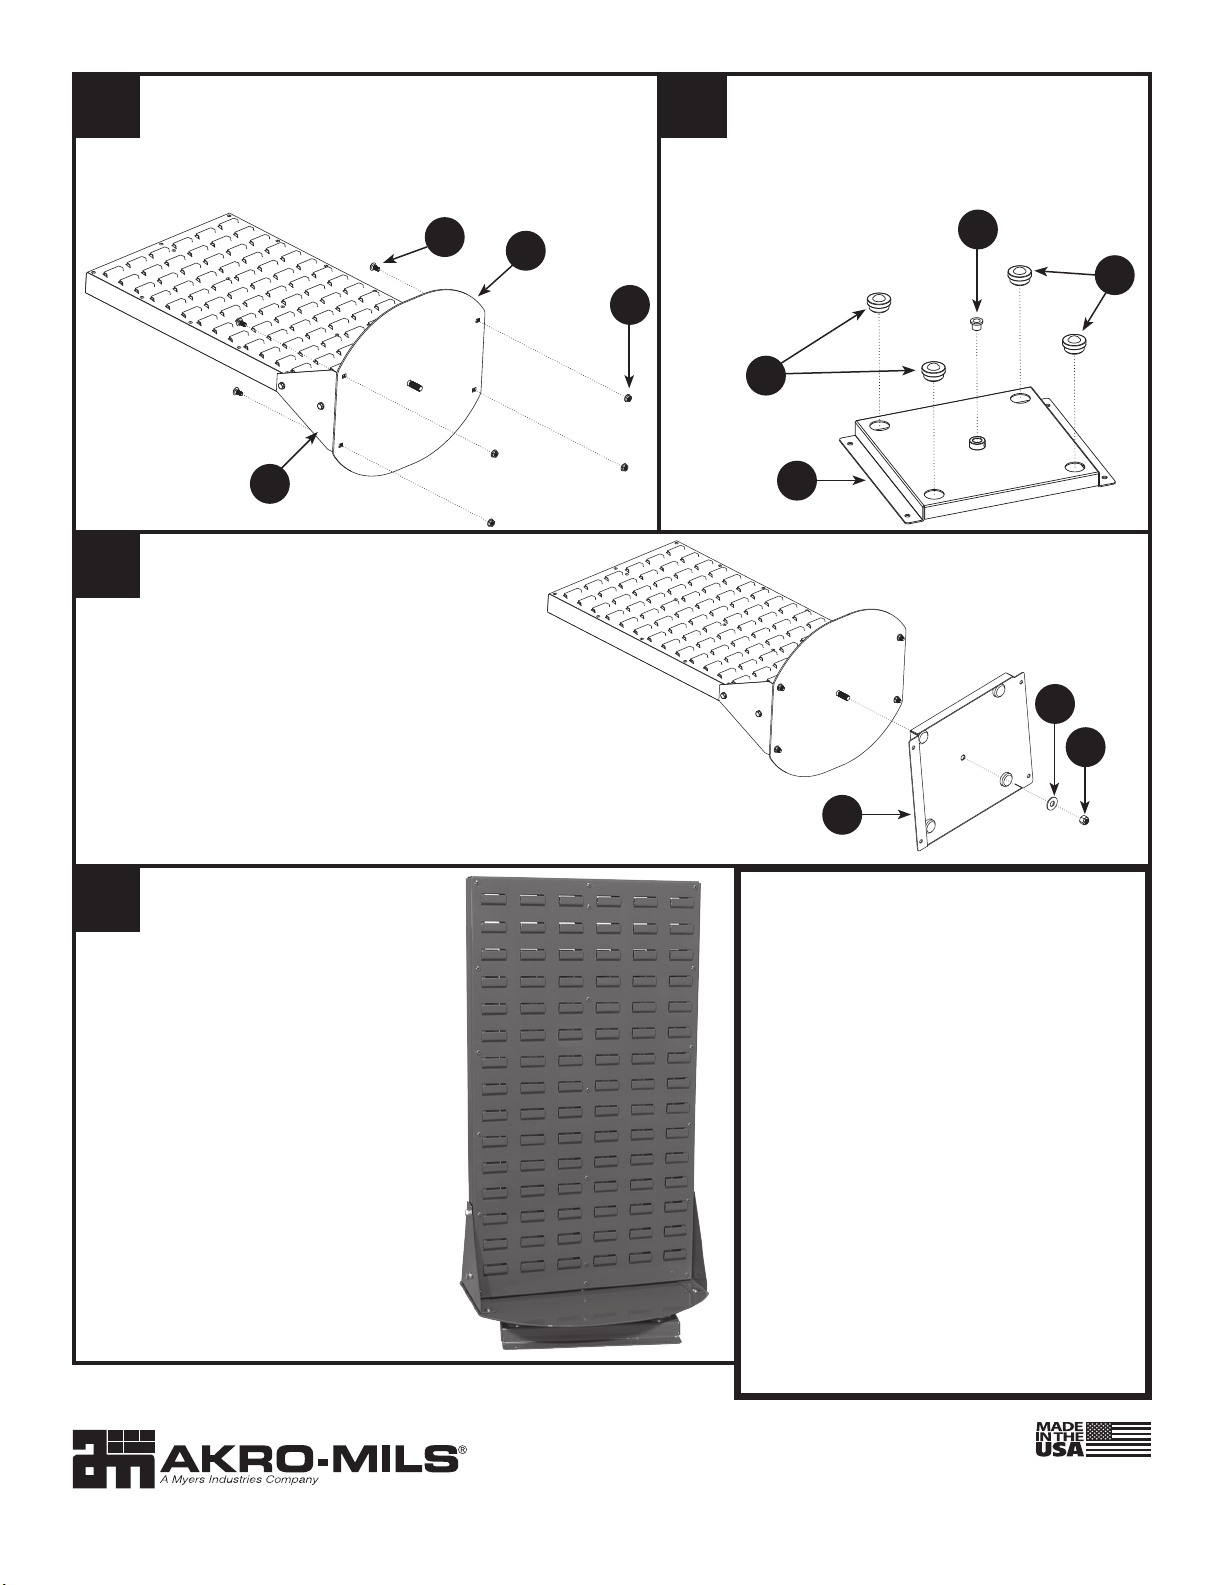
[email protected]6) Insert ball transfer units into base, (4). Fit ange bushing to base and snug with 5/32 allen wrench
Fasten connectors (C) to disk (B). Use 4 carriage bolts (G)
and 4 flange nuts (H).
Fije los soportes (C) en el disco (B). Use 4 pernos de
carrocería (G) y 4 tuercas con brida (H).
Attacher les connecteurs (C) au disque (B). Utiliser 4 boulons de
carrosserie (G) et 4 écrous à embase (H).
Tilt base (D) sideways and slide over ½" bolt.
Hold firmly against disk. Install flat washer
(I). Install locknut (L). Tighten until nut stops,
then back off a ¼ turn.
Incline la base (D) sobre un costado e insértela en el perno
de ½ pulgada. Presiónela firmemente contra el disco. Instale
una arandela plana (I). Instale una contratuerca (L). Apriete
hasta que la tuerca se detenga y aflójela ¼ de vuelta.
Basculer le socle (D) sur le côté et l'enfiler sur la vis de
½po. Tenir fermement contre le disque. Poser une rondelle
plate (I). Poser l'écrou-frein (L). Serrer l'écrou à fond, puis le
desserrer de ¼ de tour.
Pare la unidad sobre la base. Gire manualmente
el bastidor, debe girar libremente. Ajuste la
tuerca según sea necesario para que la unidad
gire libremente. Fije la unidad a la superficie de
trabajo con los orificios en la base (D) o con
abrazaderas.
Placer l'ensemble verticalement sur son socle.
Faire tourner le bâti à la main pour vérifier qu'il
pivote librement. Ajuster l'écrou comme il se
doit pour faciliter la rotation du bâti. Fixer à la
surface de travail par les trous dans le socle (D)
ou avec des serre-joints.
Note: Holds up to 200 lbs. - weight should be
evenly distributed.
Nota: Soporta hasta 90 kg (200 lb) - el peso
debe distribuirse uniformemente.
Remarque: Accepte jusqu'à 90 kg (200 lb) -
le poids doit être réparti uniformément.
Stand unit upright on base. Manually
spin rack; the unit should spin freely.
Adjust nut as desired to help unit spin
easily. Secure to work surface with the
holes in the base (D), or clamp to table.
Insert 4 ball transfer units (K) into base (D). Fit flange
bushing (J) to center of base (D) and tighten with
5/32 allen wrench.
Inserte 4 bolas de transferencia (K) en la base (D). Introduzca
el casquillo con brida (J) en el centro de la base (D) y apriételo
con una llave allen de 5/32.
Insérer 4 appuis à bille (K) dans le
socle (D). Enfoncer le manchon à
bride (J) dans le centre du socle (D)
et serrer avec la clé Allen de 5/32po.
3
5
6
4
GBK
K
H
J
C
I
L
D
D
©2015 Akro-Mils/Myers Industries, Inc. #AKM446 98318-010115 01/15
5) Fasten supports to disc. (4) 5/16-18 x 5/8” carriage bolt + (4) 5/16 ange nut
7) Tilt base until it slides over ½” bolt.
7a.) Hold rmly against disk.
7b.) Install ½” at washer
7c.) Install ½” locknut
7d.) Tighten until nut stops, then back off a ¼ turn.
Akro-Mils prides itself in providing
your best value in storage,
organization and material handling
products. If you have
any questions, comments or need
assistance with this product
please call our
toll-free service number:
800-253-2467
Service representatives are available
weekdays from 8 a.m. to 5 p.m.
Eastern Time to assist you (outside
normal business hours, leave a
message and we’ll get back to you).


