manuals.online logo
Brands
  1. Home
  2. •
  3. Brands
  4. •
  5. AKRO-MILS
  6. •
  7. Indoor Furnishing
  8. •
  9. AKRO-MILS ASC1279 User manual

AKRO-MILS ASC1279 User manual

This manual suits for next models

1

Other AKRO-MILS Indoor Furnishing manuals

AKRO-MILS 98318 User manual

AKRO-MILS

AKRO-MILS 98318 User manual

AKRO-MILS APRS User manual

AKRO-MILS

AKRO-MILS APRS User manual

Popular Indoor Furnishing manuals by other brands

Regency LWMS3015 Assembly instructions

Regency

Regency LWMS3015 Assembly instructions

Furniture of America CM7751C Assembly instructions

Furniture of America

Furniture of America CM7751C Assembly instructions

Safavieh Furniture Estella CNS5731 manual

Safavieh Furniture

Safavieh Furniture Estella CNS5731 manual

PLACES OF STYLE Ovalfuss Assembly instruction

PLACES OF STYLE

PLACES OF STYLE Ovalfuss Assembly instruction

Trasman 1138 Bo1 Assembly manual

Trasman

Trasman 1138 Bo1 Assembly manual

Costway JV10856 manual

Costway

Costway JV10856 manual

moss DESIGN Caisson Credenza Assembly instructions

moss DESIGN

moss DESIGN Caisson Credenza Assembly instructions

Aquaglide FULL DECK 15.0 owner's manual

Aquaglide

Aquaglide FULL DECK 15.0 owner's manual

AREBOS AR-HE-SW30 user manual

AREBOS

AREBOS AR-HE-SW30 user manual

Till-Hilft Fulda 87005.330 Assembly instructions

Till-Hilft

Till-Hilft Fulda 87005.330 Assembly instructions

Twoey Outside 2010 quick start guide

Twoey Outside

Twoey Outside 2010 quick start guide

Hettich Easys 200 operating instructions

Hettich

Hettich Easys 200 operating instructions

The bedboss RELAX 404 Series owner's manual

The bedboss

The bedboss RELAX 404 Series owner's manual

Oeseder Möbelindustrie Bern 991 720 Assembly instructions

Oeseder Möbelindustrie

Oeseder Möbelindustrie Bern 991 720 Assembly instructions

Costway HW68469 user manual

Costway

Costway HW68469 user manual

Next ALIX A27743 Assembly instructions

Next

Next ALIX A27743 Assembly instructions

BROSA Hans Assembly guide

BROSA

BROSA Hans Assembly guide

Prodigg MINIKA PBA015T-FUR installation manual

Prodigg

Prodigg MINIKA PBA015T-FUR installation manual

manuals.online logo
manuals.online logoBrands
  • About & Mission
  • Contact us
  • Privacy Policy
  • Terms and Conditions

Copyright 2025 Manuals.Online. All Rights Reserved.

Assembly Instructions
Steel Shelving
Model Nos. ASC1279, ASC1879
PARTS:
PARTES:
PIÈCES:
7/16 SOCKET ON RATCHET
TRINQUETE CON CASQUILLO DE 7/16 PULG.
DOUILLE DE 7/16 SUR CLIQUET
PHILLIPS SCREWDRIVER
DESTORNILLADOR PHILLIPS
TOURNEVIS PHILLIPS
SHELF
ESTANTE
ÉTAGÈRE
POST
POSTE
MONTANT
BACK PANEL
PANEL POSTERIOR
PANNEAU ARRIÈRE SIDE PANEL
PANEL LATERAL
PANNEAU LATÉRAL
BACK PANEL CLIP
SUJETADOR DEL PANEL POSTERIOR
ATTACHE DE PANNEAU ARRIÈRE
SHELF CLIP
SUJETADOR DE ESTANTE
ATTACHE D'ÉTAGÈRE
1/4-20 x 5/8 BOLT
PERNO DE 1/4-20 x 5/8
BOULON 1/4-20 x 5/8
1/4-20 NUT
TUERCA DE 1/4-20
ÉCROU 1/4-20
TOOLS:
HERRAMIENTAS:
OUTILS:
Instrucciones de ensamblaje
Estantería metálica
Modelo No. ASC1279, ASC1879
Instructions d’assemblage
Étagère en acier
Modèle n° ASC1279, ASC1879
Akro-Mils prides itself in providing your best value in
storage, organization and material handling products. If you
have any questions, comments or need assistance with this
product please call our toll-free service number:
800 -863-5817
Service representatives are available weekdays from 8 a.m. to
5 p.m. Eastern Time to assist you (outside normal business
hours, leave a message and we’ll get back to you).
1
2
34
5
Akro-Mils, 1293 South Main St., Akron, Ohio 44301 • 800-253-2467 • Fax: 330-761-6348 • akro-mils.com • [email protected]
©2015 Akro-Mils/Myers Industries, Inc. #AKM230 ASC1279/ASC1879-010115 01/15
BOTTOM SHELF
STEP 3
1) INSERT CLIP INTO THE FIRST TWO BOTTOM SLOTS OF
THE POST.
2) INSERT THE SHELF INTO THE CLIP.
STEP 4
TOP SHELF
1) INSERT CLIP INTO THE TOP AND LAST SLOT OF THE
POST.
2) INSERT THE SHELF INTO THE CLIP.
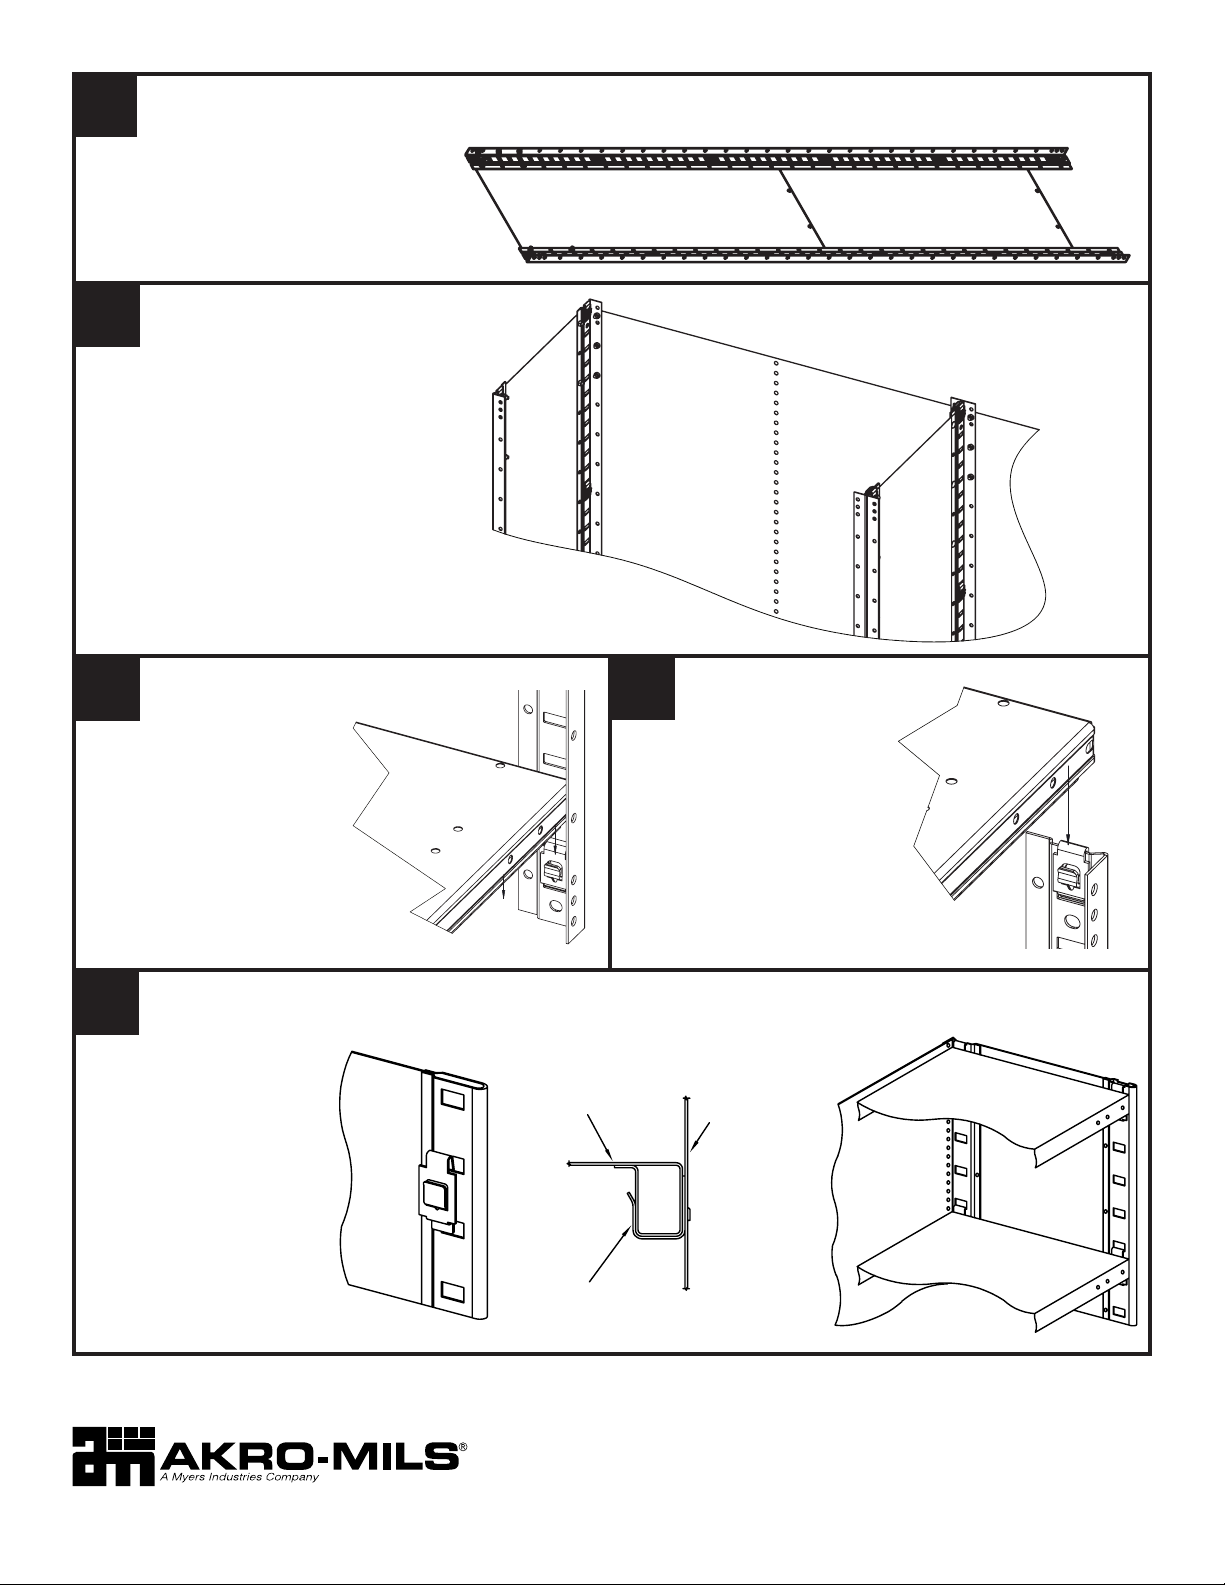
Arrange back panels to fit the length of the post (panels will
overlap in the middle). Back panels must be attached to the
back posts at 12" intervals, using nuts and bolts.
Distribuya los paneles posteriores a lo largo del poste (los
paneles se solapan en el centro). Los paneles posteriores
deben fijarse a los postes posteriores cada 12 pulgadas
con pernos y tuercas.
Placer les panneaux arrière le long du montant (les
panneaux se chevauchent au milieu). Les panneaux arrière
s'attachent aux montants arrière à 12 pouces (30 cm)
d'intervalle, avec des boulons et des écrous.
Lay two side panels flat on the floor, along with 2 posts. Arrange panels to fit the length of the
post (panels will overlap in the middle). Attach panels to posts with nuts and bolts.
Insert clip into the first two
bottom slots in each post.
Slide shelf down onto the clip.
Insert clip over the top and into
the last slots in each post. Slide
shelf down onto the clip.
Attach the remaining shelf clips spaced evenly throughout the posts, 4 clips per shelf. Attach a back panel
clip to the center of the back panel at each shelf location. Slide the shelves down onto all the clips.
Acueste dos paneles laterales sobre el suelo, junto a 2
postes. Distribuya los paneles a lo largo del poste (los paneles
se solapan en el centro). Conecte los paneles a los postes con
pernos y tuercas.
Poser deux panneaux latéraux à plat sur le sol, avec deux
montants. Placer les panneaux le long des montants (les
panneaux se chevauchent au milieu). Attacher les panneaux
aux montants avec des boulons et des écrous.
Inserte una presilla en las primeras dos
ranuras inferiores de cada poste. Baje
el estante sobre la presilla.
Insérer l'attache dans les deux
premières rainures de chaque montant.
Enfiler l'étagère sur l'attache par le
dessus.
Inserte la presilla sobre la parte
superior, dentro de las últimas ranuras
de cada poste. Baje el estante sobre la
presilla.
Insérer une attache par le haut et dans
les dernières rainures de chaque
montant. Enfiler l'étagère sur l'attache
par le dessus.
Instale las presillas restantes en los
postes a distancias regulares,
usando 4 presillas por estante.
Instale una presilla para panel
posterior en el centro del panel
posterior, junto a cada estante. Baje
los estantes sobre las presillas.
Poser les attaches restantes en les
espaçant régulièrement sur la
longueur des poteaux, en comptant
4 attaches par étagère. Poser
l'attache arrière au milieu du panneau
arrière pour chaque étagère. Poser
des étagères sur toutes les attaches
par le dessus.
SHELF
ESTANTE
ÉTAGÈRE
BACK PANEL
PANEL POSTERIOR
PANNEAU ARRIÈRE
BACK PANEL CLIP
SUJETADOR DEL PANEL POSTERIOR
ATTACHE DE PANNEAU ARRIÈRE