Akura AV42720-HD User manual

AV42720-HD
OPERATING INSTRUCTIONS
42" LCD TV COLOUR TELEVISION

-1-
Contents
Preparation .............................................2
Features ...............................................2
Safety Precautions .................................2
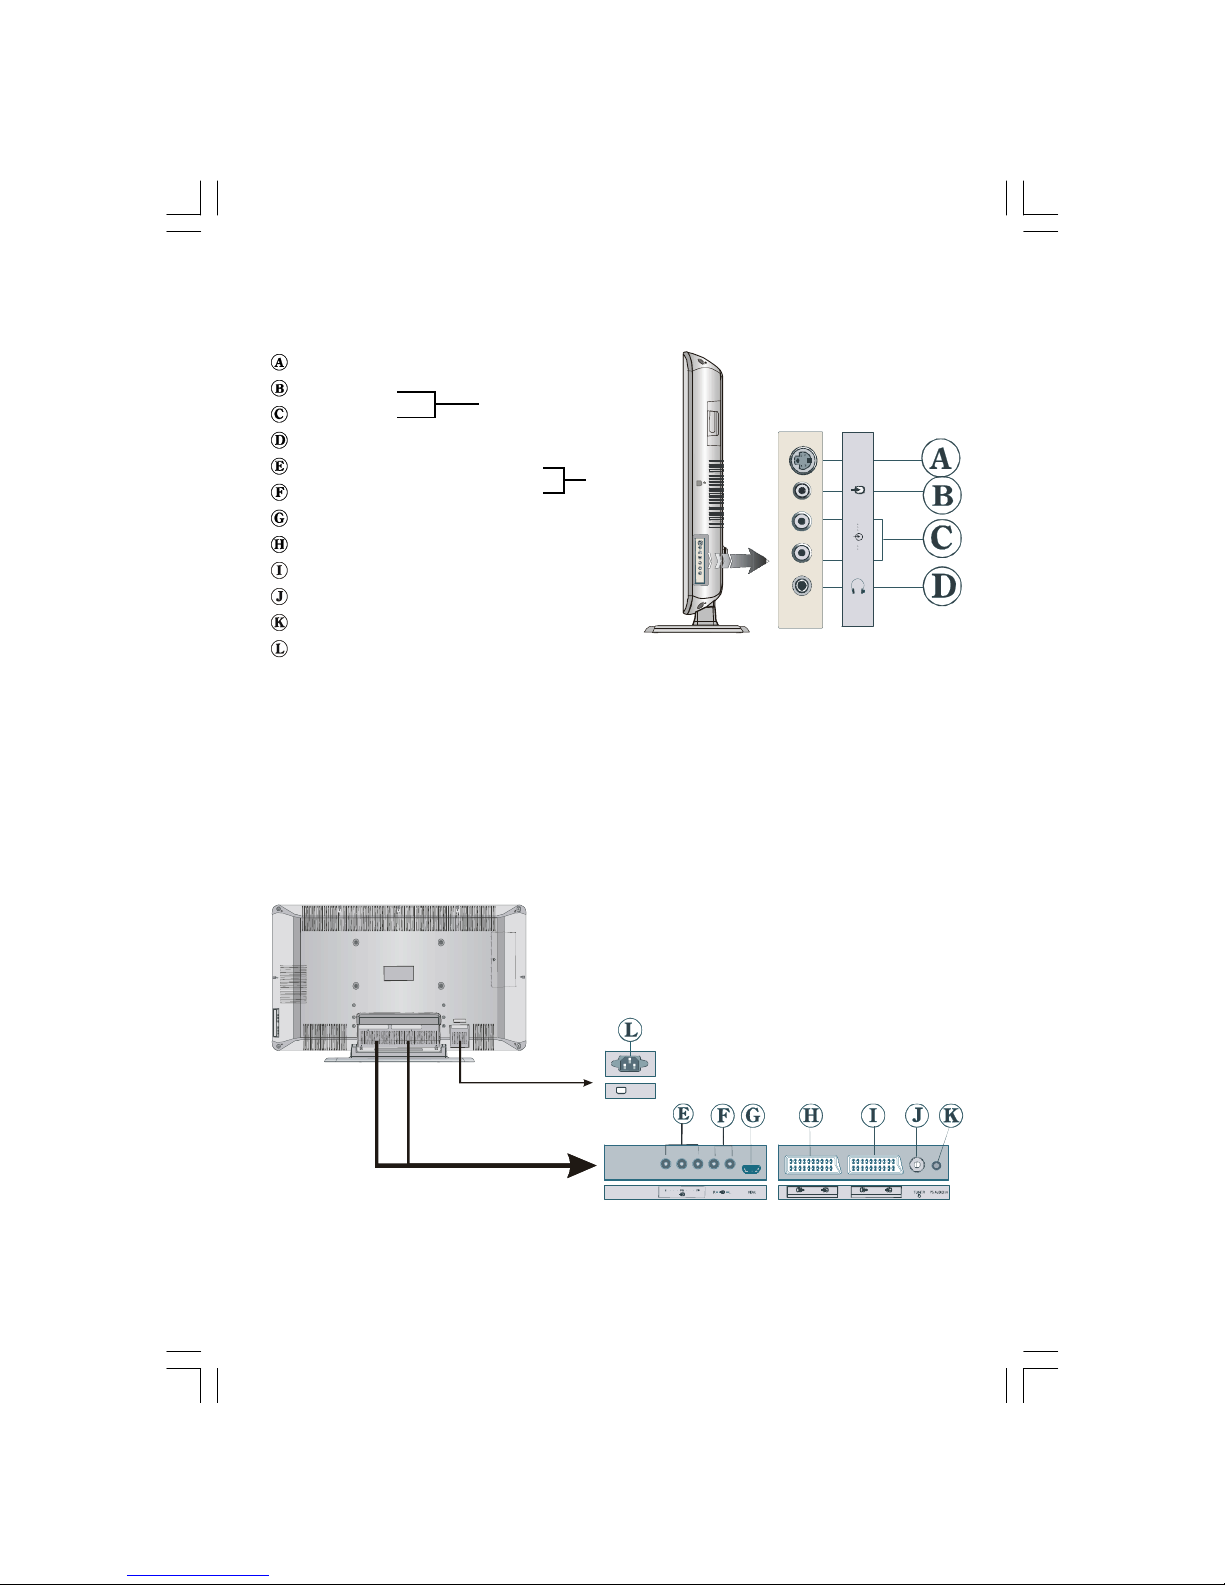
LCD TV ..................................................... 4
Remote Control Buttons .........................6
Before Switching On Your TV ................. 7
Power Connection................................7
Connections To The Aerial Input Socket7
How To Connect Other Devices ...........7
Inserting Batteries In The Remote
Control Handset ...................................7
Switching The TV ON/OFF ....................... 7
To switch the TV on:..............................7
To switch the TV off:..............................7
Initial Settings .........................................8
Initial APS (Automatic Programming
System) ................................................8
Operating The TV .................................... 8
Operating with the buttonson the TV set...8
Operating With Remote Control ...........8
Menu System .......................................... 9
Picture menu ........................................9
Sound menu.......................................10
Feature menu ..................................... 11
Install menu .......................................12
Program menu ...................................13
Source menu......................................14
Other Features ...................................... 14
TVStatus.............................................14
Mute Indicator .....................................14
Freeze Picture.....................................15
Zoom Modes ......................................15
Teletext .................................................. 16
To Operate Teletext.............................16
To Select APage Of Teletext ...............16
To Select Index Page..........................16
ToSelectTeletextWithATVProgramme.16
To Select Double Height Text .............16
To Reveal “Concealed” Information ...16
To Stop Automatic Page Change........16
To Select A Subcode Page .................16
To Exit Teletext ....................................17
To Display The Time ..........................17
Fastext................................................17
Connect Peripheral Equipment ............17
High Definition....................................17
Via The Scart ......................................17
ViaAerial Input ....................................17
Decoder..............................................18
TVAnd Video Recorder.......................18
Playback NTSC ..................................18
CopyFacility .......................................18
Search For And Store The Test
Signal Of The Video Recorder............18
Camera And Camcorder ....................18
To Connect to S-Video Input...............18
Connect The Decoder To The Video
Recorder.............................................18
Connecting Headphones...................18
Aerial Connection ................................. 19
CAUTION ................................................ 21
Specifications .......................................22
Important Instruction ............................23
ENG-42720W-1063UK-42 INCH 17MB15 OEM-(WO VGA-WO PIP)(HD READY)(S)-50093758.p65 11.09.2006, 12:331

-2-
Preparation
Install Display on solid horizontal surface
such as a table or desk.
For ventilation, leave a space of at least 10
cm free all around the set. To prevent any
fault and unsafe situations, please do not
place any objects on top of the set.
This apparatus can be used in tropical and/
or moderate climates.
Features
• Remote controlledcolour television.
• 100 programmes from VHF, UHF bands or
cable channels can be preset.
• It can tune cable channels.
• Controlling the TV is very easy by its menu
driven system.
•Ithas2 Scartsocketsforexternaldevices(such
as video, video games, audio set, etc.)
• Stereo sound system (German+Nicam).
• Full function Teletext .
Fastext (1000Pages), TOP text.
• Headphone connection.
• Direct channel access.
•A.P.S. (Automatic Programming System).
• All programmes can be named.
• Forward or backward automatic tuning.
• Sleep timer.
• Child Lock.
•Automatic sound mute when no transmission.
• NTSC Playback.
• AV in and S VIDEO are available.
• It has an HDMI connector for Digital Video
and Audio. This connection is also de-
signed to accept High Definition signals.
• AVL (Automatic Volume Limiting)
• When no valid signal is detected, after 5
minutes the TV switches itself automatically
to stand-by mode.
• Stereo PCAudio Input
• PLL (Frequency Search)
• 3D Comb Filter
Safety Precautions
Please read the following recommended
safety precautions carefully for your safety
1. Power Source
The receiver must only be operated on a
230-240V AC 50 Hz supply.
2. Power Cord
Do not place the set, a piece of furniture,etc.
on the power cord(mains lead) or pinch the
cord.Handle the power cord by the plug.Do
not pull out the plug by tugging the cord and
never touch the power cord when your
hands are wet as this could cause a short
circuit or electric shock.Never make a knot in
the cord or tie it with other cord.The power
cord should be placed in such a way that
they are not likely to be stepped on.
A damaged power cord can cause fire or
give you an electric shock. When it is dam-
aged and need to be changed, it should be
done by qualified personel.
3. Moisture and Water
Do not use this equipment in a humid and
damp place (avoid the bathroom, the sink in
the kitchen, and near the washing machine).
Do not expose this equipment to rain or wa-
ter, as this may be dangerous and do not
place objects filled with liquids,such as
flower vases on top of the set. Avoid from
dripping or splashing.
If any solid object or liquid falls into the cabinet,
unplug the set and have it checked by qualified
personnel before operating it any further
ENG-42720W-1063UK-42 INCH 17MB15 OEM-(WO VGA-WO PIP)(HD READY)(S)-50093758.p65 11.09.2006, 12:332

-3-
Surely connect
the ground wire.
Be sure to ground the connection properly.
Connect the ground terminal of TV with the ground terminal provided
at the power outlet using the enclosed power cord. If theprovided plug
does not fit your outlet, consult an electrician for replacement
of the obsolete outlet.
4. Cleaning
Before cleaning, disconnect the mains sup-
ply. Do not use chemical cleaning agents.
Use a dry duster. For sticky stains, use a
damp cloth with a mild detergent.
5. Ventilation
The slots and openings on the back cover
are intended for ventilation and to ensure re-
liable operation. To prevent overheating,
these openings must not be blocked or cov-
ered in anyway.
6.Heat and Flames
In the case of a Thunderstorm, or when leav-
ing the Tv for long periods, disconnect the
Aerial lead (if outdoor) and the mains supply
to prevent power surges damaging the Tv.
7. Lightning
In the event of a Thunderstorm or when go-
ing on holiday. Disconnect the mains supply
and aerial (if external).
8. Replacement Part
When replacement parts are required, be sure
the service technician has used replacement
parts which are specified by the manufacturer
or have the same specifications as the origi-
nal one. Unauthorised substitutions may re-
sult in fire, electrical shock, or other hazards.
9 . Servicing
Please refer all servicing to qualified per-
sonnel. Do not remove the cover yourself as
this may result in an electric shock.
WARNING: When the device is not in use
for a long time, disconnect from power.
Instructions for waste disposal:
• Packaging and packaging aids are recy-
clable and should principally be recycled.
Packaging materials, such as foil bag, must
be kept away from children.
• Remote control batteries should be dis-
posed of in a safe manner. Do not break
open or throw on a fire. Contact your local
environment office for advice.
• Cold cathode fluoresant lamp in LCD PANEL
contains a small amount of mercury, please fol-
low local ordinates or regulations for disposal.
• The mains plug is used to disconnect the TV
from the mains and therefore it shall remain
readily operable.
Warning: To prevent injury, this device must
be securely attached to the floor/wall in ac-
cordance with the installation instrutions.
"The LCD panel is very high technology
product with about a million thin film tran-
sistors, giving you fine picture details. Oc-
casionally, a few non-active pixels may ap-
pear on the screen as a fixed point of blue,
green or red. Please note that this does
not affect the performance of your prod-
uct."
“DO NOT LEAVE THE TV IN STANDBY OR
OPERATINGWHEN LEAVING THE HOUSE”
ENG-42720W-1063UK-42 INCH 17MB15 OEM-(WO VGA-WO PIP)(HD READY)(S)-50093758.p65 11.09.2006, 12:333

-4-
LCD TV
FRONTVIEW
REARVIEW
MENU
- P/CH +
TV/AV
ENG-42720W-1063UK-42 INCH 17MB15 OEM-(WO VGA-WO PIP)(HD READY)(S)-50093758.p65 11.09.2006, 12:334

-5-
S-Video Input EXT-4S
Video Input
Audio Inputss
Headphone
Component Video (YPbPr) Inputs
Component Audio Inputss
HDMI Input (EXT-5)
Scart 1 (EXT-1)
Scart 2 (EXT-2)
PCAudio Input
Aerial
Power cord input
EXT-4
EXT-3
L
R
S-VHS
220V-240V
AC~50 H z
2
1
ENG-42720W-1063UK-42 INCH 17MB15 OEM-(WO VGA-WO PIP)(HD READY)(S)-50093758.p65 11.09.2006, 12:335

-6-
Remote Control Buttons
2
3
4
5
6
8
9
7
0
OK/
SELECT
P<P/SWAP
-/--
PP
I II
-
TV
AV
+
+
GUIDE
WIDE
EXIT
ABC
DEF
GHI
JKL MNO
PQR
STU VWX YZ
M
DTV
1
SOURCE
Signal Indicator
= Cursor Up
= Stand By
= Cursor Right
OK/SELECT = Okay, Still Picture
= Cursor Down
0 - 9 = Direct Programme
-/-- / EXIT = No Function
P + = Programme Up
P - = Programme Down
I-II =Mono/Stereo - DualA-B
TV
DTV
=TV / Quit Menu
AV
/SOURCE = Source Select
= Time / Subpage
/ = Mix / PIP mode
=Update / PAP Mode
/GUIDE = Index Page
=Reveal
BLUE = Install Menu
YELLOW = Feature Menu
GREEN =Picture Menu
RED = Sound Menu
/WIDE / = Wide (Zoom Modes)
/Expand
= Hold / = PIP Position
= Teletext
PP =Picture Mode Selection
(Natural, Cinema, Dynamic)
V - = Volume Down
V+ = Volume Up
P<P/SWAP=Previous Programme/SWAP
M= Main Menu
31
= Cursor Left
32
= Mute
33
= Information button
ENG-42720W-1063UK-42 INCH 17MB15 OEM-(WO VGA-WO PIP)(HD READY)(S)-50093758.p65 11.09.2006, 12:336

-7-
Before Switching On Your TV
Power Connection
IMPORTANT: The TV set is designed to op-
erate on230-240V AC, 50 Hz.
•After unpacking, allowthe TV set to reach the
ambient room temperature before you con-
nect the set to the mains.
Connections To The Aerial Input
Socket
VHF/UHF
75
REAR OF THE TV
CABLE TV
•Connect the aerial to the aerial socket on the
Tv, you mayalso connect a VCRor otherbox
at the same time.
How To Connect Other Devices
IMPORTANT: Switch off the TV before con-
necting any external device.
Sockets for external connections are at the
rear side of the TV. For connection of other
devices via Scart refer to the manuals of the
related devices.
Inserting Batteries In The Remote
Control Handset
• Remove the battery cover located on the
back of the handset by gently pulling down-
wards from the indicated part.
• Insert two AA/R6 or equivalent type batteries
inside. Place the batteries in the right direc-
tions.
• Replace the battery cover.
NOTE: Remove the batteries from remote
control handset when it is not to be used for
a long period.Otherwise it can be damaged
due to any leakage of batteries.
Switching The TV ON/OFF
To switch the TV on:
Your TV will switch on in two steps:
1- Connect the power supply cord to the sys-
tem. Press On/Off switch at the rear of the
TV. Then the TV switches itself to stand-
by mode and the LED becomes BLUE lo-
cated on the front of the TV.
2- To switch on the TV from stand-by mode
either:
Press a digit button on the remote control so
that a programme number is selected,
or,
Press “ ”, "-P/CH" or "P/CH+" button on the
right side of the TV or press “-P/CH” or “P/
CH+” button on the remote control, so that
last switched off programme is selected.
By either ways the TV will switch on and the
LED will turn off.
To switch the TV off:
• Press the “stand-by” button on the remote
control, so the TV will switch to stand-by
mode and the LED will become BLUE,
or,
Press the “ ” button located on the right
side of the TV, so the TV will switch off and
the LED will become BLUE.
ENG-42720W-1063UK-42 INCH 17MB15 OEM-(WO VGA-WO PIP)(HD READY)(S)-50093758.p65 11.09.2006, 12:337

-8-
Operating The TV
You can operate your TV using both the remote
control handset and the buttons on the set.
Operating with the buttons on the
TV set
Volume setting and programme selection
can be made by using the buttons on the
control panel at the topof the TV.
Volume Setting
Press the "VOLUME -" button to decrease vol-
ume or the "+ VOLUME" button to increase
volume, so a volume level scale (slider) will be
displayed at the bottom of the screen.
Programme Selecting
Press the "+P/CH" button to select the next
programme or the "P/CH-" button to select
the previous programme.
Entering The Menu
Press the “MENU” button on the control
panel at the top of the TV to enter the menu.
"+P/CH" /"PCH-" and "VOLUME -" /"+
VOLUME" buttons on the TV are used as
navigation buttons in the menu.
AV Mode
Press the "TV / AV" button on the control
panel at the top of the TV to switch your TV to
EXT modes.
Operating With Remote Control
The remote control handset of your TV is de-
signed to control all the functions of your TV.
The functions will be described in accor-
dance with the menu system of your TV.
Functions of the menu system are de-
scribed in Menu System section.
Volume Setting
Press the “V +” button to increase volume.
Press the “- V” button to decrease volume.
A volume level scale (slider) will be dis-
played at the bottom of the screen.
Programme Selecting
(Previous or next programme)
• Press the“- P” button to select the previous
programme.
To power down the TV completely, press
On/Off switch,
or
unplug the power cord from the mains
socket.
Initial Settings
Initial APS (Automatic Programming
System)
The following menu will be displayed on the
screen when you turn your TV on for the first
time. APS, searches and sorts all channels
and stores them automatically on your TV,
according to the transmission of
programme systems in your area.
AUTO PROGRAM
PLEASE CHECK ANTENNA CABLE
Language
English
AUTO. PROGRAMMING SYSTEM
Country
UK
OK
Cancel
First of all choose Language and Country by
using
/
and
/
buttons. This will af-
fect the sort process in APS. To start APS,
pressthe RED or “OK” button.
APS is running...
UK - I 155,25 Mhz
Cancel
01 - C-01
After APS is finalized, the programme table
will appear on the screen. In the programme
table you will see the programme numbers
and names assigned to the programmes.
If you do not accept the locations and / or the
programme names of programmes, you
can change them from the Program Menu.
(See page 13)
ENG-42720W-1063UK-42 INCH 17MB15 OEM-(WO VGA-WO PIP)(HD READY)(S)-50093758.p65 11.09.2006, 12:338

-9-
• Press the “P +” button to select the next
programme.
Programme Selecting (direct access):
Press digit buttons on the remote control
handset to select programmes between 0
and 9. The TV will switch to the selected
programme after a short delay.
• For a two digitprogramme number enter the
second digit after pressing the first digit
within 2 seconds.
Menu System
Your TV has been designed with a menu
system to provide easy manipulation of a
multifunction system.
Press the “M” button to enter the menu.
Press
/
button to select a menu title and
then
/
button to select a menu item and
/
or “OK” button to enter the menu item.
You can access the menus directly by press-
ing the coloured buttons on the remote control:
Red Button Sound Menu
Green Button Picture Menu
Yellow Button Feature Menu
Blue Button Install Menu
• Press the “M” or
TV
DTV
button to return to
the previous menu.
Picture menu
By pressing
/
button, select the first icon.
Picture menu appears on the screen.
OK
Mode Cinema
Contrast
PAL 50Hz
Brightness
Sharpness
Colour
Colour Temp Warm
Noise Reduction
Reset
10
24
62
32
Film Mode
Off
3D Comb
Off
Off
PICTURE
Mode
By pressing
/
button, select Mode.
Press
/
button to choose one of these
options: Natural,Cinema and Dynamic.
Contrast
By pressing
/
button, select Contrast.
Press
button to increase contrast. Press
button to decrease contrast. Contrast level
can be adjusted between 0 and 63.
Brightness
By pressing
/
button, select Brightness.
Press
button to increase brightness. Press
button to decrease brightness. Brightness
level can be adjusted between 0 and 63.
Sharpness
By pressing
/
button, select Sharp-
ness. Press
button to increase sharp-
ness. Press
button to decrease sharp-
ness. Sharpness level can be adjusted be-
tween 0 and 31.
Colour
By pressing
/
button, select Colour.
Press
button to increase colour. Press
button to decrease colour. Colour level can
be adjusted between 0 and 99.
Hue
This item is displayed in picture menu when
the TV receives an NTSC signal. By press-
ing
/
button, select Hue. Press
button
to increase hue level. Press
button to de-
crease hue level. Hue level can be adjusted
between -31 and 31.
Colour Temp
By pressing
/
button, select Colour
Temp. Press
/
button to choose one of
these options: Cool,Normal and Warm.
Noise Reduction
This item is used to reduce the image noise
and improve the picture quality at weak signals.
By pressing
/
button, select Noise Re-
duction. Press
/
button to set Noise re-
duction level to Off,Low,Medium or High.
ENG-42720W-1063UK-42 INCH 17MB15 OEM-(WO VGA-WO PIP)(HD READY)(S)-50093758.p65 11.09.2006, 12:339

- 10 -
Film Mode
Films are recorded at a different number of
frames per second to normal television
programmes.
By pressing
/
button, selectFilm Mode.
Press
/
button to set this feature On or
Off. Turn this feature on when you are watch-
ing films to see the fast motion scenes
clearly.
3D Comb
3D Comb is used to improve colour transi-
tions and colour quality of pictures.
By pressing
/
button, select 3D Comb.
Press
/
button to set this feature On or
Off.
Reset
By pressing
/
button, select Reset.
Press
/
or “OK” button to reset the picture
modes to factory default settings.
Sound menu
By pressing
/
button, select the second
icon. Sound menu appears on the screen.
Volume
Equalizer
Balance
Headphone
Sound Mode
10
0
Stereo
AVL
Effect
Dynamic Bass
On
Off
Off
SOUND
Volume
By pressing
/
button, select Volume.
Press
button to increase volume level.
Press
button to decrease volume level.
Volume level can be adjusted between 0
and 63.
Equalizer
By pressing
/
button, select Equalizer.
Press
/
or “OK” button to enter equalizer
menu.
Equalizer
Sound Mode
User
120Hz
500Hz
1.5kHz
5kHz
0
10kHz
0
0
0
0
SOUND
In equalizer menu the sound mode can be
changed to User, Pop, Rock, Jazz, Flat and
Classic by pressing
/
button. Equalizer
menu settings can be changed only when
Sound Mode is User. Select the desired fre-
quency by
/
button and increase or de-
crease the frequency gain by pressing
/
button.
Press the “M” button to return to the previ-
ous menu.
Balance
By pressing
/
button, select Balance.
Press
button to increase balance to the
right. Press
button to increase balance to
the left. Balance level can be adjusted be-
tween -31 and 31.
Headphone
By pressing
/
button, select Head-
phone. Press
/
or “OK” button to enter
hedphone menu.
ENG-42720W-1063UK-42 INCH 17MB15 OEM-(WO VGA-WO PIP)(HD READY)(S)-50093758.p65 11.09.2006, 12:3310

- 11 -
Headphone
Sound Mode
Balance
10
0
Stereo
Volume
SOUND
volume
By pressing
/
button, select Volume.
Press
button to increase hp volume level.
Press
button to decrease hp volume level.
Headphone volume level can be adjusted
between 0 and 63.
sound mode
By pressing
/
button, selectSound Mode.
Press
/
button to change sound mode.
Sound mode is used to identify sound mode of
the headphone and can be set tomono, stereo,
dual a ordual b according tothe transmission.
balance
By pressing
/
button, select Balance.
Press
button to increase balance to the
right. Press
button to decrease balance to
the left. Balance level can be adjusted be-
tween -31 and 31.
Press the “M” button to return to the previ-
ous menu.
Sound Mode
By pressing
/
button, select Sound
Mode. Press
/
button to change the mode.
You can select Mono,Stereo, Dual A or Dual
Bmode, only if the selected channel sup-
ports that mode.
In case of bilingual broadcast (Dual Sound),
you can select original or dubbed language
using mode option.
AVL
Automatic Volume Limiting (AVL) function
adjusts the sound to obtain fixed output level
between programs, having different sound
levels.
Pressing
/
button will turn this feature on
or off.
Effect
You can use this feature to switch the sound
effect on or off. If the current sound system is
Mono and the sound effect is switched on,
then the sound will be heard as if it is Ste-
reo. If the current sound system is Stereo,
switching this effect on will give a more spa-
tial effect.
Pressing
/
button will turn this feature on
or off.
Dynamic Bass
Dynamic Bass is used to increase bass ef-
fect of the TV set.
By pressing
/
button, select Dynamic
Bass. By pressing
/
button set Dynamic
bass to Low, High or Off. It is not recom-
mended to select High if listening at high
volume levels.
Feature menu
By pressing
/
button, select the third icon.
Feature menu appears on the screen.
Sleep Timer
Child Lock
Language
Ext-2 Out
Default Zoom
Off
Off
English
EXT - 1
Panoramic
Blue Background
On
Menu Background
Translucent
Menu Timeout
30 sec
Teletext Language
West
FEATURE
ENG-42720W-1063UK-42 INCH 17MB15 OEM-(WO VGA-WO PIP)(HD READY)(S)-50093758.p65 11.09.2006, 12:3311

- 12 -
Sleep Timer
By pressing
/
button, select Sleep
Timer. The timer can be programmed be-
tween Off and 2 hours in steps of 10 min-
utes by pressing
/
button. If sleep timer
is activated, at the end of the selected time,
the TV automatically goes into stand-by
mode.
Child Lock
You can use this feature to prevent children
from turning the TV on or changing
programmes or adjustments etc. without re-
mote control.
The child lock feature can be set by
/
but-
ton to either On or Off.When Off is selected,
there will be no difference in the operation of
your TV. When On is selected, the TV can
only be controlled by the remote control
handset. In this case the control panel but-
tons, except the Power on/off button, at the
rear side of the TV will not work. If one of
these buttons is pressed, “Child Lock On”
will be displayed on the screen.
Language
By pressing
/
button, select Language.
By pressing
/
button, you can select the
language.
Ext-2 Out
By pressing
/
button, select Ext-2 Out.
You can set Ext-2 Out to TV, EXT-1, EXT-3,
EXT-4 or EXT-5 by pressing
/
button.
Note: Only audio output is available for EXT-
3 and EXT-5. The other options have both
audio and video outputs.
Default Zoom
By pressing
/
button, select Default
Zoom. You can set Default Zoom to Pan-
oramic, 4:3 or 14:9 Zoom by pressing
/
button.
If there is no WSS or aspect ratio (picture
size) information and zoom mode is se-
lected as Auto by pressing the “WIDE” but-
ton, then the zoom mode will automatically
change to Default Zoom setting. See also
Zoom Modes on page 15.
Blue Background
You can set the TV to automatically change
to a blue screen if the signal is weak or ab-
sent, or when there is no input from an exter-
nal device.
The Blue Background feature can be turned
on or off by pressing
/
button.
Menu Background
By pressing
/
button, select Menu
Background. You can change menu back-
ground to Translucent or Opaque by press-
ing
/
button.
Menu Timeout
By pressing
/
button, select Menu
Timeout. Press
/
button to change menu
timeout to 15 sec, 30 sec or 60 sec.
Teletext Language
By pressing
/
button, select Teletext
Language. Press
/
button to change
Teletext Language to West, East, Cyrillic,
Turk/Gre or Arabic. This will normally be set
to West for Western Europe.
Install menu
By pressing
/
button, select the fourth
icon. Install menu appears on the screen.
ENG-42720W-1063UK-42 INCH 17MB15 OEM-(WO VGA-WO PIP)(HD READY)(S)-50093758.p65 11.09.2006, 12:3312

- 13 -
Program
By pressing
/
button, select Program.
Press
/
button to select the program
number. You can also enter a number via
digit buttons on the remote control. There
are 100 program storage between 0 and 99.
Band
Band can be selected either "C" or "S" using
the
/
buttons. "C" is used for "Off Air"
signals. "S" is used for cable connections.
Channel
Channel can be changed by
/
button or
Digit Buttons.
Colour System
By pressing
/
button, select Colour
System. Press
/
button to change the
colour system to PAL, SECAM, PAL60 or
AUTO.
If Sound System is set to I, SECAM is not
available for the Colour System.
Note: In EXT mode, you can choose NTSC
3.58 and NTSC 4.43 as well.
Sound System
By pressing the
/
buttons, select
Sound System. Press the
/
buttons to
select the Sound system. BG "Western
Europe", DK "Eastern Europe", I "UK only" L
and LP "France".
Fine Tune
By pressing
/
button, select Fine Tune.
Press
/
button to adjust the tuning.
Search
By pressing
/
button, select Search.
Press
/
button to start program search-
ing. The searching will stop when a signal is
found. You can also enter a frequency value
directly by pressing the digit buttons.
VCR (Video Cassette Recorder)
• This item can be seen in all modes except
EXT-3 and EXT-5.
• If you want to watch aVCR source from one
of these modes, then it will be better to set
VCR mode “on”. For this, while the cursor is
on this item press the
/
buttons to set it
“On”.
• If you want to watch a DVD , then you must
set this item “Off”.
Store Program
By pressing
/
button, select Store Pro-
gram. Press
/
or “OK” button to store the
adjustments. “Program Stored” will be dis-
played on the screen.
Program menu
By pressing
/
button, select thefifth icon.
Program menu appears on the screen.
01 ITV
02 ZDF
03 CH5
04 C - 02
05 C - 05
06 C - 06
07 C - 08
08 C - 21
09 C - 23
10 C - 35
11 C - 43
12 C - 64
13 C - 68
14 S - 40
15 - - - - -
16 - - - - -
17 - - - - -
18 - - - - -
19 - - - - -
20 - - - - -
Name
Insert
Delete
APS
PROGRAM
By moving the cursor in four directions you
can reach 20 programmes in the same
page. You can scroll the pages up or down
by pressing the navigation buttons to see all
the programmes in TV mode (except the AV
mode).
By cursor action, programme selection is
done automatically.
Name:
To change the name of a decided
programme, select the programme and
press the RED button.
The first letter of the selected name starts to
blink. Press
/
button to change that let-
ENG-42720W-1063UK-42 INCH 17MB15 OEM-(WO VGA-WO PIP)(HD READY)(S)-50093758.p65 11.09.2006, 12:3313

- 14 -
ter and
/
button to select the other letters.
By pressing the RED button, you can store
the name.
Insert:
Select the programme which you want to in-
sert by navigation buttons. Press the
GREEN button. By navigation buttons move
the selected programme to the decided
programme space and press the GREEN
button again.
Delete:
To delete a programme, press the YELLOW
button. Pressing the YELLOW button again
erases the selected programme from the
programme list, and the programmes below
shift one up.
APS (Automatic Programming System)
When you press the BLUE button for APS,
the following warning screen will be dis-
played.
WARNING !
Country
UK
All prestored programs
OK
Cancel
will be deleted
PROGRAM
Press the BLUE button to cancel APS if you
do not want to delete your existing
programme list.
To continue APS, first select the country by
pressing
/
button and then press the
RED or “OK” button.
APS is running...
UK - I 155,25 Mhz
Cancel
01 - C-01
After APS is finalized, the programme table
will appear on the screen.
Source menu
By pressing
/
button, select the sixth
icon. Source menu appears on the screen.
TV
EXT - 1
EXT - 2
EXT - 3
EXT - 4S
EXT - 4
EXT - 5
SOURCE : TV
In source menu, highlight a source by
pressing
/
button and switch to that
mode by pressing
/
or “OK”button.
Other Features
TV Status
Programme Number,Programme Name,
Sound Indicator and Zoom Mode are dis-
played on the upper right side of the screen
when a new programme is entered,
TV
but-
ton is pressed.
Mute Indicator
It is placed in the upper left side of the
screen when enabled.
To cancel mute, there are two alternatives;
the first one is pressing the button and
ENG-42720W-1063UK-42 INCH 17MB15 OEM-(WO VGA-WO PIP)(HD READY)(S)-50093758.p65 11.09.2006, 12:3314

- 15 -
the second one is increasing/decreasing
the volume level.
Freeze Picture
You can freeze the picture on the screen by
pressing the OK button.
Zoom Modes
Zoom mode can be changed by pressing
theWIDE button. You can change the screen
size according to the picture aspect ratio.
Select the optimum one from the following
ZOOM modes.
Auto:
When aWSS (Wide Screen Signalling) sig-
nal, which shows the aspect ratio of the pic-
ture, is included in the broadcast signal or
the signal from an external device, the TV
automatically changes the ZOOM mode ac-
cording to the WSS signal.
• When theAUTO mode does not function cor-
rectly due to poor WSS signal quality or
when you want to change the ZOOM mode,
change to another ZOOM mode manually.
Full:
This uniformly stretches the left and right
sides of a normal picture (4:3 aspect ratio)
to fill the wide TV screen.
• For 16:9 aspect ratio pictures that have been
squeezed into a normal picture (4:3 aspect
ratio), use the Full mode to restore the pic-
ture to its original shape.
Cinema:
This zooms up the wide picture (16:9 aspect
ratio) to the full screen.
16:9 Subtitle:
This zooms up the wide picture (16:9 aspect
ratio) with subtitles to the full screen.
“Default Zoom” Modes:
4:3
Use to view a normal picture (4:3 aspect ra-
tio) as this is its original shape.
14:9 Zoom:
This zooms up the wide picture (14:9 aspect
ratio) to the upper and lower limits of the
screen.
Panoramic:
This stretches the left and right sides of a
normal picture (4:3 aspect ratio) to fill the
screen, without making the picture appear
unnatural.
The top and bottom of the picture are slightly
cut off.
ENG-42720W-1063UK-42 INCH 17MB15 OEM-(WO VGA-WO PIP)(HD READY)(S)-50093758.p65 11.09.2006, 12:3315

- 16 -
Teletext
Teletext is an information system that dis-
plays text on your TV screen. Using the Tele-
text information system you can view a page
of information on a subject that is available
in the list of contents (index).
To Operate Teletext
• Select a TV station where Teletext is being
transmitted.
• Press the button. Usually the list of con-
tents (index) is displayed on the screen.
GUIDE
WIDE
AV
SOURCE
To Select A Page Of Teletext
• Press the appropriate digit buttons for the
required Teletext page number.
The selected page number is displayed in
the top left corner of the screen. The Teletext
page counter searches until the selected
page number is located, the desired page is
then displayed on the screen.
• Press the
or “P +”button to move the
Teletext screen forward one page at a time.
• Press the
or “- P”button to move the Tele-
text screen backward one page at a time.
To Select Index Page
• To select the page number of the index(gen-
erally page 100), press the button.
To Select Teletext With A TV
Programme
• Press the button. The text isnow superim-
posed over the programme on the screen.
• Press the button again to return to the
Teletext page.
To Select Double Height Text
• Press the button for the top half of the in-
formation page to be displayed in double
height text.
• Press the button again for the bottom half
of the information page to be displayed in
double height text.
• Press the button once more for the full
page of normal height text.
To Reveal “Concealed” Information
• Pressing the button once will reveal an-
swers on a quiz or games page.
• Pressing the button again will conceal
the revealed answers.
To Stop Automatic Page Change
The teletext page you have selected may
contain more information than what is on the
screen; the rest of the information will be
displayed after a period of time.
• Press the button to stop the automatic
page change.
• Press the button again to allow the next
page to be displayed.
To Select A Subcode Page
Subcode pages are subsections of long
Teletext pages that can only be displayed on
the screen one section at a time.
• Select the required Teletext page.
• Press the button.
• Select the required subcode page number
by pressing four digit buttons (e.g. 0001).
• If the selected subcode page is not displayed
in a short time, press the button. TV
programme will be displayed on the screen.
• Teletext page number will be displayed on
the upper left corner of the screen when the
selected page is found.
• Press the button to display the selected
Teletext page.
ENG-42720W-1063UK-42 INCH 17MB15 OEM-(WO VGA-WO PIP)(HD READY)(S)-50093758.p65 11.09.2006, 12:3316

- 17 -
To Exit Teletext
• Press the button. The screen will switch
to TV mode.
To Display The Time
• While watching a TV programme with Tele-
text transmission press the button. The
current time information, captured from Tele-
text will be displayed on the screen.
• If the programme being watched does not
have Teletext transmission, no information
will be displayed.
Fastext
Your TV supports the 1000 page Teletext sys-
tem. When the page number of any of the
1000 pages in memory is entered, the system
will not search for the requested page; instead
it will display the page automatically. If the re-
quested page is not in memory, the system
will search for the requested page number
and save the 1000 pages including the re-
quested page into memory after finding it.
• Press the
button to move the Teletext
screen forward one page at a time.
• Press the
button to move the Teletext
screen backward one page at a time.
For Fastext
The subject-heading for the information may
have a particular colour.
•Press anappropriateRED,GREEN,YELLOW
or BLUE button in order to reach the relevant
page quickly.
For TOP text
TOP text mode of operation will be activated
automatically according to the transmission.
• If TOP text transmission is present, colour
coded buttons will appear in status row.
• If TOP text transmission is not present, sta-
tus row will not appear.
The subject-heading for information may be
located in coloured box.
In Top mode the
or
commands will re-
quest the next or previous page respectively.
If TOP text transmission is not available, in
case of operation of these commands,
wraparound occurs. For example page 100
appears to be one greater than page 199.
Connect Peripheral
Equipment
There is a wide range of audio and video
equipment that can be connected to your TV.
The following connection diagrams show you
where the different (Optional) equipment
should be connected at the rear side of the TV.
High Definition
Your LCD Television is capable of display-
ing High Definition pictures from devices
such as a High Definition Satellite Receiver
or DVD Player. These devices must be con-
nected via the HDMI socket (EXT-5) or Com-
ponent Socket (EXT-3). These sockets can
accept either 720p or 1080i signals.
Note: For proper connection of a device to
HDMI input of your TV via using a DVI-to-
HDMI cable, use PC Audio In input for sound
connection.
Via The Scart
LCD TV has 2 Scart sockets. If you want to
connect peripherals (e.g. video, decoder,
etc.) which have Scart sockets to the TV, use
SCART 1 or SCART 2.
If an external device is connected via the
Scart sockets, the TV will be switched to AV
mode automatically.
• Do not connect Digital Set Top Box devices
via Scart 1. Use Scart 2.
Via Aerial Input
If you want to connect to your TV, peripherals
like video recorders or decoders, but the de-
vice you want to connect does not have a
Scart socket, you should connect it to the
Aerial input of the TV.
If the VCR is connected via Aerial input it
is suggested to use Programme 0.
ENG-42720W-1063UK-42 INCH 17MB15 OEM-(WO VGA-WO PIP)(HD READY)(S)-50093758.p65 11.09.2006, 12:3317

- 18 -
Decoder
Cable TV offers you a wide choice of
programmes. Most of them are free, others
are to be paid for by the viewer. This means
that you will need to subscribe to the broad-
casting organisation whose programmes
you wish to receive. This organisation will
supply you a corresponding decoder unit to
allow the programmes to be unscrambled.
For further information ask your dealer. See
also the booklet supplied with your decoder.
Connect a decoder with an aerial socket
to the TV
• Connect the aerial cable.
Connect a decoder without an aerial
socket to the TV
• Connect the decoder to the TV with a Scart
cable toSCART 1.
TV And Video Recorder
• Connect the aerial cables.
Better picture quality can be obtained if you
also connect a Scart cable toSCART sockets.
Playback NTSC
To use this option you can;
• Connect an NTSC VCR player to a Scart
socket at the rear side of the TV.
•Connect an NTSC VCR player to RCA Jacks
at the side of theTV.
Then, press
AV
/SOURCE button to select
appropriate source.
Copy Facility
Source selection for VCR recording.
• Select Feature menu.
• Select Ext-2 Out bypressing
/
button.
• Select a source to copy the picture from that
source.
Search For And Store The Test
Signal Of The Video Recorder
• Unplug the aerial cable from the aerial
socket of your video recorder.
• Switch on your TV and put the video recorder
on the test signal. (See the booklet for your
video recorder.)
•Enter the Install menu and select search.
• Search for the test signal of your video re-
corder in the same way as you searched
for and stored theTV signals. Store the test
signal under programme number 0.
• Replace the aerial cable in the aerial socket
ofyour video recorder once you have stored
the test signal.
Camera And Camcorder
To Connect To AV Input
Connect your camera or camcorder to AV
(EXT-4) input at theright side of the TV.
• Connect your equipment to the TV viaVIDEO
(yellow),AUDIO R (red) and AUDIO L (white)
inputs. You must connect the jacks to the in-
put using the same colour.
To Connect to S-Video Input
Connect your camera or camcorder S-Video
output to the input at the right of the Tv.
Connect the equipment to the Tv via the
S-Video input and audio input via the input
AV-2. Use a S-Video lead and RCA (phono)
lead.
Connect The Decoder To The
Video Recorder
Some video recorders have a special Scart
socket for decoder.
• Connect a Scart cable to theScart socket of
your decoder and to the special Scart
socket of your video recorder. Refer to the
booklet of your video recorder.
• To connect your video recorder to the TV, re-
fer to the TV and Video Recorder section.
If you want to connect more equipment to
your TV, consult your dealer.
Connecting Headphones
Use the stereo headphone socket at the
rightside of the TV, to connect headphones.
ENG-42720W-1063UK-42 INCH 17MB15 OEM-(WO VGA-WO PIP)(HD READY)(S)-50093758.p65 11.09.2006, 12:3318

- 19 -
Connect Peripheral Equipment
Aerial Connection
VHF/UHF
75
Round 75 ohm coaxial cable
Rear of TV
Outdoor Aerial Connection
ANT.IN
VCR
AV-1
AV-2
LCD TV
...or through a satellite decoder...
ANT.IN
RF Lead to
Aerial
Satellite LNB lead
RF Lead from
Satellite to TV
Aerial
• Scart Lead to
EXT-1 on TV.
TV VCR
LCD TV
...or through a VCR and satellite decoder.
ANT.IN
ANT.IN
RF Lead to
Aerial
RF Lead
from VCR to
Satellite
RF Lead from
VCR to TV
Satellite LNB lead
Aerial
VCR
• Scart Lead to
o n TV.EXT-1
AV-1
TV VCR
AV-2
LCD TV
camcorder connection
headphone connection
either connect the aerial straight to your TV...
Aerial (RF) Socket
wall
socket
Aerial (RF)
Lead
...or connect the aerial through a VCR...
Aerial (RF) Socket
wall
socket
Aerial (RF)
Lead
Aerial (RF) Socket VCR
(RF) connector
lead VCR to TV
DC IN
IN/OUT
A/V IN/OUT
OUT
Headphone
...or through a DVD Player...
Scart Lead to
EXT-1 on TV.
LCD TV
ENG-42720W-1063UK-42 INCH 17MB15 OEM-(WO VGA-WO PIP)(HD READY)(S)-50093758.p65 11.09.2006, 12:3319
Table of contents
Other Akura LCD TV manuals

Akura
Akura AV42751-FHD User manual

Akura
Akura APL1668U User manual

Akura
Akura APL2YR2668FDU User manual

Akura
Akura APL2YR1968UH User manual

Akura
Akura AV47751-FHDID User manual

Akura
Akura ALEDVD1601V (MSD306) User manual

Akura
Akura APL15668 User manual

Akura
Akura APL3268FD4 User manual

Akura
Akura AHH17LCDVD User manual

Akura
Akura APL1519W -HDID (MSD106) User manual

Akura
Akura AV42751-HDID User manual

Akura
Akura APLDVD15421W-HDID User manual

Akura
Akura AH260LCD User manual

Akura
Akura APL15421W-HDID User manual

Akura
Akura APLDVD1621W User manual

Akura
Akura AV37751-HDID User manual

Akura
Akura SP 7050 User manual

Akura
Akura APL18568 User manual

Akura
Akura APL18521W-HDID User manual

Akura
Akura AHH260LCD User manual