Akva-Stabil Effect-Line User manual

Aquarium Racks
assembly instructions
Akva-Stabil • Ole Roemersvej 12 • 6100 Haderslev • Denmark • +45 7352 4242 • [email protected]

2
Dear customer
Thank you for choosing an Akva-Stabil Effect-Line Aquarium
shelving unit. We are sure you will be completely satisfied with
your choice.
Before starting assembly, read these instructions thoroughly so
you have a good idea about what assembly entails. Follow-
ing the sequence of operations in these instructions will give
you a correct result for the least effort. To allow you to work
systematically, you should also have your layout plan to hand.
Follow your layout plan and assemble the shelving from one
end to the other.
Before starting, please check you have received all the compo-
nents as stated on the consignment note. You should also check
that no damage has occurred during transport.
All components are clearly marked with item codes correspond-
ing to the numbers on your consignment note. Before starting
the actual assembly, here is a brief summary of the various
components with a short description. We hope this will give
you an overall impression of the system and an understanding
of what assembly will involve. So, it’s down to work!
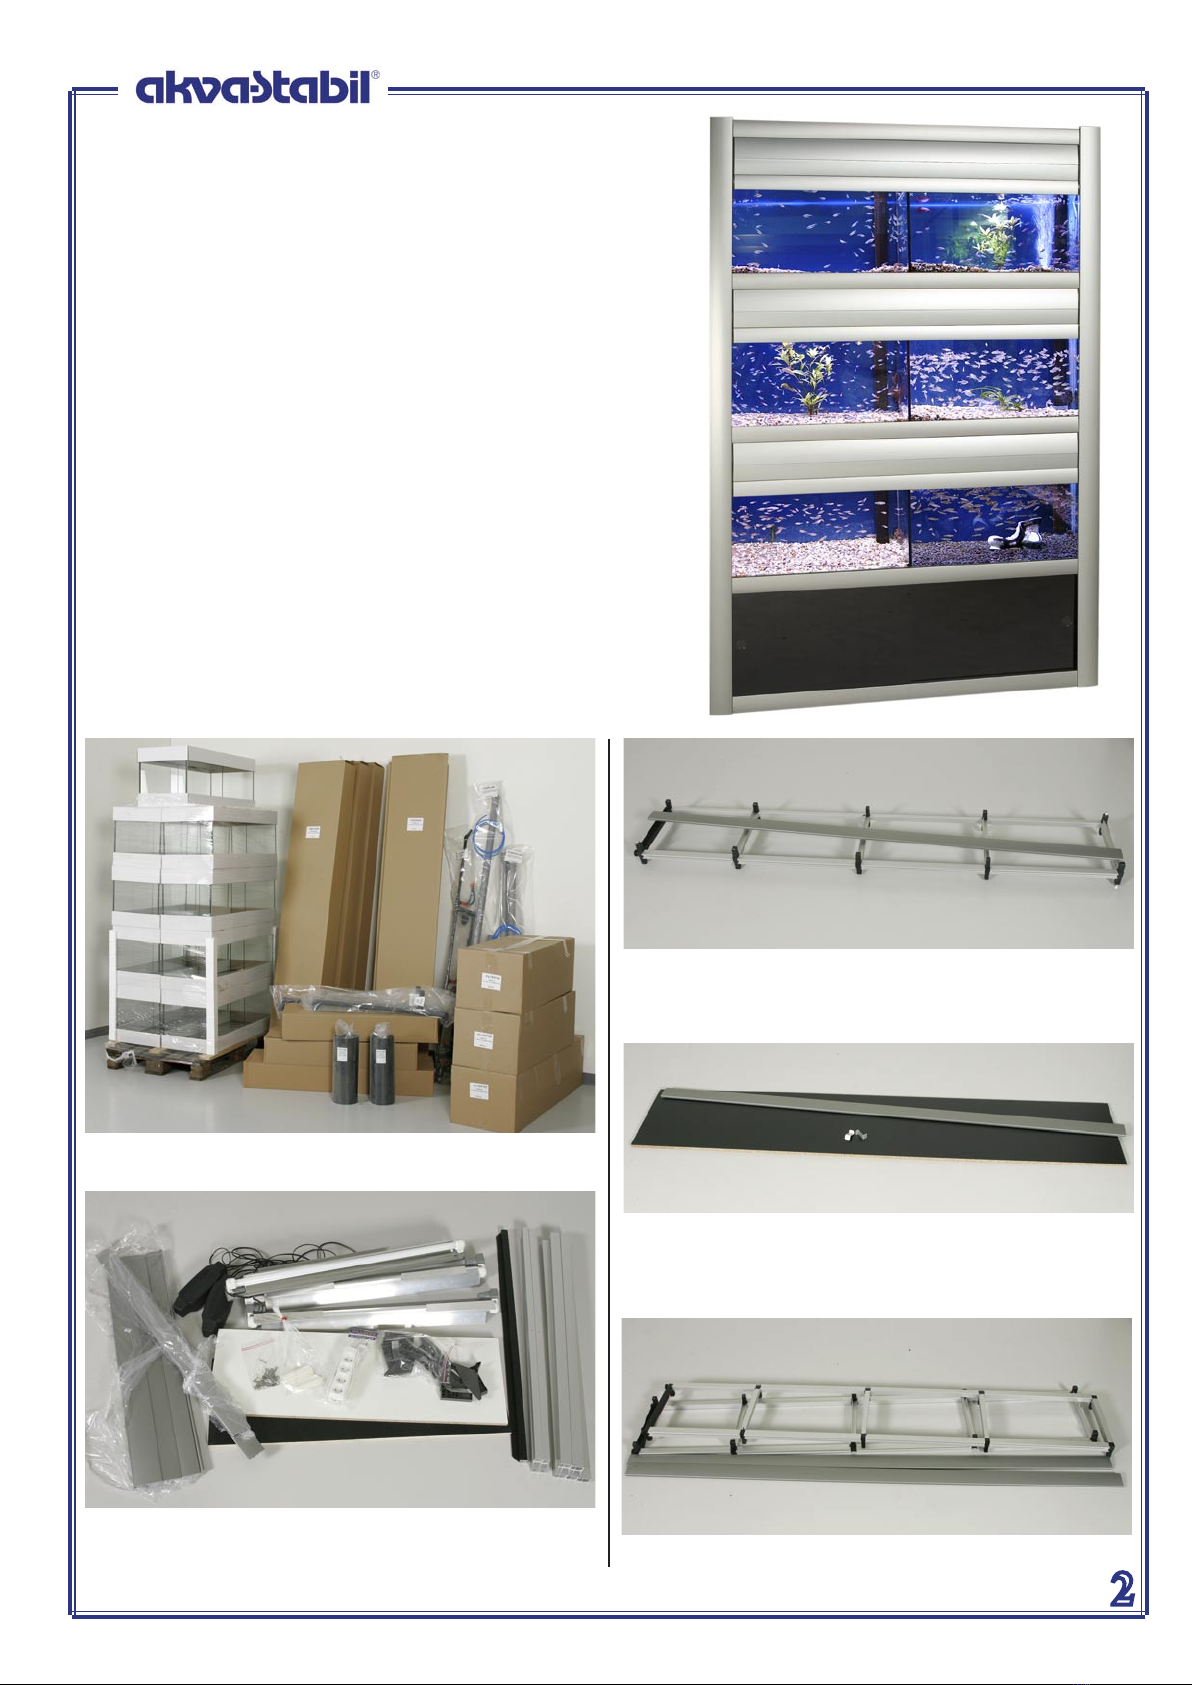
Check consignment for any omissions or damage.
Endlad: Pack with 2 end ladder racks and 2 vertical
cover strips.
Midlad: Pack with 1 middle ladder rack and 1 vertical
cover strip.
Visend: Pack with 1 melamine sheet for covering the
side of the unit and 1 vertical cover strip and mounting
fitting.
Basic: Pack with 10 horizontal rails, 3 fluorescent light-
fittings with tubes, 3 doors, 3 sets of hinges, 5 horizontal
cover strips, 2 shelves, 1 multiple electric socket, bag of
white pads and a strip for fixing the shelves.

3
Filter: Box with filter, various PVC fittings, float valve,
hoses and heating element.
Plumb1: Bag with complete pipe system for 3 aquariums
without partitions. Also used for sections containing 3
aquariums with 2 glass partitions.
Plumb2: Bag with complete pipe system for 3 aquariums
with 1 glass partition. Also used for sections containing 3
aquariums with 2 glass partitions.
Startplum : Bag with various fittings and hoses for the
start and end of the pipe system. Conveys water max. 3 m
to and from the shelving unit.
Conplum : Bag of various fittings and hoses for connect-
ing 2 shelving units, e.g. in a corner.
Docon: PVC pipe for connecting 2 outlet pipes. Used
for sections containing aquariums with a single glass
partition.
Tricon: PVC pipe for connecting 3 outlet pipes. Used for
sections containing aquariums with 2 glass partitions. The
hoses are used for the pump.
Sincon: PVC pipe for
bringing water from the
aquariums down to the
filter. Used for sections
containing aquariums with-
out partitions.
Pump: Pump for use in
filter.
Back: Bag with back-
ground film for 3 aquari-
ums.
Slid: Pack with 2 sliding doors and slide rails for mount-
ing in front of filter.
Plug: Bag with plugs for
3 holes. Used where a pipe
system is not used.

77
4
Side of unit. Middle ladder rack.
Front of shelving unit.
There are 3 types of hori-
zontal rails.
front rear rear
(bottom)
Start by adjusting all set-
ting screws.
Tap the horizontal rails
into the first end ladder.
Use a rubber hammer.
The holes in the rear hori-
zontal rails must face away
from the shelving unit.
Bottom rear horizontal rail.
Tap all horizontal rails into the ladder. The groove on the
front rails must face away from the shelving unit.
Knock the rear horizontal rails into position.

5
Continue in the same way with the next sections. Re-
member to work from your layout plan to get the correct
length of the shelving unit. Finish with an end ladder.
and tap it onto the rails.
Bring the next ladder rack (middle or end ladder) into
position. Remember to follow your layout plan,
Screw the pipe holders to the rear of the shelving unit
with a crosshead screwdriver.
Mount the pipe holders according to your layout plan. In
sections where the aquariums have one or no glass parti-
tions, mount only one set of pipe holders in the middle
holes. In sections with 2 glass partitions, mount 2 sets of
pipe holders in the outer holes.
Click the inlet pipes into the pipe holders.

6
Mount all inlet pipes. In sections of aquariums without
glass partitions, use the pipe with 3 taps. In sections of
aquariums with one glass partition, use the pipe with 6
taps. In sections with 2 partitions, use one of each type of
inlet pipe.
Lay the top shelves on the shelving unit. Check that the
spacer pieces at the top of the unit are in place.
Lay the ballast boxes for the light-fittings on top of the
shelves.
Arrange the ballast boxes so there are 3 over each ladder.
Pull out the mounting strip
and insert the light-fitting.
Place light-fittings over the
three upper bays of each
section.
Insert the plugs from the
ballast boxes in the 4-point
sockets.
All parts for the hinges.
Screw the hinge bases to
the front side of the shelv-
ing unit.
Before screwing base no. 2
to the ladder, the steel pegs
with washer and split pin
must be mounted.

7
Make sure the bases are
correctly adjusted.
1-2mm.
gap
screws
the base
must be
flush
with the
rear edge
of the
rail
Adjust both along and
across.
NB. Make sure there is al-
ways a minimum gap of 25
mm below the bottom rail
Mount the bushing through
the hole in the filter.
Unpack the filters.
Position the shelving unit.
Make sure there is approx.
10 cm between the unit and
the wall. Carefully adjust
all setting screws using a
spirit level.
Lay all bottom shelves in
position.
Fit the filters. The bushing
must face backwards.
The rubber gasket must be
on the outside.
Fit the T-piece to the ac-
companying outlet pipe.
Connect the pipes at the
rear
Mount all T-pieces and
pipes.
Fit the T-piece to the bush-
ing behind the filter.
Use the plug for the final
filter.
Connect all float valves
with the blue hose.

8
Insert the heating element
in the filter. It must lay on
the bottom.
Fix the hoses in position
with the hose fastener.
Mount the green hose onto
the pumps and fit them in
the filters as shown.
Prepare the pumps. Use the
small hose nozzle.
1/2” threaded portion for
water tap.
Attach the long hose to the
water tap.
Plug mounted.
At the end of the shelving
unit, mount either a plug or
a hose to the water tap.
Simply press the hoses into
the T-piece.
How to prepare pumps for
sections with 2 glass parti-
tions.
Mounting of hoses in sec-
tions with 2 glass partitions
in the aquariums.
Adjust the floats to a
middle position.
The ”conplum” accessories bag contains fittings for con-
necting the pipe systems of 2 shelving units. Adjust the
length of the pipes yourself.
Clean the rear sides of the aquariums.

9
Remove the protective paper from the double-sided tape.
Carefully move the aquariums into position. Remember
to work from your layout plan.
NB. If a pipe system is mounted, all aquariums in the
same section must be of the same type.
Clean the plastic sheets carefully and mount them on the
rear of all aquariums.
Position a white pad under
each corner of all aquari-
ums.
The white pad must be
flush with the outside
edges of the aquarium. Pull
the aquariums forward all
the way to the front edge of
the shelving unit.
The rubber gasket and cap
will sit inside the aquari-
um.
If no pipe system is mount-
ed, seal the holes with the
plugs.
There may be 2 gaskets on
certain bushings. These are
for adjustment purposes
and must be left in posi-
tion.
Remove the nut and the
white washer from the
return pipes.
Carefully guide the return pipes behind the shelving unit.
Mount the white washers
and screw the nuts onto the
bushings.
Push the bushings up
through the holes in the
base glass of the aquari-
ums.

10
Tighten the nuts well.
Screw the overflow pipes
into the bushings.
Mount the O-rings on the
unions at the bottom of the
return pipes.
Place the perforated pipes
down over the overflow
pipes.
Mount the end pieces onto
the doors.
Place a washer on the steel
peg.
Do the same on the oppo-
site side.
Carefully pull on the end
piece and guide the steel
peg into the hole.
Push the steel peg out
through the hole with a
finger from the rear side.
Mount the washer and
split pin. Bend the split pin
round the steel peg.
Insert the doors in the shelving unit. Let it rest on the
steel pegs.
Mount the connecting pipes which bring the water down
to the filters. For sections without glass partitions in the
aquariums use the “Sincon” type.
For sections with 1 or 2 glass partitions, use the types
“Docon” or “Tricon” respectively.

11
The slide rails must lie
flush with the front edge of
the shelving unit.
You must now mount the
vertical cover strips
to the whole shelving unit.
Mount 3 stop blocks on
each door.
Just click the strips into
their tracks on the front
of the shelving unit. The
strips are designed for easy
removal if this should be
necessary.
Place the end panel on the
angle fittings and push in
against the vertical cover
strip at the rear.
Next mount the front cover
strip.
The top 4 horizontal cover
strips must be positioned as
shown.
For covered unit sides,
mount a vertical cover strip
on the rear of the shelving
unit.
Mount the high slide rail over the filter.
Mount the set with the 2 low slide rails at the bottom of
the shelving unit. On unit sides which are to be fitted with an end panel,
stick the two angles to the base of the shelving unit.
long
short

You have now completed the assembly of the shelving unit. All that remains is to fix the shelving units securely to the
wall. Use the flat strip from the “basic” box or other suitable material.
You must use an electrician to connect the lights, pumps and heating elements, and you must supply your own suitable
filter material. We recommend you use a very coarse filter pad in the first chamber, an ordinary filter pad in the next
and a porous biological material in the final chamber. Choose a filter material with a high permeability. This will avoid
blockage of the filters. Adjust the floats in the filters for a suitable water level, i.e. the chamber must be full.
Attach the inlet hose to a water tap and the outlet pipe to a drain. You can leave the water turned on permanently.
However, we recommend you fit the water tap with a magnetic valve controlled by a timer switch. In this way you can
automatically cut off the water to the filters at night, when it is not needed. If you wish to mount a UV tube in some of
the sections, you can use a UV tube designed for garden ponds. Mount the tube on the hose between the pump and the
inlet pipe.
The profiles fit tightly. Use
your hand to knock them
into place.
Mount the lower horizontal
cover strip with the short
side upmost.
short
long
Finally mount the sliding doors. Mount the rear door first
by pushing it up into the top rail track and then letting it
fall back into the bottom rail.
Table of contents
Popular Indoor Furnishing manuals by other brands

Tradecraft Specialties
Tradecraft Specialties SEMITR-19 instruction manual

WATSON
WATSON Haven Assembly

Great Little Trading
Great Little Trading Hamilton L5131 manual

INSPIRE Q
INSPIRE Q E817-04 Assembly instruction

Mocka
Mocka Arlo Entertainment Unit Assembly instructions

storke
storke Reflecta installation guide