AL-KO BLOWER VAC 2200 E User manual

Blower Vac 2200 E
Blower Vac 2400 E speed control
Betriebsanleitung
INFORMATION I MANUALS I SERVICE
QUALITY FOR LIFE
Garden + Hobby
470602_a I 07/2009
GB
F
I
DK
N
PL
SK
D
H
S
CZ
RUS

Original-Betriebsanleitung
2
Laubsauger
© Copyright 2009
AL-KO Geräte GmbH Kötz, Germany
This documentation is allowed to-also in excerpts-only with express authorization of the AL-KO Geräte GmbH duplicates or third
accessible is done. Technical alterations of inßuence of the function reservations.
D: Betriebsanleitung....................................6
GB: Operating Instructions ..........................14
F : Mode d’emploi ......................................22
I: Libretto di istruzioni...............................30
PL: Instrukcja obs!ugi..................................38
CZ: Návod k použití.....................................46
SK: Návod na použitie.................................54
H: Használat..............................................62
DK: Brugsanvisning.....................................70
S: Bruksanvisning .....................................78
N: Bruksanvisning .....................................86
RUS: "#$%&%'()&% *% +$(*,#-)-.//............94

3470 602_a
Blower Vac 2200 E / 2400 E
1
3
2
6
7
5
4

Original-Betriebsanleitung
4
Laubsauger
9
2
1
8
10
12 NOT FOR GREAT BRITAIN 13 ONLY FOR GREAT BRITAIN
1514
11

5470 602_a
Blower Vac 2200 E / 2400 E
16
18
19 20
21 22
17

GB
Translation of original user instructions
14
Blower vac
Product description
This documentation describes an electric blower-vac
with leaf collection sack.
The machine is Þtted with a 0.3 m long power cable.The
power cable is Þtted with a moulded plug.
Designated use
The following uses comply with the designated use:
Sucking up and blowing away dry leaves and
garden refuse (grass clippings, small twigs, pine
cones, scraps of paper)
The machine is intended for non-commercial use
Using the machine for any other or additional pur-
pose is considered contrary to its designated use.
The manufacturer accepts no liability for the
resulting damage!
Instances of improper use
The following uses do not comply with the designated
use:
Bypassing or removing safety equipment
Sucking up or blowing away burning, ßammable or
explosive materials
Sucking up liquids
Operating the machine when it is raining
Operating the machine for commercial purposes
Safety and protective equipment
Safety switch for the sack frame
Non-latching ON / OFF switch
About this handbook
Read through these operating instructions before
starting up the machine. This is a prerequisite for
safe and trouble-free working.
Observe the safety and warning signs on the ma-
chine.
You should save these instructions, and also pass
them on to any subsequent users.
Pictogram description
Caution!
Following these safety warnings carefully can
prevent personal injury and / or material damage.
Special information for better understanding and
handling.
The camera symbol refers to illustrations
Contents
About this handbook.................................................... 14
Product description...................................................... 14
Safety and protective equipment................................. 14
Technical data.............................................................. 16
Safety instructions ....................................................... 16
Assembly..................................................................... 17
Operation..................................................................... 18
Maintenance and care................................................. 19
Storage........................................................................ 19
Disposal....................................................................... 19
Trouble-shooting.......................................................... 20
Warranty ...................................................................... 20
EC declaration of conformity ....................................... 21

GB
15
470 602_a
2200 E / 2400 E
Product overview
1 Carrying handle 7 Pre-separator
2 Carrying strap 8 Collection sack
3 Speed controller* 9 Rollers
4 ON / OFF switch 10 Sucking / blowing duct
5 Mains power cable 11 Motor housing
6 Sack frame 12 Changeover lever sucking / blowing
* depending on the version
Meaning of symbols on the machine
Before performing cleaning or maintenance operations, unplug the power cable from the socket and wait
until the motor has stopped.
Read the operating instructions and operate the machine accordingly
Keep anyone not involved, especially children, away from the machine.
Do not use the machine when it is raining, or leave it outdoors.
Wear safety glasses.
12
3
4
5
6
7
8
10
11
12
9

GB
Translation of original user instructions
16
Blower vac
Technical data
Technical data Blower Vac 2200 E Blower Vac 2400 E
speed control
Power consumption 2200 W 2 400 W
Suction power 9.7 m3/min 5.0 – 10.0 m3/min
Blowing speed 205 km /h 170 – 210 km /h
Pre-separator volume 5l 5 l
Collection sack volume 40 l 40 l
Carrying strap Yes Yes, with padding
Speed controller No Yes
Reduction in the suction volume Up to 90% Up to 90%
Mains voltage, fuse rating 230 V AC / 50 Hz, 10 A 230 V AC / 50 Hz, 10 A
Protection class / II / II
Noise level LPA 93 dB (A) 93 dB(A)
Maximum vibration acceleration avhw < 2.5 m/s2< 2.5 m/s2
Weight 5.1 kg 5.4 kg
Safety instructions
Warning!
Only use the machine if it is in faultless technical
condition!
Warning – risk of injury!
Safety and protective equipment must not be
disabled.
Electrical safety
Use only extension leads designed for use outdoors
Use only extension leads with a cross-section of
at least 3 x 1.5 mm2
Never use an extension lead that is damaged or
brittle
Take care not to overload extension leads that are
rolled up on a cable drum
Secure extension leads to the strain relief on the
machine
Always keep cables away from the machine work-
ing area
Protect the machine against moisture
Safety instructions for operation
Comply with local regulations regarding operation
of the machine.
The operator or user is personally responsible for
any accidents or hazards to other people and their
property.
Children must not be allowed to use the machine
Persons unfamiliar with these operating instructions
must not use the machine
Use the machine only in daylight or under very
good artiÞcial lighting conditions
Do not use the machine while under the inßuence
of alcohol, drugs or medication
Do not use the machine while other people, espe-
cially children, or pets are nearby.
Do not leave the machine unattended
Every time before using the machine, check it for
damage – have any damaged parts replaced
Never start the machine if the sack frame or collec-
tion sack is damaged or not Þtted

GB
17
470 602_a
2200 E / 2400 E
Wear appropriate working clothes:
Safety glasses
Protective gloves
Ear defenders
Face mask for dust protection
Sturdy footwear
Long trousers
Keep the following items away from the suction
intake:
Loose hanging clothing
Jewellery
Long hair
Keep all cooling air inlets clear of rubbish.
Never blow rubbish towards people.
Assembly
Warning!
Do not use the machine until it has been fully
assembled.
Fitting the carrying handle
Insert the square nut into the carrying handle1.
( 2).
Push the carrying handle on to the housing (2. 3).
Set the carrying handle to the desired position.3.
Insert the bolt (M6×100) into the carrying handle4.
(4).
Tighten the carrying handle bolt.5.
Fitting the changeover lever
Place the grip piece in position (1. 5).
Insert the bolt (Ø 3.5 × 16) into the grip piece.2.
Tighten the grip piece bolt.3.
Fitting the collection sack ( 6)
Place the collection sack belt over the support pin1.
on the sack frame and place it around the sack
frame collar.
Ensure the locking bracket engages in the eye of2.
the collection sack belt ( 7).
Carefully tighten the collection sack belt using the3.
nut and bolt (M4×30) ( 7).
Fitting the pre-separator
Slide the lower edge of the pre-separator into the1.
sack frame ( 8).
Click the upper edge of the pre-separator home in2.
the sack frame ( 8).
Fitting the sack frame
Hook the sack frame on to the suction duct stub1.
(9/1).
Pull the sack frame upwards slightly (2. 9/2).
Allow the carrying handle to click home into the3.
housing ( 10).
Fitting the carrying strap
Insert the carrying strap carabiner hook into the belt1.
retainer on the machine ( 11).
Adjust the belt length so that the machine can be2.
guided just clear of the ground.
Only for Blower Vac 2400 E speed control:3.
Place the belt padding around the shoulder area of
the carrying belt, and close the Velcro fastening.
Fitting the rollers
Push the left and right rollers on to the roller carrier1.
until they click home ( 19, 20).
Insert the roller carrier into the slot on the underside2.
of the sucking / blowing duct until it clicks home
(21, 22).

GB
Translation of original user instructions
18
Blower vac
Operation
Use for the Þrst time
Warning!
Do not use the machine until it has been fully
assembled.
The plug and socket on extension leads must be
made of rubber, plasticized PVC or other thermo-
plastic material with the same mechanical strength,
or be clad in this material
The extension lead must not be to a lower speciÞ-
cation than:
light-duty rubber sheathed cable H05 RN-F
to VDE 0282 part 8
sheathed cable with polyurethane cladding
to VDE 0282 part 10
Keep children away from the machine whilst it is
plugged into the mains
Plug the machine only into mains sockets that are
protected with a residual-current device (RCD) with
a triggering current of max. 30 mA
The plug connectors of extension leads must be
splash-proof
Do not remove any protection devices
Transport
Warning – risk of damage!
Do not unplug the machine by pulling on the
power cable.
Unplug it by grasping the plug to withdraw it!
When carrying the machine always hold it by the
handle or carrying strap
Do not use the rollers for transporting the machine
Operation
Warning – risk of injury!
Do not operate the machine without a collection
sack.
Close the zip on the collection sack..
The blower-vac will not work unless the sack
frame is attached to the housing
(safety switch).
Regularly check the power cable and extension
leads for signs of damage; use them only if they are
in faultless condition!
If a cable is damaged in use, immediately discon-
nect it from the mains!
Plug the mains plug into the extension lead socket.1.
Secure extension lead by inserting it into the strain2.
relief ( 12, 13).
Plug the extension lead plug into the mains socket.3.
Switching on
Press the ON / OFF switch in and keep it pressed.
Switching off
Release the ON / OFF switch
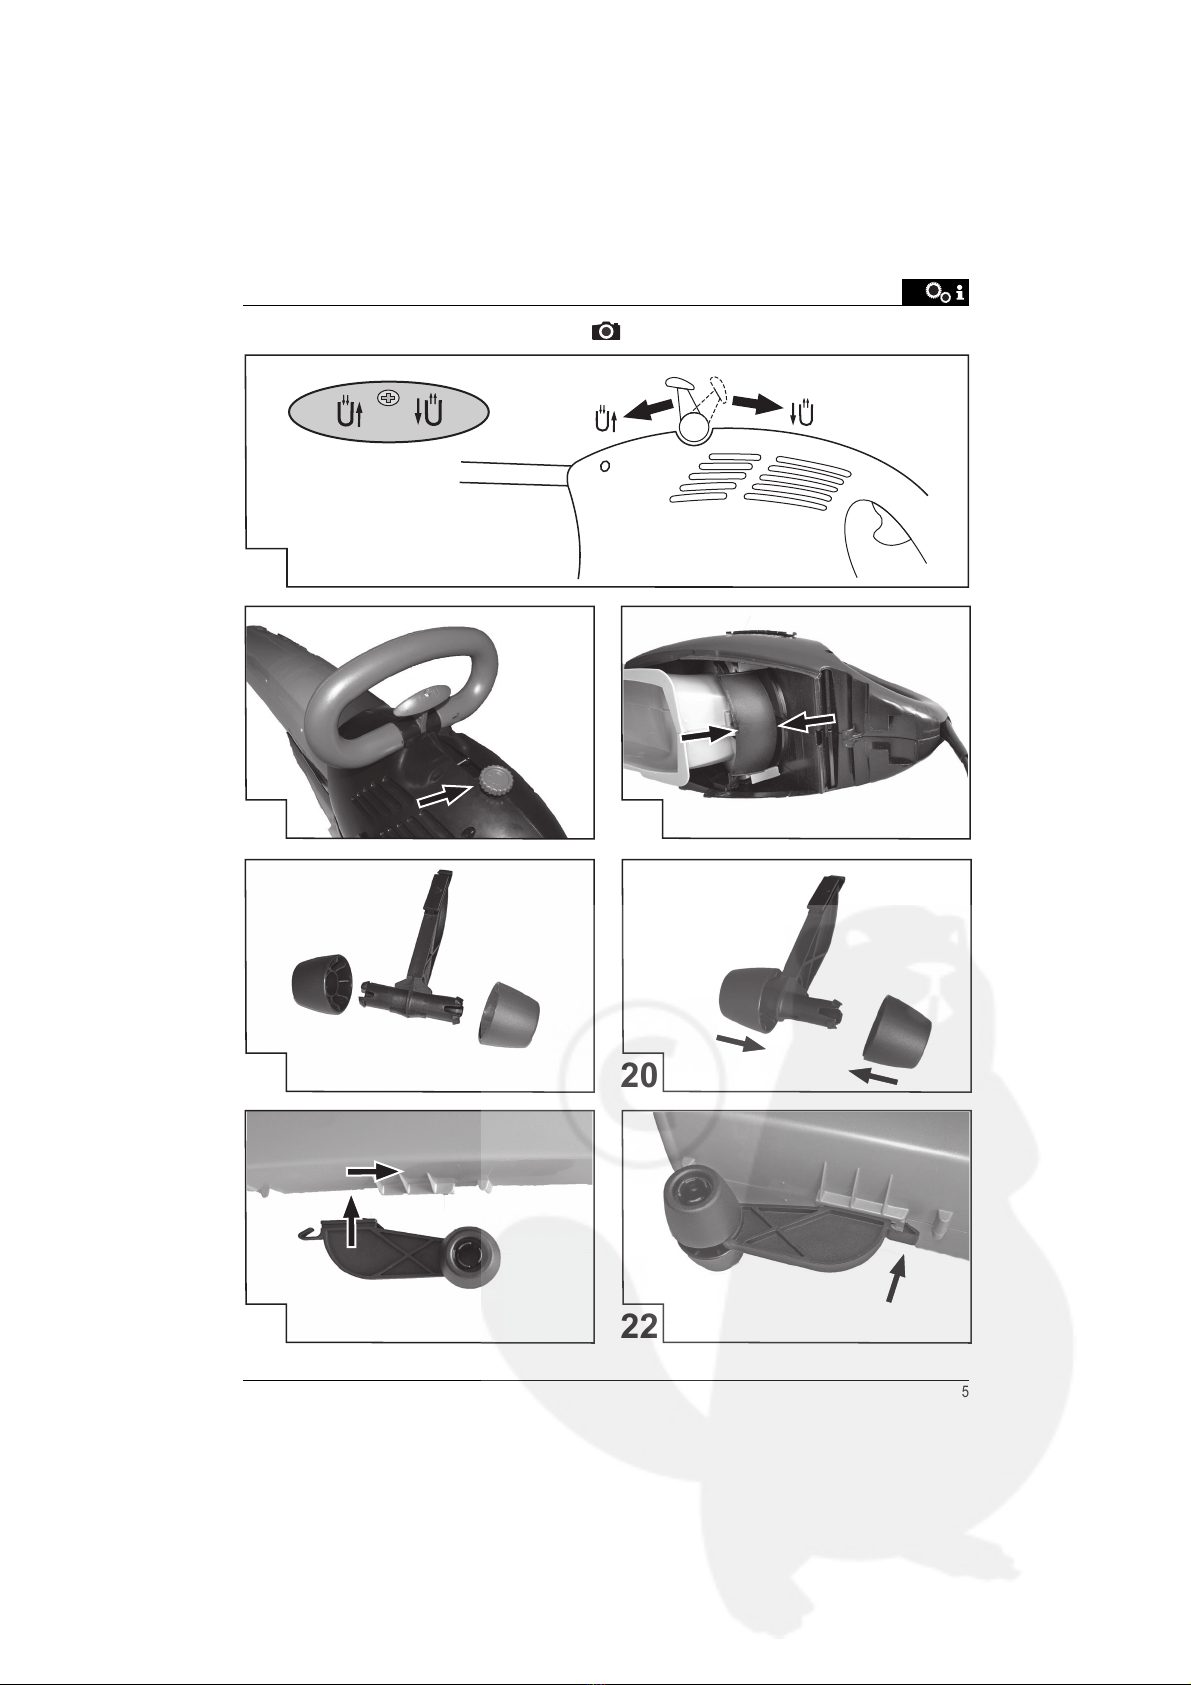
Selecting the operating mode
The operating mode is selected using the changeover
lever:
( 15, 16)
Move the changeover lever to position :
- Sucking mode is selected
Move the changeover lever to position :
- Blowing mode is selected
The operating mode can be selected when the motor is
running or when it its stopped.
Setting the sucking / blowing power (17)
(only for Blower Vac 2400 E speed control)
Turn the speed controller clockwise:
- sucking / blowing power is increased
Turn the speed controller anti-clockwise:
- sucking / blowing power is decreased

GB
19
470 602_a
2200 E / 2400 E
Emptying the collection sack
Switch off the machine1.
Unplug it from the mains2.
Open the zip on the collection sack3.
Thoroughly shake out the collection sack4.
Close the zip again5.
In order to empty the collection sack it is not
necessary to remove it from the sack frame.
Emptying the pre-separator
After coarse material has been sucked up (twigs, pine
cones...) the pre-separator must be emptied.
Take off the sack frame1.
Empty the pre-separator.2.
Re-attach the sack frame.3.
If the blowing operation causes material previ-
ously sucked up to be blown out again, the pre-
separator needs emptying.
Maintenance and care
Warning
Injury hazard from moving parts.
Unplug from the mains and wait until the machine
has stopped.
Warning – risk of damage!
Do not use a high-pressure cleaner or running
water to clean the machine.
If the machine develops a fault, have it checked by an
authorized specialist or in a customer service workshop.
Check that all nuts, bolts and pins are secure, so
that the machine can safely be operated
Exchange any worn or damaged parts
Use only original spare parts and accessories
Changeover lever
Residues of material sucked up can make the change-
over lever stiff to operate.
Immediately after using the machine, clear the
changeover lever by moving it back and forth sev-
eral times
Collection sack
Frequently check the collection sack for wear or
damaged parts
Thoroughly shake out the collection sack. Brush it
out if necessary.
If the collection sack is heavily soiled it may be
washed by hand at 30 °C.
No do use aggressive cleaning agents!
Mains power cable
Regularly check the mains power cable; if it is dam-
aged, have it exchanged by an authorized specialist
or in a customer service workshop.
Extension lead
Regularly check the extension lead; if it is dam-
aged, exchange it.
Storage
Unplug the machine from the mains for storage
Store the machine in a dry condition
Store the machine out of reach of children and un-
authorized persons
Empty the pre-separator and collection sack
Disposal
Do not dispose of old equipment, batteries or
accumulators as household waste!
Machine, packaging, and accessories are made of recycla-
ble materials, and should be disposed of accordingly.

GB
Translation of original user instructions
20
Blower vac
Trouble-shooting
Trouble Possible cause Solution
Machine does not work No power supply Check fuse / extension lead
Power cable defective Contact AL-KO Service Centre
Machine cuts out intermit-
tently
Extension lead damaged Exchange extension lead
ON / OFF switch defective Contact AL-KO Service Centre
Reduced sucking / blow-
ing power
Pre-separator full Empty the pre-separator
Collection sack full Empty the collection sack
Sucking / blowing power
too feeble
Extension lead too long Limit the extension lead length to a maximum
of 50 m
Extension lead conductor cross-
section too small
Use an extension lead with a conductor cross-
section of at least 3 x 1.5 mm²
For faults not listed in this table, or which you cannot resolve by yourself, please contact our customer service.
Warranty
If any material or manufacturing defects are found during the statutory customer protection period, we will either
repair or replace the equipment, whichever we consider the more appropriate.
This statutory period may vary according to the legislation in force in the country where the equipment was
purchased.
Our warranty is valid only if: The warranty is no longer valid if:
The equipment has been used properly
The operating instructions have been followed
Genuine replacement parts have been used
The equipment has been tampered with
Technical modiÞcations have been made
The equipment was not used for its intended pur-
pose (for example, used for commercial or communal
applications)
The following are not covered by warranty:
Paint damage due to normal wear
Wear parts identiÞed by a border XXX XXX (X) on the spare parts list
Combustion motors – these are covered by a separate warranty from the manufacturer concerned
To make a claim under warranty, please take this statement of warranty and proof of purchase to the nearest autho-
rized customer service centre.
This warranty does not affect the usual statutory rights of the customer relative to the seller.
!!!!!!"
#!!!!!!$

GB
21
470 602_a
2200 E / 2400 E
EC declaration of conformity
We hereby declare that this product, in the form in which it is marketed, meets the requirements of the harmonized
EU guidelines, EU safety standards, and the product-speciÞc standards.
Product
Electric blower-vac
Serial number
G 2512515
Manufacturer
AL-KO Geräte GmbH
Ichenhauser Str. 14
D-89359 Kötz
Executive ofÞcer
Anton Eberle
Ichenhauser Str. 14
D-89359 Kötz
Model
Blower Vac 2200 E
Blower Vac 2400E speed control
EU directives
98/37/EG (up to 28/12/09)
2006/42/EG (from 29/12/09)
2006/95/EG 2004/108/EG
2002/88/EG
Harmonized standards
EN 60335-1
IEC 60335-2-100
Sound power level
measured / guaranteed
Blower Vac 2200 E
102 dB(A) / 103 dB(A)
Blower Vac 2400E speed control
102 dB(A) / 103 dB(A)
Conformity evaluation
2000/14/EG, Appendix V
Kötz, 27.07.2009
Antonio de Filippo, Managing Director
Other manuals for BLOWER VAC 2200 E
1
This manual suits for next models
1
Table of contents
Other AL-KO Blower manuals

AL-KO
AL-KO LB 1860 User manual

AL-KO
AL-KO BLOWER VAC 2200 E User manual

AL-KO
AL-KO LB 4060 Operating and installation instructions

AL-KO
AL-KO LB 2060 User manual

AL-KO
AL-KO LBV 4090 Operating and installation instructions

AL-KO
AL-KO LB 36 Li User manual

AL-KO
AL-KO LB 36 Li User manual

AL-KO
AL-KO solo 442 Operating and installation instructions

AL-KO
AL-KO solo 442 User manual