MAGNET-LESS CYCLING
SPEED / CADENCE SENSOR
PLACE BATTERY
231
Sealing
ring
4
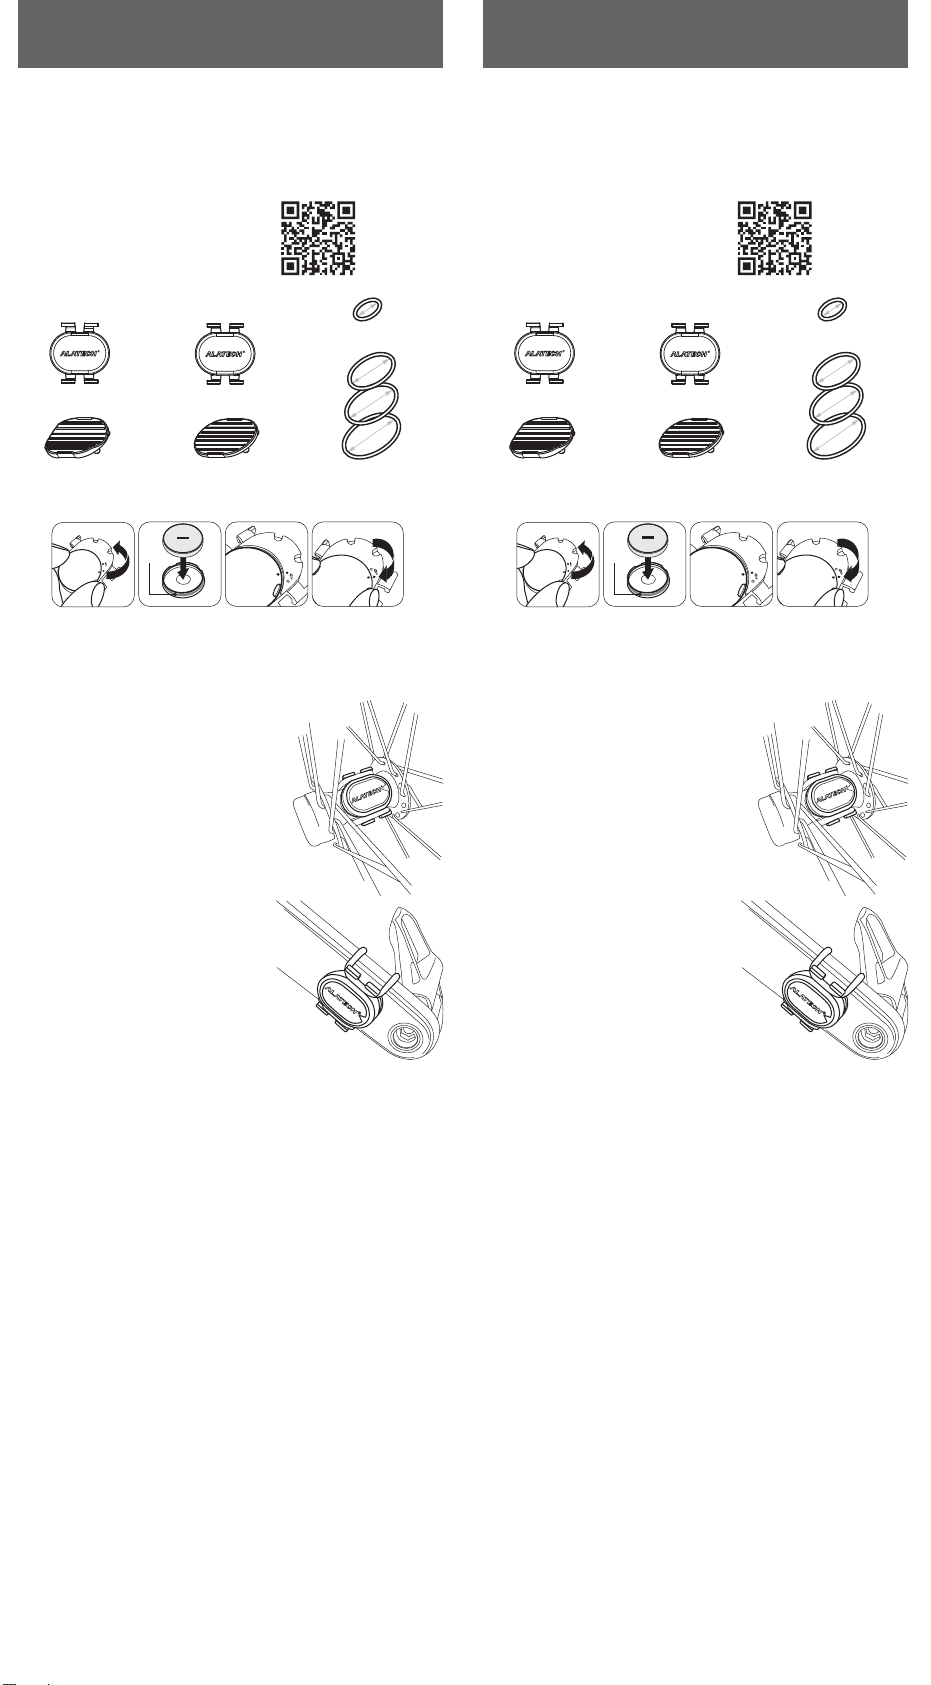
Twist the battery cover counter-clockwise to OPEN and remove the cover.
Place the battery (CR2032) into the cover with positive (+) side facing the inside of
the battery cover. Make sure the sealing ring is in the groove of the battery cover.
To reinstall the battery cover, align the cover dot with OPEN.
Press and twist the cover clockwise back into place (the cover dot points to LOCK).
Check if the battery back cover is securely locked to ensure water resistance.
1
2
3
4
5
FEATURES
Dual Band Technology
Connects to smartphones or ANT+ bike computers
via its ANT+ and Bluetooth®.
Wireless Connection
Wirelessly tracks speed or cadence while cycling.
Easy installation, no magnet required.
Accurate Measurement
Provides accurate speed and cadence data.
Scan to download AlaFitness.
System Requirements:
• iOS 11.0 or later
• Android 5.0 or later
• Bluetooth 4.0
APP
(Android / iOS)
IN THE BOX
1
2
Speed Sensor
Hub rubber pad
3
4
Cadence Sensor
Crank rubber pad
Ø50
Ø26.4
Ø57
Ø63
5
6
Crank rubber O-ring
Hub rubber O-ring
Model: SC003
Dimension: L35×W35.4×D8.25mm
Weight: 7.7g (CR2032 included)
Detected Cadence range: 10~240 rpm
Detected Speed range: 24~780 rpm( approx.3~98kph)
Operating temperature: -10~60°C (14~140°F)
Wireless transmission interface: Bluetooth 4.0 / ANT+
Wireless transmission frequency: 2.402~2.480 GHz
•
•
•
•
•
•
•
•
Battery: CR2032
Battery life: approx.300 Hours
Waterproof: IPX7
Accuracy: +/- 2 %
•
•
•
•
SPECIFICATIONS
Note
If the sensor is installed on the crank, it will be automatically set to the cadence sensor. If installed on
the wheel hub, it is automatically set to the speed sensor.
Continuously rotating for 5 seconds or more, the sensor’s LED will flash once to let you know that it's
woken up.
The LED will flash red when the sensor is used to detect the cadence, and the LED flashes green when
the sensor is used as the detection speed.
Flashes every 3 seconds during the detection period, and flashes every 5 sec if there is a Bluetooth
connection. After 100 consecutive flashes, the LEDs automatically turns off to save battery power.
For the first time installation and use, please pair the sensor with your device.
1
2
3
4
5
INSTALLATION
Used As A Speed Sensor 1, 3
If you do not have two sensors and use one of them as a
speed sensor, please skip this task.
Select the smallest size hub rubber O-ring that can
fits your wheel hub securely.
Place the sensor on the hub rubber pad with logo
facing up. Hold them on top of the wheel hub.
Pull the hub rubber O-ring around the wheel hub, and
attach it to the hook on both sides of the sensor.
Rotate the wheel for detection2, the sensor should not
move and touch other parts of your bike.
1
2
3
4
Used As A Cadence Sensor1, 3
If you do not have two sensors and use one of them as
a cadence sensor, please skip this task.
Place the sensor on the crank rubber pad
with logo facing up. On the non-drive side,
hold them on the crank arm.
Pull the crank rubber O-ring around the crank arm, and
attach it to the hook on both sides of the sensor.
Rotate the crank arm for detection2, the sensor should not
move and touch any part of your shoe or bike.
1
2
3
2PF297164075001
V1.1
FCC
Federal Communications Commission Statement
This device complies with FCC Rules Part 15. Operation is subject to the following two
conditions:
• This device may not cause harmful interference.
• This device must accept any interference received, including interference that may
cause undesired operation.
This equipment has been tested and found to comply with the limits for a class B digital
device, pursuant to Part 15 of the Federal Communications Commission (FCC) rules.
These limits are designed to provide reasonable protection against harmful interference
in a residential installation. This equipment generates, uses, and can radiate radio
frequency energy and, if not installed and used in accordance with the instructions, may
cause harmful interference to radio communications. However, there is no guarantee
that interference will not occur in a particular installation. If this equipment causes
harmful interference to radio or television reception, which can be determined by
turning the equipment off and on, the user is encouraged to try to correct the
interference by doing one or more of the following measures:
• Reorient or relocate the receiving antenna.
• Increase the separation between the equipment and receiver.
• Connect the equipment into an outlet on a circuit different from that to which the
receiver is connected.
• Consult the dealer or an experienced radio/TV technician for help.
FCC Caution
Any changes or modifications not expressly approved by the party responsible for
compliance could void the user‘s authority to operate the equipment.
The antenna(s) used for this transmitter must not be co-located or operating in
conjunction with any other antenna or transmitter.
Radiation Exposure Statement
This equipment complies with FCC radiation exposure limits set forth for an uncontrolled
environment. End users must follow the specific operating instructions for satisfying RF
exposure compliance. To maintain compliance with FCC exposure compliance
requirement, please follow operation instruction as documented in this manual.
PRODUCT WARRANTY
/ 產品保修
We thank you for purchasing. We provide a one-year manufacturer's warranty from the
date of purchase.
Warranty period:
We provide repair service free of charge but such service will be limited to normal use
only. Any damage caused by misuse of users shall not be covered by the warranty
hereof.
1) We offer a risk free 90 day warranty on all replacement parts that we offer for you.
2) User will pay for postage of replacement products from home to our service center.
(Please pack properly)
Non-Warranty Repair Policy: (User needs to pay for the repairs.)
1) If malfunction or damage is caused by improper use, disassembly and modification.
2) If damage is caused by accident, abuse, misuse, flood, fire, earthquake, any other
natural disasters or human negligence.
3) Due to normal wear and tear of consumptive parts such as battery, rubber pad, rubber
O-ring, etc.
4) If any serial number has been removed or defaced.
5) If it is damaged after the warranty expires.
低功率電波輻射性電管理辦法
本產品僅遵循國家通訊傳播委員會所頒佈低功率電波輻射性電機管理辦法規範,
並經驗證通過合格,請使用者遵循相關電信法規以避免違反規定受罰。
若使用者欲攜帶本機至其它國家應用,也請遵循該地區或國家之相關法令限制。
根據國家通訊傳播委員會低功率電波輻射性電機管理辦法規定:
取得審驗證明之低功率射頻器材,非經核准,公司、商號或使用者均不得擅自變
更頻率、加大功率或變更原設計之特性及功能。低功率射頻器材之使用不得影響
飛航安全及干擾合法通信;經發現有干擾現象時,應立即停用,並改善至無干擾
時方得繼續使用。
前述合法通信,指依電信管理法規定作業之無線電通信。低功率射頻器材須忍受
合法通信或工業、科學及醫療用電波輻射性電機設備之干擾。
感謝支持與購買!自購買日起本公司提供一年保固服務。
保固範圍:
倘若本產品在正常使用情況下發生故障,經鑑定為產品本身問題,在保固期限內
,本公司提供免費修復或更換服務。
1) 維修後產品以原產品的剩餘保固期限或90天內為新的保固期限。
2) 客戶須自費將產品郵寄(請妥善包裝) 或送回本公司進行檢修。
非保固範圍:(將收取適當維修費用)
1) 不當使用、拆修及改造引起的故障或損壞。
2) 天災、火災、地震、意外等不可抗力之災害及人為處理上之疏忽。
3) 自然損耗、消耗性零配件,例如:電池、橡膠墊、橡膠環等。
4) 產品或零件機身的序號已除去或塗毀。
5) 保固期限過後之故障或損害。
* The serial number is printed directly on the back of device.
* 請查看產品背面SN 後面之一組數字即為您的產品序號.
* 请查看产品背面SN 后面之一组数字即为您的产品序号
Model/型號
Dealer’s Stamp/經銷商蓋章/经销商盖章
Date of purchase/購買日期
YYYY 年/ MM 月/DD 日
Serial No.*/序號
SN:
Manufacturer/製造商/制造商
Zhejiang ALA Fitness Technology LTD.
Zhejiang ALA Fitness Technology LTD.
No.405 Tongxin Road, Tongxiang Economic
Development Zone, Zhejiang, China
浙江艾乐健康科技有限公司
浙江省桐乡市经济开发区同心路405号
Customer Service/售後服務/售后服务
ALATECH TECHNOLOGY LIMITED
ALATECH TECHNOLOGY LIMITED
39F., No.758, Jungming S. Rd.
Taichung City 40255
台中市南區40255忠明南路758號39樓
TEL:+886-4-2260 8341#14
9:30-17:30, PST, M-F (周一至周五)
(Only applies to the Taiwan Area.限台灣地區)
感谢支持与购买!自购买日起本公司提供一年保修服务。
保修范围:
倘若本产品在正常使用情况下发生故障,经鉴定为产品本身问题,在保修期限内
,本公司提供免费修复或更换服务。
1) 维修后产品以原产品的剩余保修期限或90 天内为新的保修期限。
2) 客户须自费将产品邮寄(请妥善包装) 或送回本公司进行检修。
非保修范围:(将收取适当维修费用)
1) 不当使用、拆修及改造引起的故障或损坏。
2) 天灾、火灾、地震、意外等不可抗力之灾害及人为处理上之疏忽。
3) 自然损耗、消耗性零配件,例如:电池、橡胶垫、橡胶环等。
4) 产品或零件机身的序号已除去或涂毁。
5) 保修期限过后之故障或损害。
TROUBLE SHOOTING
How to connect the sensor via Bluetooth within App?
Please install AlaFitness on your mobile device.
Turned on Bluetooth® on your mobile device.
Open the app. Follow the on-screen instructions to register on App and set up User’s
Profile.
Swipe left and select [Cycling] > Connect: [CSC Sensor]. On the displayed device list,
select [SC003].
Select [NEXT STEP] > [Start], and follow the on-screen instructions to complete the
operation.
Why can't I connect the sensor in App?
Please use AlaFitness on your mobile device.
Make sure the Bluetooth® on your mobile device has been turned on.
In order to save battery power, the sensor will enter sleep mode after 10 minutes of
no action or Bluetooth connection. Please shake it slightly to wake it up. Please repeat
this step if it has been left idle for another 10 minutes.
Keep the transmission distance between the sensor and your mobile device within
2 meters.
Check the battery. If exhausted, please replace the battery.
1
2
3
4
5
1
2
3
4
5