Alba LCD32947HDS Manual

32” LCD TV
Installation & Operating Instructions - Please keep for future reference
529/9232
LCD32947HDS
APPROVED
IMPORTANT - Please read these instructions fully before installing or operating
These instructions contain important information whichwill help you get the best from your
televisionandensure safe andcorrect installation andoperation.
For any help concerning set up and use of your TV please call the
Customer Helpline: 0345 604 0105
Lines open: 9am - 8pm Monday to Saturday and 10am - 4pm Sunday
For any help concerning set up and use of your TV please call the Customer Helpline: 0345 604 0105
Issue 1 - 9/2/11

Contents
Contents
2
Contents
3-6
Preparation
4
Intended Use
4
Power source
4
Positioning the TV
4
Power cord and plug
4
Moisture and Water
5
Ventilation
5
Heat sources and Flames
5
Headphone Volume
5
Wall Mounting (optional)
5
LCD Screen
5
Cleaning
5
Batteries
5
Replacement Parts
6
Servicing
6
Taking out of service and storing
6
Connection to a Television Distribution System
(Cable TV etc.) from Tuner
6
Symbols in this Instruction Book
6
Getting Started
7-14
TV - Features
8
Viewing remote control - TV
9
Getting Started
10
Attaching the Stand
10
Getting Started
11
TV - Control buttons (left side)
11
Aerial connection
12
Power connection
12
Remote control - Inserting batteries
12
Wall Mounting
12
Switching the TV On and Off
12
Switching the TV On
12
Switching the TV Off
12
Operation using TV control buttons
13
Operation using Remote control buttons
13
Initial set up
14
General operation
14
Information Banner
14
Connections
15-19
Back connections explained
15
Left side connections explained
16
HDMI Connections
17
SCART Connections
17
VGAConnections
17
Side AV Connections
18
Using a Conditional Access Module
18
USB Connections
19
Basic Features 20-28
How to navigate menus - Selecting source
20
Electronic programme guide (EPG)
20
General Operation
21
Displaying Subtitles
21
Zoom Modes
21
Using Main Menu Screen
21
Configuring Date/Time Settings
21
Source Settings
21
Audio Language
21
Basic Features
22
Navigating Channel List
22
Moving a Channel
22
Deleting a Channel
22
Renaming a Channel
22
Locking a Channel
22
Sorting Channel List
22
LanguageSettings
24
Language Settings
24
Other Functions and Features
25
Favourite Mode
25
Conditional Access
25
Setting Sleep Timer
25
Setting Programme Timers
25
Editing a Timer
25
Deleting a Timer
25
Picture Controls
26
Configuring Picture Settings
26
Operating Picture Settings Menu Items
26
Picture Settings Menu Items
26
PC Picture Settings Operation
26
Sound and Source Settings
27
Configuring Sound Settings
27
Sound Settings Menu Items
27
Configuring Source Settings
27
Other Controls
28
Operation
28
Other Settings Menu Items
28
2 For any help concerning set up and use of your TV please call the Customer Helpline: 0345 604 0105

Contents
Advanced Features
29-32
Media Browser
29
Starting Media Browser
29
Media Browser Configuration
29
Operation
29
View Style
29
Slide Show Interval
29
Show Subtitle
29
Subtitle Language
29
Subtitle Position
29
Subtitle Font Size
29
Loop / Shuffle during Playback
29
Media Browser - continued
30
Viewing Videos via USB
30
Video Playback Screen
30
Subtitle Time Correction
30
Viewing Photos via USB
30
Displaying Photos in Slideshow Mode
30
Playing Music via USB
30
Setting the channels
31
Accessing Installation Menu
31
Automatic Channel Scan (Retune)
31
Manual Channel Scan
31
Analogue Fine Tune
31
First Time Installation
31
Clear Service List
31
Parental Control
32
Other Information
33-36
Teletext
33
Analogue Teletext
33
Digital Teletext (for the UK only)
33
Specifications
34
Other Information
35
Plug replacement - UK and Ireland only
35
Other Information
36
Product Support
37-42
Trouble shooting
37
Disposalinformation
38
Supported DVI Resolutions
38
Supported File Formats for USB Mode
39
AV and HDMI Signal Compatibility (Input
Types)
Signal
39
PC Input Typical Display Modes
40
Definition of important terms - TV
41
Software Upgrade
42
Guarantee
43
Model number
ALBA DVB-T LCD32947HDS
For any help concerning set up and use of your TV please call the Customer Helpline: 0345 604 0105 3

Safety Information
IMPORTANT - Please read these instructions fully before installing or operating
CAUTION
RISK OF ELECTRIC SHOCK
DO NOT OPEN
CAUTION:
TO REDUCE THE RISK OF ELECTRIC SHOCK,
DO NOT REMOVE COVER (OR BACK).
NO USER-SERVICEABLE PARTS INSIDE.
REFER SERVICING TO QUALIFIED SERVICE
PERSONNEL.
The lightning flash with arrowhead symbol, within
an equilateral triangle, is intended to alert the
user to the presence of uninsulated “dangerous
voltage” within the product’s enclosure that may
be of sufficient magnitude to constitute a risk of
electric shock of persons.
Theexclamationpointwithinanequilateraltriangle
is intended to alert the user to the presence of
important operating and maintenance (servicing)
instructions in the literature accompanying the
appliance.
Preparation
Placethedeviceonasolid evensurface.Forventilation,
leave a free space of at least 10 cm all around the
set. To prevent any fault and unsafe situations, do not
place any objects on top of the set. Use this device in
moderate climates.
Operation temperature and operation humidity:
5ºC up to 45ºC, 85% rel. humidity max. (not blocking
ventilation openings).
Intended Use
This device is used to receive and display TV
programmmes.The different connection options make
an additional expansion of the reception and display
sources possible (various external devices). This device
is only suitable for dry interior use. This appliance is
intended solely for private domestic use and may not
be used for industrial and commercial purposes. We
exclude liability in principle, if the device is not used
as intended, or unauthorized modifications have been
made. To operate your LCD TV in extreme ambient
conditions may cause the damage of the device.
WARNING: Never let people (including children)
with physical, sensory or mental abilities or lack of
experience and / or knowledge unsupervised use
electrical device!
Children may not recognize dangers right! The
swallowing of batteries can be fatal. Keep batteries
always out of reach of small children. If a battery is
swallowed, seek immediate medical attention. Keep
the packaging films out of reach of children, there is a
risk of suffocation.
Power source
•The TV should be operated only from a 220-240V
AC, 50 Hz outlet.
•Warning: Do not leave your TV in standby or
operating mode when you leave your house.
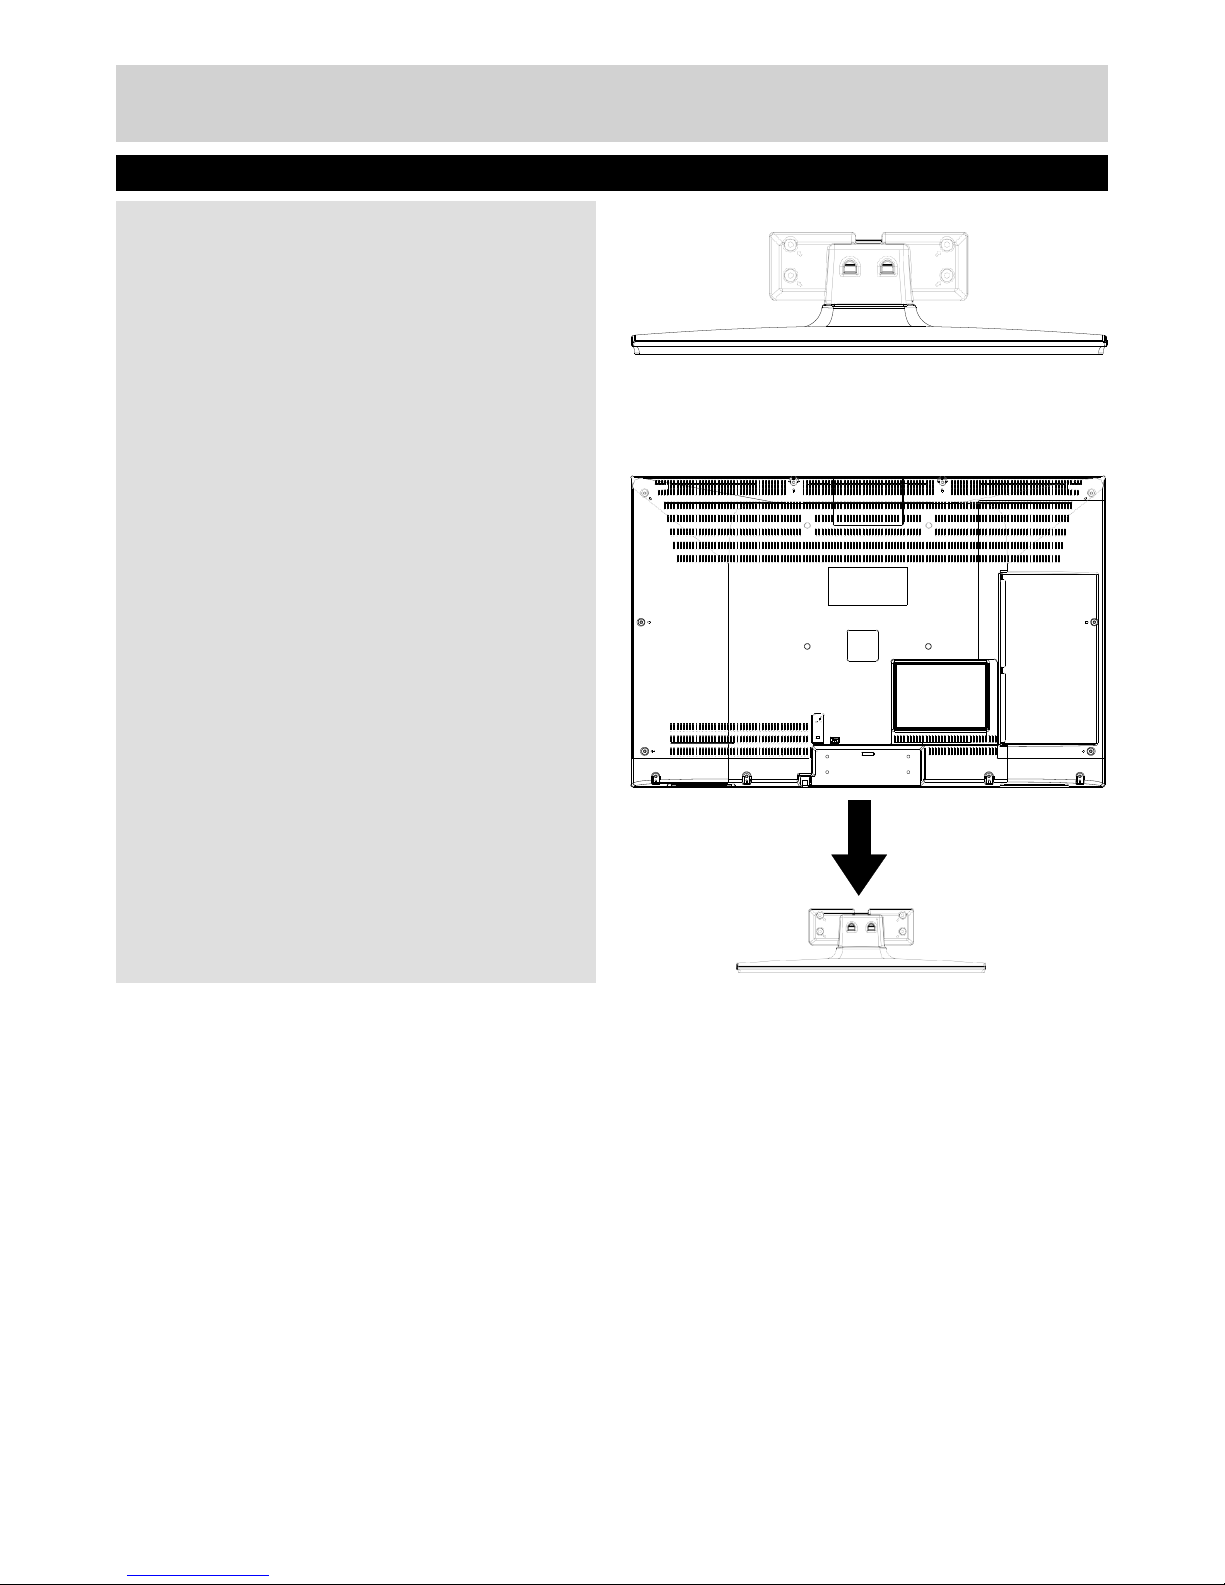
Positioning the TV
•For ventilation, please leave a clear space of at
least 10cm all around the TV.
•Do not block the ventilation openings.
•Do not place the TV on sloping or unstable
surfaces, the TV may tip over.
•To prevent damage to the TV, do not place any
objects on top of the TV.
•Only use the TV in moderate climates.
Power cord and plug
•The power cord plug should be easily accessible.
In case of storms and lightning, when going on
holiday, or when the TV is not used for a long
period of time disconnect the power cord from the
mains power socket.
•The mains plug is used to disconnect TV set from
the mains and therefore it must remain readily
accessible.
•Do not place the TV, furniture, etc. on the power
cord or pinch the cord.
•Handle the power cord by the plug, do not unplug
the TV by pulling the power cord.
•Nevertouchthe power cord/plug with wethandsas
this could cause a short circuit or electric shock.
•Never make a knot in the power cord or tie it with
other cords.
•Power cords should be placed in such a way
that they are not likely to be stepped on or driven
over.
•A damaged power cord/plug can cause fire or give
you an electric shock. When damaged it must be
replaced, this should only be done by qualified
personnel.
4 For any help concerning set up and use of your TV please call the Customer Helpline: 0345 604 0105

Safety Information
IMPORTANT - Please read these instructions fully before installing or operating
Moisture and Water
•Do not usethisTVinahumidordampplace(avoid
bathrooms, the sink in the kitchen, etc.
•Do not exposethisTVto rainor water,asthismay
be dangerous.
•Do not place objects filled with liquids, such as
flower vases, ontop of theTV.Avoidfromdripping
or splashing.
•If any solid object or liquid falls into the cabinet,
unplug the TV and have it checked by qualified
personnel before operating it any further.
Ventilation
•TheslotsandopeningsontheTVsetare intended
for ventilation and to ensure reliable operation.
•To prevent overheating, these openings must not
be blocked or covered in anyway.
Heat sources and Flames
•Do not expose the TV to direct sunlight or other
heat sources.
•The TV should not be placed near to
open flames and sources of intense
heat such as an electric heater.
•Ensure that no open flame sources,
such as lighted candles, are placed on top of the
TV.
Headphone Volume
•Excessivesoundpressurefromearphones
and headphones can cause hearing loss,
please take care.
Wall Mounting (optional)
•Topreventinjury,thisTVmustbesecurelyattached
to the wall in accordance with the installation
instructions (if the option is available).
LCD Screen
•Occasionally, a few non-active pixels may appear
on the screen as a fixed blue, green or red
point. Please note that this does not affect the
performance of your product.
•Take care not to scratch the screen with fingernails
or other hard objects.
Cleaning
•Before cleaning, unplug the TV from the wall
socket.
•Do not use liquid or aerosol cleaners. Only use a
soft, dry cloth.
Batteries
•Warning: Incorrect installation of
batteries may cause battery leakage
and corrosion, resulting in damage to
the remote control.
•Do not mix old and new batteries, or
batteries of different types.
•Do not dispose of batteries in a fire.
•Donot disposeofbatterieswithnormalhousehold
waste, take to a local recycling centre.
CAUTION: Insert the batteries / rechargeable
batteries in the correct polarity. Don´t try to recharge
nonrechargeablebatteriesandunder nocircumstances
throw them into fire. Danger of explosion. Do not use
unequal batteries (old and new, Alkaline and carbon,
etc.) simultaneously. If you will not use the device for
a long time, remove the batteries and store the device
in a dry and dust free place. Improper use of batteries
maycause an explosion or leakage. If thebatteries have
leaked, use gloves and clean the appliance thoroughly
with a dry cloth! Batteries should not be exposed to
heat, such as sunshine, fire or the like.
For any help concerning set up and use of your TV please call the Customer Helpline: 0345 604 0105 5

Safety Information
IMPORTANT - Please read these instructions fully before installing or operating
Replacement Parts
When replacement parts are required, make sure that
the service technician has used replacement parts,
which are specified by the manufacturer or have the
same specifications as the original one. Unauthorised
substitutions mayresult in fire, electrical shock or other
hazards.
Servicing
•Warning: Riskofelectricshock,do not attempt
torepair,serviceormodifythisTVyourself.Contact
the manufacturer, their approved service agent or
the Customer Helpline: 0345 604 0105.
Taking out of service and storing
Unplug the TV from the mains and pack the TV in an
appropriate cardboard box. Remove the batteries from
the remote control and pack the remote control to the
TV set.
NOTE: The TV set should be stored in a dry and
dust-free room.
Connection to a Television Distribution
System (Cable TV etc.) from Tuner
Device connected to the protective earthing of the
building installation through the mains connection or
through other apparatus with a connection to protective
earthing-and to a television distribution system using
coaxial cable, may in some circumstances create a
fire hazard.
Connection to a cable distribution system has therefore
to be provided through a device providing electrical
isolation below a certain frequency range (galvanic
isolator, see EN 60728-11).
Symbols in this Instruction Book
The following symbols are used in the Instruction
Book as a marker for restrictions and precautions and
safety instructions. Note such information for security
reasons.
WARNING
If you do not pay attention to such a marked warning, it
can cause serious injury or death. Note these warnings
strictly, in order to ensure a safe operation.
CAUTION
Such a precaution is marked, you should take up
or note, to avoid injury or property damage. Note
these instructions strictly, in order to ensure a safe
operation.
IMPORTANT
Warningsontheapplianceandrestrictionsare displayed
like this. Read this informationstrictlyin orderto operate
the system correctly and avoid damage.
NOTE: Information about the operation and
additional explanations are marked like this. To be
aware of such information is recommended to ensure
that the functions can be used optimally.
WARNING
This is a class Aproduct. In adomestic
environment it could cause radio
interference, in which case it may
require the user to take appropriate
action.
6 For any help concerning set up and use of your TV please call the Customer Helpline: 0345 604 0105

Getting Started
The Argos Technical Helpline is here to help
Technical experts are available 7 days a week
•Simple help and advice on setting up your digital
equipment (image).
•Guidance on connecting other devices to your
television such as a DVD player, Sky, home cinema
system or a games console.
•Order spare parts, including that lost remote
control.
•Any other technical issues you may need
assistance with.
Call us today: 0345 604 0105
Local call rates applies*
Lines open 9am-8pm Monday to Saturday and 10am-4pm Sunday.
*Calls to Argos enquiry lines may attract a charge and set up fee from residential
lines depending on your call plan/tariff. Mobile and other providers costs may vary,
see www.bt.com/pricing for details.
For Security and training purposes, telephone calls to and from customer service
centres maybe recorded and monitored. Calls from Republic of Ireland will attract
international call charges.
For any help concerning set up and use of your TV please call the Customer Helpline: 0345 604 0105 7

Getting Started
TV - Features
•Remote controlled colour LCD TV.
•FullyintegratedTerrestrialdigitalTV(DVB-T-MPEG2,
MPEG4)
•HDMI connectors for digital video and audio.
This connection is also designed to accept high
definition signals.
•USB input.
•1000 programmes (analogue+digital).
•OSD menu system.
•Integrated tuner MPEG 2, MPEG 4 compatible.
•Scart socket for external devices (such as video,
video games, audio set, etc.).
•Stereo sound system. (German+Nicam)
•Teletext, fastext, TOP text.
•Headphone connection.
•Automatic programming system.
•Forward or backward manual tuning.
•Sleep timer / Child lock.
•Automatic sound mute when no transmission.
•NTSC playback.
•AVL (Automatic Volume Limiting).
•Auto power down.
•PLL (Frequency Search).
•PC input.
•Plug&Play for Windows 98, ME, 2000, XP, Vista,
Windos 7.
•Game Mode
Accessories included
Remote Control
Batteries: 2 x AAA
Instruction Book
Quick Start Guide
Optional Accessories
Wall mount bracket
NOTE:You should check the accessories after
purchasing. Make sure that each accessory is
included.
8 For any help concerning set up and use of your TV please call the Customer Helpline: 0345 604 0105

1
28
?
Getting Started - TV
Viewing remote control - TV
1.
Standby
2.
Mono/Stereo - Dual I-II / Currrent Language (in
DVBchannels)
3.
Imagesize
4.
Greenbutton
5.
Redbutton
6.
Numeric buttons
2
7.
Teletext / Mix(in TXTmode)
8.
Cursor Left
3
9.
Menu on-off
4
30
29
SCREEN LANG SUBTITLE PIP
10.
11. AV /Source selection
FavouriteModeSelection(inDVBchannels)
5
1 2 3 4
27
12.
13.
14.
15.
16.
17.
Volume Up
6
Info / Reveal (in TXTmode)
Mute
7
VolumeDown
ProgrammeDown/ Pageup(in DVBchannels) 8
Electronicprogrammeguide(inDVBchannels)
9
5 6 7 8
26
9 0
25
24
23
18.
19.
20.
21.
ProgrammeUp/ Pagedown(inDVBchannels)
SleepTimer
Picturemodeselecion
Okay (Confirm) / Hold (in TXT mode)/Edit 10
MENU RETURN
22
OK
21
ChannelList
SOURCE FAV PRESETS SLEEP
20
22.
23.
24.
25.
26.
CursorDown
Exit / Return / Index page (in TXTmode)
Cursor Right / Subpage (in TXTmode)
CursorUp
Previousprogramme
V
V
+
P
P
+
19
11
18
12
27.
28.
29.
30.
Yellowbutton
Bluebutton
Nofunction
Subtitleon-off(inDVB channels)
INFO EPG
13
V-
P
P
-
17
14
15 16
NOTE:RemoteControlbuttonsthatarenotindicated
with a number can not be used in TV mode.
The Remote Control range is approximately
7m/ 23ft.
For any help concerning set up and use of your TV please call the Customer Helpline: 0345 604 0105 9

Getting Started
Attaching the Stand
1.
Stand is placed on a flat surface (fig.1).
fig
.1
2.
To install the TV on the wall, first of all, foot
assemblyshouldberemoved.Unscrewthe4screws
that attach the foot assembly to the panel and
remove the foot assembly from the panel (fig.2).
fig
.2
10 For any help concerning set up and use of your TV please call the Customer Helpline: 0345 604 0105

Getting Started
TV - Control buttons (left side)
1.
Standby ( ) button
Turns the TV on when in standby mode or turns
the TV off into standby mode.
2.
TV/AV button
Changes the operation of “Up” and “Down”
buttons.
3.
Programme Up/Down buttons
Moves up/down a channel.
4.
Volume Up/Down buttons
Increases/decreases the volume.
NOTE:IfyouswitchonyourTVviaPROGRAMME
UP/DOWNbuttonsontheremotecontrol oronthe
TVset,the programmethatyouwerewatchinglast
will be reselected.
NOTE:Press “ ”/ “ ” buttons at the same
time to view main menu.
Standby-LED
4 3 2 1
For any help concerning set up and use of your TV please call the Customer Helpline: 0345 604 0105 11

Getting Started
22
D
M
ID
M
I
H
H
H
D
M
I
1
Aerial connection
Connect the “aerial” or “cable TV” plug to AERIAL
INPUT (ANT.) socket located on the back of the
TV (fig.1).
Power connection
SPDIF
Coax.OUT
IMPORTANT:TheTVsetisdesignedtooperateon
220-240V AC, 50 Hz.
Please note: After unpacking, allow the TV to reach
ambient room temperature before connecting the TV
to the mains power socket.
Connect the power cord plug to the mains power
socket.
The LED on the front of the TV then lights up, this
indicates that the TV is in ‘Standby’mode.
Remote control - Inserting batteries
fig.1
Remove the battery cover on the back of the remote
control, gently push down and pull backwards at the
same time as shown.
Insert two AAA/R3 or equivalent type batteries. Ensure
the batteries are inserted the correct way and replace
the battery cover (fig.2).
NOTE: When the remote control is not going to
be used for long periods of time, the batteries should
be removed. Otherwise the remote control may be
damaged, caused by battery leakage and corrosion.
Wall Mounting
When wall mountingpleaseensure youuse acompatible
wallmount(notsupplied).ThisTVconformstotheVESA
mounting specifications and is 200 x 200mm.
AAA/R3 x 2
Batteries fig.2
Switching the TV On and Off
Switching the TV On
With power cord plug connected to the mains power
socket, the TV is in ‘Standby’mode.
To switch the TV on from standby mode:
Connect the power cord to the 220-240V AC 50 Hz.
Then the standby LED lights up. (The led will blink
during the standby On/Off)
To switch on the TV from standby mode either:
a.
Press the “”button, P+ / P- or a numeric button on
the remote control.
b.
Press the “”, - or + button of the TV.
By either method the TV will switch on.
Switching the TV Off
Press the “”button on the remote control or press
the “”switch on the TV, the TV will switch to standby
mode.
To turn off the TV completely, remove the power
cord plug from the mains power socket.
NOTE: WhentheTVisinstandbymode,thestandby
LED can blink to indicate that features such as Standby
Search, Over Air Download or Timer is active.
NOTE:If you switch on your TVvia P +/- buttons on
the remote control or +/- on the TV set, the programme
that you were watching last will be reselected.
12 For any help concerning set up and use of your TV please call the Customer Helpline: 0345 604 0105

Getting Started
Operation using TV control buttons
The main menu OSD (On Screen Display) cannot
be displayed using the TV control buttons.
The “”/“ ”buttons will function as volume
up/down as default. Evenif you setother functions
for these buttons, the “ ”/“ ”buttons will
return to volume control after a short while.
Volume Setting
Press “ ”button to decrease volume or “ ”
buttonto increase volume, soa volume level scale
(slider) will be displayed on the screen.
Programme Selection
Press “P/CH +”button to select the next
programme or “P/CH -”button to select the
previous programme.
AV Mode
Hold the TV/AV button for a few seconds, the
“Source” OSD will be displayed.
Operationusing Remotecontrolbuttons
The remote control is designed to control all the
functions of the model you selected.
Volume Setting
Press “V +”button to increase the volume. Press
“V -”buttontodecreasethevolume.Avolumelevel
scale (slider) will be displayed on the screen.
Programme Selection (Previous or Next
Programme)
PressP- button toselectthe previousprogramme.
Press P+ button to select the next programme.
Programme Selection (Direct Access)
Press number buttons on the remote control to
select programmes between 0 and 9. The TV will
switch to the selected programme.
To select programmes between 10-500 (IDTV)
or 10-199 (analogue), press the number buttons
consecutively.
SCREEN LANG
SUBTIITLE
PIP
1 2 3 4
5 6 7 8
9 0
MENU
RETUR N
OK
SOURCE FAV PRESETS SLEEP
V
V
+
P
P
+
?
INFO
EPG
V-
P
P
-
For any help concerning set up and use of your TV please call the Customer Helpline: 0345 604 0105 13

Getting Started
Initial set up
When turned on for the first time, language selection
message is displayed (fig.1). Press the “ ”or “
”button to highlight the required language, press OK
button to select. “First Time Installation” appears. Use“
”or “”button to set the required country, and press
“ ”button to select “Teletext Language”. Use “ ”or
“”button to set the “Teletext Language” and select
“Scan Encrypted” using “”or “”button. Set “Scan
Encrypted” using “ ” or “ ” button (fig.2).
Press OK button on the remote control to continue and the
confirmation screen will be displayed on the screen (fig.3).To
start automatic select Yes (to cancel select No), highlight
the item required using the “”or “”button and press
OK button to select. The search will start (fig.4).
IMPORTANT: Do not turn off the TV while
“FirstTimeInstallation”isinoperation.
After all the available stations are stored, Channel List
will be displayed on the screen. If LCN (*) is availablein
your country, a message appears on the screen which
asks you if you want to sort the channels according to
LCN. In some countries, the order of the channels is
arrangedautomaticallybythe broadcaster.Thisiscalled
logical channel number (LCN). If the selected country
has LCN support, the channels will be enumerated one
by one, beginning from number 1. You cannot move
any programme to a position after the last saved one.
If you try to do this, both programmes will change their
places. If LCN support is not available, you can move
the channels as you wish.
Press OK button to quit channel list and watch TV.
(*) LCN is the Logical Channel Number system that
organizes available broadcasts in accordance with a
recognizable channel sequence.
Source Selection
Press the SOURCE button on the remote control for
switching between the sources.
Information Banner
Wheneveryouchange channel usingtheP-/P+ buttons
or the numeric buttons, the TV displays the broadcast
picture along with an information banner at the bottom
of the screen. The information banner can be displayed
at any time while watching TV by pressing the INFO
button on the remote control (fig.5).
Hint: Not all channels broadcast the programme data. If
the name and time of the programme are not available,
then information banner will be displayed with blanks.
If the selected channel is locked, you must enter the
correct four-digit numeric code to view the channel
(default code is 0000). “Enter PIN” will be displayed on
the screen in such a case.
(fig.1)
(fig.2)
(fig.3)
(fig.4)
(fig.5)
14 For any help concerning set up and use of your TV please call the Customer Helpline: 0345 604 0105

Connections
Back connections explained
1.
SCART socket
Inputsoroutputsforexternaldevices. Connect the
SCART cable between the SCART socket on the
TV and the SCART socket on the external device
(decoder, VCR or DVD player) (see page 00).
NOTE: If an external device is connected via the
SCART socket, the TV will automatically switch to AV
mode. When receiving DTV channels (Mpeg4 H.264)
or while in Media Browser mode, output will not be
available via the scart socket.
2.
HDMI Input
Connects a device that has an HDMI socket.
The TV can display High Definition pictures from
devicessuchasaHighDefinition SatelliteReceiver
or DVD Player. These devices must be connected
via the HDMI sockets or Component Socket. No
sound connection is needed for an HDMI to HDMI
2
connection (see page 00).
3.
PC Input (VGA) 34
Connects a personalcomputer tothe TV. Connect
the PC cable between the PC INPUT on the TV
and the PC output on the PC. You can use the
PC input to allow YPbPr signal connection with a
device that has component output. Connect the 5
YPbPr to PC cable (not supplied) between the
PC INPUT on the TV and the component video
outputs of the device. 1
4.
RF Input (ANT.)
Connectstoaerial (antenna)orcableTV.Ifyouuse
adecoderoramedia recorder, youshouldconnect
the aerial cable through the device to the TV with
an appropriate aerial cable (see page 00).
NOTE: When using the wall mounting kit (optional),
we recommend that you plug all your cables into the
back of the TV before mounting on the wall.
5.
S/PDIF Coaxial Out
Outputs digital audio signals of the currently
watched source.
Use an SPDIF coaxial cable to trasfer audio
signals to a device that has S/PDIF input.

Connections
For any help concerning set up and use of your TV please call the Customer Helpline: 0345 604 0105 15

Connections
Left side connections explained
6.
CI Slot
Used to insert a CI card. A CI card allows you
to view all the channels that you subscribe to.
For more information, see “Conditional Access”
section.
6
7.
USB Input
To connect devices to the TV, providing fast data
exchange. USB will only function in DTV mode. 7
UseanSPDIFcoaxialcable totrasferaudiosignals
to a device that has S/PDIF input. 8
8.
Video input 9
VideoInput isusedforconnectingvideosignalsof
external devices.Connectthevideocablebetween 10
the VIDEO IN socket on the TV and the VIDEO
OUT jack on your device.
9.
Audio input
AudioInputsareusedforconnectingaudiosignalsof
external devices. Connect the audio cable between
the AUDIO INPUTS on the TV and the AUDIO
OUTPUT jacks on your device.
NOTE: If you connect a device to the TV via
the VIDEO INPUT, you should also connect your
device with an audio cable to the AUDIO INPUTS
of the TV to enable audio.
10.
Headphone
Headphone jack is used for connecting an
external headphone to the system. Connect to
the HEADPHONE jack to listen to the TV from
headphones (optional).
16 For any help concerning set up and use of your TV please call the Customer Helpline: 0345 604 0105

Connections
2
I
M
D
H
HD
MI
1
HDMI Connections
HDMI lets you enjoy high definition digital images
and high quality sound by connecting the TV to
external devices such as DVD players, set top
boxes or gaming equipment (fig.1).
Power off both the TV and the device before
making any connections.
For more information, refer to your device’s own
instruction book.
After making the connection, switch to HDMI 1 or
HDMI2 as a source, depending on which HDMI
connector the external equipment is connected.
See, Input Selection section for more information
on changing sources.
NOTE: HDMI cable is not supplied.
SCART Connections
Most devices support SCART connection. You can
connecta;DVDrecorder,VCRordecodertotheTVusing
the SCART socket (fig.2).
Power off both the TV and the device before making any
connections.
Formoreinformation,refertoyourdevice’sowninstruction
book.
NOTE: The Scart cable is not supplied.
NOTE:If your external device has a S-Video output, it is
possible to connect your external device with a SCART-S-
video adapter (notincluded)tothescartinputoftheTV.First
plug the SCART S-Video adapter to the SCART connector
onyourTVset.Then,connectaS-videocabletotheSCART
socket (via the Scart S-Video adapter) to the S-video output
of your external device.
VGAConnections
You can connect a computer (PC) to the TV to
display your computer’s screen image on the TV.
Power up both computer and TV before making
any connections.
Use a 15-pin D-sub display cable to connect a PC
totheTV. Useanaudiocablebetweenaudioinputs
on the left side of the TVand audio output on your
PC to enable sound connection (fig.3). You will
need to use the supplied SIDE AV CONNECTION
cable for connecting audio signals.
When the connection is made, switch “Source” to
“PC-VGA”. See “Input selection” section.
Set the resolution that suits your viewing
requirements. Resolution information can be
found in the “Appendix parts”.
NOTE: The cable is not supplied.
NOTE: You can use YPbPr to VGA cable (not
supplied) to enable YPbPr signal via VGA input.
WARNING: You cannot use VGA and YPbPr at the
same time.
SPDIF
Coax.OUT
PCInput
(back)
Side AV Input
fig.1
Scart Cable
(not supplied)
Externaldevice
fig. 2
PC VGACable
(Notsupplied)
PCAudioCable
(Notsupplied)
fig. 3
HDMI Cable
(not supplied)
External device
Or
For any help concerning set up and use of your TV please call the Customer Helpline: 0345 604 0105 17

Connections
Side AV Connections
You can connect a range of optional equipment to your
LCD TV.
1.
For connecting a camcorder, connect to the
VIDEO IN socket and the AUDIO SOCKETS. Do
not connect the camcoder to VIDEO IN socket
at the same time since it can cause noise in the
picture. For selecting the related source, see the
section “Input selection” in the following parts.
2.
TolistentheTVsoundfromheadphones,connect
to the HEADPHONE jack of theTV (fig.1).
Using a Conditional Access Module
AVCable
(notsupplied)
fig. 1
Camera
Headphone
IMPORTANT:InsertorremovetheCImoduleonly
when the TV is SWITCHED OFF.
In order to watch certain digital channels, a conditional
access module (CAM) can be necessary. This module
must be inserted in the CI slot of your TV.
1.
Obtain the Conditional Access Module (CAM) and
the viewing card by subscribing to a pay channel
company, then insert those to the TV using the following
procedure.
2.
Insert the CAM and then the viewing card to the slot
that is located in the terminal cover at the rear side of
the TV.
3.
TheCAM should be correctly inserted,it is impossible
to insert fully if reversed. The CAM or the TV terminal
may be damaged if the CAM is forcefully inserted.
4.
Connect the TV to the mains supply, switch on and
then wait for few moments until the card is activated.
5.
Whennomoduleisinserted,“No Common Interface
module detected”message appears on the screen.
You can refer to the module instruction manual for
details of the settings.
fig. 2
CAM
module
18 For any help concerning set up and use of your TV please call the Customer Helpline: 0345 604 0105

Connections
USB Connections
2.5” and 3.5” inch (hdd with external power supply)
external hard disk drives are supported.
IMPORTANT
You should back up your files before making any
connections to theTV set in order to avoid any possible
data loss.Notethatmanufacturerwillnotberesponsible
for any file damage or dataloss.
It is possible that certain types of USB devices (e.g.
MP3 Players) or USB hard disk drives/memory sticks
may not be compatible with this TV.
The TV supports FAT32 and NTFS disk formatting.
USB Disk Connection
Plug your USB device to the USB input of the TV.
NOTE
:
Plug or unplug your USB disk while the TV is switched
off.
If you are going toconnect a USB hard disk drive to the
TV set, USB connection cable used between the disk
drive and the TV should have a USB logo and should
be as short as possible.
While formatting a USB hard disk that has 1TB (Tera
Byte)ormorefilecapacity,youcanexperienceproblems
with the formatting process. In such a case, you should
format the disk with your personal computer and the
formatted disk type should be FAT32.
CAUTION:
Quickly plugging and unplugging USB devices, is a
very hazardous operation. Especially, do not repeatedly
quickly plug and unplug the drive. This may cause
physical damage to the USB player and especially the
USB device itself. Do not pull out USB module while
playing or recording a file.
For any help concerning set up and use of your TV please call the Customer Helpline: 0345 604 0105 19
Table of contents
Other Alba LCD TV manuals