Alba ALTVDI711701 User manual

- 1 -
INSTRUCTION MANUAL
17” HD Ready Digital
LCD TV with
built-in DVD player
docking for iPod
ALTVDi711701

- 2 -
PLACEMENT INFORMATION
• Donotusethisunitinplaceswhichareextremelyhot,cold,dusty,orhumid.
• Placetheunitonaatandevensurface.
• Donotrestricttheairowofthisunitbyplacingitsomewherewithpoorairow,bycoveringitwithacloth,
orbyplacingitonbeddingorcarpeting.
• Undertheenvironmentwithradiofrequencyinterference,thepicturemaybeinuenced.
SAFETY INFORMATION
• Whenconnectingordisconnectingthecord,griptheplugandnottheACcorditself.Pullingthecordmay
damageitandcreateahazard.
•Whenyouarenotgoingtousetheunitforalongperiodoftime,disconnecttheACcord.
• Themainsplugisusedasthedisconnectingdevice.Itshallremainreadilyoperableandshouldnotbeobstructed
duringintendeduse.Tobecompletelydisconnectedfromthesupplymains,themainsplugoftheapparatus
shouldbedisconnectedfromthemainssocketoutletcompletely.
• Theapparatusshouldnotbeexposedtodrippingorsplashingandthatnoobjectslledwithliquids,suchas
vases,shouldbeplacedonapparatus.
• Leaveaminimumof200mmaroundtheapparatusforventilation,and200mmbesidetheDVDmechanism;
• Theventilationopeningsshouldnotbeimpededbycoveringwithitemssuchasnewspaper,table-cloths,
curtainsetc.
• Nonakedamesourcessuchaslightedcandlesshouldbeplacedontheapparatus;
• Attentionshouldbedrawntotheenvironmentalaspectsofbatterydisposal;
• Theuseofapparatusinmoderateclimates.
• Undertheinuenceofelectrostaticphenomenon,theproductmaymalfunctionandrequireusertopower
reset.
CONDENSATION INFORMATION
• Whenleftinaheatedroomwhereitiswarmanddamp,waterdropletsorcondensationmayforminsidethe
unit.Whenthereiscondensationinsidetheunit,theunitmaynotfunctionnormally.Lettheunitstandfor1-2
hoursbeforeturningthepoweron,orgraduallyheattheroomandlettheunitdrybeforeuse.
RATING PLATE LOCATION
• Theratingplateisontherearofproduct.
CAUTION
INVISIBLELASERRADIATIONWHEN
OPENANDINTERLOCKSDEFEATED.
AVOIDEXPOSURETOBEAM
ThesymbolforClassII(Double
lnsulation)
WARNING: TOPREVENTFIREORSHOCKHAZARD,DONOTEXPOSETHISUNITTORAINORMOISTURE.
DONOTPLACEOBJECTSFILLEDWITHLIQUIDSONORNEARTHISUNIT.
CAUTION: DANGEROFEXPLOSIONIFBATTERYISINCORRECTLYREPLACED.REPLACEONLYWITHTHE
SAMEOREQUIVALENTTYPE.
Theexclamationpointwithinatrianglealerts
youtothepresenceofimportantoperating,
maintenanceandservicinginstructionsin
thisuser’smanual.
Thelightningashwithanarrowheadwithin
atrianglealertsyoutouninsulateddangerous
voltagewithintheproduct’senclosurethat
couldcauseanelectricshock.
Thisproductcontains
a low power laser
device.
CAUTION
RISK OF ELECTRIC SHOCK
DO NOT OPEN
WARNING: TO REDUCE THE RISK OF ELECTRIC
SHOCK, DO NOT REMOVE COVER (OR BACK).
NO USER-SERVICEABLE PARTS INSIDE. REFER
SERVICING TO QUALIFIED PERSONNEL.
This symbol means that the unit
complieswithEuropeansafelyand
electricalinterferencedirectives.
SAFETY PRECAUTIONS
WARNING:Shouldanyproblemsoccur,disconnecttheACcordandreferservicingtoaqualied
technician.

- 3 -
MAINS PLUG
UNITS SUPPLIED WITH MOULDED MAINS PLUG
1.IfthemainsplugttedtotheACcordsuppliedisnotsuitableforyourmainsoutletitmaybenecessarytocut
itoff.Carefullydisposeoftheseveredplug.Undernocircumstancesmustitbeinsertedintoamainssocket,
otherwiseadangerouselectricshockcouldresult.
2.Ifthefuseinthettedmainsplugshouldfail,replaceitwithaBS1362approvedfuseratedat3ANeveruse
theplugwithoutthefusecovertted.
WIRING A MAINS PLUG
As the wires in the mains lead may not correspond with the coloured markings
identifyingtheterminalsinyourplugproceedasfollows:
• Thewirewhichiscolouredbluemustbeconnectedtotheterminalwhichismarked
withtheletterNorcolouredblack.
• Thewire whichiscolouredbrownmustbeconnectedtotheterminalwhichis
markedwiththeletterL orcolouredred.
• No connectionistobemadetotheearth terminaloftheplugwhichismarked
withtheletterEorcolouredgreenorgreen and yellowormarkedbythesafety
earthsymbol.
Thestandard(BS1363)mainsplugmustbettedwitha3AmpfuseapprovedtoBS1362.Ifanyotherplugor
connectionisuseda3Ampfusemustbettedintheplugoradaptororinthedistributionboard.
Caution: Moisture Condensation
Iftheequipmentismovedfromacoldplacetoawarmone,waterintheairwillcondenseonsomepartsand
maycausedamageormalfunctioniftheequipmentisoperated.
Allowatleasttwohoursfortheequipmenttoacclimatisebeforeswitchingiton.
This unit is designed to operate from a 230V AC ~ 50Hz mains supply.
PleasenotethatwhentheSTANDBY/ONswitchisinthestandbypositionthisdoesnotcompletelydisconnect
theunitfromthemainssupply.Iftheequipmentisnottobeusedforadayormore,disconnectitatthewall
outlet.
Thissymbolmeansthattheunitisdoubleinsulated.Noconnectiontoearthisnecessary.
SAFE USE OF YOUR EQUIPMENT
This equipment has been designed and manufactured to meet UK safety standards but like any electrical
equipmentcaremustbetakentoobtainthebestresultsfromtheequipmentandassureyourownsafety.Here
areafewtipstohelpyoudothis:
READthisinstructionmanualbeforeyouattempttousetheequipment.
NEVERtmakeshiftstandsorlegswithwoodscrews.Useonlyapprovedsupportsandfastenersspeciallydesigned
fortheequipment.
NEVERletanyone,especiallychildren,pushobjectsintoholes,ventilationslotsoranyotheropening;thiscould
resultinfatalelectricshock!
ALWAYSdisconnecttheACpowercordwhenyouarenotgoingtousetheunitforalongperiodoftime.
ENSUREadequateventilationoftheequipmentisnotobstructed,forexamplebycurtainsaboveorsoftfurnishings
underneathit.
ENSUREthatallelectricalconnections(includingthemainsplug,extensionleadsandinterconnectionsbetween
piecesofequipment)areproperlymadeinaccordancewiththeinstructionsgiven.Switchoffthemainsupply
whenmakingorchangingconnections.
CONSULTyourdealerifyouareeverindoubtabouttheinstallation,operationorsafetyofyourequipment.
DON’Tcontinuetooperatetheequipmentifitisdamagedinanywayorifitdoesnotfunctionnormally.
Withdrawthemainsplugandconsultyourdealer.
DON’Tleaveequipmentswitchedonwhenitisunattendedunlessitispartofit’snormalfunctiontooperatein
yourabsence,forexampleavideocassetterecorderwithtimedrecordingfacility.
LISTENtoheadphonesatmoderatevolumelevels;highvolumelevelscanpermanentlydamageyourhearing.
ImPORTANT SAFETY INSTRUCTIONS
The wires in this mains lead are
coloured in accordance with the
following code.
BLUE-NEUTRAL
BROWN-LIVE

- 4 -
SAFETY PRECAUTIONS ............................. 2
ImPORTANT SAFETY INSTRUCTIONS ...... 3
TABLE OF CONTENTS ............................... 4
DISC FORmATS ........................................ 5
GETTING STARTED .................................. 6
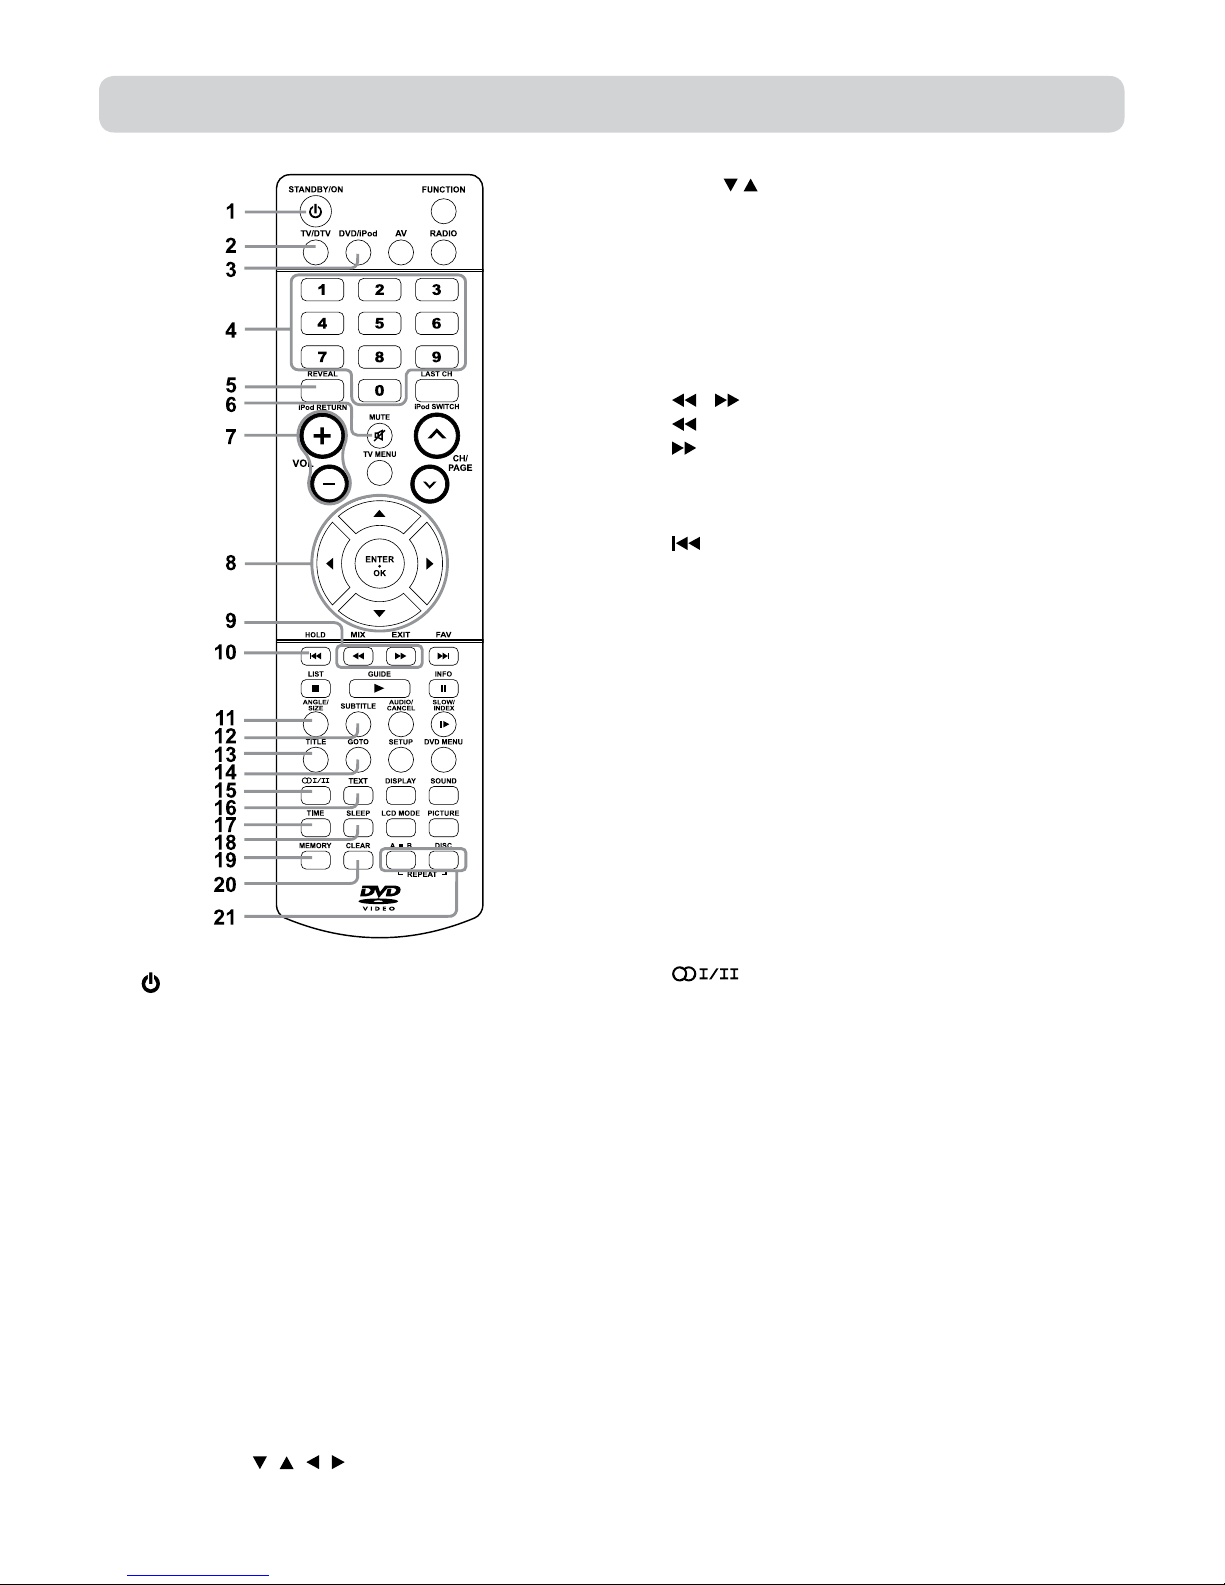
REmOTE CONTROL REFERENCE GUIDE .......
............................................................... 7 - 8
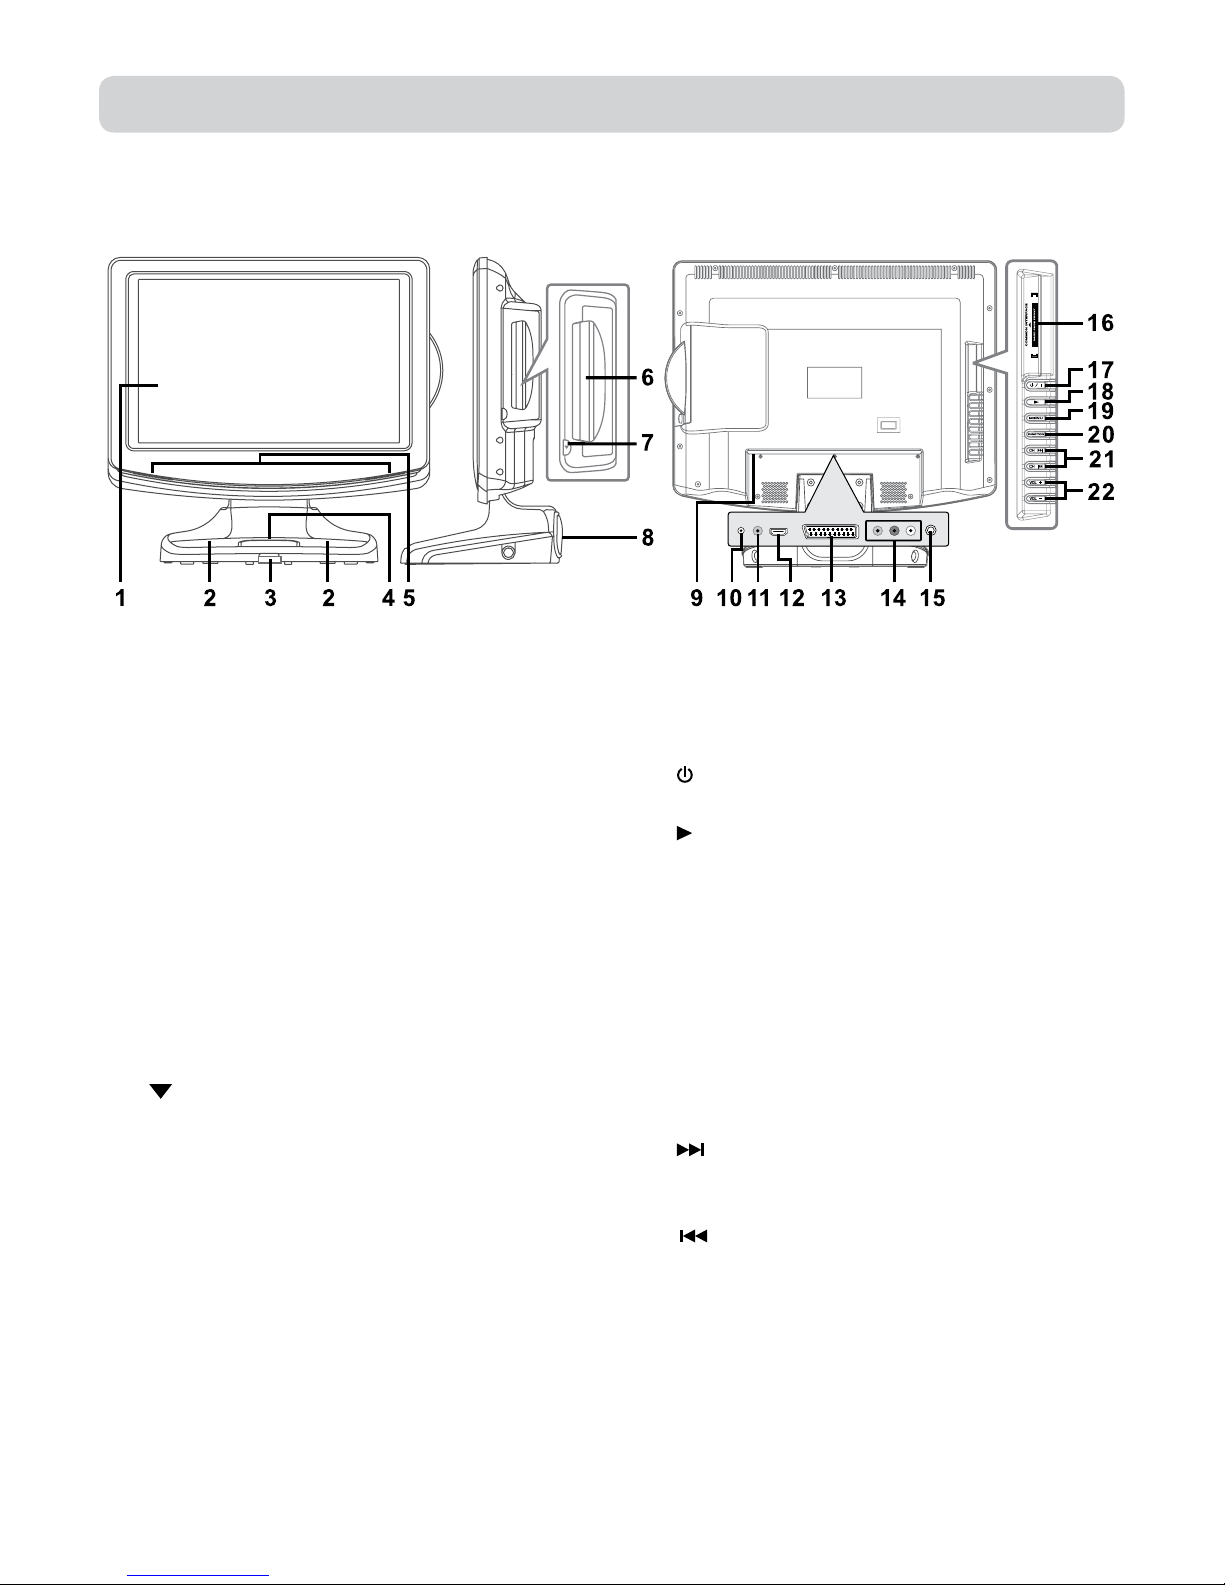
UNIT REFERENCE GUIDE ......................... 9
CONNECTIONS .............................. 10
ConnectingaTVAntenna/Cable/Satellite....10
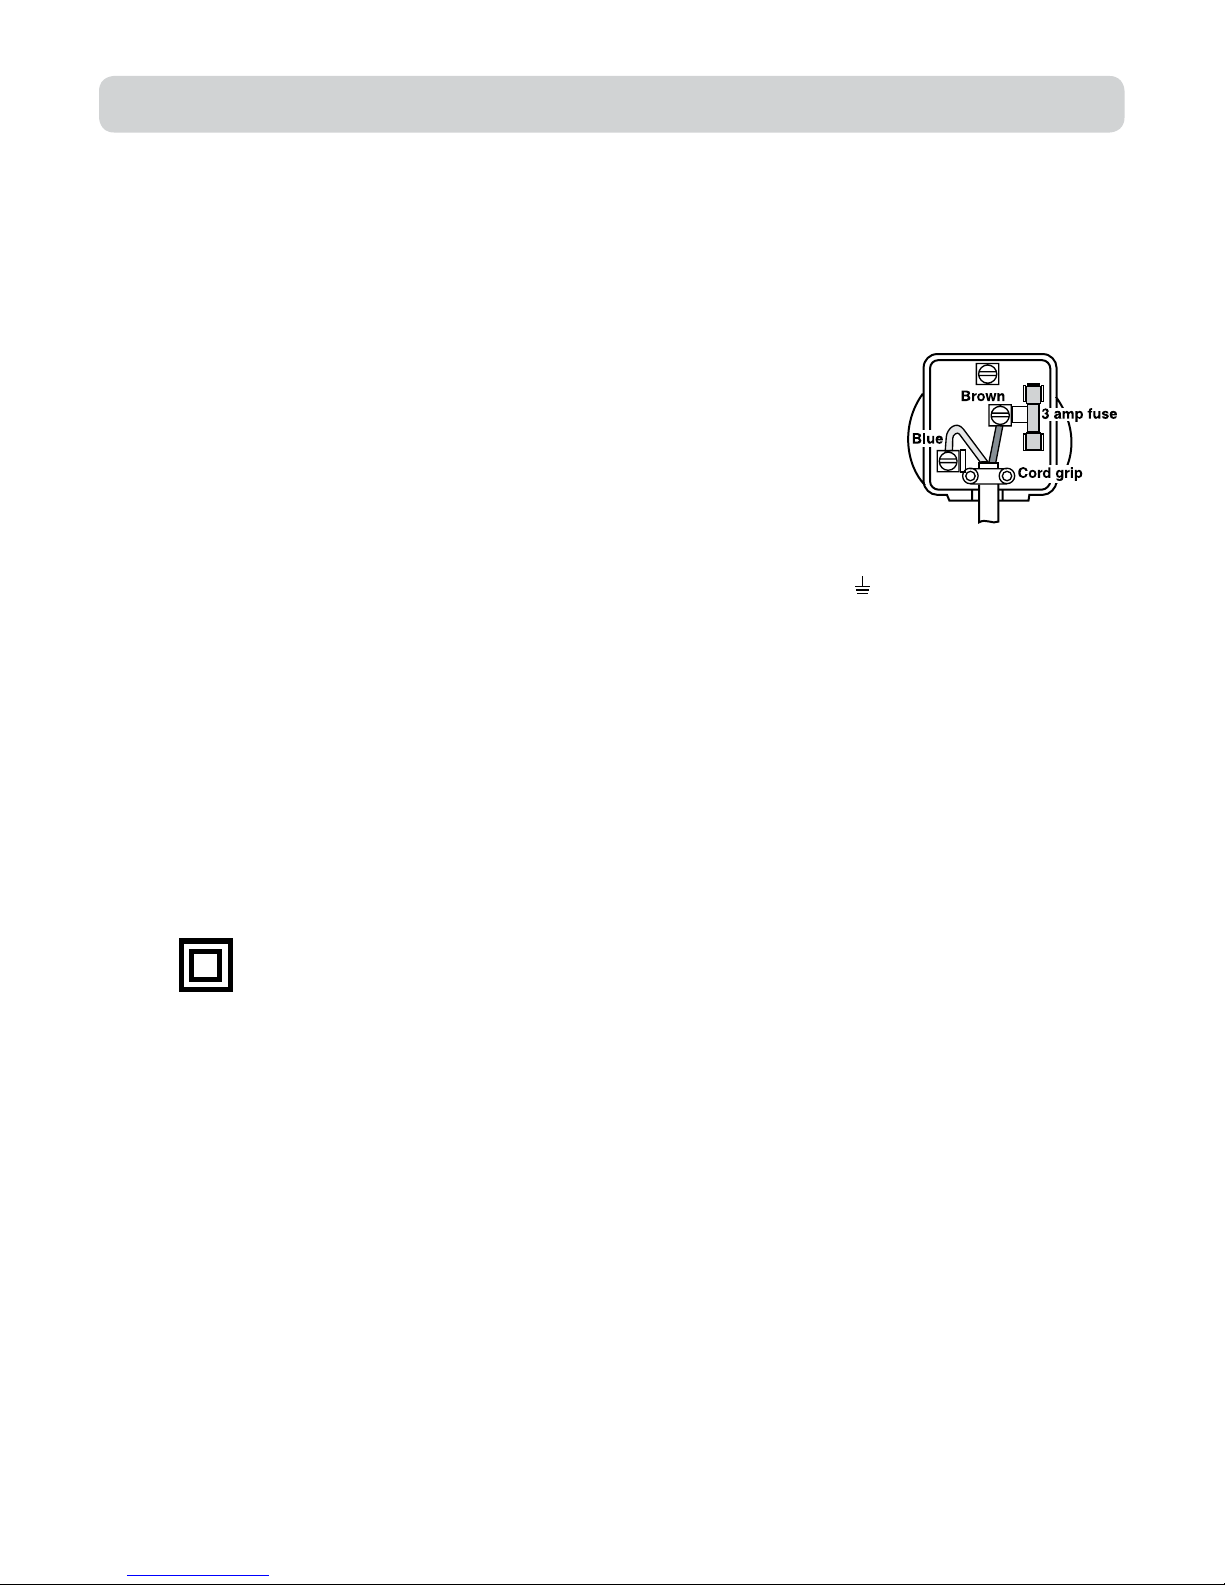
ConnectingthePowerCord......................10
UNIT OPERATION ............................ 11 - 12
TurningtheUnitonfortheFirstTime..........11
ElectronicProgrammeGuide(EPG)forDTV..
.................................................................12
AudioLanguageforDTV.........................12
TV / DTV SETUP .................................. 13 - 16
TVSettingMenu........................................13
PictureMenu.........................................14
SoundMenu..........................................14
TimeMenu............................................15
Setup Menu ........................................... 15
Lock Menu ........................................... 16
TELETEXT ............................................... 17
CONNECTIONS .............................. 18 - 20
CommonInterface...................................18
Connectingtodeviceswithacomposite(yellow
RCA-type)videooutput.........................18
Connectingtosourceswithscart.............18
Connecting a High Denition (HD) Source
(YUV)........................................................19
Using Headphones ............................... 19
Connecting HDMI ................................ 20
SOUND SYSTEm ................................... 20
USING WITH YOUR iPod ................... 21 - 25
CD/DVD OPERATION ..................... 26 - 27
Playingadisc.............................................26
Playingapictureledisc.......................26
Pausingplayback(stillmode)....................26
Stoppingplayback....................................26
Skippingtoadifferenttrack......................26
Fastforward/fastreverse...........................27
Slow-motionplay(DVD)...........................27
Audioselection(DVD).............................27
Subtitleselection(DVD)...........................27
Angleselection(DVD)................................27
SPECIAL FUNCTIONS ............................ 28
Displayfunction.........................................28
Locatingaspecictitle(DVD).....................28
Locatingaspecicchapter/track...................28
Locatingaspecictime.................................28
REPEAT PLAYBACK ................................... 29
Repeatingachapter/title(DVD)..............29
Repeatingasingletrack/wholedisc(CD).........29
Repeatingaspecicsection(DVD/CD).......29
DVD PROGRAmmABLE PLAYBACK ........ 30
Programmablememory.............................30
Title/chapterprogrammedplayback(DVD)...
..................................................................30
CUSTOmIZING THE FUNCTION SETTINGS ...
........................................................... 30 - 32
Languagesetup...........................................30
Videosetup...............................................31
Systemsetup........................................31-32
mAINTENANCE ..................................... 32
TROUBLESHOOTING GUIDE ........... 33 - 34
TABLE OF CONTENTS

-5-
Thisunitcanplayback:
TITLES, CHAPTERS AND TRACKS
•DVDs are divided into “titles” and “chapters”. If
thedischasmorethanonemovieonit,eachmovie
wouldbeaseparate“title”.“Chapters”aresections
oftitles.
•AudioCDsaredividedinto“tracks”.A“track”is
usuallyonesongonanAudioCD.
ICONS USED ON DVDS
Samplelcons
Note:
•WhenplayingbackaCD-G(Graphics)orCDEXTRA
disc,theaudioportionwillbeplayed,butthegraphic
imageswillnotbeshown.
DVDS
[8CM/12CM DISC]
AUDIO CDS
[8CM/12CM DISC]
CD-R/CD-RW
Compatible
REGION MANAGEMENT INFORMATION
RegionManagementInformation:ThisunitisdesignedandmanufacturedtorespondtotheRegion
ManagementInformationthatisencodedonDVDdiscs.IftheRegionnumberprintedontheDVD
discdoesnotcorrespondtotheRegionnumberofthisunit,thisunitcannotplaythatdisc.
Theregionnumberofthisunitis .
Note:
•Numbersidentifyeachtitle,chapter,andtrackonadisc.Mostdiscshavethesenumbersrecorded
onthem,butsomedonot.
Notes on Unauthorized Discs
YoumaynotbeabletoplaybacksomeDVDdiscsonthisunitiftheywerepurchasedfromoutside
yourgeographicareaormadeforbusinesspurposes.
DISC FUNCTION OR OPERATION THAT IS NOT AVAILABLE
Whenthe symbolappearsonthescreen,itindicatesthatthefunctionoroperationattemptedis
notavailableatthattime.ThisoccursbecausetheDVDdiscmanufacturerdeterminesthespecic
functions.Certainfunctionsmaynotbeavailableonsomediscs.Besuretoreadthedocumentation
providedwiththeDVD.
Languageselectionsforaudio
Languageselectionsforsubtitles
Screenaspectratio
Multiplecameraangles
Regioncodeindicator
1
NOTES ON COPYRIGHT
Itisforbiddenbylawtocopy,broadcast,show,broadcastoncable,playinpublic,orrentcopyrighted
materialwithoutpermission.
ApparatusClaimsofU.S.PatentNos.6,836,549;6,381,747;7,050,698;6,516,132;and5,583,936
licensedforlimitedviewingusesonly.
This product incorporatescopyrightprotectiontechnologythatis protected byU.S. patentsand
otherintellectualpropertyrights.Useofthiscopyrightprotectiontechnologymustbeauthorized
byMacrovision,andisintendedforhomeandotherlimitedviewingusesonlyunlessotherwise
authorizedbyMacrovision.Reverseengineeringordisassemblyisprohibited.
DISC FORmATS

-6-
USING THE REMOTE CONTROL
• PointtheremotecontrolattheREMOTESENSORlocatedontheunit.
• Whenusingthisunitinaverybrightlylitarea,theinfraredREMOTECONTROLSENSORmay
notworkproperly.
• Therecommendedeffectivedistanceforusingtheremotecontrolisabout16feet(5metres).
TO CHANGE THE REMOTE CONTROL BATTERIES
1.Openthebatterydoor. 2.Inserttwo“AAA”batteries.
BATTERY REPLACEMENT
Whenthebatteriesbecomeweak,theoperatingdistanceoftheremotecontrolwillbegreatlyreduced
andyouwillneedtoreplacethebatteries.
Note:
•IftheRemoteControlisnottobeusedforalongtime,removethebatteriestoavoiddamage
causedbybatteryleakagecorrosion.
•Donotmixoldandnewbatteries.DonotmixALKALINE,standard(CARBON-ZINC)orrechargeable
(NICKEL-CADMIUM)batteries.
•Corrosion,oxidation,battery-leakageandanyothergraduallyacidicdefectofthisnaturewill
invalidatetheguarantee.
•Whendiscardingbatteries,environmentalproblemsmustbeconsideredandlocalrulesorlaws
governingthedisposalofthesebatteriesmustbefollowedstrictly.
CAUTION:
Dangerofexplosionifbatteriesareincorrectlyreplaced.Replaceonlywiththesameorequivalent
type.
WARNING:
•Donotdisposeofbatteriesinareortheymayleakand/orexplode.
•Thebatteryshallnotbeexposedtoexcessiveheatsuchassunshine,reorthelike.
GETTING STARTED

-7-
1) STANDBY/ON button
PresstoturnONtheunitorputitinSTANDBY
(OFF)mode.
2) TV/DTV button
PresstoswitchtoTV/DTVmode.
3) DVD/iPod button
PresstoswitchDVD/iPodmode.
4) Number (0 - 9) buttons
UsetochangetheTV/DTVchannels.
5) REVEAL button
Presstorevealanswersonaquizorgamepages
fromTeletext.
iPod RETURN button
PresstoreturntothepreviousmenuiniPod
mode.
6) MUTE button
Presstomutethesound.
Pressagaintocancelmute.
7) VOLUME (+/–) buttons
Presstoadjustthevolumelevel.
8) CURSOR ( , , , ) buttons
Presstohighlightselectionsonamenuscreen
andmakeadjustcertainsettings.
Press / buttontonavigatetheiPodmenulists.
ENTER•OKbutton
Press to confirm selections on a menu
screen.
9) MIX button
PresstoselectTeletextwithaTVprogramme.
EXIT button
Presstoexitthemenuandreturndirectlyto
normalviewing.
/ buttons
:Fastreverseplayback.
:Fastforwardplayback.
10) HOLD button
Presstostoptheautomaticpagechangefrom
Teletext.
PREV button
Presstoselectpreviouschapters,tracksortitles
onadisc.
11) ANGLE button
Presstoswitchthecameraangleofthevideo
presentationwhensceneswithmultiplecamera
anglesarerecordedonaDVD.
SIZE button
Presstosettheletterssizeofteletextonthe
screen.
12) SUBTITLE button
Press to select one of the subtitle languages
programmedonaDVD.
13) TITLE Button
Presstoselectthetitlemenuscreen.
14) GOTO button
Presstoskipdirectlytoaspeciclocationon
aDVD/CD.
15) button
PresstodirectlyselectMono/StereoorMono/
DualI/DualII.
16) TEXT button
PresstodirectlyselectsTeletextmode.
17) TIME button
EnterandexittheTIMEmenuatDTVchannel.
18) SLEEP button
Press to set the SLEEP timer.The unit will
remainONforthetimethatis set, and will
automaticallyshutoffafterwards.
19) MEMORY button
Presstoenterthenumberofaselectedchapter,
trackortitle.
20) CLEAR button
Press to clear input selections and cancel
certainplaybackfunctions.
21) REPEAT A-B button
Presstoperformpoint-to-pointrepeatplayback
onaDVDorCD.
REPEAT DISC button
Repeattitle/chapterofaDVD.
RepeatsingletrackorwholeCD.
REmOTE CONTROL REFERENCE GUIDE

-8-
22) FUNCTION button
Pressto switch betweenDTV,TV,AV1,AV2/
SCART,YUV/SCART,DVD,iPodorHDMI.
23) RADIO button
PresstoselectDTVdigitalradioprogrammes.
PressagaintoexittonormalDTVprogrammes
mode.
24) AV button
PresstoselectsourceconnectedtoAV1,AV2/
SCART.
25) LAST CH button
Presstoswitchrepeatedlybetweenthelasttwo
channelsdisplayed.
iPod SWITCH button
PresstobetweeniPod’s“RemoteUImode”and
“ExtendedInterfaceMode”.
26) TV MENU button
Presstodisplaytheon-screenTVmenu.
27) CH/PAGE / buttons
PresstochangetheTV/DTVchannels.
Presstogoforwardorbackwardthepageof
TeletextscreeninTVmode.
Pressto goforwardorbackwardthepage of
ProgrammeEdit&FavouriteinTV/DTVmode.
28) FAV button
PresstodisplaytheFavouritesprograminTV/
DTVmode.(Youshouldsetupyourfavourite
TV/DTVchannelsinProgrammeEditmenu.
NEXT button
Presstoselectnextchapters,tracksortitleson
adisc.
29) STOP button
Presstostopplayingadisc.
LIST button
Press to display the channel list inTV/DTV
mode.
PLAY button
Presstostartandresumeplaybackofadisc.
GUIDE button
PresstodisplaythePROGRAMMEGuidein
DTVmode.
PAUSE button
Press to pause playback and single frame
advanceonDVD(STEP).
INFO button
PresstodisplaythechannelinformationinDTV
mode.
30) SLOW button
PresstoplayaDVDinslow-motion.
INDEX button
Presstoselectthepagenumberoftheindex
fromTeletext.
31) AUDIO button
PresstoselectaudiosoundtracksofaDVDor
changetheoutputmodeofaCD.
CANCEL button
PresstocanceltheTeletextmenu.
32) DVD MENU button
Presstoenterthemainmenuofthediscyou
arewatching.
33) SETUP button
PresstoenterandexittheSETUPmenuofthe
DVDplayer.
34) SOUND button
Press to select from preset sound settings
(Standard,Music,Theatre,Voice,Personal)to
matchthetypeofshowyouarewatching.
35) DISPLAY button
Press to change disc status information
displayedonthescreen.
36) PICTURE button
Press to select from preset screen display
settings to match the type of show you are
watching (Standard, Movie, Dynamic, Soft,
Personal).
37) LCD MODE button
PresstosetthesizeofLCDdisplay.
38) RED/GREEN/YELLOW/BLUE button
Presstoselecttherelevantpagequicklyfrom
Teletext.
REmOTE CONTROL REFERENCE GUIDE

-9-
FRONT, REAR & SIDE VIEW
UNIT REFERENCE GUIDE
1) Colour LCD Screen
2) Speakers
3) Remote Sensor
Donotblockthissensorortheremotecontrol
willnotwork.
Standby Indicator
Indicates whether the unit is ON or in
STANDBY(OFF)mode.
Light On:TheunitisinSTANDBY.
Light Off: TheunitisturnedON.
4) Dock for iPod®
5) Tweeters
6) Disc Door
Pushgentlytoclosethediscdoor.
7) knob
Pushdowntoopenthediscdoor.
8) iPod woofer
9) Power Cord
10) PHONES jack
11) DVD VIDEO OUT jack
12) HDMI jack
13) SCART jack (AV IN 2)
14) AUDIO IN jacks (Left/Right) / VIDEO IN
jack (AV IN 1)
15) TV Antenna Cable terminal - Coaxial TV
antenna input
16) COMMON INTERFACE slot
17) / I button
Turnstheunitonandoff.
18) PLAY button
Presstostartorresumeplaybackofadisc.
19) MENU button
Presstodisplaytheon-screenTVmenu.
20) FUNCTION button
Select
DTV,TV,AV1,AV2/SCART,YUV/SCART,
DVD,iPodorHDMI
.
21) CH buttons
PresstochangetheTVchannelsandhighlight
selections (Up & Down) on the menu
screen.
button
Presstoselectnexttitles,chaptersortracks
onadisc.
button
Press to select previous titles, chapters or
tracksonadisc.
22) VOL +/ VOL – controls
Adjustthevolumelevel.

-10-
CONNECTING A TV ANTENNA/CABLE/SATELLITE
To view television channels correctly, a signal must be
receivedfromoneofthefollowingsources:
-Anindoororoutdooraerialantenna
-RFoutputofacablesystem
-RFoutputofasatellitesystem
Note:
Forreceivingover-the-airTVbroadcasts,werecommend
thatyouuseanexternalxedantenna.Shouldyourequire
the use of a temporary antenna, please ensure that you
purchase an antenna with sufcient ability to receive in
weaksignalareas.Onlywhenyouareincloseproximity
toatransmitterwillatemporaryantennareproduceasignal
asstronglyasaxedantenna.
CONNECTIONS
Satellite / Cable RF Out or
TV antenna cable to
TV ANTENNA CABLE Terminal
(cable not included)
CONNECTING THE POWER CORD
•ConnecttheACpowercordintoawalloutlet.
•Pressthe /Ibuttonontheunitorremotecontroltoturnontheunit.
Notes:
•BesuretheACpowercordisdisconnectedandthe
TVisswitchedoffbeforemakingconnections.
•Make sure that all the components are connected
correctly.
•Whenyouarenotgoingtousetheunitforalong
periodoftime,disconnectthepowercord.
•Theapparatusshouldnotbeexposedtodrippingor
splashingandthatnoobjectslledwithliquids,such
asvases,shouldbeplacedonapparatus.
•Themainsplugisusedasthedisconnectingdevice.
Itshouldremainreadilyaccessibleandshouldnotbe
obstructedduringuse.Tobecompletelydisconnected
fromthesupplymains,themainsplugoftheapparatus
shouldbedisconnectedfromthemainssocketoutlet
completely.
To AC Outlet

- 11 -
TURNING THE UNIT ON
WhentheACpowercordisconnected,pressthe /Ibuttonontheunittoturnit
on.PresstheFUNCTION buttontoselectthedesiredmode(DTV,TV,AV1,AV2/
SCART,YUV/SCART,DVD,iPodorHDMI).IfyouselectDVD,theDVDlogowill
appearonthescreen.
Note:
Whentheunitisnotgoingtobeusedforalongtime,disconnecttheACpowersupplycordfrom
walloutlet.
TURNING THE UNIT ON FOR THE FIRST TIME
Thersttimeyouturntheuniton,itwillgostraightintoAutoscanmode.Simplyfollowthescreen
promptsasbelowtotuneinthechannels.
1.Pressthe
ENTER•OK
buttontoacceptEnglishlanguage.
2.Pressthe
ENTER•OK
buttontoenterAutoTuningMenu.
3.Pressthe
ENTER•OK
buttontoacceptUKasCountry.
4.Press the
ENTER•OK
button to start tuning.The system will automatically scan and store all
availableprograms.
5.Afterscanninghasnished,theTVwilldisplaytherstprogramstored.
UNIT OPERATION

- 12 -
•Usethe , , , buttonselectaprogramme,theprogrammetimeandnamedisplays,pressthe
INFObuttontodisplaydetailedinformationifavailable.PresstheINFObuttonagaintoreturn.
•PresstheYELLOWbuttontohighlightprogrammedate,usethe / buttontodisplayinformation
forotherdates.
•PresstheENTER•OKbuttontowatchtheselectedchannel.
•PresstheEXITbuttontoexitthePROGRAMMEGUIDEmenu.
Note:
GuideinformationdisplaymaybedifferentaccordingtotheDTVprogrammes.
AUDIO LANGUAGE FOR DTV
WhilewatchingaDTVprogramme,youcanpressthe
buttontodisplaytheAudioLanguagemenu,andselectaudio
language,audioformatandsoundtrack.
•Usethe or buttontoselectanaudiolanguageoraudio
formatifavailable,pressthe or buttontoselectsound
trackbetweenL/R(Stereo),L/L(MonoLeft)andR/R(Mono
Right).PresstheENTER•OKbuttontoconrm.
•Pressthe orEXITbuttontoexittheAudioLanguage
menu.
Note:
ForanalogueTV,pressthe buttontoselectMono/
Stereo-DualI/IIdirectly.
ELECTRONIC PROGRAMME GUIDE (EPG) FOR DTV
WhilewatchingaDTVprogramme,youcanpresstheGUIDEbuttontodisplaythePROGRAMME
GUIDEmenu,andcheckforprogrammeinformation.
V1
UNIT OPERATION

- 13 -
TV SETTING MENU (only in ATV or DTV mode)
1.PresstheTV MENUbutton.
2.Usethe or buttontoselecttheTV SETTING.
3.Usethe or buttontoselecttheoptions(AutoTuning,
DTV Manual Tuning, ATV Manual Tuning, Programme
Edit, CI Information),presstheENTER•OKbuttonto
enterthesettings.
4.PresstheTV MENUbuttontoreturntopreviousmenu,
repeatstep3toselectotheroptions.
5.Toexitthesetupmenuandreturntothenormalscreen,
presstheEXITbutton.
•AutoTuning
Automatically scan, sort and store all available
programmes.
•DTVManualTuning
PerformmanualsearchforDTV(DigitalTV)programmes.
•ATVManualTuning
PerformmanualsearchandnetuneforATV(AnalogTV)programmes.
•ProgrammeEdit
AllchannelsstoredarelistedintheProgrammeEditmenu,youcaneditthechannelsbythefollowingsteps:
1.Usethe or buttontoselectachannel.(PresstheCH/PAGE / buttontoskiptoprevious/
nextpage.)
2.PresstheRED/GREEN/YELLOW/BLUEbuttonortheFAVbuttontoeditthechannel.
•DELETE
PresstheREDbuttontodeletetheselectedchannel,presstheENTER•OKbuttontoconrm.Press
theTV MENUbuttontostopdelete.
•RENAME (for ATV mode only)
PresstheGREENbuttontorenametheselectedchannel.Usethe
or buttontoselectthecharacterstorepresentthestationname,use
the or buttontomovethenextpositionofcharacter,presstheTV
MENUbuttontoconrm.
•MOVE (for ATV mode only)
PresstheYELLOWbuttonandusethe or buttontomovetheselected
channel,thenpresstheTV MENUbuttontoconrm.
•SKIP
PresstheBLUEbuttontoskipornotskiptheselectedchannel.
•FAV(Favourite)
PresstheFAVbuttontosetorcanceltheselectedchannelasoneofthe
favouriteprogrammes.
•CIInformation
DisplayCAMandSmartcardinformation;selectthelanguageifavailable.
Before you begin to you to use your DVB-TTV please note the
followingpoints:
1. YourcurrentAerialmaynotbesuitableforreceivingtheDigital
signal.
2. YourexistingAerialmaynotbepointinginthecorrectdirection.
3. Yourhousemaybesituatedinapoorreceptionareatoreceive
DigitalTV.
Allthesecausesmaypreventyoufromreceivingsomeorallthe
FreeviewChannels.
Ifyouarehavingdifculty,pleasecheckthefollowingwebsiteor
contactaqualiedAerialinstallationengineerforassistance.Your
TVisnotfaulty.
Youmayneedtoupgradeyourcurrentaerialifyouaretocontinue
receiving these channels reliably, or at all. Seek advice from a
RegisteredDigitalInstaller(RDI)whocarriesthedigitalticklogo(it
meanstheyhavebeentrainedandsecuritychecked).Ifyoucan’t
ndanRDIinstaller,lookforamemberoftheCAIoran‘associate
RDI’(whohasalsobeensecuritychecked).Otherwise,lookforan
installerfromanindustrytradebody,suchasIDSC.
Youshouldneveragreetohaveworkdonebysomeonewhocalls
withoutanappointmentanddoesn’tshowidentication.
Pleaseusethefollowingcontactinformationtocheckyoursignal
availability, either http://www.digitaluk.co.uk/postcodechecker or
http://www.freeview.co.uk/availability
Re-Tune
Intheeventyouexperiencealossofoneormorechannels,please
re-scan. The service provider may alter the program location
withoutpriornotice.
PleaseretunetheTVbeforecallingfortechnicalhelp.
DVB-T (Digital Video Broadcasting - Terrestrial)
TV / DTV SETUP
1Xxxxx Xxxxxxx
2Xxxxxxxx
3Xxxx Xxxxx
Programme Edit
DELETE
MOVE
SKIP
FAV
DTV
DTV
DTV
RENAME

- 14 -
PICTURE MENU
1.PresstheTV MENUbutton.
2.Usethe or buttontoselecttheoptions(Picture Mode,
Contrast, Brightness, Colour, Sharpness, Colour Temp),
adjustthemusingthe or button.
3.PresstheTV MENUbuttontoreturntopreviousmenu.
4.Toexitthesetupmenuandreturntothenormalscreen,
presstheEXITbutton.
•PictureMode
Selectfromfourpresetscreendisplaysettings(Standard,
Movie, Dynamic and Soft), or select Personal in which
yourownsettingsofContrast,Brightness,ColourandSharpnessarestored.
•Contrast
Adjustthecontrastofthepicture.Theblackportionsofthepicturebecomericherindarkness
andthewhitebecomebrighter.
•Brightness
Adjustthebrightnessofthepicture.
•Colour
Adjustthecolourofthepicture.
•Sharpness
Adjustthesharpnessleveltoimprovedetailinthepicture.
•Colour Temp
Selectthecolourtemperatureofthepicture.SelectNormal(balanced)/Warm(redwhite)/Cold
(bluewhite)mode.
Note:You can also select Picture Mode simply by pressing the PICTURE button on the remote
control.
TV / DTV SETUP
SOUND MENU
1.PresstheTV MENUbutton.
2.Usethe or buttontoselecttheSOUND.
3.Usethe or buttontoselecttheoptions(Sound Mode,
Treble, Bass, Balance), adjust them using the or
button.
4.PresstheTV MENUbuttontoreturntopreviousmenu.
5.Toexitthesetupmenuandreturntothenormalscreen,
presstheEXITbutton.
Experiment with different sound settings until you find the
settings you prefer.
•SoundMode
Selectfromfourpresetsoundsettings(Standard,Music,TheatreandVoice),orselectPersonalin
whichyourownsettingsofTreble,BassandBalancearestored.
•Treble
Adjustthetreblerange.
•Bass
Adjustthebassrange.
•Balance
Adjustthebalanceleveltowardtheleftorrightspeakers.
Note:YoucanalsoselectSoundModesimplybypressingtheSOUNDbuttonontheremotecontrol.

-15-
TIME MENU
1.PresstheTV MENUbutton.
2.Usethe or buttontoselecttheTIME.
3.Use the or button to select the options (Clock,
Sleep Timer, Time Zone),adjustthemusingthe or
button.
4.Press the TV MENU button to return to previous
menu.
5.To exit the setup menu and return to the normal
screen,presstheEXIT button.
•Clock
Press the ENTER•OK button to enter the Clock menu, use the , , , button to set Date,
Month,Year,HourandMinute.
Note:IfyouwatchDTV,theclockwillbeautomaticallyset.
•Sleeptimer
SelectthetimetoturntheunittoStandbymodeautomatically:Off->5min----->90min->
120min.
•TimeZone
Selectyourtimezone.
TV / DTV SETUP
SETUP MENU
1.PresstheTV MENUbutton.
2.Usethe or buttontoselecttheSETUP.
3.Usethe or buttontoselecttheoptions(Language,
Audio Language, Subtitle Language, Restore Setting),
adjustthemusingthe or button.
4.PresstheTV MENUbuttontoreturntopreviousmenu.
5.Toexitthesetupmenuandreturntothenormalscreen,
presstheEXITbutton.
•Language
SelectyourpreferredOnScreenDisplaylanguage.
•AudioLanguage
Selectyourpreferredaudiolanguage.(Availablefordigitalchannelsifmultipleaudiolanguages
arebroadcasted.)
•SubtitleLanguage
Selectyourpreferredsubtitlelanguageorturnoffsubtitle.(Availablefordigitalchannelsifmultiple
subtitlelanguagesarebroadcasted.)
•RestoreSetting
PresstheENTER•OKbuttontorestorethesystemsettingstothefactorydefault.

-16-
LOCK MENU
1.PresstheTV MENUbutton.
2.Usethe or buttontoselecttheLOCK.
3.PresstheENTER•OKor buttontoenter,enterpassword
toproceed.
(Thedefaultpasswordis8888.)
4.Usethe or buttontoselecttheoptions(Lock System,
ChangePassword, BlockProgramme, ParentalGuidance),
presstheENTER•OKor or buttontoadjust.
5.PresstheTV MENU buttontoreturntopreviousmenu.
6.Toexitthesetupmenuandreturntothenormalscreen,
presstheEXITbutton.
•LockSystem
Selecttolockorunlocktheprogrammes.
•ChangePassword
Ifyouchangethepassword,rememberyourpassword.
•BlockProgramme
EntertheBlockProgrammemenu,pressthe or buttontoselectachannel,presstheGREEN
buttontochangeLockorUnlockthechannel.
•ParentalGuidance
Selectacensorshipleveltocensorandblocktheprogrammes.(Off,level4,...,level18)
Note:ThissystemwillonlyworkifthecorrectinformationistransmittedbytheTVchannel.
If you forget the password, enter
" 8888 " to unlock parental
control.
TV / DTV SETUP

-17-
TELETEXT
TeletextisaninformationsystemthatdisplaystextonyourTVscreen.UsingtheTeletextcontrol
buttonsyoucanviewpagesofinformationthatarelistedintheteletextindex.
AnalogueandDigitalTeletextslookverydifferentandoperatedifferently.
Please Note
Teletextisonlytransmittedonsomechannels.YouwillonlybeabletoenterTeletextonthese.
TO ENTER TEXT MODE
ForAnaloguetext,presstheTEXTbuttoninATVmode.
Fordigitaltext,presstheTEXTbuttoninDTVmode.Thetextpagewillappear,normallytheindexpage.
TO EXIT TEXT MODE
PresstheTEXTbutton.TheTVwillreturntothechannelyouwerewatching.
TO SELECT A PAGE OF TEXT
FindthenumberofthepageintheindexandenteritusingtheNumericbuttons.Thenumberof
thepagewillappearonthetopleftcornerofthescreen.
Thepagecounterwillsearchforyourpage.Whenitndsit,thepagewillbedisplayed.
Tomovetothenextpageoftext,presstheCH/PAGE button.
Tomovetothepreviouspage,presstheCH/PAGE button.
Toreturntotheindexpage,enterthe“100”byusingtheNumericbuttons.
ForDigitalTextyoucanalsousethe , andMENUbuttonstoselectpages.
FASTEXT
Atthebottomoftheteletextscreenisarowofsubjectheadingsinred,green,yellowandblue.
Theremotecontrolhasarowofcolourbuttonscorrespondingtotherowofcolouredsubjectsonthescreen.
Pressing one of the colour buttons will take you directly to the page corresponding to the subject
heading.
ANALOGUE TEXT ONLY:
MIX
ToviewapageofthetextwhilstwatchingaTVprogrammepresstheMIXbutton.Thetextwillbe
superimposedovertheTVprogramme.PresstheMIXbuttonagaintoreturntothetextpage.
PAGE SEARCH WHILST WATCHING TV
InTextmodepresstheCANCELbutton.
EnterthepagenumberyouwantusingtheNumericbuttons.
Thetoplineofthetextpagewillappearwhilstthetextsearchesforyourpage.Whenthepageis
foundthenumberwillremaininthetoplefthandcornerofthescreen.
DOUBLE HEIGHT TEXT
IfyouhavedifcultyreadingthetextontheTVyoucandoubletheheightofthetext.
PresstheSIZEbutton.Thetophalfofthepagewillbedisplayedindoubleheighttext.
PresstheSIZEbuttonagain.Thebottomhalfofthepagewillbedisplayedindoubleheighttext.
PresstheSIZEbuttonagaintoreturntothefullpage.
PAGE STOP
Ifthe pageoftextyouhaveselectedcontainssubpages,thesesub pageswillautomatically be
displayedinorderwithadelaytoallowyoutoreadthepage.
Tostopthemovetothenextsubpage,presstheHOLDbutton.“ ”willappearonthetopleft
cornerofthescreen.
Tocontinuemovingthroughthesubpages,presstheHOLDbuttonagain.
TO REVEAL INFORMATION
PresstheREVEALbuttontorevealconcealedinformation(quizanswersetc.).
PresstheREVEALbuttonagaintoconcealtheinformationagain.

-18-
COMMON INTERFACE
TheunitisequippedwithaCIslot.TheCIslotallowsyoutoinsertaCAM(ConditionalAccess
Module)withanappropriatesubscriptioncardforsomepayforviewservices.
ItisrequiredtosubscribetoapaychannelcompanytoviewthepaychannelsoftheDigitalTerrestrial
broadcasting.
FullyinserttheCAM(ConditionalAccessModule)intotheCI(CommonInterface)slotontheside
oftheunitwithitslabelsidefacingyou.
Important notes:
•SwitchofftheTVandunplugfromtheACpowermainsbeforeinsertorremovetheCAM.
•TheCAMshouldbecorrectlyinserted,itisimpossibletoinsertfullyifreversed.TheCAMorthe
TV terminal may be damaged if the CAM is forcefully inserted.
•SomeCAMsmayrequiresettingup.Refertothemoduleinstructionmanualfordetailsofthe
settings.
CONNECTINGTO SOURCESWITH SCART
DeviceswithRGBoutputmustbeconnectedto
theSCARTinput:
Connects the SCART from the source to the
correspondingSCARTonthisunit(SCARTcable
notincluded)asshown.
Make sure you connect both to SCART to
SCART.
Tooperatetheconnecteddeviceandplaythe
source,rstpresstheFUNCTIONorAV button
toselecttheAV2/SCARTmode.
CONNECTING TO DEVICES WITH A COMPOSITE (YELLOW RCA-TYPE) VIDEO OUTPUT
ToconnecttoA/VdevicessuchasaVCR,camcorderorvideogamesystem.
- Connect to a VCR / Video Game System /
Camcorder
Connect theAUDIO /VIDEO cable (not
included)asshown.
Make sure you connect the cable from the
other equipment (AUDIO and VIDEO OUT)
tothisunit(AUDIOandVIDEO IN).Pressthe
FUNCTIONorAVbuttontoselectAV1mode.
Note:
Please refer to the instruction manual for the
otherequipmentformoreinformation.
ToAUDIO/VIDEOOUTjacks
ToAUDIO/
VIDEOINjacks
(AV IN 1)
SCART
CABLE
If your VCR permits, then connect your
antenna to your VCR and VCR RF to your TV
CONNECTIONS

-19-
Note:
Whenconnectinga DVDplayertothe television, thepictureresolutionisdependentupon the
resolutionofboththeDVDplayerandtheTV.Forbestresults,selectthehighestresolutionofthe
DVDuptotheTVmaximumof1080i.
CONNECTING A HIGH-DEFINITION (HD) SOURCE (YUV)
High-Denition(HD)DeviceswithcomponentvideooutputmustbeconnectedtotheYUVinput.
Connectthecomponentvideocableandaudiocable(notincluded)asshown.
MakesureyouconnecttheYUVScartadaptortothisunit,thenconnectcomponentvideocable
andaudiocablefromtheotherequipment(COMPONENT VIDEO OUT and AUDIO OUT)tothis
unit(SCARTandAUDIO IN).
Tooperatetheconnecteddeviceandplaythesource,rstpresstheFUNCTIONbuttontoselect
theYUV/SCARTmode.
*May require a subscription
for receiving HD channels.
Checkwithyourcable/satellite
serviceproviderfordetails.
ToAUDIO
INjacks
ToAUDIOOUT
jacks
YUVSCART
adaptor
(included)
ToCOMPONENT
VIDEOOUTjacks
ToSCART
jacks
CONNECTIONS
USING HEADPHONES
•Turndownthevolumebeforeconnectingheadphones
totheunit,thenadjustthevolumetoyourdesired
level.
•When headphones are connected, no sound will
comefromthefrontspeakers.
Note:
•Avoidlisteningtosoundathighlevelsforprolonged
periodsoftime.Thismaybeharmfultoyouandmay
causehearingloss.
Earphones / Headphones
(1/8”[3.5mm]diameterplug)

-20-
DOLBY DIGITAL (For DVD)
Dolby Digital is a sound system developed by Dolby Laboratories Inc.This unit automatically
recognizesDVDsthathavebeenrecordedwithDolbyDigital.
NotallDolbyDigitalsourcesarerecordedwith6channels.
SomesourcesmarkedDolbyDigitalmayberecordedinDolbySurround,a2channelsystem.Look
forthislogoonyourunit.
ManufacturedunderlicensefromDolbyLaboratories.
“Dolby”andthedouble-DsymbolaretrademarksofDolbyLaboratories.
CONNECTING HDMI
HDMI(HighDenitionMultimediaInterface)supportsbothvideoandaudioonasingledigital
connectionforusewithDVDplayers,DTV,set-topboxesandotherdigitalAVdevices.HDMIwas
developedtoprovidethetechnologiesofHighBandwidthDigitalContentProtection(HDCP)as
wellasDigitalVisualInterface(DVI)inonespecication.HDCPisusedtoprotectdigitalcontent
transmittedandreceivedbyDVI-compliantorHDMI-compliantdisplays.
HDMIhasthecapabilitytosupportstandard,enhancedorhigh-denitionvideoplusstandardto
multi-channelsurround-soundaudio.HDMIfeatureincludeuncompresseddigitalvideo,abandwidth
ofupto2.2gigabytespersecond(withHDTVsignals),oneconnector(insteadofseveralcablesand
connectors),andcommunicationbetweentheAVsourceandAVdevicessuchasDTVs.
HDMI,theHDMIlogo andHigh-Denition
Multimedia Interface are trademarks or registered
trademarksofHDMIlicensingLLC.
ConnecttheHDMIcable(notincluded)asshown.
Makesureyouconnectthecablefromtheequipment
(HDMI OUT)tothisunit(HDMI IN).
Tooperatetheconnecteddeviceandplaythesource,
rstpresstheFUNCTIONbuttontoselecttheHDMI
mode.
Note:
ItisnotrecommendedtouseHDMIcableslongerthan
2masthismayaffecttheHDMIperformance.
SOUND SYSTEm
CONNECTIONS
To HDMI IN jack
HD SOURCE
with HDMI
output
This manual suits for next models
1
Table of contents
Other Alba TV DVD Combo manuals