Kogan KALED16DVDYA User manual

KALED16DVDYA
USER MANUAL

Contents
-2-
SAFETY AND WARNINGS.............................................................2-4
BASE STAND .........................................5
INSTALLATION.............................................................................6-9
REMOTE CONTROL.................................................................10-11
OPERATION.............................................................................12-17
DVD OPERATION......................................................................18-21
DVD TROUBLE SHOOTING............................................................22
TROUBLE SHOOTING................................................................... 23
TECHNICAL SPECIFICATIONS.......................................................24
ASSEMBLY INSTRUCTION
WALL MOUNTING INSTALLATION GUIDELINES...............................5

-3-
SAFETY AND WARNINGS
Important Safety Instructions
Warning: To reduce the risk of electric shock, do not remove the cover or back. There are
no user-serviceable parts inside. Refer servicing to qualified personnel.
Warning: To prevent fire or electric shock hazard, do not expose the unit to rain or
moisture.
Do not expose the Adaptor and product to water (dripping or splashing) and no objects
filled with liquids, such as vases, should be placed on the unit.
Keep the product away from direct sunlight and heat source such as radiators or stoves.
Do not block the ventilation openings. Slots and openings on the unit are provided for
ventilation. The openings should never be blocked by placing your product on a cushion,
sofa or other similar surface.
Do not place the product on unstable cart, stand, tripod, bracket or table. The unit may fall,
resulting in possible damage or injury.
Never place heavy or sharp objects on the panel or frame.
Only use the AC adapter included with product. Using any other adapter will void your
warranty.
Unplug the power from the outlet when the unit is not in use.
Attention should be drawn to the environmental aspects of battery disposal.
WARNING: The battery (battery or batteries or battery pack) shall not be exposed to
excessive heat such as sunshine, fire or the like.
WARNING: Excessive sound pressure from earphones or headphones can cause
hearing loss.
WARNING: Only use attachments/accessories specified provided by the manufacturer,
the product is supplied by AC adapter, the AC adapter is used as disconnect device, the
disconnect device shall remain readily operable.

-4-
High voltages are used in the operation of this
television receiver. Do not remove the cabinet
back from your set.
Refer servicing to qualified service personnel.
To prevent fire or electrical shock hazard, do not
expose the television receiver to rain or moisture.
Do not drop or push objects into the television
cabinet slots or openings. Never spill any kind
of liquid on the television receiver.
Do not block the ventilation holes in the back
cover.
Adequate ventilation is essential to prevent
failure of electrical components.
Do not trap the power supply cord under the
television receiver.
Never stand on, lean on, or suddenly push the
television or its stand. You should pay special
attention to children. Serious injury may result if it
falls.
Do not place your television on an unstable cart,
stand, shelf or table. Serious injury to an individual,
and damage to the television may result if it falls.
When the television receiver is not used for an
extended period of time, it is advisable to
disconnect the AC power cord from the AC outlet.
Avoid exposing the television receiver to direct sunlight
and other sources of heat. Do not stand the television
receiver directly on other products which give off heat,
e.g. video cassette players and audio amplifiers. Do not
place naked flame sources, such as lighted candles on
the television.
If the television is to be built into a compartment or similar
enclosure, the minimum distances must be maintained. Heat
build-up can reduce the service life of your television, and
can also be dangerous.
Dim:515*320mm(不包括底座)
SAFETY AND WARNINGS

-5-
INSTALLATION
Base Stand Assembly Instruction
1. Place the TV with the display side down
on a flat surface. Use a cloth to protect screen.
Locate the bottom of the stand.
2. Fix the bottom with turning the screw
tightly on the stand.
WALL MOUNTING INSTALLATION GUIDELINES
For wall mounting with the optional bracket, please read the following instruction and the bracket
instruction. Make sure qualified service personnel perform the operation.
KOGAN bears no responsibility for improper mounting that results in accident or injury.
This television can be wall mounted as follows:
1.Place the LED LCD Television onto a solid surface. Please place some soft material over the
front of the screen to protect it from any damage.
2.Remove the screws from the lower part of the television, where the base joins to the
TV, and take away the stand (put the stand somewhere safe for future use).
3.Use the four screws provided to fix the TV onto a wall mounting bracket (not included) via the
four VESA standard holes on the back of the television.
100 mm
100 mm

INSTALLATION
-6-
Front panel
KEYBOARD
1.SOURCE:
Displays the input source Menu.
2.MENU:
Displays the main MENU.
3.CH+/CH-
In TV mode, press "CH+" or "CH-" to change the channel up or down.
In MENU mode, press "CH+" or "CH-" to select items.
4.VOL+/VOL-
Adjusts the sound level.
In MENU mode, press "VOL+" or "VOL-" to adjust the item that you have selected.
5. STANDBY
Once the TV's main power switch has been activated, press this button to turn the
unit ON from STANDBY mode.
Press it again to return the set back to STANDBY.
30 3 0
1: Remote control sensor.
2: Indicator LED:
BLUE = POWER ON.
RED = Stand-by.
3: Keyboard (on side of TV).
SOURCE
MENU
CH+
CH-
VOL+
VOL-
STANDBY
3
1
2

-7-
INSTALLATION
STEPS:
PC
Be sure both the TV and computer are
set to Power off.
1.Connect VGA and audio cable.
2.Connect the power cord.
3.Power on the TV, switch to PC mode.
4.Power on the PC.
This sequence is very important.
ANTENNA
Note:
Aerial connections: IEC(female).
Input impedance: 75 unbalanced.
REAR AV Connections
All the terminals are(from left to right):
, Audio input, Power socket, YPbPr (component video) input,
HDMI2 input.
Note: 1. AV and YPbPr share one audio channel.
2. When the HDMI2 port receives a DVI signal, the audio signal is received from the
YPbPr/AV Audio channel.
AV composite video input
REAR AV Connections(SIDE)
All the terminals are(from left to right):
HDMI1 input, USB, PC Audio input, (composite video and audio) VGA input,
Note: When HDMI1 receives a DVI signal, the audio signal is received from the PC
Audio channel.
AV output ,
Antenna socket.
USB PC AUDIO VGA RF
HDMI1 AV LR
AV OUTPU T
USB PC AUD IO VGA R F
HDMI1 AV LR
AV OUTP UT
AV L R Y Pb Pr
HDMI2
POWER

-8-
PRESET MODE
PC
INSTALLATION
1
2
3
4
5
6
7
720*400
640*480
800*600
800*600
800*600
1024*768
1024*768
70
60
56
60
72
60
70
31.47
31.47
35.156
37.88
48.08
48.36
56.48
RESOLUTION V.Freq.(Hz) H.Freq.(KHz)
AV L R Y Pb Pr
HDMI2
POWER

-9-
INSTALLATION
You can use the input terminals on TV set rear as follows.
AV EQUIPMENT
Yellow (video)
White(audio L)
Red(audio R or Pr)
Y
W
R
W R
GBR
Blue(Pb)
Green(Y)
B
G
VIDEO EQUIPMENT with YPbPr (component) output
WR
GBR
WR
W R
It can be connected to the following appliances: VCR, multi disc player, DVD, camcorder, video
game or stereo system, etc.....
YPbPr can support these video formats: 480i,576i,480p,576p,720p,1080i.(component video)
HDMI
TO AUDIO OUTPU TS
VIDEO EQUIPMENT with Composite output
TO VIDEO
OUTPUTS
HDMI
W
R
W R
TO AUDIO INPUTS
VIDEO EQUIPMENT
TO VIDEO
INPUTS
USB PC AUDIO VGA RF
HDMI1 AV LR
AV OUTP UT
AV L R Y Pb Pr
HDMI2
POWER

-10-
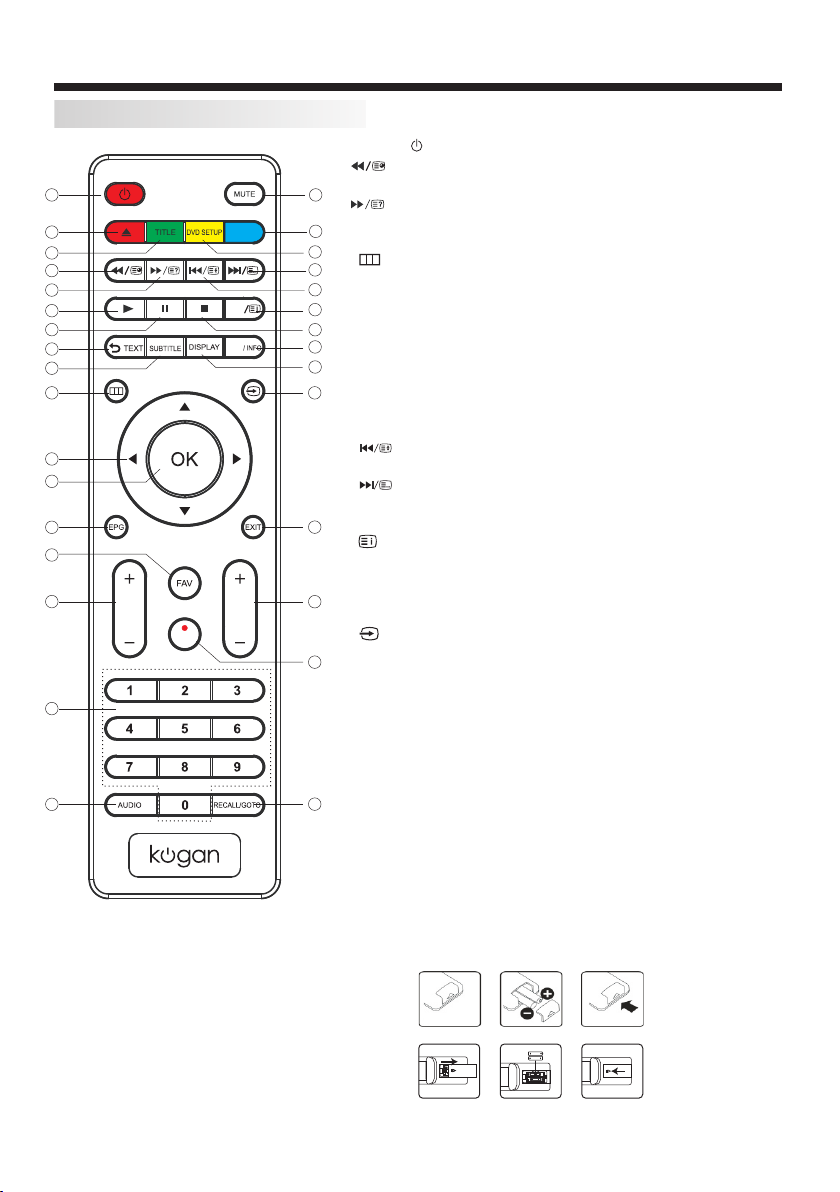
REMOTE CONTROLREMOTE CONTROL
REMOTE CONTROL
1:POWER :To set the TV to standby or power on.
4: : In DVD mode(if available),or in USB mode, used as
reverse key, in teletext mode used as subpage key.
5: : In DVD mode(if available),or in USB mode, used as
forword key, in teletext mode used as reveal key.
8.TEXT: To enter or exit TELETEXT.
10: : Displays the main on-screen menu.
11:CURSOR: To move within the menu.
12:OK: Confirms selection.
13:EPG: To display information about the program being viewed
and what's on next in DTV mode.
14:FAV: To access your favourite channels list in TV or DTV mode.
15:VOL+/- : To adjust sound level.
16:NUMERIC KEY: For direct access to channels.
17:AUDIO: To select the available audio language of TV programs .
18:MUTE: To disable or enable the sound output.
21: : In DVD mode(if available),or in USB mode, used as
previous key, in teletext mode used as hold key.
22: : In DVD mode(if available),or in USB mode, used as
next key, in teletext mode used as list key. In TV/DTV mode,used
as channel list key when without TTX function.
23: : In teletext mode used as index.
25:MENU/INFO: During DVD playback, press MENU to display the
disc menu of the current title. During VCD/SVCD playback,press
MENU to control PBC ON/OFF. In DTV mode used as info. In USB
playback mode, provides control tab at bottom of screen.
27: : Press to display and select the available video input sources.
28:EXIT: To return to the previous menu or exit menu.
29:CH+/CH-: To access the next or previous channels.
31:RECALL/GOTO: DTV Mode:RECALL:Jumps to last channel viewed.
DVD Mode(if available):GOTO:Allows direct chapter/Title/Track/time
Note:
30:REC/REP: Press to record the TV program you are watching in
DTV Mode or In USB mode, select Repeat mode.
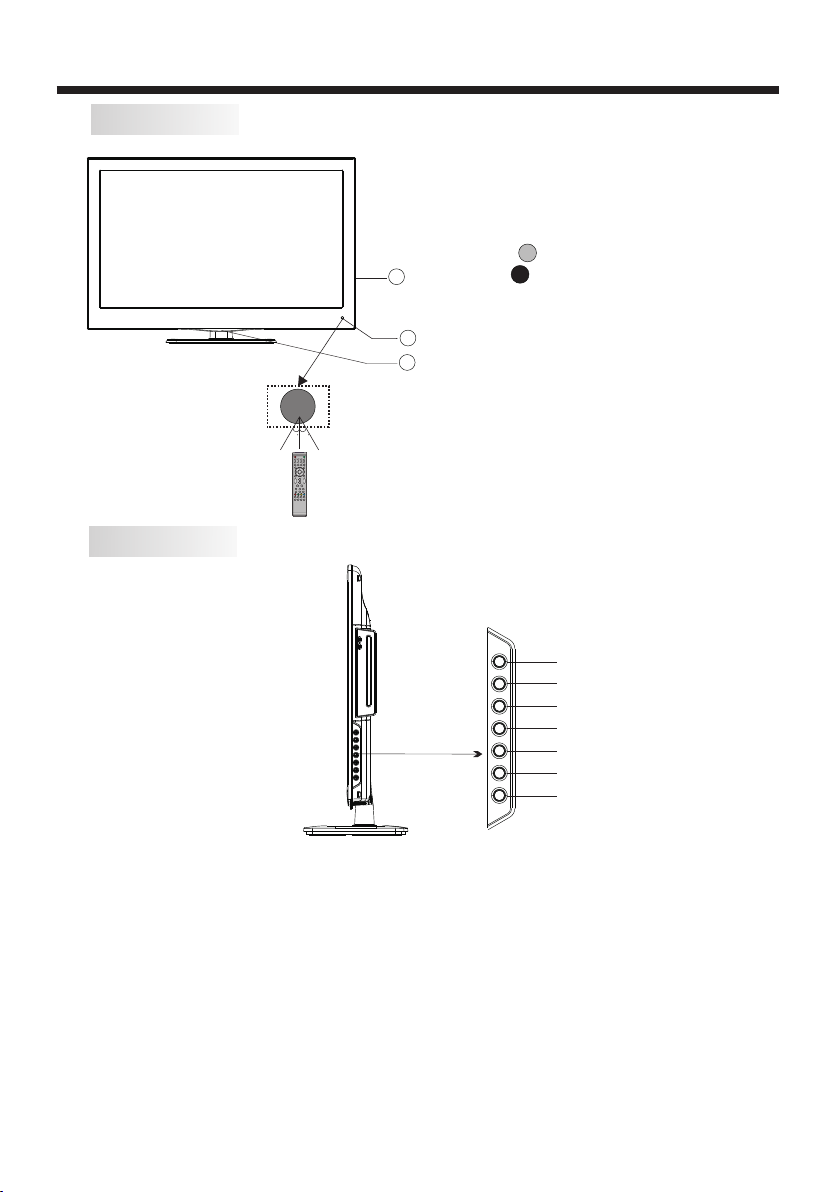
Remote Control Battery Installation
The remote control requires two AAA batteries. Below are steps to
assist you with replacing the batteries.
1.Open the back cover of the battery compartment.
2.Install the batteries into the battery tray. There are +/- polarity
markings in the battery compartment. Please ensure the battery
polarity is correct.
3.Close the battery cover.
There are two battery cover types that may be used, Please
refer to picture 1 or picture 2 as Remote control at your hand.
Picture 1:
Picture 2:
1
VOL CH
2
4
5
7
6
8
9
10
11
12
13
15
14
16
17
3
18
19
20
21
22
23
24
25
26
27
28
29
30
31
MENU
/
ANGLE
REP
A-B

-11-
REMOTE CONTROL
TELETEXT
TEXT
SELECTING A PAGE
DIRECT ACCESS
TO THE ITEMS
INDEX
SUB PAGE
HOLD
REVEAL
Press: You will obtain :
LIST
Enter the number of the page required using the 0 to 9 up/down.
Example: page 120, enter 120. The number is displayed top left, the
counter turns and then the page is displayed. Repeat this operation to
view another page. If the counter continues to search, this means
that the page is not transmitted. Select another number.
Coloured buttons correspond to the colours at the bottom of the
screen. The 4 coloured keys are used to access the items or
corresponding pages. The coloured areas flash when the item or the
page is not yet available.
This returns to the contents page (usually page 100).
Certain pages contain sub-pages which are automatically
displayed successively. This key is used to stop or resume sub-
page acquisition. The indication appears top left.
To freeze the page.
To display or hide the concealed information (games solutions).
The user can set four favourite pages to be directly linked to the four
color keys. While list mode is activated, it is not possibility to use TOP
or FLOF navigation with the colourkeys. The favourite page numbers
should be stored and restored to/from nonvolatile memory for each
channel by the system software.
This is used to call or exit teletext modes. The summary appears with
a list of items that can be accessed. Each item has a corresponding
3 digit page number. If the channel selected does not broadcast
teletext, the indication 100 will be displayed and the screen will
remain blank (in this case, exit teletext and select another channel).
Teletext is an information system broadcast by certain channels which can be
consulted like a newspaper. It also offers access to subtitles for viewers with hearing
problems or who are not familiar with the transmission language (cable networks,
satellite channels, etc.)

-12-
OPERATION
Installation Guide
Press to select country at first, then press the OK button to start auto tuning.
This screen only appears when the TV is turned on for the first time, or reset to factory settings. You can
choose language, country and auto tuning programs. After tuning, the screen will skip to the first DTV program.
1.CHANNEL MENU
The first item of the MENU is channel menu (for ATV or DTV source only). ATV = Analogue TV, DTV = Digital TV.
You can search channels and edit programs here.
1).Auto tuning:
Search all the channels automatically (you can select ATV and DTV)
ATV Manual Tuning
Programme Edit
Signal Information
< >
CHANNEL
Auto Tuning
DTV Manual Tuning
Software Update(USB)
Software Update(OAD)Off
Dansk
Deutsch
Hrvatski
Italiano
Please select an OSD Language
OK
Magyar
Nederlands
Norsk
PolskiEnglish
Cesky
E ka
Espanol
~
Fran ais
Portugues
Pycck
Austria
Belgium
Country
OK
Australia
Croatia Finland Greece Luxembourg
Czech France Hungary Netherlands
Bulgaria Denmark Germany Italy
Tune Type DTV+ATV
MENU
Austria
Belgium
Australia
Croatia
Czech
Bulgaria
Finland
France
Denmark
NOTE:
All the channels including ATV, DTV and Radio can be tuned at once, if the Tune Type is set to DTV+ATV.
Any previously stored channels will be deleted after auto tuning is carried out.
After auto tuning, the receiver will skip to the first DTV channel.
Channel Tuning
TV : 0 Programme(s)
DTV : 0 Programme(s)
Radio : 0 Programme(s)
96% UHF CH 68 DTV
To select the MENU mode, press the menu button on the side keyboard of the TV, or press the TV/menu button
on the remote control.

2).DTV Manual tuning:
You can select a DTV channel then find the program in this channel.
Press to select the channel, then press OK to search the programs .
OPERATION
NOTE:
The Bad Normal Good bar graph on this screen shows signal intensity.
3). ATV Manual tuning :
You can change the sound system, search the analog TV channels and fine tune them, then store the
channels you selected.
ATV Manual Tuning
Storage To 1
System BG
Current CH 1
Search
Fine-Tune
Frequency 255.25 MHz
Save MENU
_+
DTV Manual Tuning
VHF CH 5
_+
Bad Nomal Good
Press OK to search
NOTE:
Press the teletext red button on the remote control to store the channels after manual tuning.
4). Program edit:
You can Delete, Rename, Move, Skip, or FAV most TV programs.
-13-
Rename:
You can only rename ATV programs.
Move the cursor to the program, press the teletext green button to rename the program.
Press to choose the character. Press to move the cursor .
Press MENU button to exit edit, Press EXIT to exit the menu.
Note: ATV program names can only be 5 characters long, DTV program names can be up to 25 characters.
Press to choose the program, press the teletext blue button to skip this program, the symbol will
show on the right side of the program.
Choose the skipped program, press the blue button again, you can cancel the skip and the symbol will
disappear.
Delete
Press the teletext red button, the program in the cursor will be deleted.
Use the Arrow Buttons to select the channel you wish to move. Then press the Yellow Button to select
Move function. Once active use the Arrow Buttons to move and then press OK to confirm.

-14-
OPERATION
Favourite
Press to choose the program, press the FAV button and it will show on the right side of the program.
Choose the FAV program, press FAV button again, you can cancel the FAV and will disappear .
Once your favorite group is created, you can press the FAV key to quickly access your favourite channel.
The second item of the MENU is PICTURE MENU.You can adjust picture effects here, such as contrast,
brightness, etc.
Press to move, press OK to adjust.
2. PICTURE MENU
Color Temperature
Aspect Ratio
Noise Reduction
Screen
Picture Mode Standard
< >
PICTURE
MENU
Picture Mode Standard
Contrast 50
Brightness 50
Color 50
Sharpness 50
Tint 50
Color Temperature Medium
Red 50
Green 50
Blue 30
MENU
NOTE:
1).Tint is available in NTSC system only.
2).There are four color temperature modes that can be selected: medium, warm, cool, user.
3).The Screen option is only available in PC mode, which allows you to adjust Horizontal position, vertical
position, size and phase.
3.SOUND MENU
The third item of the MENU is the SOUND MENU.
You can adjust the sound effect here such as treble, bass, balance etc.
Press to move, press OK to adjust.
< >
Balance
Auto Volume
Sound Mode Standard
SOUND
Note:
Auto volume: only available when the input signal volume is too large or there is distortion.
4.TIME MENU
The fourth item of the menu is the TIME MENU. You can adjust the clock, power on/off time, sleep time etc
Press to move, press OK to adjust.
NOTE:
If within 15 minutes there is no signal, the TV will auto sleep, if Auto Sleep is set ON. The clock time can be
set from the DTV system.
Off Time
On Time
Sleep Timer
Auto Sleep
Time Zone
Clock -- -- -- --
TIME
< >

< >
PVR File System
OSD Language English
OPTION
Audio Languages
Subtitle Languages
Country Australia
Restore Factory Default
Check PVR File System Start
USB Disk
Format
Time Shift Size
Speed
Free Record Limit 6 Hr.
Select Disk C:
In PVR File System Menu you will be asked to format your USB Disk or Hard Disc for PVR Operation.
Select Disc
To view and select the USB file or the allocated space on your Hard Disc that you would like to record to,
press OK button to enter the Select Disc Sub- Menu and then press or buttons on your remote control
to select the particular partition/file for recording.
Press the Menu Button to return to the Main Menu.
Check PVR File System
Press the OK Button to start checking the file system of your USB storage or Hard Disk. Once Success
is shown after checking, you will then be able to begin recording or or use Time Shift function. If FAIL is
shown after checking, you then need to format your USB or Hard Disc and to be able to record or use
Time Shift.
Format
When you format your USB or Hard Disc partition any saved data will be lost. Please ensure
that you start with a blank partition on your Hard Disc to ensure you don't lose any data.
PVR File System Type
There are two types of format s: FAT32 and Hi Speed Format. You can press or buttons to choose
the type of formatting. If FAT32 is selected, you will have to format whole size of your USB or the
allocated partition for recording. If Hi Speed Format is selected, you will then be able to press or
buttons to select the size you wish to use (for example 1G, 10G, 20G... or All). Once a particular size is
booked for recording, you will be able to use the remaining space of your USB or Hard Disc for other data
storage.
Please note no matter which size is booked for recording, all the data in the allocated partition of the
Hard Disc will be lost after formatting.
Speed
This will show the supported speed of recording.
Record Limit
This will show the approximate time you will be able to record on to your USB or Hard Disc.
File System Size
PVR File System Type FAT32
MENU
PVR File System Size All
SD 13 Mins
HD 3 Mins
-15-
OPERATION
5.OPTION MENU
To enter the Option Menu, press MENU button and then press or buttons to select the Option Menu.
Once in Option Menu, press or buttons to select the settings you wish to adjust. Press MENU button
to return to the Main Menu.
NOTE:
Restore Factory Default will clear all the programs and password.

OPERATION
Press the OK button to enter the basic DMP (Digital Media Player) Menu and then use the or buttons
on the remote control to select the file playback type (eg. Photo, Music, Movie, Text), then press OK. You
can preview a selected file by highlighting it using the cursor arrows and pressing OK. Press the play
button to show it in full-screen size. Press the MENU/INFO button to bring up a controls tab at the bottom
of the screen, allowing easler control of play, pause, stop and repeat modes. Press the EXIT button to
progressively return back to the DMP menu.
PHOTO MUSIC MOVIE TEXT
6.LOCK MENU
To enter the LOCK Menu, press MENU button and then press or buttons to select the LOCK Menu.
The default password is 6666.
Please set a new password so it is easy to remember. Follow the on screen steps to set.
Set Password
Lock System
LOCK
< >
Block Program
Parental Guidance Off
7. APPLICATIONS MENU
To enter the Applications Menu, press MENU button and then press or buttons to select the
Applications Menu. This is where you will be able to view and play various low data-rate USB media files.
< >
APPLICATIONS
DMP
The supported formats are as below:
Photo: JPEG (Press Play to start slideshow. For best results use 1920 x 1080 pixel images).
Music: MP3
Movie: Small AVI files (Not all .AVI formats are supported).
Text: TXT (eg. Windows Notepad).
Once the Parental Guidance mode is turned on, you can set viewing restrictions during DTV TV reception
based on the programs classification (eg. G, PG, M, MA etc).
NB. The viewing restrictions do not apply to the DVD player.
FACTORY RESET NOTE:
If you wish to reset your TV, please select the Restore Factory Default option, this will clear all settings.
-16-

OPERATION
-17-
Schedule List 04:55 28th Apr Delete
Time Date Programme Title Channel Name
3.
Press the Blue Button to book a program for future viewing and add to the schedule list.
Remind
802 SZTVM03
08 Minute
05 Hour
Apr Month
28 Date
Once Mode
Reminder setting
BACK
OK
_+
8.EPG Menu (Electronic Program Guide).
The EPG Menu is used to look at what is being broadcasted in DTV or Radio modes. Press the EPG
Button to access the EPG Menu. You will receive detailed program information of the channel you
are currently watching as well as programs in the near future.
28 Apr 04:39
800 SZTVM01 No Information
801 SZTVM02
802 SZTVM03
803 SZTVM04
804 Date
No Information
No Information
No Information
No Information
PROGRAMME GUIDE TIME
ScheduleINFO Remind
OK INDEX
2.
Press the teletext yellow key to list all the reminder schedule, press to choose the list, press red key
to delete the schedule list, Press EPG to return to EPG menu.
Schedule
DELETE
1.
Use to select a program and then press the Green Button or INFO key on the Remote to display the
highlighted program's information.
INFO
Sample1.ts
Resolution: 720x576
Subtitle: 1/1
Size: 30574 KBytes
Close
AudioT r a c k: 1/2
Program: 1/1

-18-
DVD OPERATION
DVD REAR PANEL
Caution
This DVD Player has a Class 1 laser which
may be harmful to your eyes. Do not
attempt to disassemble the cabinet or make
any adjustments.
Refer all servicing to a qualified
professional.
Features
Disc formats supported by this player:
Dolby Digital
Subtitle choices
KODAK picture CD
Audio choices
MP3 files on
CD-R/CD-RW
16:9
LB
TV Aspect
Ratio modes
DVD video
This product incorporates copyright
protection technology that is protected by
U.S. patents and other intellectual property
rights. Use of this copyright protection
technology must be authorized by Rovi
Corporation, and is intended for home and
other limited viewing uses only unless
otherwise authorized by Rovi Corporation.
Reverse engineering or disassembly is
prohibited.
The product complies with the KODAK
Picture CD format and will display
KODAK Picture CDs. The "KODAK
Picture CD Compatible" logo is a
trademark of Eastman Kodak Company
and is used with permission.
Manufactured under license from Dolby
Laboratories."Dolby" and the double-D
symbol are trademarks of Dolby
Laboratories. Confidential Unpublished
Works. 1992-1997 Dolby Laboratories, Inc.
All rights reserved.
Multi-angle
OPEN/CLOSE
PLAY/PAUSE

-19-
DVD OPERATION
MENU OPERATION
Press the DVD SETUP button on the remote
control, the SETUP MENU will be displayed.
After accessing the setup menu, press the
direction buttons for up and down movement to
select an item desired, and press RIGHT
direction button to select the SUBMENU item.
Then press the ENTER/OK button to confirm.
Press LEFT direction button to return to the
upper level menu. To exit the setup, press the
SETUP button again. In the SETUP MENU, you
may choose any of the following options as you
like.
LANGUAGE SETUP
Select Language in the setup menu, and display
the Language submenu:
OSD Language
Use this item to select the language of the setup
menu and screen display.
Subtitle
This option provides the preset subtitle
language.
Audio
Select the built-in disc dubbing language
options.
DVD Menu
This option provides the film's menu language
options.
VIDEO SETUP
Select Video in the setup menu, and display the
Video submenu:
SYSTEM SETUP
Aspect Ratio
Select the aspect ratio.
Notes:
TV System
Select a different TV system.
The image display ratio is related to the
recorded disc format. Some discs can not
display images in the aspect ratio you choose. If
you play a disc recorded in 4:3 format on a wide
screen TV, black bars will appear on the left and
right side of the screen. You must adjust the
screen setting depending on the type of the
television you have.
Note: This DVD player setting should be
matched to your TV set (for Australia, most
DVDs will be in PAL format).
MISC SETUP
Select MISC in the setup menu, and
display the submenu:
Use Default Settings
Reset setup data to factory default value.

-20-
DVD OPERATION
MP3/WMA/JPEG PLAYBACK
A MP3/WMA disc will show a directory structure
as shown in the picture above.
Press Direction key to choose the root directory
and then press ENTER/OK button to enter into
the sub directory. Press Direction key to choose
the desired track and then press ENTER/OK or
PLAY to enjoy the music or movie. If you want to
return to the upper menu, press Direction key to
choose the icon and press ENTER/OK
button.
Filter: Allows selecting the categories of files
displayed in the browser list.
Repeat: To switch different repeat playing modes
Mode: Select different playing mode as follows:
Normal: Shuffle mode is cancelled.
Shuffle: Shuffle mode enabled. When playback
reaches the end of the current chapter/track,
playback jumps to a random chapter/track. As the
end of each chapter/track is reached, another
random chapter/track will be played until all
tracks/chapters have been played or the Shuffle
mode is cancelled by toggling to a different Mode
Option.
Edit Mode: To enable programmed playback
mode. When you select the mode, press LEFT
Direction key to directory and press ENTER/OK
to choose the desired track and press Add to
program and press Program view and press the
Edit mode to cancel the edit mode. At last press
Left key to display program track and press
ENTER/OK to start program playback.
Program view: Display program track.
Browser view: Display track directory.
Add to program: Choose the track, press Add to
program to add the track to the program play
directory.
Clear program: In the complete stop state (press
the STOP button twice), then press Edit mode to
enable the edit mode. Press Left key to program
track and press ENTER/OK to cancel the desired
track. Press Clear program to delete the track
from the program play directory.
PICTURE CD PLAYBACK
A PICTURE CD disc will show a similar directory
structure as shown in the following picture.
Press Direction key to choose the root
directory and then press ENTER/OK
button to enter into the sub directory.
Press Direction key to choose the desired
picture and then press ENTER/OK or
PLAY to enjoy the picture. If you want to
return to the upper menu, press Direction
key to choose the icon and press
ENTER/OK button.
Image rotation
In picture play state, press Direction key
to rotate the picture.
Table of contents
Other Kogan TV DVD Combo manuals

Kogan
Kogan 1080p PRO32 User manual

Kogan
Kogan KALED24DVDZC User manual

Kogan
Kogan KALED24DVDVB User manual

Kogan
Kogan KALED19DVDWA User manual

Kogan
Kogan KALED19DVDZA User manual

Kogan
Kogan KALED24DVDWB User manual

Kogan
Kogan KULED32DVDYA User manual

Kogan
Kogan 6 LH6000 Series User manual

Kogan
Kogan KALED24DVDZA User manual

Kogan
Kogan HDMI PRO22 User manual

Kogan
Kogan KALCD22DVDAB User manual

Kogan
Kogan KALED32DVDZC User manual

Kogan
Kogan KULED19DVDYA User manual

Kogan
Kogan 1080P-PRO22 User manual

Kogan
Kogan 6 Series User manual

Kogan
Kogan 1080p PRO32 User manual

Kogan
Kogan PRO26 User manual

Kogan
Kogan KALED19DVDYA User manual

Kogan
Kogan KALED28DVDZA User manual

Kogan
Kogan PRO19 User manual