Einschalttaste / Funktionstaste
Halten Sie nach dem Einschalten des Oximeters die Einschalttaste / Funktionstaste etwa eine
Sekunde lang gedrückt. Das Oximeter zeigt eine Schnittstelle zur Parametereinstellung.Halten Sie
die Einschalt- / Funktionstaste gedrückt, um entsprechende Vorgänge auszuführen. Halten Sie die
Taste gedrückt, um ein Element festzulegen, oder drücken Sie darauf, um eine Option zu
wechseln. Drücken bedeutet nicht mehr als 0.5 Sekunden, während Halten mehr als 0.5 Sekunden
bedeutet.
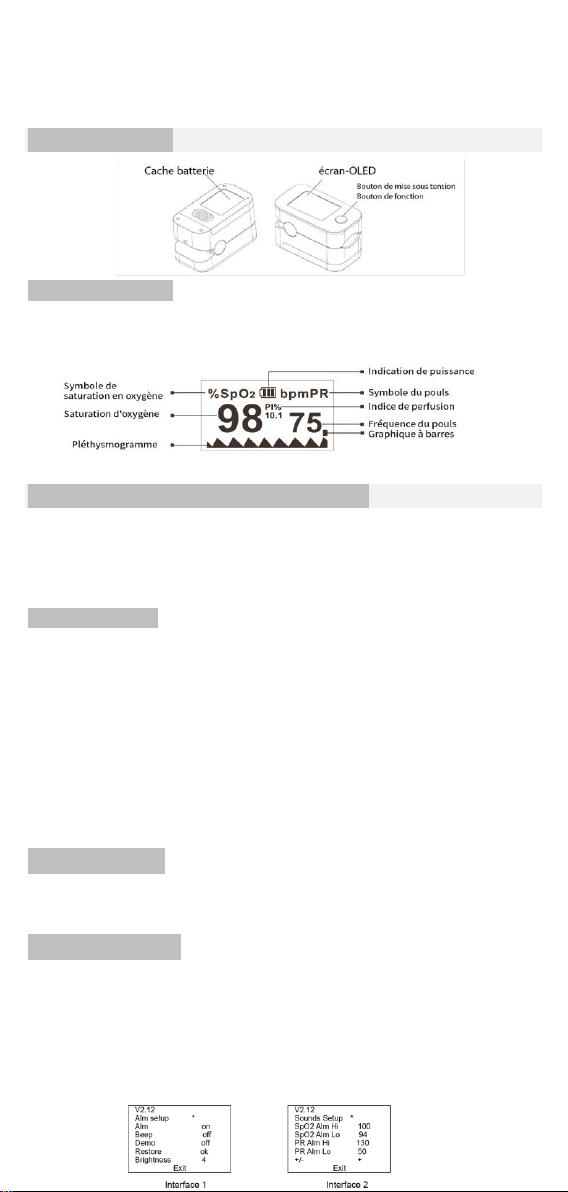
Alarmtoneinstellung
Halten Sie die Einschalttaste / Funktionstaste gedrückt, während sich das Oximeter im
eingeschalteten Zustand befindet.Die Parametereinstellungsschnittstelle 1 wird angezeigt (siehe
folgende Abbildung).Bewegen Sie "*" zur entsprechenden Option und halten Sie die
Funktionstaste gedrückt, um Alm einzuschalten und Beep aus auszuschalten.Wenn Alm
eingeschaltet ist und die gemessenen Werte der Blutsauerstoffsättigung und der Pulsfrequenz die
Ober- oder Untergrenze überschreiten, gibt das Oximeter einenAlarmton aus.Wenn Alm
ausgeschaltet ist und die gemessenen Werte den Grenzwert überschreiten, gibt das Oximeter
keinen Alarmton aus.Wenn Beep eingeschaltet ist, ist während der Pulsfrequenzmessung ein Tick
zusammen mit den Pulsschlägen zu hören.Wenn der Signalton ausgeschaltet ist, wird während der
Pulsfrequenzmessung kein Ton zusammen mit den Pulsschlägen ausgegeben. Halten Sie die
Funktionstaste gedrückt, um die Werkseinstellungen wiederherzustellen, während das Symbol "*"
bei der Option "Wiederherstellen" bleibt.
Helligkeitseinstellung
Auf Parameterschnittstelle 1, Drücken Sie die Funktionstaste, um die Option Helligkeit
auszuwählen, und halten Sie dann die Funktionstaste gedrückt, um die Helligkeit zwischen 1 und
5 einzustellen. The greater the value, the greater the brightness of the screen. Je größer der Wert,
desto größer die Helligkeit des Bildschirms.
Alarmbereichseinstellung
Auf Parameterschnittstelle 2, Drücken Sie die Funktionstaste, um zwischen den Optionen zu
wechseln. Auf dieser Schnittstelle können Sie die Ober- und Untergrenze von SpO2 Alm und PR
Alm festlegen. Während das Symbol "*" bei der Option +/- bleibt, halten Sie die Funktionstaste
gedrückt, um die Option auf + oder - zu setzen. Wählen Sie im + Modus die entsprechende
Option aus und halten Sie die Funktionstaste gedrückt, um die obere oder untere Grenze zu
erhöhen; im - Modus, Halten Sie die Funktionstaste gedrückt, um die obere oder untere Grenze zu
diskretisieren. Bewegen Sie "*" zur Option "Beenden" und halten Sie die Funktionstaste gedrückt,
um zur Überwachungsschnittstelle zurückzukehren.
Bedienerführung
Stecken Sie einen Finger vollständig in die Messteile des Oximeters,Halten Sie die
Fingernageloberfläche nach oben und lassen Sie den Clip los. Drücken Sie dann den Netzschalter,
um das Oximeter einzuschalten.
Wenn Sie Ihren Finger nicht vollständig in die
Kavität eingeführt habeny, Das Messergebnis ist
möglicherweise ungenau.
Vibrieren Sie Ihren Finger während der Messung nicht.Stellen Sie vorzugsweise sicher,
dass sich Ihr Körper nicht bewegt. Nachdem die Messwerte stabil geworden sind, lesen Sie die
gemessenen Werte für die Sauerstoffsättigung und die Pulsfrequenz auf dem Bildschirm ab.
Hinweis: Das Oximeter wird 10 Sekunden später automatisch heruntergefahren, nachdem Ihr
Finger weg ist.
Ersetzen Sie die Batterien, wenn die Batteriekapazität
nicht ausreicht und das Symbol auf dem
Bildschirm flackert.
Legen Sie die beiden AAA-Trockenbatterien gemäß der