ALDEN Skymatic User manual

Automatic satellite system Skymatic
with SSC SKEW unit
User’s guide
100306ALD-06603
Z.A. du Hairy F-67230 HUTTENHEIM www.alden.fr
Register pattern • Design and specifications are subject to change without notice.
More information https://www.caravansplus.com.au

ALD-066022
The reproduction of whole or part of this guide is strictly forbidden without Coast to Coast RV Services agreement.
Coast to Coast RV Services draws your attention to the risks that may occur if the mounting is not correct. Coast to
Coast RV Services declines all responsability if the product is not mounted in the correct way and especially if it is
installed by a non professional person. Coast to Coast RV Services declines all responsibility in the event of incidents
or accidents if they are due to a non observation of the installation instructions or the way the product is used.
Each product with electronic components has to be protected from undervoltage (under 10,5 volts) and overvoltage
(over 15 volts).
It is strictly forbidden to open, interfer, repair and/or modify the product without Coast to Coast RV Services
agreement. The warranty will become void if you undertake such an action.
Do not use the + after ignition, which means starting the vehicle, to close the system down. Before starting the
vehicle, make sure the satellite system is folded down in the folding down position.
Do not hesitate to call our technical service. +61 2 9645 7600 or email technical@coastrv.com.au should you have
any further questions.
If any changes occur concerning the emission frequencies or the power of emission from the satellites, neither the
salesperson nor the manufacturer can be held responsible. Neither the salesperson nor the manufacturer can be
held responsible if a satellite or a program come to disappear, if a free-to-air channel becomes scrambled or for
any other modification that may affect the emission. Unpredictable events can not lead to any exchange, refund
or compensation from the salesperson nor the manufacturer. The reception areas of the satellites are given as a
guidance.
If the wind gets up or by gale force, we recommend to fold the satellite system down. Refer to page 13 of this
manual. You must therefore fold the satellite system down when the wind is above 50 km per hour.
Never unfold the satellite system when it has snowed or by freezing rainfalls. Always make sure nothing will block
the opening of the satellite system (nor ice, nor snow...). Remove if this is the case.
You must ALWAYS fold the satellite system down before starting the engine of the vehicle. Go through the folding
down procedure. Before starting the engine, make sure the satellite system is completely down.
Always switch the receiver off before unplugging the power supply.
We advise to withdraw the fuse supplying the receiver in case of long periods without driving or to disconnect the
power supply.
If you leave the vehicle, never leave the satellite system open.
Remove the fuse from the electric circuit board of the satellite system and receiver before interfering on the general
circuit board, or changing or connecting the battery. If the vehicle is equipped with a solar panel, also remove the
fuse.
You MUST use the provided cables, without cutting nor modifying them. If not, the warranty will become void.
Do not use the existing coax cables in the vehicle: the quality of the reception can be altered. Each joint or different
types of cables may weaken the quality of reception signal.
About power supply matters: separate cables, with an adapted fuse on the plus line, must be installed directly from
the battery cell the S.S.C.® Search module: directly from the ignition key to the S.S.C.® Search module for the folding
down security; directly from the battery cell to the receiver. Refer to the instructions of the receiver.
Warning
More information https://www.caravansplus.com.au

ALD-06602 3
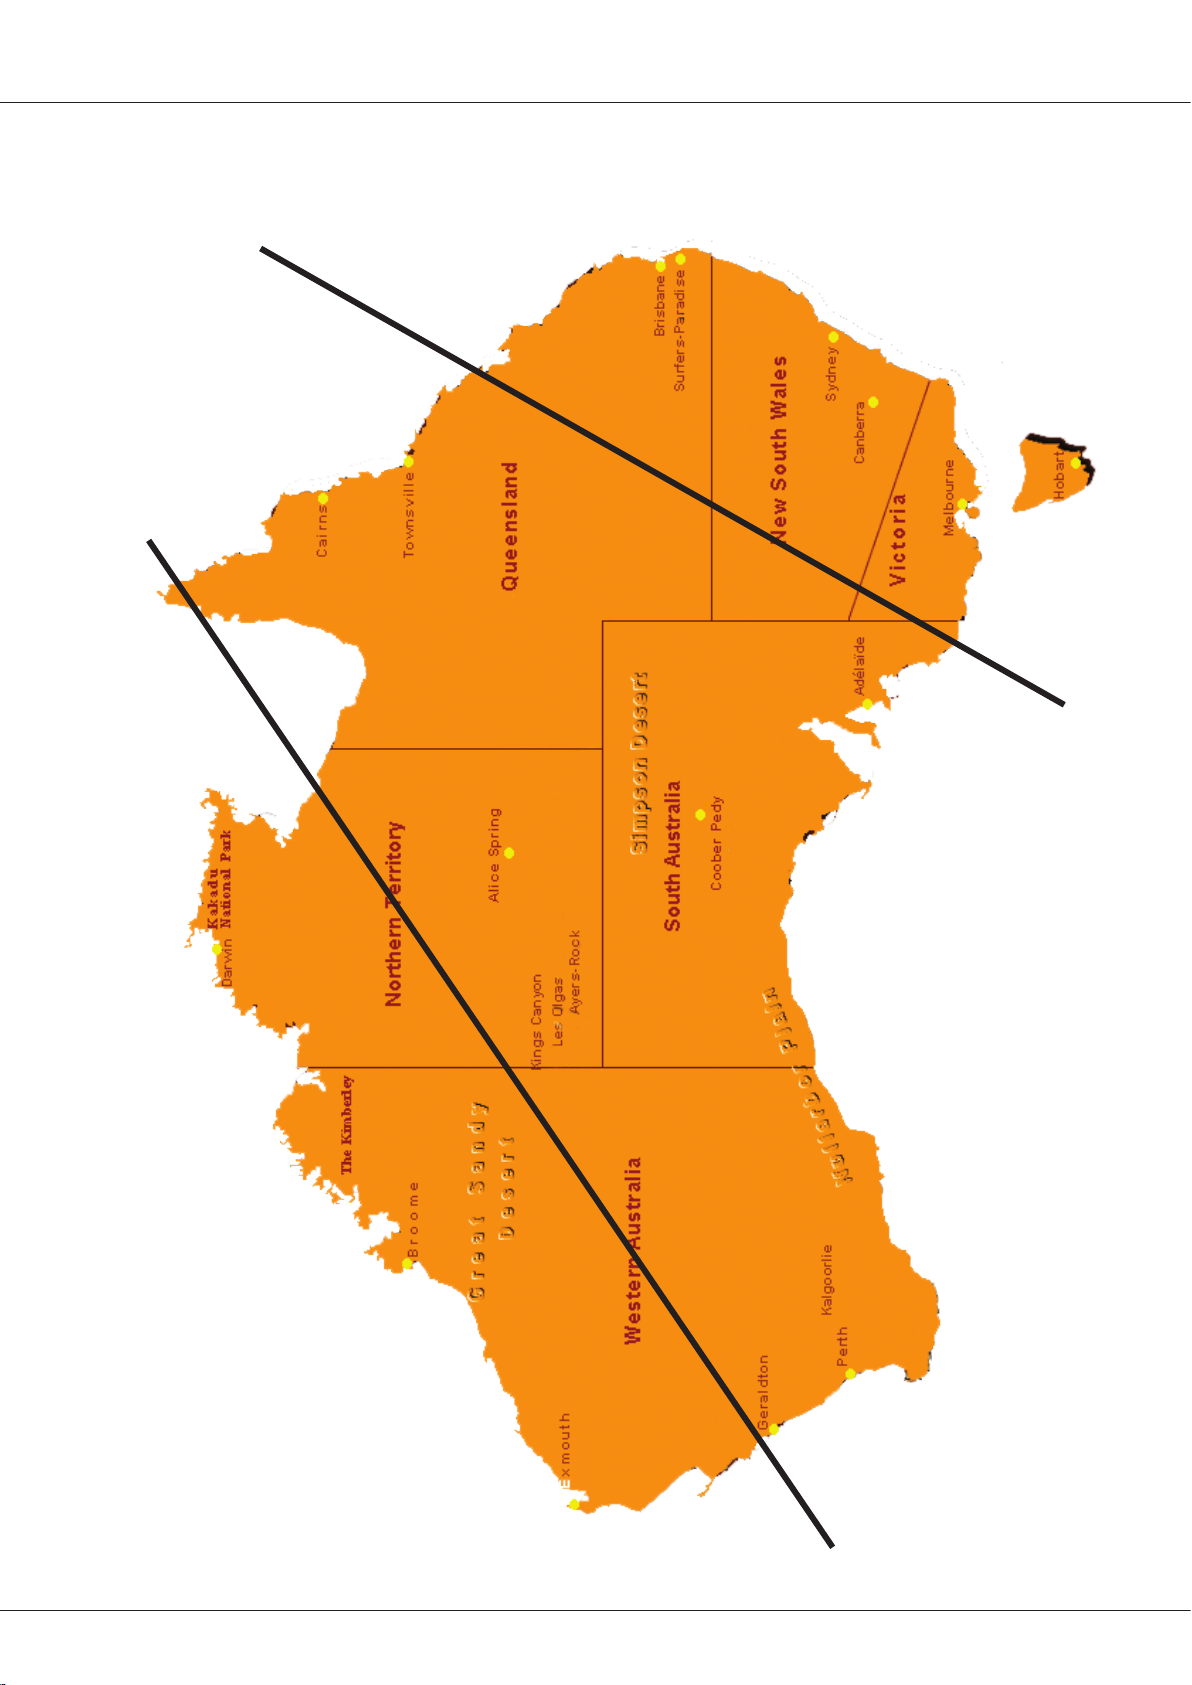
When you travel a long distance, the satellite system will need more time to find and memorize the location of
the satellites which will then give you access to the chosen channels.
Example:
You are in Sydney and you have used the satellite system. The next day, you drive to Canberra. You are still
in the same geographical area, so your satellite system will need 40 to 70 seconds to find the satellite you
have chosen. However, if you travel thousands of kilometers towards the North or the South (from Sydney to
Melbourne), your satellite system will need 2 to 3 minutes to search and memorize the location of each satellite.
When you travel a great distance, for example from Brisbane to Perth, it can take more than 10 minutes for the
satellite system to locate and memorize each satellite.
The S.S.C.® unit is a satellite search control system dedicated to find OPTUS D2, OPTUS C1, OPTUS D1, INTELSAT
8, OPTUS D3, SAT 1. It can be used with any existing receiver (using 10.7 GHz LO) that allows the reception of
the channels from the chosen satellite. The S.S.C.® unit is especially designed to be used in leisure vehicles.
Warning before using
Introduction
SSC unit description
Description Function
On/Off Switch on / off.
Green button Choose a satellite.
Red button Fold the satellite system down.
Blue button Skew function.
OPTUS D2 The satellite Optus D2 has been chosen.
OPTUS C1 The satellite Optus C1 has been chosen.
OPTUS D1 The satellite Optus D1 has been chosen.
INTELSAT 8 The satellite Intelsat 8 has been chosen.
OPTUS D3 The satellite Optus D3 has been chosen.
SAT 1 Not used.
Power The unit is on.
Close The satellite system is folding down.
Search The satellite system is in search mode.
Error There has been an error during the search.
Low batt. The battery voltage is too low.
OPTUS D2
INTELSAT 8
OPTUS D1
OPTUS C1
POWER
CLOSE
SEARCH
ERROR
OPTUS D3
SAT 1
LOW BATT.
More information https://www.caravansplus.com.au

ALD-066024
How to use the system
A. How to start.
Warning before using the system:
- Never switch to O position whilst watching TV. The picture will disappear.
- Never use the main switch on the S.S.C.® unit to close the satellite system. Always follow the
instructions and undertake a complete closing procedure.
- Never let the battery go under 10 Volts. If the “Low bat” led comes on, this means the battery is
under 9 Volts. In this case, you will have to go through the closing procedure to be able to use
the S.S.C.® unit again.
- If something happens to stop the dish from turning, the ‘‘Error led’’ will come on. For general
safety reasons, always make sure nothing will block the satellite system before putting it in
search mode.
1. Switch the S.S.C.® on by switching to I. If the dish was up before doing this, it will automatically come
down. No other manipulation will be possible until the dish is totaly folded down.
2. Use the Green button to select a satellite. Keep your finger down on this button to go from one satellite
to another. Each time you change satellites, you will hear a beep-tone. The satellites will change in the
following order: OPTUS D2 OPTUS C1 OPTUS D1 INTELSAT 8 OPTUS D3 SAT 1 OPTUS D2...
3.Once you have chosen a satellite, the green LED will flash for a few seconds and then stay on, then the
blue LED, which indicates the position of the LNB, will also flash. Make sure by refering to page 6 to 9
that the LNB is in the right position depending on the chosen satellite and your geographical position.
If not, use the blue button to select the appropriate position amongst the 5 zones.
OPTUS D2
INTELSAT 8
OPTUS D
1
OPTUS C
1
POWER
CLOSE
SEARCH
ERROR
OPTUS D3
SAT
1
LOW BATT.
zone 1 zone 2 zone 3 zone 4 zone 5
Example:
• You are in Melbourne and you have selected Optus C1: you must now select the blue LED which
corresponds to zone 1.
• You are in Broome and you have selected Optus D1: you must now select the blue LED which corresponds
to zone 4.
4. The Search LED will come on: this means that the system is searching the chosen satellite. Once the
system has found the satellite, the Search LED will go off and you will hear 2 beep-tones.
Please take note:
• When you use the system for the first time or if you have changed areas, the search may take a little
longer.
• If the Error LED starts to flash, make sure you have not left the ignition key on, on your vehicle.
• Everytime you turn the S.S.C.® unit on, the last chosen satellite and the last position of the LNB will
automatically be selected. This avoides any manipulation if the choice of the satellite and the LNB
position do not change.
More information https://www.caravansplus.com.au

ALD-06602 5
5. Turn the TV on.
6. Turn the receiver on and choose a programme.
B. Changing satellites whilst using the system.
1. By pressing the Green button, choose a satellite. Keep your finger down to go from one satellite
to another. Eveytime you go from one satellite to another, you will hear a beep-tone. The satellites
have been programmed in the following order: OPTUS D2 OPTUS C1 OPTUS D1 INTELSAT 8
OPTUS D3 SAT 1 OPTUS D2...
2. If the satellite chosen on the S.S.C.® unit is different to the one on the receiver, select the correct
satellite using your receiver, then select the same satellite with the Green button on the S.S.C.® unit.
C. How to fold the system down.
1. Press the Red button on the S.S.C.® unit. The Close LED will come on. It will only go off once the
system is completely folded down.
2. Now the system is down, and that the Close LED has gone off, switch the O/I switch on the S.S.C.®
unit to the O position.
Warning: Never forget to switch the S.S.C.® unit off once the satellite system is completely folded down.
3. Turn the receiver and the TV off.
More information https://www.caravansplus.com.au

ALD-066026
OPTUS D2
Zone 4
Zone 3
Zone 2
More information https://www.caravansplus.com.au
ALD-06602 7
OPTUS C1/D3
Zone 3
Zone 2
Zone 1
More information https://www.caravansplus.com.au

ALD-066028
INTELSAT 8
Zone 4
Zone 3
More information https://www.caravansplus.com.au

ALD-06602 9
OPTUS D1
Zone 4
Zone 3
More information https://www.caravansplus.com.au

ALD-0660210
The following instructions are given as general advice: you MUST follow the instructions delivered with the
receiver that will be installed.
1. Place the receiver in a ventilated and accessible area.
2. Connect the receiver to the S.S.C.® unit (Out to demo).
Warning: Do not use the existing coax circuit. The quality of the picture could be altered. Each connection
between the satellite system and the S.S.C.® or between the S.S.C.® and the receiver can cause the signal to
weaken. Different types of cables can also cause interference.
3. Connect the television to the receiver.
4. Connect the receiver to the power supply. The + line must be protected with an adapted fuse (see the
instructions delivered with your receiver). We also advice to put a swith on the + line.
5. In the Setup menu of your receiver, make sure the local oscillator (LO) is at 10.7 GHz.
Warning:
• In any case, a direct line (no links) with an adapted fuse must go from the receiver to the battery for the
+ line.
• Always use the provided cables.
• The warranty will become void if these instructions are not followed.
Advice on how to install a receiver & cable connection
Coax cable
Motor cable
TV VCR / DECODER
DC
12... 18V in
5 A FUSE
5 A FUSE
+ after ignition
This supply must be able to deliver 1,5 A minimum
FUSIBLE 5A
+12V DC
Coax cable
Battery 12 V
RECEIVER / DECODER
Skew cable
More information https://www.caravansplus.com.au

ALD-06602 11
SSC connection layout
1 2 3 45
N° : description Type of connection Description of inputs / outputs
1 : IR Jack 3.5mm connector Not used.
2 : LNB in Coaxial type F Connection with the LNB from the satellite system.
3 : Out to demo Coaxial type F Connection used between the unit and the
receiver.
4 : Data RJ-45 Used to transfer the updating data.
5 : Motor Power Used for the motorization of the satellite system.
6 : Skew Power Used for the motorization of the LNB.
7 : Contact Terminal connection Safety device: will fold the satellite system down
and is connected to the vehicle ignition.
8 : 10-15V DC Jack 3.5mm connector Main power supply.
Reminder:
•The system must be in a vertical position in a well ventilated space.
• Do not place the unit near a source of heat or humidity.
• The ventilation must be free. Do not block.
• Do not use existing coax circuits. The quality of the picture can be affected.
• Each link will weaken the signal.
• Cables of a different type can also change the quality of the picture.
• In any case, even when initial cables have been put in:
- a direct line (no links) with a 5Amp fuse must go from the unit to the battery for the + wire.
- a direct line (no links) must go from the unit to the battery for the - wire.
- a direct line (no links) with a 5Amp fuse must go from the unit to the “+ after ignition” located
on the ignition key or on the main unit.
• Never use the “+ after ignition” on the fridge, the steps or the battery separator.
• You must always use the provided cables.
•The warranty will become void if these instructions are not followed.
6 7 8
More information https://www.caravansplus.com.au

ALD-0660212
What to do if the system breaks down
Bad picture:
Improve the position of the satellite system by pressing the Green button on the front of the S.S.C.®
unit. If the dish happens to be orientated towards the back of the vehicle, it may happen that the
chosen satellite is out of angle. If so, change the position of the vehicle.
How to change the satellite:
See page 5.
In case of a power failure:
Check the connections, the cables and the fuse. Follow the closing procedure and then use as normal.
The satellite system does not find the satellite:
• Make sure there is nothing stopping the satellite system from turning, or interferring with the signal
coming from the satellite.
• If the dish happens to be orientated towards the back of the vehicle, it may happen that the chosen
satellite is out of angle. If so, change the position of the vehicle.
• The frequency of the satellite may change, in this case, the satellite system will not be in the right
position. Please contact a technician.
The satellite system will not fold down:
• Start the vehicle and see if the satellite system will fold down.
• Switch the S.S.C.® unit off then on, to try to fold the system down.
• If the satellite system does not fold down, stop the vehicle and remove the dish from the main unit.
More information https://www.caravansplus.com.au

ALD-06602 13
Wind classication
When the wind gets to 5, we advice to fold your mobile equipment down (solar panel, satellite systems).
When it gets to 7, you MUST fold everything down.
Strenght Name Speed Effect
Knot Km/h
0Calme 1111 Smoke is rising straight up.
1Very slight breeze 1315Smoke gives the direction of the wind;
windvanes are not moving.
2Slight breeze 46611 You can feel the wind on your face;
leaves will move.
3Small breeze 710 12 19 Flags are up and leaves rustle.
4Pleasant breeze 11 16 20 28
Dust and sand is lifting from the
ground;
small branches are bending.
5Strong breeze 17 21 29 38 Small trees are swaying and the tops of
all trees are moving.
6Cold wind 22 27 39 49 You can hear the wind whistle.
7Strong cold wind 28 33 50 61 All the trees are moving;
you can only just walk facing the wind.
8Gust of wind 34 40 62 74 You cannot walk facing the wind;
some branches are breaking off.
9Strong gust of
wind 41 47 75 88 You cannot walk facing the wind;
the wind is damaging buildings.
10 Storm 48 55 89 102 There is a lot of damage;
young children of 12 cannot keep their
feet on the ground (they can fly away!)
11 Violent storm 56 63 103 117
12 Hurricane 64 plus 118 plus
We remind you that if you forget to fold the system down when the wind gets strong,
the warranty will become void.
Technical specications
S.S.C. module
Frequency band KU
Frequency 11.65 to 12.85 GHz
Polarization Horizontal and Vertical
LNB local oscillator (LO) 10.7 GHz
Power supply 12 V DC
Power 10 W maximum
Temperature rate -20°C to +50°C
Humidity rate 85 % maximum
Size L=170mm • W=130mm • H=45mm
Weight 290g
More information https://www.caravansplus.com.au

ALD-0660214
LIMITED WARRANTY FOR COAST TO COAST RV SERVICES
RECREATIONAL VEHICLE SATELLITE SYSTEM
THIS IS A LIMITED ONE YEAR WARRANTY ONLY!!
This Coast to Coast RV Services product is warranted to the original purchaser to be free from defects in material
and workmanship under normal use and maintenance for a period of one year from the date of purchase,
regardless of the commencement date of use. It is the responsibility of the consumer/owner to establish the
warranty period. Coast to Coast RV Services does not use warranty registration cards for its standard warranty.
You are required to furnish proof of purchase date through a bill of sale or other payment record.
Coast to Coast RV Services will replace any parts that are found to be defective within the first year and will
pay a warranty service allowance directly to the authorized Coast to Coast RV Services approved Agent at
rates mutually agreed upon between Coast to Coast RV Services and its authorized service center or agent.
The Alden Satellite system must be returned to a Coast to Coast RV Services authorized service center. Coast
to Coast RV Services will not bear costs involving traveling time from their service agents.
Service agents can perform warranty repairs on site but all traveling time will be paid by owner of Vehicle or
Caravan.
We remind you that all electrical installations must be protected with an adapted fuse.
COAST TO COAST RV SERVICES WILL NOT BE RESPONSIBLE FOR:
• Normal maintenance as outlined in the Installation and Users manuals.
• The replacement of any wearing parts.
• Damage or repairs required as a consequence of faulty or incorrect installation or application not in
conformance with Coast to Coast RV Services instructions.
• Failure to start of operate due to loose or disconnected wires, water or dirt in controls, or low voltage.
• Costs incurred in gaining access to the Alden Dish antenna unit or the Satellite Search Control unit.
• Parts or accessories not supplied by Coast to Coast RV Services.
• Freight charges incurred from parts replacement.
• Damage or repairs as a consequence of any misapplication, abuse, unreasonable use, unauthorized alteration,
improper service, improper operation or failure to provide reasonable and necessary maintenance.
• Coast to Coast RV Services products whose serial number has been altered, defaced or removed.
• Damage as a result of floods, winds, lightning, accidents, corrosive atmosphere or other conditions beyond
the control of Coast to Coast RV Services.
• Any special indirect or consequential property, economic or commercial damage of any nature whatsoever.
Some states do not allow the exclusion of accidental or consequential damages, so the above limitation
may not apply to you.
• NO REPRESENTATIVE, DEALER OR OTHER PERSON IS AUTHORIZED TO ASSUME FOR COAST TO COAST RV
SERVICES ANY ADDITIONAL, DIFFERENT OR OTHER LIABILITY IN CONNECTION WITH THE SALE OF THIS
COAST TO COAST RV SERVICES PRODUCT.
• This warranty gives you specific legal rights. You may also have additional rights which vary from state to
state.
IF YOU HAVE A PRODUCT PROBLEM
Contact:
Coast to Coast RV Services
Ph: +61 2 9645 7600
e: technical@coastrv.com.au
More information https://www.caravansplus.com.au

ALD-06602 15
More information https://www.caravansplus.com.au
IMPORTED & DISTRIBUTED BY:
1300 COASTRV
(1300 2627878)
www.coastrv.com.au
NEW SOUTH WALES
(HEAD OFFICE)
Coast to Coast RV Services
20 George Young Street
Auburn NSW 2144
e: salesnsw@coastrv.com.au
VICTORIA
Coast to Coast RV Services
3 Frog Court
Craigieburn VIC 3064
e: salesvic@coastrv.com.au
QUEENSLAND
Coast to Coast RV Services
Unit 3&4 No.33-43 Meakin Road
Meadowbrook QLD 4131
e: salesqld@coastrv.com.au
WESTERN AUSTRALIA
Coast to Coast RV Services
Unit 1 No.45 Tacoma Circuit
Canning Vale WA 6155
e: saleswa@coastrv.com.au
Calls from outside Australia +61 2 9645 7600
Technical Support: technical@coastrv.com.au
More information https://www.caravansplus.com.au
Table of contents
Other ALDEN Antenna manuals


