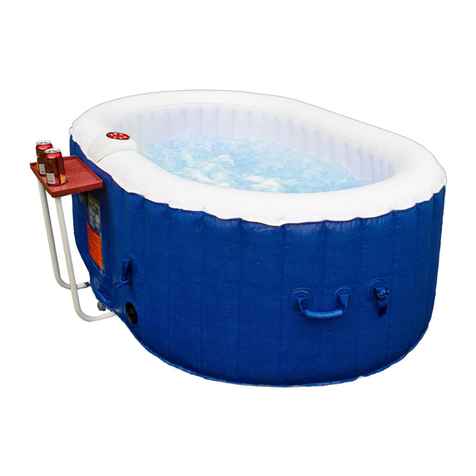
Aleko HTIO2BLD User manual

HTIO2BLD
HTIO2BKW
HTIO2BRWH
HTIO2BKBK
HTIR4GRW
HTIR4WHBK
HTIR4BRW
HTIR6BKW
HTIR6GYBR
HTIR6BRW
HTISQ4BR
HTISQ4WHGY
HTISQ4BKWH
HTISQ6BRWH
HTISQ6GYBK
HTISQ6BKWH
HTISQ6GY

When the heang funcon is enabled, if the bubble funcon is started at the same
me, the heang tube will stop working, but the indicator light will sll on. When the
bubble stops, the heang tube will automacally work again.
CAUTION 8: The spa should not be setup or le out in temperatures lower than 4°C
(40°F)
CAUTION 9: To avoid damage to the spa. Heang funcon and Bubble funcon can't
operate at the same me.
3
1
hello@aleko.com
833-926-2323

SKO
W
I
H
H
B
L
T
HTIO2BLD
B
2
L4
LW24
LW
626
2W6H
6WH
26HZ, WL42H
L
SKO
W
I
H
H
B
L
T
HTIO2BKW
BW
2
L4
LW24
LW
626
2W6H
6WH
26HZWL42H
L
SKO
W
I
H
H
B
L
T
HTIO2BKBK
BB
2
L4
LW24
LW
626
2W6H
6WH
26HZWL42H
L
SKO
W
I
H
H
B
L
T
HTIR4BRW
BW
4
L2
4
626
2W6H
6WH
26HZWL42H
L
SKO
W
I
H
H
B
L
T
HTIO2BRWH
BW
2
L4
LW24
LW
626
2W6H
6WH
26HZWL42H
L
SKO
W
I
H
H
B
L
T
HTIR4GRW
GW
4
L2
4
626
2W6H
6WH
26HZWL42H
L
4
2

SKO
W
I
H
H
B
L
T
HTISQ4BKWH
BW
4
6L
4
626
2W6H
6WH
26HZWL42H
L
SKO
W
I
H
H
B
L
T
HTISQ4WHGY
GW
4
6L
4
626
2W6H
6WH
26HZWL42H
L
SKO
W
I
H
H
B
L
T
HTIR6BRW
BW
6
L264
22
66
626
2W6H
6WH
26HZWL42H
L
SKO
W
I
H
H
B
L
T
HTIR6BKW
BW
6
L264
22
66
626
2W6H
6WH
26HZWL42H
L
SKO
W
I
H
H
B
L
T
HTIR4WHBK
BW
4
L2
4
626
2W6H
6WH
26HZ WL42H
L
SKO
W
I
H
H
B
L
T
HTISQ4BR
BW
4
6L
4
626
2W6H
6WH
26HZWL42H
L
5
3

SKO
W
I
H
H
B
L
T
HTISQ6GY
GG
6
L22
626
2W6H
6WH
26HZWL42H
L
SKO
W
I
H
H
B
L
T
HTISQ6BKWH
BW
6
L22
626
2W6H
6WH
26HZWL42H
L
SKO
W
I
H
H
B
L
T
HTISQ6BRWH
BW
6
L22
626
2W6H
6WH
26HZWL42H
L
SKO
W
I
H
H
B
L
T
HTIR6GYBR
BG
6
L264
22
66
626
2W6H
6WH
26HZWL42H
L
SKO
W
I
H
H
B
L
T
HTISQ6GYBK
BG
6
L22
626
2W6H
6WH
26HZWL42H
L
6
4

c
PRIOR TO ASSEMBLY
Ensure ll arts are resent:
b d&e
f
g
i
7
5
b Ci- T Cer
c fi He
d Fier Crridge
e Fier Crridge cer
f Drige ug
g eir ce
h rud ee
i. fe Lcig Ci Ke
h
•utr nstallatn:
1. Seu ur S ee id fudi d idig r bec e cud dge
e S
ure ur S i ugged i eer i cke rfei fied i eer
rfig e reced uig eei cbe i c be fire rik
VFLA ur S Air ce eed be ef iide e f e S fr
ir ei (durig eer d crci (durig cder eer
LAC ur S i direc uig e d ri f e S cud buge durig
eer e VC e u uig ddii re e ier ed cuig ed fiure
5. urig fiig eig r e i ue er i u er drige i cbe
f gig e ue f er
:
•nr nstallatn:
Fr ud be i ee urfce
Fr u be be id eig f e S+ccu
efre cig ur ub idr eure uibe drige i ibe d c be reced
refu cider e cee f ur befre ii
i e S cre r er eri c be dged b iure

Figure
Fig Fig
Fig
ee e ifi e d cre e e ig
ee e ifi e fr e ir ue d cre e e c ig
8
6
e e ir ue e cre e ed f e ifi e i i Fig
e e ir ie e e ec e er ed f ifi e i e ir ie e Fig
fe e ub b reig e E bu e e i
rer ifed re e E bu u ff e bubbe
ttentn : Do not overinflate.
ASSEMBLY
fd e fr e cgig red e e Grud ee
(
Pr
)
ridede ure e urrudig r bec re cered

7
iide
use T id ier pup ereig, e ir
je c be rered fer 10 iue Te ir je fuci c be pped r red gi y ie durig
eir 20 iue cyce
B for using, fill th SPA with wat r b tw n th “Min/ Max” lin s.
Cip e pcer (Part b) rei e,d ckcip i e Sfey Lckig Cip Key(part i)
When the FILTER PUMP has worked for 168 hours, the le
on the display screen. It remainds user to clean/replace a new Filter
Cartridge
(
Part d
)
.
Once done, press “FILTER”button again, “FC”willdisapper, and the
water temperature will be displayed. All function
will return to normal.

HEATER Key - On/Off key for the hea
and the red indicator lamp will be on. Press again and the hea
turn off. When the hea FILTER key will also be on
and the filter pump will start working as well. When the hea
will be con
occurrence required by the design. When the preset temperature has been reached, the hea
system will stop working, but the hea
to operate, with the indicator light on. When the water falls 2°C below the preset temperature, the
hea
8
/
Pre bu fr icreig/ decreig eperure
We e eig i fiied, pre “TEMPEATUE” bu gi ed i
The temperature can be set in the range of 68°F~ 104 F.
Note:

Cleaning the Filter Cartridge
Remove the electrical plug from the mains.
cre e fier crridge b urig cuerccie Fig
ee e fier crridge cer Fig
Fig Fig
e fier crridge c be ried ff i grde e d reued eer if e fier crridge rei
ied d dicred e fier crridge ud be reced Fig
e fier crridge cer d c e fier crridge e er ie b urig ccie Fig
Fig Fig
11
9
3. pa epair
f e i r r ucured ue e rided reir c
r e re be reired
A rg deie eir c d e cer e dged re
e urfce ree ir bubbe Lee dr fr ur
MAINTENANCE
aintaining
pa
ater
•
•
•
•
e er ud be cged eer fe d d crrec ceic ud be ued died b
e eciied ceic uier
ue cciuciig ceic e c fr ce e
ier eig ube d
i ce c dge e eecric iide e cr bx
recudig i ife
i receded u ee ur er' ~ ii ud be ~ d free
crie ud be ~ c dge ur d u
A e i ud be ud e ur er ceir ec ie befre u ue ur A e ce
ee
er ii i e reibii f e er d c be cieed b regur ddig
red iier ic i ceic cr irue d bceri ree i e er r brug i
durig ue
1)
2)
3)
4)
1)
2)
3)

MAINTENANCE
. Cleaning the
pa
eerge reidue d died id fr big ui d ceic i grdu ccuue i e
er
ce e ue d er e rie
Note: Do not use hard brushes or abrasive cleaners.
EMPTY, DEFLATE AND STORAGE
3.
pa torage
•
e ure er i dried fr e d u e i i eei eed e ife f e
e reced e ue f edr cuu b u r uc u er fr e ie d u ie
•
ee e fier crridge
•
i receded u re e i i rigi cge i r dr ce
Note: Plastic becomes brittle and susceptible to breakage when exposed to subzero temperatures. Freezing can
severely damage the spa. Improper winterization of your spa may void your warranty.
1
Empty
)
Ucre c fr er ue be ir ie e f
Eure e rige ug
(
ee e r f icure
)
i i
iered ree uexeced driig
) cre
Ifi
He
(
ee e r c icure
)
e er ue d direc e e ed f ifi e
rrie
)Ree e rige ug
(
r f
)
fr e fr f e er c f u
(
Fig
)
)
ce dried ue ge brb exce er e u UT
ere ir e fuci fr e 0
ecd
dri e er fr e ir ieie
) e driig i fiied ree e
Ifi
He
(
Part c
)
d rece e rige ug
(
r f
)
d er uec
Fig
10
Remove the Spa plug from the electrical mains.
1
2.
Deflate
1
)
Find the black 1-way valve on the Spa
(
See the Fig.3
)
2
)
Fully unscrew and re move rapid deflation air valve by turning anti-clockwise to allow the air to escape.
3
)
Fold away the
S
pa carefully directly and re moving as m uch air as possible through the open valve.

ODE AEOLUTION
F
Control Panel Error Codes
HL
SL
SH
e firi e red fr
r168 ur “F”i er
di ed ig i i be i
fier u i be eri
eig e i r d red
ig i be u eer
Over Temperature/ Temperature Issue
11
Unplug from mains and wait. Temperature should start to reduce
and return to normal range.
Temperature Issue
Water Temperature ensor issue
Call for service on 833-926-2323 or hello@aleko.com
e r rece e Fier rridge r d
Oce
de
re“FLE”
bu gi
“F”
cde i dier
d
e ereerure i be died A fuci i
reur
r
rbe rbbe ue ui
e e de
ere
Air u i
eig i rg i e
er b
ug e ir u Afer e ir u ced ier e
ug d re e e bu cie
fr erice O 8339633 r e@ec
eig e
de ere
eerure e
ir fier crridge
rer er ee
eig eee fied
re
Fierig e
de ere
ir fier crridge
Fier creed ig
ge r icrrec freuec
erece e fier crridge i ie
Le e Fier ig
A rfei eecrici cec eer e ued iu
ge r freuec i r
ege i r r ucured e rided reir c
er ce
ufficie fierig ie
ir fier crridge
rer er iece
cree firi ie
erece e fier crridge
efer e ceic ufcurer iruci
i eerure
i iger 1F
fer ig eig
fuci L de
ied & Beeig
eidu er i e i
ciue be eed b reidu
eerure
ug fr i d i iue e eerure i r
reduce d reur r
er ie rug fier e
be bced
e e ie
fr erice 8339633 r e@ec
e
iger eerure
68F~
1F curre er eeru
erece
e
fier crridge
i
ie
Add
er
ecified
ee
fr erice O
8339633
r e@ec
TROUBLESHOOTING
ere are some helpful tips to help you to diagnose and rectify some common sources of trouble.

arning rotection leels ar base on the one spa is place in. ee the below scheme
boe figure one imensions of swimming pools an paling pools
Note: he measured zone dimensions are not limited by walls and fixed partitions.
•A ere gruded bd ciig f iiu guge id cer cducie ire i reuired
beee cr e grudig eri d e urfce ced i e
• e urfce r uide eecric deice be ree ii e fr re
•A bded ceci u be fucducie d gruded
•ecric euie e e e fig degree f reci
ouci be be ied i e d
o e d ice ig r er eecric ce be ree
oe rfrer u be ced uide e
e decline liability for any damage or accident derived from any use of this product
which is not in conformity with the instructions contained in this booklet.
lease consult a license electrician for further electrical installation guielines
or in placement scenarios not specificall mentione in this manual.
CORRECT DISPOSAL OF THIS PRODUCT
This marking indicates that this product should not be disposed with other
household wastes throughout the EU. To prevent possible harm to the
environment or human health from uncontrolled waste disposal, recycle it
responsibly to promote the sustainable reuse of material resources. To
return your used device, please use the return and collection systems or
contact the retailer where the product was purchased. They can take this
product for environmental safe recycling.
Copyright 201 ALEKO. All rights reserved. No part of this manual may be reproduced or transmitted in any form
or by any means without the express written permission of ALEKO.
ALEKO Inflatable Spas, website: www.AlekoProducts.com
ea ts entre anual ere peratn
ELECTRICAL PROTECTION LEVEL
12

SCAN QR CODE WITH YOUR MOBILE
DEVICE FOR MORE INFORMATION
A
ALEKO
®
g ALEKOrduc
KOrduci
®
Aig ALEKOrduci
ALEKOrducic
A AA
ALEKO
®
Aig ALEKOrducic
AA ALEKO
®
Aig ALEKOrducic
rducic AA A AA
rducic ALEKO
®
Aig ALEKOrducic
AA ALEKO
®
Aig ALEKOrducic
®
Aig ALEKOrducic AA A
AA ALEKO
®
Aig ALEKOrducic ALEKO
®
Aig
ALEKOrducic AA A AA ALEKO
®
Aig
ALEKOrducic ALEKO
®
Aig ALEKOrducic A
AA A AA ALEKO
®
Aig ALEKOrducic
ALEKO
®
Aig ALEKOrducic AA A
AA ALEKO
®
Aig ALEKOrducic
ALEKO
®
Aig ALEKOrducic AA A
A AA ALEKO
®
Aig ALEKOrducic
ALEKO
®
Aig ALEKOrducic AA A
AA A AA ALEKO
®
Aig ALEKOrducic
rducic ALEKO
®
Aig ALEKOrducic A
rducic AA A AA ALEKO
®
Aig
AA ALEKO
®
Aig ALEKOrducic ALEKO
®
Aig
ALEKO
®
Aig ALEKOrducic AA A
AA A AA ALEKO
®
Aig ALEKOrduci
®
Aig ALEKOrducic ALEKO
®
Aig
ALEKO
®
Aig ALEKOrducic AA A
rducic AA A AA ALEKO
®
AA ALEKO
®
Aig ALEKOrducic
O
®
Aig ALEKOrducic ALEKO
®
ducic ALEKO
®
Aig ALEKOrduci
ALEKO
®
Aig ALEKOrducic AA
ALEKO
®
Aig ALEKOrducic AA A
ALEKO
®
Aig ALEKOrducic AA A
ALEKO
®
Aig ALEKOrducic AA A
ALEKO
®
Aig ALEKOrducic AA A
rducic ALEKO
®
Aig ALEKOrducic A
ALEKO
®
Aig ALEKOrducic ALEKO
®
Aig ALEKO-
AA ALEKO
®
Aig ALEKOrducic
Orducic AA A AA ALEKO
®
cic ALEKO
®
Aig ALEKOrducic A
A A AA ALEKO
®
Aig ALEKOrducic
ALEKO
®
Aig ALEKOrducic AA
A AA ALEKO
®
A
ig ALEKOrduci
ALEKO
Products
8307 S 192ND ST. KENT, WA 98032
hello@aleko.com
PHONE: 833-926-2323
ALEKO.COM
YOUTUBE.COM/ALEKOPRODUCTS
Other manuals for HTIO2BLD
1
This manual suits for next models
16
Table of contents
Other Aleko Hot Tub manuals
Popular Hot Tub manuals by other brands

Hikki
Hikki Bohemen How to assemble

RivieraPool
RivieraPool Vitara Instructions for installation and use

American Standard
American Standard Cadenza Elite 6060EC Features & dimensions

Aquatic
Aquatic AI32AIR6036HS Specification sheet

Intex
Intex Greywood Deluxe owner's manual

Jacuzzi
Jacuzzi U961000 Installation and operation instructions