Aleko HTIO2BLD User manual

HTIO2BLD
HTIO2BKW
HTIO2BRWH
HTIO2BKBK
HTIR4GRW
HTIR4WHBK
HTIR4BRW
HTIR6BKW
HTIR6GYBR
HTIR6BRW
HTISQ4BR
HTISQ4WHGY
HTISQ4BKWH
HTISQ6BRWH
HTISQ6GYBK
HTISQ6BKWH
HTISQ6GY

When the heang funcon is enabled, if the bubble funcon is started at the same
me, the heang tube will stop working, but the indicator light will sll on. When the
bubble stops, the heang tube will automacally work again.
CAUTION 8: The spa should not be setup or le out in temperatures lower than 4°C
(40°F)
CAUTION 9: To avoid damage to the spa. Heang funcon and Bubble funcon can't
operate at the same me.
3
1
833-926-2323

SKU NO.
Color
Number of people:
Water capacity:
External diameter:
Internal diameter:
Height:
Number of air jets:
Heang device:
Bubble:
Cable Length:
Filter:
Top cover:
HTIO2BLD
Blue
2
550L/145 gallons
L 1.90 m/75”;W 1.20 m/ 47"
L 1.50 m/59”;W 0.8 m/ 31.5"
0.65 m/25.6”
85 X φ 3 mm
1200W/1.63HP
600W/0.81HP
3.3M
120V, 60HZ, 35W, 1880L/420gallon/H
Laminated PVC with heat reflecve coang
SKU NO.
Color
Number of people:
Water capacity:
External diameter:
Internal diameter:
Height:
Number of air jets:
Heang device:
Bubble:
Cable Length:
Filter:
Top cover:
HTIO2BKW
Black & White
2
550L/145 gallons
L 1.90 m/75”;W 1.20 m/ 47"
L 1.50 m/59”;W 0.8 m/ 31.5"
0.65 m/25.6”
85 X φ 3 mm
1200W/1.63HP
600W/0.81HP
3.3M
120V, 60HZ, 35W, 1880L/420gallon/H
Laminated PVC with heat reflecve coang
SKU NO.
Color
Number of people:
Water capacity:
External diameter:
Internal diameter:
Height:
Number of air jets:
Heang device:
Bubble:
Cable Length:
Filter:
Top cover:
HTIO2BKBK
Black & Black
2
550L/145 gallons
L 1.90 m/75”;W 1.20 m/ 47"
L 1.50 m/59”;W 0.8 m/ 31.5"
0.65 m/25.6”
85 X φ 3 mm
1200W/1.63HP
600W/0.81HP
3.3M
120V, 60HZ 35W, 1880L/420gallon/H
Laminated PVC with heat reflecve coang
SKU NO.
Color
Number of people:
Water capacity:
External diameter:
Internal diameter:
Height:
Number of air jets:
Heang device:
Bubble:
Cable Length:
Filter:
Top cover:
HTIR4BRW
Brown & White
4
800L/211 gallons
1.80 m/71"
1.40 m/55"
0.65 m/25.6"
110 X φ 3 mm
1200W/1.63HP
600W/0.81HP
3.3M
120V, 60HZ 35W, 1880L/420gallon/H
Laminated PVC with heat reflecve coang
SKU NO.
Color
Number of people:
Water capacity:
External diameter:
Internal diameter:
Height:
Number of air jets:
Heang device:
Bubble:
Cable Length:
Filter:
Top cover:
HTIO2BRWH
Brown & White
2
550L/145 gallons
L 1.90 m/75”;W 1.20 m/ 47"
L 1.50 m/59”;W 0.8 m/ 31.5"
0.65 m/25.6”
85 X φ 3 mm
1200W/1.63HP
600W/0.81HP
3.3M
120V, 60HZ 35W, 1880L/420gallon/H
Laminated PVC with heat reflecve coang
SKU NO.
Color
Number of people:
Water capacity:
External diameter:
Internal diameter:
Height:
Number of air jets:
Heang device:
Bubble:
Cable Length:
Filter:
Top cover:
HTIR4GRW
Green & White
4
800L/211 gallons
1.80 m/71"
1.40 m/55"
0.65 m/25.6"
110 X φ 3 mm
1200W/1.63HP
600W/0.81HP
3.3M
120V, 60HZ 35W, 1880L/420gallon/H
Laminated PVC with heat reflecve coang
4
2

SKU NO.
Color
Number of people:
Water capacity:
External diameter:
Internal diameter:
Height:
Number of air jets:
Heang device:
Bubble:
Cable Length:
Filter:
Top cover:
HTISQ4BKWH
Black & While
4
600L/158 gallons
1.50 m/59”
1.10 m/43”
0.65 m/25.6”
85 X φ 3 mm
1200W/1.63HP
600W/0.81HP
3.3M
120V, 60HZ 35W, 1880L/420gallon/H
Laminated PVC with heat reflecve coang
SKU NO.
Color
Number of people:
Water capacity:
External diameter:
Internal diameter:
Height:
Number of air jets:
Heang device:
Bubble:
Cable Length:
Filter:
Top cover:
HTISQ4WHGY
Gray & White
4
600L/158 gallons
1.50 m/59”
1.10 m/43”
0.65 m/25.6”
85 X φ 3 mm
1200W/1.63HP
600W/0.81HP
3.3M
120V, 60HZ 35W, 1880L/420gallon/H
Laminated PVC with heat reflecve coang
SKU NO.
Color
Number of people:
Water capacity:
External diameter:
Internal diameter:
Height:
Number of air jets:
Heang device:
Bubble:
Cable Length:
Filter:
Top cover:
HTIR6BRW
Brown &White
6
1000L/264 gallons
2.08 m/82”
1.60 m/63”
0.65 m/25.6”
130 X φ 3 mm
1200W/1.63HP
600W/0.81HP
3.3M
120V, 60HZ 35W, 1880L/420gallon/H
Laminated PVC with heat reflecve coang
SKU NO.
Color
Number of people:
Water capacity:
External diameter:
Internal diameter:
Height:
Number of air jets:
Heang device:
Bubble:
Cable Length:
Filter:
Top cover:
HTIR6BKW
Brown &White
6
1000L/264 gallons
2.08 m/82”
1.60 m/63”
0.65 m/25.6”
130 X φ 3 mm
1200W/1.63HP
600W/0.81HP
3.3M
120V, 60HZ 35W, 1880L/420gallon/H
Laminated PVC with heat reflecve coang
SKU NO.
Color
Number of people:
Water capacity:
External diameter:
Internal diameter:
Height:
Number of air jets:
Heang device:
Bubble:
Cable Length:
Filter:
Top cover:
HTIR4WHBK
Black & White
4
800L/211 gallons
1.80 m/71"
1.40 m/55"
0.65 m/25.6"
110 X φ 3 mm
1200W/1.63HP
600W/0.81HP
3.3M
120V, 60HZ 35W, 1880L/420gallon/H
Laminated PVC with heat reflecve coang
SKU NO.
Color
Number of people:
Water capacity:
External diameter:
Internal diameter:
Height:
Number of air jets:
Heang device:
Bubble:
Cable Length:
Filter:
Top cover:
HTISQ4BR
Brown & White
4
600L/158 gallons
1.50 m/59"
1.10 m/43"
0.65 m/25.6"
85 X φ 3 mm
1200W/1.63HP
600W/0.81HP
3.3M
120V, 60HZ 35W, 1880L/420gallon/H
Laminated PVC with heat reflecve coang
5
3

SKU NO.
Color
Number of people:
Water capacity:
External diameter:
Internal diameter:
Height:
Number of air jets:
Heang device:
Bubble:
Cable Length:
Filter:
Top cover:
HTISQ6GY
Gray & Gray
6
950L/252 gallons
1.85 m/73”
1.50 m/59”
0.65 m/25.6”
130 X φ 3 mm
1200W/1.63HP
600W/0.81HP
3.3M
120V, 60HZ 35W, 1880L/420gallon/H
Laminated PVC with heat reflecve coang
SKU NO.
Color
Number of people:
Water capacity:
External diameter:
Internal diameter:
Height:
Number of air jets:
Heang device:
Bubble:
Cable Length:
Filter:
Top cover:
HTISQ6BKWH
Black &White
6
950L/252 gallons
1.85 m/73”
1.50 m/59”
0.65 m/25.6”
130 X φ 3 mm
1200W/1.63HP
600W/0.81HP
3.3M
120V, 60HZ 35W, 1880L/420gallon/H
Laminated PVC with heat reflecve coang
SKU NO.
Color
Number of people:
Water capacity:
External diameter:
Internal diameter:
Height:
Number of air jets:
Heang device:
Bubble:
Cable Length:
Filter:
Top cover:
HTISQ6BRWH
Brown & White
6
950L/252 gallons
1.85 m/73”
1.50 m/59”
0.65 m/25.6”
130 X φ 3 mm
1200W/1.63HP
600W/0.81HP
3.3M
120V, 60HZ 35W, 1880L/420gallon/H
Laminated PVC with heat reflecve coang
SKU NO.
Color
Number of people:
Water capacity:
External diameter:
Internal diameter:
Height:
Number of air jets:
Heang device:
Bubble:
Cable Length:
Filter:
Top cover:
HTIR6GYBR
Brown & Gray
6
1000L/264 gallons
2.08 m/82”
1.60 m/63”
0.65 m/25.6”
130 X φ 3 mm
1200W/1.63HP
600W/0.81HP
3.3M
120V, 60HZ 35W, 1880L/420gallon/H
Laminated PVC with heat reflecve coang
SKU NO.
Color
Number of people:
Water capacity:
External diameter:
Internal diameter:
Height:
Number of air jets:
Heang device:
Bubble:
Cable Length:
Filter:
Top cover:
HTISQ6GYBK
Black & Gray
6
950L/252 gallons
1.85 m/73”
1.50 m/59”
0.65 m/25.6”
130 X φ 3 mm
1200W/1.63HP
600W/0.81HP
3.3M
120V, 60HZ 35W, 1880L/420gallon/H
Laminated PVC with heat reflecve coang
6
4

c
PRIOR TO ASSEMBLY
Ensure All Parts are Present:
ab d&e
f
g
i
7
5
a. Spa Pool
b. Clip-on Top Cover
c. Inflation Hose
d. Filter Cartridge
e. Filter Cartridge cover
f. Drainage Plug
g. Repair Patches
h.Ground Sheet
i. Safety Locking Clip Keys
h
•Outdoor Installation:
1. Setup your Spa on a leve, solid foundation, and avoiding sharp objects as they could damage
the Spa.
2. Ensure your Spa is plugged into an external mains socket, professionally fitted, with weather
proofing. We DONOT recommend using an extension cable as this can be a fire risk.
3. DONOTOVERINFLATEyour Spa-Air space needs to be left inside the wall of the Spa to allow for
air expansion (during hot weather)and contraction (during colder weather).
4. DONOTPLACEyour Spa in direct sunlight-The wall and rim of the Spa could bulge during hot
weather as the PVC heats up, putting additional stress on the internal welds, causing weld failures.
5. uring filling, emptying or when in use, water may spill out. Install near to a drainage point capable
of managing the volume of water.
D
IMPORTANT:
•Indoor Installation:
1. Floor should be a non-slip, level surface.
2. Floor must be able to withstand weight of the Spa+occupants.
3. Before placing your hot tub indoors, ensure suitable drainage is available and can be reached.
Carefully consider the placement of yourSpa before installation.
4. Do not install the Spa on carpet or other material that can be damaged by moisture.

Figure 1
Fig. 2 Fig. 3
Fig. 4
5. Remove the inflation hose and screw the valve tight.
6. Remove the inflation hose from the air outlet and screw the valve cap tight.
8
6
2. Open the air outlet on the spa. Screw one end of the inflation hose
into it
(Fig. 2).
3. Open the air inlet valve on the spa. Connect the other end of inflation hose into the air inlet valve
(Fig. 3).
4.
Inflate the spa tub by pressing the
BUBBLE
button.
When the spa is
properly inflated, press the
BUBBLE
button to shut off the bubbles.
Attention :
Do not overinflate.
ASSEMBLY
1. Unfold the spa from the packaging. Spread the spa on the
Ground Sheet
(Part h)
provided.
Make sure that the surrounding sharp objects are cleared.

7
inside
use.To avoid internal pump overheating, the air
jets can be restarted after 10 minutes. The air jet function can be stopped or started again at any time during
their 20 minutes cycle.
Before using, fill the SPA with water between the “Min/ Max” lines.
Clip
on the top
cover
(Part
b)to retain heat,
and lock
clips with the
Safety
Locking
Clip
Keys
(part
i)
When
the
FILTER
PUMP
has
worked
for
168
hours,
the
le
on
the
display
screen.
It remainds user to clean/
replace a new Filter
Cartridge
(Part d).
Once done, press
“FILTER”
button again,
“FC”
willdisapper, and the
water temperature will be displayed. All function
will return to normal.

HEATER Key - On/Off key for the hea
and the red indicator lamp will be on. Press again and the hea
turn off. When the hea FILTER key will also be on
and the filter pump will start working as well. When the hea
will be con
occurrence required by the design. When the preset temperature has been reached, the hea
system will stop working, but the hea
to operate, with the indicator light on. When the water falls 2°C below the preset temperature, the
hea
8
/
Press button for increasing/ decreasing temperatures.
When then setting is finished, press “TEMPERATURE” button again to end it.
The temperature can be set in the range of 68°F~ 104 F.
Note:

2. Cleaning the Filter Cartridge
Remove the electrical plug from the mains.
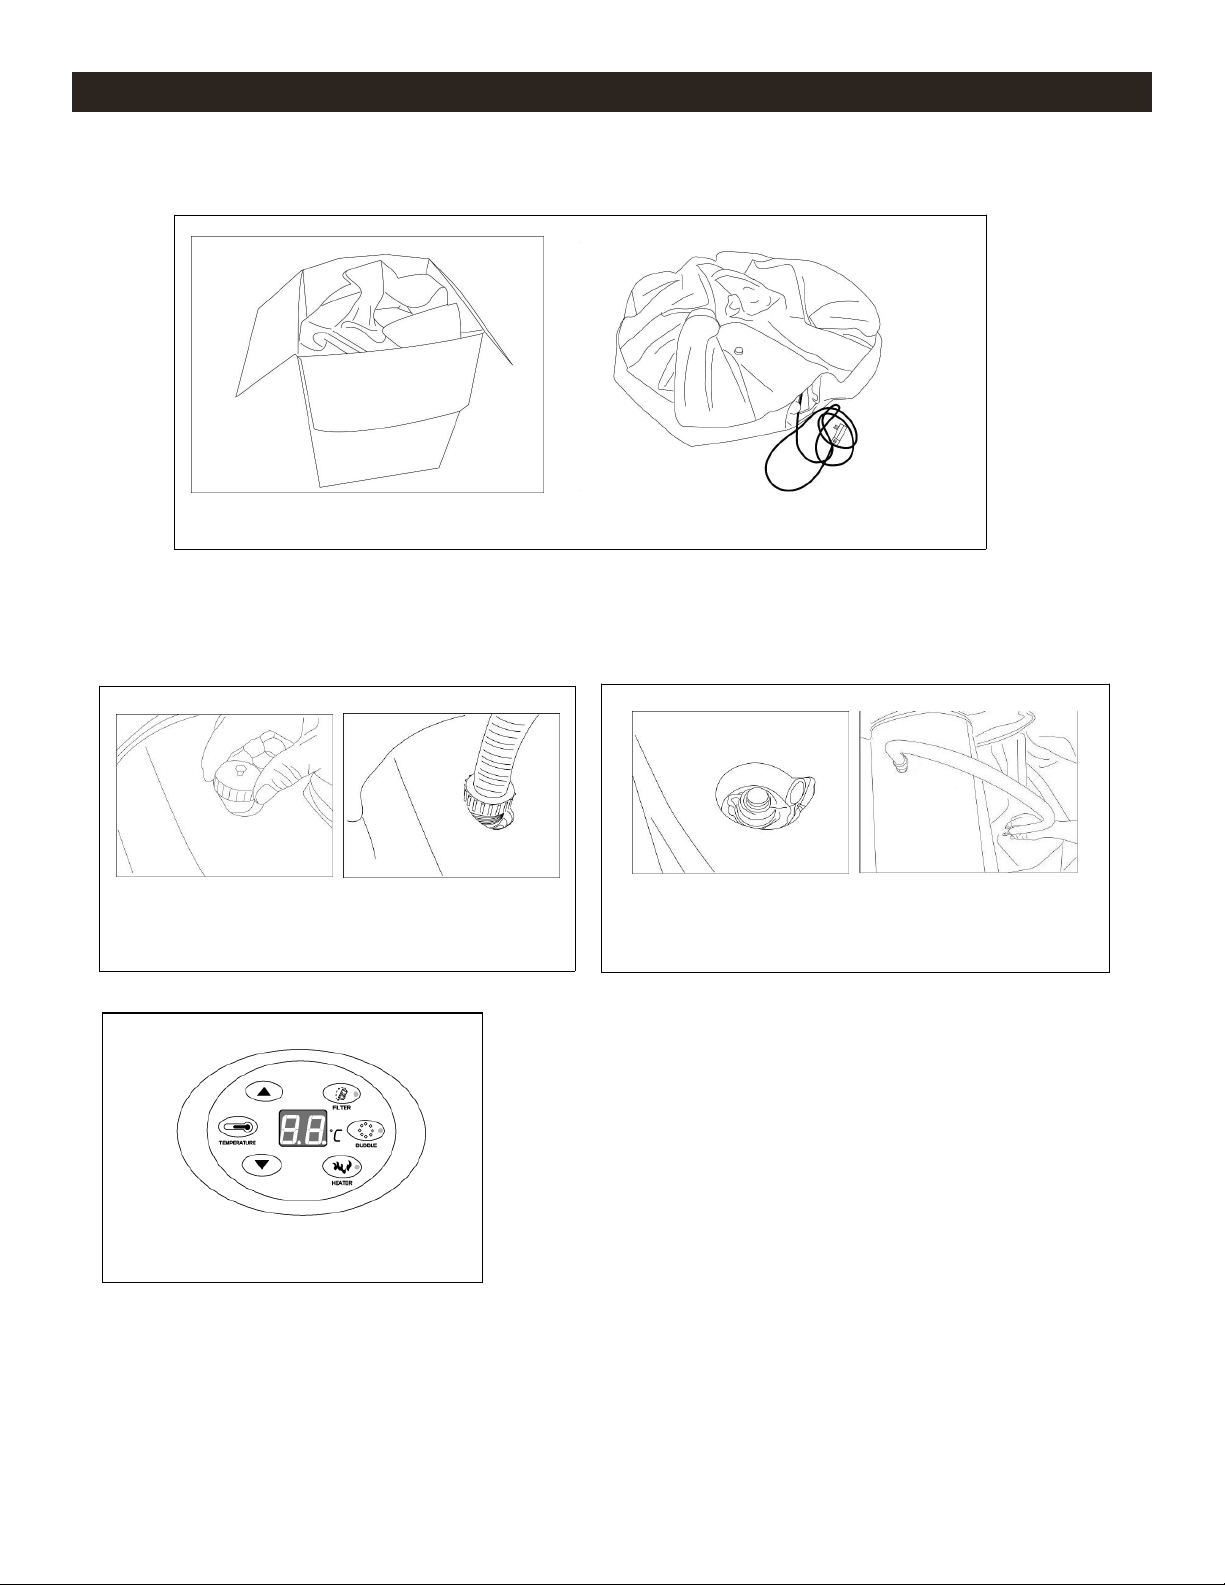
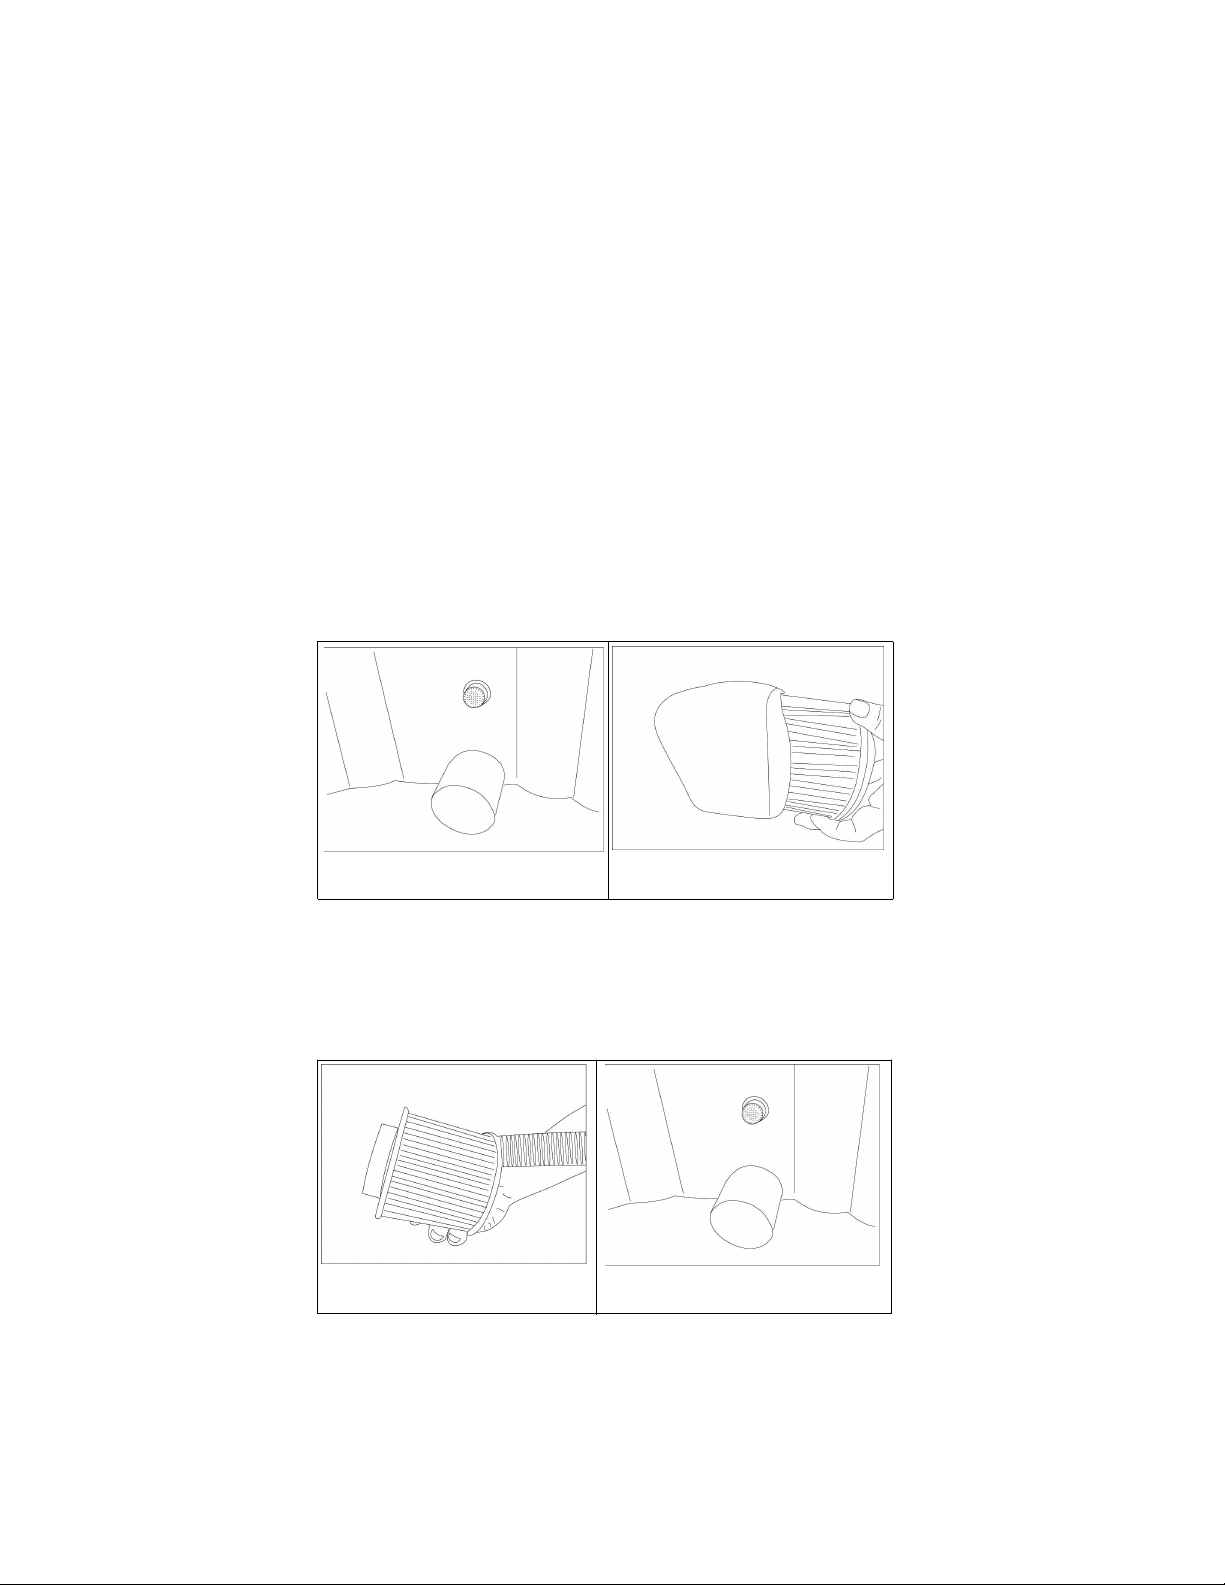
Unscrew the filter cartridge by turning counterclockwise (Fig 1).
Remove the filter cartridge cover (Fig. 2).
Fig. 1 Fig. 2
The filter cartridge can be rinsed off with a garden hose and reused. However, if the filter cartridge remains
soiled and discolored the filter cartridge should be replaced (Fig.3).
Re-apply filter cartridge cover and attach the filter cartridge to the water inlet by turning clockwise (Fig.4).
Fig. 3 Fig. 4
11
9
3. Spa Repair
If the spa is torn or punctured, use the provided repair patch.
Dry the area to be repaired.
Apply strong adhesive to Repair Patch and then cover the damaged area.
Smooth the surface to remove any air bubbles. Leave to dry for 12 hours.
MAINTENANCE
1.
Maintaining
Spa
Water
•
•
•
•
The water should be changed every few days and correct pool chemicals should be used as advised by
the specialized chemical supplier
(Do not use calcium-containing chemicals as they can form scale on the
inner heating tube and tank
walls.
This scale can also damage the electronics inside the control box,
recuding its life).
It is recommended that you keep your water's pH 7.2~7.8, total alkalinity should be 80~120ppm, and free
chlorine should be 3~5ppm. Low pH can damage your spa and pump.
A test kit should be usd to test yur water chemistry each time before you use your Spa. At least once a
week.
Water sanitation is the responsibility of the Spa owner, and can be achieved by regularly adding
approved sanitizer, which will chemically control viruses and bacteria present in the water or brought in
during use.
1)
2)
3)
4)
1)
2)
3)

MAINTENANCE
4. Cleaning the
Spa
Detergent residues and dissolved solids from bathing suits and chemicals will gradually accumulate in the
spa’s water.
To clean the spa, use soap and water then rinse.
Note: Do not use hard brushes or abrasive cleaners.
EMPTY,DEFLATE AND STORAGE
3.
Spa Storage
•
Make sure all water is drained from the spa and pump system. This is essential to extend the life of the spa.
We recommend the use of a wet/dry vacuum to blow out or suck up water from the spa pipes and pump lines.
•
Remove the filter cartridge.
•
It is recommended you store the spa in its original package in a warm dry place.
Note: Plastic becomes brittle and susceptible to breakage when exposed to subzero temperatures. Freezing can
severely damage the spa. Improper winterization of your spa may void your warranty.
1.
Empty
2)
Unscrew cap from Water Outlet below air inlet valve of Spa.
Ensure the Drainage Plug
(See the “ Part f ” picture)
is still
inserted to prevent unexpected draining.
3) Screw
Inflation
Hose
(See the “Part c” picture)
onto the Water Outlet and direct open the end of inflation hose
appropriately.
4)Remove the Drainage Plug
(Part f
)
from the floor of the Spa, so water can flow out
(Fig.5).
5)
Once drained use a sponge to absorb excess water, then you MUST
operate air jet function for at least 30
seconds to
drain the water from the air pipeline.
6) When draining is finished, remove the
Inflation
Hose
(Part c)
and replace the Drainage Plug
(Part f
)
and water outletcap.
Fig. 5
10
Remove the Spa plug from the electrical mains.
1)
2.
Deflate
1)
Find the black 1-way valve on the Spa
(See the Fig.3)
2) Fully unscrew and remove rapid deflation air valve by turning anti-clockwise to allow the air to escape.
3) Fold away the Spa carefully directly and removing as much air as possible through the open valve.

CODE CAUSESOLUTION
FC
Control Panel Error Codes
HL
SL
SH
When filtration system has worked for
approx.168 hours, “FC”will appear
on display. Red light will still be lit on
filter, pump will not be operational.
Heating system will not work, and red
light will be out on heater.
Over Temperature/ Temperature Issue
11
Unplug from mains and wait. Temperature should start to reduce
and return to normal range.
Temperature Issue
Water Temperature ensor issue
Call for service on 833-926-2323 or hello@aleko.com
Clean or replace a new Filter Cartridge (Part d).
Once
done,
press“FILTER”
button again.
“FC”
code will disapper,
and
the watertemperature will be displayed. All functions will
return
to normal.
Problems Probable Causes Solutions
Jet system does
not operate
---Air pump is too hot
---Something is wrong with the
power box
---Unplug the air pump. After the air pump has cooled, insert the
plug and press the Jet button to activate.
--- Call for service On 833-926-2323 or hello@aleko.com
Heating system
does not operate
---Temperature set too low
---Dirty filter cartridge
---Improper water levels
---Heating element failed
re
Filtering system
does not operate
---Dirty filter cartridge
---Filter screwed on too tight
---Voltage too low or incorrect frequency
---Clean/replace the filter cartridge in time.
---Loosen the Filter slightly
---Ask professional electrician to check whether the household input
voltage or frequency is normal
Spa leakage ---Spa is torn or punctured ---Use provided repair patch
Water not clean
---Insufficient filtering time
---Dirty filter cartridge
---Improper water maintenance
---Increase filtration time.
---Clean/replace the filter cartridge.
---Refer to the chemical manufacturer’s instructions.
Display temperature
is higher than 104°F,
after stopping heating
function/ HL Code
Displayed & Beeping
---Residual water in the Spa will
continue to be heated by residual
temperature
---Unplug from manins and wait 20 minutes. The temperature will start
to reduce and return to normal
Water inlet through filter system may
be blocked
---
--- Clean the inlet
--- Call for service on 833-926-2323 or hello@aleko.com
---Set
to
a
higher temperature
(68°F~
104°F) than current water temperatu
---Clean/replace
the
filter cartridge
in
time.
---Add
water
to
specified
levels.
---Call for service, On
833-926-2323
or hello@aleko.com
TROUBLESHOOTING
Here are some helpful tips to help you to diagnose and rectify some common sources of trouble.

Warning: Protection levels vary based on the Zone spa is placed in. See the below scheme:
Above figure: Zone dimensions of swimming pools and paddling pools
Note: The measured zone dimensions are not limited by walls and fixed partitions.
•A permanent grounded bond consisting of a minimum 8-guage solid copper conductive wire is required
between spa control panel grounding terminal and any metal surface located in Zone 1.
•No metal surfaces or outside electrical devices may be present within Zone 0 for any reason.
•All bonded connections must be fully-conductive and grounded.
•Electrical equipment shall have at least the following degrees of protection:
oJunction boxes shall not be installed in Zones 0 and 1.
oIn Zones 0 and 1, no switches, lights or any other electrical components shall be present.
oThe transformer must be located outside Zone 1.
We decline liability for any damage or accident derived from any use of this product
which is not in conformity with the instructions contained in this booklet.
Please consult a licensed electrician for further electrical installation guidelines,
or in placement scenarios not specifically mentioned in this manual.
CORRECT DISPOSAL OF THIS PRODUCT
This marking indicates that this product should not be disposed with other
household wastes throughout the EU. To prevent possible harm to the
environment or human health from uncontrolled waste disposal, recycle it
responsibly to promote the sustainable reuse of material resources. To
return your used device, please use the return and collection systems or
contact the retailer where the product was purchased. They can take this
product for environmental safe recycling.
Copyright 2019 ALEKO. All rights reserved. No part of this manual may be reproduced or transmitted in any form
or by any means without the express written permission of ALEKO.
ALEKO Inflatable Spas, website: www.AlekoProducts.com
(Read this entire manual before operation)
ELECTRICAL PROTECTION LEVEL
12

SCAN QR CODE WITH YOUR MOBILE
DEVICE FOR MORE INFORMATION
RACT
ERS ALEKO
®
ngs ALEKOProduc-
S 10X8 12X10
KOProductis.
WE LOVE OUR
®
Awnings ALEKOProductis.
ALEKOProductis.com WE LOVE OUR
AWNINGS SIZES 10X8 12X10 13X10 MANUAL
CUSTOMERS ALEKO
®
Awnings ALEKOProductis.com RE-
MANUAL ALEKO
®
Awnings ALEKOProductis.com WE LOVE OUR
roductis.com RETRACTABLE AWNINGS SIZES 10X8 12X10 13X10 MANUAL
Productis.com WE LOVE OUR CUSTOMERS ALEKO
®
Awnings ALEKOProductis.com
12X10 13X10 MANUAL ALEKO
®
Awnings ALEKOProductis.com WE LOVE
®
Awnings ALEKOProductis.com RETRACTABLE AWNINGS SIZES 10X8 12X10
MANUAL ALEKO
®
Awnings ALEKOProductis.com WE LOVE OUR CUSTOMERS ALEKO
®
Awnings
ALEKOProductis.com RETRACTABLE AWNINGS SIZES 10X8 12X10 13X10 MANUAL ALEKO
®
Awnings
ALEKOProductis.com WE LOVE OUR CUSTOMERS ALEKO
®
Awnings ALEKOProductis.com RETRACT-
TRACTABLE AWNINGS SIZES 10X8 12X10 13X10 MANUAL ALEKO
®
Awnings ALEKOProductis.com WE
WE LOVE OUR CUSTOMERS ALEKO
®
Awnings ALEKOProductis.com RETRACTABLE AWNINGS
SIZES 10X8 12X10 13X10 MANUAL ALEKO
®
Awnings ALEKOProductis.com WE LOVE OUR
LOVE OUR CUSTOMERS ALEKO
®
Awnings ALEKOProductis.com RETRACTABLE AWNINGS SIZES
AWNINGS SIZES 10X8 12X10 13X10 MANUAL ALEKO
®
Awnings ALEKOProductis.com WE LOVE OUR
WE LOVE OUR CUSTOMERS ALEKO
®
Awnings ALEKOProductis.com RETRACTABLE AWNINGS
RETRACTABLE AWNINGS SIZES 10X8 12X10 13X10 MANUAL ALEKO
®
Awnings ALEKOProductis.com WE
Productis.com WE LOVE OUR CUSTOMERS ALEKO
®
Awnings ALEKOProductis.com RETRACT-
Productis.com RETRACTABLE AWNINGS SIZES 10X8 12X10 13X10 MANUAL ALEKO
®
Awnings
MANUAL ALEKO
®
Awnings ALEKOProductis.com WE LOVE OUR CUSTOMERS ALEKO
®
Awnings
OUR CUSTOMERS ALEKO
®
Awnings ALEKOProductis.com RETRACTABLE AWNINGS SIZES 10X8
RETRACTABLE AWNINGS SIZES 10X8 12X10 13X10 MANUAL ALEKO
®
Awnings ALEKOProductis.
®
Awnings ALEKOProductis.com WE LOVE OUR CUSTOMERS ALEKO
®
Awnings
CUSTOMERS ALEKO
®
Awnings ALEKOProductis.com RETRACTABLE AWNINGS
Productis.com RETRACTABLE AWNINGS SIZES 10X8 12X10 13X10 MANUAL ALEKO
®
10X8 12X10 13X10 MANUAL ALEKO
®
Awnings ALEKOProductis.com WE
O
®
Awnings ALEKOProductis.com WE LOVE OUR CUSTOMERS ALEKO
®
oductis.com WE LOVE OUR CUSTOMERS ALEKO
®
Awnings ALEKOProductis.
CUSTOMERS ALEKO
®
Awnings ALEKOProductis.com RETRACTABLE
ALEKO
®
Awnings ALEKOProductis.com RETRACTABLE AWNINGS
ALEKO
®
Awnings ALEKOProductis.com RETRACTABLE AWNINGS SIZES
CUSTOMERS ALEKO
®
Awnings ALEKOProductis.com RETRACTABLE AWNINGS SIZES
OUR CUSTOMERS ALEKO
®
Awnings ALEKOProductis.com RETRACTABLE AWNINGS
Productis.com WE LOVE OUR CUSTOMERS ALEKO
®
Awnings ALEKOProductis.com RETRACT-
ALEKO
®
Awnings ALEKOProductis.com WE LOVE OUR CUSTOMERS ALEKO
®
Awnings ALEKO-
IZES 10X8 12X10 13X10 MANUAL ALEKO
®
Awnings ALEKOProductis.com WE LOVE OUR
OProductis.com RETRACTABLE AWNINGS SIZES 10X8 12X10 13X10 MANUAL ALEKO
®
ctis.com WE LOVE OUR CUSTOMERS ALEKO
®
Awnings ALEKOProductis.com RETRACT-
ABLE AWNINGS SIZES 10X8 12X10 13X10 MANUAL ALEKO
®
Awnings ALEKOProductis.com WE
LOVE OUR CUSTOMERS ALEKO
®
Awnings ALEKOProductis.com RETRACTABLE
AWNINGS SIZES 10X8 12X10 13X10 MANUAL ALEKO
®
Aw-
nings ALEKOProductis.
ALEKO
®
Aw-
nings ALEKOProductis.com RE-
TRACTABLE AWNINGS SIZES 10X8 12X10 13X10 MAN-
UAL ALEKO
®
Awnings ALEKOProductis.com WE LOVE OUR
CUSTOMERS ALEKO
®
Awnings ALEKOProductis.com RETRACTABLE AWNINGS
SIZES 10X8 12X10 13X10 MANUAL ALEKO
®
Awnings ALEKOProductis.com W
OUR CUSTOMERS ALEKO
®
Awnings ALEKOProductis.com RETRACTABLE
12X10 13X10 MANUAL ALEKO
®
Awnings ALEKOProductis.com WE LOVE
Awnings ALEKOProductis.com RETRACTABLE AWNINGS SIZES 10X8
ALEKOProductis.com WE LOVE OUR CUSTOMERS ALEKO
®
NINGS SIZES 10X8 12X10 13X10 MANUAL ALEKO
®
Awnings
Awnings ALEKOProductis.com RETRACTABLE AW
tis.com WE LOVE OUR CUSTOMERS ALEKO
®
MANUAL ALEKO
®
Awnings ALEKOP
AWNINGS SIZES 10X8 12X10 13X10
KOProductis.com RE
TOMERS ALEKO
®
Awnings ALEKO
tis.com WE LOVE OUR C
Awnings A
MANU
ALEKO
®
TOMERS
CUSTO
OUR CU
LO
ALEKO
Products
8307 S 192ND ST. KENT, WA 98032
hello@aleko.com
PHONE: 833-926-2323
ALEKO.COM
YOUTUBE.COM/ALEKOPRODUCTS
Other manuals for HTIO2BLD
1
This manual suits for next models
16
Table of contents
Other Aleko Hot Tub manuals
Popular Hot Tub manuals by other brands

Hikki
Hikki Bohemen How to assemble

RivieraPool
RivieraPool Vitara Instructions for installation and use

American Standard
American Standard Cadenza Elite 6060EC Features & dimensions

Aquatic
Aquatic AI32AIR6036HS Specification sheet

Intex
Intex Greywood Deluxe owner's manual

Jacuzzi
Jacuzzi U961000 Installation and operation instructions