Alesis Melody61 MKII User manual

User Guide
English ( 3 – 8 )
Guía del usuario
Español ( 9 – 14 )
Guide d’utilisation
Français ( 15 – 20 )
Guida per l’uso
Italiano ( 21 – 26 )
Benutzerhandbuch
Deutsch ( 27 – 32 )
Appendix
English ( 33 )
MKII

2

3
User Guide (English)
Introduction
Box Contents
Melody 61 MKII
Microphone
Headphones
Music Rest
Keyboard Stand
Bench
Power Adapter
User Guide
Safety & Warranty Manual
Support
For the latest information about this product (system requirements, compatibility information, etc.) and
product registration, visit alesis.com.
For additional product support, visit alesis.com/support.
Setup
Bench
Stand
1 23
Keyboard
Strap
Keyboard
Strap x2
1 2 34

4
MIC PHONES
DC 12V
Connection Diagram
Items not listed in Introduction > Box Contents are sold separately.
Microphone
Power
Headphones
DC 9V

5
Features
Top Panel
1. Power On/Off: Press this button to turn the keyboard on or off.
2. Transpose: Press the Transpose + or Transpo se – button to increase or decrease the
pitch of the keyboard by a half-step. Press the Transpose + and Transpose – buttons
simultaneously to reset to the default value.
3. Rhythm Volume: Press the Rhythm Vol + or Rhythm Vol – button to increase or
decrease accompaniment rhythm volume. Press the Rhythm Vol + and Rhythm Vol –
simultaneously to reset to the default value.
4. Chord Volume: Press the Chord Vol + or Chord Vol –button to increase or decrease
accompaniment chord volume. Press the Chord Vol + and Chord Vol – buttons
simultaneously to reset to the default value.
5. Master Volume: Press the Master Vol + or Master Vol – button to increase or decrease
the overall volume for the sounds and rhythms. Press the Master Vol + and Master Vol –
buttons simultaneously to reset to the default value.
6. Te m p o : Press the Tempo + or Te m p o – button to increase or decrease the speed of the
rhythm and chord accompaniment, demo song and/or metronome. Press the Te mp o +
and Te m p o – buttons simultaneously to reset to the default value.
7. Demo: Press this button to begin playback of the demonstration songs. Use the number
buttons or +or -buttons to select another demonstration song. Press this button again to
stop the playback.
8. One-Key: Press this button to start the one-key function. This function lets you play
along with the demo songs by pressing any key to the rhythm of the song. Use the
number buttons or the +or -buttons to select another demonstration song.
9. LED Display: Shows the various keyboard functions and numerical values.
10. Program: Press this button to program a custom accompaniment rhythm.
11. Play: Press this button to playback a custom accompaniment rhythm or recorded song.
12. Record: Press this button to record a custom song.
13. To n e : Press this button and then use the number buttons or the +or -buttons to select a
tone.
14. Rhythm: Press this button and then use the number buttons or the +or -buttons to
select an accompaniment rhythm.
15. Numbers: Use these buttons to select an instrument, rhythm, song, or tempo.
16. Sync: Press the Sync button, and then play the keys in the lowest two octaves
(corresponding to the chords/notes). The play-along feature starts immediately when
playing a key, instead of having to press the Start/Stop button to start it.
17. Start/Stop: Press to start or stop an accompaniment rhythm.
18. Fill In: Press this button to have a temporary rhythm play during the accompaniment
rhythm.
1
1
2
3
4
5
6
7
8
9
10
10
11
11
12
12
13
13
14
14
15
15
16
16
17
17
18
18
19
19
20
20
21
21
22
22
23
23
24
24
25
25
26
26
27
27
28
28

6
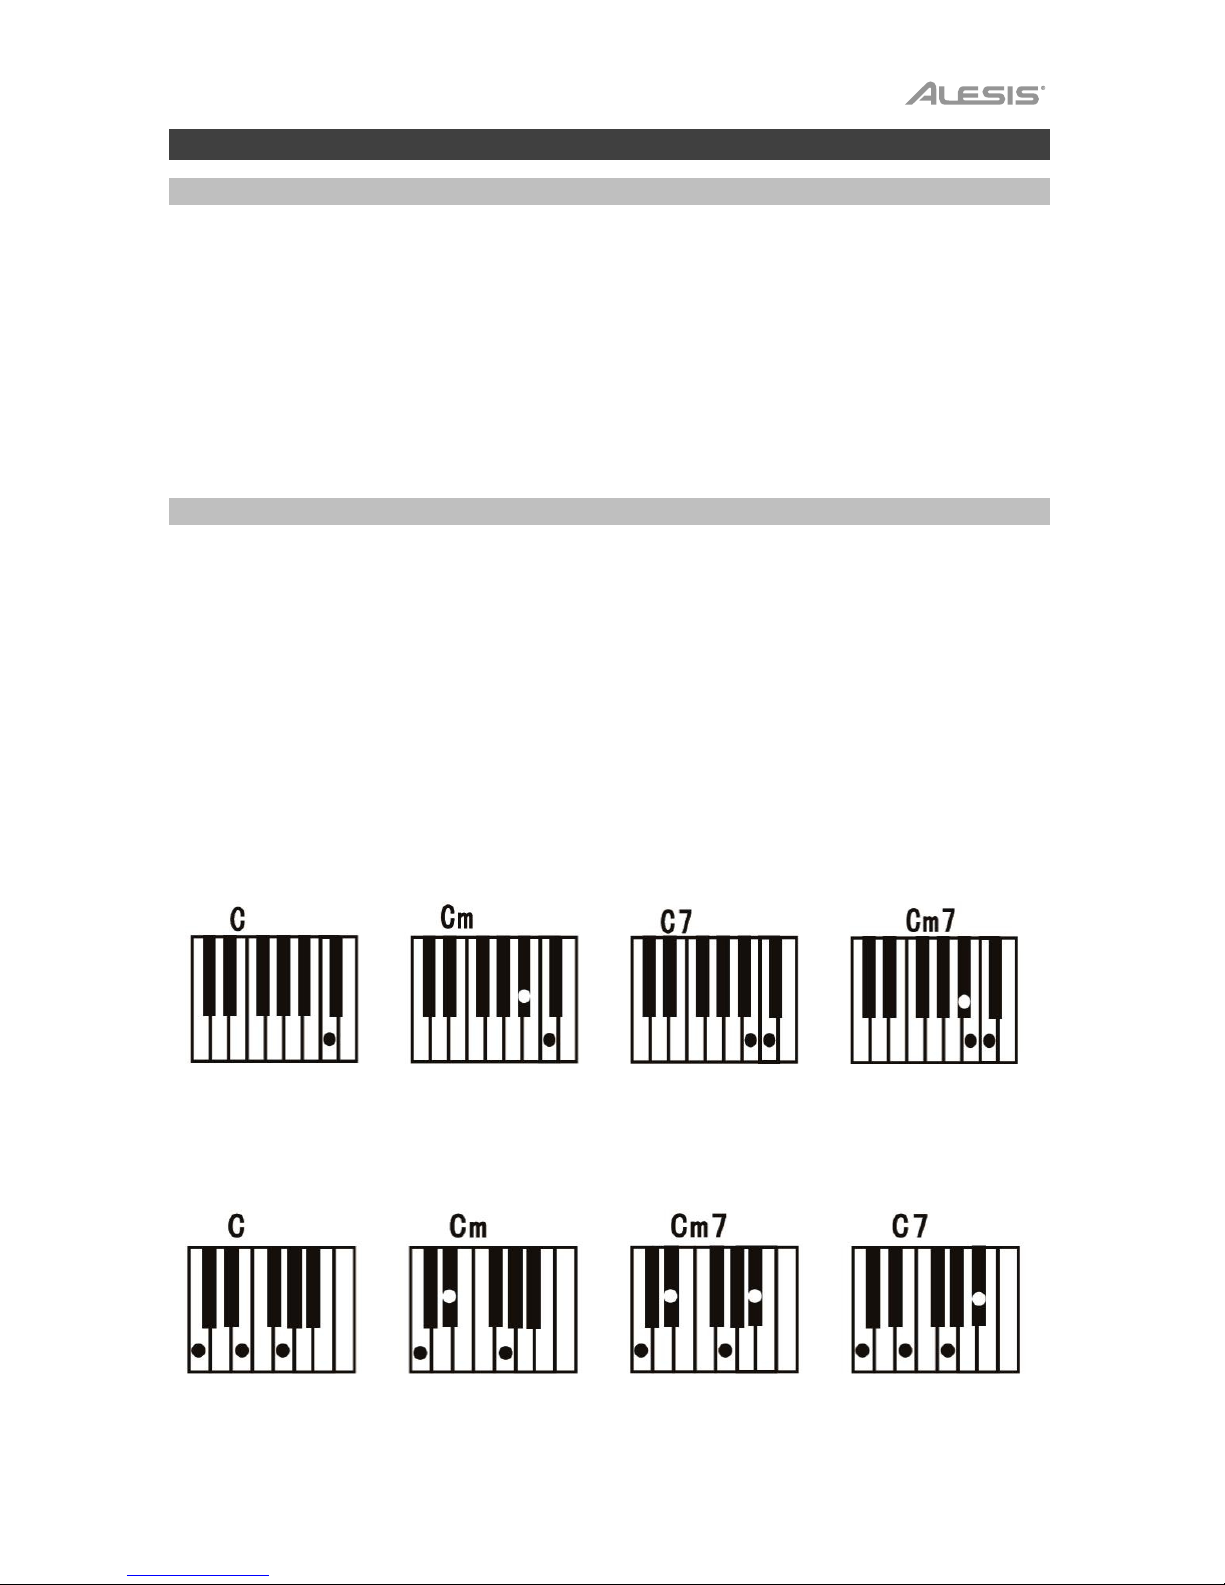
19. Single Chord: Press this button to enable the Single automatic chord feature. This
feature will generate chords for the accompaniment rhythms based on the keys you play
that are the second lowest F# key or lower on the keyboard. The available chords for this
function are described in Operation > Accompaniment Rhythm.Press this button again
or press the Chord Clear button to disable the chord function.
20. Fingered Chord: Press this button to enable the Fingered automatic chord feature. This
feature will generate chords for the accompaniment rhythms based on the keys you play
(the second lowest F# key or lower on the keyboard). The available chords for this
function are described in Operation > Accompaniment Rhythm.Press this button again
or press the Chord Clear button to disable the chord function.
21. Chord Clear: Press this button to turn the Single Chord/Fingered Chord feature off.
22. Sustain: Press this button to activate a sustain effect which simulates a sustain pedal
when playing the keyboard. Press this button again to disable the sustain effect.
23. Vibrato: Press this button to activate a pulsating change to the pitch when playing the
keyboard. Press this button again to disable to vibrato effect.
24. Dual: Press this button to layer two sounds together. The sound that you were using
before pressing the Dual button will be used for one part of the layer. To select the other
sound for the layer, enter a number for the sound or use the +and –buttons. Press the
Dual button again to disable the dual-tone function.
25. Split: Press this button to split the keyboard into two zones. The sound that you were
using before pressing the Split button will be applied to the left-hand side of the
keyboard. To select a sound for the right-hand side, enter a number for the sound or use
the +and –buttons. Press the Split button again to disable the keyboard split.
26. Percussion: Press this button to play the built-in drum kit and percussion sounds using
the keys. Press this button again to disable this function.
27. Intro/Ending: Press this button to play an intro and then start playback of an
accompaniment rhythm. Press this button while the accompaniment rhythm is playing to
play an outro and then stop playback of an accompaniment rhythm.
28. Beat: Press this button to start the metronome. Press this button again to change the
time signature of this button or turn off the metronome.
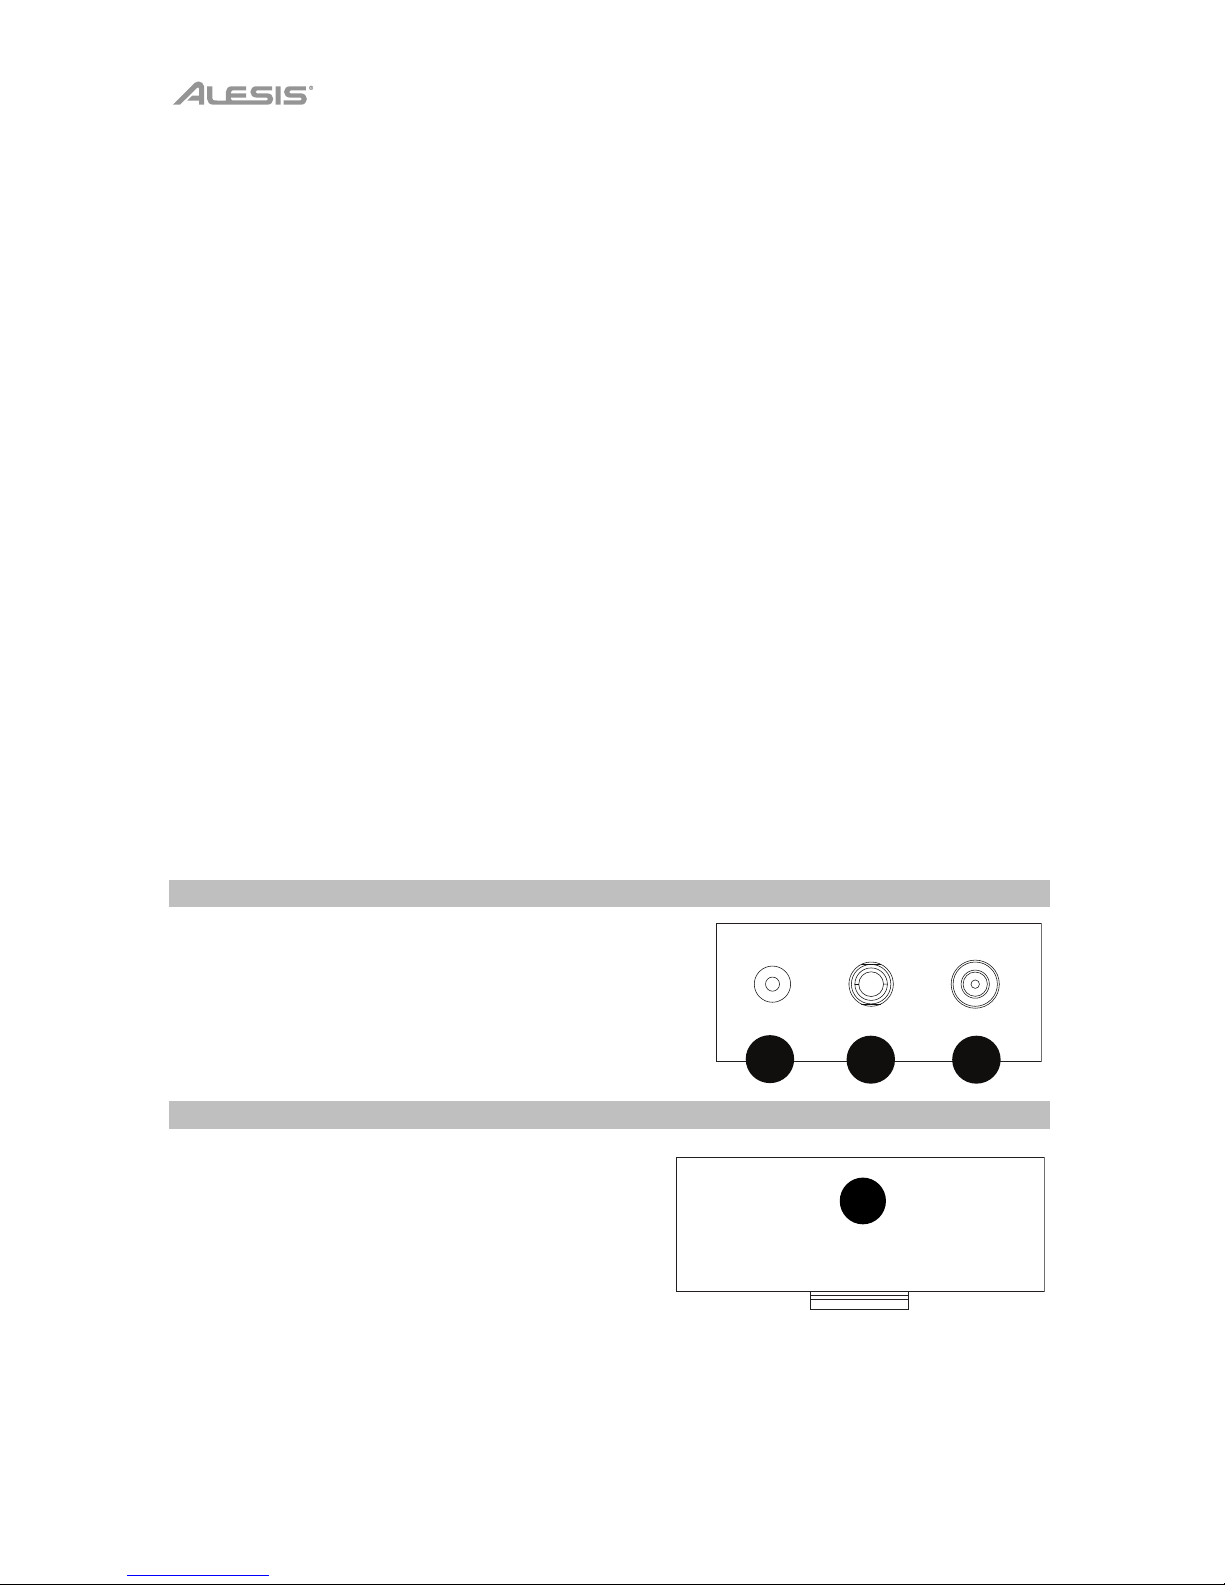
Rear Panel
1. Mic: Connect the included microphone here to
sing while playing the keyboard.
2. Phones: Connect the included headphones here to
hear the keyboard and mute the internal speakers.
3. Power Input: Connect the included power adapter
here.
Bottom Panel
1. Battery Compartment: Install 6 “AA”
batteries here to power the keyboard if you
are not using the power adapter.
1
MIC PHONES DC 12V
12 3
DC 9
V

7
Operation
Selecting a Tone
To select a tone, press Tone then use the number buttons or the +and –buttons.
To layer two sounds together, press the Dual button. The sound that you were using before
pressing the Dual button will be used for one part of the layer. To select the other sound for
the layer, enter a number for the sound or use the + and – buttons. Press the Dual button
again to disable the dual-tone function.
To split the keyboard into two zones, press the Split button. The sound that you were using
before pressing the Split button will be applied to the left-hand side of the keyboard. To select
a sound for the right-hand side, enter a number for the sound or use the + and – buttons.
Press the Split button again to disable the keyboard split.
Accompaniment Rhythm
To select an accompaniment rhythm, press Rhythm then use the number buttons or the +and
–buttons.
To start or stop an accompaniment rhythm, press the Start/Stop button.
To have the accompaniment rhythm play a fill, press the Fill In button.
Press the Single Chord or Fingered Chord button to enable the automatic chord features.
These features will generate chords for the accompaniment rhythms based on the keys you
play that are the second lowest F# key or lower on the keyboard. Press this button again or
press the Chord Clear button to disable the chord function.
Single Chord:
When using the Single Chord feature you can use the abbreviated chord shapes shown below
starting on any note to play major, minor, seventh, or minor seventh chords.
Fingered Chord:
When using the Single Chord feature you can use the full chord shapes shown below starting
on any note to play major, minor, seventh, or minor seventh chords.

8
Recording Function
1. To record your playing, press the Record button to start recording a song.
2. During the recording process, press Play to stop recording. Press Play again to play the
recorded song.
3. Press Play again to stop playback.
Note: The recorded song will be erased when recording is started again or when the
keyboard is turned off. When the memory is full, the screen will display “FUL”, and
recording will automatically stop.
Rhythm Programming
To create custom accompaniment rhythms using the keyboard keys:
1. Press the Program button and start programming the rhythm by playing each note in the
pattern, one at a time.
2. Press Play to stop programming and hear the programmed rhythm.
3. Press the Program button again to disable the programming function and erase the
programming rhythm.
Note: The programmed rhythm will be erased when programming is performed again or if the
keyboard is turned off.
Auto-power Off
After 5 minutes of inactivity, Melody 61 MKII will power off. If you press any button or key, it
will turn back on.

9
Guía del usuario (Español)
Introducción
Contenido de la caja
Melody 61 MKII
Micrófono
Auriculares
Atril
Soporte para teclado
Banco
Adaptador de corriente
Guía del usuario
Manual sobre la seguridad y garantía
Soporte
Para obtener la información más reciente acerca de este producto (requisitos de sistema,
información de compatibilidad, etc.) y registrarlo, visite alesis.com.
Para obtener soporte adicional del producto, visite alesis.com/support.
Instalación
Banco
Soporte
1 23
Banda de
teclado x2
1 2 34

10
MIC PHONES
DC 12V
Diagrama de conexión
Los elementos que no se enumeran en Introducción > Contenido de la caja se venden por
separado.
Micrófono
Suministro
eléctrico
Auriculares
DC 9V

11
Características
Panel superior
1. Encendido/apagado: Pulse este botón para encender o apagar el teclado.
2. Transponer: Pulse el botón Transpose + o Tra nspose – para aumentar o disminuir el
tono en medio tono. Pulse los botones Transpose + y Transpose – simultáneamente
para restaurar el valor por defecto.
3. Volumen del ritmo: Pulse el botón Rhythm Vol + o Rhythm Vol – para aumentar o
disminuir el volumen del ritmo del acompañamiento. Pulse los botones Rhythm Vol + y
Rhythm Vol – simultáneamente para restaurar el valor por defecto.
4. Volumen de los acordes: Pulse el botón Chord Vol + o Chord Vol –para aumentar o
disminuir el volumen de los acordes del acompañamiento. Pulse los botones Chord Vol
+y Chord Vol – simultáneamente para restaurar el valor por defecto.
5. Volumen maestro: Pulse el botón Master Vol + o Master Vol – para aumentar o
disminuir el volumen general para los sonidos y los ritmos. Pulse los botones Master Vol
+y Master Vol – simultáneamente para restaurar el valor por defecto.
6. Te m p o : Pulse el botón Te m p o + o Tempo – para aumentar o disminuir la velocidad del
ritmo y el acorde del acompañamiento, el tema demo y/o el metrónomo. Pulse los
botones Te mpo + y Tem p o – simultáneamente para restaurar el valor por defecto.
7. Demo: Pulse este botón para iniciar y detener la reproducción de los temas demo. Utilice
los botones numéricos o los botones +o – para seleccionar otra canción de
demostración. Pulse este botón nuevamente para detener la reproducción.
8. One-Key: Pulse este botón para iniciar la función de una tecla. Esta función le permite
tocar acompañando los temas demo pulsando cualquier tecla al ritmo de la canción.
Utilice los botones numéricos o los botones +o – para seleccionar otra canción de
demostración.
9. Pantalla de LED: Muestra las diversas funciones del teclado y valores numéricos.
10. Program: Pulse este botón para seleccionar un ritmo de acompañamiento
personalizado.
11. Play: Pulse este botón para reproducir un ritmo de acompañamiento personalizado o una
canción grabada.
12. Record: Pulse este botón para grabar un ritmo personalizado.
13. To n e : Pulse este botón y luego utilice los botones numéricos o los botones +o -Para
seleccionar un tono.
14. Rhythm: Pulse este botón y luego utilice los botones numéricos o los botones +o -Para
seleccionar un ritmo de acompañamiento.
15. Números: Utilice estos botones para seleccionar un instrumento, ritmo, canción o
tempo.
1
1
2
3
4
5
6
7
8
9
10
10
11
11
12
12
13
13
14
14
15
15
16
16
17
17
18
18
19
19
20
20
21
21
22
22
23
23
24
24
25
25
26
26
27
27
28
28

12
16. Sincronización: Pulse el botón Sync y luego toque las teclas de las dos octavas más
bajas (correspondientes a los acordes/notas). La característica para tocar sobre pistas
comienza inmediatamente al tocar una tecla, en lugar de tener que pulsar el botón
Start/Stop para que empiece.
17. Iniciar/parar: Pulse este botón para iniciar o detener un ritmo de acompañamiento.
18. Relleno: Pulse este botón para hacer que se reproduzca un ritmo temporal durante el
ritmo de acompañamiento.
19. Single Chord: Pulse este botón para activar la característica de acorde automático
único. Esta característica genera acordes para los ritmos de acompañamiento basados
en las teclas que usted toca que son la segunda tecla más baja fa sostenido (F#) o más
baja en el teclado. Los acordes disponibles para esta función se describen en Operación
> Ritmo de acompañamiento.Pulse nuevamente este botón o pulse el botón Chord
Clear para desactivar la función de acorde.
20. Fingered Chord: Pulse este botón para activar la característica de acorde automático
con teclas. Esta característica genera acordes para los ritmos de acompañamiento
basados en las teclas que usted toca (la segunda tecla más baja fa sostenido (F#) o más
baja en el teclado). Los acordes disponibles para esta función se describen en
Operación > Ritmo de acompañamiento.Pulse nuevamente este botón o pulse el
botón Chord Clear para desactivar la función de acorde.
21. Chord Clear: Pulse este botón para activar y desactivar la características de acorde
único/acorde con teclas.
22. Sostenido: Pulse este botón para activar un efecto de sostenido que simula el pedal de
sostenido cuando se toca el teclado. Pulse este botón nuevamente para desactivar el
efecto de sostenido.
23. Vibrato: Pulse este botón para activar un cambio pulsante al tono al tocar el teclado.
Pulse este botón nuevamente para desactivar el efecto de vibrato.
24. Dual: Pulse este botón para disponer dos sonidos en capas. El sonido que estaba
utilizando antes de pulsar el botón Dual se utilizará en una parte de la capa. Para
seleccionar el otro sonido de la capa, introduzca un número para el sonido o utilice los
botones +y –.Pulse el botón Dual nuevamente para desactivar la función de tono doble.
25. Split: Pulse este botón para dividir el teclado en dos zonas. El sonido que estaba
utilizando antes de pulsar el botón Split se aplicará al lado izquierdo del teclado. Para
seleccionar el sonido del lado derecho, introduzca un número para el sonido o utilice los
botones +y –.Pulse el botón Split nuevamente para desactivar la división del teclado.
26. Percussion: Pulse este botón para reproducir los sonidos de percusión y batería
integrados utilizando las teclas. Pulse este botón nuevamente para desactivar esta
función.
27. Intro/Ending: Pulse este botón para reproducir una introducción y luego iniciar la
reproducción de un ritmo de acompañamiento. Pulse este botón mientras se reproduce
el ritmo para reproducir una secuencia final y luego detener la reproducción del ritmo de
acompañamiento.
28. Beat: Pulse este botón para iniciar el metrónomo. Pulse este botón nuevamente para
cambiar la firma de tiempo de este botón o apagar el metrónomo.
Panel trasero
1. Mic: Conecte aquí el micrófono incluido para
cantar mientras toca el teclado.
2. Phones: Conecte aquí los auriculares incluidos
para escuchar el teclado y silenciar los altavoces
internos.
3. Entrada de corriente: Conecte aquí el adaptador
de corriente incluido.
MIC PHONES DC 12V
12 3
DC 9V

13
Panel inferior
1. Compartimiento para pilas: Instale aquí 6
baterías "AA" para alimentar el teclado digital
Recital si no está utilizando el adaptador de
corriente.
Funcionamiento
Cómo seleccionar un tono
Para seleccionar un tono, pulse Tone y luego utilice los botones numéricos o los botones +y
–.
Para tocar en capa dos sonidos juntos, pulse el botón Dual. El sonido que estaba utilizando
antes de pulsar el botón Dual se utilizará en una parte de la capa. Para seleccionar el otro
sonido de la capa, introduzca un número para el sonido o utilice los botones +y –. Pulse el
botón Dual nuevamente para desactivar la función de tono doble.
Para dividir el teclado en dos zonas, pulse el botón Split. El sonido que estaba utilizando
antes de pulsar el botón Split se aplicará al lado izquierdo del teclado. Para seleccionar el
sonido del lado derecho, introduzca un número para el sonido o utilice los botones +y –.
Pulse el botón Split nuevamente para desactivar la división del teclado.
Ritmo del acompañamiento
Para seleccionar un ritmo del acompañamiento, pulse Rhythm y luego utilice los botones
numéricos o los botones +y –.
Para iniciar o detener un ritmo del acompañamiento, pulse el botón Start/Stop.
Para que el ritmo del acompañamiento reproduzca un relleno, pulse el botón Fill In.
Pulse el botón Single Chord oFingered Chord para activar las características de acorde
automático. Estas características generan acordes para los ritmos de acompañamiento
basados en las teclas que usted toca que son la segunda tecla más baja fa sostenido (F#) o
más baja en el teclado. Pulse nuevamente este botón o pulse el botón Chord Clear para
desactivar la función de acorde.
1

14
Single Chord:
Cuando utiliza la característica Single Chord (Acorde único), puede utilizar las formas de
acordes abreviadas mostradas a continuación antes de comenzar en cualquier nota a
reproducir acordes mayores, menores, de séptima o de séptima menores.
Fingered Chord:
Cuando utiliza la característica Single Chord, puede utilizar las formas de acordes completas
mostradas a continuación antes de comenzar en cualquier nota a reproducir acordes
mayores, menores, de séptima o de séptima menores.
Función de grabación
1. Para grabar su interpretación, pulse el botón Record a fin de iniciar la grabación de un
tema.
2. Durante el proceso de grabación, pulse Play para detener la grabación. Pulse Play
nuevamente para reproducir el tema grabado.
3. Pulse Play nuevamente para detener la reproducción.
Nota: El tema grabado se borrará cuando se inicie una nueva grabación o cuando se
apague el teclado. Cuando la memoria se encuentre llena, la pantalla mostrará “FUL” y la
grabación se detendrá automáticamente.
Programación de ritmos
Para crear ritmos de acompañamiento personalizados con las teclas del teclado:
1. Pulse el botón Program y comience a programar el ritmo tocando cada una de las notas
del patrón de a una a la vez.
2. Pulse Play para detener la programación y escuchar el ritmo programado.
3. Pulse el botón Program nuevamente para desactivar la función de programación y borrar
el ritmo de programación.
Nota: El ritmo programado se borrará cuando se realice una nueva programación o cuando se
apague el teclado.
Apagado automático
Después de 5 minutos de inactividad, el Melody 61 MKII se apaga. Si pulsa cualquier botón o
tecla, se encenderá nuevamente.

15
Guide d’utilisation (Français)
Présentation
Contenu de la boîte
Melody 61 MKII
Microphone
Casque d'écoute
Pupitre
Support pour clavier
Banc
Câble d’alimentation
Guide d'utilisation
Consignes de sécurité et informations concernant la garantie
Assistance technique
Pour les toutes dernières informations concernant la configuration système requise, la
compatibilité, etc., et l’enregistrement du produit, veuillez visiter alesis.com.
Pour de l’assistance supplémentaire, veuillez visiter alesis.com/support.
Installation
Banc
Support pour clavier
1 2 3
2 courroies
pour clavier
1 2 3 4

16
MIC PHONES
DC 12V
Schéma de connexion
Les éléments qui ne figurent pas dans la section Présentation > Contenu de la boîte sont
vendus séparément.
Microphone Alimentation
Casque d’écoute
DC 9V
DC 9V

17
Caractéristiques
Panneau supérieur
1. Interrupteur d’alimentation : Cette touche permet de mettre le clavier sous et hors
tension.
2. Transpositi on : Utilisez les touches Transpose +et Transp ose –afin d'augmenter ou de
diminuer la hauteur tonale du clavier en demi-tons. Appuyez sur les deux touches
Transpose + et Transpose – simultanément afin de réinitialiser la valeur par défaut.
3. Volume du rythme : Utilisez les touches Rhythm Vol +et Rhythm Vol –afin d'augmenter
ou de diminuer le volume du rythme d’accompagnement. Appuyez sur les deux touches
Rhythm Vol + et Rhythm Vol – simultanément afin de réinitialiser la valeur par défaut.
4. Volume de l’accord : Utilisez les touches Chord Vol + et Chord Vol –afin d'augmenter
ou de diminuer le volume de l’accord d’accompagnement. Appuyez sur les deux touches
Rhythm Chord Vol + et Chord Vol –simultanément afin de réinitialiser la valeur par
défaut.
5. Volume général : Utilisez les touches Master Vol + et Master Vol – afin d'augmenter ou
de diminuer le volume général pour tous les sons et rythmes. Appuyez sur les deux
touches Master Vol + et Master Vol – simultanément afin de réinitialiser la valeur par
défaut.
6. Te m p o : Utilisez les touches Temp o + et Te m po – afin d'augmenter ou de diminuer la
vitesse du rythme et de l’accord d’accompagnement. Appuyez sur les deux touches
Te m p o + et Tempo – simultanément afin de réinitialiser la valeur par défaut.
7. Demo : Cette touche permet de lancer la lecture des chansons de démonstration. Utiliser
les touches numériques ou les touches +et –permet de sélectionner une autre chanson
de démonstration. Appuyer de nouveau sur cette touche permet d’arrêter la lecture.
8. One-Key : Cette touche permet de lancer la fonction one-key. Cette fonction vous
permet de jouer avec les chansons de démonstration en appuyant sur n’importe quelle
touche au rythme de la chanson. Utiliser les touches numériques ou les touches +et –
permet de sélectionner une autre chanson de démonstration.
9. Affichage DEL : Affiche les diverses fonctions du clavier et les valeurs numériques.
10. Program : Cette touche permet de créer un rythme d’accompagnement personnalisé.
11. Play : Cette touche permet de lancer un rythme d’accompagnement personnalisé ou
d’une chanson enregistrée.
12. Record : Cette touche permet d’enregistrer une chanson personnalisée.
13. Tone : Appuyer sur cette touche puis utiliser les touches numériques ou les touches +et
–permet de sélectionner une sonorité.
14. Rythme : Appuyer sur cette touche puis utiliser les touches numériques ou les touches +
et –permet de sélectionner un rythme d’accompagnement.
15. Touches numériques : Ces touches permettent de sélectionner un instrument, un
rythme, une chanson ou un tempo.
1
1
2
3
4
5
6
7
8
9
10
10
11
11
12
12
13
13
14
14
15
15
16
16
17
17
18
18
19
19
20
20
21
21
22
22
23
23
24
24
25
25
26
26
27
27
28
28

18
16. Synchronisation : Appuyez sur la touche Sync puis jouer les touches dans
les deux octaves plus graves (correspondant aux accords/notes). La fonction
d’accompagnement commence immédiatement lorsqu’une touche est jouée sans avoir à
appuyer sur la touche Lancer/arrêter la lecture.
17. Lancer/arrêter la lecture : Cette touche permet de lancer ou d’arrêter un rythme
d’accompagnement.
18. Rythme temporaire : Cette touche permet d’activer un rythme temporaire durant la
lecture d’un rythme d’accompagnement.
19. Single Chord : Cette touche permet d’activer la fonction d’accompagnement avec
accords automatiques à un doigt. Cette fonction permet de générer des accords pour les
rythmes d’accompagnement basés sur les touches jouées à partir de la deuxième note
de fa dièse et les touches suivantes. Les accords disponibles pour cette fonction sont
décrits dans la section Fonctionnement > Rythme d’accompagnement.Appuyer de
nouveau sur cette touche ou sur la touche Chord Clear pour désactiver la fonction
d’accompagnement avec accords automatiques.
20. Fingered Chord : Cette touche permet d’activer la fonction d’accompagnement avec
accords automatiques à plusieurs doigts. Cette fonction permet de générer des accords
pour les rythmes d’accompagnement basés sur les touches jouées à partir de la
deuxième note fa dièse et les touches suivantes. Les accords disponibles pour cette
fonction sont décrits dans la section Fonctionnement > Rythme d’accompagnement.
Appuyer de nouveau sur cette touche ou sur la touche Chord Clear permet de désactiver
la fonction d’accompagnement avec accords automatiques.
21. Chord Clear : Cette touche permet d’activer la fonction d’accompagnement avec
accords automatiques à un ou à plusieurs doigts.
22. Sustain : Appuyez sur cette touche pour activer un effet de sustain qui simule une pédale
de sustain. Appuyez de nouveau sur cette touche pour désactiver l’effet de sustain.
23. Vibrato : Appuyez sur cette touche pour activer un changement de la tonalité pulsatoire.
Appuyez de nouveau sur cette touche pour désactiver l’effet de vibrato.
24. Dual : Cette touche permet de superposer deux sonorités. La sonorité sélectionnée avant
d’appuyer sur la touche Dual sera l’une des sonorités superposées. Pour sélectionner
l’autre sonorité qui sera superposée, entrez le numéro de la sonorité désirée ou utilisez
les touches + et –. Appuyer de nouveau sur la touche Dual permet de désactiver la
fonction à deux sonorités.
25. Split : Cette touche permet de séparer le clavier en deux sections. La sonorité
sélectionnée avant d’appuyer sur la touche Split sera utilisée pour le côté gauche du
clavier. Pour sélectionner une sonorité pour le côté droit du clavier, entrez le numéro de la
sonorité désirée ou utilisez les touches + et –. Appuyer de nouveau sur la touche Split
permet de désactiver la séparation du clavier.
26. Percussion : Cette touche permet d’utiliser les touches pour jouer les sons de batterie et
de percussion intégrés. Appuyer de nouveau sur cette touche permet de désactiver cette
fonction.
27. Intro/Ending : Appuyer sur cette touche permet de jouer une introduction puis de lancer
un rythme d’accompagnement. Appuyer sur cette touche lors de la lecture d’un rythme
d’accompagnement permet de jouer une outro puis d’arrêter la lecture du rythme
d’accompagnement.
28. Beat : Cette touche permet d’activer le métronome. Appuyer de nouveau sur cette
touche permet de modifier la division temporelle de cette touche ou de désactiver le
métronome.

19
Panneau arrière
1. Mic : Cette entrée permet de brancher le
microphone fourni afin de chanter tout en jouant
du clavier.
2. Sortie casque : Cette entrée permet de brancher
le casque d’écoute fourni afin d’écouter les notes
jouées et de mettre en sourdine les haut-parleurs
internes.
3. Entrée d'alimentation : Cette entrée permet de
brancher l’adaptateur secteur fourni.
Panneau inférieur
1. Compartiment des piles : Insérez 6 piles de type AA
dans ce compartiment afin d’alimenter le le clavier si
vous n'utilisez pas l'adaptateur secteur.
Fonctionnement
Rythme d'accompagnement
Pour sélectionner un rythme d’accompagnement, appuyez sur la touche Rhythm puis utilisez
les touches numériques ou les touches +et –.
Pour lancer ou arrêter un rythme d'accompagnement, appuyez sur la touche Start/Stop.
Pour que le rythme d'accompagnement joue un rythme de fond, appuyez sur la touche Fill In.
Pour activer la fonction d’accompagnement avec accords automatiques, appuyez sur la
touche Single Chord ou Fingered Chord. Cette fonction permet de générer des accords pour
les rythmes d’accompagnement basés sur les touches jouées à partir de la deuxième note fa
dièse et les touches suivantes. Pour désactiver la fonction d’accompagnement avec accords
automatiques, appuyez de nouveau sur cette touche ou sur la touche Chord Clear.
Single Chord :
Lorsque vous utilisez la fonctionnalité d’accompagnement avec accords automatiques à un
doigt, vous pouvez utiliser les formes d’accord abrégées ci-dessous à partir de n’importe
quelle note pour jouer un accord majeur, mineur, de septième ou de septième mineur.
1
MIC PHONES DC 12V
12 3
DC 9V

20
Fingered Chord :
Lorsque vous utilisez la fonctionnalité d’accompagnement avec accords automatiques à
plusieurs doigts, vous pouvez utiliser les formes d’accord complètes ci-dessous à partir de
n’importe quelle note pour jouer un accord majeur, mineur, de septième ou de septième
mineur.
Fonction d’enregistrement
1. Pour enregistrer votre performance, appuyez sur la touche Record.
2. Au cours du processus d’enregistrement, appuyez sur la touche Play pour arrêter
l’enregistrement. Appuyez de nouveau sur la touche Play pour faire jouer la chanson
enregistrée.
3. Appuyez de nouveau sur la touche Play afin d’arrêter la lecture.
Remarque : La chanson sera effacée lorsque l’enregistrement recommencera ou lorsque
le clavier sera mis hors tension. Lorsque la mémoire est pleine, l’écran affichera « FUL »,
et l’enregistrement s’arrêtera automatiquement.
Programmation d’un rythme
Pour créer des rythmes d’accompagnement personnalisés en jouant les touches du clavier :
1. Appuyez sur la touche Program et commencer à programmer le rythme en jouant
chaque note, une à la fois.
2. Appuyez sur la touche Play pour arrêter la programmation et écouter le rythme
programmé.
3. Appuyez de nouveau sur la touche Program pour désactiver la fonction de
programmation et effacer les données enregistrées.
Remarque : Le rythme programmé sera effacé lorsque la programmation recommencera ou
lorsque le clavier sera mis hors tension.
Mise à l’arrêt automatique
Après 5 minutes d'inactivité, le Melody 61 MKII se met automatiquement en mode veille. Si
vous appuyez sur une des touches, il se rallumera.
Other manuals for Melody61 MKII
1
Table of contents
Languages:
Other Alesis Electronic Keyboard manuals

Alesis
Alesis VX 49 User manual

Alesis
Alesis V149 User manual

Alesis
Alesis Melody61 MKII User manual

Alesis
Alesis Q25 User manual

Alesis
Alesis QuadraSynth Plus User manual

Alesis
Alesis Melody 54 User manual

Alesis
Alesis QX25 User manual

Alesis
Alesis Studio 32 User manual

Alesis
Alesis Q61 User manual

Alesis
Alesis v125 User manual

Alesis
Alesis Micron User manual

Alesis
Alesis V49 User manual

Alesis
Alesis WX49 User manual

Alesis
Alesis V61 MKII User manual

Alesis
Alesis QuadraSynth User manual

Alesis
Alesis Fusion 6HD Manual

Alesis
Alesis HARMONY61 User manual

Alesis
Alesis Recital Grand User manual

Alesis
Alesis V25 User manual

Alesis
Alesis QuadraSynth S4 Manual