Alesis Recital Grand User manual

User Guide
English ( 3 – 12 )
Guía del usuario
Español ( 13 – 22 )
Guide d’utilisation
Français ( 23 – 33 )
Guida per l’uso
Italiano ( 34 – 43 )
Benutzerhandbuch
Deutsch ( 44 – 53 )
Appendix
English ( 54 )

2

3
A
3
User Guide (English)
Introduction
Box Contents
Recital Grand
Power Adapter
Music Rest
Software Download Card
Sustain Pedal
User Guide
Safety & Warranty Manual
Support
For the latest information about this product (system requirements, compatibility information,
etc.) and product registration, visit alesis.com.
For additional product support, visit alesis.com/support.
Setup
Connection Diagram
Items not listed in
Introduction >Box Contents
are sold separately.
Computer Speakers
Sustain
Pedal
Power
Tablet
Pedal
Unit

4
Features
Top Panel
1. Power Switch: Turns the piano’s power on or off.
2. Volume Knob: Adjusts the volume for the Line Output and either Headphone Output.
Note: If the internal speakers do not produce any sound, check that the Volume knob is not
set too low or if headphones are plugged into either Headphone Output. The speakers will
be muted if there are headphones plugged into either Headphone Output.
3. Rec/Start/Stop Button: Press this button to arm recording or stop recording a user song,
start or stop a user song, stop a demo song, or stop the metronome. Press and hold this
button to erase an existing user song.
4. Key Function Button: Press and hold this button while also pressing one of the 88 keys to
edit various settings.
5. Voice Select Buttons: Press one of these buttons to select a preset voice. See Operation
>Voices to learn more.
6. Layer Button: Press this button to enable/disable Layer Mode.
7. Split Button: Press this button to enable/disable Split Mode.

5
Rear Panel
1. Power Connector: Connect the included power adapter here.
2. Sustain Pedal Input: Connect a standard 1/4” (6.35 mm) sustain pedal here.
3. Pedal Unit Input: Connect a pedal unit to this input.
4. Line Output: Connect external audio equipment such as an amplifier, mixer, or recorder.
Use the Rand Loutputs for stereo output or just the Loutput for mono output.
5. Aux Input: Connect a mobile device or other audio source to this input. You can adjust the
volume of this device on your mobile device or other audio source itself.
6. USB Port: Allows for transfer of MIDI data to a computer.
Front Panel
1. 1/4” Headphone Output: Connect stereo headphones with a 1/4” (6.35
mm) stereo (TRS) connector. When headphones are connected, the
internal speakers will automatically turn off and sound will only be heard
from the headphones.
2. 1/8” Headphone Output: Connect stereo headphones with a 1/8” (3.5
mm) stereo (TRS) connector. When headphones are connected, the
internal speakers will automatically turn off and sound will only be heard
from the headphones.
PHONES
A
3

6
+
+
Operation
Quick Start
Playing Demo Songs
The Recital Grand digital piano features 10 demo songs:
• Fantaisie-Impromptu in C# Minor Opus 66
• Etude Opus 25 No. 1
• Polonaise No. 6 in A Flat Major Opus 53
• Sonata No. 16 in C Major
• Toccata and Fugue in D Minor
• Prelude and Fugue No. 30 in D Minor
• Prelude and Fugue No. 1 in C Major
• Suite of Minuets in F Major
• Danse des Mirlitons
• Wedding March
To play the demo songs:
1. To play a song demo, press and hold the Key
Function button, then press a key from C#2
through A#2.
2. To stop a song demo, press the Rec/Start/Stop
button.
Playing Voice Demos
Each Voice button on the panel is preset with a voice
demo. Press and hold the Key Function button, and
then press C2. This will play the voice demo for the
currently selected sound. If layer or split mode is
active, the voice demo will play for the upper voice.

7
Voices
The Recital Grand digital piano features 4 voice categories with 4 voice variations each, for a
total of 16 voices to choose from:
Voice Category Piano Electric
Piano Organ Strings/Synth
Variation 1
(White LED) Grand Piano Mark I Jazz Organ String
Ensemble
Variation 2
(Green LED) Dark Grand Suitcase Rock Organ Upright Bass
Variation 3 (Red LED) Bright
Grand Wurli Pipe Organ
1 Polysynth
Variation 4 (Blue LED) Harpsichord FM Piano Pipe Organ
2 Synth Bass
To select and play a voice:
1. Press one of the Voice Select buttons to select a
voice category. The corresponding LED will be lit
for that voice category.
2. Press the same Voice Select button again to
select one of the other voice variations in that
category. The corresponding LED will change
color to indicate which variation voice is selected.
3. Play the keys to hear the voice.
4. To change the volume for the main voice, press
and hold Key Function, and then press a key
from D6 to F#6. The available selections for this
function are 1 (D6), 2 (D#6), 3 (E6), 4 (F6), and 5
(F#6).
+

8
+
Layer Mode
Layer Mode enables for two different voices to be
layered together for a fuller and richer sound.
To enable Layer Mode:
1. Press and release the Layer button. The
corresponding LED will turn on to indicate layer
mode is enabled. When Layer Mode is enabled,
the layered voice is referred to as the R2 voice.
2. Press and hold the Layer button while using the
Voice Select buttons to select a layer voice
3. To change the volume of the layer voice (R2),
press and hold Key Function, and then press a
key from G6 to B6. The available selections for
this function are 1 (G6), 2 (G#6), 3 (A6), 4 (A#6),
and 5 (B6).
4. To disable layer mode, press and release the
Layer button again. The corresponding LED will
turn off to indicate layer mode is disabled.
Note: When you are selecting which voices will be layered, the first Voice button you press will
be set as the "Upper" voice, and the second Voice button you press will be set as the "Lower"
voice.
Note: You cannot layer 2 voice variations from the same voice category when using Layer Mode.
Split Mode
Split Mode enables you to split the 88 keys into two
zones so that you can have two different voices for
each of your hands. For example, you may want the
Piano voice for your right hand, and the Bass voice
for your left hand. When Split Mode is enabled, the
left-hand voice is referred to as the L1 voice.
To enable Split Mode:
1. Press and release the Split button. The
corresponding LED will turn on to indicate split
mode is enabled.
2. Press and hold the Split button while pressing a
Voice Select button to select a split voice.
3. Press and hold the Split button while pressing a
key to set the split point.
4. To change the volume of the split voice, press
and hold Key Function, then press a key from
A5 to C#6. The available selections for this
function are 1 (A5), 2
(A#5), 3 (B5), 4 (C6), and 5
(C#6).
5. To disable split mode, press and release the
Split button again. The corresponding LED will
turn off to indicate split mode is disable.
+

9
Advanced Functions
Metronome
The metronome feature provides a steady beat to aid in practicing at a
consistent tempo. The tempo of the metronome can be freely adjusted from
30 to 280 beats per minute.
Note: The metronome cannot be used during Demo playback.
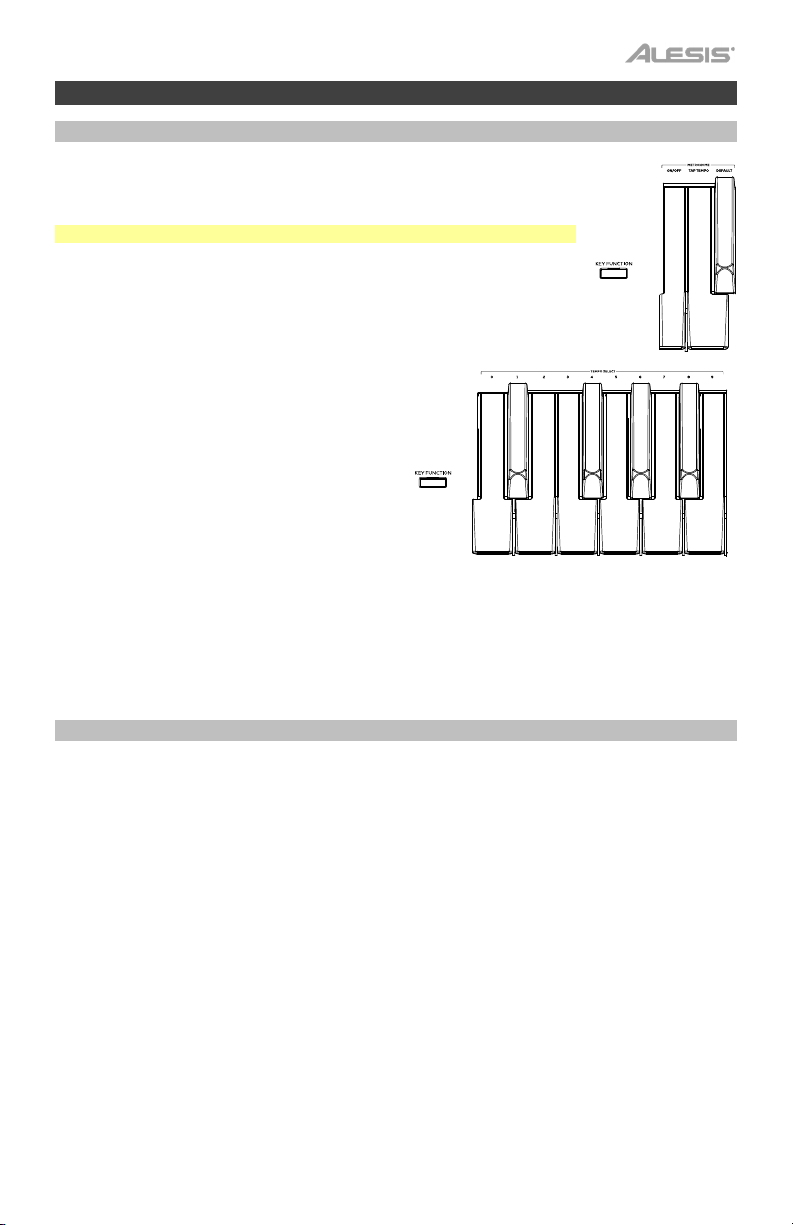
To enable or disable the metronome, press and hold the Key Function
button, and then press the B2 key.
To set the tempo via tap, press and hold Key Function, then press the C3
key at least 2 times to get the desired tempo.
To set the tempo to default (120 BPM), press and
hold Key Function, then press the C#3 key.
To manually change the metronome’s tempo,
press and hold Key Function, then press 3 digits
using D3 to B3.
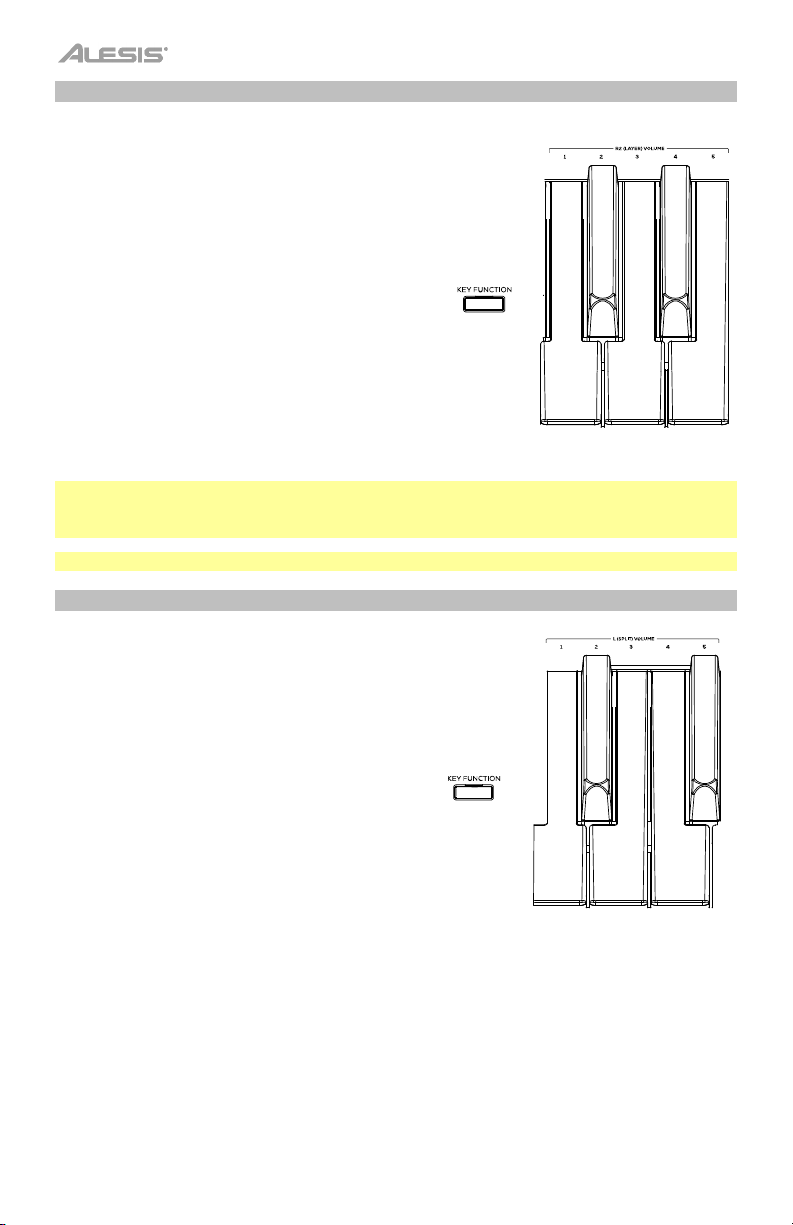
To lower/raise the metronome’s volume, press
and hold Key Function, and then press C4 or C#4
respectively. To increase or decrease this by
multiple steps, press and hold Key Function, and
then press C4 or C#4 repeatedly.
To set the metronome’s volume to default
(4), press and hold Key Function, and then
press D4.
To change the metronome’s time signature, press and hold Key Function, and then press D#4 or
E4 respectively. To increase or decrease this by multiple steps, press and hold Key Function, and
then press D#4 or E4 repeatedly.
To set the metronome’s time signature to the default value (4), press and hold Key Function, and
then press F4.
User Song Mode
To record and/or playback a user song:
1. Press the Rec/Start/Stop button to enter to the User Song Mode. The Rec/Start/Stop LED will
quickly flash continuously.
2. Press any of the 88 keys to start recording a song. The Rec/Start/Stop LED will slowly flash
continuously. If the metronome is playing, the Rec/Start/Stop LED will flash at the current tempo.
3. Press the Rec/Start/Stop button again to stop recording. The Rec/Start/Stop LED will be lit solid
to confirm a song exists.
4. Press the Rec/Start/Stop button again to playback the recording. The Rec/Start/Stop LED will
slowly flash continuously. Press the Rec/Start/Stop button again to stop the user song. The
Rec/Start/Stop LED will be lit solid when a song exists and is stopped.
5. Press and hold the Rec/Start/Stop button for 3 seconds to erase the user song. The
Rec/Start/Stop LED will quickly flash 3 times to confirm it has been erased.
Important User Song Mode Notes:
• The recorded user song will stay in memory until it is erased.
• If the internal memory becomes full during recording, the recording will automatically stop and be
saved.
+
+

10
+
+
+
Reverb
You can also add an adjustable reverb effect to your
sound.
To select the reverb effect type, press and hold Key
Function, and then press a key from C5 to F5. The
available selections for this Key Function are Off, (C5),
Hall 1 (C#5), Hall 2 (D5), Stage (D#5), Room (E5), and
Plate (F5).
To change the depth of the reverb, press and hold
Key Function, and then press F#5 or G5 respectively.
To increase or decrease this by multiple steps, press
and hold Key Function, and then press F#5 or G5
repeatedly.
To set the depth of the reverb to the factory default
value (3), press and hold Key Function, and then
press G#5.
Transpose
This key function allows the overall pitch of the piano
to be transposed up or down by a maximum of one
octave in semitone increments in either direction.
To change the transposition, press and hold Key
Function, and then press F#4 or G4 respectively. To
increase or decrease this by multiple steps, press and
hold Key Function, and then press F#4 or G4
repeatedly.
To set the transposition to the factory default value,
press and hold Key Function, and then press G#4.
Tuning
This key function allows the overall pitch of the piano
to be fine-tuned up or down by a maximum of 25
increments in either direction.
To change the tuning, press and hold Key Function,
and then press A4 or A#4 respectively. To increase or
decrease this by multiple steps, press and hold Key
Function, and then press A4 or A#4 repeatedly.
To set the tuning to the factory default value, press
and hold Key Function, and then press B4.

11
Pedal Resonance
Pedal resonance is a function that simulates the reverberation of
notes when pressing the sustain pedal on an actual piano. With Pedal
Resonance enabled, Recital Grand reproduces the rich harmonics
and unique sound characteristics of an actual piano when using a
sustain pedal.
To turn Pedal Resonance On/Off, press and hold Key Function,
and then press the F#7 key.
Lesson Mode
The Lesson Mode feature divides the keyboard into two zones with
the same pitch and voice. This enables both the student and teacher
to easily watch and/or play together during instruction without having
to move away from the piano and take turns or having to reach over
each other to play the same pitch.
Note: In Lesson Mode, the Layer and Split Modes will be
automatically disabled.
Note: Lesson Mode cannot be selected during Demo playback.
To turn Lesson Mode On/Off, press and hold Key Function, and
then press the F7 key.
+
+

12
Settings
To change other settings of the digital piano:
To set the touch sensitivity of the keybed, press and hold Key Function, and then press one
these available selections:
• Fixed (C#7): The volume level does not change at all regardless of how soft or hard you play
the 88 keys.
• Soft (D7): The volume level does not change much when press you the 88 keys soft or hard.
• Medium (D#7): This is the standard piano touch response, and the default setting.
• Hard (E7): The volume level changes a lot when press the 88 keys soft or hard. You have to
hit the keys hard to produce a loud sound.
To change the MIDI channel of the keybed, press and hold Key Function, and then press G7
or G#7 accordingly. To increase or decrease this by multiple steps, press and hold Key
Function, and then press G7 or G#7 repeatedly. The available selections for this Key Function
are 1-16. The default MIDI channel is 1.
To turn local MIDI on/off, press and hold Key Function, and then press A7. When local MIDI
is on (default), sound will be generated and heard through the speaker, and MIDI messages will
be sent to the USB-MIDI output when keys are played.
When local MIDI is off, sound will not be
generated, however MIDI messages will still be sent to the USB-MIDI output when keys are
played.
To turn the click that plays when settings are changed on/off, press and hold Key Function,
and then press A#7.
To turn eco mode (auto-power off) on/off, press and hold Key Function, and then press B7.
Note: The default auto-power off time is 30 minutes.
To reset the piano to its factory settings, press and hold Key Function, and then press C8.
+

13
A
3
Guía del usuario (Español)
Introducción
Contenido de la caja
Recital Grand
Adaptador de alimentación
Atril
Tarjeta de descarga de software
Pedal de sostenido
Guía del usuario
Manual sobre la seguridad y garantía
Soporte
Para obtener la información más completa acerca de este product (los requisitos del sistema,
compatibilidad, etc) y registro del producto, visite alesis.com.
Para soporte adicional del producto, visite alesis.com/support.
Instalación
Diagrama de conexión
Los elementos que no se enumeran en Introducción >Contenido de la caja se venden por separado.
Ordenador
Altavoces
Sostenido
Pedal
Suministro
eléctrico
Tableta
Unidad
de
p
edal

14
Características
Panel superior
1. Interruptor de encendido: Enciende y apaga el teclado.
2. Perilla de volumen: Ajusta el volumen de la salida de línea y ya sea salida para auriculares.
Nota: Si los altavoces internos no emiten ningún sonido, compruebe si la perilla volumen
maestro no tiene un ajuste demasiado bajo o si los auriculares están conectados a ya sea
salida para auriculares. Los altavoces se silenciarán si se conectan auriculares a ya sea
salida para auriculares.
3. Botón de grabación/inicio/parada: Pulsar este botón para preparar la unidad para grabar
o detener la grabación de una canción del usuario, iniciar o detener una canción del usuario,
detener una canción demo o detener el metrónomo. Mantenga pulsado este botón para
eliminar una canción del usuario existente.
4. Botón de función de tecla: Mantenga pulsado el botón a la vez que pulsa una de las 88
teclas para modificar diversos ajustes.
5. Botones Voice Select (Selección de voz): Pulse uno de estos botones para seleccionar
una voz predeterminada. Consulte Funcionamiento >Voces para más información.
6. Botón Layer: Pulse este botón para activar/desactivar el modo de capas.
7. Botón Split: Pulse este botón para activar/desactivar el modo de división.

15
Panel trasero
1. Conector de corriente: Conecte aquí el adaptador de corriente incluido.
2. Entrada para pedal de sostenido: Conecte aquí un pedal TS estándar de 6,35 mm (1/4
pulg.).
3. Entrada para unidad de pedal: Conecte un pedal a esta entrada.
4. Salida de línea: Conecte aquí un equipo de audio externo, como por ejemplo un
amplificador, un mezclador o una grabadora. Use las salidas Ry Lpara obtener una salida
estéreo o la salida Lsolamente para obtener una salida monoaural.
5. Entrada auxiliar: Conecte un dispositivo móvil u otra fuente de audio a esta entrada. Puede
ajustar este volumen desde el mismo dispositivo móvil o fuente de audio.
6. Puerto USB: Permite la transferencia de datos MIDI al ordenador.
Panel frontal
1. Salida para auriculares: Conecte auriculares estéreo con conector
estéreo de 6,35 mm (1/4 pulg.). Cuando los auriculares se encuentran
conectados, los altavoces internos se apagarán automáticamente y el
sonido solo podrá escucharse desde los auriculares.
2. Salida para auriculares: Conecte auriculares estéreo con conector
estéreo de 3,5 mm (1/8 pulg.). Cuando los auriculares se encuentran
conectados, los altavoces internos se apagarán automáticamente y el
sonido solo podrá escucharse desde los auriculares.
PHONES
A
3

16
+
+
Funcionamiento
Inicio rápido
Cómo reproducir canciones demo
El piano digital Recital Grand cuenta con 10 canciones demo:
• Fantaisie-Impromptu in C# Minor Opus 66
• Etude Opus 25 No. 1
• Polonaise No. 6 in A Flat Major Opus 53
• Sonata No. 16 in C Major
• Toccata and Fugue in D Minor
• Prelude and Fugue No. 30 in D Minor
• Prelude and Fugue No. 1 in C Major
• Suite of Minuets in F Major
• Danse des Mirlitons
• Wedding March
Para reproducir canciones demo:
1. Para reproducir una canción demo, mantenga
pulsado el botón Key Function, y luego pulse una
tecla entre C#2 y A#2.
2. Para reproducir una canción demo, pulse el botón
Rec/Start/Stop.
Cómo
reproducir demos de voz
Cada botón Voice (Voz) del panel está preprogramado
con un demo de voz. Cada botón Voice (Voz) del panel
está preprogramado con un demo de voz. Mantenga
pulsado el botón Key Function y luego pulse C2. Esto
reproducirá la demo de voz para el sonido actualmente
seleccionado. Si el modo de capas o de división está
activo, la demo de voz se reproducirá para la voz
superior.

17
+
Voces
El piano digital Recital Grand cuenta con 4 categorías de voces con 4 variaciones de voz cada
una, lo que ofrece un total de 16 voces para elegir:
Categoría de voz Piano Electric Piano Organ Strings/Synth
Variación 1
(LED blanco) Piano de cola Mark I Órgano de jazz Conjunto de cuerdas
Variación 2
(LED verde) Dark Grand Suitcase Órgano de Rock Contrabajo
Variación 3
(LED rojo) Bright Grand Wurli Órgano de iglesia 1 Polisintetizador
Variación 4
(LED azul) Clavecín Piano FM Órgano de iglesia 2 Bajo sintetizado
Para seleccionar y reproducir una voz:
1. Pulse uno de los botones Voice Select para
seleccionar una categoría de voz. El LED
correspondiente se encenderá para esa
categoría de voz.
2. Pulse el botón Voice Select nuevamente para
seleccionar una de las otras variaciones de voz
en esa categoría. El LED correspondiente
cambiará de color para indicar la variación de
voz que está seleccionada.
3. Toque las teclas para escuchar la voz.
4. Para seleccionar el volumen de la voz principal,
mantenga pulsado Key Function, y luego pulse
una tecla entre D6 y F#6. Las selecciones
disponibles para esta función son 1 (D6), 2
(D#6), 3 (E6), 4 (F6) y 5 (F#6).

18
+
+
Modo de capas
El modo de capas permite tocar dos voces diferentes en capas para lograr un sonido más completo
y rico.
Para habilitar el modo de capas:
1. Pulse y suelte el botón Layer. Se encenderá el LED
correspondiente para indicar que el modo de capas está
activado. Cuando el modo de capas se encuentra activado,
la voz de la capa se denomina la voz R2.
2. Mantenga pulsado el botón Layer mientras usa los botones
Voice Select para seleccionar una nueva voz de la capa
3. Para modificar el volumen de la voz de la capa (R2),
mantenga pulsado Key Function y luego pulse una tecla
entre D6 y F#6. Las selecciones disponibles para esta
función son 1 (G6), 2 (G#6), 3 (A6), 4 (A#6) y 5 (B6).
4. Para desactivar el modo de capas, pulse y suelte el botón
Layer nuevamente. Se apagará el LED correspondiente
para indicar que el modo de capas está desactivado.
Nota: No se puede poner en capas 2 variaciones de voz de la misma categoría de voz al utilizar el
modo de capas.
Nota: La voz del primer botón Voice que pulse al seleccionar las voces para las capas será la voz
"superior" y la voz del segundo botón Voice que pulse será la voz "inferior".
Modo de división
El modo de división le permite dividir las 88 teclas en dos zonas
para que pueda tener dos voces diferentes para cada una de
sus manos. Por ejemplo, puede tener la voz de piano para su
mano derecha y la voz de bajo para su mano izquierda. Cuando
el modo de división se encuentra activado, la voz asignada a la
mano izquierda se denomina la voz de división.
Para habilitar el modo de división:
1. Pulse y suelte el botón Split. Se encenderá el LED
correspondiente para indicar que el modo de división está
activado.
2. Mantenga pulsado el botón Split mientras pulsa un botón
Voice Select para seleccionar una nueva voz de división.
3. Mantenga pulsado el botón Split mientras pulsa una tecla
que será la que define el punto de división.
4. Para modificar el volumen de la voz de la división, mantenga pulsado Key Function y luego
pulse una tecla entre A6 y C#6. Las selecciones disponibles para esta función son 1 (A6), 2 (A#6),
3 (B6), 4 (C6) y 5 (C#6).
5. Para desactivar el modo de división, pulse y suelte el botón Split nuevamente. Se apagará el LED
correspondiente para indicar que el modo de división está desactivado.
Para desactivar el modo de división, pulse nuevamente el botón Split. El LED del botón Split se
apagará cuando se desactive el modo de división.

19
+
+
Funciones avanzadas
Metrónomo
La característica de metrónomo brinda un pulso
constante para ayudar a practicar a un tempo
consistente. El tempo del metrónomo puede
ajustarse libremente entre 30 y 280 beats por
minuto.
Nota: Durante el modo de reproducción de
demo no se puede utilizar el metrónomo.
Para activar o desactivar el metrónomo,
mantenga pulsado el botón Key Function y
luego pulse la tecla B3.
Para ajustar el tiempo mediante toques ("tap
tempo"), mantenga pulsado Key Function y
luego pulse la tecla C3 al menos 2 veces para
ajustar el tiempo deseado.
Para ajustar el tempo al valor por defecto
(120 BPM), mantenga pulsado Key Function y
luego pulse la tecla C#3.
Para modificar manualmente el tempo del
metrónomo, mantenga pulsado Key Function
y luego pulse 3 dígitos utilizando D3 a B3.
Para subir/bajar el volumen del metrónomo, mantenga pulsado Key Function y luego pulse
C4 o C#4 respectivamente. Para subir/bajar múltiples niveles el volumen del metrónomo,
mantenga pulsado Key Function y luego pulse C4 o C#4 repetidamente.
Para ajustar el volumen del metrónomo al valor por defecto (4), mantenga pulsado Key
Function y luego pulse D4.
Para modificar la firma de tiempo del metrónomo, mantenga pulsado Key Function y luego
pulse D#4 o E4 respectivamente. Para subir/bajar múltiples niveles de la firma de tiempo del
metrónomo, mantenga pulsado Key Function y luego pulse D#4 o E4 repetidamente.
Para ajustar la firma de tiempo del metrónomo al valor por defecto (4), mantenga pulsado
Key Function y luego pulse F4.

20
+
Modo de canción del usuario
Como grabar y/o reproducir una canción del usuario:
1. Pulse el botón Rec/Start/Stop para ingresar al modo de canción del usuario. El LED
Rec/Start/Stop parpadeará continua y rápidamente.
2. Pulse cualquiera de las 88 teclas para comenzar a grabar una canción. El LED
Rec/Start/Stop parpadeará continua y lentamente. Si el metrónomo está activado, el LED
Rec/Start/Stop parpadeará según el tempo actual.
3. Pulse el botón Rec/Start/Stop nuevamente. El LED Rec/Start/Stop quedará iluminado
permanentemente para confirmar que existe una canción.
4. Pulse el botón Rec/Start/Stop nuevamente para reproducir la grabación. El LED
Rec/Start/Stop parpadeará continua y lentamente. Pulse el botón Rec/Start/Stop
nuevamente para detener la canción del usuario. El LED Rec/Start/Stop quedará iluminado
permanentemente cuando existe una canción y esté detenida.
5. Mantenga pulsado el botón Rec/Start/Stop durante 3 segundos para eliminar la canción
del usuario. El LED Rec/Start/Stop parpadeará 3 veces rápidamente para confirmar la
eliminación.
Notas importantes sobre el modo de canción del usuario:
• La canción del usuario grabada permanecerá en la memoria hasta que se elimine.
• Si la memoria interna se queda sin espacio libre durante una grabación, esta se detendrá y
quedará guardada automáticamente.
Reverberación
También puede agregar un efecto de reverberación
ajustable a su sonido.
Para seleccionar el tipo de efecto de reverberación,
mantenga pulsado Key Function y luego pulse una
tecla entre D5 y F#5. Las opciones disponibles para
Key Function son apagada, (C5), Salón 1 (C#5), Salón
2(D5), Escenario (D#5), Sala (E5) y Plato (F5).
Para modificar la profundidad de la reverberación,
mantenga pulsado Key Function y luego pulse F#5 o
G5 respectivamente. Para subir/bajar múltiples niveles
la profundidad de la reverberación, mantenga pulsado
Key Function y luego pulse F#5 o G5 repetidamente.
Para ajustar la profundidad de la reverberación al
valor por defecto (3), mantenga pulsado Key
Function y luego pulse G#5.
Table of contents
Languages:
Other Alesis Electronic Keyboard manuals

Alesis
Alesis V149 User manual

Alesis
Alesis Q25 User manual

Alesis
Alesis QS7 Troubleshooting guide

Alesis
Alesis QuadraSynth S4 Manual

Alesis
Alesis V61 MKII User manual

Alesis
Alesis Micron User manual

Alesis
Alesis QuadraSynth User manual

Alesis
Alesis VX 49 User manual

Alesis
Alesis Melody61 MKII User manual

Alesis
Alesis Studio 32 User manual

Alesis
Alesis QuadraSynth User manual

Alesis
Alesis Q49 User manual

Alesis
Alesis V25 User manual

Alesis
Alesis Melody 54 User manual

Alesis
Alesis WX49 User manual

Alesis
Alesis Fusion 6HD Manual

Alesis
Alesis QX25 User manual

Alesis
Alesis HARMONY61 User manual

Alesis
Alesis Melody61 MKII User manual

Alesis
Alesis v125 User manual