Aleta S1 User manual

Aleta S1
User Guide
Version 2.2

Introduction
This manual is for the users who attempt to use Aleta S1 360 degree camera and the Aleta
Viewer on mobile device.
Table of Contents
Chapter 1 Connectors and Buttons............................................................. 4
1.1 Power Button ...................................................................................................4
1.2 Shot Button ......................................................................................................4
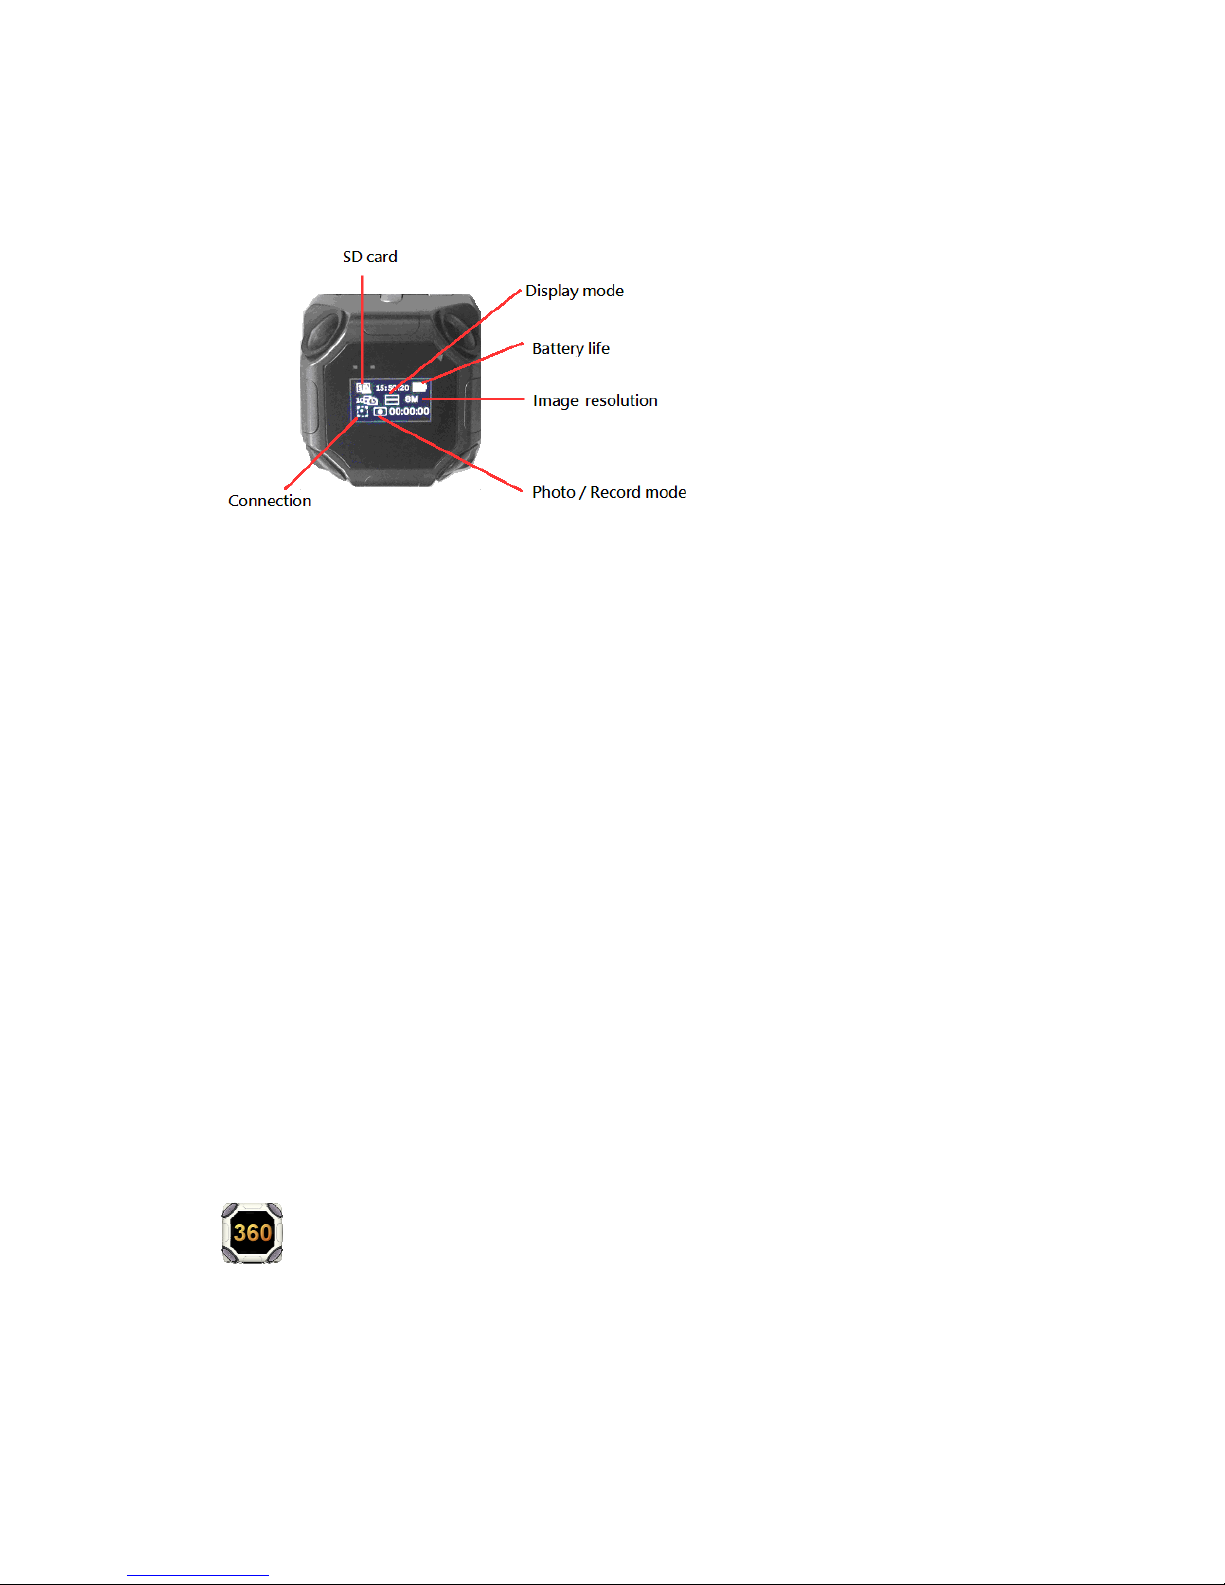
1.3 OLED screen....................................................................................................5
1.4 LED indicators.................................................................................................5
1.5 Connectors .......................................................................................................5
Chapter 2 Connect to Aleta S1 to Mobile Device........................................ 5
2.1 Install Aleta Viewer..........................................................................................5
2.2 Power on Camera.............................................................................................5
2.3 Connect to Wi-Fi..............................................................................................6
2.4 Run Aleta Viewer.............................................................................................6
Chapter 3 Live View Function ...................................................................... 7
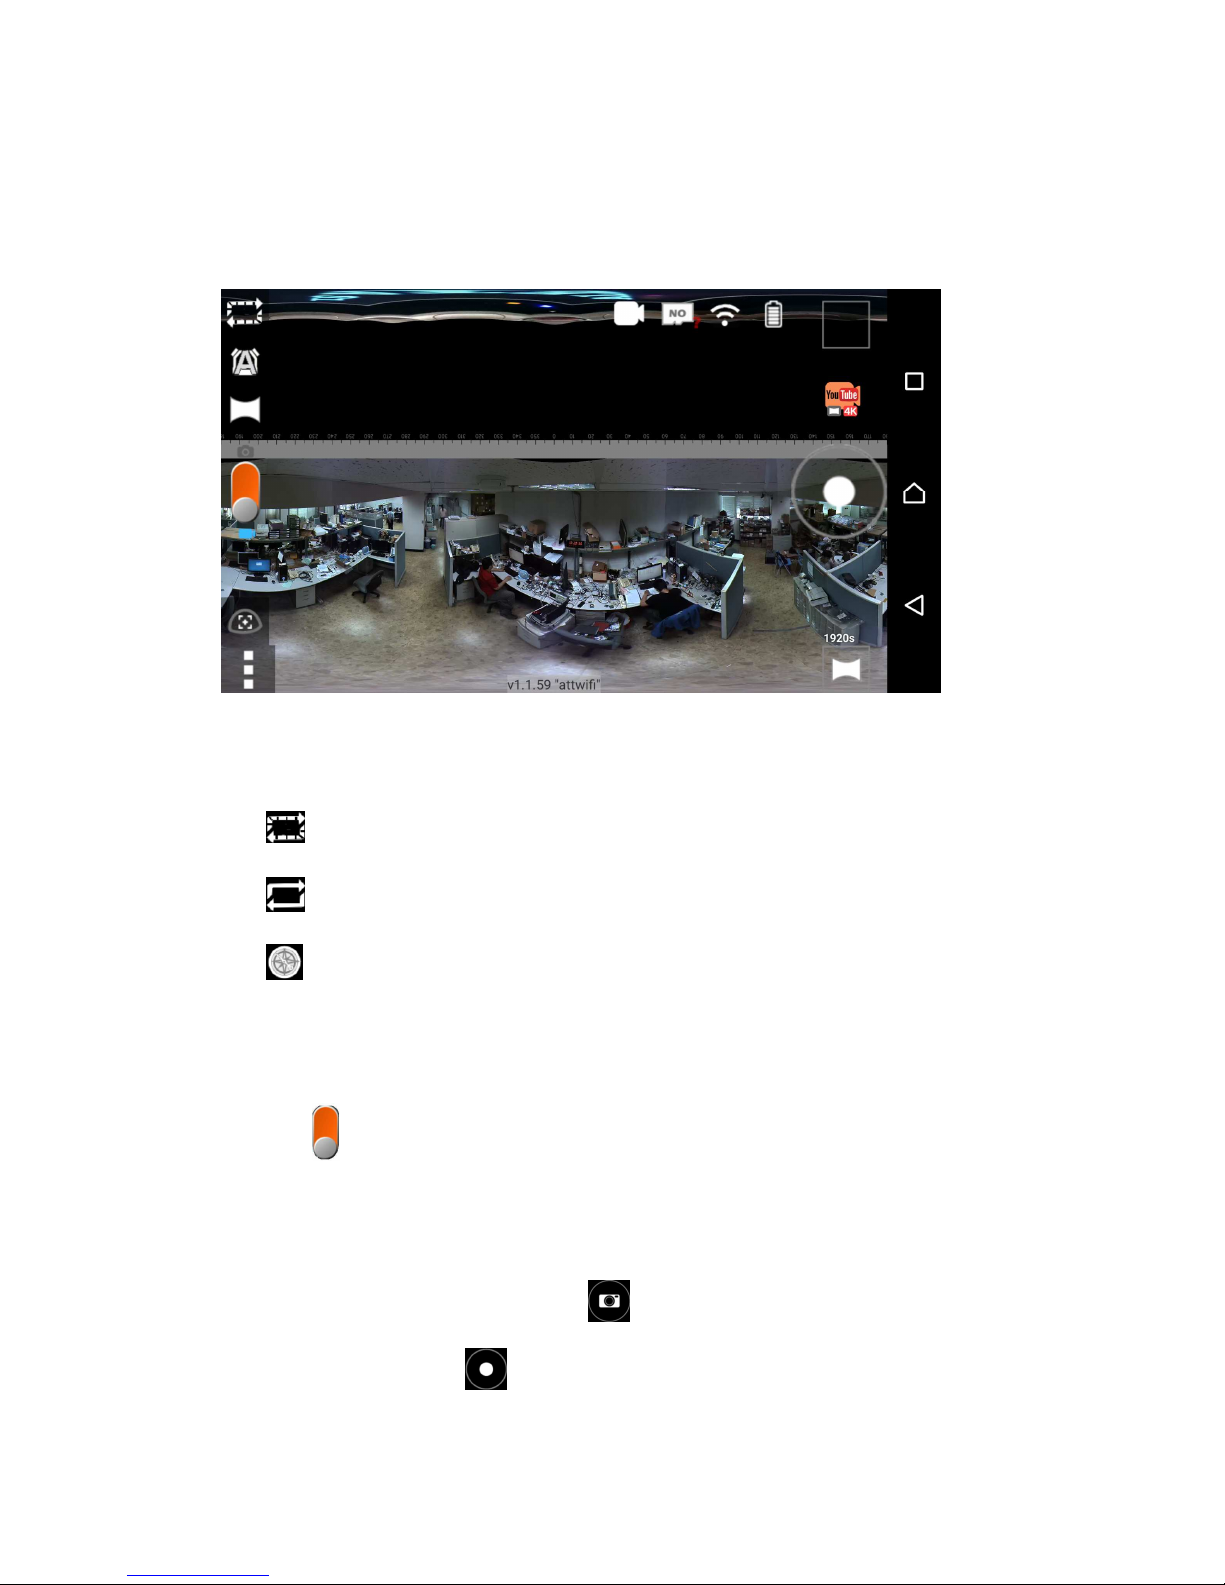
3.1 Live View.........................................................................................................7
3.2 Switch button...................................................................................................7
3.3 Shot button.......................................................................................................7
3.4 Position ............................................................................................................8
3.5 Live display view.............................................................................................8
3.6 Status................................................................................................................8
3.7 Shortcut............................................................................................................9
3.8 Storage .............................................................................................................9
3.9 Stitching.........................................................................................................11
Chapter 4 Display Mode...............................................................................11
4.1 Global.............................................................................................................11
4.2 360..................................................................................................................11
4.3 Front...............................................................................................................12
4.4 180..................................................................................................................12
4.5 Quad...............................................................................................................12
Chapter 5 Setup........................................................................................... 12

5.1 EV..................................................................................................................12
5.2 Focus..............................................................................................................13
5.3 ISO.................................................................................................................13
5.4 Shutter Speed.................................................................................................13
5.5 Sharpness .......................................................................................................13
5.6 White Balance................................................................................................14
5.7 Setting............................................................................................................14
Chapter 6 Firmware Upgrade ..................................................................... 16
Appendix 1:..................................................................................................16

Chapter 1 Connectors and Buttons
OLED screen
[Power Button] [Shot Button] [USB port] [SD Slot] [HDMI] [Power USB]
1.1 Power Button
Press power button to power on the camera.
Press power button to enter sleep mode when camera is on.
Press power button again to exit sleep mode.
Hold power button for 2 seconds to turn off camera. The OLED screen will show
“Shutting down”
Hold power button for 4 seconds to hard shut down the camera.
1.2 Shot Button
Press shot button to take picture in Photo mode.
Press shot button to start / stop recording in Record mode.
Hold shot button to switch Photo / Record mode.
Hold shot button and tilt the camera to enter motion setting mode.
Rotate camera to move the options and click shot button to select.
First row: Photo / Recording / Burst mode / Time-lapse mode
Second row: Display mode
Third row: Resolution

1.3 OLED screen
The icons on the OLED screen would show camera information:
1.4 LED indicators
Yellow LED: Power and recording
Blue LED: Wi-Fi data transferring
1.5 Connectors
USB port: Connect to extension devices.
SD Slot: Insert Micro SD card for storage. The camera supports 8GB~128GB SD
cards, but only in FAT32 format. Note that most 128GB SD cards exFAT so
please use the camera to format it.
HDMI: Connect to HDMI displayer.
Power USB: Connect to USB power to charge the battery.
Chapter 2 Connect to Aleta S1 to Mobile Device
2.1 Install Aleta Viewer
Install Aleta Viewer from APP Store or Google Play on your mobile device. The icon
will show on your app list.
2.2 Power on Camera
Click the power button to power on the camera.

During the booting processing, a set of SSID and Password will show up on the
OLED screen.
2.3 Connect to Wi-Fi
Connect to the Wi-Fi SSID and input the password shown on camera by your mobile
device.
※If you missed the Wi-Fi SSID and password information, click power button to
enter sleep mode, and click it again to wake up the camera. The Wi-Fi information
will show up again.
2.4 Run Aleta Viewer
Click the icon to run the Viewer. If the Wi-Fi is connected correctly it will
show live image immediately.

Chapter 3 Live View Function
3.1 Live View
The live image should be displayed in Front mode while you first access to Viewer.
There are 3 modes to control the view angle:
Normal mode: Slide on the screen to change the view angel.
Auto mode: The view angel will keep moving after sliding.
Compass mode: Rotate your mobile device to change the view angel.
Just click the icon in the upper-left to switch the mode.
3.2 Switch button
Slide the button to switch photo and recording modes. Note that 6K resolution is
only available in photo mode.
3.3 Shot button
In photo mode, click the capture button to take pictures. In recording mode,
click the recording button to start recording, and click it again to stop.
Recording time will show up during recording. The maximum size of the recoded file
View angle mode
Position
Switch Shot
Live display view
Status
Shortcut
Storage
Stitching
Settings Display mode

is 1GB, and the maximum time is 30 minutes. Once one of the thresholds is reached,
camera will save current file and start a new file automatically.
3.4 Position
There are 3 position modes:
Auto
Flat
Ceiling
Select the mode according to the way you install your camera, or use Auto mode for
auto position detection.
3.5 Live display view
In Global display mode, live view can be displayed in different views. (To change
display mode, please see Chapter 4: Display Mode).
Normal global view: Display full 360 image.
Front view: Display 90 degrees of image and the view angle can be changed.
Tiny planet view: Display 360 image in a circle.
VR view: Display side-by-side image. Please use a cardboard to view the
immersive 360 degree image.
View angle control:
Rotate head to change view angle
3.6 Status
The status icons will show in upper-right.

SD card status. “OK” means SD card is in slot and ready for image saving.
“No” means there is no SD card in slot. “100%” means the SD card is full, and
“ERR” means the card is broken or still in detection. Click this icon can view full
SD card status.
Wi-Fi signal status. “!” mark means the signal is weak or disconnected that
image could be lag or lost. Click this icon could select available Wi-Fi. (Android
only)
Battery life indication. Click this icon can view full battery status.
/ Shooting mode. Photo mode includes continuous shooting and self
timer. Recording mode includes time-lapse. Click this icon can change the setup.
3.7 Shortcut
Click the button can enter the shortcut menu. It offers some default settings for
different applications. You can set the shot mode, display mode, resolution, and
time-lapse just in one click.
3.8 Storage
Click the upper-right button to access the storage menu.
Tool Bar:
All / Photo / Video: Select the type of file to be shown.
Change the amount of displayed files.
/ Switch to Atelta SD card / Mobile device storage.
View file folders (Android) / Album (iOS) in the cell phone
Play selected file. Only downloaded files can be played. To play a file in

SD card will trigger download first. Files recorded in 360 or Global mode can be
displayed in different formats. Click the button on lower-right to select the
format.
Normal 360: Display full 360 image.
Front view: Display 90 degrees of image and the view angle can be changed.
Tiny planet: Display 360 image in a circle.
VR: Display side-by-side image. Please use a cardboard to view the
immersive 360 degree image.
View angle control:
Rotate head to change view angle
Download file from SD card to mobile device.
Upload selected file. Only downloaded files can be uploaded. To play a file
in SD card will trigger download first. During uploading the camera will shut the
Wi-Fi connection so that the cell phone can access internet through other
connection.
Delete file
The color of frame means different status:
Green: Selected
Gray: Downloaded
Red: Resume (download unfinished)
The color of file name tag different location:
Green: In camera SD card
Blue: In cell phone local storage
Yellow: In cell phone SD card

3.9 Stitching
Stitching is focus function to adjust the distance between lenses.
Click the bottom-left button can change the stitching method:
Manual: Manually change distance. (See 5.2 Focus for more information)
One Time: Auto stitching one time and then keep the setting.
Loop: Auto stitching continuously.
* There is a min. distance of 65 cm that can be stitched.
Chapter 4 Display Mode
Click the display button in the bottom right to setup display mode and video quality.
First click the mode icon, and then click the resolution number to finish the setting.
The live view display, captured picture, and recorded video will all follow the setting.
4.1 Global
Global mode is the standard panorama mode including full sky view which is
capable for Google and YouTube image format. 6K is for photo only.
Video frame rate:
4K(1920s): 10fps
3K(1536s): 24fps
* Global mode can be played in different views in live display.
4.2 360
This mode displays 360 degree image without full sky. The horizontal view
angel can be moved by view angle control. 6K is photo only and the video frame for
3K (1536s) is 24.
Note: The actual pixel size would be different between video and picture in 360 and
global mode since video would have addition filler image to blind spots for better
looking and capacity. The actual size:
Picture Video
360-6K 6144 x 1152 N/A

360-3K 3072 x 576 3072 x 1536
Global-6K 6144 x 1792 N/A
Global-4K 3840 x 1120 3840 x 1920
Global-3K 3072 x 896 3072 x 1536
4.3 Front
90° view with free view angle moving. Recording frame rate is 30 fps for both
1080p and 720p resolution. Note that this mode offers better quality but the view
angle cannot be changed after recording.
4.4 180
This mode displays a combination of two 180° view without full sky. The
horizontal view angel can be moved by view angle control.
Video frame rate for 180 mode:
4K(2160p): 10fps
Full-HD (1080P): 30fps
HD (720p): 30fps
4.5 Quad
This mode is 4-screen split mode with free view angle moving.
Video frame rate for Quad mode:
4K(2160p): 10fps
Full-HD (1080P): 30fps
HD (720p): 30fps
Chapter 5 Setup
Click the bottom-left button for Aleta S1 setup.
5.1 EV
Change image target brightness by selecting the EV value. Note that the target
is adjusted by ISO and shutter speed. If both ISO and shutter speed are set to fixed
values, this function would not work.

5.2 Focus
The focus function changes the stitching gap between lenses.
The button will work differently according to Live Stitching setting.
One Time or Loop : This button will trigger auto stitching
Manual: Manually change stitching gap by distance.. Just slide the bar to find
the best stitching gap for the target.
Stitching gap for the image on top.
Stitching gap for surrounding image.
5.3 ISO
Change image gain value. Larger gain brings more brightness, but also more
noise. If ISO is set to auto, camera will adjust it based on EV.
5.4 Shutter Speed
Change the shutter speed. Fast (short) shutter speed can get clear image for
moving objects, but the brightness would become low. If shutter speed is set to auto,
camera will adjust it based on EV.
※EV target adjustment is based on ISO and shutter speed, so it only works when at
least one of them is set to “Auto”.
5.5 Sharpness
Change the sharpness of the image.

5.6 White Balance
Change the white balance of the environment:
Auto detection
Lamp
Fluorescent
Daylight
Cloudy
5.7 Setting
Camera
Photo Mode: It includes continuous shooting mode and selfie countdown. Set
burst to capture 3 / 5 / 10 shots by one click and 2 / 10 seconds countdown time
for self shooting.
Time Lapse Mode: Setup the time between each frame for time lapse mode. The
recorded video would be played in 30 fps. The time-lapse video would be faster
than normal video and need more time to record.
0.1 sec: 3 times faster.
1 sec: 30 times faster
2 sec: 60 times faster
5 sec: 150 times faster
10 sec: 300 times faster
30 sec: 900 times faster
60 sec: 1800 times faster
Light Frequency: Select the frequency of the light source and electric
equipments to avoid flicker.

System
Format SD: Format the SD card in camera (all files will be erased).
Sleep: Set the idle time that triggers sleep mode. Click the power button can
wake up the camera. Note if the camera is in sleep mode for over 10 minutes, it
will shut down automatically.
Auto: Auto speed control by temperature detection.
Restore to Factory Default: Reset all settings to default.
About: Check Firmware version, System Time, Battery power, and SD card
status.
Advanced
Power Saving: On: Live view image on the viewer is all 6 fps.
Off: Live view image on the viewer is up to 30 fps.
Choose Normal for power saving and Performance for smoother image.
Wi-Fi Channel: Select the Wi-Fi channel to avoid interference.
SSID / Password: Change the SSID and password of the camera Wi-Fi.
Fan Control: The fan can cool down the camera, but it will also make noise for
audio recording. Select the fan behavior that fits your application.
On: Always on and in max speed.
Off: Always off.
Live Stream Codec: H.264 is more compressed but need more CPU power to
decode. MJPEG is easier to decode but need more bandwidth so that the frame
rate is lower. Note that if your cell phone doesn’t support 4K H.264 decoding,
you can only use MJPEG to view 3K / 4K / 6K live image.
Color Control: Color control on will make color stitching more accurate, but
will cause unstable cooler shifting while camera is moving. Set it on, off or auto
for the best performance in different conditions.
Ethernet Setting: Set camera IP for Ethernet IP connection.
*For Ethernet connection, please refer to Appendix 1.

HDMI Display Chart: Show / Hide the lumen chart in HDMI display.
Camera Version Update Tip: Turn on / off the notice of camera firmware
update.
Chapter 6 Firmware Upgrade
Put the upgrade file (.zip) to the root of the SD card and make sure that there is
no other zip file in the same root.
Insert the SD card into the camera.
Turn on the camera and while the SD card status is “OK”, the camera will start to
upgrade.
After finishing upgrading, the camera will reboot.
The upgrade file will be remembered so the camera will not keep upgrading by
the same file.
If the zip file is not recognized successfully, the camera will stop upgrading and
show “aborted” on the OLED screen. Please press power button to shut down the
camera and check the file again.
Appendix 1: Aleta S1 Network streaming display
guide
1. IP setting
Required devices:
(1) Micro USB to RJ45 adaptor
(2) Network Hub

1-1. DHCP: No need setting.
1-2. Static IP: Connect to Aleta S1 byAleta Viewer and go to Ethernet
Settings.
1-3. Connect Aleta S1 to the Hub through a USB to RJ45 adaptor.
1-4. After connection, the OLED screen will show the IP.
2. Play by VLC player
2-1. Connect your PC to the hub and run VLC Player and click open
“Network Streaming”.

2-2. Input: rtsp://(IP):8554/us360.264
*If it needs user name and password, enter the camera Wi-Fi SSID and password.
3. Play by the Viewer on a mobile device
3-1. Connect your mobile device to the same network of the camera and
run the Viewer.
3-2. Click the Wi-Fi icon on upper-right and select RTSP connection. (For
iOS version, run the APP without connecting to a Aleta S1 Wi-Fi, the
RTSP connection will show up.)
2-8. Input the IP and port to connect to the camera in the network.
Table of contents